


Operating Instructions
Инструкция по эксплуатации Інструкція з експлуатації Пайдалану нұсқаулары
(Household) AC/Rechargeable Hair Clipper
(Бытового назначения) Машинка для стрижки волос с возможностью работы от сети и аккумулятора (Побутового призначення) Машинка для стрижки волосся з можливістю роботи від мережі живлення та кумулятора (Тұрмыстықі) Желі мен аккумулятордан жұмыс істейтін шаш қырқу машинкасы
Model No.
Модель №
Модель № ER GC70/ER GC50
Үлгі №
English |
2 |
Русский |
8 |
Українська |
15 |
Қазақша |
22 |
Before operating this unit, please read these instructions completely and save them for future use.
Прежде чем использовать этот прибор, внимательно прочитайте данную инструкцию и сохраните её для дальнейшего использования.
Перш ніж починати користуватись цим приладом, уважно прочитайте дані інструкції та збережіть їх для подальшого використання.
Осы құралды пайдаланар алдында осы нұсқауларды мұқият оқып шығыңыз және оларды болашақта қолдануға сақтап қойыңыз.

English
Thank you for choosing a Panasonic Hair Clipper. Please read all instructions before use.
Important
This clipper has a built-in rechargeable battery. Do not throw into fire, apply heat, or charge, use, or leave in a high temperature environment.
►Using the clipper
•Check that the blades are not damaged or deformed before use.
•Terminate the usage when there is abnormality or failure.
•Turn off the appliance before changing the trimming length or removing the comb attachment.
•Before each use, apply oil at the places marked with arrows. (See page 6.)
•The appliance should not be used on animals.
•Do not press the blade against the skin.
•Do not use the clipper for any purpose other than trimming.
•This appliance is not intended for use by persons (including children) with reduced physical, sensory or mental capabilities, or lack of experience and knowledge, unless they have been given supervision or instruction concerning use of the appliance by a person responsible for their safety. Children should be supervised to ensure that they do not play with the appliance.
►Charging the clipper
•Never use the AC adaptor in the bathroom or shower room.
•Do not use any power cord or AC adaptor other than this AC adaptor (RE9 49).
•Charge the appliance in a location where it will not be exposed to direct sunlight or other heat sources, at temperatures of
5 °C to 35 °C.
•Plug in the AC adaptor into a household outlet where there is no moisture and handle it with dry hands.
•Hold the AC adaptor when disconnecting it from the household outlet. If you tug on the power cord, you may damage it.
•Do not damage or deform the power cord. Do not place heavy objects on the power cord or trap it between objects.
•Do not use the clipper if the power cord or the AC adaptor is worn, or if the AC adaptor does not fit snugly in the outlet.
•The power cord cannot be replaced. If the cord is damaged, the AC adaptor should be scrapped.
►Cleaning the clipper
Warning
Disconnect the power cord from the clipper before cleaning it in water to prevent electric shock.
•The housing should not be taken apart as this can affect the watertight construction of the appliance.
•If you clean the clipper with water, do not use salt water or hot water. Do not soak the clipper in water for a long period of time.
•Clean the housing only with a soft cloth slightly dampened with tap water or soapy tap water. Do not use thinner, benzine, alcohol or other chemicals.
•Clean the power plug regularly to remove any dust or dirt.
►Storing the clipper
•Store the clipper in a place with low humidity after use.
•Do not store the clipper where it will be exposed to direct sunlight or other heat sources.
•Store the AC adaptor in a dry area where it is protected from damage.
•Keep the oil away from children.

Parts identification
|
|
|
|
|
|
|
|
|
|
|
|
||
|
|
|
|
|||
|
|
|
|
|
||
|
|
|
|
|
|
|
|
|
|
|
|
|
|
|
|
|
|
|
|
|
|
|
|
|
a |
|
|
|
|
|
|
|
|
|
|
|
|
|
|
|
|
|
|
|
|
b |
|
|
|
|
|
|
|
|
|
|
|
ER-GC70 |
ER-GC50 |
|
|
|
|
|
|
|
|
|
|
AMain body |
|
|
CComb attachment [A] |
|||
1Dial |
|
|
|
(1 mm to 5 mm) |
|
|
a. Scale marks |
|
DComb attachment [B] |
||||
b. Instruction marks |
(6 mm to 25 mm) |
|||||
2Charge indicator lamp |
EComb attachment [C] |
|||||
3Power switch [0/1] |
(26 mm to 45 mm) |
|||||
BBlade block |
|
|
FAC adaptor (RE9 49) |
|||
4Cleaning lever |
|
8Power cord |
|
|||
5Moving blade |
|
9Appliance plug |
||||
6Stationary blade |
GOil |
|
|
|||
7Mounting hook |
|
HCleaning brush |
|
|||
|
|
|
|
ITravel pouch |
|
|
Accessories |
ER GC70 |
ER GC50 |
CComb attachment [A] (1 mm to 5 mm) |
|
|
|
|
|
DComb attachment [B] (6 mm to 25 mm) |
|
|
|
|
|
EComb attachment [C] (26 mm to 45 mm) |
|
- |
ITravel pouch |
|
- |
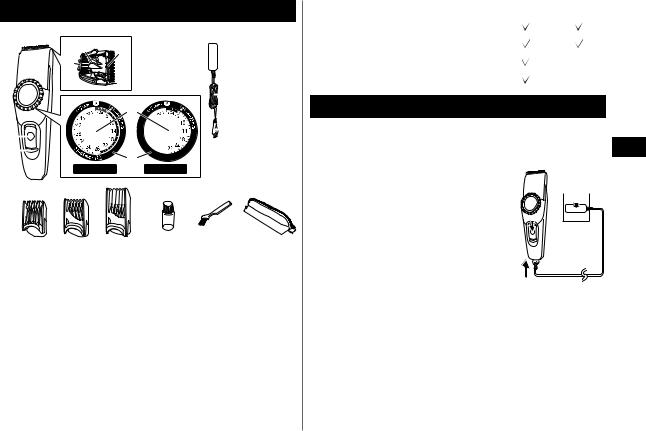
Charging the clipper
You can fully charge the clipper in 8 hours if it is losing speed.
A full charge supplies enough power for approximately 40 minutes of use.
1. Slide the power switch on the main |
|
body to the “0” position to turn off |
2 |
the clipper. |
|
2. Plug in the AC adaptor into a |
|
household outlet. |
1 |
3. Insert the appliance plug into the |
clipper.
The charge indicator lamp lights and
stays on until the AC adaptor is removed 3 from a household outlet.
4.Disconnect the AC adaptor from an outlet when charging is completed.
When charging the clipper for the first time or when it has not been in use for more than 6 months, please charge it for 16 hours (in order to activate the rechargeable battery). If you charge the clipper with the battery completely discharged, the charge indicator lamp may not glow immediately. However, the lamp will glow normally after charging for a few minutes.
English

English
AC operation
You can use the clipper while charging, even if the battery capacity is low.
If the clipper does not work, continue charging it for approx. 1 minute.
Using
Using comb attachments
1.Slide the power switch on the main body to the “0” position to turn off the clipper.
2. Make sure there is no damage to the blade. 3. Mount the attachment and adjust the dial.
• See pages 4 and 5.
4. Slide the power switch on the
main body to the “1” position to turn on the clipper.
After adjusting the trimming length, make sure the attachment is fixed with 
the switch in the “1” position. When the attachment is mounted correctly,
the dial will not turn with the switch set to “1”.
5. Cut hair to the correct height by moving the clipper back against the flow of the hair.
Do not use the clipper in an inverted position. This can cut hair too deeply.
►Trimming without attachment combs
Trimming your hair without an attachment will trim hair length to approx. 0.5 mm.
1. Cut hair by placing the clipper head directly on the scalp.
Installing the attachment comb
Comb attachment [A] (1 mm to 5 mm)
1. Align the |
2. Mount the |
|
3. Align the |
||||||
instruction |
comb |
|
|
|
|
instruction |
|||
mark “ ” to |
attachment [A] |
|
mark “ ” to |
||||||
“1”. |
to the main |
|
|
the length you |
|||||
|
body. |
|
|
|
|
want to cut. |
|||
|
|
|
|
|
|
|
|
|
|
Cutting length (mm) |
|
1 |
2 |
|
3 |
4 |
|
5 |
|
(estimate) |
|
|
|
|
|||||
|
|
|
|
|
|
|
|
|
|
Scale marks |
|
1 |
2 |
|
3 |
4 |
|
5 |
|
•The dial will turn past the indicator “6” even when the comb attachment [A] is being used. The clipper will not cut well above 6 mm, so do not try to cut more than 6 mm with the comb attachment [A] mounted.
•Actual hair length will be a little longer than the height you set.

Comb attachment [B] (6 mm to 25 mm)
1. Align the |
2. Mount the |
|
3. Align the |
|
||||||||
instruction |
comb |
|
|
|
|
instruction |
|
|||||
mark “ ” to |
attachment [B] |
|
mark “ |
” to |
||||||||
“6”. |
to the main |
|
|
the length you |
||||||||
|
body. |
|
|
|
|
want to cut. |
|
|||||
|
|
|
|
|
|
|
|
|
|
|
|
|
Cutting length (mm) |
|
6 |
7 |
|
8 |
9 |
|
10 |
|
11 |
|
12 |
(estimate) |
|
|
|
|
|
|||||||
|
|
|
|
|
|
|
|
|
|
|
|
|
Scale marks |
|
6 |
• |
|
• |
• |
|
10 |
|
• |
|
• |
|
|
|
|
|
|
|
|
|
|
|
|
|
Cutting length (mm) |
|
13 |
14 |
|
15 |
16 |
|
17 |
|
18 |
|
19 |
(estimate) |
|
|
|
|
|
|||||||
|
|
|
|
|
|
|
|
|
|
|
|
|
Scale marks |
|
• |
14 |
|
• |
• |
|
• |
|
18 |
|
• |
|
|
|
|
|
|
|
|
|
|
|
|
|
|
|
|
|
|
|
|
|
|
|
|
|
|
Cutting length (mm) |
|
20 |
21 |
|
22 |
23 |
|
24 |
|
25 |
|
|
(estimate) |
|
|
|
|
|
|
||||||
|
|
|
|
|
|
|
|
|
|
|
|
|
Scale marks |
|
• |
• |
|
22 |
• |
|
• |
|
• |
|
|
• Actual hair length will be a little longer than the height you set.
Comb attachment [C] (26 mm to 45 mm) ER GC70
English
1. Align the |
2. Mount the |
|
3. Align the |
|
|
||||||||
instruction |
comb |
|
|
|
|
instruction |
|||||||
mark “ ” to |
attachment [C] |
|
mark “ |
|
” to |
||||||||
“26”. |
to the main |
|
|
the length you |
|||||||||
|
body. |
|
|
|
|
want to cut. |
|||||||
|
|
|
|
|
|
|
|
|
|
|
|
|
|
Cutting length (mm) |
|
26 |
|
27 |
|
28 |
29 |
|
30 |
|
31 |
|
32 |
(estimate) |
|
|
|
|
|
|
|||||||
|
|
|
|
|
|
|
|
|
|
|
|
|
|
Scale marks |
|
26 |
|
• |
|
• |
• |
|
30 |
|
• |
|
• |
|
|
|
|
|
|
|
|
|
|
|
|
|
|
Cutting length (mm) |
|
33 |
|
34 |
|
35 |
36 |
|
37 |
|
38 |
|
39 |
(estimate) |
|
|
|
|
|
|
|||||||
|
|
|
|
|
|
|
|
|
|
|
|
|
|
Scale marks |
|
• |
|
34 |
|
• |
• |
|
• |
|
38 |
|
• |
|
|
|
|
|
|
|
|
|
|
|
|
|
|
Cutting length (mm) |
|
40 |
|
41 |
|
42 |
43 |
|
44 |
|
45 |
|
|
(estimate) |
|
|
|
|
|
|
|
||||||
|
|
|
|
|
|
|
|
|
|
|
|
|
|
Scale marks |
|
• |
|
• |
|
42 |
• |
|
• |
|
45 |
|
|
|
|
|
|
|
|
|
|
|
|
|
|
|
|
• Actual hair length will be a little longer than the height you set.

Cleaning
English |
Cleaning with brush |
|||
1. Disconnect the power cord from the |
||||
|
||||
|
clipper. |
|||
|
• Be sure to set the switch to “0” before you |
|||
|
remove the blade. |
|||
|
2. Remove the comb attachment. |
|||
|
3. Hold the main body, place your thumb |
|||
|
against the blades and then push |
|||
|
them away from the main body. |
|||
|
4. Brush off any hair trimmings from the |
|||
|
main body and from around the blade. |
|
|
|
|
5. Brush any hair trimmings out from |
|||
|
between the stationary blade and the |
|||
|
moving blade while pressing down |
|||
|
the cleaning lever to raise the moving |
|||
|
blade. |
|||
Cleaning in water
The mark on the left means suitable for cleaning under an open water tap.
Warning
Disconnect the power cord from the clipper before cleaning it in water to prevent electric shock.
1. Disconnect the power cord from the clipper.
2. Remove the blade.
3. Rinse off any hair trimmings that are sticking to the blades with running water.
4. Rinse out any hair trimmings that are inside the clipper with running water.
5.Gently shake the clipper 4 or 5 times and then wipe off any water drops from the clipper and the blade.
6.Place the clipper on a towel with the power switch on the main body facing downwards to let it dry fully.
Lubrication
Apply the oil to the clipper before and after each use.
Apply a drop of the oil to the points indicated by the arrows.
Remounting the blade
Fit the mounting hook into the blade mounting on the clipper and then push in until you hear a click.

►Blade life
Blade life will vary according to the frequency and length of use. It is expected to be about 2 years when using the clipper twice a month for 20 minutes each time. If cutting efficiency is reduced despite proper maintenance, change the blades.
►Battery life
Battery life will vary according to the frequency and length of use. If the batteries are charged 3 times a month, the service life will be approximately 3 years.
•It is recommended that the clipper be recharged at least every 6 months even when not in regular use because the charge will drain from the battery and its service life may be shortened.
Disposal of the clipper battery
Remove the built-in rechargeable battery before disposing of the clipper. Please make sure that the battery is disposed of at an officially designated location if there is one. Do not dismantle or replace the battery so that you can use the clipper again. This could cause fire or an electric shock. Replace it at an authorized service center.
•Disconnect the power cord from the clipper when removing the battery.
•Discharge the battery completely before removing it.
•Be careful not to short the + and – terminals of the battery after removing it.
•Perform steps 1 to 8 and lift the battery, and then remove it.
1.Disconnect the power cord from the clipper.
2.Remove the blade from the clipper. Remove the 2 screws (a).
3.Remove the screw (b).
4.Detach the dial cover (c), remove the screw (d) and disconnect the dial (e).
5.Detach the housing (f).
6.Remove the screws (g).
7.Disconnect housing (h).
8.Disconnect the battery chamber (i) and remove the battery (j).
English
WARNING
Do not attempt to replace the battery for the purpose of reusing the clipper. This could result in the risk of fire or electric shock.
Important notice regarding environmental protection
The built in rechargeable Nickel Metal Hydride battery contains substances that may be environmentally harmful. Please remove the battery before discarding your clipper.
For environmental protection and recycling of materials
This clipper contains a Nickel-Metal Hydride battery. Please make sure that the battery is disposed of at an officially assigned location, if there is one in your country.
Specifications
Power source |
See the name plate on the AC adaptor. |
|
(Automatic voltage conversion) |
||
|
||
Motor voltage |
1.2 V DC |
|
Charging time |
Approx. 8 hours |
This product is intended for household use only.

Русский
Благодарим Вас за выбор машинки для стрижки волос Panasonic. Перед использованием прочитайте полностью все инструкции.
Важная информация
Данная машинка оснащена встроенным аккумулятором. Не бросайте в огонь, не нагревайте, а также не заряжайте, не используйте и не оставляйте прибор в месте с высокой температурой.
►Использование машинки для стрижки
•Каждый раз перед началом стрижки проверяйте лезвия на предмет деформации или повреждений.
•Немедленно прекратите использование в случае нарушения работы или неисправности.
•Отключите прибор, перед тем как регулировать длину стрижки или снять насадку.
•Каждый раз перед началом стрижки наносите масло на участки, отмеченные стрелками. (См. страницу 12.)
•Запрещается использовать триммер для стрижки шерсти животных.
•Не прижимайте лезвие к коже.
•Используйте машинку только по назначению - для стрижки волос.
•Это устройство не предназначено для использования людьми (включая детей) с ограниченными физическими, сенсорными или умственными способностями или лицами без соответствующих знаний и опыта. Использование устройства такими людьми допускается только под наблюдением лица, отвечающего за их безопасность, и при условии предоставления с его стороны чётких инструкций по работе с устройством. Необходимо следить, чтобы дети не играли с устройством.
►Зарядка машинки для стрижки
•Никогда не используйте адаптер в ванной комнате.
•Используйте только сетевой шнур с адаптером переменного тока (RE9 49), входящим в комплект.
•Не производите зарядку аккумулятора в местах, подверженных воздействию прямых солнечных лучей и других источников тепла, а также при температуре ниже 5 °C или выше 35 °C.
•Вставьте адаптер в бытовую розетку. Убедитесь в отсутствии влаги и не прикасайтесь к нему мокрыми руками.
•Выключая адаптер переменного тока из розетки, держитесь за его корпус. Не тяните за сетевой шнур, так как это может повредить его.
•Не повреждайте и не деформируйте электрический провод. Не ставьте тяжелые предметы на электрический провод и не зажимайте его между ними.
•Не используйте машинку, если её сетевой шнур или адаптер переменного тока имеют видимые повреждения, а также если адаптер переменного тока не плотно входит в розетку.
•Сетевой шнур замене не подлежит. В случае повреждения шнура адаптер переменного тока необходимо утилизировать.
►Очистка машинки для стрижки
Предостережение
Прежде чем чистить машинку водой, отсоедините её сетевой шнур, чтобы избежать поражения электрическим током.
•Не следует снимать защитный корпус, так как это может нарушить водонепроницаемые свойства прибора.
•При очистке машинки в воде не используйте солёную или горячую воду. Не оставляйте машинку погруженной в воду на длительное время.
•Чистите корпус только мягкой тканью, слегка смоченной водопроводной водой или слабым мыльным раствором. Не используйте растворитель, бензин, спирт и другие химические вещества.
•Выполняйте регулярную очистку вилки сетевого адаптера от грязи и пыли.
►Хранение машинки для стрижки
•После использования храните машинку в сухом месте.
•Не храните машинку в местах, где она будет подвергаться воздействию прямых солнечных лучей или других источников тепла.
•Храните адаптер в сухом надёжном месте, где будет гарантирована его целостность.
•Храните смазочное масло в недоступном для детей месте.
Детали устройства
|
|
|
|
|
|
|
|
|
|
|
|
|
|
||
|
|
|
|
|
|||
|
|
|
|
|
|
||
|
|
|
|
|
|
|
|
|
|
|
|
|
|
|
|
|
|
|
|
|
|
|
|
|
|
|
|
a |
|
|
|
|
|
|
|
|
|
|
|
|
|
|
|
|
|
|
|
|
|
|
|
b |
|
|
|
|
|
|
|
|
|
|
|
|
|
|
ER-GC70 |
ER-GC50 |
|
||
|
|
|
|
|
|
|
|
AКорпус |
|
|
|
DНасадка-гребень [В] |
|||
1 |
Поворотный переключатель |
(от 6 мм до 25 мм) |
|||||
|
длины стрижки |
|
EНасадка-гребень [С] |
||||
|
a. Шкала |
|
|
(от 26 мм до 45 мм) |
|||
|
b. Регулировочная метка |
FАдаптер сети переменного тока |
|||||
2 |
Индикатор зарядки |
(RE9 49) |
|
||||
3 |
Выключатель питания [0/1] |
8Сетевой шнур |
|
||||
BБлок лезвий |
|
|
9Вилка подключения к |
||||
4 |
Рычаг для очистки |
|
прибору |
|
|||
5 |
Рабочее лезвие |
|
GСмазочное масло |
||||
6 |
Неподвижное лезвие |
HЧистящая щёточка |
|||||
7 |
Крепежный зацеп |
IМягкий чехол |
|
||||
CНасадка-гребень [A] (от 1 мм до 5 мм)
Аксессуары |
ER GC70 |
ER GC50 |
CНасадка-гребень [A] (от 1 мм до 5 мм) |
|
|
DНасадка-гребень [В] (от 6 мм до 25 мм) |
|
|
|
|
|
EНасадка-гребень [С] (от 26 мм до 45 мм) |
|
- |
IМягкий чехол |
|
- |
Зарядка машинки для стрижки
Машинка для стрижки полностью заряжается за 8 часов. Заряжайте машинку, когда скорость её работы падает.
Полный заряд аккумулятора обеспечивает приблизительно 40 минут непрерывной работы.
1. |
Переведите выключатель питания на |
|
|
корпусе машинки в положение “0”, |
2 |
|
чтобы выключить её. |
|
2. |
Вставьте вилку адаптера в |
|
|
электрическую розетку. |
1 |
3. |
Вставьте вилку подключения к |
прибору в машинку.
Загорится индикатор зарядки и будет продолжать гореть, пока адаптер будет 3 оставаться в сети.
4.После полной зарядки машинки вынимайте адаптер переменного тока из розетки.
Заряжая машинку впервые, или если она не использовалась дольше 6 месяцев, оставьте её заряжаться на 16 часов (для активации аккумулятора). При зарядке машинки с полностью разряженным аккумулятором индикатор зарядки может загореться не сразу, а через некоторое время. Как правило, индикатор загорается через несколько минут после начала зарядки.
Русский
 Loading...