


Panasonic ET-EMW300, ET-EMW400, ET-EMW500, ET-EMT800, ET-EMT700 User Manual
...
Operating Instructions
Zoom Lens Commercial Use
Model No. ET-EMW200
ET-EMW300
ET-EMW400
ET-EMW500
ET-EMW200 |
ET-EMW300 |
ET-EMS600 |
|
ET-EMT700
ET-EMT800
ENGLISH
ET-EMW400 ET-EMW500
FRANÇAIS
ET-EMS600 |
ET-EMT700 |
ET-EMT800 |
Thank you for purchasing this Panasonic product.
■■ To ensure correct use of this lens, please read the operating instructions supplied with the lens and the projector carefully.
■■ Before using this product, be sure to read “Read this first!” (Page 3).
■■ Please save this manual for future use.
■■ ET-EMW300 / ET-EMW500 / ET-EMT800 released in January, 2020. ET-EMW200 released in April, 2020.
DPQX1425ZA/X1

█ Contents |
|
Read this first!....................................................................................... |
3 |
Before Use............................................................................................. |
4 |
Preparation............................................................................................ |
5 |
Before replacing the projection lens......................................................... |
5 |
Attaching the Lens / Detaching the Lens................................................. |
5 |
Peripheral focus adjustment function....................................................... |
5 |
Lens calibration........................................................................................ |
5 |
Projection relationships....................................................................... |
6 |
Lens shift ranges.................................................................................. |
7 |
Specifications........................................................................................ |
9 |
Dimensions............................................................................................ |
9 |
Projected image size and Projection distance....... |
Appendix / Annexe / 1 |
The "Appendix" can be found after the Japanese language section ( ). |
|
2-ENGLISH

Read this first!
Always follow these precautions
WARNING:
Do not look at or place your skin into the light emitted from the lens while the projector is being used.
Doing so can cause burns or loss of sight.
zzStrong light is emitted from the projector’s lens. Do not look at or place your hands directly into this light.
zzTurn off the power when moving away from the projection lens or projector.
Do not project an image with the lens cover attached. zzDoing so can cause fire.
CAUTION:
Before replacing the projection lens, be sure to turn off the power and disconnect the power plug from the wall outlet.
zzUnexpected projection of light may cause injury to eyes.
zzReplacing the projection lens without removing the power plug may result in electric shock.
Do not stand in front of the lens while the projector is being used.
Doing so can cause damage and burns to clothing. zzStrong light is emitted from the projector’s lens.
Do not place objects in front of the lens while the projector is being used.
Doing so can cause fire, damage to the object, or malfunction of the lens and projector.
zzStrong light is emitted from the projector’s lens.
Do not open the desiccant bag. Do not eat the contents.
Inadvertently ingesting desiccant could be harmful.
zzIf the desiccant gets into your eyes or mouth, immediately rinse with plenty of water and seek medical attention.
zzKeep desiccant out of the reach of children.
ENGLISH-3

Before Use
■■Supported projectors
PT-MZ16K / PT-MZ13K / PT-MZ10K
Note
zzThis manual omits the alphabets at the end of projector model numbers.
zzModels other than the above may also be supported. Refer to the operating instructions for your projector or the Panasonic website (https://panasonic.net/cns/projector/).
■■Supplied Accessories
Make sure that the following has been provided.
Part name
Lens cover
Appearance
zzThe product is delivered with lens covers attached.
zzThe shape and size of the lens covers are different for each product.
1 each for front and rear
4-ENGLISH

Preparation
Before replacing the projection lens
Return the projection lens to the home position before replacing or removing it.
For details on how to return the lens to the home position, refer to the operating instructions of the projector.
Attention
zzMake sure that the projector power supply is switched off before attaching or detaching the projection lens.
zzAfter removing the projection lens, store it safely away from vibration or impacts.
zzDo not touch the electric contact points of the projection lens with your fingers. Dust and dirt on the contacts may cause contact malfunctions, while static electricity may damage the unit.
zzDo not turn the gear (ring) part of the projection lens barrel by hand. Doing so may damage the motor.
zzDo not touch the surface of the lens with bare hands. Finger prints and dirt on the surface of the lens will be magnified by the lens and lower the quality of the projected image. Place the supplied lens cover on the zoom lens when the projector is not in use.
zzThe lens is made of glass. The lens could be damaged if brought into contact with or rubbed against hard objects. Handle the lens carefully.
zzUse a clean, soft and dry cloth to wipe away dust and dirt from the projection lens. Do not use fl uffy cloths containing oil, water or dust for cleaning. The lens is easily damaged, so do not apply excessive pressure when wiping it.
Attaching the Lens / Detaching the Lens
For details on attaching or removing the projection lens, refer to the operating instructions for the projector.
Peripheral focus adjustment function
When you change the size of the projected image, the focal balance between the center and peripheral areas of the screen may shift.
The ET-EMW200 / ET-EMW300 / ET-EMW400 / ET-EMW500 is equipped with a peripheral focus adjustment function to correct the shift in focal balance between the center and peripheral areas of the screen.
For instructions on adjusting the peripheral focus, refer to “Projecting” in the operating instructions for the projector.
Lens calibration
Perform lens calibration after attaching the lens.
For instructions on lens calibration, refer to “Projecting” in the operating instructions for the projector.
ENGLISH-5
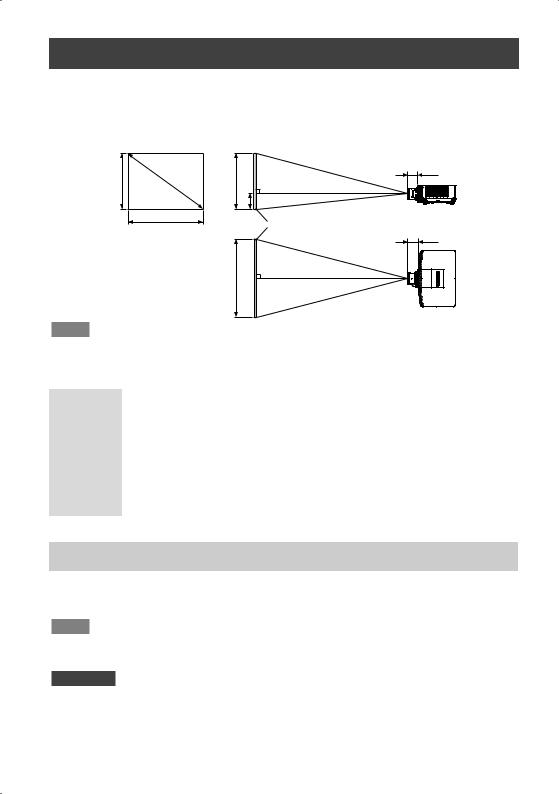
Projection relationships
The dimensional relationship between the screen and the projector is shown below.
■■Dimensional relationship diagram
SH
Projected image
SD
SW
SH
H
SW
L1
L (LW/LT)
Screen
L1
L (LW/LT)
Note
zzThis diagram assumes that the size and position of the projected image will be adjusted so that the image fills the entire screen.
zzThis illustration is not drawn to scale.
L |
|
Projection distance |
|
|
|
|
|
|||
|
LW |
|
Minimum distance |
|
|
|
|
|
||
|
LT |
|
Maximum distance |
|
|
|
|
|
||
L1 |
|
Lens protrusion dimension |
|
|
|
|
||||
SH |
|
Projected image height |
|
|
|
|
||||
H |
|
Distance from the lens center to the lower edge of the projected image |
||||||||
SW |
|
Projected image width |
|
|
|
|
||||
SD |
|
Projected image size |
|
|
|
|
||||
zzDimension for L1 (approximate values) |
|
|
|
(Unit: m) |
||||||
Projector |
ET-EMW200 |
ET-EMW300 |
ET-EMW400 |
ET-EMW500 |
ET-EMS600 |
ET-EMT700 |
ET-EMT800 |
|||
model |
|
|
|
|
|
|
|
|
|
|
PT-MZ16K / |
0.125 |
0.124 |
|
0.124 |
0.125 |
0.117 |
0.168 |
0.174 |
||
PT-MZ13K / |
|
|||||||||
PT-MZ10K |
|
|
|
|
|
|
|
|
|
|
Note
zzThe illustrations of projectors in this manual are for informational purposes only and do not represent a specific projector model. Configurations may vary with the model.
Attention
zzTo prevent blocking of the intake and exhaust vents, maintain clearances from walls and objects of at least 1 000 mm (3'3") for the exhaust vent and at least 500 mm (1'8") for the intake vent.
zzAvoid setting up in places which are subject to sudden temperature changes, such as near an air conditioner or lighting equipment (studio lamps, etc.).
6-ENGLISH

Projection relationships (continued)
■■Dimensional relationship
For details on the projection distance (L), refer to “Projected image size and Projection distance” and “Projection distance formulas” in the Appendix.
Note
zzFor details on “Projected image size and Projection distance” for projector models other than PT-MZ16K / PT-MZ13K / PT-MZ10K, refer to “Setting up” in the operating instructions of the projector.
Lens shift ranges
Perform the lens position shift within the adjustment range.
Perform lens shift adjustment within the ranges shown in the following illustrations.
The focus may change when the lens position is shifted out of the adjustment range. This is because the movement of the lens is restricted to protect the optical parts. Projection position can be adjusted with the optical axis shift based on the home position in the respective range.
ET-EMW400 / ET-EMW500 / ET-EMS600 / ET-EMT700 / ET-EMT800
Origin position of |
Standard projection |
the lens mounter |
position |
image |
0.28V |
0.6V |
Projected |
0.28V |
0.6V |
|
heightV |
|
|
0.2H |
0.2H |
|
|
Projected image width H |
ENGLISH-7

Lens shift ranges (continued)
ET-EMW200
ET-EMW300
Origin position of |
Standard projection |
the lens mounter |
position |
image |
0.4V |
Projected height V |
0.4V |
0.19H |
0.19H |
Projected image width H |
|
|
|
|
Origin position of |
|
Standard projection |
the lens mounter |
|
position |
image |
0.13V |
0.5V |
Projected |
0.13V |
0.5V |
|
heightV |
|
|
0.2H |
0.2H |
Projected image width H
Note
zzThe home position of the projector a point of origin position for the lens shift (i.e., vertical and horizontal positions of the lens) based on the results of lens calibration. It is not the optical center position of the screen.
8-ENGLISH
 Loading...