


General Precautions
The user must operate each product according to the performance specifications described in the operation manuals.
Before using the product under conditions which are not described in the manual or applying the product to nuclear control systems, railroad systems, aviation systems, vehicles, combustion systems, medical equipment, amusement machines, safety equipment, and other systems, machines and equipment that may have a serious influence on lives and property if used improperly, consult your OMRON representative.
Make sure that the ratings and performance characteristic of the product are sufficient for the systems, machines, and equipment, and be sure to provide the systems, machines, and equipment with double safety mechanisms.
This manual provides information for using the programmable terminal model NS12. Be sure to read this manual before attempting to use the software and keep this manual close at hand for reference during operation.
Contents
Section1. Operation Flow
Operation Flow • • • • • • • • • • • • • • • • • • • • • • • • • • • • • • • • • • • • • • • • • • • • • • • • • • • • • • • • • • • • • • • • • • • • • • • • • • • • • • • • • • • • • • • • • • • • • • • • • • • • • • • • • • • • • • • • • • • • • • • • • • • • • • • • • • • • • • • • • • • |
2 |
|||
Section2. CX-Designer |
|
|||
1. |
Preparations and settings • • • • • • • • • • • • • • • • • • • • • • • • • • • • • • • • • • • • • • • • • • • • • • • • • • • • • • • • • • • • • • • • • • • • • • • • • • • • • • • • • • • • • • • • • • • • • • • • • • • • • • • • • • • • • |
4 |
||
2. |
Starting up the CX-Designer • • • • • • • • • • • • • • • • • • • • • • • • • • • • • • • • • • • • • • • • • • • • • • • • • • • • • • • • • • • • • • • • • • • • • • • • • • • • • • • • • • • • • • • • • • • • • • • • • • • • • • • |
10 |
||
3. |
Creating a new project • • • • • • • • • • • • • • • • • • • • • • • • • • • • • • • • • • • • • • • • • • • • • • • • • • • • • • • • • • • • • • • • • • • • • • • • • • • • • • • • • • • • • • • • • • • • • • • • • • • • • • • • • • • • • • • • • • • • |
11 |
||
4. |
Setting project properties • • • • • • • • • • • • • • • • • • • • • • • • • • • • • • • • • • • • • • • • • • • • • • • • • • • • • • • • • • • • • • • • • • • • • • • • • • • • • • • • • • • • • • • • • • • • • • • • • • • • • • • • • • • • • • • |
12 |
||
5. |
Communications settings • • • • • • • • • • • • • • • • • • • • • • • • • • • • • • • • • • • • • • • • • • • • • • • • • • • • • • • • • • • • • • • • • • • • • • • • • • • • • • • • • • • • • • • • • • • • • • • • • • • • • • • • • • • • • • • |
14 |
||
6. |
System settings • • • • • • • • • • • • • • • • • • • • • • • • • • • • • • • • • • • • • • • • • • • • • • • • • • • • • • • • • • • • • • • • • • • • • • • • • • • • • • • • • • • • • • • • • • • • • • • • • • • • • • • • • • • • • • • • • • • • • • • • • • • • • • • • • • • • • |
15 |
||
7. |
Saving a project • • • • • • • • • • • • • • • • • • • • • • • • • • • • • • • • • • • • • • • • • • • • • • • • • • • • • • • • • • • • • • • • • • • • • • • • • • • • • • • • • • • • • • • • • • • • • • • • • • • • • • • • • • • • • • • • • • • • • • • • • • • • • • • • • • • • |
17 |
||
8. |
Screen properties • • • • • • • • • • • • • • • • • • • • • • • • • • • • • • • • • • • • • • • • • • • • • • • • • • • • • • • • • • • • • • • • • • • • • • • • • • • • • • • • • • • • • • • • • • • • • • • • • • • • • • • • • • • • • • • • • • • • • • • • • • • • • • • • |
18 |
||
9. |
Displaying a text • • • • • • • • • • • • • • • • • • • • • • • • • • • • • • • • • • • • • • • • • • • • • • • • • • • • • • • • • • • • • • • • • • • • • • • • • • • • • • • • • • • • • • • • • • • • • • • • • • • • • • • • • • • • • • • • • • • • • • • • • • • • • • • • • • • |
19 |
||
10.ON/OFF Button • • • • • • • • • • • • • • • • • • • • • • • • • • • • • • • • • • • • • • • • • • • • • • • • • • • • • • • • • • • • • • • • • • • • • • • • • • • • • • • • • • • • • • • • • • • • • • • • • • • • • • • • • • • • • • • • • • • • • • • • • • • • • • • • • • • • |
22 |
|||
11.Repeat function |
|
|||
|
|
11-1 |
Repeat function (Button) • • • • • • • • • • • • • • • • • • • • • • • • • • • • • • • • • • • • • • • • • • • • • • • • • • • • • • • • • • • • • • • • • • • • • • • • • • • • • • • • • • • • • • • • • • • • • • |
24 |
|
|
11-2 |
Repeat function (Text) • • • • • • • • • • • • • • • • • • • • • • • • • • • • • • • • • • • • • • • • • • • • • • • • • • • • • • • • • • • • • • • • • • • • • • • • • • • • • • • • • • • • • • • • • • • • • • • • • • • |
26 |
12. |
Bit Lamp • • • • • • • • • • • • • • • • • • • • • • • • • • • • • • • • • • • • • • • • • • • • • • • • • • • • • • • • • • • • • • • • • • • • • • • • • • • • • • • • • • • • • • • • • • • • • • • • • • • • • • • • • • • • • • • • • • • • • • • • • • • • • • • • • • • • • • • • • • • • • • • • • • • |
30 |
||
13. |
Adding a screen • • • • • • • • • • • • • • • • • • • • • • • • • • • • • • • • • • • • • • • • • • • • • • • • • • • • • • • • • • • • • • • • • • • • • • • • • • • • • • • • • • • • • • • • • • • • • • • • • • • • • • • • • • • • • • • • • • • • • • • • • • • • • • • • • |
35 |
||
14. |
Frame |
• • • • • • • • • • • • • • • • • • • • • • • • • • • • • • • • • • • • • • • • • • • • • • • • • • • • • • • • • • • • • • • • • • • • • • • • • • • • • • • • • • • • • • • • • • • • • • • • • • • • • • • • • • • • • • • • • • • • • • • • • • • • • • • • • • • • • • • • • • • • • • • • • • • |
37 |
|
15. |
Numeral Display & Input • • • • • • • • • • • • • • • • • • • • • • • • • • • • • • • • • • • • • • • • • • • • • • • • • • • • • • • • • • • • • • • • • • • • • • • • • • • • • • • • • • • • • • • • • • • • • • • • • • • • • • • • • • • • • • |
46 |
||
16. |
Macro • • • • • • • • • • • • • • • • • • • • • • • • • • • • • • • • • • • • • • • • • • • • • • • • • • • • • • • • • • • • • • • • • • • • • • • • • • • • • • • • • • • • • • • • • • • • • • • • • • • • • • • • • • • • • • • • • • • • • • • • • • • • • • • • • • • • • • • • • • • • • • • • • • • • • • • • • |
48 |
||
17. |
Alarm/Event Display • • • • • • • • • • • • • • • • • • • • • • • • • • • • • • • • • • • • • • • • • • • • • • • • • • • • • • • • • • • • • • • • • • • • • • • • • • • • • • • • • • • • • • • • • • • • • • • • • • • • • • • • • • • • • • • • • • • • • • • • |
50 |
||
18. |
Alarm/Event Summary & History • • • • • • • • • • • • • • • • • • • • • • • • • • • • • • • • • • • • • • • • • • • • • • • • • • • • • • • • • • • • • • • • • • • • • • • • • • • • • • • • • • • • • • • • • • • • |
55 |
||
19. |
Pop-up Screen • • • • • • • • • • • • • • • • • • • • • • • • • • • • • • • • • • • • • • • • • • • • • • • • • • • • • • • • • • • • • • • • • • • • • • • • • • • • • • • • • • • • • • • • • • • • • • • • • • • • • • • • • • • • • • • • • • • • • • • • • • • • • • • • • • • • |
56 |
||
20. |
Sheet • • • • • • • • • • • • • • • • • • • • • • • • • • • • • • • • • • • • • • • • • • • • • • • • • • • • • • • • • • • • • • • • • • • • • • • • • • • • • • • • • • • • • • • • • • • • • • • • • • • • • • • • • • • • • • • • • • • • • • • • • • • • • • • • • • • • • • • • • • • • • • • • • • • • • • • • • |
63 |
||
21. |
Word Button/Command Button |
|
||
|
|
21-1 |
Switch label button • • • • • • • • • • • • • • • • • • • • • • • • • • • • • • • • • • • • • • • • • • • • • • • • • • • • • • • • • • • • • • • • • • • • • • • • • • • • • • • • • • • • • • • • • • • • • • • • • • • • • • • • • |
64 |
|
|
21-2 |
Switch screen button • • • • • • • • • • • • • • • • • • • • • • • • • • • • • • • • • • • • • • • • • • • • • • • • • • • • • • • • • • • • • • • • • • • • • • • • • • • • • • • • • • • • • • • • • • • • • • • • • • • • |
66 |
22. |
Creating another language label |
|
||
|
|
22-1 |
Creating a Dutch label • • • • • • • • • • • • • • • • • • • • • • • • • • • • • • • • • • • • • • • • • • • • • • • • • • • • • • • • • • • • • • • • • • • • • • • • • • • • • • • • • • • • • • • • • • • • • • • • • • |
71 |
|
|
22-2 |
Alarm/Event settings in Dutch • • • • • • • • • • • • • • • • • • • • • • • • • • • • • • • • • • • • • • • • • • • • • • • • • • • • • • • • • • • • • • • • • • • • • • • • • • • • • • • • • |
78 |
23. |
Useful functions |
|
||
|
|
23-1 |
Find (Address) • • • • • • • • • • • • • • • • • • • • • • • • • • • • • • • • • • • • • • • • • • • • • • • • • • • • • • • • • • • • • • • • • • • • • • • • • • • • • • • • • • • • • • • • • • • • • • • • • • • • • • • • • • • • • • • • • • • |
81 |
|
|
23-2 |
Find (Label) • • • • • • • • • • • • • • • • • • • • • • • • • • • • • • • • • • • • • • • • • • • • • • • • • • • • • • • • • • • • • • • • • • • • • • • • • • • • • • • • • • • • • • • • • • • • • • • • • • • • • • • • • • • • • • • • • • • • • • • • • |
83 |
|
|
23-3 |
Select Object • • • • • • • • • • • • • • • • • • • • • • • • • • • • • • • • • • • • • • • • • • • • • • • • • • • • • • • • • • • • • • • • • • • • • • • • • • • • • • • • • • • • • • • • • • • • • • • • • • • • • • • • • • • • • • • • • • • • • |
84 |
|
|
23-4 |
Reuse of screen (by copying) • • • • • • • • • • • • • • • • • • • • • • • • • • • • • • • • • • • • • • • • • • • • • • • • • • • • • • • • • • • • • • • • • • • • • • • • • • • • • • • • • |
85 |
24.Test function • • • • • • • • • • • • • • • • • • • • • • • • • • • • • • • • • • • • • • • • • • • • • • • • • • • • • • • • • • • • • • • • • • • • • • • • • • • • • • • • • • • • • • • • • • • • • • • • • • • • • • • • • • • • • • • • • • • • • • • • • • • • • • • • • • • • • • • • • • |
87 |
|||
Section3.Transferring project data |
|
|||
|
1.Transferring project data via serial cable (RS232C) • • • • • • • • • • • • • • • • • • • • • • • • • • • • • • • • • • • • • • • • • • • • • • • • • • |
92 |
||
|
2.Transfer project data using a memory card • • • • • • • • • • • • • • • • • • • • • • • • • • • • • • • • • • • • • • • • • • • • • • • • • • • • • • • • • • • • • • • • • • • • • |
95 |
||

CXCX--DesignerDesigner
Installing CX-Designer to a personal computer
StartingStarting upup thethe CXCX-- DesignerDesigner
CreatingCreatingaascreenscreen
Setting Project
Properties
Entering project title and labels
System Setting
Allocate system memory,
set communication port etc...
Creating a Screen
Data
Creating lamp, touch switch, numeral display and graph etc...
Test/ Validation
Checking errors on the CXDesigner
Operation Flow
NS8NS8--V1V1
Mount NS on the control panel
Refer to NS
Setup Manual
Connecting power supply/ communication cable
Refer to NS
Setup Manual
Power ON
SystemSystemMenuMenuSettingSetting
TransferringTransferringthethescreenscreendatadatatotoNSNSHardwareHardware
HostHostsideside(PLC)(PLC)
SettingSettingcommunicationcommunication
portport
Refer to NS
Setup Manual
Creating Ladder program
Power ON
StartStartOperationOperation
MaintenanceMaintenanceandandInspectionInspection

*A screen image depends on a CX-Designer system version; when you use a different system version from the one used in this manual, the screen image may not be the same.
*Certain settings depend on the hardware that you use. In this manual, NS8-V1 is used to create screens.

Start up |
Creating a |
Project |
System |
Creating |
Validation |
Transferring |
|
CX-D |
new project |
property |
setting |
a screen |
a project |
||
|
11..PreparationsPreparationsandandsettingssettings
IntroductionIntroduction
This manual describes how to use the CX-Designer and its functions with a visual assistance in creating sample screens.
NecessaryNecessaryEquipmentEquipment
|
Item |
|
|
Model |
|
- CX-Designer |
|
|
NS-CXDC1-V[] |
|
- NS Hardware |
|
|
- NS8-TV1[](B)-V1 |
|
- PLC |
|
|
- CS Series, CJ Series |
|
- NS Hardware – PC |
Serial communication cable |
- XW2Z-S002 |
|
|
- NS Hardware – PLC |
Serial communication cable |
- XW2Z-200T |
|
|
- PC |
|
|
- Widows PC on which CX-Designer performs |
|
|
|
|
|
|
Configuration & |
|
|
|
|
Configuration & |
|
|
|
|
Communication Settings |
|
|
|
|
Communication Settings |
|
|
|
|
PLC |
|
NS hardware |
PC |
|
|
|
|
|
|
|
|
|
|
|
|
|
|
|
|
|
|
|
|
|
|
|
|
|
|
|
|
|
|
|
|
|
|
|
|
|
|
|
|
|
|
|
|
|
|
|
|
|
|
|
|
|
|
|
|
|
|
|
|
|
|
|
|
|
|
|
|
|
|
|
|
|
|
|
|
|
|
|
|
|
|
|
|
|
|
|
|
|
|
|
|
|
|
|
|
|
|
|
|
|
|
|
|
|
RS232C Port |
|
|
|
|
|
|
|
|
|
|
|
|
|
|
|
|
|
||
|
|
|
|
|
|
|
|
|
|
|
|
|
|
|
|
|
|
|
|
|
|
|||
|
|
|
|
|
|
|
|
|
|
|
|
|
|
|
|
|
|
COM Port |
||||||
|
|
|
|
|
|
|
|
|
|
|
|
|
|
|
|
|
|
|
|
|
||||
|
|
|
|
|
|
|
Serial |
|
Serial |
|
|
|||||||||||||
|
|
|
|
|
|
|
|
|
|
|
|
|
|
|||||||||||
NS Hardware |
|
|
|
|
|
Port A |
|
Port B |
|
|
|
|
|
|
||||||||||
|
|
|
|
|
|
|
|
|
|
|
|
|
|
|
|
|
|
|
|
|
|
|
||
- Serial Port A |
NT Link (1:N), No. of units: 0, Communication Speed: High-speed |
|
|
|
|
|
|
|||||||||||||||||
Serial Port B |
Setting is not necessary |
|
|
|
|
|
|
|
|
|
|
|
|
|
|
|||||||||
PLC |
|
|
|
|
|
|
|
|
|
|
|
|
|
|
|
|
|
|
|
|
|
|
|
|
- Host Link Port Communication Speed: High-speed NT Link, Communication Mode: NT Link (1:N), NT Link Max. No. of units: 1
AllocationA locationAddressAddress
The following PLC allocation addresses are used for sample screens shown in this manual.
Allocation |
|
Description |
Address |
|
|
00000.00 |
Power 1 Running / Stopped |
|
|
|
|
00000.01 |
Power 2 Running / Stopped |
|
|
|
|
00000.02 |
Power 3 |
Running / Stopped |
|
|
|
00000.03 |
Power 4 |
Running / Stopped |
|
|
|
00000.04 |
Power 5 |
Running / Stopped |
|
|
|
00000.05 |
Power 6 |
Running / Stopped |
|
|
|
|
|
|
Allocation |
|
Description |
Address |
|
|
DM100 |
Present value |
|
|
|
|
Allocation Address |
Description |
00001.00 |
Alarm 1 Occurred / Released |
|
|
00001.01 |
Alarm 2 Occurred / Released |
|
|
00001.02 |
Alarm 3 Occurred / Released |
|
|
00001.03 |
Alarm 4 Occurred / Released |
|
|
00001.04 |
Alarm 5 Occurred / Released |
|
|
00001.05 |
Alarm 6 Occurred / Released |
|
|
00002.00 |
Alarm 7 Occurred / Released |
|
|
00002.01 |
Alarm 8 Occurred / Released |
|
|
00002.02 |
Alarm 9 Occurred / Released |
|
|
00002.03 |
Alarm 10 Occurred / Released |
|
|
00002.04 |
Alarm 11 Occurred / Released |
|
|
00002.05 |
Alarm 12 Occurred / Released |
|
|

Start up |
Creating a |
Project |
System |
Creating |
Validation |
Transferring |
|
CX-D |
new project |
property |
setting |
a screen |
a project |
||
|
SampleSampleScreenScreen
Create 5 screens using the CX-Designer.
All screens are designed to display labels in two languages (English/Dutch) with “Switch Label” function.
ScreenScreen11
Here, you will create a screen that turns ON/OFF specified addresses of the PLC.
On the screen 1, lamps (bit lamp) are lit/out according to the status of bits allocated to the PLC.
The screen below illustrates an example of a touch panel screen used to operate a machinery.
ON/OFF Button Operational Status Display
1.ON/OFF Button
Press the button to switch ON/OFF status.
2.Operational Status Display
“RUN/STOP” lamp is lit/out in linked with the status of an ON/OFF button.

Start up |
Creating a |
Project |
System |
Creating |
Validation |
Transferring |
|
CX-D |
new project |
property |
setting |
a screen |
a project |
||
|
ScreenScreen22
On Screen 2, you will create a screen with 2 functions: one is a frame where more than one small screens are displayed by switching a tab; the other is to write values to memories in the PLC.
Alarm Display |
Present Value / Set Value |
Transfer Button |
1.Alarm Display
Is used to switch a Low Alarm Display and a High Alarm Display by pressing the tab of the Frame function.
Alarm lamps are respectively allocated to bits of the PLC as shown in the table on page 4.
2.Present Value / Set Value
An object that displays the numeral value of an address is used to show the content of the PLC memory as a present value.
3.Set Value/Transfer Button
Numeral Display & Input object lets the user to enter numeral values. In this manual, you will create a screen where values entered by the user are saved in the NS’s internal memory area and be transferred to the PLC memory areas by pressing the Transfer button.
Start up |
Creating a |
Project |
System |
Creating |
Validation |
Transferring |
|
CX-D |
new project |
property |
setting |
a screen |
a project |
||
|
ScreenScreen33
NS has a function that shows the ON/OFF status of a specified bit as an alarm history. On screen 3, you will generate a virtual alarm on the pop-up screen (described later) and display its history.
Alarm History |
Latest Alarm |
1.Alarm History
Displays a virtual alarm history that was occurred and cancelled on the pop-up screen.
2.Latest Alarm
Displays the latest virtual alarm that has occurred on the pop-up screen.

Start up |
Creating a |
Project |
System |
Creating |
Validation |
Transferring |
|
CX-D |
new project |
property |
setting |
a screen |
a project |
||
|
SheetSheet11
A sheet is a screen that contains objects commonly used on several screens.
In this manual, you will create a sheet with a “Switch Label” function to switch labels between English and Dutch, a function to display a screen (to be described later) for generating a virtual alarm, and a function to switch screens.
Switch Label Button |
Virtual Alarm |
Screen Switch Buttons |
|
Display Button |
|||
|
|
1.Switch Label Button
Press this button to show a pop-up menu from which you can switch a label in
English and Dutch.
2.Virtual Alarm Display Button
Press this button to display the pop-up screen (to be described later) with a
Virtual Alarm Display button.
3.Screen Switch Button
Press a button to display the screen number (1 to 3) shown on the button .
Start up |
Creating a |
Project |
System |
Creating |
Validation |
Transferring |
|
CX-D |
new project |
property |
setting |
a screen |
a project |
||
|
PopPop--upupScreenScreen
A pop-up screen is a small screen that can be displayed as needed on top of another screen.
You will create a pop-up screen that turns ON/OFF the PLC allocation addresses 00001.00 to 0001.05, and 00002.00 to 0002.05 and generate/cancel virtual alarms.
Low Alarm buttons |
Close button |
High Alarm button |
1.Low Alarm button
Press this button to switch ON/OFF (Occurrence/Recovery).
2.High Alarm button
Press this button to switch ON/OFF (Occurrence/Recovery).
3.Close button
Closes the pop-up screen.

Start up |
Creating a |
Project |
System |
Creating |
Validation |
Transferring |
|
CX-D |
new project |
property |
setting |
a screen |
a project |
||
|
22.. StartingStarting upup thethe CXCX--DesignerDesigner
Select [Start]-[Program]- [Omron]-[CX-One] -[CX-Designer] -[CX-Designer Ver. xx] (CX-Designer Ver. 1.0 is used here.)
When the CX-Designer is started up, the main window will appear.

Start up |
Creating a |
Project |
System |
Creating |
Validation |
Transferring |
|
CX-D |
new project |
property |
setting |
a screen |
a project |
||
|
33..CreatingCreating aa newnew projectproject
Click [New project] button on the CX-Designer.
Left-click the icon
Set as follow: [Model name]
NS8-TS1[]-V1
[System Version] System Ver.6.2 (* Note)
[Project Title] Enter a title.
“Test Program” is entered here.
[File Name]
Enter a file name. “GUIDE” is entered here.
[Location]
Specifies a location where the file is saved.
The file is saved in [C¥Documents and Settings¥kc¥Desktop¥Sam ple] here.
Click
Enter a title name. “Screen 1” is entered here.
Click
* Note the following points when you enter the project name.
-A file name can be as long as 42 characters including extension (.IPP).
-A file name may use any number or letter, underscore(_), and dollar mark($).
If project name is not entered correctly( e.g. using wide size characters etc…)
the error occurs when transferring data.
It is now ready to create a screen.
*System Ver.6.2 is used here. Select [System Version] according to yours

Start up |
Creating a |
Project |
System |
Creating |
Validation |
Transferring |
|
CX-D |
new project |
property |
setting |
a screen |
a project |
||
|
44.. SettingSetting projectproject propertiesproperties
Making settings for a project data.
In this section, you will make a project that is able to show two
language labels – English and Dutch by switching them. Here, it is necessary to set a project property for a label switching function is required.
Click the [System] tab
in the project workspace.
Double-click [Project 
Property]
Click the [Switch
Label] tab.
Set 2 for No. of
Labels.
Set 0 to Label No. and enter English
as a label name.
Set 1 to Label No. and enter Dutch
as a label name.
Click

Start up |
Creating a |
Project |
System |
Creating |
Validation |
Transferring |
|
CX-D |
new project |
property |
setting |
a screen |
a project |
||
|
Click [Yes]
Click [Yes to All]
Start up |
Creating a |
Project |
System |
Creating |
Validation |
Transferring |
|
CX-D |
new project |
property |
setting |
a screen |
a project |
||
|
55 CommunicationsCo unications settingssettings
Making communications settings for the NS hardware to connect with the PLC. In this manual, you will connect the NS to the PLC thru Serial port A.
Click
[System] in the Project Workspace.
Double-click
[Comm. Setting].
Click [Serial Port A]
Set as follow:
Serial Port
![PLC]
Host Name
![HOST1]
Protocol
![NT Link(1:N)]
Comm. Speed
![High-speed]
[Comm.-All], [Ethernet], [Controller Link] settings are not required.
Click
<Note>
You can make communication settings when creating a new project.
Click [Comm. Setting] in the New Project dialog box as described in 3 “Creating a new project”.

Start up |
Creating a |
Project |
System |
Creating |
Validation |
Transferring |
|
CX-D |
new project |
property |
setting |
a screen |
a project |
||
|
66.. SystemSystemsettingssettings
Click [System]
In the “Project Workspace”.
Double-click
[System Setting]. 
AllocateA locateaawordwordtoto thethePLCPLCforforcontrollingcontro ling screenscreenNoNo..
Allocating NS system memory areas to the PLC.
System memory area is memory area that is used to control the NS from the host (PLC) or to notify operation status from the NS to the host.
In this manual, you will allocate system memory areas to the PLC.
Click the [Initial] tab
Click
Set as follow:
Host name
![HOST 1]
Word
!“0”
Area Type
! [Data Memory (DM)]
Set address in the same way as [Set(1)]
Host name
![HOST 1]
Word
!“10” Area Type
![Data Memory (DM)]
Complete
With this setting, a present value of DM0010CH is shown on the PT.
Start up |
Creating a |
Project |
System |
Creating |
Validation |
Transferring |
|
CX-D |
new project |
property |
setting |
a screen |
a project |
||
|
<Note>
You can make system settings when creating a new project.
Click [System Setting] in the New Project dialog box as described in 3 “Creating a new project”.
Start up |
Creating a |
Project |
System |
Creating |
Validation |
Transferring |
|
CX-D |
new project |
property |
setting |
a screen |
a project |
||
|
Saving a whole project.
77.. SavingSaving aa projectproject In this manual, you will save the project’s system settings and screens/sheets all together.
Click the icon.
<Note>
We recommend to save projects and screens frequently.

|
|
|
|
|
|
|
|
|
|
|
|
|
|
|
|
|
Start up |
|
Creating a |
|
|
Project |
|
System |
|
Creating |
|
Validation |
|
Transferring |
|
|
CX-D |
|
new project |
|
|
property |
|
setting |
|
a screen |
|
|
a project |
|
|
|
|
|
|
|
|
|
|
|
|
||||||
|
|
|
|
|
|
|
|
|
|
|
|
|
|
|
|
|
|
|
|
|
Making basic settings when creating a new screen. |
|
|
||||||||
|
8. Screen properties |
|
|
||||||||||||
|
8. Screen properties |
|
In this manual, you will change the screen background color. |
|
|
||||||||||
Click the [Screen/Sheet] tab in the project workspace.
Right-click the
[0000: Screen Page 1] to display the menu.
Click [Screen Property] on the menu.
The screen property dialog appears.
Click the [Background/Other] tab.
Click
to display the color selection dialog and select a background color.
Click
Completed image

|
|
|
|
|
|
|
|
|
|
|
|
|
|
|
|
|
Start up |
|
Creating a |
|
|
Project |
|
System |
|
Creating |
|
Validation |
|
Transferring |
|
|
CX-D |
|
new project |
|
|
property |
|
setting |
|
a screen |
|
|
a project |
|
|
|
|
|
|
|
|
|
|
|
|
||||||
|
|
|
|
|
|
|
|
|
|
|
|
|
|
|
|
|
9. Displaying a text |
Creating a text object on the screen. A text object is used to display a fixed |
|||||||||||||
|
9. Displaying a text |
character string. |
|
|
|
|
|
|
|
|
|
||||
In this manual, it is used for a string character that displays a screen title or item name and does not have a special function.
Click the [Text] icon
on the list.
Drag & drop the mouse on the editing screen till you get the size you want. (The size and position of the object can be changed later.)
A new text object is created as shown on the right.
Start up |
Creating a |
Project |
System |
Creating |
Validation |
Transferring |
|
CX-D |
new project |
property |
setting |
a screen |
a project |
||
|
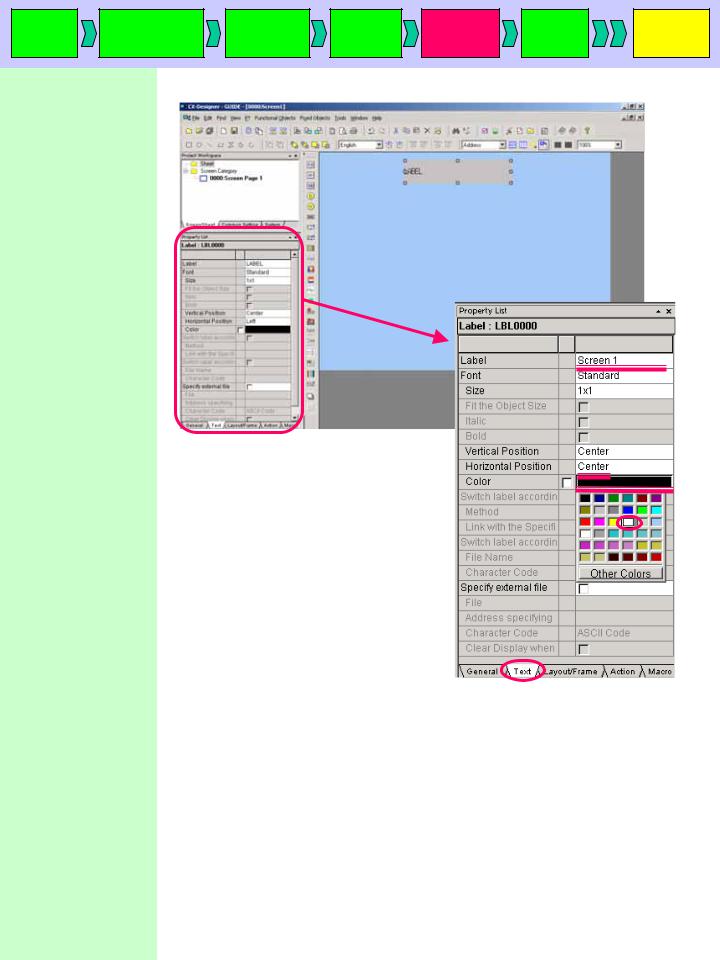
The property list is displayed by clicking the text object to display.
Click the property list and set as follow:
Text tab [Label]
! “Screen1” Vertical position ![Center]
Horizontal position ![Center]
Select a color.

Start up |
Creating a |
Project |
System |
Creating |
Validation |
Transferring |
|
CX-D |
new project |
property |
setting |
a screen |
a project |
||
|
Click
to switch to the [Dutch] label.
Set the following items on the property list.
Text tab [Label]
!“Screen 1” [Horizontal Position]
!“Center”
Click the [General] tab on the property list.
Click the [Background Color] and select a color.
Select the [Layout/Frame] tab.
Check “Three-dimensional
Frame” check box.
Set “2” to [Size].
Completed image
Click
to switch back to the [English] label.

Start up |
Creating a |
Project |
System |
Creating |
Validation |
Transferring |
|
CX-D |
new project |
property |
setting |
a screen |
a project |
||
|
1010.. ON/OFFN/ FF ButtonButton
Create a text object by referring to a “Display a Text”.
Creating a ON/OFF button on the screen.
ON/OFF Button has a function that goes ON/OFF according to the ON/OFF states of specified address (bit) by operation such as touch switch input.
In this manual, a button is used as ON/OFF button and Occurred/Cancelled button of virtual alarms.
Click the [ON/OFF] icon
on the list.
Drag and drop a mouse to make a shape, same as performed for the text object on page 19.
Select the [General] tab.
Click [Type] and select “Select Shape (Type 1)”.
Click “Shape 1” and
Select “Parts List”

Start up |
Creating a |
Project |
System |
Creating |
Validation |
Transferring |
|
CX-D |
new project |
property |
setting |
a screen |
a project |
||
|
Click
to display the [BMPfiles] pull-down menu.
Select “Switches-Toggle&Dip”
in the BMPfiles.
Select the shape.
Check [Pair].
Click
Click [Action] in the ON/OFF button property list and select [Alternate].
Click [Write Address] and 
Set as follow:
Host
! [HOST1]
Area
![Common I/O Area (CIO)]
Word
![0]
Bit
! [0]
Click
Completed image.
Then,
complete.

Start up |
Creating a |
Project |
System |
Creating |
Validation |
Transferring |
|
CX-D |
new project |
property |
setting |
a screen |
a project |
||
|
1111..RepeatRepeat functionfunction
1111--11RepeatRepeatfunctionfunction (Button)(Button)
Right-click the created button.
Select [Repeat(R)] from the pop-up menu.
Set as follow:
[Qty]
Horizontal ![1] Vertical ! [5]
[Spacing] Horizontal ! [0] Vertical ! [0]
Select a repeat direction.
Set 1 to [Offset Address].
Using a [Repeat] function to copy a object already created.
In this manual, you will copy an ON/OFF button with [Repeat] function.

Start up |
Creating a |
Project |
System |
Creating |
Validation |
Transferring |
|
CX-D |
new project |
property |
setting |
a screen |
a project |
||
|
You can check an allocated address of a functional object (switch) from the [Property list].
<Note>
You can display and edit a list of allocated addresses by selecting ON/OFF button in the
Edit Properties dialog box.
See “11-2. Repeat Function (Label)” for how to use “Edit Properties”.

Start up |
Creating a |
Project |
System |
Creating |
Validation |
Transferring |
|
CX-D |
new project |
property |
setting |
a screen |
a project |
||
|
1111--22RepeatRepeatFunctionFunction (Text)(Text)
Add two more texts as shown on the right by referring to “9 Displaying a Text”.
Upper text [Label]
!“Label” Bottom text [Label]
!“Power Supply 1”
Right-click this button,
then select [Repeat] from the pull-down menu.
Enter Qty:
Horizontal
![1] Vertical
![5]
Select a repeat direction
Using [Repeat] function to copy a text object to create multiple objects. In this manual, you will copy a text object using this function.
Click
 Loading...