


BP786N
Table of contents
 Loading...
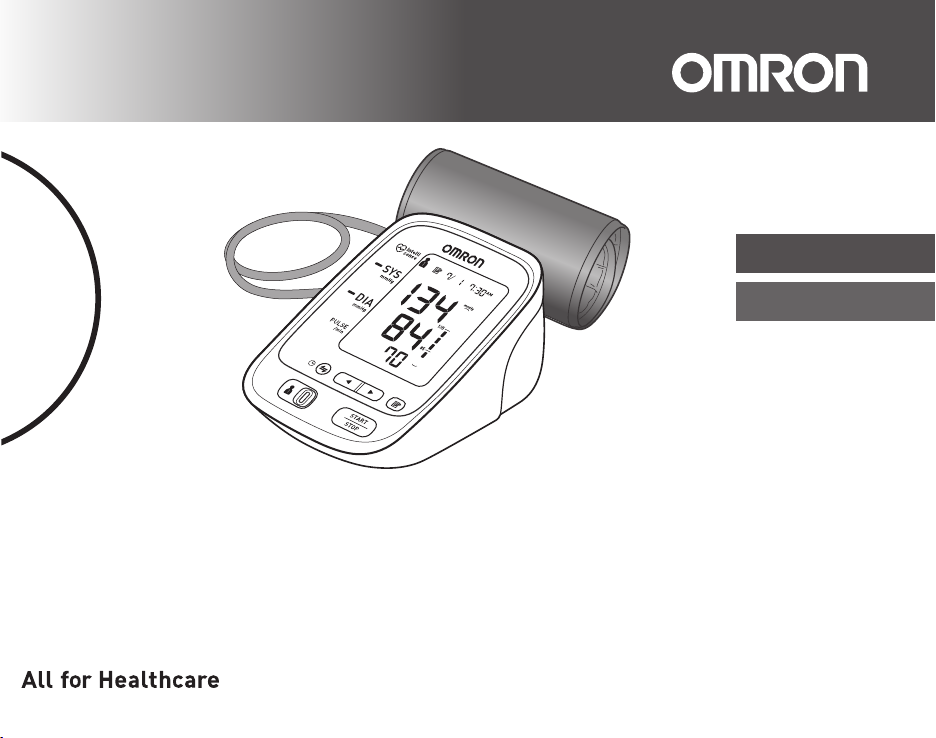
English
Eespañol
10 series Blood Pressure Monitor
Model BP786N
Instruction Manual
English
Español
9701498-6B
10 series Blood Pressure Monitor
Model BP786N
Instruction Manual
Monitor
AC Adapter
Instruction Manual
ComFit™ Cuff
English
Eespañol
10 series Blood Pressure Monitor
Model BP786N
Instruction Manual
El producto incluye:
Monitor
Adaptador de CA
Manual de Instrucciones
Brazalete ComFit™
Quick Start Guide
Guía resumida
Battery Set
Juego de Pilas
BP786N
Product includes:
1 2
b
c
d
b
a
A
L
M

Contents
Thank you for purchasing the OMRON
®
BP786N Blood Pressure Monitor.
Your new blood pressure monitor uses the oscillometric method of blood pressure
measurement. This means the monitor detects your blood movement through your brachial
artery and converts the movements into a digital reading. An oscillometric monitor does not
need a stethoscope so the monitor is simple to use.
Intended Use
This device is a digital monitor intended for use in measuring blood
pressure and pulse rate in
adult patient population. The device detects the appearance of irregular heartbeats during
measurement and gives a warning signal with the measurement result.
Important Safety Information........................1
1. Know Your Device....................................4
1.1 Display Symbols.....................................5
1.2 Before Taking a Measurement...............6
2. Preparation ...............................................7
2.1 Battery Installation..................................7
2.2 Using the AC adapter.............................8
2.
3 Setting the TruReadTM Mode..............10
2.4 Setting the Date and Time ...................11
3. Using the Device ....................................12
3.1 Applying the Arm Cuff ..........................12
3.2 How to Sit Correctly .............................13
3.3 Taking a Measurement ........................14
3.4 Using the Memory Function.................
18
4. Error Messages and Troubleshooting... 28
4.1 Error Messages ................................... 28
4.2 Troubleshooting................................... 30
5. Maintenance and Storage......................31
5.1 Maintenance ........................................ 31
5.2
Storage................................................ 32
5.3 Optional Medical Accessories ............. 33
6. Specifications.........................................34
7. FCC/IC Statement and Trademarks ......35
8. Limited Warranty....................................37
9.
Guidance and Manufacturer’s Declaration
....
38
Please read this instruction manual thoroughly before using the device.
Please keep for future reference. For specific information about your own
blood pressure, CONSULT YOUR PHYSICIAN.
3.5 Turning “OFF” the Bluetooth
®
..............
26

1
EN
Important Safety Information
Warning: Indicates a potentially hazardous situation which, if not avoided, could result in death or
serious injury.
(General Usage)
DO NOT adjust medication based on measurement results from this blood pressure monitor. Take medication as
prescribed by your physician. Only a physician is qualified to diagnose and treat High Blood Pressure.
The monitor is not intended to be a diagnostic device.
Consult your physician before using the device for any of the following conditions: common arrhythmias such as
atrial or ventricular premature beats or atrial fibrillation, arterial sclerosis, poor perfusion, diabetes, age,
pregnancy, pre-eclampsia, renal diseases.
Note that PATIENT motion, trembling, shivering may affect the measurement reading.
Do not use the device on the injured arm or the arm under medical treatment.
Do not apply the arm cuff on the arm while on an intravenous drip or blood transfusion.
Consult your physician before using the device on the arm with an arterio-venous (A-V) shunt.
Do not use the device with other medical electrical (ME) equipment simultaneously.
Do not use the device in the area of HF surgical equipment, MRI, or CT scanner, or in an oxygen rich environment.
The air tube or the AC adapter cable may cause accidental strangulation in infants.
Contains small parts that may cause a choking hazard if swallowed by infants.
(Data Transmission)
Do not use this product on aircraft or in hospitals. Please remove the battery and AC adapter from the unit. This
product emits radio frequencies (RF) in the 2.4 GHz band, use of this product in locations where RF is restricted
is not recommended.
The use of RF in this product is licensed for use by the FCC, for further information on any potential restrictions
refer to documentation on Bluetooth
®
usage by the FCC.
(AC Adapter Usage)
Do not use the AC adapter if the device or the power cord is damaged. Turn off the power and unplug the power
cord immediately.
Plug the AC adapter into the appropriate voltage outlet. Do not use in a multi-outlet plug.
Never plug in or unplug the power cord from the electric outlet with wet hands.

2
Important Safety Information
Caution: Indicates a potentially hazardous situation which, if not avoided, may result in minor or
moderate injury to the user or patient or damage to the equipment or other property.
(General Usage)
Always consult your physician. Self-diagnosis of measurement results and self-treatment are dangerous.
Consult your physician before using the device for any of the following conditions:
• If you have had a mastectomy.
• Do not take measurements more than necessary. It may cause bruising due to blood flow interference.
• People with severe blood flow problems or blood disorders as cuff inflation can cause bruising.
Remove the arm cuff if it does not start deflating during the measurement.
Do not use this device on infants or persons who cannot express their intentions.
Do not use the device for any purpose other than measuring blood pressure.
Use only the approved arm cuff for this device. Use of other arm cuffs may result in incorrect measurement results.
Do not use a mobile phone or other devices that emit electromagnetic fields near the device except when in use
for wireless communications. This may result in incorrect operation of the device.
Do not disassemble the monitor or arm cuff. This may cause an inaccurate reading.
Do not use in a location with moisture, or a location where water may splash on the device. This may damage the
device.
Do not use the device in a moving vehicle (car, airplane).
Read "If your systolic pressure is more than 210 mmHg" (page14) of this instruction manual, if your systolic
pressure is known to be more than 210 mmHg. Inflating to a higher pressure than necessary may result in bruising
where the cuff is applied.
(AC Adapter Usage)
Fully insert the power plug into the outlet.
When disconnecting the power plug from the outlet, do not pull the power cord. Be sure to pull from the power plug
safely.
When handling the power cord, take care not to do the following:
Do not damage. Do not break it.
Do not tamper with it. Do not forcibly bend or pull.
Do not twist. Do not bundle during use.
Do not pinch. Do not place under heavy objects.

3
Important Safety Information
EN
Wipe the dust off from the power plug.
Unplug monitor when not in use.
Disconnect the power plug before cleaning.
Use only an OMRON AC adapter designed for this device. Use of unsupported adapters may damage and/or may
be hazardous to the device.
(Battery Usage)
Do not insert the batteries with their polarities incorrectly aligned.
Use only 4 “AA” alkaline or manganese batteries with this device. Do not use other types of batteries. Do not use
new and used batteries together.
Remove the batteries if the device will not be used for three months or more.
General Precautions
• Do not forcibly crease the arm cuff or the air tube excessively.
• Do not press the air tube while taking a measurement.
• To unplug the air plug, pull on the air plug at the connection with the monitor, not the tube itself.
• Do not drop the monitor or subject device to strong shocks or vibrations.
• Do not inflate the arm cuff when it is not wrapped around your arm.
• Do not use the device outside the specified environment. It may cause an inaccurate reading.
• Dispose of the device, components and optional accessories according to applicable local regulations. Unlawful
disposal may cause environmental pollution.
4
1. Know Your Device
Monitor
Air jack
Blood pressure color indicator
Connection button
USER ID selection switch
Display
Memory button
START/STOP button
Up/Down buttons
Battery compartment
AC adapter jack
Arm cuff
Arm cuff (Arm circumference
9” - 17” (22 - 42 cm))
Air plug
Air tube
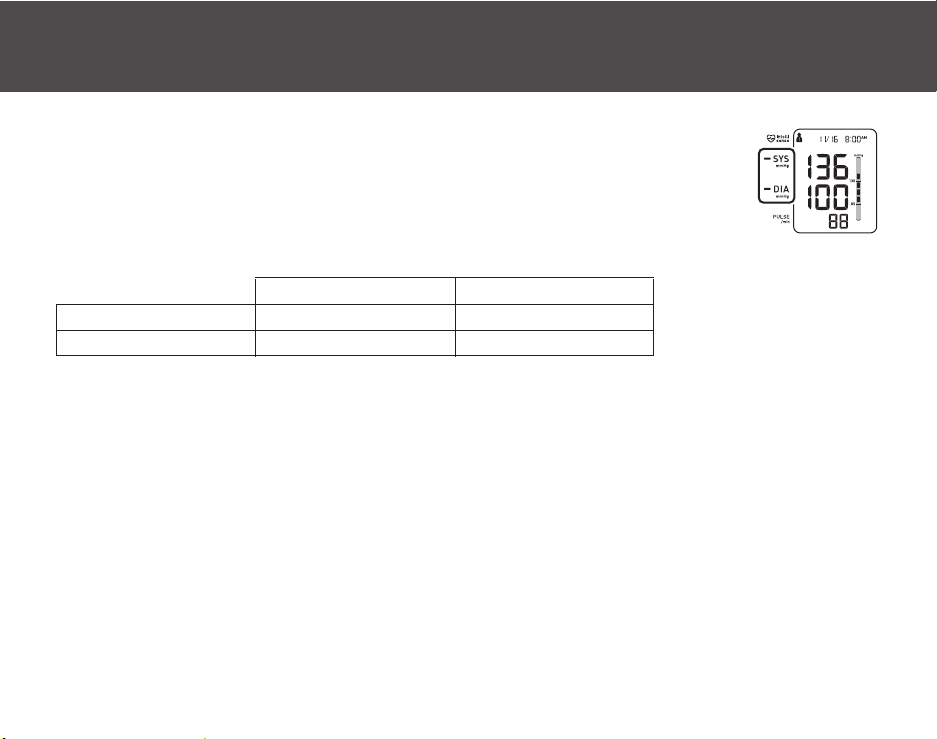
Display
Memory symbol
USER ID symbol
Average value symbol
Systolic blood pressure
Diastolic blood pressure
Connection symbol
Memory full symbol
OK symbol
Heartbeat symbol
(Flashes during measurement)
Date/Time display
TruRead
TM
symbol
Movement error symbol
Irregular heartbeat symbol
Blood pressure level indicator
Low battery symbol
Deflation symbol
Pulse display / Memory number
Open the rear cover page to read the following:
The letter identifiers on the rear cover page correspond to those in the body of this page.
A
B
C
D
E
F
G
H
I
J
K
L
M
N
O
P
Q
R
S
T
U
V
W
X
Y
Z
AA
AB
AC
AD
5
1. Know Your Device
EN
1.1
Display Symbols
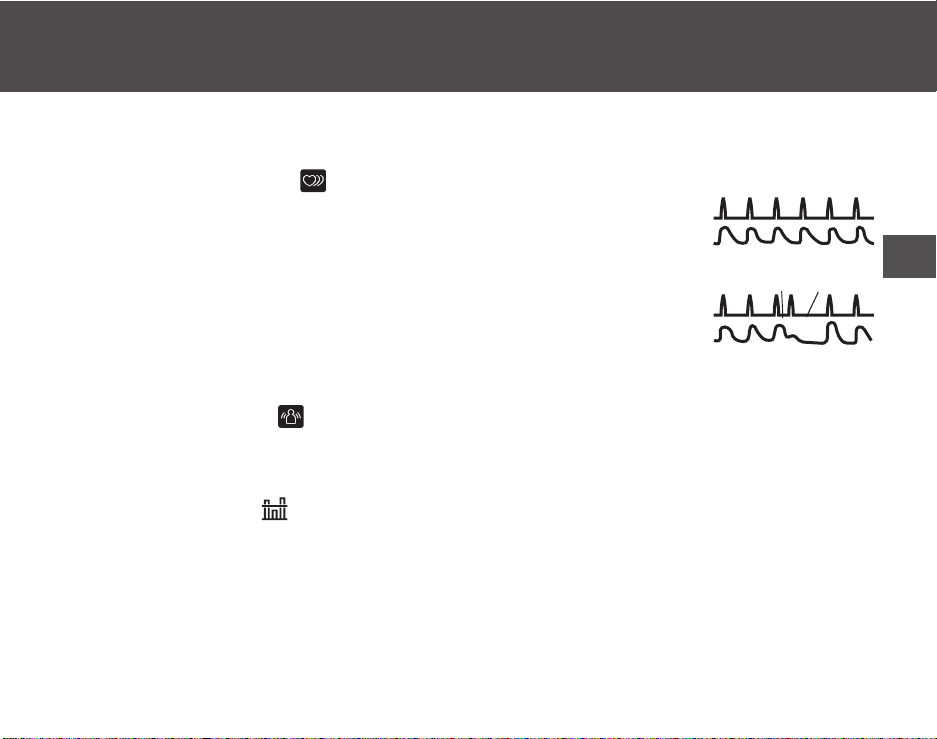
Irregular Heartbeat Symbol ( )
When the monitor detects an irregular rhythm two or more times during the
measurement, the irregular heartbeat symbol will appear on the display with
the measurement values.
An irregular heartbeat rhythm is defined as a rhythm that is 25% less or 25%
more than the average rhythm detected while the monitor is measuring the
systolic and diastolic blood pressure.
If the irregular heartbeat symbol displays with your measurement results, we
recommend you consult your physician. Follow the directions
of your physician.
Movement Error Symbol ( )
The movement error symbol is displayed if you move your body during the measurement. Please remove the arm
cuff, and wait 2-3 minutes. Take another measurement, remain still during measurement.
Average Value Symbol ( )
The average value symbol is displayed when you press and hold the memory button for more than 3 seconds. The
most recent average value appears on the display screen.
N
orma
l
H
eart
b
eat
Irregular Heartbeat
Pulse
Blood pressure
Blood pressure
Short
Long
Pulse
6
1. Know Your Device
Blood Pressure Color Indicator
If your Systolic Blood Pressure is 135 mmHg or above and/or the Diastolic Blood Pressure
is 85 mmHg or above, the blood pressure color indicator will light in “orange” when the
measurement result is displayed. If the measurements are within the standard range, the
blood pressure color indicator will light in “green”.
2013 ESH/ESC Guidelines for the management of arterial hypertension
Definitions of hypertension by office and home blood pressure levels
These are from statistical values for blood pressure
.
1.2
Before Taking a Measurement
To help ensure an accurate reading, follow these directions:
1. Avoid bathing, drinking alcohol or caffeine, smoking, exercising and eating for 30 minutes before taking a
measurement. Rest for at least 15 minutes before taking the measurement.
2. Stress raises blood pressure. Avoid taking measurements during stressful times.
3. Measurements should be taken in a quiet place.
4. Remove tight-fitting clothing from your arm.
5. Sit on a chair with your feet flat on the floor. Rest your arm on a table so that the arm cuff is at the same level as
your heart.
6. Remain still and do not talk during the measurement.
7. Keep a record of your blood pressure and pulse readings for your physician. A single measurement does not
provide an accurate indication of your true blood pressure. You need to take and record several readings over a
period of time. Try to measure your blood pressure at the same time each day for consistency.
Office Home
Systolic Blood Pressure 140 mmHg 135 mmHg
Diastolic Blood Pressure 90 mmHg 85 mmHg
7
EN
2. Preparation
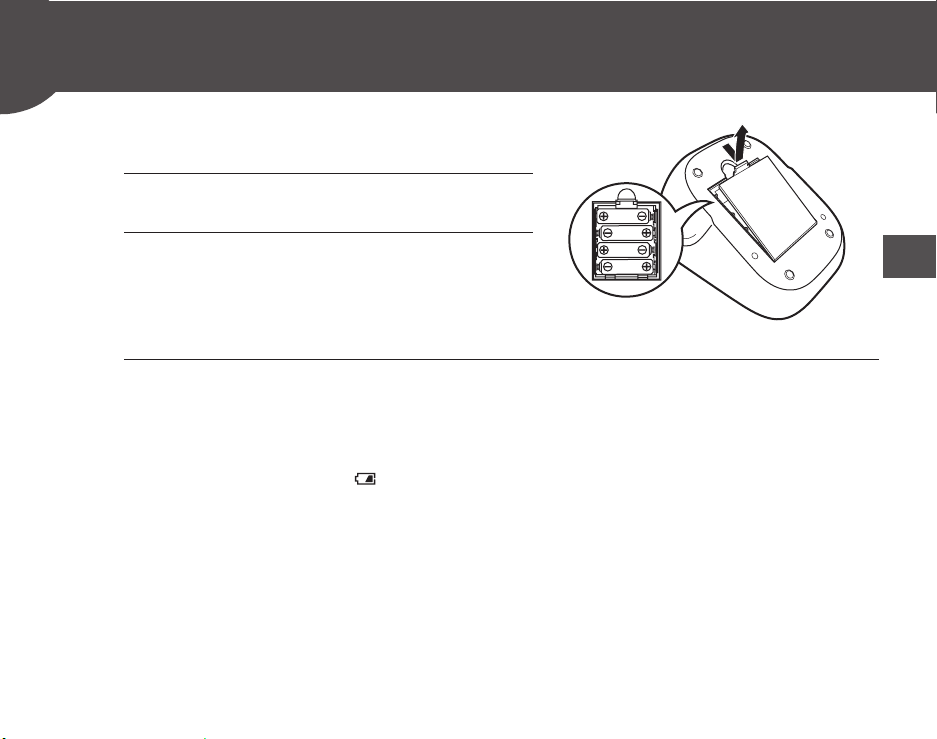
2.1
Battery Installation
1. Remove the battery cover.
2. Insert 4 “AA” batteries as
indicated in the battery
compartment.
3. Replace the battery cover.
Notes:
• When the low battery symbol ( ) appears on the display, turn the monitor off, then replace all batteries
at the same time. Long life alkaline batteries are recommended.
• The measurement values continue to be stored in memory even after the batteries are replaced.
• Dispose of the device, components and optional accessories according to applicable local regulations.
Unlawful disposal may cause environmental pollution.
8
2. Preparation
2.2
Using the AC adapter
IMPORTANT SAFETY INSTRUCTIONS
SAVE THESE INSTRUCTIONS
- DANGER -
TO REDUCE THE RISK OF FIRE OR ELECTRIC SHOCK,
CAREFULLY FOLLOW THESE INSTRUCTIONS.
For connection to a power supply not in the U.S.A. or Canada, use an attachment plug adapter of
the proper configuration for the power outlet.
The power unit (AC Adapter) is intended to be correctly oriented in a vertical or floor mount
position.
NOTES:
• Use only the authorized OMRON AC Adapter that came with this monitor.
• We recommend you install the batteries even if the AC Adapter is used. If no batteries are installed, you
may need to reset the date and time if the AC Adapter is disconnected. The measurement results will not
be deleted.
Use only OMRON authorized parts and accessories. Parts and accessories not approved for use with the
device may damage the device.
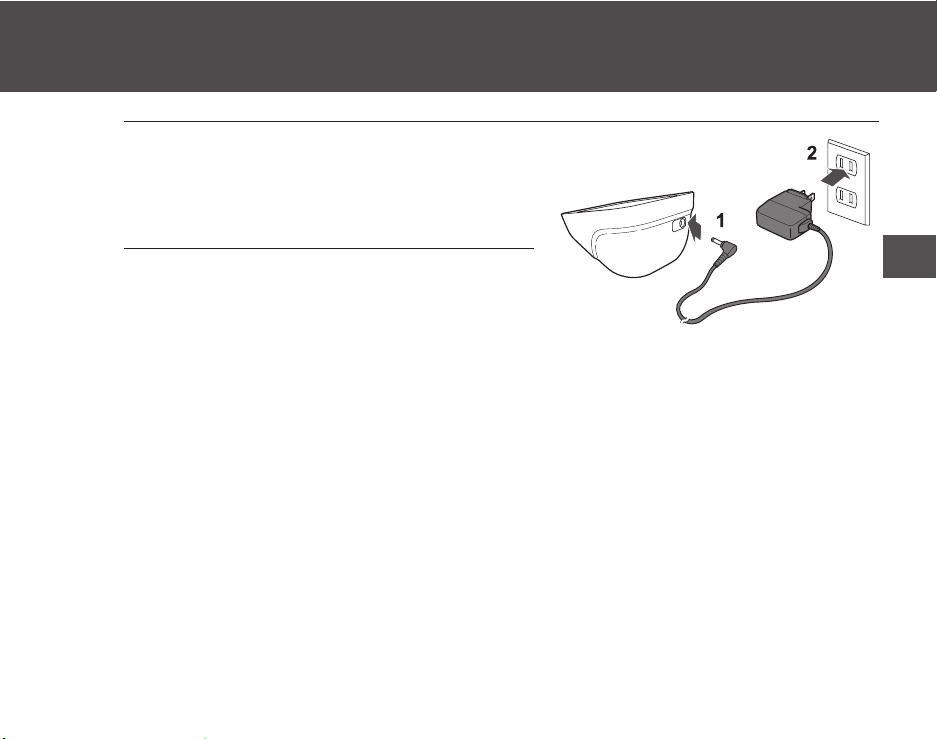
9
2. Preparation
EN
1. Insert the AC adapter plug
into the AC adapter jack on
the rear side of the monitor.
2. Plug the AC adapter into an
electrical outlet.
To disconnect the AC adapter, unplug the AC adapter from the electrical outlet first
and then remove the AC adapter plug from the monitor.
10
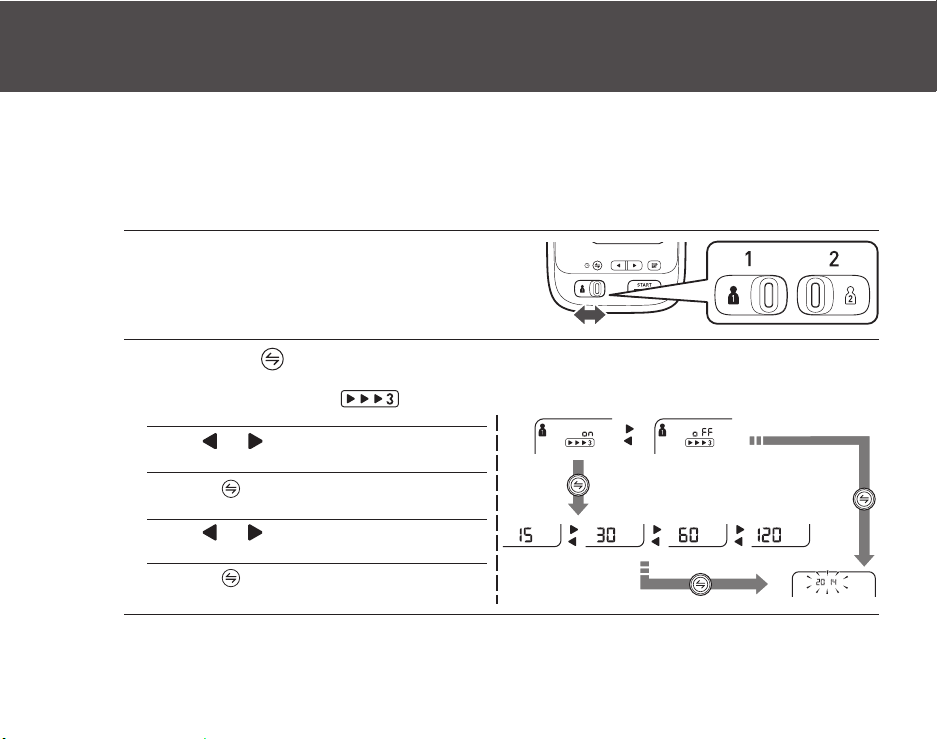
2. Preparation
2.3
Setting the TruRead
TM
Mode
The TruRead
TM
Mode takes 3 consecutive measurements. The monitor will inflate,
take a measurement, and deflate - 3 times, separated by a short interval between
each measurement. The TruRead
TM
Mode is set “oFF” by default
.
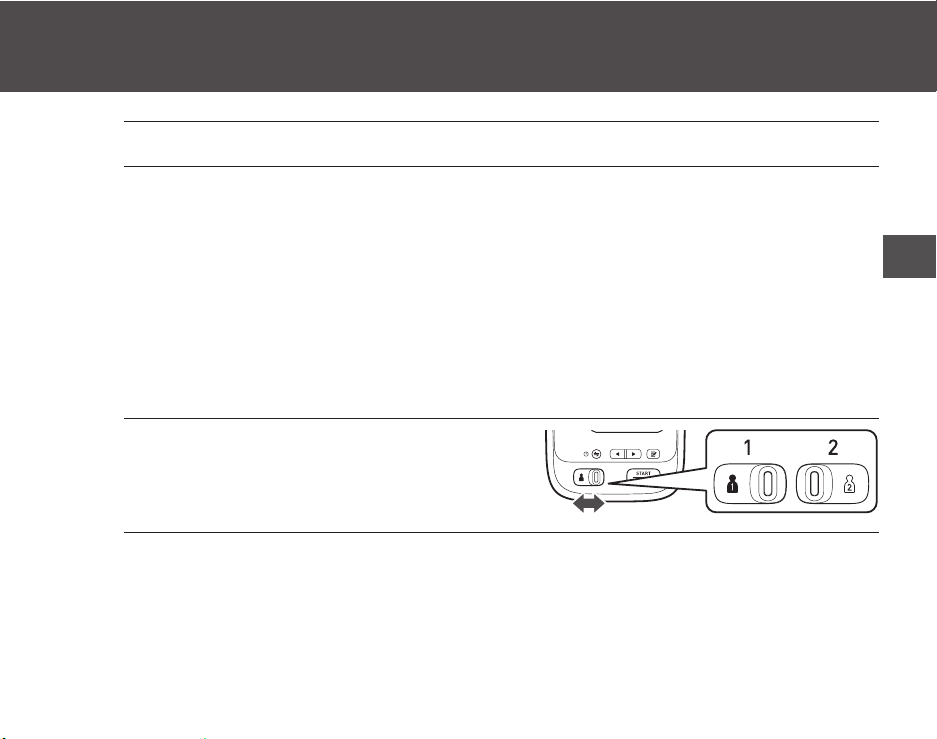
1. Select your USER ID (1 or 2).
2. Press the button.
The TruRead
TM
symbol ( ) appears on the display.
3. To set the date and time, proceed to section 2.4
If the date and time are correct, press the START/STOP button to turn the monitor off.
1)
3)
2)
4)
Press the button to confirm.
If “on” is selected the interval setting appears.
Press
or
buttons to select “on” or
“oFF”.
Press
or
buttons to change the interval.
It can be set 15, 30, 60, or 120 seconds.
Press the button to confirm.
The year flashes on the display.
11
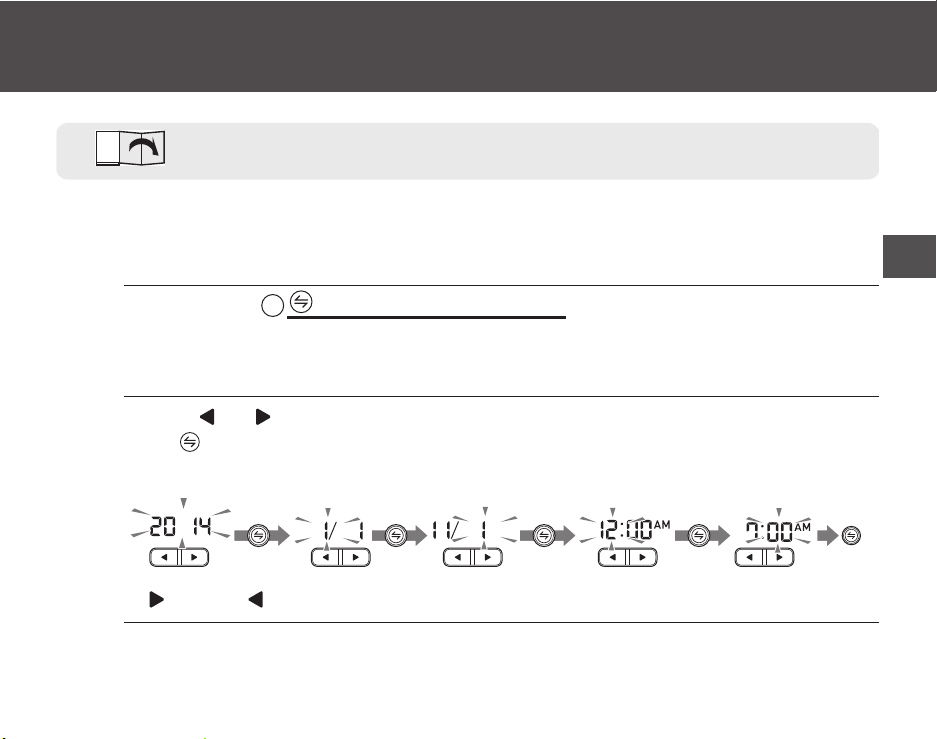
2. Preparation
EN
2.4
Setting the Date and Time
The date and time will be automatically set when paired with your smartphone. To set
manually, follow the instructions below.
1. Press the connection button repeatedly until the
year flashes on the Date/Time display.
Note: The number of times depends on TruRead
TM
Mode and if the device is paired with a smartphone.
2. Push or button to change the year.
Push button to confirm the year and then the month flashes. Repeat the same
steps to change the month, day, hour, and minute.
3. Press the START/STOP button to turn the monitor off.
Open the rear cover page to read the following:
The letter identifiers on the rear cover page correspond to those in the body of this page.
C
Change Confirm
Change Confirm
Change Confirm
Change Confirm
Change Confirm
: Forward : Back
Year
Month
Day
Hour
Minute
12
3. Using the Device
3.1
Applying the Arm Cuff
Remove tight-fitting clothing or tight rolled up sleeve from your left upper arm.
Do not place the arm cuff over thick clothes.
1. Insert the air plug into the air jack securely.
2. Apply the arm cuff to your left upper arm.
The bottom edge of the arm cuff should be 1/2 inch (1 to 2 cm) above the elbow.
Air tube
is on the inside of your arm and aligned with your middle finger.
3. Secure closed with the fabric fastener.
Notes:
• When you take a measurement on the right arm, the air tube will be at the side of your elbow. Be careful
not to rest your arm on the air tube. ---
• The blood pressure can differ between the right arm and the left arm, and the measured blood pressure
values can be different. OMRON recommends to always use the same arm for measurement. If the
values between both arms differ substantially, please check with your physician which arm to use for your
measurements.
Open both the front and rear covers to read the following:
The letter identifiers on the cover page correspond to those in the body of this page.
L A
a
M
b

13
3. Using the Device
EN
3.2
How to Sit Correctly
To take a measurement, you need to be relaxed and comfortably seated, at a
comfortable room temperature. Avoid bathing, drinking alcohol or caffeine, smoking,
exercising or eating 30 minutes before taking a measurement.
• Sit on a chair with your feet flat on the floor.
• Sit upright with your back straight. ---
• Sit with your back and arm being supported.
• The arm cuff should be placed on your arm at the same level as your heart. ---
c
d
14
3. Using the Device
3.3
Taking a Measurement
Notes:
• To stop a measurement, press the START/STOP button once to deflate the arm cuff.
• Remain still and quiet while taking a measurement.
The monitor is designed to take measurements and store the measurement values in
the memory for 2 people using USER ID 1 and USER ID 2.
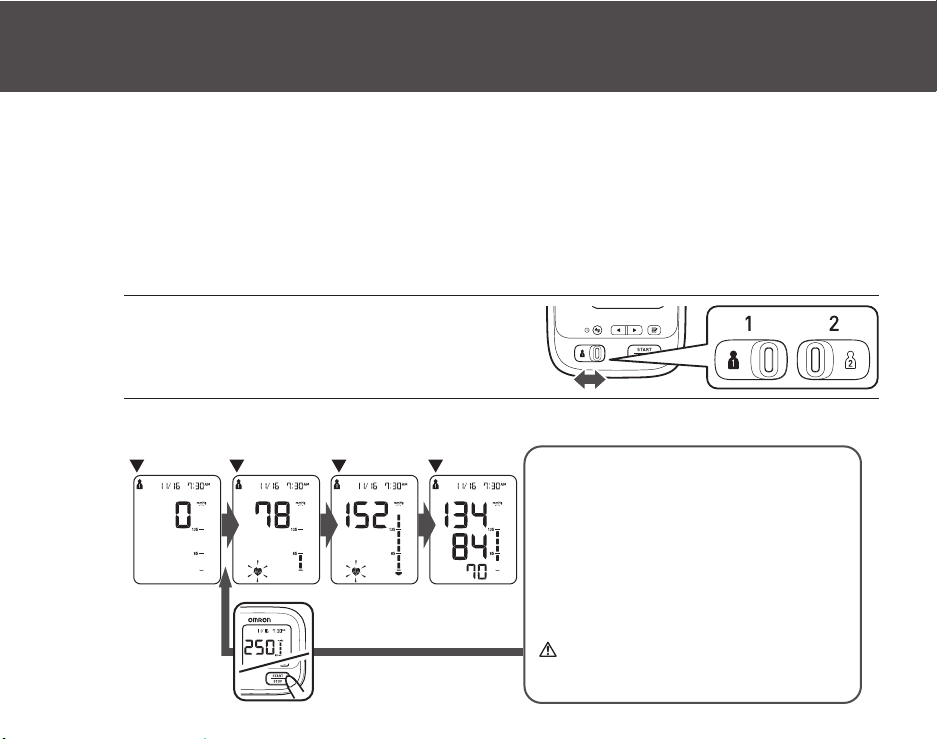
Using the Single Mode
1. Select your USER ID (1 or 2).
2. Press the START/STOP button.
The arm cuff starts to inflate automatically.
If your systolic pressure is
more than 210 mmHg
After the arm cuff starts to inflate, press and
hold the START/STOP button until the
monitor inflates 30 to 40 mmHg higher than
your expected systolic pressure.
Notes:
• The monitor will not inflate above 299 mmHg.
Inflating to a higher pressure than
necessary may result in bruising where
the arm cuff is applied.
START
INFLATE
DEFLATE
COMPLETE
15
3. Using the Device
EN
3. Remove the arm cuff.
4. Press the START/STOP button to turn the monitor off.
The monitor automatically stores the measurement result in its memory.
It will automatically turn off after 2 minutes.
Note: Wait 2-3 minutes before taking another measurement. Waiting between measurements allows the
arteries to return to the condition prior to taking a measurement.
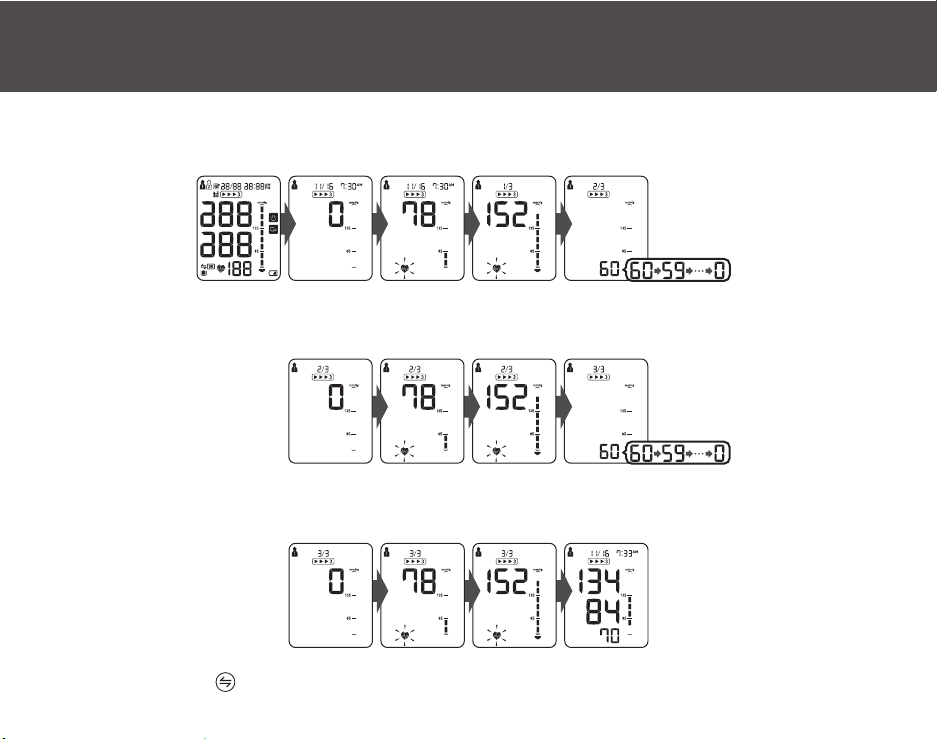
Using the TruRead
TM
Mode
1. Select your USER ID (1 or 2).
2. Press the START/STOP button.
The arm cuff starts to inflate automatically.
16
3. Using the Device
The first measurement is complete, waiting to start the next measurement.
The interval will appear on the display.
The second measurement is complete, waiting to start the next measurement.
The interval will appear on the display.
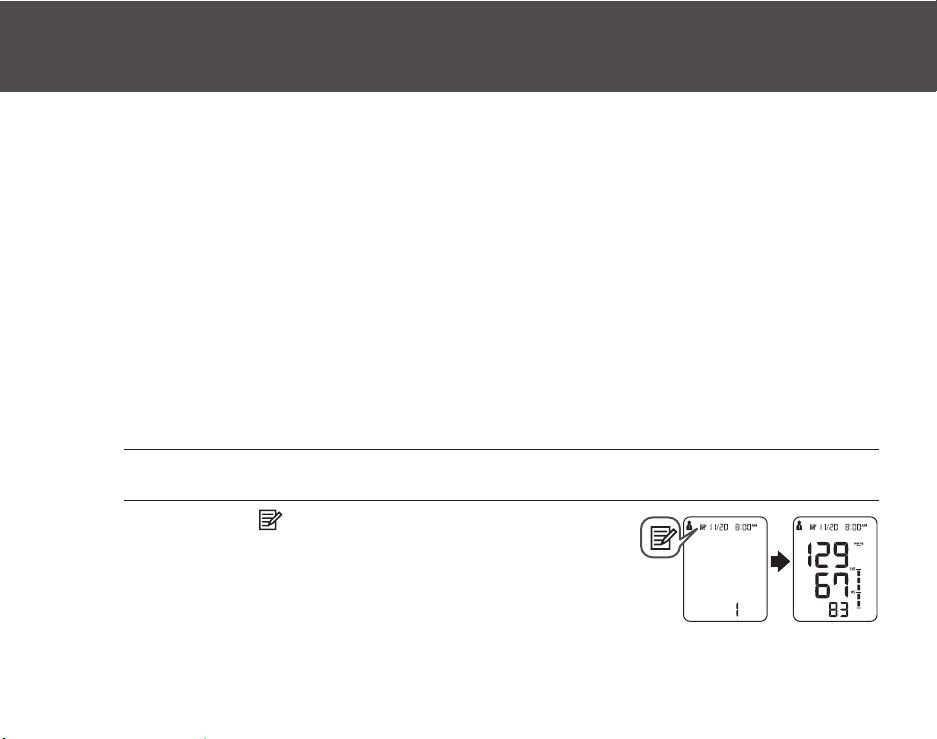
The third measurement is complete, the average for the 3 measurements appears on
the display.
Press
the button
to display the individual measurement values.
17
3. Using the Device
EN
Using the Guest Mode
The monitor stores measurement values for 2 users in the memory. The guest mode
can be used to take a single measurement for another user. No measurement values
are stored in the memory, and the TruRead
TM
mode is not available when the guest
mode is selected.
1. Press and hold the START/STOP
button for more than 3 seconds.
The USER ID symbol and the Date/Time display will disappear.
2. Release the START/STOP button when the Date/Time
display turns off.
The arm cuff will start to inflate automatically.
DO NOT adjust medication based on measurement results from this blood pressure monitor. Take
medication as prescribed by your physician. Only a physician is qualified to diagnose and treat High
Blood Pressure.
This monitor is not intended to be a diagnostic device.
Always consult your physician. Self-diagnosis of measurement results and self-treatment are dangerous.
Read "If your systolic pressure is more than 210 mmHg" (page14) of this instruction manual, if your
systolic pressure is known to be more than 210 mmHg. Inflating to a higher pressure than necessary
may result in bruising where the cuff is applied.
18
3. Using the Device
3.4
Using the Memory Function
The monitor automatically stores the results up to 100 readings for each user (1 and
2).
It can also calculate an average value based on the last 3 measurement values taken
within 10 minutes.
Notes:
• If there are only 2 measurement values in the memory for that period, the average will be based on these
2 values.
• If there is 1 measurement value in the memory for that period, this is displayed as the average.
• If the memory is full, the monitor will delete the oldest value.
• When viewing the measurement value taken without setting the date and time, “-/ - -:--” is displayed
instead of the date and time.
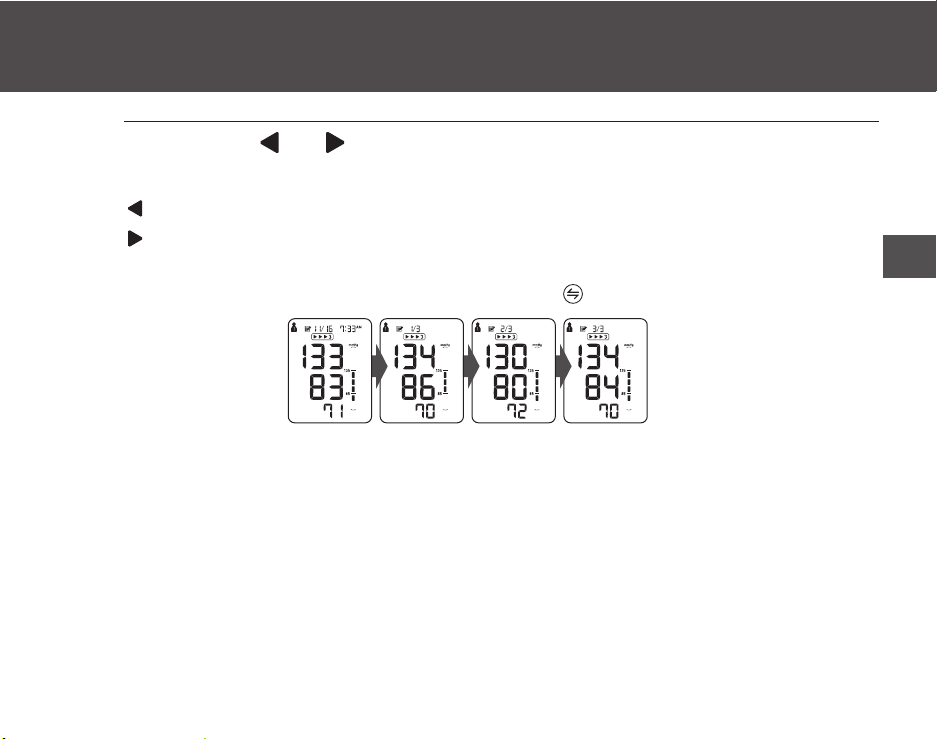
To View the Measurement Values Stored in Memory
1. Select your USER ID (1 or 2).
2. Press the button.
The Memory number appears for a second before the
pulse rate is displayed. The newest set is numbered “1”.
19
3. Using the Device
EN
3. Press the or button to view the values stored in the
memory.
: To view the older values
: To view the more recent values
Note: The value with the TruRead
TM
symbol is the average for the consecutive 3 measurements. To
display the individual measurement values, press
the
button
while the average is displayed.
20
3. Using the Device
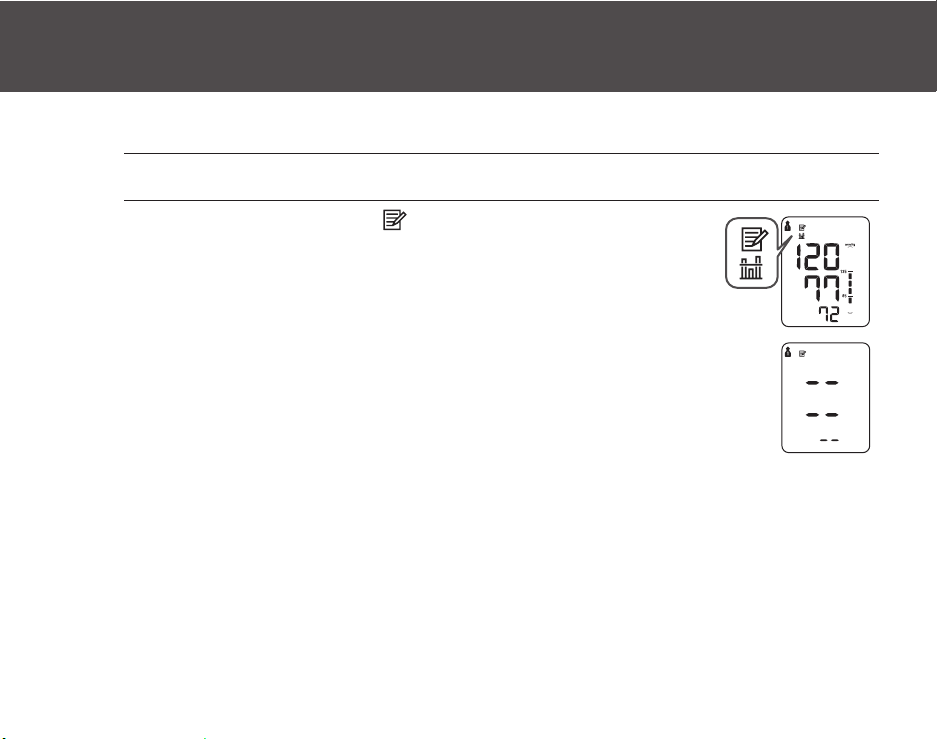
To View the Average Value
1. Select your USER ID (1 or 2).
2. Press and hold the button for more
than 3 seconds.
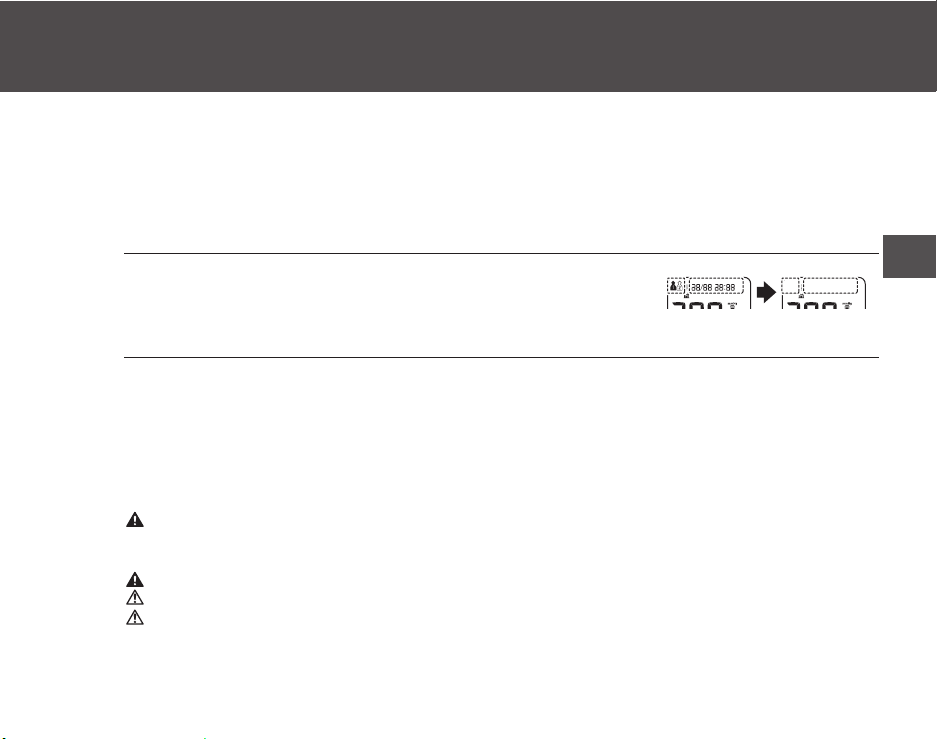
Notes:
• If the previous measurement was taken without setting the date and time,
the average value is not calculated.
• If there are no measurement values stored in the memory, the screen to
the right is displayed.
21
3. Using the Device
EN
To Pair This Device With a Smartphone
1. To begin, download and install the free "Omron
Wellness" App onto your smartphone.
2. Open the App on your smartphone and follow set-up and
pairing instructions.
Note: Please make sure that you do not currently have an active reading screen on. If your reading
screen is on, press the START/STOP button to clear the screen to allow you to begin to transfer
your readings.
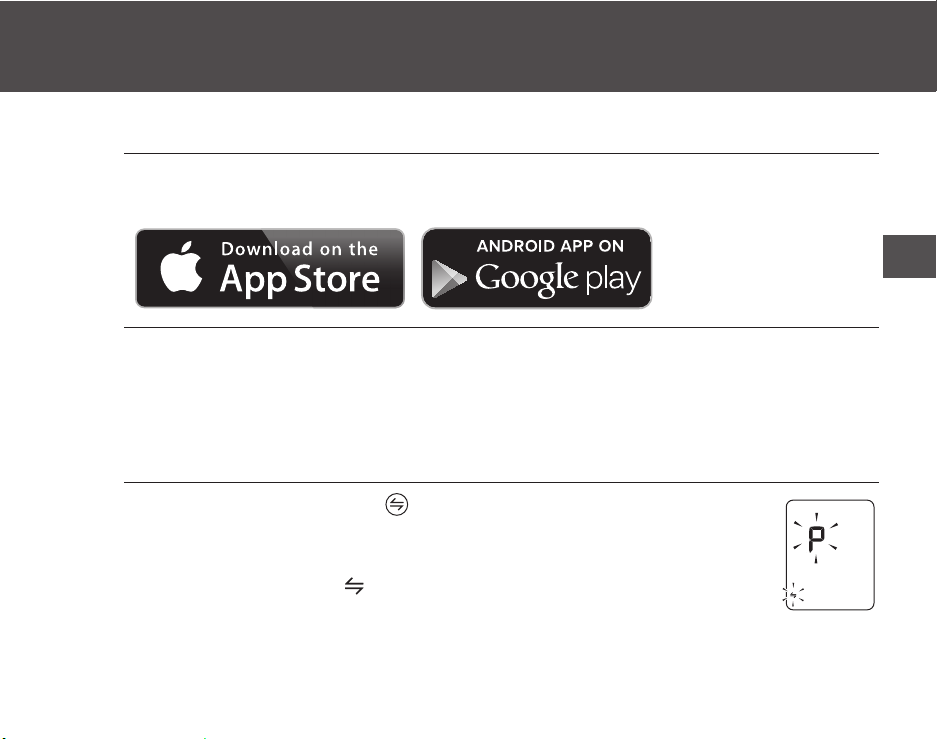
3. Press and hold the button for more than 2
seconds.
The connection symbol ( ) and the “P” flashes on the device’s display.
22
3. Using the Device
4. Open the "Omron Wellness" App on your
smartphone and follow the device pairing
instructions shown on your smartphone, while
the connection symbol is flashing on the device’s
display.
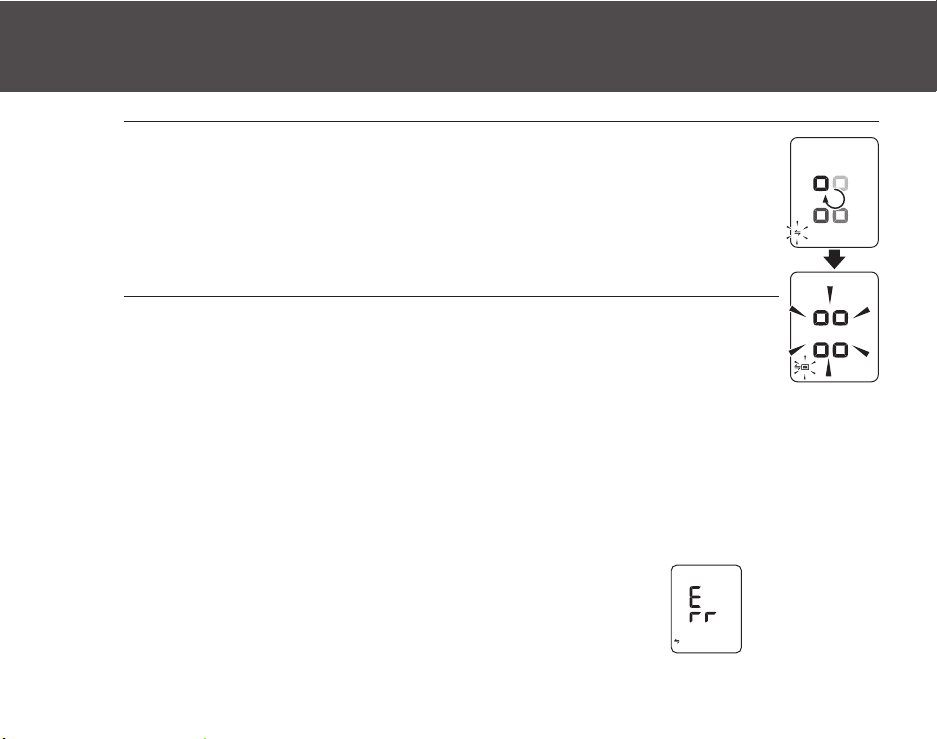
5.
Confirm if the device is connected successfully.
When the device is connected successfully to the smartphone,
“OK” symbol and the display shown on the right will flash.
The monitor will automatically turn off without any operations.
The date and time settings of your smartphone will automatically sync with the device
when paired.
When “Err” appears, refer to “Connection failure.” in section 4.2 for more detail.
Notes:
• You can pair up to 4 destination smartphones with the monitor.
• When paired with 5 or more smartphones, any information previously
stored in your device will be overwritten.
• Any readings currently saved in the blood pressure monitor’s memory
will automatically be transferred to the app after successful
completion of the pairing process.
23
3. Using the Device
EN
TO TRANSFER THE DATA
After the measurement is complete, you can transfer the data (measurement results
of blood pressure and pulse rate).
Notes:
• The stored data can be transferred all at once.
• The date and time settings of your smartphone will sync with the device when transferred.
*Sync occurs if the time between smartphone and device differs more than 10 minutes.
1. Open the app on your smartphone.
2.
Clear your reading screen by pressing the "START/
STOP" button on your monitor. Next, tap the "transfer"
icon in the Omron Wellness app to start the transfer.
* If the data transfer is not starting, refer to “Connection failure. Data cannot be sent.”
in “4. Error Messages and Troubleshooting”.
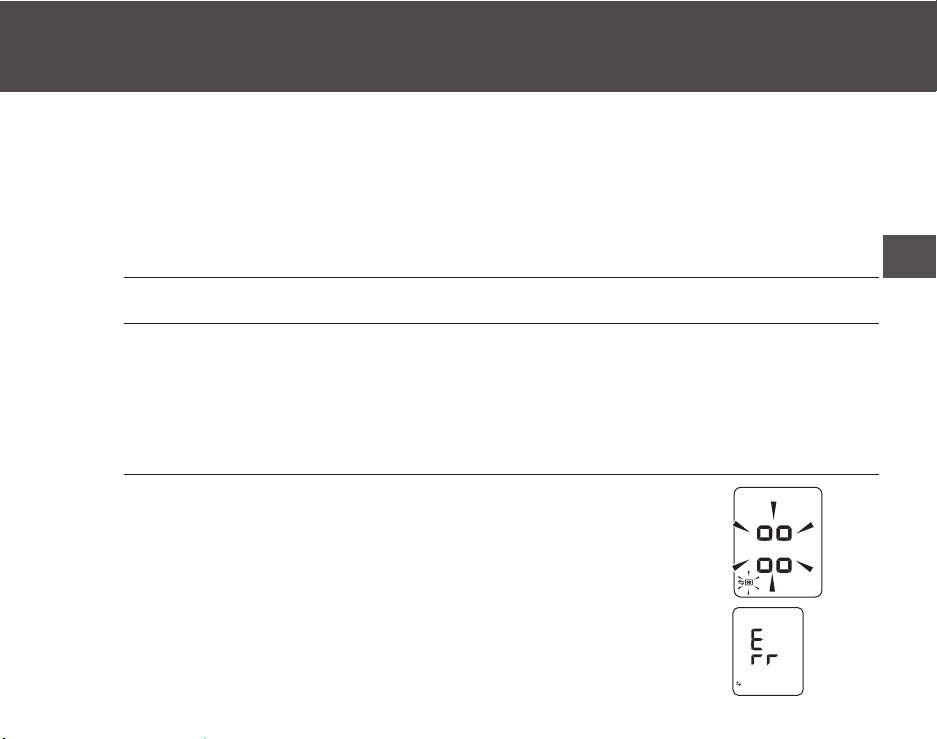
3. Confirm with your device if the
measurement data is transferred
successfully.
If the display on the right is shown, the data is transferred successfully.
When “Err” appears, refer to “Data cannot be sent.” in section 4.2 for more
detail.
Loading...