


INSTRUCTIONS
Before using your camera, read this manual carefully to ensure correct use.
PREPARATIONS
BASIC OPERATIONS
ADVANCED TECHNIQUES
CAMERA MAINTENANCE
Thank you for purchasing an Olympus camera. Before you start to use your new camera, please read these
instructions carefully to obtain optimum performance and a longer service life from the unit.
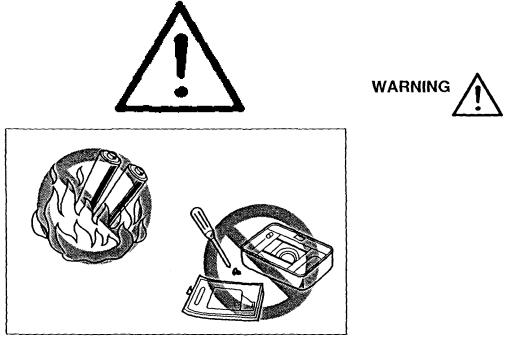
KEEP THE BATTERIES AWAY FROM FIRE NEVER TRY TO DISASSEMBLE, RECHARGE OR SHORT CIRCUIT BATTERIES.
NEVER ATTEMPT TO DISASSEMBLE THE CAMERA; IT CONTAINS A HIGH-VOLTAGE CIRCUIT.
IF THE INTERNAL PARTS OF THE CAMERA
ARE EXPOSED DUE TO DROPPING OR DAMAGE, REMOVE THE BATTERIES IMMEDIATELY TO PREVENT FURTHER USAGE.
2
•Before using your camera, read this manual carefully to ensure correct use.
•We recommend that you take test shots to get accustomed to your camera before taking important photographs.
MAIN FEATURES
An easy-to-use fully automatic camera with a leather-like touch.
Built-in 38mm - 105mm approx. 3X zoom lens. Quartz date or time imprinting.
Weatherproof.  Remote control (optional). Versatile, easy-to-use functions include spot metering, night scene mode, as well as various flash modes.
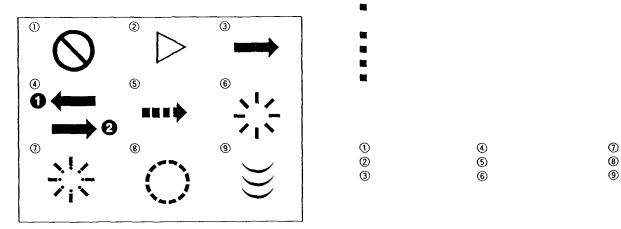
Symbols used in this manual:
Incorrect |
Operation order |
Indicator blinking |
Next operation |
Automatic operation |
Attention |
Manual operation |
Indicator on |
Depress halfway |
|
Product shown in pictures and illustrations may be |
3 |
slightly different from the actual unit. |
PREPARATIONS
BASIC OPERATIONS
Names and functions of parts ........................................... |
6 |
Viewfinder display/LCD panel ............................................. |
8 |
Diopter adjustment ............................................................. |
9 |
Using the strap ................................................................... |
9 |
Outline of operations .......................................................... |
10 |
Loading the battery ............................................................. |
13 |
Checking the battery ........................................................... |
14 |
Points to remember ............................................................ |
15 |
Loading the film ................................................................. |
17 |
Taking pictures ................................................................... |
20 |
Using the focus lock ........................................................... |
25 |
After Shooting .................................................................... |
27 |
Unloading the film .............................................................. |
28 |
4

ADVANCED TECHNIQUES
CAMERA MAINTENANCE
Using the flash modes ........................................................ |
29 |
Auto (Auto Flash) ............................................................... |
31 |
Auto-S (Redeye-Reducing Flash) ...................................... |
32 |
OFF (Flash Override) ........................................................... |
33 |
FILL-IN (Forced Activation) ................................................ |
34 |
Night Scene ................................................................... |
35 |
Spot ............................................................................. |
36 |
Selftimer............................................................................. |
37 |
Remote Control (optional) .................................................. |
38 |
Correcting the data ............................................................. |
40 |
Printing the date and time .................................................. |
42 |
Questions and answers ...................................................... |
43 |
Care and storage ................................................................ |
44 |
Caring for your weatherproof camera.................................. |
47 |
Battery handling ................................................................. |
49 |
Remote control (optional) handling .................................. |
51 |
Troubleshooting ............................................................... |
52 |
Specifications ................................................................... |
59 |
5
PREPARATIONS
6
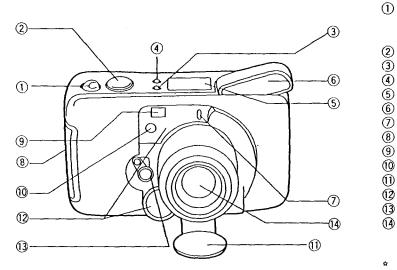
NAMES AND FUNCTIONS OF PARTS
Zoom lever (See p. 21.) Zooms In — telephoto.
Zooms out — wide-angle. Shutter release button (See p. 16.)
Selftimer/remote control button (See p. 37/38.) Flash mode button (See p. 29.)
LCD panel (Date/time indicator ) (See p. 8.) Flash
Selftimer indicator Strap eyelet Viewfinder
Light sensor Lens barrier
Autofocus windows Power switch
Lens
Do not soil as this can cause blurred pictures. Wipe clean with a soft cloth.
Quartzdate mode buttons (See p. 40.) Panorama lever (See p. 29)
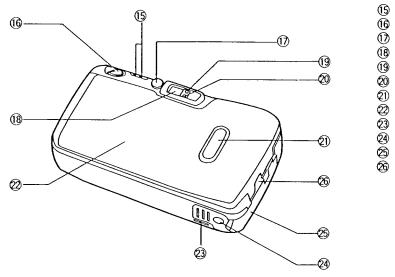
Diopter adjustment dial (See p. 9.)
Viewfinder (See p. 8.) Orange lamp
Green lamp Film window Back cover
Mid-roll rewind button (See p. 28.)
Tripod socket
Battery compartment cover Back cover release
7
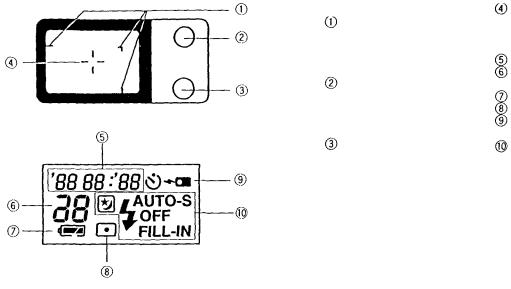
VIEWFINDER DISPLAY/LCD PANEL
Viewfinder Display
Close-up correction marks At a close distance, your subject must be positioned within the close-up correction marks.
Orange lamp
Lights when the flash is ready to fire.
Blinks while the flash is recharging.
Green lamp
Lights when the subject is in focus.
Blinks when the subject is not in focus.
Autofocus mark
Position your subject within the autofocus mark.
LCDPanel
Date/time indicator Exposure counter (See p. 19.)
Battery check (See p. 14.) Spot (See p. 36.)
Selftimer/remote control
(See p. 37/38.)
Flash modes (See p. 29.)
|
Note: |
|
8 |
The LCD panel does not actually display all indication |
|
simultaneously as shown. |
||
|
DIOPTER ADJUSTMENT
To Adjust the Viewfinder to Compensate for Near-and Far-sighted vision
Turn the diopter adjustment dial until the viewfinder display becomes clear.
Turn to the right if you are far-sighted or to the left if you are near-sighted.
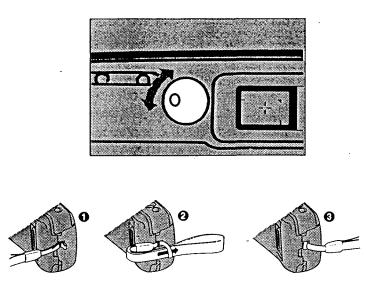
USING THE STRAP
Attaching the strap.
9
1.
2.
OUTLINE OF OPERATIONS
Basic Shooting Procedures
Load a battery (p. 13).
Open the back cover (p. 17).
3. Load the film (p. 17).
(Use of ISO 400 film is recommended.)
4. Close the back cover. The film automatically advances to the first frame (p. 19).
10
5. Turn the power switch ON (p. 19).
The lens barrier will open automatically.
6.
7.
8.
Make sure the exposure counter on the
LCD panelreads  (p. 19).
Press the zoom lever for telephoto or wide-angle photography (p. 21).
Place the autofocus mark on the subject you want to photograph (p. 22).
11
9. Depress the shutter release button halfway to make sure the green lamp lights (p. 22).
10.
11.
12.
Depress the shutter release button fully to take a picture (p. 23).
When the film reaches the end, it will automatically rewind (p. 28).
Open the back cover to remove the rewound film (p. 28).
12
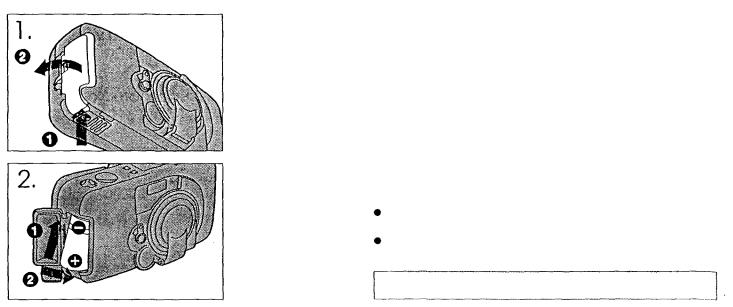
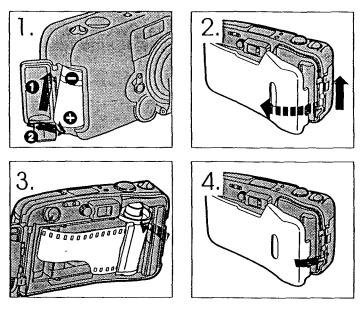
LOADING THE BATTERY
1.
2.
After turning the power switch OFF, push
OPEN  to open the battery compartment cover
 .
.
Turn the power switch OFF and close the lens barrier when replacing the batteries.
Insert the new battery correctly as shown and close the battery compartment cover tightly.
Use a 3 V lithium battery (DL 123A, CR123A, or equivalent.)
About 15 rolls of film can be used with one new battery.
(p. 43)
Read "Battery Handling" on page 49.
13
CHECKING THE BATTERY
Turn the power switch ON. Check the remaining battery power.
Display |
Meaning |
|
|
lights (and turns off |
Battery is OK. |
automatically). |
You can shoot. |
|
|
blinks and other |
Battery power is low and |
indicators on the LCD panel |
battery should be replaced |
are displayed normally. |
|
|
|
blinks and other |
Battery is dead and should |
indicators on the LCD panel |
be replaced immediately. |
go out. |
|
|
|
Note: Keep spare battery on hand when going on a long trip a wedding or when using the camera in cold weather. Adjust the data of the Quartzdate every time the battery is replaced.
14
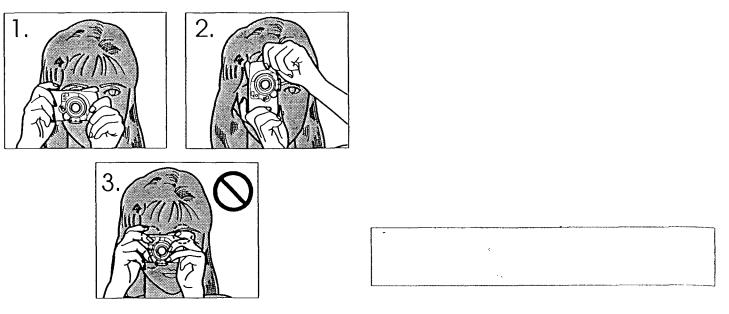
POINTS TO REMEMBER
Hold the Camera Correctly.
1.Correct.
Hold the camera firmly with both hands while keeping elbows at sides to prevent the camera from shaking.
2.Correct.
In the vertical position, hold the camera with its flash positioned at the top.
3.Incorrect.
Caution:
keep your fingers and the strap away from the lens, lens barrier, autofocus windows and flash. (See p. 6)
15
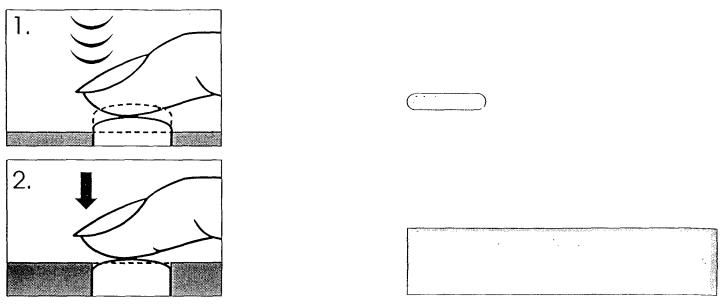
Proper Shutter Release.
Practice before loading the film.
1. Depress the shutter release button halfway to lock the focus.
Make sure.
The green lamp next to the viewfinder lights.
2. Depress the shutter release button fully to release the shutter and take the picture.
Cautions:
•Press the shutter release button gently.
•Avoid shaking the camera when pressing the
16 |
shutter release button to prevent blurry pictures. |

BASIC OPERATIONS
LOADING THE FILM
1. Slide the back cover release upward to open the back cover.
Do not touch the inside of the camera, especially the lens. If there is dust or dirt on the lens, remove it with a blower brush.
2. Insert the film cartridge, making sure the film is lying flat.
Note: Use of ISO 400 film is recommended.
When using non-DX-coded film, use ISO 100 film.
17
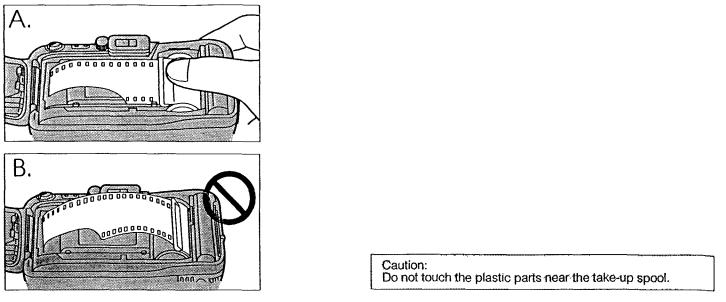
A.
B.
Correct.
Make sure the film is lying flat before closing the back cover.
Incorrect.
If the film is not lying flat as shown, the film may not advance to the first frame.
18
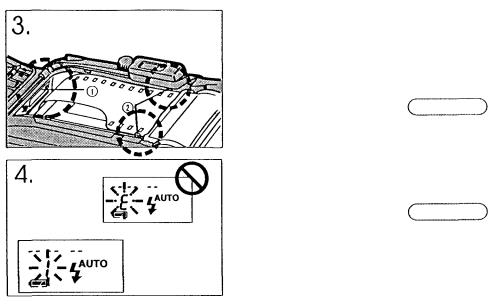
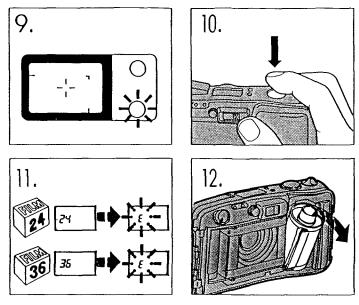
3. Align the film leader with the mark  , and close the back cover.
The film automatically advances to the first frame.
Make sure
The film does not overlap any of the positioning guides shown on the left.
4. Turn the power switch ON.
Make sure
The exposure counter on the LCD panel reads 
Note:
If  blinks in the exposure counter, as shown on the left,
the film is improperly loaded. Reload the film.
19
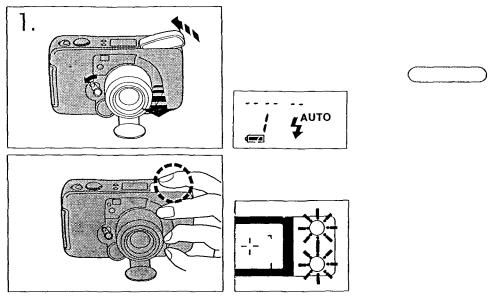
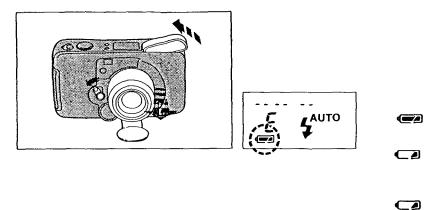
TAKING PICTURES
1. Turn the power switch ON.
Make sure
The lens extends slightly, the flash pops up, and the LCD panel activates.
When the flash is held down, the two indicators next to the viewfinder blink. The camera will not activate.
The display also goes out.
Release the flash to reactivate the camera.
20
 Loading...