


 Loading...
C9000 Series
Configuration Guide
C9655n
C9655dn
C9655hdn
C9655hdtn
TM
 C9000
C9000
PREFACE
Every effort has been made to ensure that the information in this document is complete, accurate, and up-to-date. The manufacturer assumes no responsibility for the results of errors beyond its control. The manufacturer also cannot guarantee that changes in software and equipment made by other manufacturers and referred to in this guide will not affect the applicability of the information in it. Mention of software products manufactured by other companies does not necessarily constitute endorsement by the manufacturer.
While all reasonable efforts have been made to make this document as accurate and helpful as possible, we make no warranty of any kind, expressed or implied, as to the accuracy or completeness of the information contained herein.
The most up-to-date drivers and manuals are available from the Oki web site: http://www.okiprintingsolutions.com
07116601 iss. 1; Copyright © 2010 Oki Europe Ltd. All rights reserved. Oki is a registered trademark of Oki Electric Industry Company, Ltd. Oki Printing Solutions is a trademark of Oki Data Corporation.
Microsoft, MS-DOS and Windows are registered trademarks of Microsoft Corporation. Apple, Macintosh, Mac and Mac OS are registered trademarks of Apple Inc.
Other product names and brand names are registered trademarks or trademarks of their proprietors.
Preface > 2
CONTENTS
Preface . . . . . . . . . . . . . . . . . . . . . . . . . . . . . . . . . . . . . . . . . . . . . . . . . . .2 Contents . . . . . . . . . . . . . . . . . . . . . . . . . . . . . . . . . . . . . . . . . . . . . . . . . .3 Notes, cautions and warnings. . . . . . . . . . . . . . . . . . . . . . . . . . . . . . . . . .6
Introduction . . . . . . . . . . . . . . . . . . . . . . . . . . . . . . . . . . . . . . . . . . . . . . .7
Sections . . . . . . . . . . . . . . . . . . . . . . . . . . . . . . . . . . . . . . . . . . . . . . . . 7 Specifications . . . . . . . . . . . . . . . . . . . . . . . . . . . . . . . . . . . . . . . . . . . . 8 Network summary printout. . . . . . . . . . . . . . . . . . . . . . . . . . . . . . . . . . . 9 Configuration methods. . . . . . . . . . . . . . . . . . . . . . . . . . . . . . . . . . . . . .10
Section 1: configuring the print server . . . . . . . . . . . . . . . . . . . . . . . . . .11
Using the adminmanager quick setup. . . . . . . . . . . . . . . . . . . . . . . . . . .12
Introduction . . . . . . . . . . . . . . . . . . . . . . . . . . . . . . . . . . . . . . . . . . . . .12 Using quick setup . . . . . . . . . . . . . . . . . . . . . . . . . . . . . . . . . . . . . . . . .12
Using adminmanager standard setup . . . . . . . . . . . . . . . . . . . . . . . . . . .14
Installing AdminManager . . . . . . . . . . . . . . . . . . . . . . . . . . . . . . . . . . . .14 The AdminManager interface . . . . . . . . . . . . . . . . . . . . . . . . . . . . . . . . .16 Pull-down menus. . . . . . . . . . . . . . . . . . . . . . . . . . . . . . . . . . . . . . . . . .16 File menu . . . . . . . . . . . . . . . . . . . . . . . . . . . . . . . . . . . . . . . . . . . . .16 Status menu . . . . . . . . . . . . . . . . . . . . . . . . . . . . . . . . . . . . . . . . . . .16 Setup menu . . . . . . . . . . . . . . . . . . . . . . . . . . . . . . . . . . . . . . . . . . .16 Option menu. . . . . . . . . . . . . . . . . . . . . . . . . . . . . . . . . . . . . . . . . . .27 Help menu . . . . . . . . . . . . . . . . . . . . . . . . . . . . . . . . . . . . . . . . . . . .29
Using a web browser. . . . . . . . . . . . . . . . . . . . . . . . . . . . . . . . . . . . . . . .30
Launching the web browser . . . . . . . . . . . . . . . . . . . . . . . . . . . . . . . . . .30 Changing the password . . . . . . . . . . . . . . . . . . . . . . . . . . . . . . . . . . . . .32
Using TELNET . . . . . . . . . . . . . . . . . . . . . . . . . . . . . . . . . . . . . . . . . . . . .33
Example TELNET configuration . . . . . . . . . . . . . . . . . . . . . . . . . . . . . . . .33
Section 2: utilities . . . . . . . . . . . . . . . . . . . . . . . . . . . . . . . . . . . . . . . . . .35 Management utility - PrintSuperVision (Windows only). . . . . . . . . . . . .36
Oki LPR printing utility (Windows only) . . . . . . . . . . . . . . . . . . . . . . . . .37
System requirement . . . . . . . . . . . . . . . . . . . . . . . . . . . . . . . . . . . . . . .37 Installing the Oki LPR utility . . . . . . . . . . . . . . . . . . . . . . . . . . . . . . . . . .37 Using Oki LPR . . . . . . . . . . . . . . . . . . . . . . . . . . . . . . . . . . . . . . . . . . . .38 Uninstalling the Oki LPR utility . . . . . . . . . . . . . . . . . . . . . . . . . . . . . . . .38
Section 3: printing from Windows. . . . . . . . . . . . . . . . . . . . . . . . . . . . . .39
Installing a network printer . . . . . . . . . . . . . . . . . . . . . . . . . . . . . . . . . .40
Using the oki driver installer . . . . . . . . . . . . . . . . . . . . . . . . . . . . . . . . . .40 Why use the oki driver installer? . . . . . . . . . . . . . . . . . . . . . . . . . . . . .40 Using the add printer wizard. . . . . . . . . . . . . . . . . . . . . . . . . . . . . . . . . .40 Method summary . . . . . . . . . . . . . . . . . . . . . . . . . . . . . . . . . . . . . . .40 About the different methods . . . . . . . . . . . . . . . . . . . . . . . . . . . . . . . .41
Section 4: printing using MacOS . . . . . . . . . . . . . . . . . . . . . . . . . . . . . . .42
Overview . . . . . . . . . . . . . . . . . . . . . . . . . . . . . . . . . . . . . . . . . . . . . . . . .43
Setting up a network printer. . . . . . . . . . . . . . . . . . . . . . . . . . . . . . . . . .43
Network summary printout. . . . . . . . . . . . . . . . . . . . . . . . . . . . . . . . . . .44
Contents > 3
MacOS printer setup utility . . . . . . . . . . . . . . . . . . . . . . . . . . . . . . . . . . .45
Installing the printer setup utility . . . . . . . . . . . . . . . . . . . . . . . . . . . . . .45 The printer setup utility interface . . . . . . . . . . . . . . . . . . . . . . . . . . . . . .46 menu options . . . . . . . . . . . . . . . . . . . . . . . . . . . . . . . . . . . . . . . . . . . .46 Discover printers . . . . . . . . . . . . . . . . . . . . . . . . . . . . . . . . . . . . . . . .46 Printer status monitor . . . . . . . . . . . . . . . . . . . . . . . . . . . . . . . . . . . .46 Printer NIC card summary/system status . . . . . . . . . . . . . . . . . . . . . . .47 Change settings/Oki device setup . . . . . . . . . . . . . . . . . . . . . . . . . . . .47 Open web browser/configuration via http . . . . . . . . . . . . . . . . . . . . . . .50 Change utility preferences/environment setup . . . . . . . . . . . . . . . . . . .50
Connecting to your printer . . . . . . . . . . . . . . . . . . . . . . . . . . . . . . . . . . .52
Snow leopard (10.6) and leopard (10.5) . . . . . . . . . . . . . . . . . . . . . . . . .52 USB . . . . . . . . . . . . . . . . . . . . . . . . . . . . . . . . . . . . . . . . . . . . . . . . .52 Bonjour . . . . . . . . . . . . . . . . . . . . . . . . . . . . . . . . . . . . . . . . . . . . . .52 AppleTalk (Leopard only) . . . . . . . . . . . . . . . . . . . . . . . . . . . . . . . . . .52 TCP/IP connection . . . . . . . . . . . . . . . . . . . . . . . . . . . . . . . . . . . . . . .52
Tiger (10.4) . . . . . . . . . . . . . . . . . . . . . . . . . . . . . . . . . . . . . . . . . . . . .53 Bonjour, AppleTalk or USB . . . . . . . . . . . . . . . . . . . . . . . . . . . . . . . . .53 TCP/IP connection . . . . . . . . . . . . . . . . . . . . . . . . . . . . . . . . . . . . . . .53 Panther (10.3) . . . . . . . . . . . . . . . . . . . . . . . . . . . . . . . . . . . . . . . . . . .54 Rendezvous . . . . . . . . . . . . . . . . . . . . . . . . . . . . . . . . . . . . . . . . . . .54 IP connection . . . . . . . . . . . . . . . . . . . . . . . . . . . . . . . . . . . . . . . . . .55 AppleTalk connection . . . . . . . . . . . . . . . . . . . . . . . . . . . . . . . . . . . . .55 USB connection. . . . . . . . . . . . . . . . . . . . . . . . . . . . . . . . . . . . . . . . .56
Configuring printer hardware options. . . . . . . . . . . . . . . . . . . . . . . . . . .57 Section 5: troubleshooting . . . . . . . . . . . . . . . . . . . . . . . . . . . . . . . . . . .58
Network summary printout. . . . . . . . . . . . . . . . . . . . . . . . . . . . . . . . . . .59
Network summary does not print . . . . . . . . . . . . . . . . . . . . . . . . . . . . . .59 An error is printed in the network summary . . . . . . . . . . . . . . . . . . . . . . .59 EEPROM check registers an error. . . . . . . . . . . . . . . . . . . . . . . . . . . . . . .59
TCP/IP. . . . . . . . . . . . . . . . . . . . . . . . . . . . . . . . . . . . . . . . . . . . . . . . . . .60
Printer cannot find the network interface card. . . . . . . . . . . . . . . . . . . . . .60 Cannot print with lpr and ftp. . . . . . . . . . . . . . . . . . . . . . . . . . . . . . . . . .60 Incorrect user name on the banner page . . . . . . . . . . . . . . . . . . . . . . . . .60
NetBEUI. . . . . . . . . . . . . . . . . . . . . . . . . . . . . . . . . . . . . . . . . . . . . . . . . .61
The network interface card is not identified . . . . . . . . . . . . . . . . . . . . . . .61 Error writing to prn1 . . . . . . . . . . . . . . . . . . . . . . . . . . . . . . . . . . . . . . .61
Mac . . . . . . . . . . . . . . . . . . . . . . . . . . . . . . . . . . . . . . . . . . . . . . . . . . . . .62
Blank pages or garbled text printed . . . . . . . . . . . . . . . . . . . . . . . . . . . . .62 No printing or print queue stopped . . . . . . . . . . . . . . . . . . . . . . . . . . . . .62
Web browser . . . . . . . . . . . . . . . . . . . . . . . . . . . . . . . . . . . . . . . . . . . . . .63
Microsoft internet explorer . . . . . . . . . . . . . . . . . . . . . . . . . . . . . . . . . . .63 Mozilla Firefox. . . . . . . . . . . . . . . . . . . . . . . . . . . . . . . . . . . . . . . . . . . .63
Contents > 4
Appendix: the printer menu . . . . . . . . . . . . . . . . . . . . . . . . . . . . . . . . . .64
Menu basics . . . . . . . . . . . . . . . . . . . . . . . . . . . . . . . . . . . . . . . . . . . . .64 Top level functions . . . . . . . . . . . . . . . . . . . . . . . . . . . . . . . . . . . . . .64 Special menu . . . . . . . . . . . . . . . . . . . . . . . . . . . . . . . . . . . . . . . . . .64 Overview . . . . . . . . . . . . . . . . . . . . . . . . . . . . . . . . . . . . . . . . . . . . . . .64 Table conventions used . . . . . . . . . . . . . . . . . . . . . . . . . . . . . . . . . . .64
Functions menu tree: admin setup,
calibration, print statistics. . . . . . . . . . . . . . . . . . . . . . . . . . . . . . . . .65 Boot menu tree . . . . . . . . . . . . . . . . . . . . . . . . . . . . . . . . . . . . . . . . .68 Printer menu: making changes in the menu . . . . . . . . . . . . . . . . . . . . . . .68 Making changes in the function menu . . . . . . . . . . . . . . . . . . . . . . . . .68 Making changes in the boot menu . . . . . . . . . . . . . . . . . . . . . . . . . . . .69 Printer menu: functions list . . . . . . . . . . . . . . . . . . . . . . . . . . . . . . . . . .70 Admin setup . . . . . . . . . . . . . . . . . . . . . . . . . . . . . . . . . . . . . . . . . . .70 Calibration menu. . . . . . . . . . . . . . . . . . . . . . . . . . . . . . . . . . . . . . . .81 Print statistics menu . . . . . . . . . . . . . . . . . . . . . . . . . . . . . . . . . . . . .83 Printer menu: boot menu . . . . . . . . . . . . . . . . . . . . . . . . . . . . . . . . . . . .83 Parallel setup . . . . . . . . . . . . . . . . . . . . . . . . . . . . . . . . . . . . . . . . . .84 USB setup . . . . . . . . . . . . . . . . . . . . . . . . . . . . . . . . . . . . . . . . . . . .84 Security setup. . . . . . . . . . . . . . . . . . . . . . . . . . . . . . . . . . . . . . . . . .85 Storage setup . . . . . . . . . . . . . . . . . . . . . . . . . . . . . . . . . . . . . . . . . .85 Power setup . . . . . . . . . . . . . . . . . . . . . . . . . . . . . . . . . . . . . . . . . . .86 Language setup. . . . . . . . . . . . . . . . . . . . . . . . . . . . . . . . . . . . . . . . .86
Index. . . . . . . . . . . . . . . . . . . . . . . . . . . . . . . . . . . . . . . . . . . . . . . . . . . .87
Contents > 5
NOTES, CAUTIONS AND WARNINGS
NOTE
A note provides additional information to supplement the main text.
CAUTION!
A caution provides additional information which, if ignored, may result in equipment malfunction or damage.
WARNING!
A warning provides additional information which, if ignored, may result in a risk of personal injury.
Specifications subject to change without notice. All trademarks acknowledged.
Notes, cautions and warnings > 6

INTRODUCTION
NOTE
The network addresses used in this manual are shown for example only. Network addresses used in your installation should be within in the appropriate address range and have the correct subnet mask for your network segment.
The OkiLAN Internal Print Server is a fast 10BASE-T/100BASE-TX/1000Base-T network interface.
This network print server supports IEEE 802.2, IEEE 802.3, Ethernet-II and SNAP, and can detect those frame types automatically.
It supports major protocols such as TCP/IP, EtherTalk (Mac) and NetBEUI (Windows).
The print server has a number of security features, including SSL/TLS, IP Filtering, disabling unused protocols, etc.
Password protection ensures that the print server is safe from unauthorised changes in settings. You can also restrict access by disabling network services, protocols, and ports you are not using. You can limit access to specific authorised IP addresses as well.
The SMTP feature allows you to have an E-mail sent to designated addresses when certain errors occur.
NOTE
Change the emulation in the Printer Menu settings to Auto or PS before printing the network summary.
SECTIONS
This book is divided into the following sections:
>“Section 1: configuring the print server” on page 11
>“Section 2: utilities” on page 35
>“Section 3: printing from Windows” on page 39
>“Section 4: printing using MacOS” on page 42
>“Section 5: troubleshooting” on page 58
Introduction > 7
SPECIFICATIONS
Frame types |
IEEE 802.2 |
|
|
IEEE 802.3 |
|
|
Ethernet-II, SNAP, AUTO |
|
|
|
|
Network |
1000BASE-T |
|
interface |
100BASE-TX |
|
|
||
|
10BASE-T |
|
|
|
|
Network |
TCP/IP |
|
protocols |
> |
Network layer: ARP, RARP, IP, ICMP, PnP |
|
> Session layer: TCP, UDP |
|
|
> Application layer: PR, FTP, TELNET, HTTP, IPP, BOOTP, DHCP, |
|
|
|
SNMP, DNS, SMTP, POP3 |
|
IPX/SPX (NetWare) |
|
|
> Remote printer mode (up to eight file servers and 32 queues) |
|
|
> Print server mode (up to eight print servers) |
|
|
> Encrypted password supported in print server mode |
|
|
> |
SNMP |
|
EtherTalk: ELAP, AARP, DDP, AEP, NBP, ZIP, RTMP, ATP, PAP |
|
|
AppleTalk |
|
|
Bonjour |
|
|
NetBEUI: SMB, NetBIOS |
|
|
|
|
Supported |
Windows |
|
Operating |
> |
7 |
Systems |
> |
Server 2008 |
|
> |
Vista |
|
> |
XP |
|
> |
2000 |
|
Mac OS X 10.3.9 or later |
|
|
|
|
Print Service |
LPR |
|
|
FTP |
|
|
Port 9100 |
|
|
Web Direct Printing |
|
|
QSERVER Binder |
|
|
QSERVER NDS |
|
|
|
|
Functions |
Self-diagnostic test printing |
|
|
Banner supported |
|
|
Monitoring/configure by Web browser |
|
|
Printer status notification by E-Mail |
|
|
|
|
Introduction > 8
NETWORK SUMMARY PRINTOUT
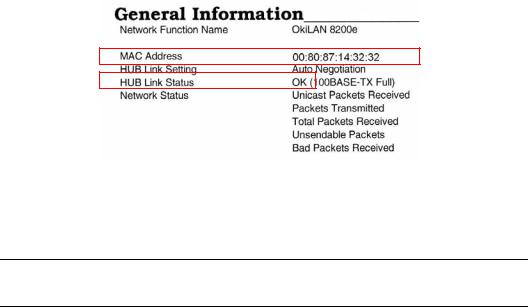
The printer server’s network summary reports the printer’s MAC Address (Ethernet address).
1.Turn the printer on.
2.Press the print server Test button for more than three seconds and release.
The printer’s MAC Address (Ethernet address) appears on the first page under General Information.
The first six digits of the MAC Address are the same for all OkiLAN print servers.
The last six digits of the MAC Address are unique to each OkiLAN and are required to set up the print server.
The hub link status results are also printed (normally “OK”).
NOTE
If anything other than “OK” is displayed see page 59.
Introduction > 9
CONFIGURATION METHODS
You can configure the print server by using one of the following methods:
UTILITY |
FEATURES |
SYSTEM REQUIREMENTS |
|
|
|
|
|
Quick Setup |
Configure the print server easily and |
Windows* |
|
(see page 12) |
simply without installing any |
> |
7 |
|
software packages into your system. |
> |
Server 2008 |
|
You can set the following: |
> |
Vista |
|
> Enable/disable TCP/IP, EtherTalk, |
> |
XP |
|
> |
2000 |
|
|
NetBEUI protocols. |
||
|
> Set IP address, Subnet Mask and |
* with TCP/IP protocol or IPX/ |
|
|
Gateway for TCP/IP manually or by |
SPX protocol installed. |
|
|
using DHCP. |
|
|
|
> Zone name and Port name for |
|
|
|
EtherTalk. |
|
|
|
|
|
|
AdminManager |
Configure the print server in detail. |
|
|
|
|
|
|
Web Browser |
Configure the print server and |
Microsoft Internet Explorer or |
|
|
printer by using a Web browser. |
similar. |
|
|
|
Operating system that supports |
|
|
|
the Web browser. |
|
|
|
|
|
TELNET |
Configure the print server using |
Third-party vendor developed |
|
|
TELNET. |
TELNET client package. |
|
|
|
A TELNET Application is |
|
|
|
standard in Windows. |
|
|
|
|
|
SNMP |
The printer and network card can be |
Third-party vendor developed |
|
|
controlled using a third-party vendor |
SNMP application. |
|
|
developed SNMP application. |
|
|
|
|
|
|
Introduction > 10
SECTION 1: CONFIGURING THE PRINT SERVER
This section explains the various ways you can configure your print server. It consists of the following:
>“Using the adminmanager quick setup” on page 12
>“Using a web browser” on page 30
>“Using adminmanager standard setup” on page 14
>“Using TELNET” on page 33
Section 1: configuring the print server > 11

USING THE ADMINMANAGER QUICK SETUP
INTRODUCTION
NOTE
>This utility can only be used on a PC that can be connected to the network with TCP/IP or IPX/SPX.
>This utility must be used on a PC that is located in the same segment as the printer.
The AdminManager Quick Setup utility allows you to configure the print server easily and simply without installing any software packages.
You can configure the following:
>Enable/disable TCP/IP, EtherTalk, NetBEUI protocols.
>Set IP address, Subnet Mask and Gateway for TCP/IP manually or by using DHCP.
>Set NetWare mode and create Queue/Print Server/Printer objects.
>Zone name and Port name for EtherTalk.
USING QUICK SETUP
1.Insert the Network & Utilities CD/DVD into the CD/DVD-ROM drive and wait for it to autorun.
If the installer does not start automatically, click Start > Run and enter E:\Setup (where E is your CD/DVD-ROM drive) in the Open field, then click OK.
2.Select the appropriate language.
3.Accept the Software License Agreement if you have not previously accepted it.
NOTE
Installation enables the user to create network queues and perform other functions.
4.Select Device Configuration (a).
5.Then select Install Network card setup (b).
a
b
6.If required, select the appropriate language.
Using the adminmanager quick setup > 12
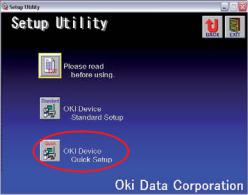
7.Select Oki Device Quick Setup and follow the on-screen instructions.
8.When you are done making your selections, review them and if they are correct, click Execute.
The new settings are transmitted to the network card, but the network card is still operating with pre-transmission settings.
9.Click Finish to validate the new settings. The print server re-initialises.
Using the adminmanager quick setup > 13

USING ADMINMANAGER STANDARD SETUP
AdminManager Standard Setup is a powerful Microsoft Windows-based utility for configuring all print server functions using a graphical user interface.
NOTE
>This utility can only be used on a PC that can be connected to the network with TCP/IP or IPX/SPX.
>This utility must be used on a PC that is located in the same segment as the printer.
INSTALLING ADMINMANAGER
1.Insert the Network & Utilities CD/DVD into the CD/DVD-ROM drive and wait for it to autorun.
If the installer does not start automatically, click Start > Run and enter E:\Setup (where E is your CD/DVD-ROM drive) in the Open field, then click OK.
2.Select the appropriate language.
3.Accept the Software License Agreement if you have not previously accepted it, then select Network Card Standard Setup.
4.Select the Network Card Setup tab (a).
5.Then select Install Network card setup (b).
a
b
6.If required, select the appropriate language.
Using adminmanager standard setup > 14
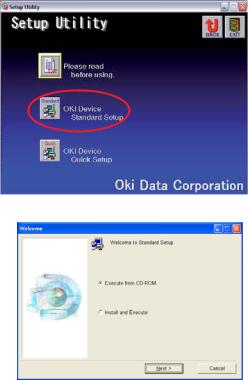
7.Click Oki Device Standard Setup.
The Welcome window displays.
Here you can choose:
>run the utility from the CD/DVD Execute from CD-ROM
>load the utility onto your hard drive and run it from there Install and Execute
8.Click Next.
(a)If you selected Install and Execute, follow the on-screen instructions to install AdminManager, then see the “The AdminManager interface” on page 16.
(b)If you selected Execute from CD-ROM, see the “The AdminManager interface” on page 16.
Using adminmanager standard setup > 15

THE ADMINMANAGER INTERFACE
NOTE
To open the standard version of AdminManager from your desktop, click
Start > Programs > OKI Setup Utility > Admin Manager.
PULL-DOWN MENUS
FILE MENU
>Search
Locates and lists all printers in your network which have an Oki compatible network card installed.
>Exit
Exit the program.
STATUS MENU
>Printer Status
Displays the current status of the printer.
>System Status
Displays the current network card configuration. The configuration data can be saved as a log file.
>List of Configuration Items
Displays current configuration. Configuration data can be saved as a log file.
SETUP MENU
>Oki Device Setup
Use this to configure the print server card.
General Tab (Oki Device Setup)
The General tab allows you to change the admin password.
1.Click Change.
2.Enter the current value, then enter the new value and re-enter it under Confirm ….
NOTE
The default admin password is the last six digits of the MAC Address, minus any punctuation marks. e.g., for a MAC (Ethernet) Address of 00:80:87:A4:55:79, the password would be A45579.
3.Click OK.
Using adminmanager standard setup > 16

TCP/IP Tab (Oki Device Setup)
ITEM |
COMMENTS |
|
|
Use TCP/IP Protocol |
Enable/disable TCP/IP protocol. |
|
|
Use DHCP/BOOTP |
Click to select this item if the IP address, subnet mask, default |
|
gateway and IP addresses for DNS primary server and |
|
secondary servers are retrieved from the DHCP or BOOTP |
|
server. |
|
|
Use IPv6 |
Use to enable/disable IPv6. |
|
|
Use Windows Rally |
Windows Vista and above only: Use to discover and |
|
configure devices over a network. |
|
|
IP Address |
Set the IP address of the selected network interface card. |
|
|
Subnet Mask |
Set the subnet mask of the selected network interface card. |
|
|
Default Gateway |
Set the default gateway of the selected network interface card. |
|
|
Auto Discovery… |
Use to enable/disable Network PnP and Bonjour, and to set the |
|
Device Name. |
|
|
DNS Server… |
Set IP addresses for DNS primary and secondary servers. |
|
|
WINS Server… |
Use to set IP addresses for primary and secondary servers, |
|
and to enter a Scope ID. |
|
|
Using adminmanager standard setup > 17
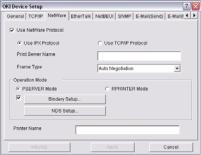
Netware Tab (Oki Device Setup)
ITEM |
COMMENTS |
|
|
|
|
|
|
Use NetWare Protocol |
Enable/disable NetWare protocol. |
||
|
|
||
Use IPX Protocol |
Click to deselect if you do not wish to use IPX. |
||
|
|
||
Use TCP/IP Protocol |
Click this to select TCP/IP protocol. |
||
|
|
|
|
Print Server Name |
Set a Print Server name. |
|
|
|
|
||
Frame Type |
Set the primary NetWare frame type. |
||
|
|
|
|
Operation Mode |
Select the NetWare mode: |
|
|
|
PSERVER Mode (the default) |
|
|
|
RPRINTER Mode |
|
|
|
|
||
Bindery Setup check |
Click to deselect Bindery. When Bindery Setup is deselected, |
||
box. |
the Bindery Setup… button is greyed out. |
||
|
|
||
Bindery Setup |
Configure Bindery mode items, including: |
||
|
|
|
|
|
File Server to be connected. |
|
Specify up to 8 file servers to |
|
|
|
connect. |
|
|
|
|
|
Password. |
|
Set a password for the Print |
|
|
|
Server. |
|
|
|
|
|
Job Polling Time |
|
Set the print job polling |
|
|
|
interval in seconds. |
|
|
|
|
NDS Setup |
Set the NDS Tree and Context where the Print Server was |
||
|
created. |
|
|
|
|
||
RPRINTER Setup |
Appears if you select RPRINTER mode under Operation Mode. |
||
|
The following can be configured: |
|
|
|
|
|
|
|
Print server to be connected. |
|
Specify up to 8 file servers to |
|
|
|
connect. |
|
|
|
|
|
Time Out |
|
Set the duration from the |
|
|
|
last data’s arrival to freeing |
|
|
|
of the port, in seconds. |
|
|
|
|
Printer Name |
Set the NetWare printer object name. |
||
|
|
|
|
Using adminmanager standard setup > 18

EtherTalk Tab (Oki Device Setup)
ITEM |
COMMENTS |
|
|
Use EtherTalk Protocol |
Enable/disable EtherTalk protocol. |
|
|
Printer Name |
Set the EtherTalk Printer object name. |
|
|
Zone Name |
Set the name of the zone to which the print server belongs. |
|
|
NetBEUI Tab (Oki Device Setup)
ITEM |
COMMENTS |
|
|
Use NetBEUI Protocol |
Enable/disable NetBEUI protocol. |
|
|
Short Printer Name |
Set a name for the print server. |
|
|
Workgroup |
Set a name for the work group to which the print server |
|
belongs. |
|
|
Comment |
Set the comments for the print server. |
|
|
Using adminmanager standard setup > 19
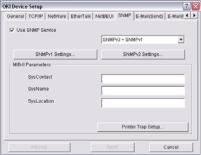
SNMP Tab (Oki Device Setup)
ITEM |
COMMENTS |
|
|
|
|
Use SNMP Service |
Enable/disable |
|
|
|
|
SNMPv1 settings |
SNMP Write community |
Change |
|
|
|
|
SNMP Read community |
Change |
|
|
|
SNMPv3 settings |
User name |
Set a user name. |
|
|
|
|
Authorization settings |
Options to Setup and Delete. |
|
|
|
|
Privacy (encryption) settings |
Options to Setup and Delete. |
|
|
|
SysContact |
Set the printer manager name. |
|
|
|
|
SysName |
Set the printer model name. |
|
|
|
|
SysLocation |
Set the location where the printer is installed. |
|
|
|
|
Printer Trap Setup… |
The following items can be configured: |
|
|
|
|
|
Printer Trap Community Name |
This community name is assigned to |
|
|
outgoing printer status traps such as |
|
|
off-line, paper out, etc. |
|
|
|
|
TCP #1 through TCP #5 |
Set up to five IP addresses to which a |
|
|
Trap packet will be sent. |
|
|
|
|
Detail… |
Click to enable sending a Trap packet |
|
[for TCP #1 through TCP #5] |
for any or all of the following selectable |
|
|
conditions: |
|
|
Printer Reboot |
|
|
Receive Illegal |
|
|
Online |
|
|
Offline |
|
|
Paper Out |
|
|
Paper Jam |
|
|
Cover Open |
|
|
Printer Error |
|
|
|
|
IPX |
Set node address and network address |
|
|
to which a Trap packet will be sent. |
|
|
|
|
Detail… [for IPX] |
Click to enable sending a Trap packet |
|
|
for any or all of the following selectable |
|
|
conditions: |
|
|
Online |
|
|
Offline |
|
|
Paper Out |
|
|
Paper Jam |
|
|
Cover Open |
|
|
Printer Error |
|
|
|
Using adminmanager standard setup > 20
E-mail(Send) Tab
ITEM |
COMMENTS |
|
|
|
|
|
|
Use SMTP Transmit |
Enable/disable sending E-mail using SMTP. |
||
|
|
||
SMTP Server Name |
Set the host name of the SMTP server. |
||
|
|
||
Printer E-mail Address |
Set the E-mail address that is used in the From field in the mail |
||
|
header. |
|
|
|
|
||
Destination Address 1… |
Set the following parameters: |
||
through 5… |
|
|
|
Destination |
Set E-mail address to which E-mail should be |
||
|
|||
|
Address |
sent. |
|
|
|
|
|
|
Notify Mode |
Select PERIOD or EVENT. |
|
|
|
|
|
|
When PERIOD is selected: |
||
|
|
|
|
|
Check Time |
Used to set the interval at which the selected |
|
|
|
events are checked. E-mail will be sent at that |
|
|
|
interval for each selected event which has |
|
|
|
occurred. |
|
|
|
|
|
|
Period Mode |
Set ON/OFF for the events listed. |
|
|
|
|
|
|
When EVENT is selected |
||
|
|
|
|
|
Event Mode |
Select Enable (ON), Disable (OFF) or Immediate |
|
|
|
(NoWait, e-mail is sent as soon as the event |
|
|
|
occurs) for the listed events. If Enable is |
|
|
|
selected, the check interval is settable in hours |
|
|
|
and/or minutes (0, 15, 30, or 45). |
|
|
|
|
|
Attach Info… |
Select whichever information is to be included in the E-mail. |
||
|
|
||
Comment… |
Set up to four lines of text to be included with the E-mail as |
||
|
comments. |
|
|
|
|
||
Authentication… |
Used to set the following security information: |
||
|
|
|
|
|
Use SMTP |
Enable/disable SMTP authentication. |
|
|
Authentication |
|
|
|
|
|
|
|
User ID |
Set the user ID for authentication. |
|
|
|
|
|
|
User Password |
Set a password for authentication. |
|
|
|
|
|
Others… |
Set the following items: |
||
|
|
|
|
|
SMTP Port |
Set the port number of SMTP (default is 25). |
|
|
Number |
|
|
|
|
|
|
|
Reply-To Address |
Set the E-mail address used for the Reply-To |
|
|
|
field in the mail header |
|
|
|
|
|
Using adminmanager standard setup > 21

E-mail(Receive) Tab (Oki Device Setup)
The print server supports an e-mail reception function (POP3) allowing the printer to print PDF and text files attached to e-mails.
Not all printers support this function. If the email receive tab is not displayed, your printer does not support this function.
ITEM |
COMMENTS |
|
|
|
|
Use POP Receive |
Enable/disable receiving E-Mail via POP3. |
|
|
|
|
POP3 Server |
Set the IP address or host name of the POP3 server. |
|
|
|
|
POP3 Server UserID |
Set User ID for POP3 server. |
|
|
|
|
POP3 Server Password |
Set a password for the POP3 server. |
|
|
|
|
POP Detail… |
Set the following: |
|
|
|
|
|
Use APOP |
Select if you want to use APOP. |
|
|
|
|
POP3 Port Number |
Set the port number for APOP (default is |
|
|
110). |
|
|
|
|
Mail Polling Time |
Set interval to retrieve E-Mail(s) from the |
|
|
POP3 server. Selectable values, OFF, 1min, |
|
|
5min (default), 10min, 30 min, 60 min. |
|
|
|
Use SMTP Receive |
Enable/disable SMTP receive. |
|
|
|
|
Domain Filter… |
Set the following: |
|
|
|
|
|
Use Domain Filter |
Enable/disable domain filtering. |
|
|
|
|
Filter Policy |
Select ACCEPT (the default) or DENY. |
|
|
|
|
Domain Filter |
Define up to five domain filters. |
|
|
|
Using adminmanager standard setup > 22

SNTP Tab (Oki Device Setup)
ITEM |
COMMENTS |
|
|
Use SNTP |
Enable/disable SNTP (Simple Network Time Protocol). |
|
|
NTP Server 1 Address |
Set the IP address or host name for NTP Server 1. |
|
|
NTP Server 2 Address |
Set the IP address or host name for NTP Server 2. |
|
|
Adjust Interval |
Set the interval for sending time update requests to the server. |
|
Select 1 hour (the default), 12 hours or 24 hours. |
|
|
Local Time Zone |
Set the local time zone from -12:00 to +13:00. Minute interval |
|
is selectable from 00 (the default), 15, 30 or 45. |
|
|
Daylight Saving |
When this is selected, one hour is added to the local time. |
|
|
Using adminmanager standard setup > 23

Maintenance Tab (Oki Device Setup)
ITEM |
COMMENTS |
|
|
|
|
LAN Scale |
Select NORMAL (the default) or SMALL. |
|
|
|
|
IP Filter Setup… |
The following items can be configured: |
|
|
|
|
|
Use IP FIlter |
Enable/disable IP Filtering. Default is disabled. |
|
|
|
|
Admin IP Address |
Enter the printer’s IP Address. |
|
|
|
|
IP Address Range |
Set up to 10 IP Filter address ranges: IP |
|
|
FIlter Range 1 through IIP Filter Range |
|
|
10. |
|
|
|
|
Printing |
Enable/disable printing of the specified IP |
|
|
address range. Default is disabled. |
|
|
|
|
Configuration |
Enable/disable changing IP address ranges. |
|
|
Default is disabled. |
|
|
|
Service… |
The following features can be selected by clicking their check box. |
|
|
TCP/IP Protocol |
|
|
NetBEUI Protocol |
|
|
NetWare Protocol |
|
|
EtherTalk Protocol |
|
|
FTP Service |
|
|
Use Telnet Service |
|
|
Use Web Service |
|
|
Use SNMP Service |
|
|
Use POP3 Protocol |
|
|
Use SNTP |
|
|
Use encrypted communication for configuration data |
|
|
|
|
Using adminmanager standard setup > 24

SSL/TLS Tab (Oki Device Setup)
ITEM |
COMMENTS |
|
|
|
|
|
|
Encryption |
Set the strength of encryption: |
||
Strength |
Strong = highest security, slowest speed |
||
|
|||
|
Standard = medium security, medium speed |
||
|
Weak = least security, fastest speed |
||
|
|
||
Self-signed |
For IPP encryption within an organisation’s internal network (intranet). |
||
Certificate |
|
|
|
|
|
||
Create |
When Self-signed Certificate is selected, the following items are configured: |
||
Certificate… |
|
|
|
Common Name |
The printer’s IP Address appears here. |
||
|
|||
|
|
|
|
|
Organisation |
Enter the name of your organization. |
|
|
|
|
|
|
Organisation Unit |
Optional. Allows you to enter a subdivision or department |
|
|
|
name. |
|
|
|
|
|
|
Locality |
Enter the name of the city where the organization is located. |
|
|
|
|
|
|
State/Province |
Enter the state or province where the organisation is located. |
|
|
|
|
|
|
Country/Region |
Enter the country or region where the organisation is |
|
|
|
located. |
|
|
|
|
|
|
Key Exchange Method |
Select RSA (the default) or Diffie-Hellman(DSS). |
|
|
|
|
|
|
Key size |
Select 512, 1024 (the default), or 2048 bits. |
|
|
|
|
|
|
Term of Validity |
Enter a starting and ending date (month/date/year) for |
|
|
|
which the certificate is valid. |
|
|
|
|
|
CA-signed |
Used for web encryption to provide security when printing over the internet. Requires |
||
Certificate… |
an outside certification service which must be purchased separately. |
||
|
|
||
Create |
When CA-signed Certificate is selected, the following items are configured: |
||
Certificate… |
|
|
|
Common Name |
The printer’s IP Address appears here. |
||
|
|||
|
|
|
|
|
Organisation |
Enter the name of your organisation. |
|
|
|
|
|
|
Organisation Unit |
Optional. Allows you to enter a subdivision or department |
|
|
|
name. |
|
|
|
|
|
|
Locality |
Enter the name of the city where the organization is located. |
|
|
|
|
|
|
State/Province |
Enter the state or province where the organisation is located. |
|
|
|
|
|
|
Country/Region |
Enter the country or region where the organisation is |
|
|
|
located. |
|
|
|
|
|
|
Key Exchange Method |
Select RSA (the default) or Diffie-Hellman(DSS). |
|
|
|
|
|
|
Key size |
Select 1024 (the default) or 2048 bits. |
|
|
|
|
|
Using adminmanager standard setup > 25

IEEE802.1X Tab (Oki Device Setup)
ITEM |
COMMENTS |
|
|
|
|
Use IEEE802.1X |
Enable/disable |
|
|
|
|
EAP Type |
The following items can be configured: |
|
|
|
|
|
EAP-TLS |
Use EAP-TLS protocol |
|
|
|
|
PEAP |
Use EAP-TLS protocol |
|
|
|
Use SSL/TLS |
Enable/disable |
|
Certificate |
|
|
|
|
|
Authenticate server |
Enable/disable |
|
|
|
|
Certificate |
Client certificate |
File: |
|
|
Password: |
|
|
Options to Import, Delete, View |
|
|
|
|
CA certificate |
File: |
|
|
Password: |
|
|
Options to Import, Delete, View |
|
|
|
>Setup by HTTP
Launches the default browser in your environment to access the selected printer’s web page.
>Setup by TELNET
Launches the TELNET application in your environment to access the selected printer’s TELNET port.
NOTE
The TELNET application is not included as part of the print server package. Install the TELNET package on to your system. For further information, see your Windows manual.
>Reset
Resets the selected network interface card.
>Test Print
Prints the network summary details (see page 9).
>IP Address Setup
Sets the static IP address of the network interface card manually. If you only use TCP/IP and the print server has not yet been configured, occasionally it may not be
Using adminmanager standard setup > 26

displayed on AdminManager. You can configure the IP address of the print server by this function.
(a)Enter the Ethernet Address (MAC Address) and the IP Address, then click
OK.
NOTE
The Ethernet (MAC) Address is displayed under “General Information” on the network summary printout (see page 9).
(b)AdminManager asks whether you want to initialise the network interface card or not. Select Yes.
NOTE
Even if you select No here, the IP address that you set can be used after turning the printer OFF and ON. The requirement to turn your printer OFF and ON is dependent on the network interface card.
OPTION MENU
>Use TCP/IP Protocol
If this item is selected, AdminManager uses TCP/IP protocol to search/configure network interface cards.
>Use IPX/SPX Protocol
If this item is selected, AdminManager uses IPX/SPX protocol to search/configure network interface cards.
>Environment Setup
Set environment items such as broadcast addresses for TCP/IP protocol, network addresses for NetWare protocol and Time Out.
Using adminmanager standard setup > 27
Loading...