


LD620D
User’s Guide

PREFACE
Every effort has been made to ensure that the information in this document is complete, accurate, and up-to-date. The manufacturer assumes no responsibility for the results of errors beyond its control. The manufacturer also cannot guarantee that changes in software and equipment made by other manufacturers and referred to in this manual will not affect the applicability of the information in it. Mention of software products manufactured by other companies does not necessarily constitute endorsement by the manufacturer.
While all reasonable efforts have been made to make this document as accurate and helpful as possible, we make no warranty of any kind, expressed or implied, as to the accuracy or completeness of the information contained herein.
All rights are reserved by Oki Data Corporation. Unauthorized copying, transferring, translating, or related actions are prohibited. You must obtain written permission from Oki Data Corporation before doing any of the above.
© 2012 Oki Data Corporation
OKI is a registered trademark of Oki Electric Industry Co., Ltd.
Energy Star is a trademark of the United States Environmental Protection Agency.
Microsoft, Windows, Windows Server and Windows Vista are registered trademarks of Microsoft Corporation.
Apple, Macintosh, Rosetta, Mac and Mac OS are registered trademarks of Apple Inc.
Other product names and brand names are registered trademarks or trademarks of their proprietors.
As an Energy Star Program Participant, the manufacturer has determined that this product meets the Energy Star guidelines for energy efficiency.
This product complies with the requirements of the Council Directives 2004/108/EC (EMC) , 2006/95/EC (LVD) , 1999/5/ EC (R&TTE) and 2011/65/EU(RoHS), as amended where applicable, on the approximation of the laws of the member states relating to Electromagnetic Compatibility, Low Voltage, Radio & Telecommunications Terminal Equipment, Energy
related Products and Restriction on the use of certain Hazardous Substances in electrical and electronic equipment.
The following cables were used to evaluate this product to achieve EMC directive 2004/108/EC compliance and configurations other than this may affect that compliance.
CABLE TYPE |
LENGTH |
CORE |
SHIELD |
|
(METRE) |
|
|
|
|
|
|
Power |
1.8 |
|
|
USB |
1.8 |
|
|
Serial |
1.8 |
|
|
Parallel |
1.8 |
|
|
- 2 -

MANUFACTURER
Oki Data Corporation, 4-11-22 Shibaura, Minato-ku, Tokyo 108-8551,
Japan
For all sales, support and general enquiries contact your local distributor.
IMPORTER TO THE EU/AUTHORISED REPRESENTATIVE
OKI Europe Limited (trading as OKI Printing Solutions)
Blays House
Wick Road
Egham
Surrey, TW20 0HJ
United Kingdom
For all sales, support and general enquiries contact your local distributor.
ENVIRONMENTAL INFORMATION
- 3 -
■ Table of Contents
Manual Information & Usage Precautions ····································································5
1.Content Confirmation ······································································································9
2.Product Part Names·······································································································10
3.Installation & Usage·······································································································12
3-1 Power Connection ······································································································12
3-2 Interface Cable Connection ························································································13
3-3 Paper Installation ········································································································14
3-4 LED Display················································································································15
3-5 Feed Button Operations······························································································16
4.Self-Test··························································································································16
5.Detailed features ············································································································17
5-1 Stand-alone Configuration Mode ················································································17 5-2 Media Length Measurement ·······················································································17 5-3 Pause/Resume ···········································································································18 5-4 Media Sensor Auto-Calibration ···················································································18 5-5 Gap Sensor Manual-Calibration··················································································19 5-6 Data Dump Mode········································································································20 5-7 The Peel-Off ···············································································································20 5-8 Using Fan-Fold Paper·································································································22
6.Cleaning Head················································································································23
6-1 Cleaning Head ············································································································23 6-2 Cleaning Sensors, Roller or/and Paper Path ······························································24
7.Appendix·························································································································25
7-1 Specifications··············································································································25
7-2 Label Types ················································································································25
Rev. 1.0 |
- 4 - |
LD620D
■ Manual Information
This user’s guide contains basic information for product usage as well as for emergency measures that may be required.
The following separate manuals provide more detailed content on various technological issues and areas.
1.Windows Driver Manual
This manual provides information on the installation instructions and main functions of the Windows Driver.
2. Unified Label Utility-II Manual
This manual provides information on the usage of software for function selection of this product, operating condition modification, etc.
3. Programming (SLCS) Manual
This manual provides information on label printer commands.
4. True Font Downloader Manual
This manual provides information on the usage of the font downloader that can downloade True Fonts and facilitate their usage as Device Fonts.
We at Oki Data maintain ongoing efforts to enhance and upgrade the functions and quality of all our products. In following, product specifications and/or user’s guide content may be changed without prior notice.
Rev. 1.0 |
- 5 - |
LD620D
■ Safety Precautions
In using the present appliance, please keep the following safety regulations in order to prevent any hazard or material damage.
WARNING
Violating following instructions can cause serious injury or death.
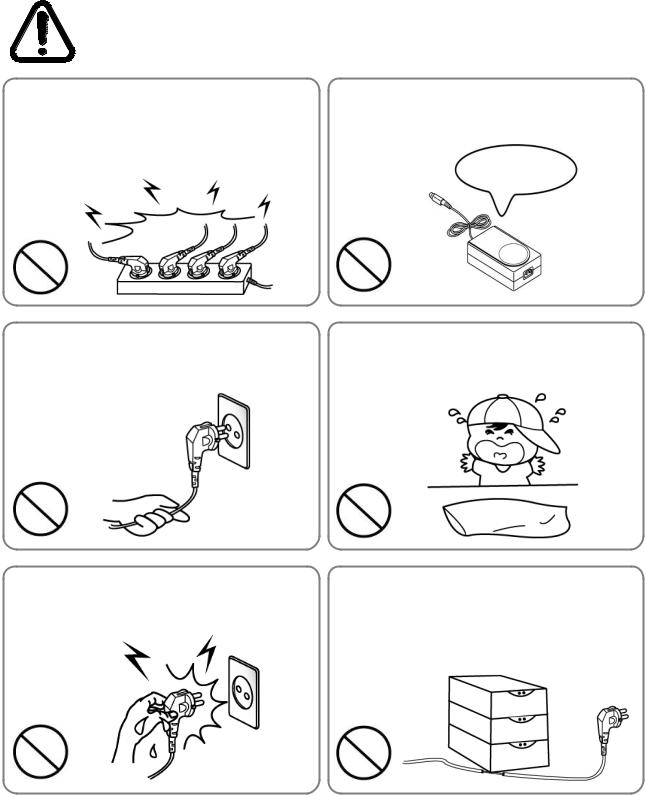
Do not plug several products in one multi-outlet.
•This can provoke over-heating and a fire.
•If the plug is wet or dirty, dry or wipe it before usage.
•If the plug does not fit perfectly with the outlet, do not plug in.
•Be sure to use only standardized multi-outlets.
You must use only the supplied adapter.
• It is dangerous to use other adapters.
ONLY SUPPLIED ADAPTER
PROHIBIT |
PROHIBIT |
Do not pull the cable to unplug.
•This can damage the cable, which is the origin of a fire or a breakdown of the printer.
Keep the plastic bag out of children’s reach.
• If not, a child may put the bag on his head.
PROHIBIT |
PROHIBIT |
Do not plug in or unplug with your hands wet.
• You can be electrocuted.
Do not bend the cable by force or leave it under any heavy object.
• A damaged cable can cause a fire.
PROHIBIT
PROHIBIT
Rev. 1.0 |
- 6 - |
LD620D
CAUTION
Violating following instructions can cause slight wound or damage the appliance.
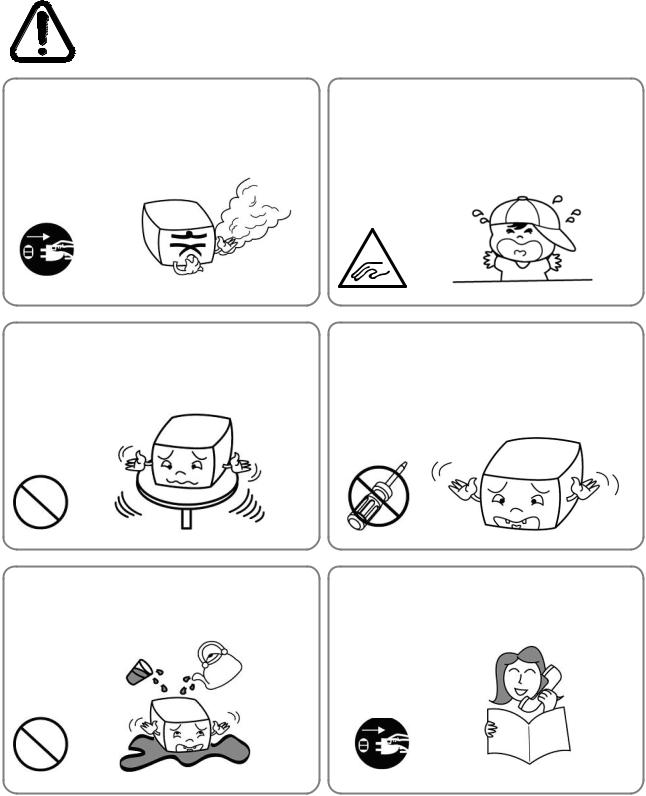
If you observe a strange smoke, odor or noise from the printer, unplug it before taking following measures.
•Switch off the printer and unplug the set from the mains.
•After the disappearance of the smoke, call your dealer to repair it.
Be careful not to get your fingers pinched when opening or closing the paper cover. Also be careful the paper cover does not slip off and drop.
|
|
MECHANICAL |
TO UNPLUG |
PRINTER |
HAZARD |
|
|
Install the printer on the stable surface.
•If the printer falls down, it can be broken and you can hurt yourself.
Use only approved accessories and do not try to disassemble, repair or remodel it for yourself.
•Call your dealer when you need these services.
•Do not touch the blade of manual cutter.
PRINTER |
DISASSEMBLING |
|
PROHIBIT |
PROHIBITED |
PRINTER |
|
Do not let water or other foreign objects in the |
Do not use the printer when it is out of order. This |
printer. |
can cause a fire or an electrocution. |
•If this happened, switch off and unplug the printer before calling your dealer.
• Switch off and unplug the printer before calling your dealer.
PROHIBIT |
PRINTER |
TO UNPLUG |
|
|
PRINTER
DEALER
Rev. 1.0 |
- 7 - |
LD620D
■ Other Precautions
The copyright for this user’s guide and various other manuals is property of the Oki Data Corporation. Any copying or conversion into electronic firm and saving of this material without the express written permission of Oki Data Corporation. is strictly prohibited.
Use of the information contained in this manual is not subject to any patent liability. This manual has been prepared with utmost care and attention to detail but may contain certain errors and/or omissions.
Oki Data Corporation. is not legally liable for any damages resulting from the use of the information in this manual.
Oki Data Corporation. and its affiliates are not legally liable (United States excluded) for any damages, loss, costs, and/or expenses that result from the breakdown, malfunction, and/or misuse of the product due to violation or neglect of the operation and maintenance information and instructions provided by the Oki Data Corporation., as well as from the unauthorized alteration, repair, and/or modification of the product by the user and/or third party.
Oki Data Corporation. is not legally liable for any damages and/or issues resulting from the use of options and/or parts that are not authentic Oki Data products or authorized products.
Rev. 1.0 |
- 8 - |
LD620D
1. Content Confirmation
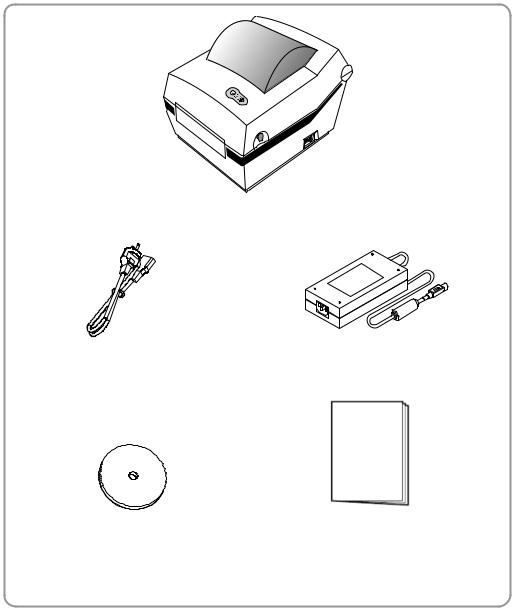
The following items should all be contained in the printer package.
Contact the dealer from which the purchase was made if any item is damaged and/or missing.
LD620D
Power Cord |
AC Adapter |
CD |
User Documents |
|
(Setup Guide, Safety, Warranty) |
Rev. 1.0 |
- 9 - |
LD620D
2. Product Part Names
Feed Button
 Power Switch
Cover Peel-off
Cover Lever
Printer Head
 Paper Cover
Paper Holder
Paper Gap Sensor
Paper Guide
Peel-off Sensor
Rev. 1.0 |
- 10 - |
LD620D
Fan-Fold
|
RS-232C Receptacle |
Power Receptacle |
IEEE1284 Receptacle |
|
|
|
USB Receptacle |
Rev. 1.0 |
- 11 - |
LD620D
3. Installation & Usage
CAUTION
-Be careful not to get your fingers pinched when opening or closing the paper cover. Also be careful the paper cover does not slip off and drop.
-When loading roll paper, be careful not to get your fingers pinched between the paper roll and the supply unit.
-Do not touch the cutter with your hands. Doing so could result in an injury.
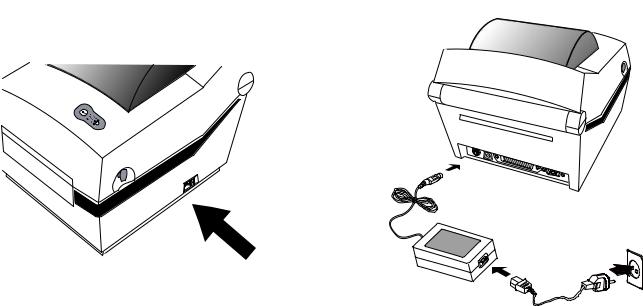
3-1 Power Connection
Connect power to the printer as shown below.
OFF
Power Switch |
AC Adapter |
|
Power Cord
1)Turn off the printer power switch.
2)Check to see that the AC adapter voltage matches that of the power source.
3)Connect the AC adapter jack to the printer power connector.
4)Connect the power cord to the AC adapter.
5)Connect the power cord to a power source/outlet.
Rev. 1.0 |
- 12 - |
LD620D
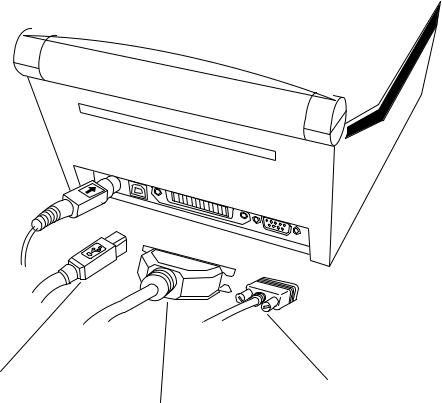
3-2 Interface Cable Connection
Connect the interface cable as shown below.
This printer supports the following communications interface standards.
-RS-232C (Serial)
-IEEE1284 (Parallel)
-USB
|
|
|
|
USB Cable |
RS-232 (Serial) Cable |
||
|
|
||
|
|
IEEE1284 (Parallel) Cable |
|
1)Turn off the power switch.
2)Connect the communication cable to the printer communication port to be used.
-Connect the RS-232C(Serial) Cable to the SERIAL port.
and tighten the screw on both sides.
This port requires a shielded cable less then 1.8m long.
-Connect the IEEE1284(Parallel) Cable to the PARALLEL port. and fasten the clips on both sides.
This port requires a shielded cable with ferrite core less then 1.8m long.
-Connect USB cable to the USB port.
This port requires a shielded cable less then 1.8m long.
Rev. 1.0 |
- 13 - |
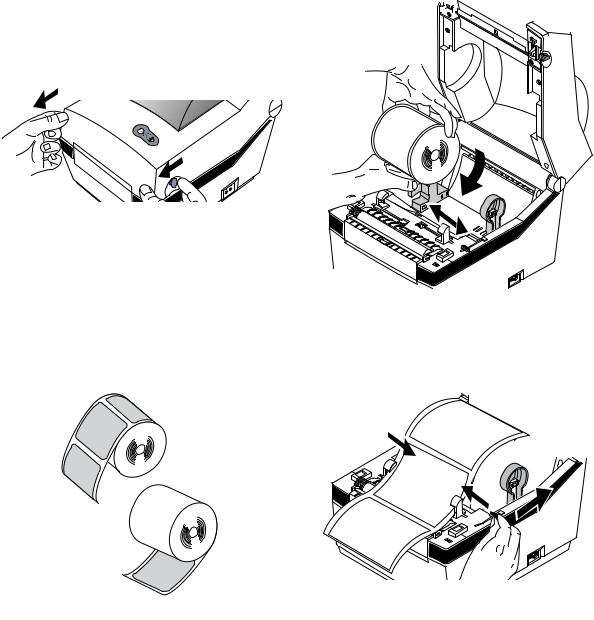
3-3 Paper Installation
1) Open the Paper Cover.
3) Keep note of paper printing direction.
5)Close the Paper Cover until a click sound is heard.
LD620D
2) Spread the paper holder and insert paper as shown.
4)Adjust the paper guide to the width of the paper.
Rev. 1.0 |
- 14 - |

LD620D
3-4 LED Display
Feed button |
Paper feed or cancel the print job. |
LED |
The current printer status can be viewed. (Refer to below) |
The current printer status can be viewed via the printer’s LED display.
1)Green LED on
-The printer waits for the data from Host (PC) in normal mode.
2)Orange LED on
-It means paper gap sensing error. It becomes on when the printer fails to detect the paper or paper jam occurred. When fails to detect the paper correctly use Auto-Calibration function.
3)Red LED on
-The printer has stopped by pressing FEED button. It restarts printing when pressed again.
4)Green LED blinking
-TPH (Thermal Printing Head) overheated or ;
-The printers is waiting for the button input to run Auto-Calibration function.
5)Orange LED blinking
-No paper. Make sure the paper is loaded correctly.
6)Red LED blinking
-The printer cover is open.
Rev. 1.0 |
- 15 - |
LD620D
3-5 Feed Button Operations
Feed Button can be used for various purposes as follows.
1) Feed Label
In Print Standby mode, pressed for shorter than 3 seconds, the printer feed one label.
2) Stand-alone Configuration Mode
In Print Standby mode, pressed for longer than 3 seconds, the printer enters into Standalone Configuration Mode. Please refer to 5-1 for details.
3) Pause and Resume printing
If pressed while printing labels, Printing toggled between Pause and Resume.
4. Self-Test
The self-test checks whether the printer has any problems.
(Users cannot perform this procedure if using the printer’s label peel-off option.) If the printer does not function properly, contact an authorized dealer.
The self-test checks the following;
1)Make sure that the paper roll has been installed properly.
2)Turn on the power while holding down the FEED button. The self-test begins. (It takes about 5 seconds before starting self-test)
3)The self-test prints the current printer configuration information.
4)After the self-test results are printed out, a printer enters into Print Standby Mode.
Rev. 1.0 |
- 16 - |
LD620D
5. Detailed features
5-1 Stand-alone Configuration Mode
Various modes can be executed by using button and LED status.
Please take following steps to start Stand-alone Configuration Mode and execute each function.
1)Make sure that a printer is in Print Standby Mode.
2)Depress the Feed button for about 3 seconds, then the LED changes to orange color.
3)Release the Feed button, then the printer starts the Standalone Configuration Mode and 6 numbers of LED status changes sequentially.
4)When the Feed button is depressed at specific LED status, the corresponding operation will be executed.
Function List of Stand-alone Configuration Mode.
|
Sequence |
|
|
|
LED |
|
|
Printer Operation |
|
||
|
Number |
|
|
Color |
|
|
Status |
|
|
|
|
|
|
|
|
|
|
|
|
|
|||
1 |
|
|
Green |
|
|
Blink 3 times |
|
|
NONE |
||
2 |
|
|
Orange |
|
|
Blink 3 times |
|
|
Factory Reset and Gap Calibration |
||
3 |
|
|
RED |
|
|
Blink 3 times |
|
|
Factory Reset and Black Mark Calibration |
||
4 |
|
|
Green |
|
|
Keep On |
|
|
NONE |
||
5 |
|
|
Orange |
|
|
Keep On |
|
|
Data Dump Mode |
||
6 |
|
|
Red |
|
|
Keep On |
|
|
Demo Mode |
||
* This information can be printed out by printer self-test.
5-2 Media Length Measurement
The printer needs to have the exact length of currently installed paper to make a proper print image.
For this, the printer automatically starts Media Length Measurement Mode in the following conditions.
1)When the printer has no measure length, for example first feeding after installation.
2)When the detected label length differs from the measured value.
In this mode, the printer feeds 2 or 3 labels to measure the exact length of label and saves the measured value on printer’s non-volatile memory.
Rev. 1.0 |
- 17 - |
LD620D
5-3 Pause/Resume
Press FEED button to pause at the middle of labels printing.
1)Press FEED once.
2)Printer stops after on-going printing and Red LED becomes on.
3)Press FEED once again. It resumes printing in a queue.
5-4 Media Sensor Auto-Calibration
Media sensor auto-calibration is used when the printer does not detect a gap or black mark on the label paper correctly.
Generally a printer is set to detect most types of gap or black mark but sometimes it fails to detect and keep feeding the paper without a stop when special paper used. In such case, use media sensor auto-calibration function for a proper detection.
1)Make sure that paper roll has been installed properly.
2)Use Stand-alone Configuration Mode, Sequence Number 2 or 3(refer to 5-1)
-Sequence Number 2: Gap Media Auto-Calibration
-Sequence Number 3: Black Mark Media Auto-Calibration.
Rev. 1.0 |
- 18 - |
LD620D
5-5 Gap Sensor Manual-Calibration
Manual-calibration of media detection can be used when the printer cannot detect a media gap (or black mark) even after auto-calibration has been executed.
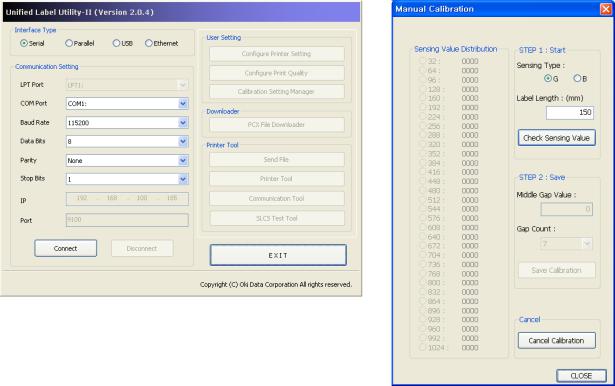
Users can calibrate sensor parameters in detail by using the utility program provided by the manufacturer.
The utility can be obtained from the enclosed CD.
Please make sure the printer is connected and execute the utility program. Please the Calibration Setting Manager Button after setting the interface type.
1)Select the sensing type and input the label length by millimeter and click on “Check Sensing Value” tap. Then printer starts to calibrate.
2)Printer will print the scanned values after calibration and the values will appear on the Screen.
3)Optimal sensing values will appear in black bold letters on the left of the utility screen and select one of the values and click on “Save Calibration”
4)If chosen value does not work properly, please try the other values among the black bold letters.
5)To go back to the initial value, please click on “Cancel Calibration”
Rev. 1.0 |
- 19 - |
LD620D
5-6 Data Dump Mode
This function can be used to diagnose the communication issues when the printer does not work correctly.
In this mode, the received data are not analyzed and printed, instead they are dumped in hex format without processing.
Turn the printer off and on to recover to the Print Standby Mode.
Use Stand-alone Configuration Mode, Sequence Number 5(refer to 5-1) to start Data Dump Mode
5-7 The Peel-Off
This function is used to automatically separate labels from the liner.
-The peeler is for Label Paper only.
-When the peeler switch is on, labels are not printed if previous printed labels have been removed from the peeler.
-When the peeler function is not required, turn the peeler switch off. Keeping the switch on may result in the printer not working correctly.
-When the peeler switch has been changed, the printer should be turned off and back on.
1)Open the peel-off cover and turn on the peeler switch. (Check if the peeler LED is on.)
P |
|
E |
|
ELER |
|
OFF |
ON |
|
|
LED
Rev. 1.0 |
- 20 - |
LD620D
2) Remove the paper and insert the paper through the slot.
Remove
3) Adjust the paper guides and close the cover.
( O ) |
( X ) |
4)Close the Paper Cover until a click sound is heard.
5)Turn the printer off and back on.
Rev. 1.0 |
- 21 - |

LD620D
5-8 Using Fan-Fold Paper
Insert paper through both the rear slot and guides.
Adjust holders and guides to the width of the paper.
1) Insert the paper at the rear of the printer and then open the Paper Cover.
2) Adjust Paper Holders to the paper width by using the Fix Tool.
3) Adjust Paper Guides and close the Paper Cover until a click sound is heard.
Paper Holder
Fix Tool
Rev. 1.0 |
- 22 - |
LD620D
6. Cleaning Head
Printing quality might be degraded by dust, foreign substance, adhesive substance, or other pollution materials stuck in the printer head or inside the printer.
When dirty, clean the print head as follows:
CAUTION
-Make sure to turn the printer power off prior to cleaning.
-As the print head gets very hot during printing, if intending to clean the print head, turn the printer power off and wait approximately 2~3 minute before commencement.
-When cleaning the print head, take care not to touch the heated portion of the print head.
→Printer Head is susceptible to damage from static electricity, etc.
-Take care not to allow the print head to become scratched and/or damaged in any way.
-Be careful not to get your fingers pinched when opening or closing the paper cover. Also be careful the paper cover does not slip off and drop.
-When loading roll paper, be careful not to get your fingers pinched between the paper roll and the supply unit.
-Do not touch the cutter with your hands. Doing so could result in an injury.
6-1 Cleaning Head
1)Open the Paper Cover and then use the cleaning pen to clean the head in the direction from the center of the head to the edges.
2)After cleaning the head, do not use the printer until the alcohol used for cleaning evaporates completely (1~2 min) and the printer has completely dried.
Perform the cleaning process each time the paper roll is replaced to prevent print quality deterioration.
Rev. 1.0 |
- 23 - |
LD620D
6-2 Cleaning Sensors, Roller or/and Paper Path
1)Open the Paper Cover and remove the paper.
2)Remove any dust or foreign substance using dry cloth or cotton swab.
3)Soak the cloth or cotton swab in alcohol for medical use and use it to remove adhesive foreign substances or other pollution materials.
4)After cleaning the parts, do not use the printer until the alcohol evaporates completely (1~2 min) and the printer has completely dried
Clean the parts when there is a degradation of performance in printing quality or paper detection.
Printer Head
 Paper Cover
Ridges
Paper Gap Sensor
Platen Roller |
Paper Holder |
|
|
Bracket P-off |
|
|
Paper Guide |
Peel-off Sensor |
Peel-off Roller |
|
|
|
Ridges |
Rev. 1.0 |
- 24 - |
LD620D
7. Appendix
7-1 Specifications
|
|
Item |
|
|
Description |
|
|
|
Printing Method |
|
|
Direct Thermal Printing |
|
|
Printer |
Dot Density |
|
|
203 dpi (8 dot/mm) |
|
|
Printing Width |
|
|
Max. 104 mm(Max. 4.09”) |
|
|
|
|
|
|
|
||
|
|
Printing Speed |
|
|
Max. 127 mm/sec(Max. 5ips) |
|
|
Paper |
Roll Width |
|
|
42 ~ 106mm(1.65 ~ 4.17”) |
|
|
|
SMPS Input Voltage |
|
|
AC 100~240V |
|
|
AC |
Frequency |
|
|
50/60 Hz |
|
|
Adapter |
SMPS Output Voltage |
|
|
DC24V±5% |
|
|
|
SMPS Output Current |
|
|
2.5A |
|
|
|
Temperature |
|
|
0 ~ 40 (Operating) |
|
|
Usage |
|
|
-20 ~ 60 (Storage) |
|
|
|
|
|
|
|
||
|
Conditions |
Humidity |
|
|
10 ~ 80 % RH (Operating) |
|
|
|
(except for paper) |
|
|
10 ~ 90 % RH (Storage) |
|
Note
-Printing speed can vary depending on the data transmission speed and combination of control commands.
-This equipment is for indoor use and all the communication wirings are limited to inside of the building.
-The switch is the disconnecting device. Turn off switch from any hazard.
7-2 Label Types
The label types used with this printer are as follows.
•Control Labels: PP
•Other Labels: PET
Rev. 1.0 |
- 25 - |

Oki contact details
Oki Systems8. /WG
Blays House
Wick Road
Egham
Surrey
TW20 0HJ
Tel:+44 (0) 1784 274300
Fax:+44 (0) 1784 274301
http://www.oki.co.uk
Oki Systems Ireland Limited
The Square Industrial Complex
Tallaght
Dublin 24
Tel:+353 (0) 1 4049590
Fax:+353 (0)1 4049591
http://www.oki.ie
Oki Systems Ireland Limited -
Northern Ireland
19 Ferndale Avenue
Glengormley
BT36 5AL
Northern Ireland
Tel:+44 (0) 7767 271447
Fax:+44 (0) 1 404 9520
http://www.oki.ie
Technical Support for all Ireland: Tel:+353 1 4049570
Fax:+353 1 4049555 E-mail: tech.support@oki.ie
OKI Systems (Czech and Slovak), s.r.o.
IBC – Pobřežní 3
186 00 Praha 8
Czech Republic
Tel: +420 224 890158
Fax:+420 22 232 6621 Website: www.oki.cz, www.oki.sk
Oki Systems (Deutschland) GmbH
Hansaallee 187
40549 Düsseldorf
Tel: 01805/6544357** 01805/OKIHELP**
Fax: +49 (0) 211 59 33 45 Website: www.okiprintingsolutions.de info@oki.de
**0,14€/Minute aus dem dt. Festnetz der T-Com (Stand 11.2008)
Διανομέας των συστημάτων OKI
CPI S.A1 Rafailidou str. 177 78 Tavros
Athens
Greece
Tel: +30 210 48 05 800
Fax:+30 210 48 05 801
EMail:sales@cpi.gr
Oki Systems (Iberica), S.A.U
C/Teide, 3
San Sebastian de los Reyes 28703, Madrid
Tel:+34 91 3431620
Fax: +34 91-3431624
Atención al cliente: 902 36 00 36 Website: www.oki.es
Oki Systèmes (France) S.A.
44-50 Av. du Général de Gaulle
94246 L'Hay les Roses Paris
Tel:+33 01 46 15 80 00 Télécopie:+33 01 46 15 80 60 Website: www.oki.fr
OKI Systems (Magyarország) Kft.
Capital Square Tower 2
7th Floor
H-1133 Budapest, Váci út 76 Hungary
Telefon: +36 1 814 8000
Telefax: +36 1 814 8009
Website: www.okihu.hu
OKI Systems (Italia) S.p.A. via Milano, 11,
20084 Lacchiarella (MI)
Tel:+39 (0) 2 900261
Fax:+39 (0) 2 90026344
Website: www.oki.it
OKI Printing Solutions
Platinium Business Park II, 3rd Floor ul. Domaniewska 42
02-672 Warsaw Poland
Tel:+48 22 448 65 00
Fax:+48 22 448 65 01
Website: www.oki.com.pl
E-mail: oki@oki.com.pl
Hotline: 0800 120066
E-mail: tech@oki.com.pl
Oki Systems (Ibérica) S.A.
Sucursal Portugal
Edifício Prime -
Av. Quinta Grande 53
7º C Alfragide
2614-521 Amadora
Portugal
Tel:+351 21 470 4200
Fax:+351 21 470 4201
Website:www.oki.pt
E-mail : oki@oki.pt
Oki Service
Serviço de apoio técnico ao Cliente
Tel: 808 200 197 E-mail : okiserv@oki.pt
OKI Europe Ltd. (Russia)
Office 702, Bldg 1 Zagorodnoye shosse 117152, Moscow
Tel: +74 095 258 6065 Fax: +74 095 258 6070 e-mail: info@oki.ru Website: www.oki.ru
Technical support: Tel: +7 495 564 8421 e-mail: tech@oki.ru
Oki Systems (Österreich)
Campus 21 Businesszentrum Wien Sued Liebermannstrasse A02 603 22345 Brun am Gebirge
Tel: +43 223 6677 110 Drucker Support:
+43 (0) 2236 677110-501 Fax Support:
+43 (0) 2236 677110-502 Website: www.oki.at
OKI Europe Ltd. (Ukraine)
Raisy Opkinoy Street,8
Building B, 2ndFloor,
Kiev 02002
Ukraine
Tel: +380 44 537 5288 e-mail: info@oki.ua Website: www.oki.ua
OKI Sistem ve Yazıcı Çözümleri Tic. Ltd. Şti.
Harman sok Duran Is Merkezi, No:4, Kat:6,
34394, Levent İstanbul
Tel: +90 212 279 2393
Faks: +90 212 279 2366 Web: www.oki.com.tr
www.okiprintingsolutions.com.tr
Oki Systems (Belgium)
Medialaan 24
1800 Vilvoorde
Helpdesk: 02-2574620
Fax: 02 2531848
Website: www.oki.be
AlphaLink Bulgaria Ltd.
2 Kukush Str.
Building "Antim Tower", fl. 6 1463 Sofia, Bulgaria
tel: +359 2 821 1160 fax: +359 2 821 1193
Website: http://bulgaria.oki.com
OKI Printing Solutions
Herstedøstervej 27
2620 Albertslund Danmark
Adm.: +45 43 66 65 00
Hotline: +45 43 66 65 40 Salg: +45 43 66 65 30 Fax: +45 43 66 65 90 Website: www.oki.dk
Oki Systems (Finland) Oy
Polaris Capella
Vänrikinkuja 3
02600 Espoo
Tel: +358 (0) 207 900 800
Fax: +358 (0) 207 900 809 Website: www.oki.fi
Oki Systems (Holland) b.v.
Neptunustraat 27-29
2132 JA Hoofddorp
Helpdesk: 0800 5667654
Tel:+31 (0) 23 55 63 740
Fax:+31 (0) 23 55 63 750 Website: www.oki.nl
Oki Systems (Norway) AS
Tevlingveien 23 N-1081 Oslo
Tel:+47 (0) 63 89 36 00 Telefax:+47 (0) 63 89 36 01 Ordrefax:+47 (0) 63 89 36 02 Website: www.oki.no
General Systems S.R.L. (Romania)
Sos. Bucuresti-Ploiesti Nr. 135. Bucharest 1
Romania
Tel: +40 21 303 3138
Fax: +40 21303 3150
Website: http://romania.oki.com
Var vänlig kontakta din Återförsäljare i första hand, för konsultation. I
andra hand kontakta
Oki Systems (Sweden) AB
Borgafjordsgatan 7 Box 1191
164 26 Kista
Tel. +46 (0) 8 634 37 00 e-mail:
info@oki.se för allmänna frågor om Oki produkter
support@oki.se för teknisk support gällandes Oki produkter
Vardagar: 08.30 - 12.00, 13.00 - 16.00
Website: www.oki.se
Oki Systems (Schweiz)
Baslerstrasse 15 CH-4310 Rheinfelden
Support deutsch +41 61 827 94 81 Support français +41 61 827 94 82 Support italiano +41 061 827 9473 Tel: +41 61 827 9494
Website: www.oki.ch
Oki Data Americas Inc.(United States • États-Unis)
2000 Bishops Gate Blvd. Mt. Laurel, NJ 08054 USA
Tel: 1-800-654-3282
Fax: 1-856-222-5247 http://WWW.OKIPRINTINGSOLUTIONS.COM http://my.okidata.com
Oki Data Americas Inc.(Canada •
Canadá)
4140 B Sladeview Crescent Units 7&8
Mississauga, Ontario Canada L5L 6A1
Tél: 1-905-608-5000
Téléc: 1-905-608-5040 http://WWW.OKIPRINTINGSOLUTIONS.COM
Oki Data Americas Inc.(América Latina (OTRO))
2000 Bishops Gate Blvd. Mt. Laurel, NJ 08054 USA
Tel (Español): 1-856-222-7496 1-856-222-5276
Fax: 1-856-222-5260
Email: LASatisfaction@okidata.com
Oki Data de Mexico, S.A. de C.V.
Mariano Escobedo #748, Piso 8 Col. Nueva Anzures
C.P. 11590, México, D.F.
Tel: 52-555-263-8780
Fax: 52-555-250-3501 http://WWW.OKIPRINTINGSOLUTIONS.COM
Oki Systems (Thailand) Ltd.
1168/81-82 Lumpini Tower,
27th Floor Rama IV Road
Tungmahamek, Sathorn
Bangkok 10120
Tel:(662) 679 9235
Fax:(662) 679 9243/245
http://www.okisysthai.com
Oki Systems (Hong Kong) Ltd.
Suite 1908, 19/F, Tower 3,
China Hong Kong City
33 Canton Road, TsimShaTsui,
Kowloon, Hong Kong
Tel: (852) 3543 9288
Fax: (852) 3549 6040
http://www.okiprintingsolutions.com.hk
Oki Data(Australia) Pty Ltd.
Levwl1 67 Epping Road, Macquarie Park
NSW 2113, Australia
Tel: +61 2 8071 0000
(Support Tel: 1800 807 472)
Fax: +61 2 8071 0010
http://www.oki.com.au
Comworth Systems Ltd.
8 Antares Place Mairangi Bay,
Auckland, New Zealand
Tel:(64) 9 477 0500
Fax:(64) 9 477 0549
http://www.comworth.co.nz
Oki Data(S) P Ltd. Malaysia Rep
Office
Suite 21.03, 21st Floor Menara IGB,
Mid Valley City,
Lingkaran Syed Pura 59200,
Kuala Lumpur, Malaysia
Tel: (60) 3 2287 1177
Fax: (60) 3 2287 1166
Oki Data do Brasil, Ltda.
Rua Avenida Alfrefo Egidio de souza Aranha 100-4° andar-Bloco C Chacara Santo Antonio Sao Paulo, Brazil 04726-170
Tel: 55-11-3444-6747 (Grande São Paulo)
0800-11-5577 (Demais localidades)
Fax: 5511-3444-3501
e-mail: okiserv@okidata.com.br http://WWW.OKIPRINTINGSOLUTIONS.COM
Oki Data (Singapore) Pte. Ltd.
438A Alexandra Road #02-11/12,
Lobby 3, Alexandra Technopark Singapore(119967)
Tel:(65) 6221 3722
Fax:(65) 6594 0609 http://www.okidata.com.sg

LD620D
Guide de l'utilisateur

PRÉFACE
Tout a été mis en œuvre pour que les informations contenues dans ce document soient complètes, précises et à jour. Le fabricant décline toute responsabilité quant aux conséquences d'erreurs échappant à son contrôle. Le fabricant ne peut garantir que les changements dans les logiciels et les équipements d'autres fabricants et mentionnés dans ce manuel n'affectera pas l'applicabilité de l'information de celuici. La mention de produits logiciels fabriqués par d'autres entreprises ne constitue pas nécessairement l'approbation par le fabricant.
Toutes les mesures ont été prises pour que ce document vous apporte une aide précieuse, toutefois nous ne pouvons garantir qu'il traite dans son intégralité toutes les informations contenus.
Tous droits réservés par OKI Data Corporation. Vous ne devez pas effectuer une copie non autorisée, le transfert, la traduction, ou des actions apparentées. Vous devez obtenir l'accord écrit d'Oki Data Corporation avant de pouvoir effectuer une des actions mentionnées ci-dessus.
© 2012 Oki Data Corporation
OKI est une marque déposée de Oki Electric Industry Co., Ltd.
Energy Star est une marque de l'Agence de protection de l'environnement des États-Unis.
Microsoft, Windows, Windows Server et Windows Vista sont des marques déposées de Microsoft Corporation.
Apple, Macintosh, Rosetta, Mac et Mac OS sont des marques déposées de Apple Inc.
D'autres noms de produits et noms de fabriques sont des marques déposées ou marques déposées de leur propriétaire.
En tant que participant au programme Energy Star, le fabricant a déterminé que ce produit répond aux directives d'Energy Star concernant l'efficacité énergétique.
Ce produit est conforme aux exigences des directives du Conseil 2004/108/CE (CEM) et 2006/ 95/CE (LVD) , 1999/5/CE (R&TTE) et 2011/65/EU(RoHS), relatives à l'harmonisation des lois des pays membres de l’Union Européenne en matière de compatibilité électromagnétique, de basse tension,
d'équipement radio et de télécommunication, de produits consommateurs d'énergie, de limitation de l'utilisation de certaines substances dangereuses dans les équipements électriques et électroniques.
Les câbles suivants ont été utilisés pour évaluer ce produit et obtenir la conformité avec la directive EMC le respect de normes 2004/108/EC et des configurations autres que celles-ci peuvent affecter leur respect.
TYPE DE CÂBLE |
LONGUEUR |
COEUR |
BLINDAGE |
|
(MÈTRE) |
|
|
|
|
|
|
Alimentation |
1,8 |
|
|
USB |
1,8 |
|
|
Série |
1,8 |
|
|
Parallèle |
1,8 |
|
|
|
|
|
|
- 2 -

FABRICANT
OKI Data Corporation, 4-11-22 Shibaura, Minato-ku, Tokyo 108-8551,
Japon
Pour toute question d'ordre général, sur les ventes et sur le support, contactez votre distributeur local.
IMPORTATEUR VERS L'UE/REPRÉSENTANT AGRÉÉ
OKI Europe Limited (Solutions pour l'impression OKI)
Blays House
Wick Road
Egham
Surrey, TW20 0HJ
Royaume Uni
Pour toute question d'ordre général, sur les ventes et sur le support, contactez votre distributeur local.
INFORMATIONS RELATIVES À L'ENVIRONNEMENT
- 3 -
 Loading...