


 Loading...
MC363/MC563/ES5463 MFP
Advanced Manual
About This Manual
This manual describes how to print from mobile terminals and how to use the OKI MFP in various ways.
It also describes advanced features such as security settings and color adjustment. Please read this manual carefully to achieve the maximum performance of the product in various conditions.
This manual uses as an example Windows 7 for Windows, Mac OS X 10.9 for Mac OS X and MC563 for the device.
This manual uses MC563 as an example to illustrate buttons and icons on the operator panel, driver screens, and the method of inputting characters and operating the device.
Some functions are not available for MC363.
Depending on your OS, the actual display of the product may differ from the descriptions in this manual. In addition, depending on the model you are using, some functions described in this manual may not be available.
Depending on the device you are using, buttons or the like on the operator panel and the actual operations may differ from the descriptions in this manual. Please read the user’s manual for the specific model that comes with your device.
About Descriptions
This section describes the marks, symbols, abbreviations and illustrations used in this manual.
About Marks
This manual uses the following marks.
Mark |
Meaning |
|
Indicates cautions and restrictions for the correct operation of the |
|
device. Be sure to read them to avoid misoperation. |
|
|
|
Indicates useful tips and references on how to use the device. We |
|
recommend you read them. |
|
|
|
Indicates reference items. Please read them to learn the detailed |
|
information. |
|
|
|
Indicates related items. Please read them to learn the relevant |
|
information. |
|
|
About Symbols
This section describes the symbols used in this manual and their meanings.
Symbol |
Meaning |
Illustration (button |
Indicates button shapes (button names) on the |
name) |
operator panel of the device. |
|
|
[ ] |
Indicates menu names, item names, options, etc. |
|
displayed on the screen of the operator panel. |
|
Indicates menus, windows and dialog box names |
|
displayed on the computer screen. |
|
They can be clearly distinguished in the description |
|
and procedure illustration. |
" " |
Indicates messages and input texts on the displayed screen. |
|
Indicates file names on the computer. |
|
Indicates item titles of link destinations. |
< > |
Indicates keys on the computer keyboard. |
|
|
> |
Indicates the transition of device or computer menus. |
|
|
About Illustrations
The illustrations used in this manual are based on MC563.
The displayed screens on the operator panel used in this manual are based on the default settings.
- 2 -

Table of contents |
|
|
1 |
Basic Operations ......................................................................................... |
9 |
|
Adjusting the Contrast of the Display Screen .............................................................................. |
10 |
|
Setting Output Destination ........................................................................................................... |
11 |
|
Output Tray ................................................................................................................................................. |
11 |
|
Rear Output Tray ........................................................................................................................................ |
12 |
|
Adjusting Volume ......................................................................................................................... |
13 |
|
Simultaneous Operation (Multitasking) ........................................................................................ |
14 |
|
Checking the Information of the Machine .................................................................................... |
15 |
|
Printing a Report to Check ......................................................................................................................... |
15 |
|
Checking the Status on the Operator Panel ............................................................................................... |
16 |
|
Easy Setup .................................................................................................................................. |
17 |
|
Configuring One Touch Button ..................................................................................................... |
19 |
|
JOB MACRO ............................................................................................................................... |
20 |
|
Registering a Frequently-used Setting as a Macro .................................................................................... |
20 |
|
Using a Registered Macro .......................................................................................................................... |
21 |
|
Editing a Macro Title ................................................................................................................................... |
21 |
|
Checking the Macro Content ...................................................................................................................... |
22 |
|
Deleting a Registered Macro ...................................................................................................................... |
22 |
2 |
Copy ............................................................................................................ |
23 |
|
Useful Functions .......................................................................................................................... |
24 |
|
Specifying the Paper Feed Tray (Paper Feed) ........................................................................................... |
24 |
|
Making Enlarged or Reduced Copies (Zoom) ............................................................................................ |
25 |
|
Copying on Both Sides of Paper (Duplex Copy) ........................................................................................ |
26 |
|
Combining Multiple Pages on One Sheet of Paper (N-in-1) ....................................................................... |
28 |
|
Changing the Scan Size (Scan Size) ......................................................................................................... |
29 |
|
Sorting Each Set in Page Order (Sort) ....................................................................................................... |
29 |
|
Enabling Continuous Scan Mode (Continuous Scan) ................................................................................ |
30 |
|
Copying Different Size Documents (Mixed Size) ........................................................................................ |
31 |
|
Resetting Copy Settings (Reset) ................................................................................................................ |
32 |
|
Changing the Document Orientation (Direction) ......................................................................................... |
32 |
|
For a Better Finish ....................................................................................................................... |
33 |
|
Adjusting the Density (Density) .................................................................................................................. |
33 |
|
Selecting the Document Type (Document Type) ........................................................................................ |
34 |
|
Specifying the Scan Resolution (Resolution) .............................................................................................. |
34 |
|
Copying a Document with a Colored Background Clearly (Background Removal) .................................... |
35 |
|
Erasing Edge Shadows (Edge Erase) ........................................................................................................ |
35 |
|
Removing Show-Through (Show-Through Removal) ................................................................................. |
36 |
|
Color Settings ............................................................................................................................. |
37 |
|
Adjusting the Contrast (Contrast) ............................................................................................................... |
37 |
|
Adjusting Hue for Color Copy .................................................................................................................... |
38 |
|
Adjusting Saturation ................................................................................................................................... |
38 |
|
Adjusting RGB ........................................................................................................................................... |
39 |
|
Advanced Copy Settings ............................................................................................................ |
40 |
|
Making Multiple Copies on a Sheet of Paper (Repeat) .............................................................................. |
40 |
|
Copying Both Sides of a Card to One Side (ID Card Copy) ...................................................................... |
41 |
|
Setting Margins (Margin) ............................................................................................................................ |
42 |
3 |
Scan ............................................................................................................. |
45 |
|
Basic Operations of Scan Functions ........................................................................................... |
46 |
|
Setting to Scan a Document ...................................................................................................................... |
46 |
|
Other Settings to Scan ............................................................................................................................... |
50 |
|
Items on Transmit and Receipt Journal Report (E-mail/Internet fax/FaxServer) ....................................... |
54 |
|
Sending Scanned Data as an E-mail Attachment ....................................................................... |
55 |
|
Specifying a Destination from Address Book or Group List ....................................................................... |
55 |
|
Specifying a Destination Using One-touch Button ..................................................................................... |
56 |
|
Specifying a Destination from Transmission History .................................................................................. |
56 |
|
Specifying a Destination Searching LDAP Server ..................................................................................... |
57 |
|
Setting the Sender's Address ..................................................................................................................... |
58 |
|
Setting the Reply Address ......................................................................................................................... |
58 |
|
Registering an E-mail Template ................................................................................................................. |
59 |
|
Using an E-Mail Template .......................................................................................................................... |
59 |
|
Saving Transmission Data ......................................................................................................................... |
60 |
|
Checking Results of Scan To E-mail .......................................................................................................... |
60 |
|
Saving Scanned Data to a Computer ......................................................................................... |
61 |
|
Changing the Machine Settings ................................................................................................................. |
61 |
|
Using ActKey ............................................................................................................................................. |
62 |
|
Using WSD Scan ....................................................................................................................................... |
66 |
|
Using Image Capture (Mac OS X) ............................................................................................................. |
68 |
|
Using a Scanner Supported Application .................................................................................................... |
69 |
|
Adding Destination for Scan To Computer ................................................................................................. |
71 |
|
Deleting Destination for Scan To Computer ............................................................................................... |
71 |
|
Saving Scanned Data to USB Memory ....................................................................................... |
72 |
|
Saving Scanned Data in a Shared Folder .................................................................................. |
73 |
|
Changing a Destination (Profile) from the Operator Panel ........................................................................ |
73 |
|
Deleting a Destination (Profile) from the Operator Panel ........................................................................... |
74 |
|
Tables of Profile Setting Items ................................................................................................................... |
74 |
4 |
Print .............................................................................................................. |
77 |
|
Printing on Various Types of Paper ............................................................................................. |
78 |
- 3 -

Printing on Envelopes ................................................................................................................................. |
78 |
Printing on Labels ....................................................................................................................................... |
81 |
Printing on Long Paper ............................................................................................................................... |
83 |
Printing on Custom Size Paper .................................................................................................................. |
84 |
Printing with Various Settings from a Computer .......................................................................... |
87 |
Printing Manually One by One ................................................................................................................... |
87 |
Enlarging or Reducing to Fit the Specified Paper Size ............................................................................... |
89 |
Printing Only the Cover from a Different Tray ............................................................................................. |
90 |
Making a Booklet ........................................................................................................................................ |
91 |
Dividing a Document to Print on Some Sheets for Making a Poster .......................................................... |
92 |
Adding Semi-transparent Text (Watermarks) .............................................................................................. |
92 |
Overlaying Forms or Logos (Overlay) ........................................................................................................ |
93 |
Outputting a Document to a File Instead of Printing on Paper ................................................................... |
95 |
Storing Frequently-printed Documents in the Printer (Except MC363) ....................................................... |
95 |
Printing E-mail Attachment Files ................................................................................................................ |
97 |
Saving Paper, Saving Toner ........................................................................................................ |
98 |
Printing on Both Sides of Paper (Duplex Printing) ...................................................................................... |
98 |
Saving Toner ............................................................................................................................................... |
99 |
Combining Multiple Pages onto One Sheet of Paper ............................................................................... |
100 |
Adjusting Color on the Computer ............................................................................................... |
102 |
Printing Color Data in Grayscale ............................................................................................................. |
102 |
Using Color Matching on Printer Driver .................................................................................................... |
103 |
Simulating Printing Results for Ink ............................................................................................................ |
104 |
Color Separation ....................................................................................................................................... |
105 |
Correcting Color Registration Error Manually ........................................................................................... |
106 |
Correcting Density Manually ..................................................................................................................... |
107 |
Adjusting Color Balance (Density) ............................................................................................................ |
107 |
Adjusting Color with Software ................................................................................................................... |
108 |
For a Better Finish ..................................................................................................................... |
109 |
Enhancing Photos .................................................................................................................................... |
109 |
Printing with a Specified Resolution ......................................................................................................... |
110 |
Emphasizing Fine Lines ........................................................................................................................... |
111 |
Specifying the Font to Use ........................................................................................................................ |
112 |
Changing Black Finish .............................................................................................................................. |
113 |
Eliminating White Gap Between Text and Background (Overprinting Black) ........................................... |
114 |
Useful Functions ........................................................................................................................ |
116 |
Collating a Multiple Page Document in Units of Copies ........................................................................... |
116 |
Printing from the Last Page of a Document .............................................................................................. |
117 |
Selecting a Tray Automatically for the Specified Paper ............................................................................ |
118 |
Switching to Another Paper Feed Tray Automatically When a Tray Runs Out Of Paper ......................... |
119 |
Changing the Default Settings with a Printer Driver ................................................................................. |
121 |
Saving Frequently-Used Settings in the Printer Driver to Use .................................................................. |
121 |
|
Storing Print Data in This Machine before Printing .................................................................................. |
122 |
|
Printing without Opening a PDF File (PDF Print Direct) .......................................................................... |
123 |
|
Printing Data in USB Memory .................................................................................................................. |
124 |
|
Printing Confidential Document ................................................................................................ |
125 |
|
Encrypting the Print Data and Setting a Password Before Printing (Private Print) (Except MC363) ....... |
125 |
5 |
Fax .............................................................................................................. |
127 |
|
Basic Operations of Fax Functions ........................................................................................... |
128 |
|
About the Dial Function ............................................................................................................................ |
128 |
|
Specifying a Destination from Phone Book .............................................................................................. |
129 |
|
Specifying a Destination Using One-touch Button ................................................................................... |
129 |
|
Specifying a Destination from Transmission History and Reception History ............................................ |
130 |
|
Deleting a Specified Destination .............................................................................................................. |
130 |
|
Receiving a Fax ....................................................................................................................................... |
131 |
|
Specifying a Tray to Be Used When Printing Received Fax .................................................................... |
131 |
|
Paper Size Priority ................................................................................................................................... |
132 |
|
Checking the Communication Status/Transmission and Reception History ............................................ |
132 |
|
Items on Transmit and Receipt Journal Report ........................................................................................ |
133 |
|
Sending a Fax via the Internet .................................................................................................. |
135 |
|
About the Internet Fax Function ............................................................................................................... |
135 |
|
Receiving an Internet Fax ........................................................................................................................ |
136 |
|
Entering a Destination E-mail Address .................................................................................................... |
136 |
|
Specifying a Destination from Address Book/Group List ......................................................................... |
137 |
|
Selecting a Destination Using One Touch Buttons .................................................................................. |
138 |
|
Selecting a Destination from Transmission History .................................................................................. |
138 |
|
Searching for a Destination in the LDAP Server ...................................................................................... |
139 |
|
Checking, Deleting or Changing a Specified Destination ......................................................................... |
140 |
|
Setting Scanning for Transmission .......................................................................................................... |
141 |
|
Checking the Transmission History .......................................................................................................... |
146 |
|
Receiving Results of Internet Fax ............................................................................................................ |
146 |
|
Setting Scanning for Transmission ........................................................................................... |
147 |
|
Scanning a Duplex Document (Duplex Scan) .......................................................................................... |
147 |
|
Specifying a Scan Resolution (Resolution) .............................................................................................. |
148 |
|
Sending a Fax to Multiple Destinations at the Same Time ...................................................................... |
148 |
|
Specifying a Scan Size (Scan Size) ......................................................................................................... |
149 |
|
Adjusting the Density (Density) ................................................................................................................ |
149 |
|
Scanning a Document with a Colored Background Clearly (Background Removal) ............................... |
150 |
|
Erasing Edge Shadows When Sending (Edge Erase) ............................................................................. |
151 |
|
Disclosing a Sender Name (Originator) to the Recipient ......................................................................... |
151 |
|
Changing the Sender Name That is Printed on Faxes ............................................................................ |
152 |
|
Printing Transmission Results Automatically (Transmit Conf. Report) ..................................................... |
152 |
|
Registering the Sender Name (Originator) .............................................................................................. |
153 |
- 4 -

Changing the Standard Originator Name ................................................................................................. |
154 |
Adding a Prefix (Prefix) ............................................................................................................................. |
154 |
Setting the Number of Redial Attempts and Redial Intervals ................................................................... |
155 |
Settings for Transmission .......................................................................................................... |
156 |
Scanning Multiple Documents Continuously on the Document Glass (Continuous Scan (Glass)) .......... |
156 |
Scanning Multiple Documents Continuously with the ADF (Continuous Scan (ADF)) ............................. |
157 |
Sending at a Specified Date and Time (Delayed Tx) ................................................................................ |
157 |
Sending While a Document is being Scanned (Memory Transmission/Real time Transmission) ............ |
158 |
Sending a Fax after Calling (Manual Transmission) ................................................................................. |
159 |
Manual Sending (On-hook dial) ................................................................................................................ |
160 |
Preventing Wrong Fax Transmissions ...................................................................................................... |
160 |
Setting for Receptions ............................................................................................................... |
162 |
Setting a Tray to Print Received Documents ............................................................................................ |
162 |
Setting a Print Method for When a Received Image Exceeds Paper Size ............................................... |
163 |
Duplex Printing ......................................................................................................................................... |
164 |
Setting So That You Can Hear Line Monitor Sound ................................................................................. |
165 |
Forwarding a Fax to Another Fax Number ............................................................................................... |
165 |
Setting When to Ring the External Telephone (Tel Priority Mode) ............................................................ |
166 |
Setting Fax Detection Mode ..................................................................................................................... |
166 |
Setting the T/F Timer ................................................................................................................................ |
167 |
Setting TAD Mode .................................................................................................................................... |
167 |
Block Junk Fax ......................................................................................................................................... |
168 |
Performing Confidential Communication and Bulletin Board Communication (Fcode |
|
Communication) ......................................................................................................................... |
170 |
About Fcode Communication ................................................................................................................... |
170 |
Registering an Fcode Box ........................................................................................................................ |
171 |
Sending a Fax to a Destination Confidential Box (Fcode Transmission) .................................................. |
172 |
Printing a Document That is Received in the Confidential Box of This Machine ...................................... |
173 |
Receiving a Document That is Saved in a Destination Bulletin Board Box by Fax (Fcode Polling) ......... |
173 |
Saving a Document in a Bulletin Board Box of This Machine .................................................................. |
174 |
Deleting a Document in a Bulletin Board Box of This Machine ................................................................ |
174 |
Deleting a Registered Fcode Box ............................................................................................................. |
175 |
Useful Functions ........................................................................................................................ |
176 |
Instructing a Fax Reception from a Telephone Remotely (Remote Switchover Number) ........................ |
176 |
Setting Secure Reception ......................................................................................................................... |
177 |
Sending a Fax from a Computer ................................................................................................ |
178 |
Sending a PC Fax .................................................................................................................................... |
178 |
Sending a Fax from a Computer with a Cover Sheet ............................................................................... |
180 |
Sending a PC Fax to Multiple Destinations at the Same Time ................................................................. |
181 |
Cancelling a PC Fax Transmission ........................................................................................................... |
182 |
Managing the PC Fax Phone Book .......................................................................................................... |
182 |
Sending Data to the Fax Server ................................................................................................ |
188 |
|
Basic Procedure for Scan to Fax Server .................................................................................................. |
188 |
|
Enabling the Scan to Fax Server Function .............................................................................................. |
189 |
|
Editing a Destination E-mail Address ....................................................................................................... |
190 |
|
Editing E-mail Body Text .......................................................................................................................... |
190 |
|
Checking Results of Scan To Fax Server ................................................................................................. |
191 |
6 |
Maintenance .............................................................................................. |
192 |
|
Replacing Maintenance Parts ................................................................................................... |
193 |
|
Replacing the Belt Unit ............................................................................................................................ |
193 |
|
Replacing the Fuser Unit ......................................................................................................................... |
196 |
|
Cleaning Each Part of the Machine .......................................................................................... |
200 |
|
Cleaning the Surface of the Machine ....................................................................................................... |
200 |
|
Cleaning the Document Feed Rollers ...................................................................................................... |
201 |
|
Cleaning the Paper Feed Rollers (Tray 1/Tray 2/Tray 3 (Except MC363)) .............................................. |
202 |
|
Cleaning the Paper Feed Rollers (MP Tray) ............................................................................................ |
203 |
|
Updating Installed Drivers ......................................................................................................... |
206 |
|
Updating the Printer Driver (Windows) .................................................................................................... |
206 |
|
Updating the Fax Driver (Windows) ......................................................................................................... |
207 |
|
Updating the Scanner Driver (Windows) .................................................................................................. |
207 |
|
Updating the Printer Driver (Mac OS X) ................................................................................................... |
208 |
|
Updating the Scanner Driver (Mac OS X) ................................................................................................ |
208 |
|
Removing Installed Drivers ....................................................................................................... |
209 |
|
Removing the Printer Driver (Windows) ................................................................................................... |
209 |
|
Removing the Fax Driver (Windows) ....................................................................................................... |
210 |
|
Removing the Scanner Driver (Windows) ................................................................................................ |
210 |
|
Removing the Printer Driver (Mac OS X) ................................................................................................. |
211 |
|
Removing the Scanner Driver (Mac OS X) .............................................................................................. |
212 |
|
Updating Firmware ................................................................................................................... |
213 |
|
Initializing Memory and Settings ............................................................................................... |
214 |
|
Initializing Flash Memory ......................................................................................................................... |
214 |
|
Initializing the Settings of the Device ....................................................................................................... |
215 |
7 |
Troubleshooting ........................................................................................ |
217 |
|
If the STATUS Button on the Operator Panel Lights Up or Flashes ......................................... |
218 |
|
Copy Problems ......................................................................................................................... |
219 |
|
The Copied Output is Different from the Original ..................................................................................... |
219 |
|
Other Problems (Copy) ............................................................................................................................ |
220 |
|
Scan Problems ......................................................................................................................... |
221 |
|
Scan To E-Mail Problems ......................................................................................................................... |
221 |
|
E-mail/Internet fax/FaxServer Error Code ................................................................................................ |
222 |
|
Scan To Computer Problems ................................................................................................................... |
222 |
- 5 -

Unable to Save Files in a Network Folder ................................................................................................ |
223 |
Network Connection Problems (Scan) ..................................................................................................... |
223 |
Wireless LAN Connection Problems (If Wireless LAN Module is Fitted) (Scan) ...................................... |
224 |
Print Problems ........................................................................................................................... |
225 |
Network Connection Problems (Print) ...................................................................................................... |
225 |
Wireless LAN Connection Problems (If Wireless LAN Module is Fitted) (Print) ....................................... |
226 |
USB Connection Problems ....................................................................................................................... |
227 |
Fax Problems ............................................................................................................................. |
228 |
Unable to Send or Received a Fax ........................................................................................................... |
228 |
Other Problems (Fax) ............................................................................................................................... |
229 |
Fax Error Codes ....................................................................................................................................... |
229 |
About Problems with Printing Results ........................................................................................ |
232 |
Table of Problems with Printing Results ................................................................................................... |
232 |
Vertical White Lines Appear ..................................................................................................................... |
234 |
Printed Images are Fading Vertically ........................................................................................................ |
234 |
Printed Images are Light .......................................................................................................................... |
235 |
White Spots and Lines Appear ................................................................................................................. |
235 |
Dew Condensation Appears on Printed Paper ......................................................................................... |
236 |
Vertical Lines Appear ................................................................................................................................ |
236 |
Horizontal Lines and Spots Appear Periodically ....................................................................................... |
237 |
White Area on Paper is Lightly Stained .................................................................................................... |
237 |
The Periphery of Characters is Smudged ................................................................................................ |
238 |
The Entire Paper Area is Lightly Stained When Printing on Envelopes or Coated Paper ........................ |
238 |
Toner Comes Off When Printed Paper is Rubbed .................................................................................... |
239 |
Uneven Gloss ........................................................................................................................................... |
239 |
Black or White Dots Appear ..................................................................................................................... |
240 |
Dirt is Printed ............................................................................................................................................ |
240 |
The Entire Page is Printed Black .............................................................................................................. |
241 |
Nothing is Printed ..................................................................................................................................... |
241 |
White Patches Appear .............................................................................................................................. |
242 |
The Entire Page is Dirty ............................................................................................................................ |
242 |
The Peripheral Area of the Page is Dirty .................................................................................................. |
243 |
The Printed Image is Skewed ................................................................................................................... |
243 |
Color of the printed image is not what you expect .................................................................................... |
244 |
Solid printing of CMY 100% is too light .................................................................................................... |
244 |
Problems about Software .......................................................................................................... |
245 |
Problems on Configuration Tool ............................................................................................................... |
245 |
Problems on a Web Browser .................................................................................................................... |
246 |
Printer Problems on a Windows PC ......................................................................................................... |
247 |
Problems on the Machine or Paper ........................................................................................... |
248 |
Problems on the Machine ......................................................................................................................... |
248 |
Problems on Document and Paper .......................................................................................................... |
251 |
|
If a Power Failure Occurs ........................................................................................................................ |
253 |
|
Before Relinquishing Your Device ............................................................................................................ |
254 |
|
AirPrint Problems ...................................................................................................................... |
255 |
|
Google Cloud Print Problems ................................................................................................... |
256 |
8 |
Editing Address Book .............................................................................. |
258 |
|
E-mail Address ......................................................................................................................... |
259 |
|
Registering an E-mail Address from the Operator Panel ......................................................................... |
259 |
|
Registering an E-mail Group from the Operator Panel ............................................................................ |
260 |
|
Registering an E-mail Address from the History ...................................................................................... |
260 |
|
Deleting a Registered E-mail Address from the Operator Panel ............................................................. |
261 |
|
Deleting a Registered E-mail Group from the Operator Panel ................................................................. |
261 |
|
Fax Numbers ............................................................................................................................ |
262 |
|
Registering a Fax Number from the Operator Panel ............................................................................... |
262 |
|
Registering a Group Number from the Operator Panel ........................................................................... |
263 |
|
Registering Fax Number from the History ................................................................................................ |
264 |
|
Deleting a Registered Fax Number from the Operator Panel .................................................................. |
264 |
|
Deleting a Registered Group Number from the Operator Panel .............................................................. |
265 |
9 |
Operating Management/ Specifications ................................................. |
266 |
|
Administrator Setup .................................................................................................................. |
267 |
|
Changing Administrator Settings ............................................................................................................. |
267 |
|
Copy Setup .............................................................................................................................................. |
268 |
|
Fax Setup ................................................................................................................................................. |
269 |
|
FaxServer Function .................................................................................................................................. |
271 |
|
Internet Fax Setup ................................................................................................................................... |
272 |
|
Scanner Setup ......................................................................................................................................... |
272 |
|
Print From USB Memory Setup ............................................................................................................... |
275 |
|
Print Setup ............................................................................................................................................... |
275 |
|
Network Menu .......................................................................................................................................... |
280 |
|
Manage Unit ............................................................................................................................................. |
283 |
|
User Install ............................................................................................................................................... |
285 |
|
Management Software .............................................................................................................. |
287 |
|
User Authentication (Access Control) ....................................................................................... |
288 |
|
Preparation (For Administrator) ................................................................................................................ |
288 |
|
Log in to This Machine ............................................................................................................................. |
295 |
|
Printing from a Computer ......................................................................................................................... |
296 |
|
Sending a Fax from a Computer (Windows) ............................................................................................ |
299 |
|
Registering IC Card Information (Except MC363) ................................................................................... |
301 |
|
Account Management ............................................................................................................... |
302 |
|
Enabling Account Management ............................................................................................................... |
302 |
- 6 -

Setting a Number of Points to Each Account ........................................................................................... |
304 |
Creating a Shared Account ...................................................................................................................... |
305 |
Setting Paper Size Points/Toner Points .................................................................................................... |
307 |
Printing When Account Management is Enabled ..................................................................................... |
308 |
Precautions when Operating .................................................................................................................... |
309 |
Moving/Transporting This Machine ............................................................................................ |
310 |
Moving This Machine ................................................................................................................................ |
310 |
Transporting This Machine ....................................................................................................................... |
311 |
10 Network ..................................................................................................... |
313 |
AirPrint ....................................................................................................................................... |
314 |
About AirPrint (Print/Scan/FaxOut Service) .............................................................................................. |
314 |
Setting AirPrint (Print/Scan/FaxOut Service) ............................................................................................ |
315 |
Registering the Machine in a Computer (Mac OS X) ............................................................................... |
316 |
Printing with AirPrint (Print) ...................................................................................................................... |
317 |
Scanning with AirPrint (Scan) ................................................................................................................... |
319 |
Sending a Fax with AirPrint (FaxOut Service) .......................................................................................... |
320 |
Google Cloud Print .................................................................................................................... |
322 |
About Google Cloud Print ......................................................................................................................... |
322 |
Setting Google Cloud Print ....................................................................................................................... |
323 |
Printing with Google Cloud Print ............................................................................................................... |
326 |
Checking Google Cloud Print Registrations ............................................................................................. |
327 |
Checking or Changing the Use of Cloud Service Settings ....................................................................... |
328 |
Deleting the Registered Information ......................................................................................................... |
329 |
Checking That Deletion is Complete ........................................................................................................ |
329 |
About Importing the CA Licenses of the Proxy Server ............................................................................. |
331 |
Network-Related Software ......................................................................................................... |
332 |
Network Settings ........................................................................................................................ |
333 |
Using Wired LAN and Wireless LAN at the Same Time (Only When the Wireless LAN Module is Mounted) 333
Initializing the Network Settings |
................................................................................................................334 |
Setting the DHCP Server .......................................................................................................................... |
335 |
Network Problems ..................................................................................................................... |
336 |
11 Utility Software ......................................................................................... |
337 |
List of Utility Software ................................................................................................................ |
338 |
Windows Utilities ...................................................................................................................................... |
338 |
Mac OS X Utilities ..................................................................................................................................... |
339 |
Installing Software ..................................................................................................................... |
340 |
For Windows ............................................................................................................................................. |
340 |
For Mac OS X ........................................................................................................................................... |
343 |
Web Page of This Machine ........................................................................................................ |
344 |
Open the Web Page of This Machine ...................................................................................................... |
344 |
Log In as the Administrator ...................................................................................................................... |
345 |
Changing the Administrator Password (Web Page) ................................................................................. |
347 |
Checking or Changing the Settings of This Machine ............................................................................... |
347 |
Encrypting Communication with SSL/TLS ............................................................................................... |
349 |
Using IPP ................................................................................................................................................. |
350 |
Encrypting Communication with IPSec .................................................................................................... |
351 |
Limiting by Using an IP Address (IP Filtering) ......................................................................................... |
354 |
Limiting by Using a MAC Address (MAC Address Filtering) .................................................................... |
355 |
E-mail Alert .............................................................................................................................................. |
355 |
Using SNMPv3 ......................................................................................................................................... |
356 |
Using IEEE802.1X (Wired LAN) .............................................................................................................. |
357 |
Setting IEEE802.1X (Wireless LAN) ........................................................................................................ |
358 |
Setting the LDAP Server .......................................................................................................................... |
360 |
E-mail Setup ............................................................................................................................................ |
361 |
Setting Power Save Mode (Web Page) ................................................................................................... |
361 |
Setting Sleep Mode (Web Page) .............................................................................................................. |
362 |
Setting Auto Power Off Mode (Web Page) .............................................................................................. |
362 |
Registering a Destination (Profile) (Web Page) ....................................................................................... |
363 |
Changing a Destination (Profile) (Web Page) .......................................................................................... |
364 |
Deleting a Destination (Profile) (Web Page) ............................................................................................ |
365 |
Forwarding Received Document Data to an E-mail Destination or Shared Folder (Auto Delivery) ......... |
366 |
Saving Sent and Received Data (Transmission Data Save) .................................................................... |
370 |
Fax Reception Notification ....................................................................................................................... |
371 |
JOB MACRO (Web Page) ........................................................................................................................ |
372 |
About Items That Can be Set or Checked ............................................................................................... |
373 |
Color Correct Utility ................................................................................................................... |
379 |
Changing Palette Color ............................................................................................................................ |
379 |
Changing Gamma Value or Hue .............................................................................................................. |
381 |
Printing in Adjusted Color Settings .......................................................................................................... |
382 |
Saving Color Correction Settings ............................................................................................................. |
383 |
Importing Color Correction Settings ......................................................................................................... |
383 |
Deleting Color Correction Settings ........................................................................................................... |
384 |
Color Swatch Utility ................................................................................................................... |
385 |
Printing Color Swatch .............................................................................................................................. |
385 |
Customizing the Color Swatch ................................................................................................................. |
386 |
Printing a File With the Color You Want ................................................................................................... |
386 |
PS Gamma Adjuster Utility ....................................................................................................... |
387 |
Registering an Adjusted Halftone ............................................................................................................ |
387 |
Printing with a Registered Halftone .......................................................................................................... |
388 |
Configuration Tool ..................................................................................................................... |
389 |
Registering This Machine ........................................................................................................................ |
390 |
- 7 -

Starting Configuration Tool ....................................................................................................................... |
390 |
Checking the Status of This Machine ....................................................................................................... |
391 |
Changing the Device Settings .................................................................................................................. |
391 |
Setting a Network Scan ............................................................................................................................ |
393 |
Cloning Settings ....................................................................................................................................... |
394 |
Displaying the Alert Info ............................................................................................................................ |
395 |
Setting the Network .................................................................................................................................. |
399 |
Registering ICC Profile ............................................................................................................................. |
400 |
Registering Forms (Form Overlay) ........................................................................................................... |
401 |
Checking the Free Space in Memory/Hard Disk Drive ............................................................................. |
402 |
Registering a User Name and Password ................................................................................................. |
402 |
Setting Power Save Mode (Configuration Tool) ........................................................................................ |
404 |
Setting Sleep Mode (Configuration Tool) .................................................................................................. |
404 |
Setting Auto Power Off Mode (Configuration Tool) ................................................................................... |
405 |
Registering a Destination (Profile) (Configuration Tool) ........................................................................... |
405 |
Changing a Destination (Profile) (Configuration Tool) .............................................................................. |
407 |
Importing and Exporting Destinations (Profile) ......................................................................................... |
408 |
Deleting a Destination (Profile) (Configuration Tool) ................................................................................ |
409 |
Registering an E-mail Address (Configuration Tool) ................................................................................. |
411 |
Registering E-mail Group (Configuration Tool) ......................................................................................... |
412 |
Deleting a Registered Destination (Configuration Tool) ............................................................................ |
414 |
Deleting a Registered E-mail Group (Configuration Tool) ........................................................................ |
415 |
Importing and Exporting Destination E-mail Addresses ........................................................................... |
416 |
Registering a Fax Number (Configuration Tool) ....................................................................................... |
417 |
Registering a Group Number (Configuration Tool) ................................................................................... |
418 |
Deleting a Registered Fax Number (Configuration Tool) .......................................................................... |
420 |
Deleting a Registered Group Number (Configuration Tool) ...................................................................... |
421 |
Importing and Exporting Speed Dials of Destinations .............................................................................. |
422 |
Removing This Machine ........................................................................................................................... |
423 |
Descriptions of Screens for Configuration Tool ........................................................................................ |
423 |
ActKey ....................................................................................................................................... |
427 |
OKI LPR Utility ........................................................................................................................... |
428 |
Starting OKI LPR Utility ............................................................................................................................ |
428 |
Registering a Device to OKI LPR Utility ................................................................................................... |
429 |
Checking the Status of a Registered Device ............................................................................................ |
429 |
Forwarding Print Jobs to a Registered Device ......................................................................................... |
430 |
Printing the Same Document from the Registered Multiple Devices ........................................................ |
431 |
Opening the Web Page of the Registered Device .................................................................................... |
431 |
Following the IP Address of the Registered Device Automatically ........................................................... |
432 |
Setting the Web Port Number of the Machine .......................................................................................... |
432 |
Sending a File to a Device That is Registered in OKI LPR Utility ............................................................. |
433 |
Deleting an Unnecessary Print Job .......................................................................................................... |
433 |
Uninstalling OKI LPR Utility (Uninstall) .................................................................................................... |
434 |
Network Extension .................................................................................................................... |
435 |
Showing Printer Properties ...................................................................................................................... |
435 |
Checking the Settings of the Machine ..................................................................................................... |
436 |
Set Options Automatically ........................................................................................................................ |
437 |
Uninstall the Utility ................................................................................................................................... |
437 |
Network Scanner Setup Tool (Mac OS X) ................................................................................ |
438 |
Network Card Setup (Mac OS X) .............................................................................................. |
439 |
Setting the IP Address ............................................................................................................................. |
439 |
Configuring Web Settings ........................................................................................................................ |
440 |
Quitting Network Card Setup ................................................................................................................... |
440 |
Print Job Accounting Client ....................................................................................................... |
441 |
For Windows ............................................................................................................................................ |
441 |
For Mac OS X .......................................................................................................................................... |
443 |
- 8 -

1Basic Operations
Adjusting the Contrast of the Display Screen Setting Output Destination
Adjusting Volume
Simultaneous Operation (Multitasking) Checking the Information of the Machine Easy Setup
Configuring One Touch Button JOB MACRO
This section describes basic operations of this machine.

1. Basic Operations
Adjusting the Contrast of the Display Screen
Brightness of the display screen can be adjusted. The larger number you set, the darker the screen becomes, and the smaller number you set, the brighter the screen becomes.
Values from -10 to +10 can be set.
1 Press the  (SETTING) button on the operator panel.
2 Press the  button once to select [Admin Setup] and press the
  button.
3 Enter the administrator password, and then press the  (OK) button.
The factory default administrator password is "999999". If the administrator password is changed, enter the updated password.
4Press the  or
or  button repeatedly to select [Manage Unit] and press the
  button.
5Press the  or
or  button repeatedly to select [System Setup] and press the
  button.
6Press the  or
or  button repeatedly to select [Panel Contrast] and press the
  button.
7 Enter the setting value, and then press the  (OK) button.
8 Press the  button to return to the standby screen.
- 10 -
Setting Output Destination
The machine outputs paper to the output tray or rear output tray.
Do not open or close the rear output tray during printing. Paper jams may result.
•Output Tray
•Rear Output Tray
1. Basic Operations
Output Tray
Use this output tray when printing on plain paper. Paper is output with the printed side down.
It is not available for envelopes, labels, or long paper.
Check that the rear output tray on the rear side of the machine is closed. If the rear output tray is open, paper is always output to the rear output tray.
Open the paper support so that outputs do not slip down from the output tray.
- 11 -
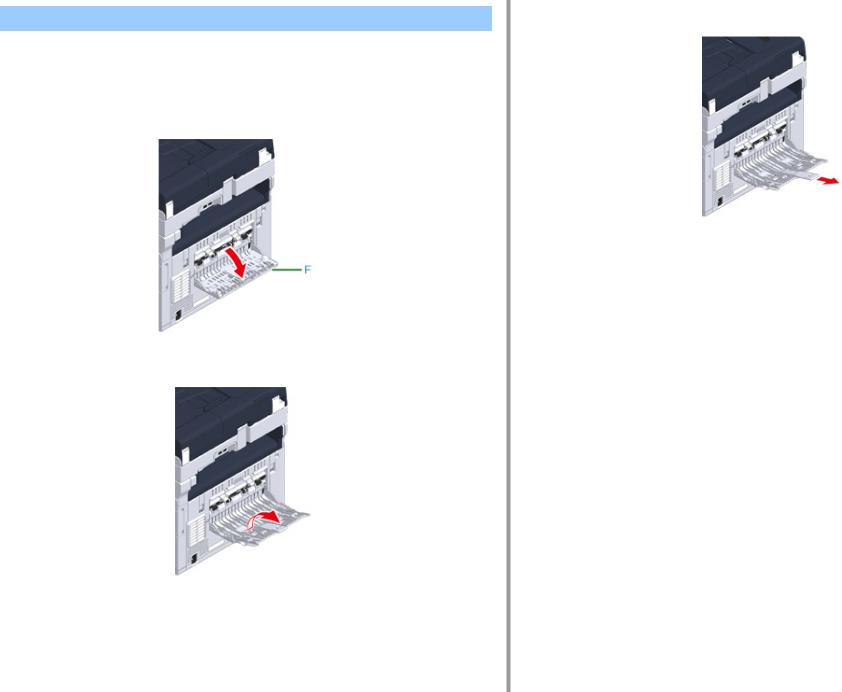
Rear Output Tray
Use the rear output tray when printing on envelopes, labels, or long paper.
Paper is output with the printed side up. Plain paper is also available for this output tray.
1 Open the rear output tray (F) on the rear side of the machine.
2 Unfold the paper support.
1. Basic Operations
3 Draw the sub support.
- 12 -

1. Basic Operations
Adjusting Volume
The volume of the sounds which are emitted in the following conditions can be adjusted in four levels.
•When a button or key on the operator panel is pressed
•When copying is complete
•Fax communication is complete
•When a paper jam occurs
•AirPrint Buzzer Volume
1 Press the  (SETTING) button on the operator panel.
2 Press the  button once to select [Admin Setup] and press the
  button.
3 Enter the administrator password, and then press the  (OK) button.
The factory default administrator password is "999999". If the administrator password is changed, enter the updated password.
4Press the  or
or  button repeatedly to select [Manage Unit] and press the
  button.
5Press the  or
or  button repeatedly to select [Sound Control] and press the
  button.
6Press the  or
or  button to select the item whose volume you want to adjust and press the
  (OK) button.
7Press the  or
or  button to select the volume level and press the
  (OK) button.
- 13 -

1. Basic Operations
Simultaneous Operation (Multitasking)
This machine can operate several functions simultaneously. For details, refer to the following table.
•You cannot use the operator panel while the machine reads documents.
•During the simultaneous operation, each operation performance may be deteriorated.
•Depending on the machine condition, such as memory full, simultaneous operation may not be accepted.
: Available |
: Not available |
|
|
|
|
|
|
|
|
|
|
First task |
|
|
Second task |
|
|
|
Copy |
Fax |
Fax reception |
Scan To |
Printing from a |
|
|
transmission |
|
Shared Folder/ |
computer |
|
|
|
|
Scan To E- |
|
|
|
|
|
mail/Scan To |
|
|
|
|
|
USB Memory |
|
Copy |
*2 |
|
*2 |
|
*2 |
Fax transmission |
|
*1 |
|
|
|
Fax reception |
*2 |
*1 |
|
|
*2 |
Scan To Shared |
|
|
|
|
|
Folder |
|
|
|
|
|
|
|
|
|
|
|
Scan To E-Mail |
|
|
|
|
|
|
|
|
|
|
|
Scan To USB |
|
|
|
|
|
Memory |
|
|
|
|
|
|
|
|
|
|
|
Printing from a |
*2 |
|
*2 |
|
*2 |
computer |
|
|
|
|
|
|
|
|
|
|
|
*1 If the first task is sending, the second task is suspended until the first task is completes. *2 When the first task completes, the second task starts to be printed.
- 14 -
Checking the Information of the Machine
Print the machine information and check the status. Press the  (STATUS) button on the operator panel to check the information such as remaining level of consumables.
•Printing a Report to Check
•Checking the Status on the Operator Panel
1. Basic Operations
Printing a Report to Check
You can print and check the configuration or the job logs of this machine.
1 Press the  (SETTING) button on the operator panel.
2 Check that [Reports] is selected, and then press the  button.
3Press the  or
or  button to select the category of the report you want to print and press the
  button.
4Press the  or
or  button to select the report to print and press the
  button.
If the administrator login screen is displayed, enter administrator password.
The factory default administrator password is "999999". If the administrator password is changed, enter the updated password.
5 Checkbutton.that [Yes] is selected on the confirmation screen, and press the  (OK)
(OK)
If you press the  (SETTING) button on the operator panel and select [Admin Setup] > [Manage Unit] > [System Setup] and then set [Allow All Reports To Print] to [Disable], log in as the administrator to print the following reports.
•Scan To Log
•Speed Dial List
•Group List
•Fax Log
•Address Book
Item |
Description |
Configuration |
Prints detailed settings of this machine. |
|
|
- 15 -

|
Item |
|
Description |
System |
File List |
|
Prints a list of job files. |
|
|
|
|
|
Demo Page |
|
Prints a demo page. |
|
|
|
|
|
Error Log |
|
Prints an error log. |
|
|
|
|
|
Scan To Log |
|
Prints the results of the jobs of Scan To E- |
|
|
|
mail, Scan To Shared Folder, or Scan To |
|
|
|
USB Memory. |
|
|
|
|
|
Usage Report |
Copies |
Prints the total of the job logs. Specifies |
|
|
|
the number of pages to print on the |
|
|
|
[Copies] screen. |
|
|
|
|
|
Network Information |
|
Prints general information on the network. |
|
|
|
|
|
Suppies Report |
|
Prints the information about consumables. |
|
|
|
|
|
User Counter Report |
|
Prints the user counter report. |
|
|
|
|
|
Job Log |
|
Prints the Job Log. |
|
|
|
|
Fax |
Speed Dial List |
|
Prints the list of the fax numbers |
|
|
|
registered for speed dials. |
|
|
|
|
|
Group List |
|
Prints the list of the fax numbers |
|
|
|
registered in groups. |
|
|
|
|
|
Fax Tx Log |
|
Prints the list of the transmission results of |
|
|
|
the latest 100 fax jobs. |
|
|
|
|
|
Fax Rx Log |
|
Prints the list of the reception results of the |
|
|
|
latest 100 fax jobs. |
|
|
|
|
|
Fax Tx/Rx Log |
|
Prints the list of the transmission and |
|
|
|
reception results of the latest 100 fax jobs. |
|
|
|
|
|
Daily Tx/Rx Log Report |
Prints Tx/Rx report for communications |
|
|
|
|
within 24 hours. |
|
|
|
|
|
Fcode Box List |
|
Prints the list of Fcode boxes. |
|
|
|
|
|
Block Junk Fax |
|
Prints the address list for Block Junk Fax. |
|
|
|
|
E-mail/Internet Fax |
Journal Report |
|
Prints the transmission and reception |
|
|
|
results of the latest 50 items of Scan To E- |
|
|
|
mail, Internet Fax, printing e-mail |
|
|
|
attachment files, and Scan to Fax server. |
|
|
|
|
|
Address Book |
|
Prints the registered address list. |
|
|
|
|
PCL Font List |
|
Prints a list of PCL font samples. |
|
|
|
|
|
|
PSE Font List |
|
Prints a list of PSE font samples. |
|
|
|
|
|
PPR Font List |
|
Prints a list of IBMPPR font samples. |
|
|
|
|
|
FX Font List |
|
Prints a list of EPSON FX font samples. |
|
|
|
|
|
Color Tuning Pattern |
|
Prints a color tuning pattern. |
|
|
|
|
|
ID Check Pattern |
|
Prints the pre-supplied ID check pattern |
|
|
|
for detecting wrong IDs. |
|
|
|
|
|
Engine Status |
|
Prints the current values of engine |
|
|
|
parameter. |
|
|
|
|
|
Color Profile List |
|
Prints a color profile list. |
|
|
|
|
1. Basic Operations
Checking the Status on the Operator Panel
You can check the residual life of consumables, the counter information, and the job list from the  (STATUS) button.
1 Press the  (STATUS) button on the operator panel.
2 Press the  button to select [Device Information] and press the
  button.
3Press the  or
or  button to select the item you want to check and press the
  button.
4 Press the  button to go back to the standby screen.
- 16 -

Easy Setup
In [Easy Setup], you can change the settings of date/time, fax, network, e-mail function by using the  (SETTING) button on the operator panel.
1 Press the  (SETTING) button on the operator panel.
2Press the  or
or  button repeatedly to select [Easy Setup] and press the
  button.
3 Enter the administrator password, and then press the  (OK) button.
The factory default administrator password is "999999". If the administrator password is changed, enter the updated password.
4Follow the on screen instructions.
•Date/Time Setting
|
Item |
Description |
|
Time Zone |
|
|
Sets the GMT time zone. |
|
|
|
|
Daylight Saving |
|
|
Sets daylight saving to ON or OFF. |
|
|
|
|
Server |
|
SNTP Server (Primary) |
Sets the SNTP server to use for setting the |
|
|
|
current date and time. You can enter up to |
|
|
SNTP Server (Secondary) |
|
|
|
|
64 characters. |
|
|
|
|
Manual |
|
Date |
Sets the current date and time manually. |
|
|
|
|
|
|
Time |
|
|
|
|
|
• Fax Setting
Item |
Description |
Fax Number |
Sets the fax number of this machine. You |
|
can enter up to 20 digits. |
|
|
Sender ID |
Sets the sender's information. You can |
|
enter up to 22 characters. |
|
|
• Network Setting
Item |
Description |
Enabling Default Gateway (If wireless LAN module fitted) |
Sets a wired LAN or wireless LAN. |
|
|
|
|
|
|
1. Basic Operations |
|
|
|
|
|
|
|
|
|
Item |
Description |
||
Wireless |
WPS |
WPS-PBC |
WPS-PBC is executed. |
||
Setting (If |
|
|
|
|
|
|
WPS-PIN |
WPS-PIN is executed. |
|||
wireless LAN |
|
||||
|
|
|
|
||
Search |
A list of access point name found in the |
Displays a list of wireless LAN access |
|||
module fitted) |
|||||
|
search |
points' names that are found in a |
|||
|
|
||||
|
|
|
|
search. |
|
|
|
|
|
||
|
|
Manual Setup |
SSID |
Enter an SSID. |
|
|
|
|
|
|
|
|
|
|
Security |
Selects the security of the wireless LAN |
|
|
|
|
|
function. |
|
|
|
|
|
"WPA-EAP" and "WPA2-EAP" can be |
|
|
|
|
|
set only in Web. |
|
|
|
|
|
|
|
|
|
|
WEP Key |
Enter WEP Key. |
|
|
|
|
|
Displays if [WEP] is selected for |
|
|
|
|
|
[Security]. |
|
|
|
|
|
|
|
|
|
|
WPA Encryption Type |
Select a WPA/WPA2-PSK or WPA2- |
|
|
|
|
|
PSK encryption type. |
|
|
|
|
|
Displays if [WPA/WPA2-PSK] or |
|
|
|
|
|
[WPA2-PSK] is selected for [Security]. |
|
|
|
|
|
|
|
|
|
|
WPA Pre-shared Key |
Enter the Pre-shared Key. |
|
|
|
|
|
Displays if [WPA/WPA2-PSK] or |
|
|
|
|
|
[WPA2-PSK] is selected for [Security]. |
|
|
|
|
|
|
|
|
Reconnect |
|
|
Wireless reconnection is executed. |
|
|
|
|
|
|
|
Obtaining IP address |
|
|
Sets to obtain the IP address |
||
|
|
|
|
automatically or manually. |
|
|
|
|
|
|
|
IP Address |
|
|
|
Sets the IP address. You can enter up |
|
|
|
|
|
to 15 characters. |
|
|
|
|
|
|
|
Subnet Mask |
|
|
|
Sets the subnet mask. You can enter |
|
|
|
|
|
up to 15 characters. |
|
|
|
|
|
|
|
Default Gateway |
|
|
|
Sets the gateway address. You can |
|
|
|
|
|
enter up to 15 characters. |
|
|
|
|
|
||
DNS Server (Primary) |
|
|
Sets the IP address for a Primary DNS |
||
|
|
|
|
server. You can enter up to |
|
|
|
|
|
15 characters. |
|
|
|
|
|
||
DNS Server (Secondary) |
|
|
Sets the IP address for a Secondary |
||
|
|
|
|
DNS server. You can enter up to |
|
|
|
|
|
15 characters. |
|
|
|
|
|
||
WINS Server (Primary) |
|
|
Sets the name or the IP address for the |
||
|
|
|
|
WINS server. You can enter up to |
|
|
|
|
|
15 characters. |
|
|
|
|
|
||
WINS Server (Secondary) |
|
|
Sets the name or the IP address for the |
||
|
|
|
|
WINS server. You can enter up to |
|
|
|
|
|
15 characters. |
|
|
|
|
|
|
|
- 17 -

1. Basic Operations
• E-mail Setting
Item |
Description |
Mail Server Address |
Sets the IP address or host name for |
|
the SMTP server. You can enter up to |
|
64 characters. |
|
|
Sender's Address (From) |
Sets an e-mail address for this |
|
machine. |
|
|
Receive Setting |
Sets the protocol to be used for |
|
receiving e-mails. |
|
|
Authentication Method |
Sets the authentication method. |
|
|
SMTP User ID |
Sets the login ID to the server used for |
|
SMTP authentication. You can enter up |
|
to 64 characters. |
|
|
SMTP Password |
Sets the password to the server used |
|
for SMTP authentication. You can enter |
|
up to 64 characters. |
|
|
POP3 Server |
Sets the IP address or host name for |
|
the POP3 server. You can enter up to |
|
64 characters. |
|
|
POP User ID |
Sets the login ID to the server used for |
|
POP authentication. You can enter up |
|
to 64 characters. |
|
|
POP Password |
Sets the password to the server used |
|
for POP authentication. You can enter |
|
up to 16 characters. |
|
|
- 18 -
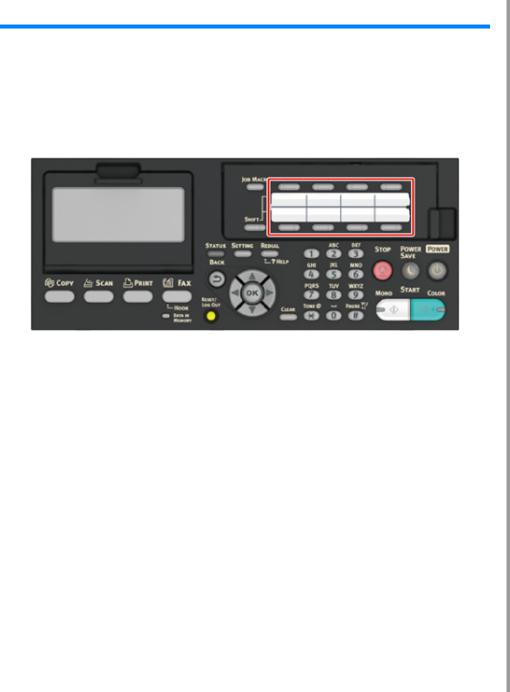
1. Basic Operations
Configuring One Touch Button
On the one-touch buttons, items registered on the address book No. 01 to 16 and speed dial numbers 001 to 016 are registered automatically.
One-touch buttons can be used for Scan To E-mail, Fax, and Internet Fax operations.
To select the speed dial numbers 009 to 016 that are assigned to one-touch buttons, press and hold the  (SHIFT) button and press the one-touch button.
- 19 -

|
|
|
|
|
|
|
|
|
1. Basic Operations |
|
JOB MACRO |
|
|
|
|
||||||
|
|
|
||||||||
|
Registering a Frequently-used Setting as a Macro |
|
||||||||
You can register macros for frequently used function settings for copying, scanning, faxing, |
|
You can create a macro for a frequently-used setting. |
|
|||||||
Internet faxing, and printing in the machine. This "Job Macro" allows you to perform |
1 |
|
|
|
|
|
|
|||
operations more simply and quickly. |
Press the |
|
(COPY) button on the operator panel. |
|
||||||
You can create a macro for settings on the following functions. |
|
|
||||||||
2 |
Change a setting value to register. |
|
|
|
||||||
|
Copying |
|
|
|
||||||
|
3 |
Press the |
|
(JOB MACRO) button on the operator panel. |
|
|||||
|
Printing from USB Memory |
|
|
|||||||
|
Scanning to e-mail |
4 |
Check the settings, and then press the |
(OK) button. |
|
|||||
|
Scanning to Shared Folder |
5 |
Press the |
or |
button to select a number indicated [Unregistered] and |
|||||
|
Scanning to USB Memory |
|||||||||
|
press the |
button. |
|
|
|
|||||
|
Fax Sending |
6 |
|
|
|
|
|
|
||
|
Internet Fax Sending |
Enter a new macro name. |
|
|
|
|||||
|
Scanning to Fax Server |
7 |
Select [Enter], and then press the |
(OK) button. |
|
|||||
|
|
|
|
|||||||
If the user authentication is enabled, log in to the machine before creating a macro. |
8 |
button.Check that [Yes] is selected on the confirmation screen, and press the |
(OK) |
|||||||
You can register up to 16 macros. |
|
|
|
|
|
|
|
|
||
|
|
|
|
|
|
|
|
|
|
|
• |
Registering a Frequently-used Setting as a Macro |
|
|
|
|
|
|
|
|
|
• |
Using a Registered Macro |
|
|
|
|
|
|
|
|
|
• |
Editing a Macro Title |
|
|
|
|
|
|
|
|
|
• |
Checking the Macro Content |
|
|
|
|
|
|
|
|
|
• |
Deleting a Registered Macro |
|
|
|
|
|
|
|
|
|
|
|
|
|
|
|
|
|
|
|
|
|
|
|
|
|
|
|
|
|
|
|
- 20 -
Using a Registered Macro
You can use a macro by reading out it.
1 Press the  (JOB MACRO) button on the operator panel.
2Press the  or
or  button to select the macro you want to use and press the
  button.
3Check that [Execute] is selected, and then press the  (OK) button.
If the access control is enabled on the functions you want to use, a message is displayed to inform you that you are not permitted to use them, and the screen returns to the JOB MACRO menu.
4 Perform a job.
1. Basic Operations
Editing a Macro Title
You can edit a macro title.
1 Press the  (JOB MACRO) button on the operator panel.
2Press the  or
or  button to select the macro you want to edit and press the
  button.
3 Press the  button to select [Title Edit] and press the
  (OK) button.
4 Press the  (OK) button.
5Enter a new title.
 Entering Characters (User's Manual)
6 Select [Enter], and then press the  (OK) button.
- 21 -

Checking the Macro Content
1 Press the  (JOB MACRO) button on the operator panel.
2Press the  or
or  button to select the macro you want to check and press the
  button.
3Press the  or
or  button to select [Execute] or [Register], and then press the
  button.
4Check the content, and then press the  button.
If you select [Execute] to check and press  (OK), the macro is applied.
1. Basic Operations
Deleting a Registered Macro
You can delete a macro.
1 Press the  (JOB MACRO) button on the operator panel.
2Press the  or
or  button to select the macro you want to delete and press the
  button.
3 |
Press the |
or |
button to select [Delete] and press the |
(OK) button. |
|
4 |
Press the |
(OK) button. |
|
|
|
5 |
button.Check that [Yes] is selected on the confirmation screen, and press the |
(OK) |
|||
- 22 -

2Copy
Useful Functions
For a Better Finish
Color Settings
Advanced Copy Settings
Useful Functions
This chapter describes various settings for copying, such as N-in-1 and duplex printing.
Settings on the copy top screen is temporarily enabled. To change the default settings, Press the  (SETTING) button on the operator panel and select [Admin Setup] > [Copy Setup] > [Default Settings].
 Copy Setup
•Specifying the Paper Feed Tray (Paper Feed)
•Making Enlarged or Reduced Copies (Zoom)
•Copying on Both Sides of Paper (Duplex Copy)
•Combining Multiple Pages on One Sheet of Paper (N-in-1)
•Changing the Scan Size (Scan Size)
•Sorting Each Set in Page Order (Sort)
•Enabling Continuous Scan Mode (Continuous Scan)
•Copying Different Size Documents (Mixed Size)
•Resetting Copy Settings (Reset)
•Changing the Document Orientation (Direction)
2. Copy
Specifying the Paper Feed Tray (Paper Feed)
•Setting the Paper Feed Tray to Tray 1/Tray 2/Tray 3 (Except MC363)
•Using the MP (Multi-Purpose) Tray
Setting the Paper Feed Tray to Tray 1/Tray 2/Tray 3 (Except MC363)
1 |
Press the |
(COPY) button on the operator panel. |
|
2 |
Set a document in the ADF or on the document glass. |
|
|
3 |
Press the |
button. |
|
4 |
Press the |
button to select [Paper Feed] and press the |
button. |
5Press the  or
or  button to select the tray to use and press the
  (OK) button.
6Press the  (MONO) or
  (COLOR) button.
•To use the MP (Multi-Purpose) tray with [Paper Feed] being set to [Auto], press the  (SETTING) button on the operator panel and select [Paper Setup] > [Select Tray] > [Copy] > [MR Tray], and then select [ON] or [ON(Prior)].
•[Tray 2]/[Tray 3] are displayed only when the optional tray unit is installed.
•If [Paper Feed] is set to [Auto], you can select a paper tray that holds A4, A5, A6, B5, B6, Letter, Legal13/13.5/14, Executive, Statement, Folio, or 8.5 SQ paper. To use a different paper size, select the paper tray in the [Paper Feed] setting.
Using the MP (Multi-Purpose) Tray
1 |
Press the |
(COPY) button on the operator panel. |
|
2 |
Set a document in the ADF or on the document glass. |
|
|
3 |
Press the |
button. |
|
4 |
Press the |
button to select [Paper Feed] and press the |
button. |
- 24 -

5 Press the  or
or  button to select [MP Tray] and press the
  (OK) button.
6Load paper in the MP tray.
 Loading Paper in the MP Tray (User's Manual)
7 Press the  (MONO) or
  (COLOR) button.
8Check the message, and press the  or
or  button to select [Start] and press the
  (OK) button.
2. Copy
Making Enlarged or Reduced Copies (Zoom)
You can use [Auto] only if copying on A4, A5, A6, B5, B6, Letter, Legal13/13.5/14, Executive, Statement, Folio, or 8.5 SQ paper.
1 |
Press the |
|
(COPY) button on the operator panel. |
|
|
2 |
Set a document in the ADF or on the document glass. |
|
|||
3 |
Press the |
button. |
|
|
|
4 |
Press the |
or |
button to select [Zoom] and press the |
button. |
|
5 |
Select the zoom ratio and press the |
(OK) button. |
|
||
|
• When using [Auto] |
|
|
||
|
(1) Select [Auto], and then press the |
(OK) button. |
|
||
• When selecting a preset zoom rate
(1)Press the  or
or  button to select the value you want to set and press the
  (OK) button.
If [Fit to page(98%)] is selected and the size of the document and the paper are the same, the document is reduced to fit the paper.
• When setting the zoom rate by using the numeric keypad
(1)Enter the zoom rate from 25 to 400% by using the numeric keypad or pressing 
 on the operator panel, and then press the
  (OK) button.
•You can set the rate in units of 1%.
•If you enter an incorrect value, press the  (CLEAR) button, and then enter the correct value.
6 Press the  (MONO) or
  (COLOR) button.
- 25 -
•If [Paper Feed] is set to [Auto], [Zoom] is automatically set to [100%]. To select a different rate, set [Paper Tray], and then set [Zoom].
•If [Paper Feed] is set to [Auto], the paper tray is automatically selected according to the selected zoom rate. To use a specific paper tray, reset [Paper Feed] again.
•Even if [Paper Feed] is set to [Auto], you cannot select a paper tray that holds paper other than A4, A5, A6, B5, B6, Letter, Legal13/13.5/14, Executive, Statement, Folio, or 8.5 SQ paper. In this case, specify from [Paper Feed].
•If [Paper Feed] is set to [Auto], the [Paper Feed] setting automatically changes from [Zoom] to [Auto]. A message is displayed on the display screen to inform you that the setting has been changed.
2. Copy
Copying on Both Sides of Paper (Duplex Copy)
•Available Printing Methods
•Use plain paper of a standard size. Use of paper other than paper of standard sizes may cause paper jams.  Loading Paper (User's Manual)
•To copy a document in your preferred orientation, specify the orientation in [Direction] in advance.  Changing the Document Orientation (Direction)
1 Press the  (COPY) button on the operator panel.
2Set a document in the ADF or on the document glass.
•When printing duplex documents on the both sides of paper or on the single side of paper, set the documents in the ADF.
•When making duplex copies from simplex documents using the document glass, Continuous Scan mode is automatically enabled. Follow the on-screen instructions.
 Enabling Continuous Scan Mode (Continuous Scan)
3 |
Press the |
button. |
|
4 |
Press the |
button to select [Duplex Copy] and press the |
button. |
5Press the  or
or  button to select the duplex copy mode.
Select [Duplex  Duplex] to add options on the binding position.
To make simplex copies of two-sided document, select [Duplex LE  Simplex] or [Duplex SE
  Simplex].
6 Press the  button to select [Binding] and press the
  button.
7Press the  or
or  button to select [Long Edge Bind] or [Short Edge Bind] and then press the
  (OK) button.
 Changing the Document Orientation (Direction)
8 Press the  (MONO) or
  (COLOR) button.
You can change other copy settings.
- 26 -
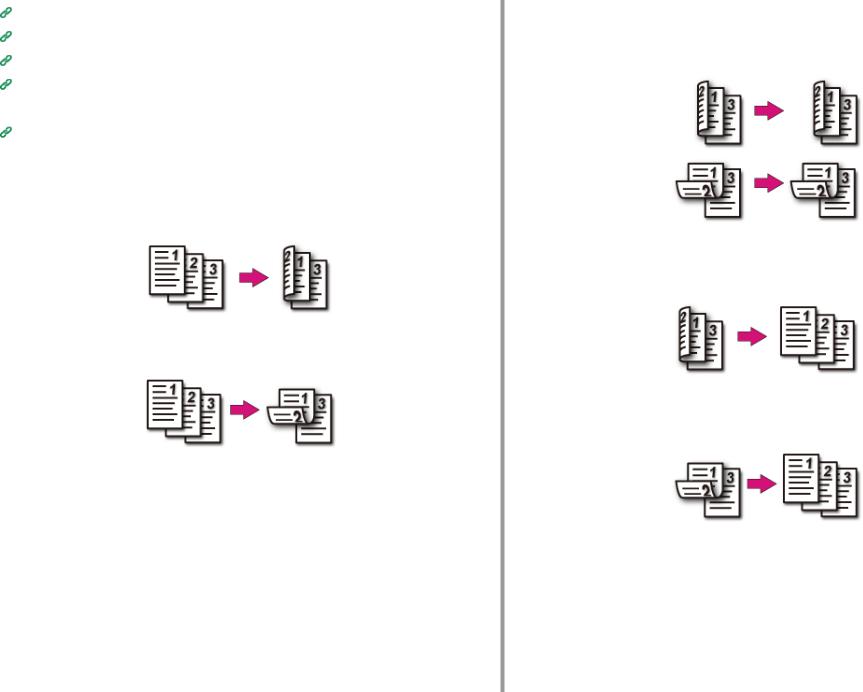
Useful Functions
For a Better Finish
Color Settings
Advanced Copy Settings
It is recommended to set a margin when you want to staple or punch holes in duplex copies.
Setting Margins (Margin)
Available Printing Methods
• Simplex document  Duplex copies with the long edge bound
• Simplex document  Duplex copies with the short edge bound
2. Copy
•Duplex documents  Duplex copies with the long edge bound or the short edge bound
Set a document in the ADF.
•Duplex documents with the long edge bound  Simplex copies
Set a document in the ADF.
•Duplex documents with the short edge bound  Simplex copies
Set a document in the ADF.
- 27 -
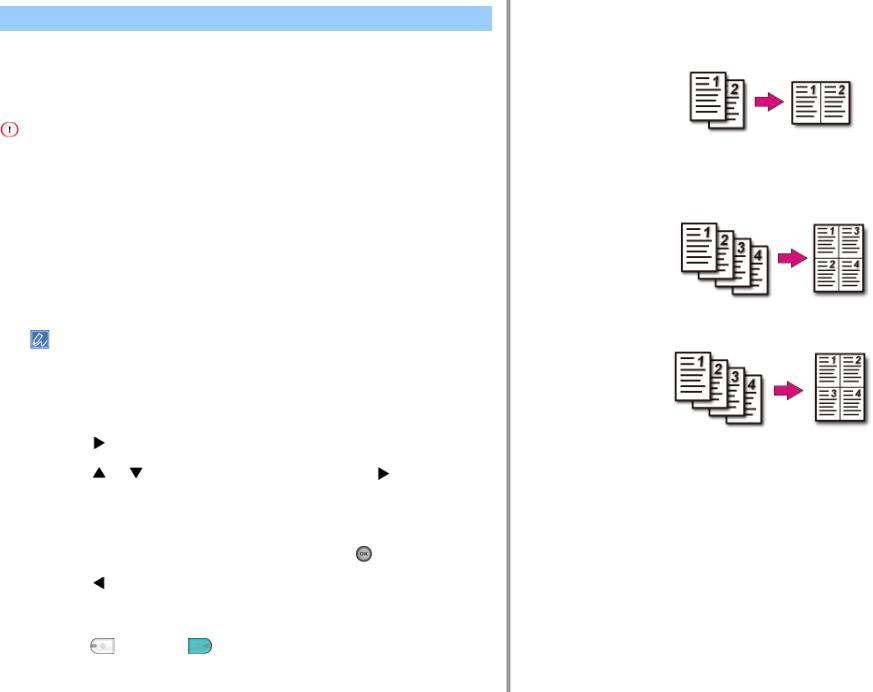
Combining Multiple Pages on One Sheet of Paper (N-in-1)
• Available Printing Methods
You can copy two or four pages of a document into one side of a single sheet of paper. Setting [Duplex Copy] at the same time can save more sheets of paper.
•To copy a document in your preferred orientation, specify the orientation in [Direction] in advance.  Changing the Document Orientation (Direction)
•If [N-in-1] is enabled, [Zoom] is automatically set to [Auto]. To specify a zoom rate, set [N-in-1], and then [Zoom].  Making Enlarged or Reduced Copies (Zoom)
•A part of the document may not be copied properly depending on the paper size, document size or specified rate.
•If [N-in-1] is enabled you cannot select [Auto] for paper feeding source. Select the paper tray to be used.
1 Press the  (COPY) button on the operator panel.
2Set a document in the ADF or on the document glass.
•When using the document glass, Continuous Scan mode is automatically enabled. Follow the on-screen instructions.
•Continuous Scan mode enables you to copy multiple documents at once. You can use both the ADF and document glass for copying multiple documents as a single job.
 Enabling Continuous Scan Mode (Continuous Scan)
3 |
Press the |
button. |
|
|
4 |
Press the |
or |
button to select [N-in-1] and press the |
button. |
5Press the  or
or  button to select an N-in-1 method, and then press the
  (OK) button.
6 |
Change other settings if necessary, and then press the (OK) button. |
||
7 |
Press the |
button to go back to the standby screen. |
|
8 |
Enter the number of copies. |
|
|
9 |
Press the |
(MONO) or |
(COLOR) button. |
2. Copy
Available Printing Methods
•Two sheets  One side of a sheet
•Four sheets  One side of a sheet
•  Vertical
•  Horizontal
- 28 -
Changing the Scan Size (Scan Size)
You can select the appropriate size of the document to be scanned.
1 |
Press the |
(COPY) button on the operator panel. |
|
2 |
Set a document in the ADF or on the document glass. |
|
|
3 |
Press the |
button. |
|
4 |
Check that [Scan Size] is selected, and then press the |
button. |
|
5Press the  or
or  button to select the paper size, and then press the
  (OK) button.
6 Press the  (MONO) or
  (COLOR) button.
2. Copy
Sorting Each Set in Page Order (Sort)
The sort function is enabled by factory default.
1 Press the  (COPY) button on the operator panel.
2Set a document in the ADF or on the document glass.
•Continuous Scan mode enables you to copy multiple documents at once.
•You can use both the ADF and document glass for copying multiple documents as a single job.  Enabling Continuous Scan Mode (Continuous Scan)
3 |
Press the |
button. |
|
|
|
4 |
Press the |
or |
button to select [Sort] and press the |
button. |
|
5 |
Press the |
or |
button to select [ON] and press the |
(OK) button. |
|
6 |
Press the |
button to go back to the standby screen. |
|
||
7 |
Enter the number of copies. |
|
|
||
8 |
Press the |
(MONO) or |
(COLOR) button. |
|
|
- 29 -

Enabling Continuous Scan Mode (Continuous Scan)
This function is useful when you want to copy multiple books.
To scan multiple sets of documents and make copies as a single job, enable the Continuous Scan mode. This mode is useful when using the [Sort], [N-in-1], or [Duplex Copy] function.
In Continuous Scan mode, you can copy your documents from the ADF, document glass, or both of them.
Sorting Each Set in Page Order (Sort)
Combining Multiple Pages on One Sheet of Paper (N-in-1)
Copying on Both Sides of Paper (Duplex Copy)
Cancelling Copying (User's Manual)
1 Press the  (COPY) button on the operator panel.
2 Set the first sheet of a document in the ADF or on the document glass.
When making N-in-1 and/or duplex copies by using the document glass, the [Please set next document] screen is displayed after scanning the documents even if [Continuous Scan] is set to [OFF].
3 Press the  button.
4Press the  or
or  button to select [Continuous Scan] and press the
  button.
5 Press the  or
or  button to select [ON] and press the
  (OK) button.
6 Press the  button to go back to the standby screen.
7 Enter the number of copies by using the numeric keypad.
8 Press the  (MONO) or
  (COLOR) button.
9When the [Please set next document.] screen is displayed, set the next document in the ADF or on the document glass.
When changing the place to set the next document, be sure to remove the document from the place you used first.
|
|
|
|
2. Copy |
10 |
Check that [Start Scan] is selected, and then press the |
(OK) button. |
||
11 |
When scanning all sets of the documents is complete, press the |
button to |
||
select [Scan Complete] and press the |
(OK) button. |
|
|
|
If you select [Scan Complete] after scanning all the documents with multiple copies (2 or more) being set for [Copies] and press the  (OK) button, the remaining number of copies are copied.
- 30 -
Loading...