


 Loading...
User Manual
Nighthawk AX12
12-Stream AX6000 WiFi Router
Model RAX120
|
NETGEAR, Inc. |
October 2020 |
350 E. Plumeria Drive |
202-11873-05 |
San Jose, CA 95134, USA |

Nighthawk AX12 12-Steam AX6000 WiFi Router
Support and Community
Visit netgear.com/support to get your questions answered and access the latest downloads.
You can also check out our NETGEAR Community for helpful advice at community.netgear.com.
Regulatory and Legal
Si ce produit est vendu au Canada, vous pouvez accéder à ce document en français canadien à https://www.netgear.com/support/download/.
(If this product is sold in Canada, you can access this document in Canadian French at https://www.netgear.com/support/download/.)
ForregulatorycomplianceinformationincludingtheEUDeclarationofConformity,visit https://www.netgear.com/about/regulatory/.
See the regulatory compliance document before connecting the power supply.
For NETGEAR’s Privacy Policy, visit https://www.netgear.com/about/privacy-policy.
By using this device, you are agreeing to NETGEAR’s Terms and Conditions at https://www.netgear.com/about/terms-and-conditions. If you do not agree, return the device to your place of purchase within your return period.
Trademarks
©NETGEAR, Inc. NETGEAR, and the NETGEAR Logo are trademarks of NETGEAR, Inc. Any non-NETGEAR trademarks are used for reference purposes only.
2

Contents
Chapter 1 Hardware Setup |
|
Unpack Your Router........................................................................... |
10 |
Top Panel LEDs and Buttons............................................................. |
11 |
Rear Panel............................................................................................ |
13 |
Extend the Antennas.......................................................................... |
15 |
Router Label........................................................................................ |
15 |
Position Your Router........................................................................... |
15 |
Cable Your Router.............................................................................. |
17 |
Turn the LEDs On or Off Using the LED On/Off Switch................. |
18 |
Chapter 2 Connect to the network and access the router |
|
Connect to the network..................................................................... |
20 |
Connect to the network using a wired connection.................... |
20 |
Find and connect to the WiFi network........................................ |
20 |
WiFi connection using WPS.......................................................... |
20 |
Types of logins.................................................................................... |
21 |
Use a web browser to access the router.......................................... |
21 |
Automatic Internet Setup.............................................................. |
21 |
Log in to the router........................................................................ |
23 |
Install and manage your router with the Nighthawk app.............. |
23 |
Change the language........................................................................ |
24 |
Chapter 3 Specify Your Internet Settings |
|
Use the Internet Setup Wizard.......................................................... |
26 |
Manually set up the Internet connection......................................... |
26 |
Specify an Internet connection without a login.......................... |
26 |
Specify an Internet connection that uses a login....................... |
28 |
Manage a Multi-Gig Internet connection........................................ |
30 |
Get Multi-Gig Internet With the Multi-Gig Port.......................... |
30 |
Get Multi-Gig Internet With Port Aggregation........................... |
31 |
Specify IPv6 Internet connections.................................................... |
32 |
Requirements for entering IPv6 addresses................................. |
33 |
Use auto detect for an IPv6 Internet connection........................ |
33 |
Set up an IPv6 6to4 tunnel Internet connection......................... |
34 |
Set up an IPv6 pass-through Internet connection...................... |
36 |
Set up an IPv6 fixed Internet connection.................................... |
36 |
3

Nighthawk AX12 12-Steam AX6000 WiFi Router
Set up an IPv6 DHCP Internet connection.................................. |
38 |
Set up an IPv6 PPPoE Internet connection.................................. |
39 |
Use auto config for an IPv6 Internet connection........................ |
41 |
Set up an IPv6 6rd Internet connection....................................... |
42 |
Manage the MTU size......................................................................... |
44 |
MTU concepts................................................................................. |
44 |
Change the MTU size.................................................................... |
45 |
Chapter 4 Control Access to the Internet |
|
Enable access control to allow or block access to the Internet.... |
48 |
Use keywords to block Internet sites............................................... |
49 |
Block services from the Internet....................................................... |
50 |
Delete keywords from the blocked list............................................ |
51 |
Prevent blocking on a trusted computer......................................... |
52 |
Manage network access control lists............................................... |
53 |
Schedule when to block Internet sites and services...................... |
53 |
Set up security event email notifications......................................... |
54 |
Chapter 5 Optimize Performance |
|
Optimize Internet Streaming With QoS........................................... |
57 |
Enable Upstream QoS................................................................... |
57 |
Add a Custom QoS Rule............................................................... |
58 |
Edit a QoS Rule.............................................................................. |
58 |
Delete a QoS Rule.......................................................................... |
59 |
Delete All QoS Rules..................................................................... |
60 |
Improve Network Connections With Universal Plug-N-Play......... |
60 |
Manage Wi-Fi Multimedia Quality of Service.................................. |
62 |
Enable or Disable Smart Connect.................................................... |
62 |
Enable or disable AX WiFi................................................................. |
63 |
Chapter 6 Manage Network Settings |
|
View or change the WAN settings.................................................... |
66 |
Set up a default DMZ server.............................................................. |
67 |
Change the Router’s Device Name.................................................. |
68 |
Change the LAN TCP/IP settings...................................................... |
68 |
Specify the IP addresses that the router assigns............................ |
70 |
Disable the DHCP server feature in the router............................... |
71 |
Manage reserved LAN IP addresses................................................ |
72 |
Reserve an IP address.................................................................... |
72 |
Edit a reserved IP address............................................................ |
73 |
Delete a reserved IP address entry.............................................. |
73 |
Use the WPS Wizard for WiFi connections...................................... |
74 |
Specify basic WiFi settings................................................................ |
75 |
Change the WiFi Password or the WiFi Security............................ |
76 |
4

Nighthawk AX12 12-Steam AX6000 WiFi Router
Change the WiFi Mode...................................................................... |
78 |
Change the Transmission Power Control........................................ |
79 |
Set Up a Guest WiFi Network............................................................ |
80 |
Control the WiFi radios...................................................................... |
82 |
Use the WiFi On/Off button.......................................................... |
82 |
Enable or disable the WiFi radios................................................ |
82 |
Set up a WiFi schedule....................................................................... |
83 |
Specify WPS settings.......................................................................... |
84 |
Set up the router as a WiFi access point.......................................... |
85 |
Set Up the Router in Bridge Mode................................................... |
86 |
Return the router to router mode..................................................... |
87 |
Set up a bridge for a port group or VLAN tag group.................... |
88 |
Set up a bridge for a port group.................................................. |
88 |
Set up a bridge for a VLAN tag group........................................ |
89 |
Set up an IPTV port........................................................................ |
91 |
Manage custom static routes............................................................ |
92 |
Set up a static route....................................................................... |
92 |
Edit a static route........................................................................... |
93 |
Delete a static route....................................................................... |
94 |
Enable or disable MU-MIMO............................................................ |
95 |
Manage Ethernet Port Aggregation to a LAN Device................... |
95 |
Set Up Ethernet Port Aggregation to a LAN Device.................. |
96 |
View or Change the Router Ethernet Port Aggregation Mode.98 |
|
Chapter 7 Manage Your Router |
|
Update the router firmware............................................................ |
101 |
Check for new firmware and update the router...................... |
101 |
Manually upload firmware to the router................................... |
102 |
Change the admin password.......................................................... |
103 |
Enable admin password recovery.................................................. |
103 |
Recover the admin password......................................................... |
104 |
View information about the router and the Internet and WiFi |
|
settings............................................................................................... |
105 |
Display the statistics of the Internet port....................................... |
106 |
Check the Internet connection status............................................ |
107 |
View and manage logs of router activity....................................... |
108 |
View devices currently on the network.......................................... |
109 |
Monitor Internet traffic..................................................................... |
109 |
Manage the router configuration file............................................. |
111 |
Back up the settings.................................................................... |
111 |
Erase the settings......................................................................... |
111 |
Restore the settings..................................................................... |
112 |
Manage remote access.................................................................... |
113 |
Set up remote management...................................................... |
113 |
5

Nighthawk AX12 12-Steam AX6000 WiFi Router
Use remote access....................................................................... |
114 |
Connect to your router with Anywhere Access............................ |
114 |
Disable LED blinking or turn off LEDs............................................ |
115 |
Set your time zone............................................................................ |
115 |
Set the NTP Server........................................................................... |
116 |
Specify ReadyDLNA Media Server Settings.................................. |
117 |
Return the router to its factory default settings............................ |
118 |
Use the Reset button................................................................... |
118 |
Erase the settings......................................................................... |
118 |
Chapter 8 Share USB Storage Devices Attached to the Router |
|
USB device requirements................................................................ |
121 |
Connect a USB storage device to the router................................ |
121 |
Access a storage device connected to the router from a |
|
Windows-based computer.............................................................. |
122 |
Map a USB device to a Windows network drive........................... |
122 |
Access a storage device that is connected to the router from a |
|
Mac..................................................................................................... |
123 |
Back up Windows-based computers with ReadySHARE Vault.... |
124 |
Back up Mac computers with Time Machine................................ |
124 |
Set up a USB hard drive on a Mac............................................. |
125 |
Prepare to back up a large amount of data.............................. |
126 |
Use Time Machine to back up onto a USB hard disk.............. |
126 |
Enable FTP access within your network......................................... |
128 |
View network folders on a storage device.................................... |
128 |
Add a network folder on a USB storage device........................... |
129 |
Edit a network folder on a USB storage device............................ |
130 |
Safely remove a USB storage device............................................. |
131 |
Chapter 9 Use Dynamic DNS to Access USB Storage Devices |
|
Through the Internet |
|
Set up and manage Dynamic DNS................................................. |
133 |
Set up FTP access through the Internet......................................... |
133 |
Your personal FTP server................................................................ |
134 |
Set up your personal FTP server................................................ |
134 |
Set up a new Dynamic DNS account......................................... |
135 |
Specify a DNS account that you already created..................... |
135 |
Change the Dynamic DNS settings........................................... |
136 |
Access USB storage devices through the Internet....................... |
137 |
Remotely access a USB device using ReadyCLOUD................... |
137 |
Create a ReadyCLOUD account................................................ |
138 |
Register your router with ReadyCLOUD................................... |
138 |
6

Nighthawk AX12 12-Steam AX6000 WiFi Router
Chapter 10 Use VPN to Access Your Network |
|
Set up a VPN connection................................................................. |
141 |
Specify VPN service in the router................................................... |
141 |
Install OpenVPN software............................................................... |
142 |
Install OpenVPN Software on Your Windows Computer....... |
142 |
Install OpenVPN software on your Mac computer.................. |
145 |
Install OpenVPN software on an iOS device............................ |
146 |
Install OpenVPN software on an Android device.................... |
146 |
Use a VPN tunnel on your Windows computer............................ |
147 |
Use VPN to access the router’s USB device and media.............. |
149 |
Use VPN to access your Internet service at home........................ |
149 |
Set up VPN client Internet access in the router........................ |
150 |
Block VPN client Internet access in the router......................... |
150 |
Use a VPN tunnel to access your Internet service at home.... |
151 |
Chapter 11 Manage port forwarding and port triggering |
|
Manage port forwarding to a local server..................................... |
154 |
Set up port forwarding to a local server................................... |
154 |
Add a custom port forwarding service..................................... |
155 |
Edit a port forwarding service.................................................... |
156 |
Delete a port forwarding entry.................................................. |
157 |
Application xxample: Make a local web server public........... |
157 |
How the router implements the port forwarding rule............. |
158 |
Port triggering.................................................................................. |
158 |
Add a port triggering service..................................................... |
159 |
Enable port triggering................................................................ |
160 |
Application example: Port triggering for Internet relay chat port |
|
triggering...................................................................................... |
160 |
Chapter 12 Troubleshooting |
|
Quick tips........................................................................................... |
163 |
Sequence to restart your network............................................. |
163 |
Check the power adapter and Ethernet cable connections... |
163 |
Check the WiFi settings.............................................................. |
163 |
Check the network settings........................................................ |
163 |
Troubleshoot with the LEDs............................................................ |
164 |
Standard LED behavior when the router is powered on........ |
164 |
Power LED is off or blinking....................................................... |
164 |
LEDs never turn off...................................................................... |
164 |
Internet or Ethernet LAN port LEDs are off.............................. |
165 |
WiFi LED is off.............................................................................. |
165 |
You cannot log in to the router....................................................... |
165 |
You cannot access the Internet....................................................... |
166 |
7

Nighthawk AX12 12-Steam AX6000 WiFi Router
Troubleshoot Internet browsing..................................................... |
168 |
Changes are not saved.................................................................... |
168 |
Troubleshoot WiFi connectivity...................................................... |
169 |
Troubleshoot your network using the ping utility........................ |
169 |
Test the LAN path to your router............................................... |
169 |
Test the path from a Windows-based computer to a remote |
|
device............................................................................................ |
170 |
Chapter 13 Supplemental Information |
|
Factory Settings................................................................................ |
173 |
Technical Specifications.................................................................. |
174 |
8

1
Hardware Setup
This chapter contains the following sections:
•Unpack Your Router
•Top Panel LEDs and Buttons
•Rear Panel
•Extend the Antennas
•Router Label
•Position Your Router
•Cable Your Router
•Turn the LEDs On or Off Using the LED On/Off Switch
Formoreinformationaboutthetopicscoveredinthismanual,visitthesupportwebsite at netgear.com/support.
9
Nighthawk AX12 12-Steam AX6000 WiFi Router
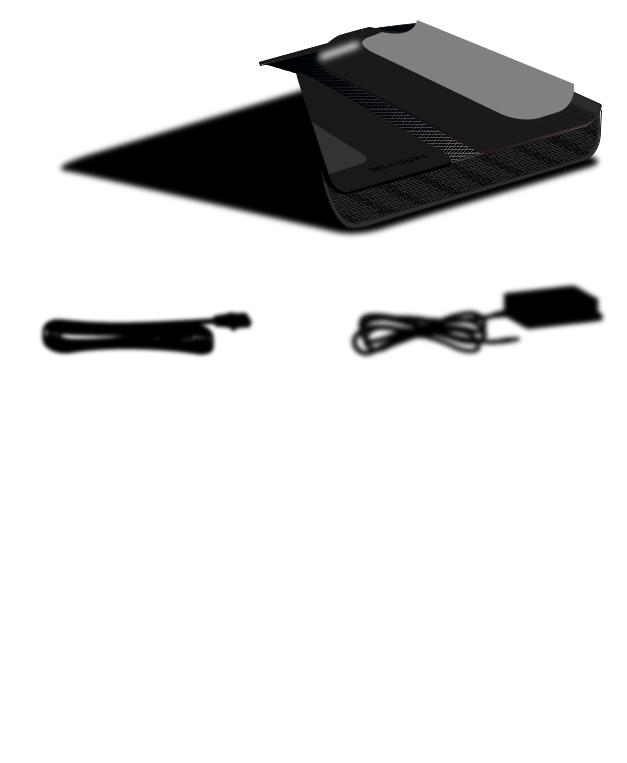
Unpack Your Router
Your package contains the router, the power adapter, and an Ethernet cable.
Figure 1. Package contents
Hardware Setup |
10 |
User Manual |

Nighthawk AX12 12-Steam AX6000 WiFi Router
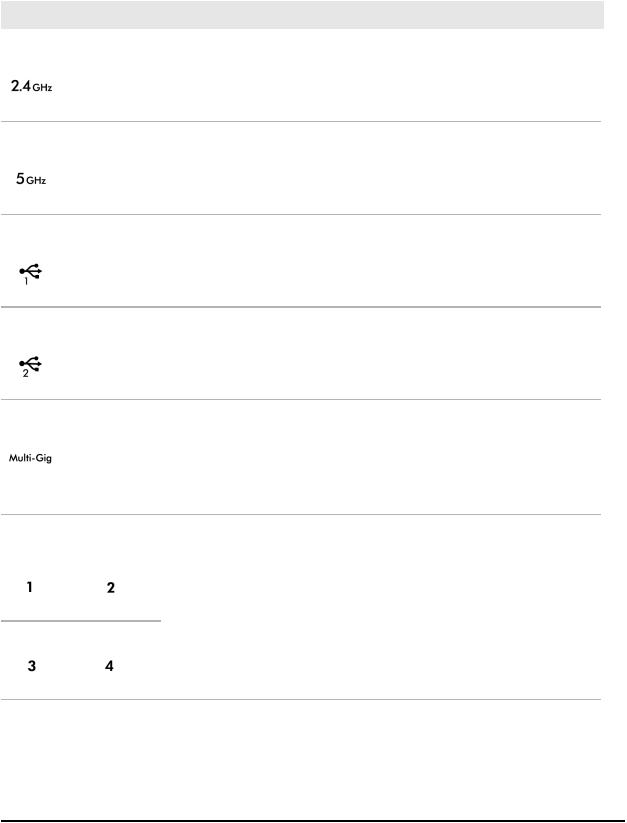
Top Panel LEDs and Buttons
The status LEDs and two buttons are located on the top panel of the router.
Figure 2. Top view
Table 1. LED descriptions
LED and Button |
Description |
Power LED |
Solid white. The router is ready. |
|
Blinking white. The router is not ready, firmware is upgrading, or the Reset |
|
button was pressed. |
|
Off. Power is not supplied to the router. |
Internet LED |
Solid white. The Internet connection is ready. |
|
Blinking white. The port is sending or receiving traffic. |
|
Off. No Ethernet cable is connected between the router and the modem. |
Hardware Setup |
11 |
User Manual |
Nighthawk AX12 12-Steam AX6000 WiFi Router
Table 1. LED descriptions (Continued)
LED and Button |
Description |
2.4 GHz WiFi LED |
Solid white. The 2.4 GHz WiFi radio is operating. |
|
Blinking white. The router is sending or receiving WiFi traffic. |
|
Off. The 2.4 GHz WiFi radio is off. |
5 GHz WiFi LED |
Solid white. The 5 GHz WiFi radio is operating. |
|
Blinking white. The router is sending or receiving WiFi traffic. |
|
Off. The 5 GHz WiFi radio is off. |
USB port 1 LED |
Solid white. A USB device is connected and is ready. |
|
Blinking white. A USB device is plugged in and is trying to connect, or a file is |
|
transferring to or from the USB device . |
|
Off. No USB device is connected, or someone clicked the Safely Remove |
|
Hardware button and it is now safe to remove the attached USB device. |
USB port 2 LED |
Solid white. A USB device is connected and is ready. |
|
Blinking white. A USB device is plugged in and is trying to connect, or a file is |
|
transferring to or from the USB device . |
|
Off. No USB device is connected, or someone clicked the Safely Remove |
|
Hardware button and it is now safe to remove the attached USB device. |
Mulit-GigEthernetportLED Solid green. A 5 Gbps or 2.5 Gbps connection is established.
Blinking green. The port is sending or receiving traffic at 5 Gbps or 2.5 Gbps. Solid white. A 1 Gbps connection is established.
Blinking white. The port is sending or receiving traffic at 1 Gbps. Solid amber. A 100 Mbps connection is established.
Blinking amber. The port is sending or receiving traffic at 100 Mbps.
.
EthernetLEDsforports1–4 The LED color indicates the speed: white for Gigabit Ethernet connections and  amber for 100 Mbps or 10 Mbps Ethernet connections.
Solid white. The router detected a 1 Gbps link with a powered-on device. Blinking white. The port is sending or receiving traffic at 1 Gbps. Solidamber.Therouterdetecteda100Mbpsor10Mbpslinkwithapowered-on device.
Blinkingamber.Theportissendingorreceivingtrafficat100Mbpsor10Mbps. Off. No device is connected to this Ethernet port.
Hardware Setup |
12 |
User Manual |
Nighthawk AX12 12-Steam AX6000 WiFi Router
Table 1. LED descriptions (Continued)
LED and Button |
Description |
WPS LED |
Pressing the WPS button lets your WPS-enabled device join your router's WiFi |
|
network without typing the WiFi password. The WPS LED blinks white during |
|
the WPS process and then lights solid white when the WPS-enabled device |
|
connects to your router's WiFi network. |
WiFi LED |
PressingtheWiFibuttonfortwosecondsturnsthe2.4Ghzand5GHzWiFiLEDs |
|
and WiFi radios on and off. |
|
IfthisLEDislit,theWiFiradiosareon.IfthisLEDisoff,theWiFiradiosareturned |
|
off and you cannot use WiFi to connect to the router. |
Note: If the LED On/Off switch on the rear panel is moved to the Off position, all the LEDs except the Power LED are turned off.
Rear Panel
The following figure shows the rear panel connectors and buttons.
Figure 3. Rear panel
Hardware Setup |
13 |
User Manual |

Nighthawk AX12 12-Steam AX6000 WiFi Router
Viewed from left to right, the rear panel contains the following components:
•LED On/Off switch. Move the LED On/Off switch to the Off position to turn off the router LEDs. The Power LED stays lit even if the LED On/Off switch is in the Off position.
•Ethernet ports. Four Gigabit Ethernet RJ-45 LAN ports. Use these ports to connect the router to LAN devices.
You can aggregate Ethernet port 1 with the Internet port for Internet (WAN) integration, or you can aggregate Ethernet ports 1 and 2 together for LAN aggregation:
-Internet (WAN) aggregation. Use Ethernet port 1 with the Internet port to set up a port aggregation link for a Multi-Gig Internet connection. For more information, see Get Multi-Gig Internet With Port Aggregation on page 31.
-LANaggregation.IfyoudonotuseEthernetport1forInternet(WAN)integration, you can use Ethernet ports 1 and 2 to set up a port aggregation link to a LAN device that also supports Ethernet port aggregation (see Manage Ethernet Port Aggregation to a LAN Device on page 95).
You can set up either Internet (WAN) aggregation or LAN aggregation. Ethernet ports 3 and 4 are non-aggregate Ethernet ports.
•Internet port. One Gigabit Ethernet RJ-45 WAN port to connect the router to an Internet modem such as a cable modem or DSL modem.
You also use the Internet port with Ethernet port 1 to set up a port aggregation link foraMulti-GigInternetconnection.Formoreinformation,seeGetMulti-GigInternet With Port Aggregation on page 31.
If you do not use the Internet port for your Internet connection (for example, if you set up a Multi-Gig Internet connection using the Multi-Gig 5G/2.5G/1G Ethernet port), you can use the Internet port as an extra LAN port.
•Multi-Gig 5G/2.5G/1G Ethernet port. Use a Category 5e (Cat5e) Ethernet cable or higher rated Ethernet cable to connect a high-speed modem for a high-speed Internet connection. For more information, see Get Multi-Gig Internet With the Multi-Gig Port on page 30.
If you do not use the Multi-Gig port for an Internet connection, you can connect a high-speed LAN device such as a Multi-Gig Ethernet switch to the port.
•Reset button. Pressing the Reset button resets the router.
IftheResetbuttonispressedforatleast10secondsandthePowerLEDblinkswhite, the router returns to its factory settings. For information about the factory settings, see Factory Settings on page 173.
•Power On/Off button. Press the Power On/Off button to provide power to the router.
•DCpowerconnector.Connectthepoweradapterthatcameintheproductpackage to the DC power connector.
Hardware Setup |
14 |
User Manual |

Nighthawk AX12 12-Steam AX6000 WiFi Router
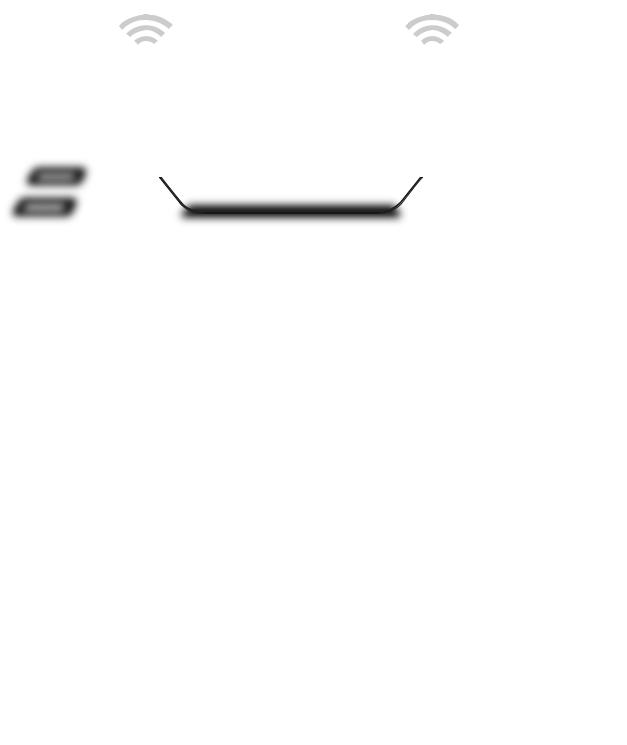
Extend the Antennas
Before you install your router, extend the antennas as shown in the following figure.
Figure 4. Position the antennas
Router Label
The router label shows the login information, WiFi Network Name (SSID), network key (password), serial number, and MAC address.
WiGig
Figure 5. Router label
Position Your Router
The router lets you access your network anywhere within the operating range of your WiFi network. However, the operating distance or range of your WiFi connection can vary significantly depending on the physical placement of your router.
Hardware Setup |
15 |
User Manual |

Nighthawk AX12 12-Steam AX6000 WiFi Router
In addition, position your router according to the following guidelines:
•Placeyourrouternearthecenteroftheareawhereyourcomputersandotherdevices operate, and within line of sight to your WiFi devices.
•Make sure that the router is within reach of an AC power outlet and near Ethernet cables for wired computers.
•Place the router in an elevated location, minimizing the number walls and ceilings between the router and your other devices.
•Place the router away from electrical devices such as these:
-Ceiling fans
-Home security systems
-Microwaves
-Computers
-Base of a cordless phone
-2.4 GHz cordless phone
-5 GHz cordless phone
•Placetherouterawayfromlargemetalsurfaces,largeglasssurfaces,insulatedwalls, and items such as these:
-Solid metal door
-Aluminum studs
-Fish tanks
-Mirrors
-Brick
-Concrete
The following factors might limit the range of your WiFi:
•The thickness and number of walls the WiFi signal passes through.
•OtherWiFiaccesspointsinandaroundyourhomemightaffectyourrouter’ssignal.
WiFiaccesspointsarerouters,repeaters,WiFirangeextenders,andanyotherdevice that emits a WiFi signal for network access.
Hardware Setup |
16 |
User Manual |
Nighthawk AX12 12-Steam AX6000 WiFi Router
Cable Your Router
Power on your router and connect it to a modem.
Figure 6. Cable your router
To cable your router:
1.Unplug your modem, remove and reinsert the backup battery if it uses one, and then plug the modem back in.
2.Use the Ethernet cable to connect the modem to the yellow Internet port on the router.
Note: If your Internet connection does not require a modem, connect your main Ethernet cable to the yellow Internet port on the router.
3.Connectthepoweradaptertoyourrouterandplugthepoweradapterintoanoutlet.
4.Press the Power On/Off button on the rear panel of the router. The router’s Power LED lights solid white when the router is ready.
Hardware Setup |
17 |
User Manual |

Nighthawk AX12 12-Steam AX6000 WiFi Router
Turn the LEDs On or Off Using the LED On/Off Switch
You can turn off the router LEDs using the LED On/Off switch on the rear panel of the router. The Power LED stays lit even if the LED On/Off switch is in the Off position.
Note: YoucanalsologintotheroutertodisableorenableLEDblinkingorturnoffthe LEDs (see Disable LED blinking or turn off LEDs on page 115).
To turn the LEDs on or off using the LED On/Off switch:
Move the LED On/Off switch on the rear panel to the On or Off position.
|
|
|
|
|
|
|
|
|
|
|
|
|
|
|
|
|
|
|
|
|
|
|
|
|
|
|
|
|
|
|
|
|
|
|
|
|
|
|
|
|
|
|
|
|
|
|
|
|
|
|
|
|
|
|
|
|
|
|
|
|
|
|
|
|
|
|
|
|
|
|
|
|
|
|
|
|
|
|
|
|
|
|
|
|
|
|
|
|
|
|
|
|
|
|
Hardware Setup |
18 |
|
|
|
|
|
|
|
|
|
|
User Manual |
||||||

2
Connecttothenetworkandaccess the router
You can connect to the router’s WiFi networks or use a wired Ethernet connection. This chapter explains the ways you can connect and how to access the router and log in.
The chapter contains the following sections:
•Connect to the network
•Types of logins
•Use a web browser to access the router
•Install and manage your router with the Nighthawk app
•Change the language
19

Nighthawk AX12 12-Steam AX6000 WiFi Router
Connect to the network
You can connect to the router’s network through a wired or WiFi connection. If you set upyourcomputertouseastaticIPaddress,changethesettingssothatitusesDynamic Host Configuration Protocol (DHCP).
Connect to the network using a wired connection
You can connect your computer to the router using an Ethernet cable and join the router’s local area network (LAN).
To connect your computer to the router with an Ethernet cable:
1.Make sure that the router is receiving power (its Power LED is lit).
2.Connect an Ethernet cable to an Ethernet port on your computer.
3.Connect the other end of the Ethernet cable a LAN port on the router. Your computer connects to the local area network (LAN).
Find and connect to the WiFi network
To find and select the WiFi network:
1.Make sure that the router is receiving power (its Power LED is lit).
2.On your computer or WiFi device, find and select the WiFi network. The WiFi network name is on the router label.
3.Join the WiFi network and enter the WiFi password. The password is on the router label.
Your device connects to the WiFi network.
WiFi connection using WPS
You can connect your WPS-enabled device to the router’s WiFi network with Wi-Fi Protected Setup (WPS) or you can find and select the WiFi network.
To use WPS to connect to the WiFi network:
1.Make sure that the router is receiving power (its Power LED is lit).
2.Check the WPS instructions for your WPS-enabled device.
3.Press the WPS button on the router.
Connect to the network and |
20 |
User Manual |
access the router |
|
|
Nighthawk AX12 12-Steam AX6000 WiFi Router
4.Within two minutes, on your WPS-enabled device, press its WPS button or follow its instructions for WPS connections.
Your WPS-enabled device connects to the WiFi network.
Types of logins
Separate types of logins serve different purposes. It is important that you understand the differences so that you know which login to use when.
Several types of logins are associated with the router:
•ISP login. The login that your Internet service provider (ISP) gave you logs you in to your Internet service. Your ISP gave you this login information in a letter or some other way. If you cannot find this login information, contact your ISP.
•WiFinetworkkey,WiFipassphrase,orWiFipassword. Yourrouterispresetwith a unique WiFi network name (SSID) and password for WiFi access. This information is on the router label.
•NETGEARaccountlogin.ThefreeNETGEARaccountthatyouneedtoregisteryour router and manage your subscriptions. If you do not own a NETGEAR account, you can create one.
•Router login. The router login password that you need to log in to the router with the admin user name when you use a web browser to access the router.
Use a web browser to access the router
When you connect to the network (either with WiFi or with an Ethernet cable), you can useawebbrowsertoaccesstheroutertovieworchangeitssettings. Whenyouaccess the router, the software automatically checks to see if your router can connect to your Internet service.
Automatic Internet Setup
You can set up your router automatically, or you can use a web browser to access the routerandsetupyourroutermanually. Beforeyoustartthesetupprocess,getyourISP information and make sure that the computers and devices in the network are using the settings described here.
Connect to the network and |
21 |
User Manual |
access the router |
|
|

Nighthawk AX12 12-Steam AX6000 WiFi Router
WhenyourInternetservicestarts,yourInternetserviceprovider(ISP)typicallygivesyou all the information needed to connect to the Internet. For DSL service, you might need the following information to set up your router:
•The ISP configuration information for your DSL account
•ISP login name and password
•Fixed or static IP address setting (special deployment by ISP; this setting is rare)
If you cannot locate this information, ask your ISP to provide it. When your Internet connection is working, you no longer need to launch the ISP login program on your computer to access the Internet. When you start an Internet application, your router automatically logs you in.
The NETGEAR installation assistant runs on any device with a web browser. Installation and basic setup takes about 15 minutes to complete.
To automatically set up your router:
1.Make sure that the router is powered on.
2.Make sure that your computer or mobile device is connected to the router with an Ethernet cable (wired) or over WiFi with the preset security settings listed on the label.
Note: If you want to change the router’s WiFi settings, use a wired connection to avoid being disconnected when the new WiFi settings take effect.
3.Launch a web browser.
The page that displays depends on whether you accessed the router before:
•ThefirsttimeyousetuptheInternetconnectionforyourrouter,thebrowsergoes to http://www.routerlogin.net and the Configuring the Internet Connection page displays.
•IfyoualreadysetuptheInternetconnection,enter http://www.routerlogin.net in the address field for your browser to start the installation process.
4.Follow the onscreen instructions. The router connects to the Internet.
5.IfthebrowserdoesnotdisplaytheNETGEARinstallationassistant,dothefollowing:
•Make sure that the computer is connected to one of the LAN Ethernet ports or over WiFi to the router.
•Make sure that the router is receiving power and that its Power LED is lit.
•Close and reopen the browser or clear the browser cache.
•Browse to http://www.routerlogin.net.
Connect to the network and |
22 |
User Manual |
access the router |
|
|

Nighthawk AX12 12-Steam AX6000 WiFi Router
•If the computer is set to a static or fixed IP address (this setting is uncommon), change it to obtain an IP address automatically from the router.
6.If the router does not connect to the Internet, do the following:
a. Reviewyoursettings. Makesurethatyouselectedthecorrectoptionsandtyped everything correctly.
b. ContactyourISPtoverifythatyouareusingthecorrectconfigurationinformation.
c. Read You cannot access the Internet on page 166. If problems persist, register your router and contact NETGEAR Technical Support.
Log in to the router
When you first connect to your router and launch a web browser, the browser automatically displays the router web interface. If you want to view or change settings for the router later, you can use a browser to log in to the router web interface.
To log in to the router:
1.Launch a web browser from a computer or mobile device that is connected to the router network.
2.Enter http://www.routerlogin.net.
Note: You can also enter http://www.routerlogin.com or http://192.168.1.1. The procedures in this manual use http://www.routerlogin.net.
A login window opens.
3.Enter the router admin user name and password.
The user name is admin. The password is the one that you specified the first time that you logged in. The user name and password are case-sensitive.
The BASIC Home page displays.
Install and manage your router with the Nighthawk app
With the Nighthawk app, you can easily install and manage your router. The app automatically updates the router to the latest firmware, allows you to personalize your WiFi network, and even helps register your router with NETGEAR.
The Nighthawk app is available for iOS and Android mobile devices.
Connect to the network and |
23 |
User Manual |
access the router |
|
|

Nighthawk AX12 12-Steam AX6000 WiFi Router
To install your router using the Nighthawk app:
1.To download the app, visit Nighthawk-app.com.
2.On your mobile device, tap Settings > Wi-Fi and find and connect to your router’s WiFi network.
Yourrouter’sWiFinetworkname(SSID)andnetworkkey(WiFipassword)areonthe router label.
If the label includes a QR code, you can scan the QR code to join the router’s WiFi network.
3.Launch the Nighthawk app on your mobile device.
4.Follow the prompts on the app to install your router and connect to the Internet.
Change the language
By default, the language that displays when you log in to the router web interface is set to Auto.
To change the language:
1.Launch a web browser from a computer or mobile device that is connected to the router network.
2.Enter http://www.routerlogin.net. A login window opens.
3.Enter the router admin user name and password.
The user name is admin. The password is the one that you specified the first time that you logged in. The user name and password are case-sensitive.
The BASIC Home page displays.
4.In the upper right corner, select a language from the menu.
5.When prompted, click the OK button to confirm this change. The page refreshes with the language that you selected.
Connect to the network and |
24 |
User Manual |
access the router |
|
|

3
Specify Your Internet Settings
Usually,thequickestwaytosetuptheroutertouseyourInternetconnectionistoallow your router to detect the Internet connection automatically when you first access the routerwebinterface.YoucanalsocustomizeandmanuallyspecifyyourInternetsettings.
This chapter contains the following sections:
•Use the Internet Setup Wizard
•Manually set up the Internet connection
•Manage a Multi-Gig Internet connection
•Specify IPv6 Internet connections
•Manage the MTU size
25

Nighthawk AX12 12-Steam AX6000 WiFi Router
Use the Internet Setup Wizard
You can use the Setup Wizard to detect your Internet settings and automatically set up your router. The Setup Wizard is not the same as the pages that display the first time you connect to your router to set it up.
To use the Setup Wizard:
1.Launch a web browser from a computer or mobile device that is connected to the router network.
2.Enter http://www.routerlogin.net. A login window opens.
3.Enter the router admin user name and password.
The user name is admin. The password is the one that you specified the first time that you logged in. The user name and password are case-sensitive.
The BASIC Home page displays.
4.Select ADVANCED > Setup Wizard. The Setup Wizard page displays.
5.Select the Yes radio button.
If you select the No radio button, you are taken to the Internet Setup page (see Manually set up the Internet connection on page 26).
6.Click the Next button.
The Setup Wizard searches your Internet connection for servers and protocols to determine your Internet configuration.
Manually set up the Internet connection
You can view or change the router’s Internet connection settings.
Specify an Internet connection without a login
To specify the Internet connection settings:
1.Launch a web browser from a computer or mobile device that is connected to therouter network.
2.Enter http://www.routerlogin.net. A login window opens.
Specify Your Internet Settings |
26 |
User Manual |

Nighthawk AX12 12-Steam AX6000 WiFi Router
3.Enter the router admin user name and password.
The user name is admin. The password is the one that you specified the first time that you logged in. The user name and password are case-sensitive.
The BASIC Home page displays.
4.Select Internet.
The Internet Setup page displays.
5.In the WAN Preference section, select one of the following options:
•Internet Port (1 Gbps). Select this option if you connected a modem to the Internet port on your router.
•WANaggregation(1Gbps+1Gbps).Selectthisoptionifyouwanttoaggregate Ethernetport1withtheInternetportforMulti-GigInternet.Formoreinformation, see Get Multi-Gig Internet With Port Aggregation on page 31.
•5GEthernetport.SelectthisoptionifyouwanttousetheMulti-Gigportforyour Internet connection. For more information, see Get Multi-Gig Internet With the Multi-Gig Port on page 30.
6.Inthe DoesyourInternetconnectionrequirealogin? section,leavethe No radio button selected.
7.If your Internet connection requires an account name or host name, click the Edit button in the Account Name section and enter the account name.
8.IfyourInternetconnectionrequiresadomainname,typeitinthe DomainName(If Required) field.
For the other sections on this page, the default settings usually work, but you can change them.
9.Select an Internet IP Address radio button:
•Get Dynamically from ISP. Your ISP uses DHCP to assign your IP address. Your ISP automatically assigns these addresses.
•Use Static IP Address. Enter the IP address, IP subnet mask, and the gateway IP addressthatyourISPassigned. ThegatewayistheISProutertowhichyourrouter connects.
10.Select a Domain Name Server (DNS) Address radio button:
•Get Automatically from ISP. Your ISP uses DHCP to assign your DNS servers. Your ISP automatically assigns this address.
•UseTheseDNSServers.IfyouknowthatyourISPrequiresspecificservers,select this option. Enter the IP address of your ISP’s primary DNS server. If a secondary DNS server address is available, enter it also.
Specify Your Internet Settings |
27 |
User Manual |

Nighthawk AX12 12-Steam AX6000 WiFi Router
11.Select a Router MAC Address radio button:
•Use Default Address. Use the default MAC address.
•Use Computer MAC Address. The router captures and uses the MAC address of the computer that you are now using. You must use the one computer that the ISP allows.
•Use This MAC Address. Enter the MAC address that you want to use.
12.Click the Apply button. Your settings are saved.
13.Click the Test button to test your Internet connection.
If the NETGEAR website does not display within one minute, see You cannot access the Internet on page 166.
Specify an Internet connection that uses a login
To view or change the basic Internet setup:
1.Launch a web browser from a computer or mobile device that is connected to the router network.
2.Enter http://www.routerlogin.net. A login window opens.
3.Enter the router admin user name and password.
The user name is admin. The password is the one that you specified the first time that you logged in. The user name and password are case-sensitive.
The BASIC Home page displays.
4.Select Internet.
The Internet Setup page displays.
5.In the WAN Preference section, select one of the following options:
•Internet Port (1 Gbps). Select this option if you connected a modem to the Internet port on your router.
•WANaggregation(1Gbps+1Gbps).Selectthisoptionifyouwanttoaggregate Ethernetport1withtheInternetportforMulti-GigInternet.Formoreinformation, see Get Multi-Gig Internet With Port Aggregation on page 31.
•5GEthernetport.SelectthisoptionifyouwanttousetheMulti-Gigportforyour Internet connection. For more information, see Get Multi-Gig Internet With the Multi-Gig Port on page 30.
Specify Your Internet Settings |
28 |
User Manual |

Nighthawk AX12 12-Steam AX6000 WiFi Router
6.In the Does your Internet connection require a login? section, select the Yes radio button.
The page adjusts.
7.FromtheInternetServiceProvidermenu,selecttheencapsulationmethod:PPPoE,
L2TP, or PPTP.
8.In the Login field, enter the login name that your ISP gave you. This login name is often an email address.
9.In the Password field, type the password that you use to log in to your Internet service.
10.If your ISP requires a service name, type it in the Service Name (if Required) field.
11.FromtheConnectionModemenu,selectAlwaysOn,DialonDemand,orManually Connect.
12.To change the number of minutes until the Internet login times out, in the Idle Timeout (In minutes) field, type the number of minutes.
ThisishowlongtherouterkeepstheInternetconnectionactivewhennooneonthe network is using the Internet connection. A value of 0 (zero) means never log out.
13.Select an Internet IP Address radio button:
•Get Dynamically from ISP. Your ISP uses DHCP to assign your IP address. Your ISP automatically assigns these addresses.
•Use Static IP Address. Enter the IP address, IP subnet mask, and the gateway IP addressthatyourISPassigned. ThegatewayistheISProutertowhichyourrouter connects.
14.Select a Domain Name Server (DNS) Address radio button:
•Get Automatically from ISP. Your ISP uses DHCP to assign your DNS servers. Your ISP automatically assigns this address.
•UseTheseDNSServers.IfyouknowthatyourISPrequiresspecificservers,select this option. Enter the IP address of your ISP’s primary DNS server. If a secondary DNS server address is available, enter it also.
15.Select a Router MAC Address radio button:
•Use Default Address. Use the default MAC address.
•Use Computer MAC Address. The router captures and uses the MAC address of the computer that you are now using. You must use the one computer that the ISP allows.
•Use This MAC Address. Enter the MAC address that you want to use.
Specify Your Internet Settings |
29 |
User Manual |

Nighthawk AX12 12-Steam AX6000 WiFi Router
16.Click the Apply button. Your settings are saved.
17.Click the Test button to test your Internet connection.
If the NETGEAR website does not display within one minute, see You cannot access the Internet on page 166.
Manage a Multi-Gig Internet connection
If your ISP offers Internet speeds up to 1 Gbps, use the Internet port to connect the router to your modem. This is the most likely setup for your Internet connection.
However, if your ISP offers Internet speeds faster than 1 Gbps, you can do one of the following to get a high-speed Internet connection:
•UsetheMulti-GigportonyourrouterforyourInternetconnection(seeGetMulti-Gig Internet With the Multi-Gig Port on page 30). The Multi-Gig port supports speeds of up to 5 Gbps.
•Set up Internet port aggregation by aggregating Ethernet port 1 with the Internet port on the router (see Get Multi-Gig Internet With Port Aggregation on page 31). Ethernet port 1 and the Internet port each support a speed of up to 1 Gbps.
The following ports can also function as LAN ports:
•Multi-Gig port. If you do not use the Multi-Gig port on your router for your Internet connection, you can use the Multi-Gig port as a high-speed LAN port. For example, if you set up Internet port aggregation by aggregating Ethernet port 1 with the Internetportontherouter,youcanconnectahigh-speedLANdevicetotheMulti-Gig port.
•Internet port. If you use the Multi-Gig port for your Internet connection, you can use the Internet port as an extra LAN port.
If you do not aggregate the Ethernet port 1 with the Internet port on the router for an Internet(WAN)connection,youcanuseEthernetport1eitherasindependentEthernet LAN port or for LAN Ethernet port aggregation (see Set Up Ethernet Port Aggregation to a LAN Device on page 96).
Get Multi-Gig Internet With the Multi-Gig Port
TheMulti-GigportonyourrouterisanEthernetportcapableofspeedsofupto5Gbps. You can connect a Multi-Gig capable device to the Multi-Gig port on your router and enjoy Multi-Gig speeds.
Specify Your Internet Settings |
30 |
User Manual |
Loading...