


NMS300
Table of contents
 Loading...
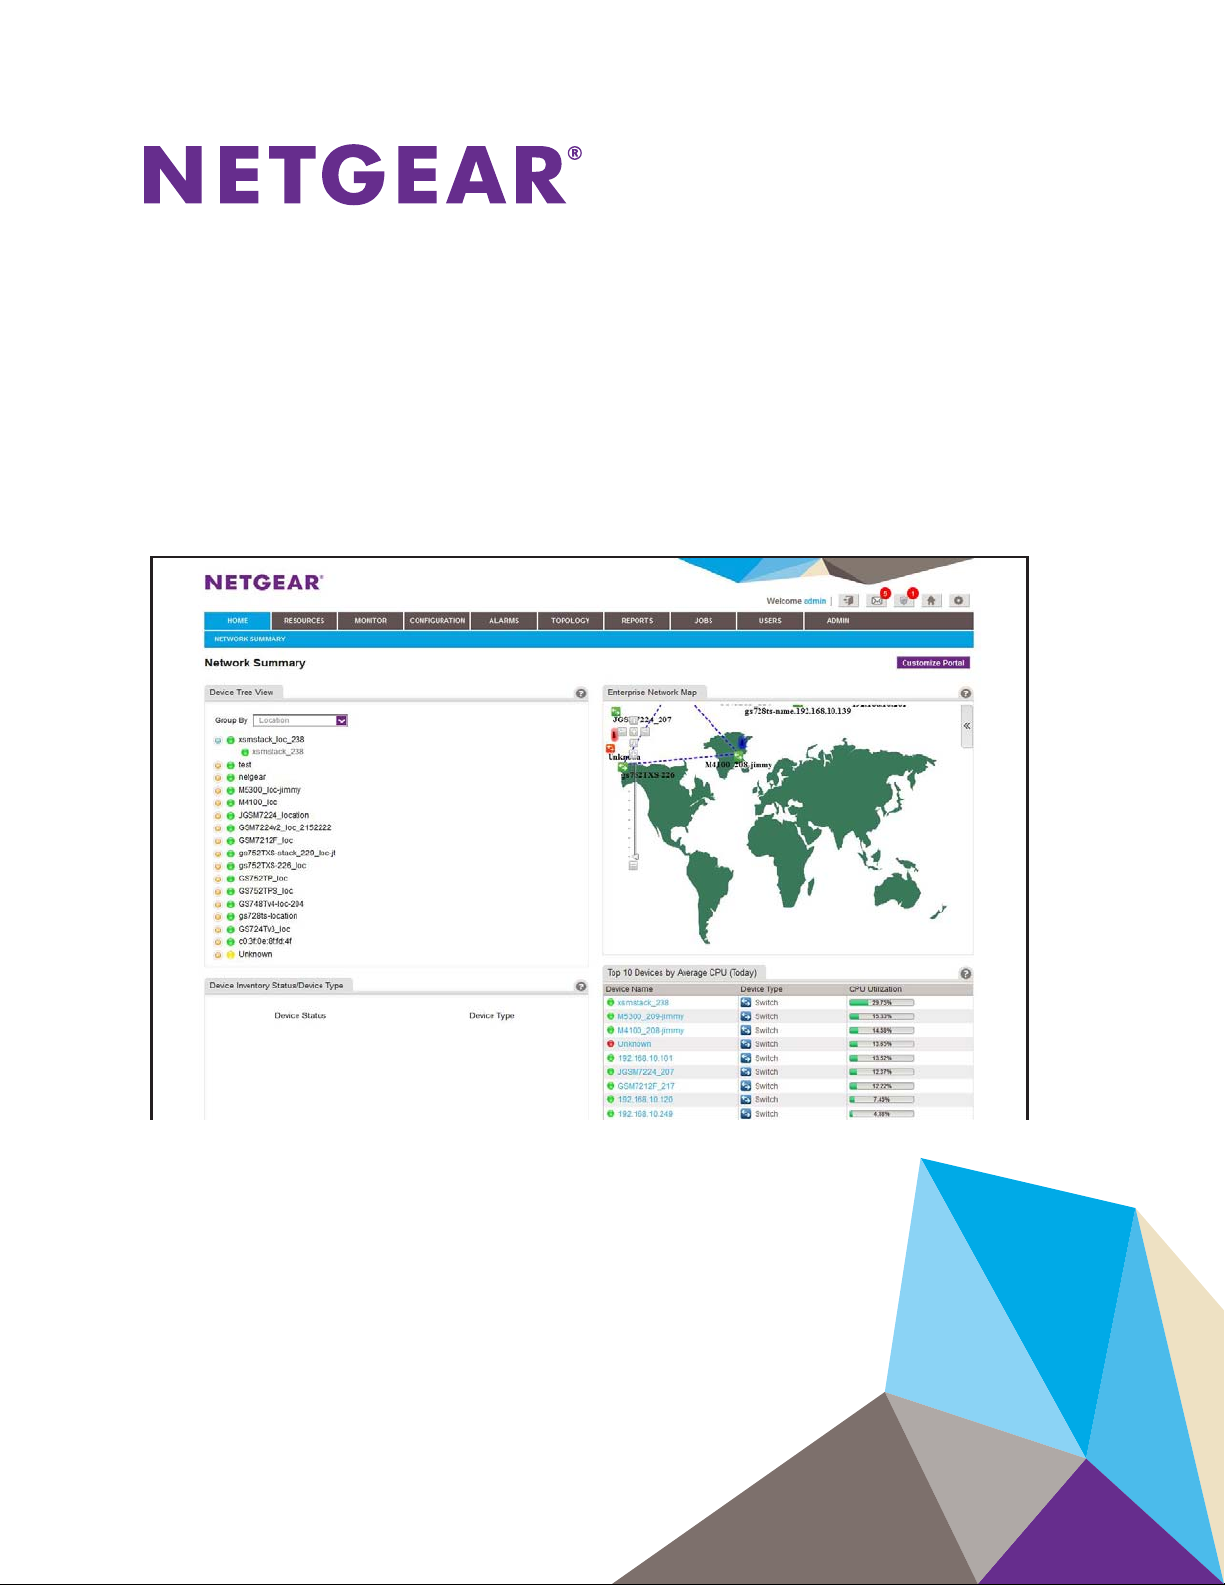
NMS300 Network Management System
User Manual
June 2013
202-11289-01
350 East Plumeria Drive
San Jose, CA 95134
USA

NMS300 Network Management System
Support
Thank you for purchasing this NETGEAR product.
After installing your device, locate the serial number on the label of your product and use it to register your product
at https://my.netgear.com. You must register your product before you can use NETGEAR telephone support.
NETGEAR recommends registering your product through the NETGEAR website. For product updates, additional
documentation, and support, visit http://support.netgear.com.
Phone (US & Canada only): 1-888-NETGEAR.
Phone (Other Countries): Check the list of phone numbers at
http://support.netgear.com/general/contact/default.aspx.
Trademarks
NETGEAR, the NETGEAR logo, and Connect with Innovation are trademarks and/or registered trademarks of
NETGEAR, Inc. and/or its subsidiaries in the United States and/or other countries. Information is subject to change
without notice. © NETGEAR, Inc. All rights reserved.
Revision History
Publication Part Number Version Publish Date Comments
202-11289-01 v1.0 June 2013 First publication
2

Contents
Chapter 1 Get to Know the NMS300 System
Chapter 2 Resource Management
Network Environment. . . . . . . . . . . . . . . . . . . . . . . . . . . . . . . . . . . . . . . . . .7
Device Groups . . . . . . . . . . . . . . . . . . . . . . . . . . . . . . . . . . . . . . . . . . . . .8
Types of Users . . . . . . . . . . . . . . . . . . . . . . . . . . . . . . . . . . . . . . . . . . . . .8
Device Discovery Preparation . . . . . . . . . . . . . . . . . . . . . . . . . . . . . . . . .8
Log In to the NMS300 System . . . . . . . . . . . . . . . . . . . . . . . . . . . . . . . . . . .9
Network Summary . . . . . . . . . . . . . . . . . . . . . . . . . . . . . . . . . . . . . . . . . . .11
Navigation Tabs and Buttons . . . . . . . . . . . . . . . . . . . . . . . . . . . . . . . . .12
Edit Your Account Information . . . . . . . . . . . . . . . . . . . . . . . . . . . . . . . .13
Change Your Password . . . . . . . . . . . . . . . . . . . . . . . . . . . . . . . . . . . . .15
Customize Your Network Summary . . . . . . . . . . . . . . . . . . . . . . . . . . . .16
Discover the Devices on Your Network . . . . . . . . . . . . . . . . . . . . . . . . . . .19
Quick Discovery . . . . . . . . . . . . . . . . . . . . . . . . . . . . . . . . . . . . . . . . . . .19
Add a Device Credential. . . . . . . . . . . . . . . . . . . . . . . . . . . . . . . . . . . . .21
Add a Discovery Profile . . . . . . . . . . . . . . . . . . . . . . . . . . . . . . . . . . . . .24
Execute a Discovery Procedure. . . . . . . . . . . . . . . . . . . . . . . . . . . . . . .27
Schedule a Discovery Procedure. . . . . . . . . . . . . . . . . . . . . . . . . . . . . .28
Examine the Devices on Your Network . . . . . . . . . . . . . . . . . . . . . . . . . . .30
View Device Information. . . . . . . . . . . . . . . . . . . . . . . . . . . . . . . . . . . . .30
Edit Device Information . . . . . . . . . . . . . . . . . . . . . . . . . . . . . . . . . . . . .31
Synchronize a Network Device. . . . . . . . . . . . . . . . . . . . . . . . . . . . . . . .32
Log In to a Device. . . . . . . . . . . . . . . . . . . . . . . . . . . . . . . . . . . . . . . . . .33
Ping, Perform a Traceroute, or Reboot a Network Device . . . . . . . . . . .34
Export the Device Inventory List. . . . . . . . . . . . . . . . . . . . . . . . . . . . . . .34
Specify Device Groups. . . . . . . . . . . . . . . . . . . . . . . . . . . . . . . . . . . . . . . .35
Add a Static Device Group. . . . . . . . . . . . . . . . . . . . . . . . . . . . . . . . . . .36
Add a Dynamic Device Group . . . . . . . . . . . . . . . . . . . . . . . . . . . . . . . .38
View the NMS300 Server Information . . . . . . . . . . . . . . . . . . . . . . . . . . . .40
Chapter 3 Performance Monitoring
Monitor the Top 10 Devices . . . . . . . . . . . . . . . . . . . . . . . . . . . . . . . . . . . .43
Configure the Monitor. . . . . . . . . . . . . . . . . . . . . . . . . . . . . . . . . . . . . . . . .45
Configure the Performance Monitor Settings . . . . . . . . . . . . . . . . . . . . .45
Configure the General Monitor Information . . . . . . . . . . . . . . . . . . . . . .46
View and Modify the Polling Interval. . . . . . . . . . . . . . . . . . . . . . . . . . . .48
View Device Details . . . . . . . . . . . . . . . . . . . . . . . . . . . . . . . . . . . . . . . . . .48
Manage the Network Dashboard . . . . . . . . . . . . . . . . . . . . . . . . . . . . . . . .51
3

NMS300 Network Management System
Create Your Custom Dashboard Views . . . . . . . . . . . . . . . . . . . . . . . . .51
View Your Network Dashboards. . . . . . . . . . . . . . . . . . . . . . . . . . . . . . .56
Chapter 4 Configuration Management
Back Up Your Device Configurations. . . . . . . . . . . . . . . . . . . . . . . . . . . . .59
Add a Device Backup Profile . . . . . . . . . . . . . . . . . . . . . . . . . . . . . . . . .59
Execute a Backup Procedure. . . . . . . . . . . . . . . . . . . . . . . . . . . . . . . . .62
Schedule a Backup Procedure. . . . . . . . . . . . . . . . . . . . . . . . . . . . . . . .63
View the Execution Status of a Backup Job. . . . . . . . . . . . . . . . . . . . . .66
Restore Your Device Configurations . . . . . . . . . . . . . . . . . . . . . . . . . . . . .67
Restore the Configuration of a Single Device. . . . . . . . . . . . . . . . . . . . .67
Configure Several Identical Devices. . . . . . . . . . . . . . . . . . . . . . . . . . . .70
Import, Export, or Delete a Configuration File . . . . . . . . . . . . . . . . . . . .74
Promote a Configuration File . . . . . . . . . . . . . . . . . . . . . . . . . . . . . . . . .76
Edit a Configuration File. . . . . . . . . . . . . . . . . . . . . . . . . . . . . . . . . . . . .78
Compare Two Configuration Files . . . . . . . . . . . . . . . . . . . . . . . . . . . . .80
Schedule a Restore Procedure . . . . . . . . . . . . . . . . . . . . . . . . . . . . . . .81
Upgrade Your Device Firmware. . . . . . . . . . . . . . . . . . . . . . . . . . . . . . . . .82
Import, Export, or Delete a Firmware File. . . . . . . . . . . . . . . . . . . . . . . .83
Edit the Information of a Firmware File. . . . . . . . . . . . . . . . . . . . . . . . . .85
Execute a Firmware Upgrade. . . . . . . . . . . . . . . . . . . . . . . . . . . . . . . . .86
Schedule a Firmware Upgrade. . . . . . . . . . . . . . . . . . . . . . . . . . . . . . . .90
Chapter 5 Alarm Management
Manage the Current Alarms. . . . . . . . . . . . . . . . . . . . . . . . . . . . . . . . . . . .93
View the Alarm History. . . . . . . . . . . . . . . . . . . . . . . . . . . . . . . . . . . . . . . .94
Configure the Alarm Trigger Settings. . . . . . . . . . . . . . . . . . . . . . . . . . . . .95
Configure the Alarm Notification Profiles . . . . . . . . . . . . . . . . . . . . . . . . . .96
View the Network Events . . . . . . . . . . . . . . . . . . . . . . . . . . . . . . . . . . . . . .98
View the Device Traps . . . . . . . . . . . . . . . . . . . . . . . . . . . . . . . . . . . . . . . .99
View the Device System Logs . . . . . . . . . . . . . . . . . . . . . . . . . . . . . . . . .100
Customize the Alarm Colors. . . . . . . . . . . . . . . . . . . . . . . . . . . . . . . . . . .102
Chapter 6 Topology Views
Map Views . . . . . . . . . . . . . . . . . . . . . . . . . . . . . . . . . . . . . . . . . . . . . . . .104
View a Map. . . . . . . . . . . . . . . . . . . . . . . . . . . . . . . . . . . . . . . . . . . . . .104
Add a Submap . . . . . . . . . . . . . . . . . . . . . . . . . . . . . . . . . . . . . . . . . . .108
Add Devices to a Map . . . . . . . . . . . . . . . . . . . . . . . . . . . . . . . . . . . . . 111
Add a Link Between Devices . . . . . . . . . . . . . . . . . . . . . . . . . . . . . . . .113
Customize the Link Style Settings . . . . . . . . . . . . . . . . . . . . . . . . . . . .115
Network Topology . . . . . . . . . . . . . . . . . . . . . . . . . . . . . . . . . . . . . . . . . .118
Display a Network Topology View . . . . . . . . . . . . . . . . . . . . . . . . . . . .118
Add a Topology View . . . . . . . . . . . . . . . . . . . . . . . . . . . . . . . . . . . . . .123
Add a Link Between Devices . . . . . . . . . . . . . . . . . . . . . . . . . . . . . . . .124
Customize the Node and Link Style Settings . . . . . . . . . . . . . . . . . . . .127
4

NMS300 Network Management System
Chapter 7 Report Generation
Manage the Report Templates. . . . . . . . . . . . . . . . . . . . . . . . . . . . . . . . .131
Manage Report Generation . . . . . . . . . . . . . . . . . . . . . . . . . . . . . . . . . . .135
Generate a One-Time Report Immediately. . . . . . . . . . . . . . . . . . . . . .136
Generate a Scheduled Report . . . . . . . . . . . . . . . . . . . . . . . . . . . . . . .137
View Saved Reports. . . . . . . . . . . . . . . . . . . . . . . . . . . . . . . . . . . . . . . . .140
Chapter 8 Job Management
Job Setup . . . . . . . . . . . . . . . . . . . . . . . . . . . . . . . . . . . . . . . . . . . . . . . . .143
Job Control. . . . . . . . . . . . . . . . . . . . . . . . . . . . . . . . . . . . . . . . . . . . . . . .143
Chapter 9 User Management
User Management . . . . . . . . . . . . . . . . . . . . . . . . . . . . . . . . . . . . . . . . . .147
Security Profiles . . . . . . . . . . . . . . . . . . . . . . . . . . . . . . . . . . . . . . . . . . . .148
Online Users. . . . . . . . . . . . . . . . . . . . . . . . . . . . . . . . . . . . . . . . . . . . . . .149
Chapter 10 Administration Panels
Get Started with the NMS300 System . . . . . . . . . . . . . . . . . . . . . . . . . . .151
Manage the System Settings . . . . . . . . . . . . . . . . . . . . . . . . . . . . . . . . . .152
Data Retention Period . . . . . . . . . . . . . . . . . . . . . . . . . . . . . . . . . . . . .153
Inventory Polling. . . . . . . . . . . . . . . . . . . . . . . . . . . . . . . . . . . . . . . . . .154
Idle Time Out . . . . . . . . . . . . . . . . . . . . . . . . . . . . . . . . . . . . . . . . . . . .155
Real-time Chart. . . . . . . . . . . . . . . . . . . . . . . . . . . . . . . . . . . . . . . . . . .156
Customize the NMS300 System Appearance . . . . . . . . . . . . . . . . . . . . .157
View the Network Device Inventory . . . . . . . . . . . . . . . . . . . . . . . . . . . . .159
Manage the Alarm Configuration . . . . . . . . . . . . . . . . . . . . . . . . . . . . . . .159
Manage the Monitor Configuration. . . . . . . . . . . . . . . . . . . . . . . . . . . . . .160
Manage the User Account Information. . . . . . . . . . . . . . . . . . . . . . . . . . .161
View the NMS300 Version Information. . . . . . . . . . . . . . . . . . . . . . . . . . .162
View the Audit Log . . . . . . . . . . . . . . . . . . . . . . . . . . . . . . . . . . . . . . . . . .163
Appendix A Technical Specifications
5

1. Get to Know the NMS300 System
Streamline your network management tasks
1
The NETGEAR NMS300 system is a centralized and comprehensive management system that
allows IT administrators to discover, monitor, configure, and report on enterprise-class networks
with NETGEAR network devices.
For more information about the topics covered in this manual, visit the support website at
http://support.netgear.com.
Firmware updates with new features and bug fixes are made available from time to time on
downloadcenter.netgear.com. Some products can regularly check the site and download new
firmware, or you can check for and download new firmware manually. If the features or behavior
of your product does not match what is described in this guide, you might need to update your
firmware.
This chapter covers the following topics:
• Network Environment
• Log In to the NMS300 System
• Network Summary
6
NMS300 Network Management System
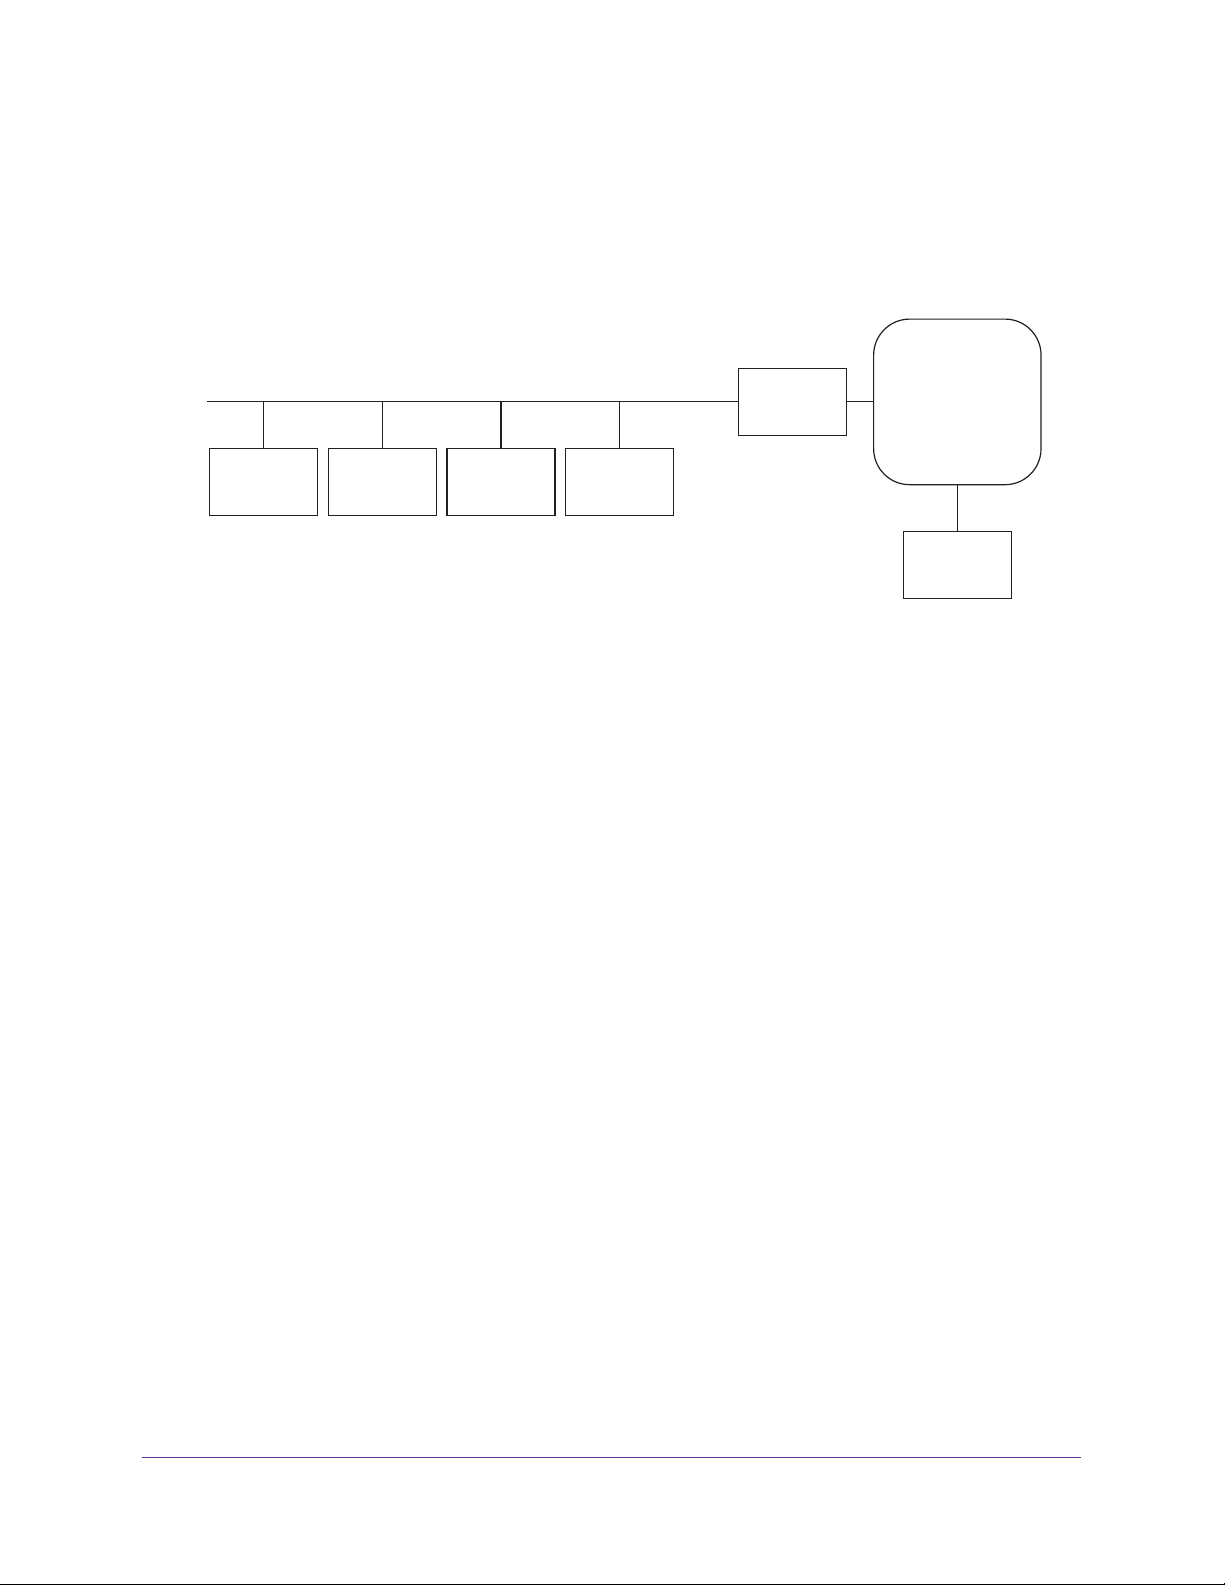
Network Environment
The NMS300 Network Management System software resides on the NMS300 server at a
static IP address on the local area network. The NMS300 software monitors the NETGEAR
and third-party devices on the network.
Local area network
Static IP
address
NMS300
server
Figure 1. The NMS300 Network Management System
Web
browser
NETGEAR
devices
Third-party
devices
Internet
gateway
Internet
Web
browser
You access the NMS300 software with a web browser. The IP address for a web browser
located outside the Internet gateway has to have permission to access the network.
The supported NETGEAR device types include the following:
• Switches (including managed and smart switches)
• NMS300 server (managed)
The NMS300 system can discover all third-party devices and display their nodes as up or
down.
More details are displayed for third-party devices that are SNMP devices, since the NMS300
system uses SNMP MIBs to gather health and status information.
The supported third-party
device types include the following:
• Routers
• VoIP gateways
• Hosts
• V
irtualization servers
Get to Know the NMS300 System
7
NMS300 Network Management System
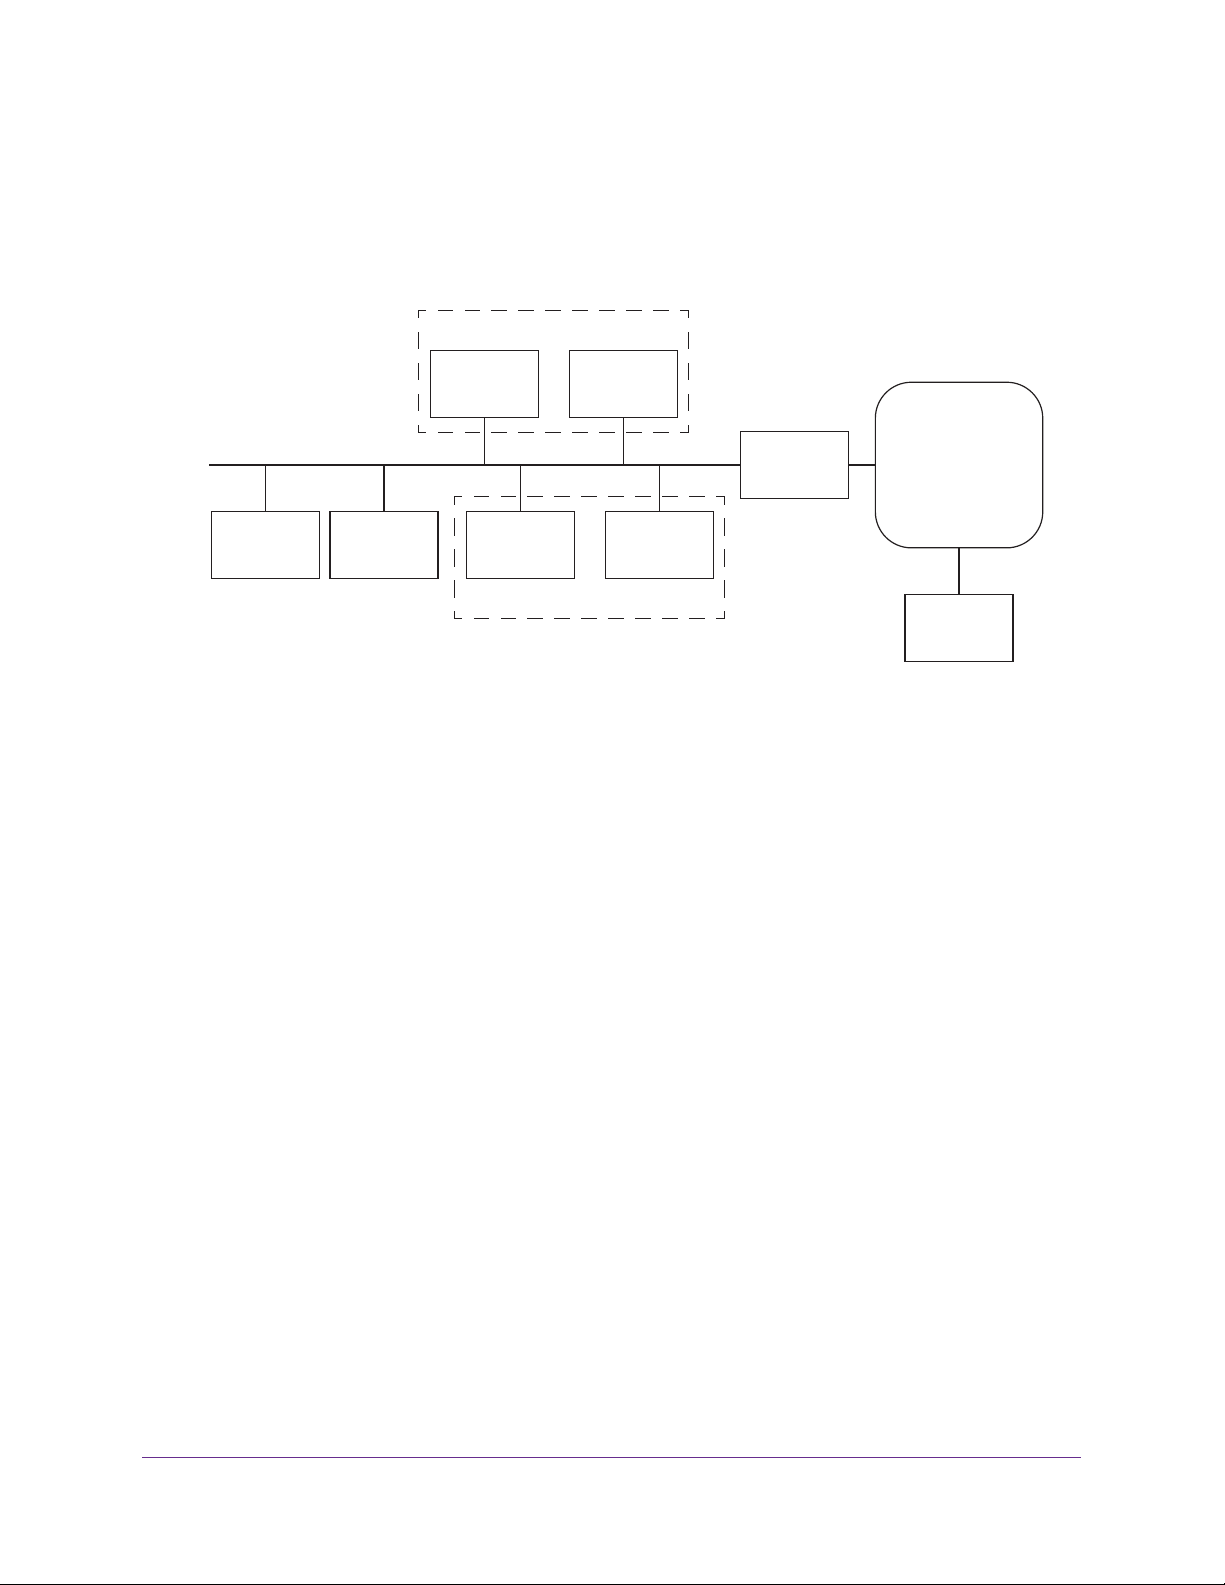
Device Groups
To simplify the management of networks with many devices, you can create device groups.
Group devices by vendor, location, device type, device model, and contact. Device groups
are optional.
Device group M
Local area network
Static IP
address
NMS300
server
Figure 2. Device groups
Web
browser
Network
device M1
Network
device N1
Device group N
Network
device Mm
Network
Device Nn
Internet
gateway
Internet
Web
browser
You can create two types of device groups:
• Static device groups. A static group is a fixed list of specific devices.
The list has to be
changed manually. For more information, see Add a Static Device Group on page 36.
• Dynamic device groups. A dynamic group is a dynamic list of devices that filter
selection criteria determine.
The list changes automatically as devices that meet the filter
criteria are added and removed from the network. For more information, see Add a
Dynamic Device Group on page 38.
Types of Users
The system includes the following default user security profiles:
• Observer. A user who can monitor and view enterprise network functions.
• Operator. A user who can manage the enterprise network functions, but cannot perform
administration-related functions.
• Admin
. A user with administration-related functions.
The admin user has the authority to
perform all NMS300 system functions, including the operator functions.
You can edit and delete these security profiles and you can define new security profiles. For
more information, see Security Profiles on page 148.
Device Discovery Preparation
To manage the devices on your network, you have to prepare them for the NMS300 system.
Get to Know the NMS300 System
8

NMS300 Network Management System
To prepare the devices on your network:
1. Upgrade your devices to their latest released firmware.
To upgrade the firmware, use the user interface of the device.
Each device has to run the latest firmware before the NMS300 software can discover and
manage it. Once this one-time upgrade is done, future upgrades of device firmware can
be done centrally with the NMS300 software.
2. Create the correct credentials for your devices.
The NMS300 software uses a combination of SNMP, HTTP, and Telnet protocols to
interact with the devices on your network.
with the correct device credentials to authenticate successfully with the devices over
these protocols.
elnet and HTTP protocols. When the devices do not have the default password for
• T
the admin user, create two new credentials in the NMS300 system.
Create one credential for the Telnet protocol and another credential for the HTTP
protocol that contain either the admin user credential or the credential of another user
of the device with administrative privileges.
The NMS300 software has to be configured
• SNMP community strings. When the devices do not have the default SNMP
community strings, create a credential in the NMS300 system for the SNMP protocol
that contains the matching community strings.
For more information, see Add a Device Credential on page 21.
3. Make sure that each device on your network is configured to send SNMP traps to the IP
address of the NMS300 server
The NMS300 software listens for SNMP traps. The devices have to be configured to send
SNMP traps to the NMS300 software. Both SNMPv1 and SNMPv2 traps are supported.
.
Log In to the NMS300 System
The NMS300 software uses a browser server architecture. Administrators and other users
can access the NMS300 software from any supported browser.
Before you log in to the NMS300 software, check the following items:
• Make sure that the NMS300 software is installed on a machine with a static IP address.
• T
o prevent issues, clear your browser cache before you use the NMS300 software.
• The NMS300 software b
about managing more devices than this number, contact your NETGEAR sales team.
• For more information about this NMS300 software release, see the NMS300 Release
Notes.
y default allows you to manage up to 200 devices. For information
To prevent issues, clear your browser cache before you use the NMS300 software.
Get to Know the NMS300 System
9

NMS300 Network Management System
To log in to the NMS300 system:
1. Open a browser and connect to the NMS300 software through the static IP address of
the server host.
o connect to the NMS300 software from the same machine where you installed the
• T
software, enter the URL
http://localhost:8080.
If you entered a different port number for the server during the NMS300 software
installation, replace 8080 in this URL with the port number that you provided during
installation.
• To connect to the NMS300 software from a remote machine, replace localhost
the IP address of the machine that runs the NMS300 software.
Once you are connected to the NMS300 software, the following screen displays:
2. Enter your user name and password.
When the NMS300 software is initially installed, the default administrator user name is
admin and the default administrator password is admin.
An administrator creates the user name and password for the other types of users.
3. Click the Sign In button.
The Network Summary screen displays. For more information, see Network Summary on
page 11.
with
Get to Know the NMS300 System
10
NMS300 Network Management System
Network Summary
After you log in to the NMS300 system, a screen similar to the following displays:
Figure 3. The Network Summary screen
Before you can manage your network, you have to find the devices that are on your network
and you have to perform other administrative setup tasks. Administrators typically perform
these setup tasks and the tasks have to be done infrequently. For more information, see Get
Started with the NMS300 System on page 151.
All users can make the following changes to their NMS300 system account.
• Account information. For information about editing your account information, see Edit
Your Account Information on page 13.
• Password. For information about changing your password, see Change Your Password
on page 15.
• Network summary. For information about customizing your network summary, see
Customize
Your Network Summary on page 16.
Get to Know the NMS300 System
11

NMS300 Network Management System
Navigation Tabs and Buttons
To navigate to the various network management task, use the tabs that are available at the
top of the NMS300 screens.
The NMS300 system organizes the tasks of network management into the following
categories:
• Resource management. Before you can manage your network, you have to find the
devices that are on your network and you have to perform other setup tasks. For more
information, see Resource Management on page 18.
• Performance monitoring. Y
statistics, real-time and historical information, and the device and interface dashboard.
You can also enable and disable the network performance monitor collection and set up
thresholds. For more information, see Performance Monitoring on page 42.
• Configuration management. Y
can also upgrade device firmware. For more information, see Configuration Management
on page 58.
• Alarm management. Y
and view current and previous alarms using various filter options. As an option, you can
receive these alarm notifications with email. For more information, see Alarm
Management on page 92.
• Topology views. You can create hierarchical maps and topological views of your
network. For more information, see
• Report generation. Y
templates, and you can view them at any time. For more information, see Report
Generation on page 130.
• Job management. Y
disable, and delete jobs. For more information, see Job Management on page 142.
• User management. Y
delete existing users. For more information, see User Management on page 146.
• Administration panels. Y
the administration dashboard. For more information, see Administration Panels on
page 150.
ou can generate reports from either built-in or customized report
ou can view job detail and status information. You can also enable,
ou can view the existing user list, create new users, and edit or
ou can view network summary information, performance
ou can back up and restore device configurations. You
ou can receive alarm notifications when conditions are suboptimal
Topology Views on page 103.
ou can change the NMS300 system and website settings with
Get to Know the NMS300 System
12
NMS300 Network Management System
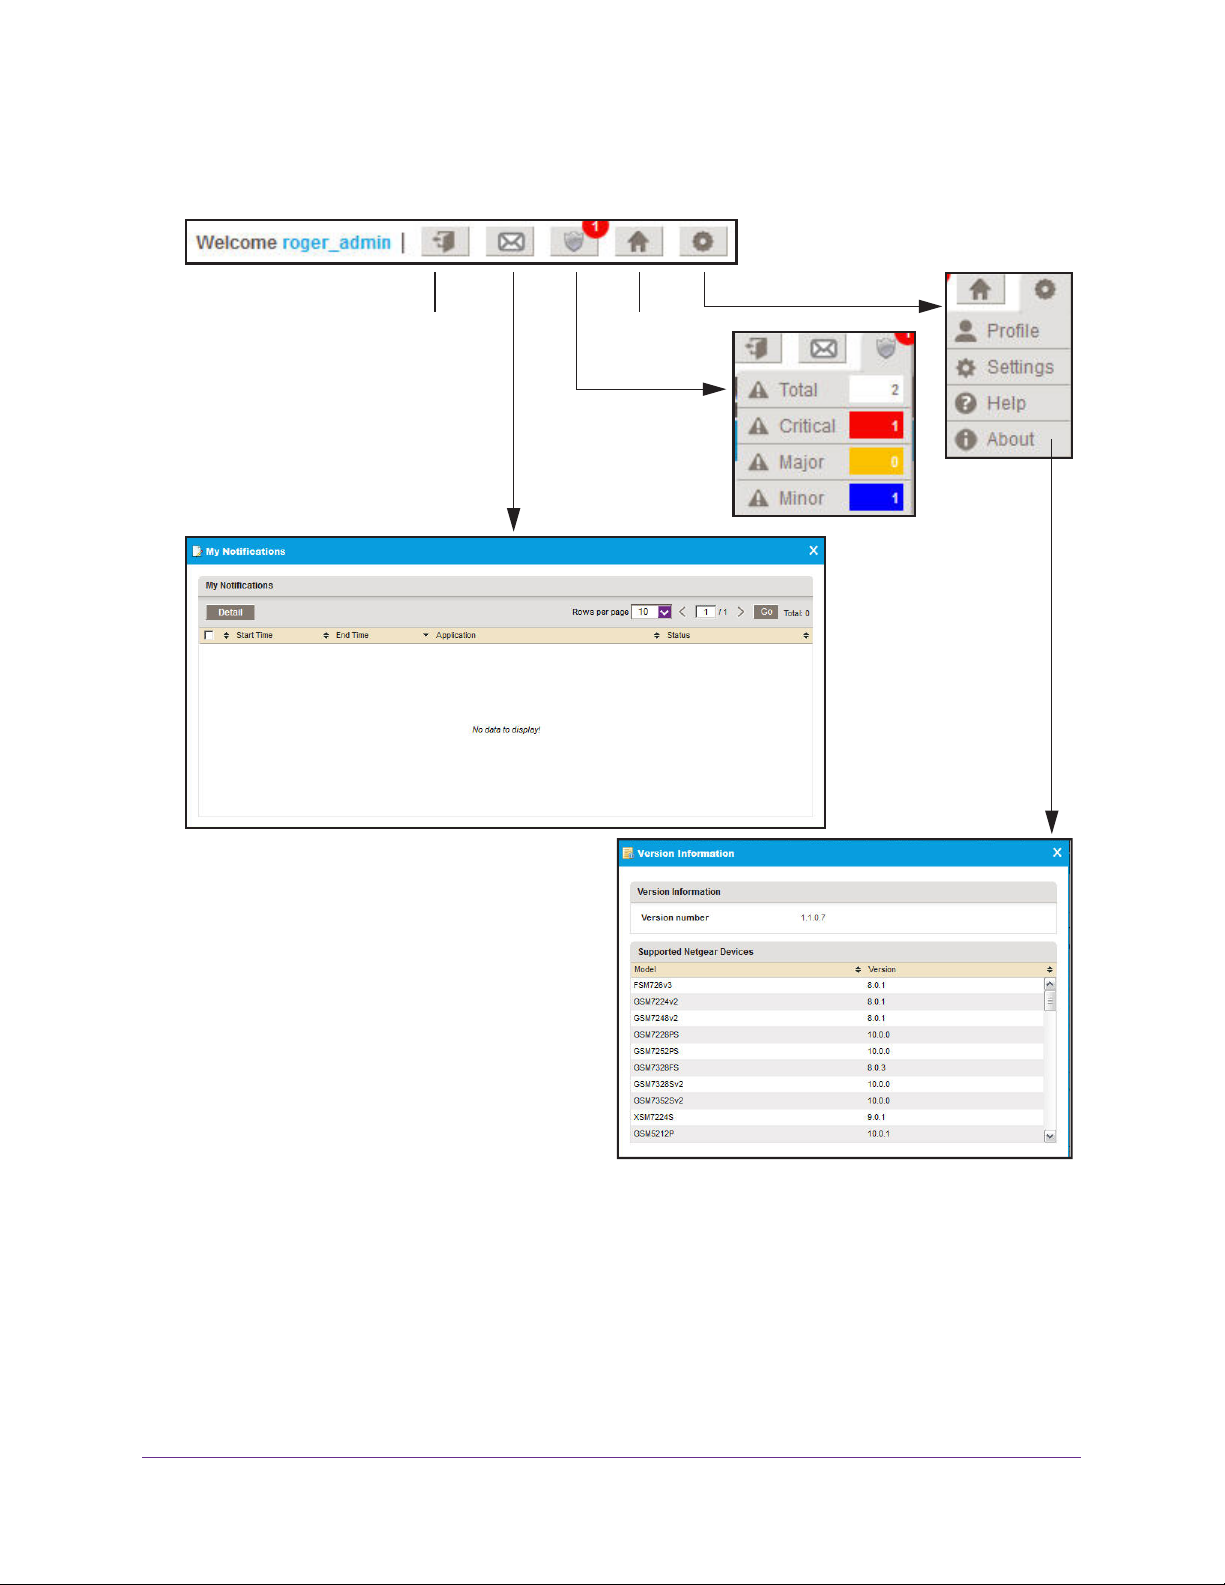
To navigate quickly to the various account management features, use the following buttons,
which are available at the top right of the NMS300 screens:
Help
Log out
My Notifications
Home
Alarms
Figure 4. Navigation buttons
Edit Your Account Information
Y ou can change your account information. Items you can change include your email address,
real name, and telephone number. You cannot change your user name.
Get to Know the NMS300 System
13
NMS300 Network Management System
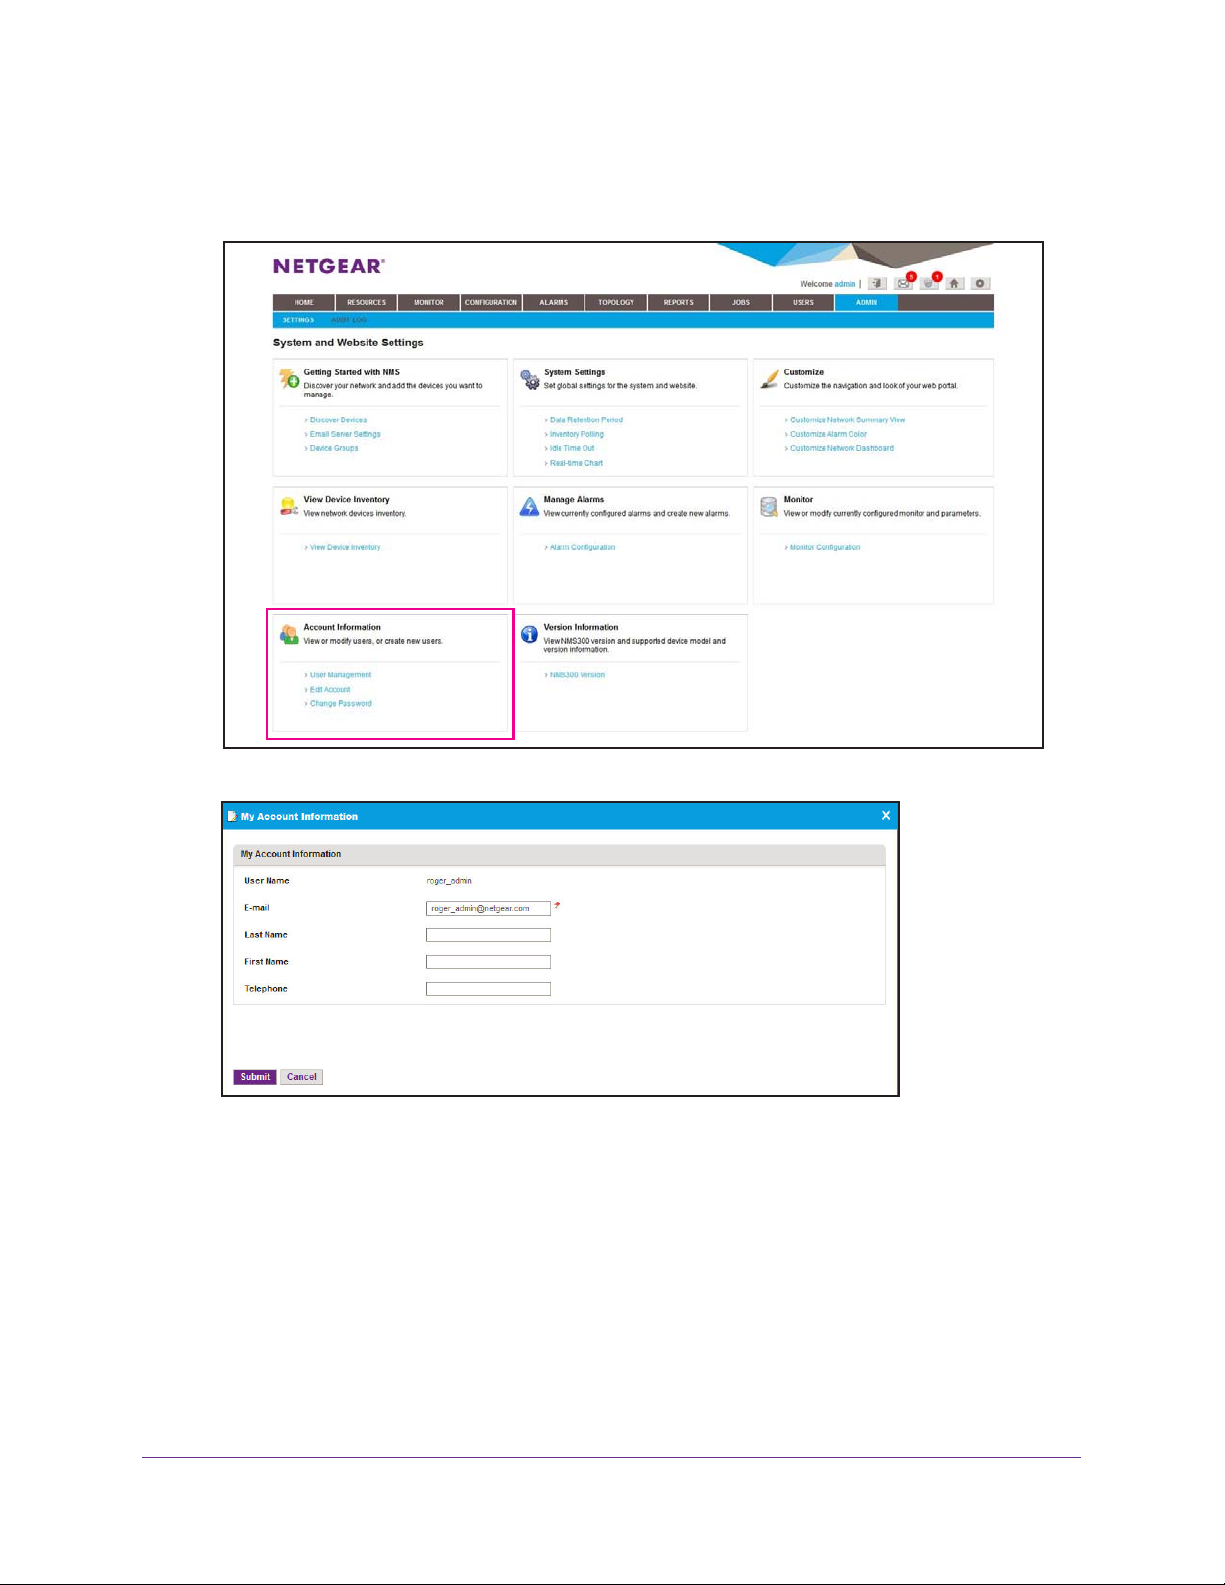
To change your account information:
1. Select ADMIN > SETTINGS.
2. Under Account Information, click Edit Account.
3. Enter you updated information.
4. Click the Submit button.
Your account information is updated.
Before you can receive email alerts, the email server settings have to be configured. For
more information, see Get Started with the NMS300 System on page 151.
Get to Know the NMS300 System
14
NMS300 Network Management System
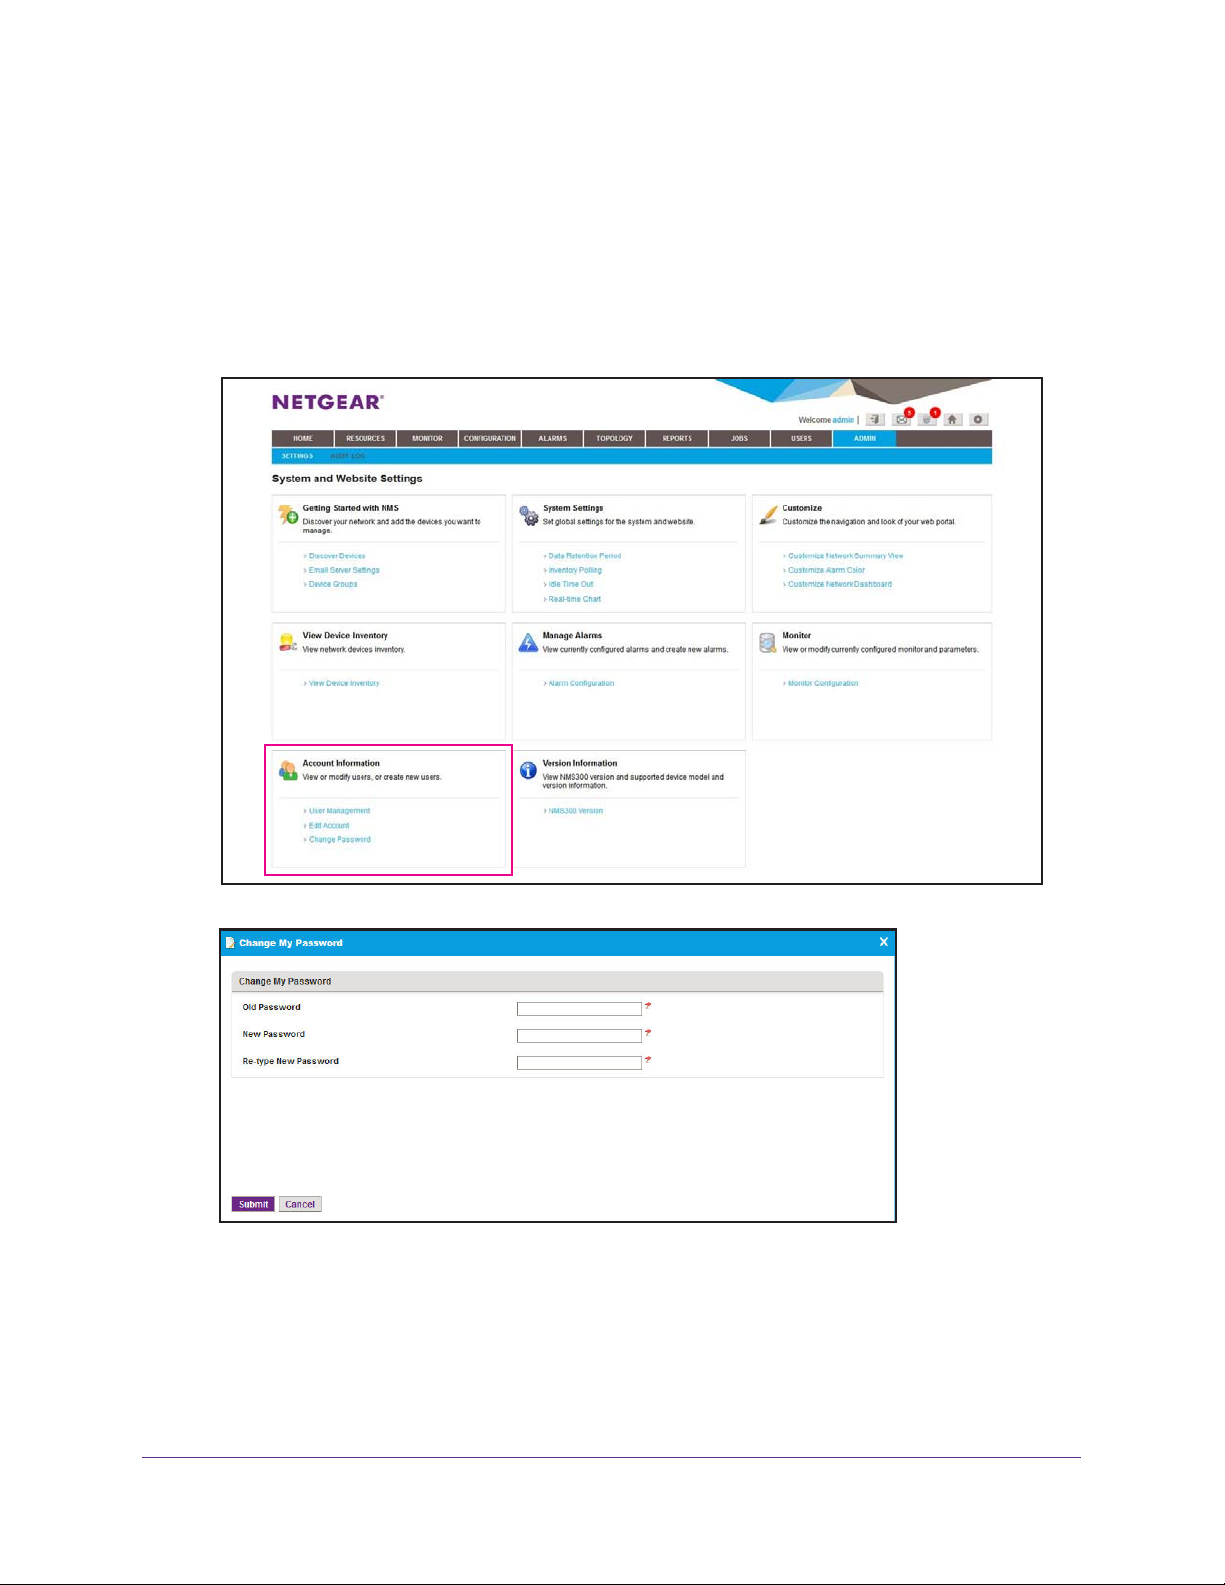
Change Your Password
When the NMS300 software is initially installed, the default administrator user name is admin
and the default administrator password is admin. An administrator creates the user name and
password for the other types of users.
To change your password:
1. Select ADMIN > SETTINGS.
2. Under Account Information, click Change Password.
3. Enter your old and new passwords.
4. Click the Submit button.
Your password is updated.
Get to Know the NMS300 System
15
NMS300 Network Management System
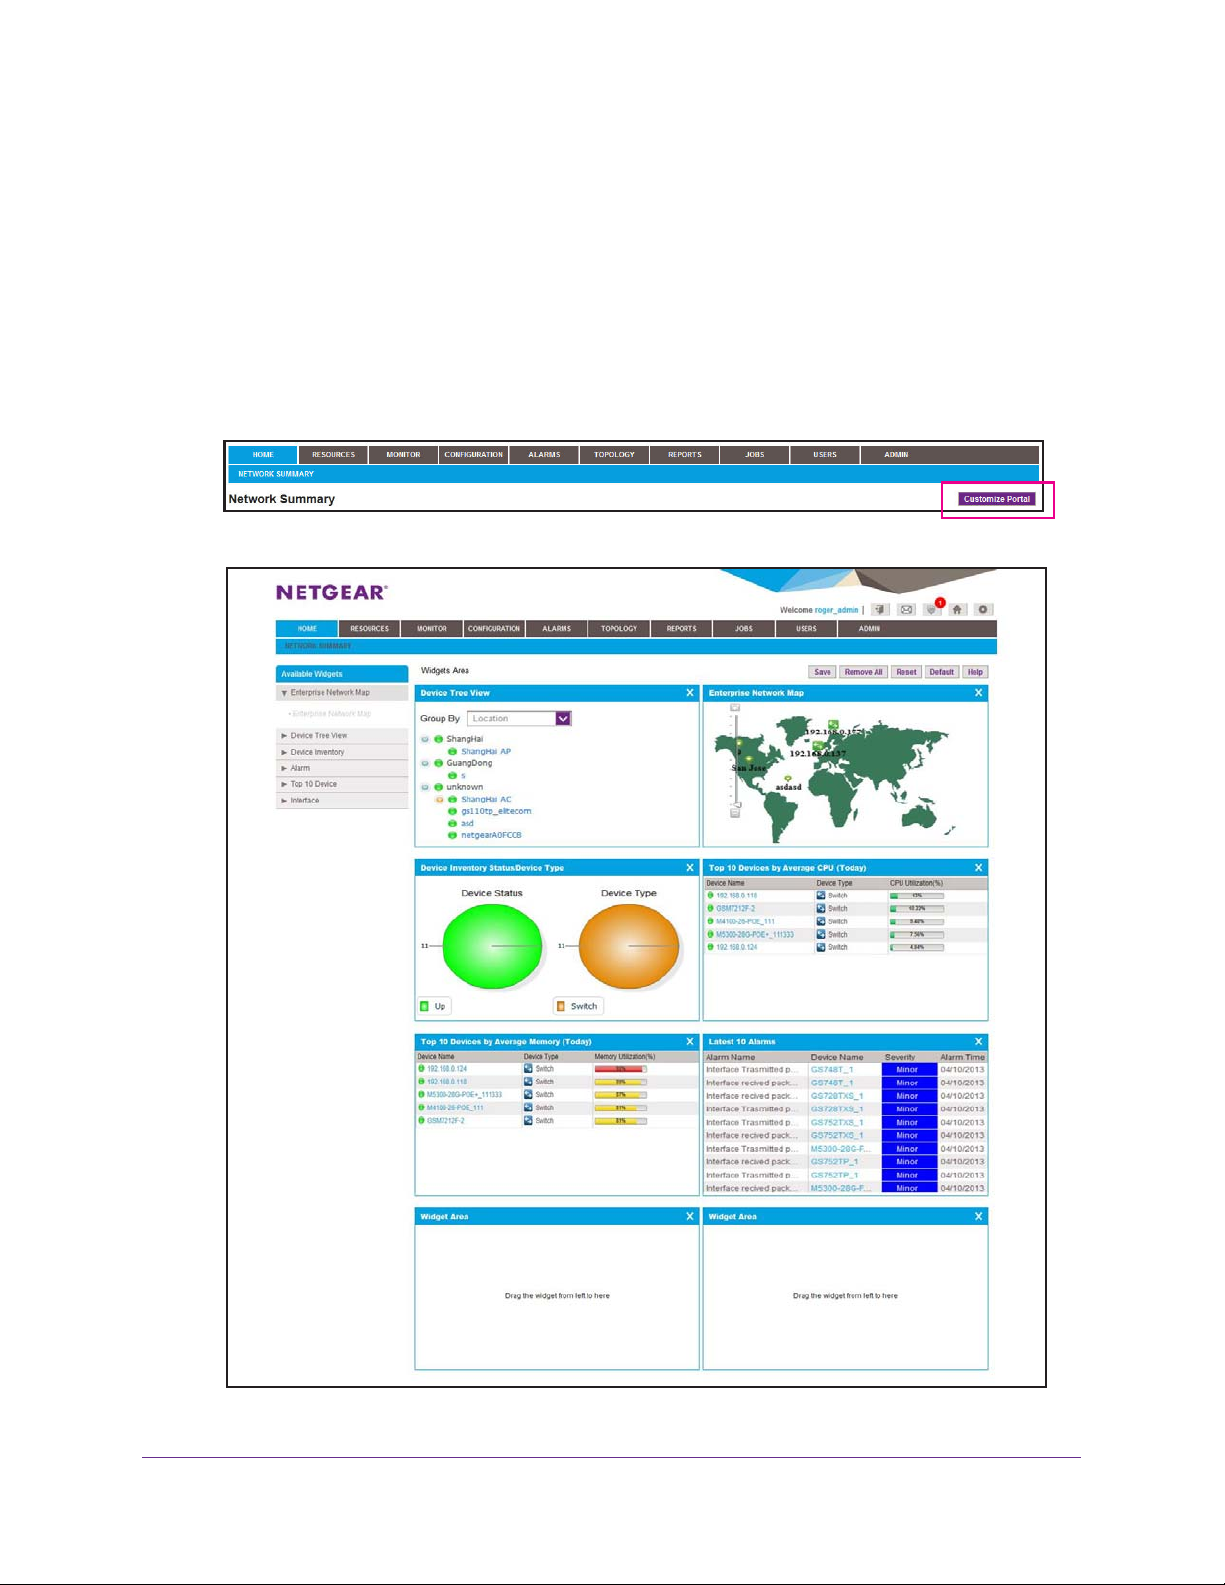
Customize Your Network Summary
Each NMS300 system user can customize the items that appear on the Network Summary
screen.
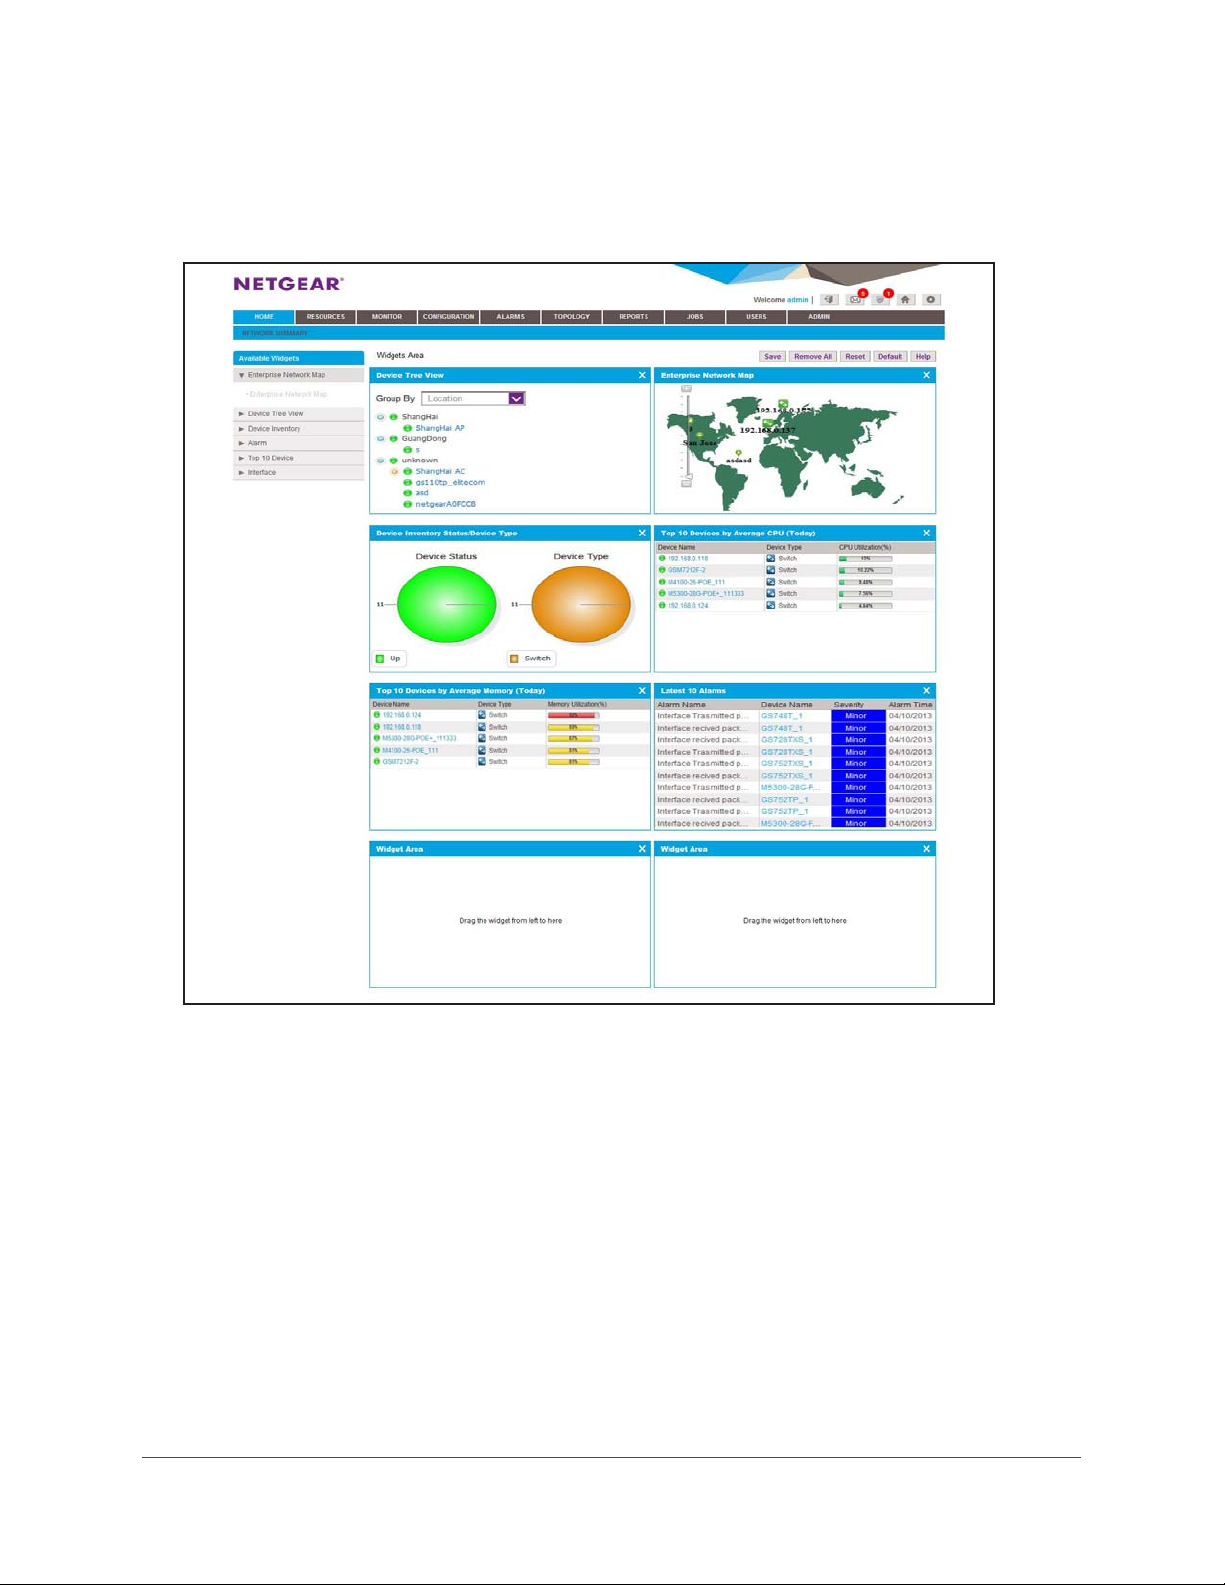
To customize the Network Summary screen for your account:
1. Select HOME > NETWORK SUMMARY.
The Network Summary screen displays.
2. Click the Customize Portal button.
A screen similar to the following displays:
Get to Know the NMS300 System
16

NMS300 Network Management System
3. To add an available widget, drag the widget from the Available Widgets list to the Widget
Areas on the right.
When the cursor is in the target Widget Area, the Widget Area is green and you can drop
the widget.
4. Click the x (
) button on the top right corner to remove a pane.
5. To adjust the widget order, in the Widgets Area, click a widget title bar to drag it from one
place to the other
6. (Optional) T
.
o take other actions, click the Remove All, Reset, or Default button.
• Remove All. The Remove All button removes all of the widgets.
• Reset. The Reset button removes all unsaved changes.
• Default
7. Click the Save
. The Default button restores the factory default widgets.
button.
Your settings are saved for your account.
Get to Know the NMS300 System
17

2. Resource Management
Find the devices on your network
2
Before you can manage your network, you have to find the devices that are on your network and
you have to perform other setup tasks. These setup tasks typically have to be done infrequently.
This chapter covers the following topics:
• Discover the Devices on Your Network
• Examine the Devices on Your Network
• Specify Device Groups
• View the NMS300 Server Information
18
NMS300 Network Management System
Discover the Devices on Your Network
You have to discover the devices on your network before you can monitor and manage them.
• Regular discovery filters the devices on your network through a discovery profile.
• Quick discovery does not use a discovery profile.
Note: When your network contains more than 200 devices, contact your
NETGEAR sales team.
Quick Discovery
To find the NETGEAR devices on your network, use quick discovery.
To discover the devices on your network:
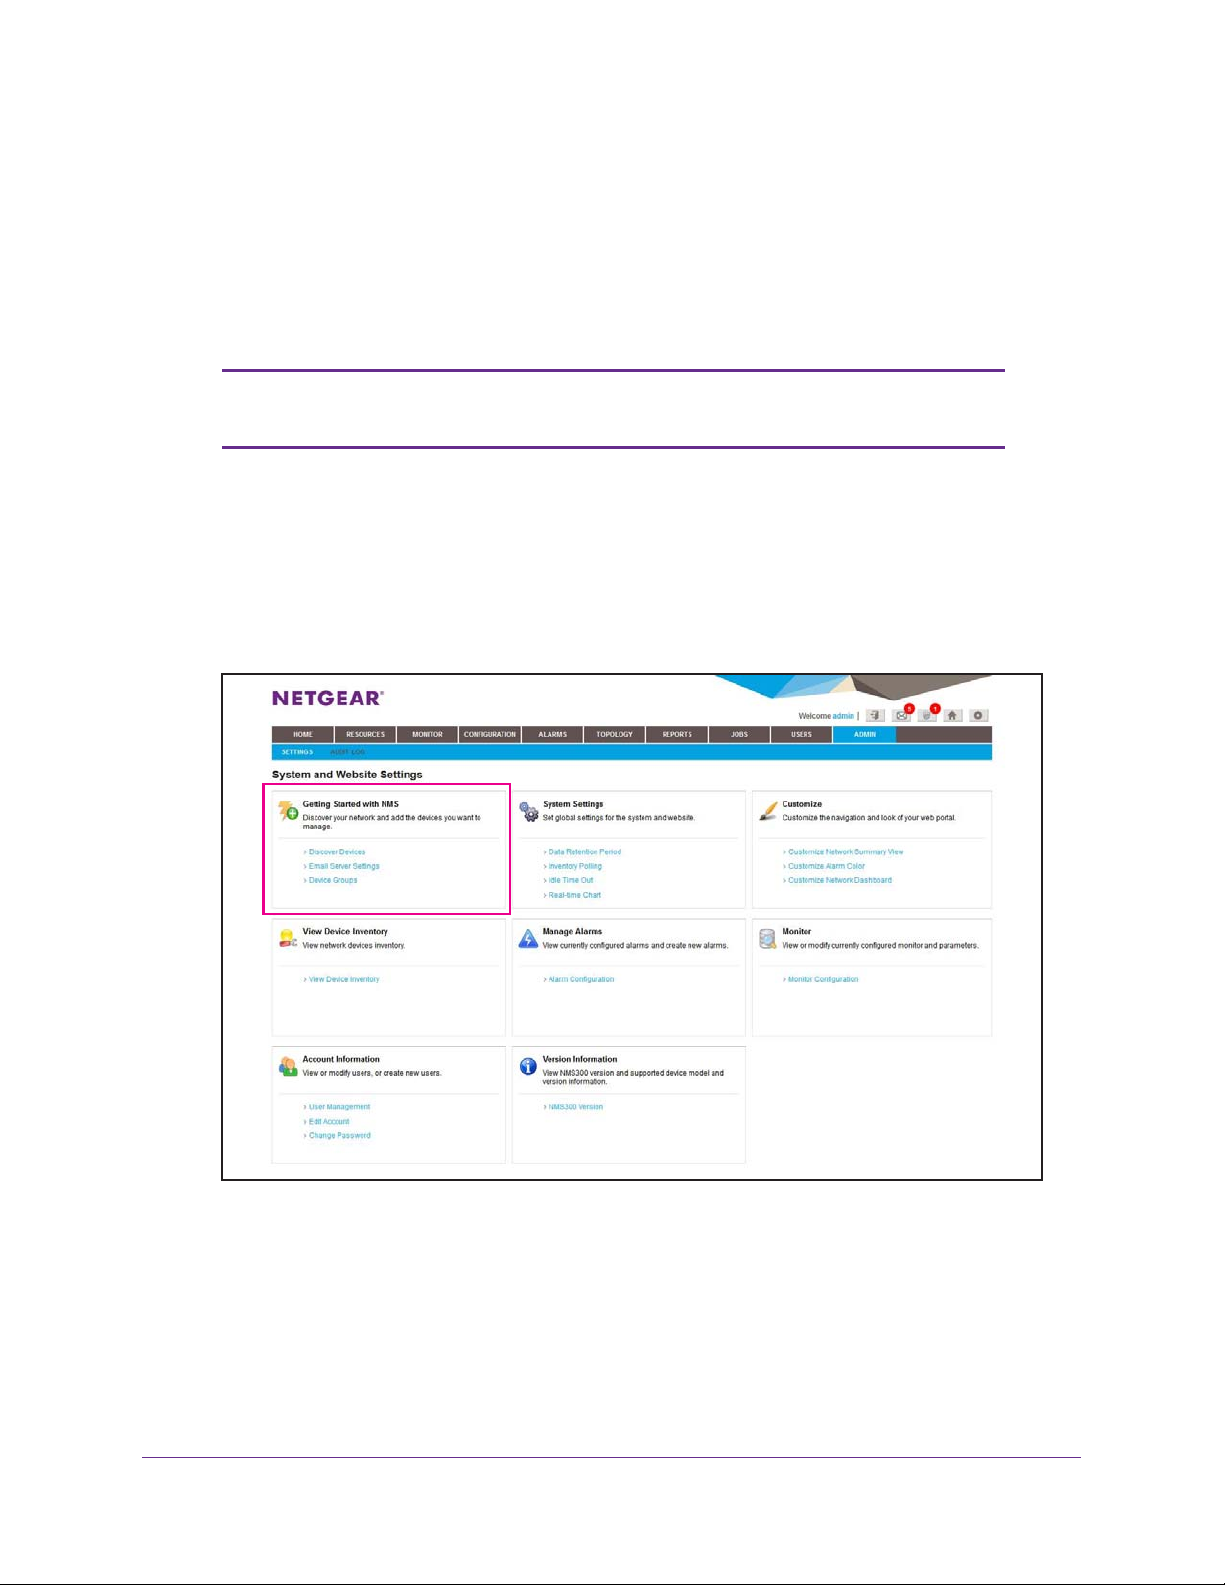
1. Select ADMIN > SETTINGS.
Resource Management
19
NMS300 Network Management System
2. Under Getting Started with NMS300, select Discover Devices.
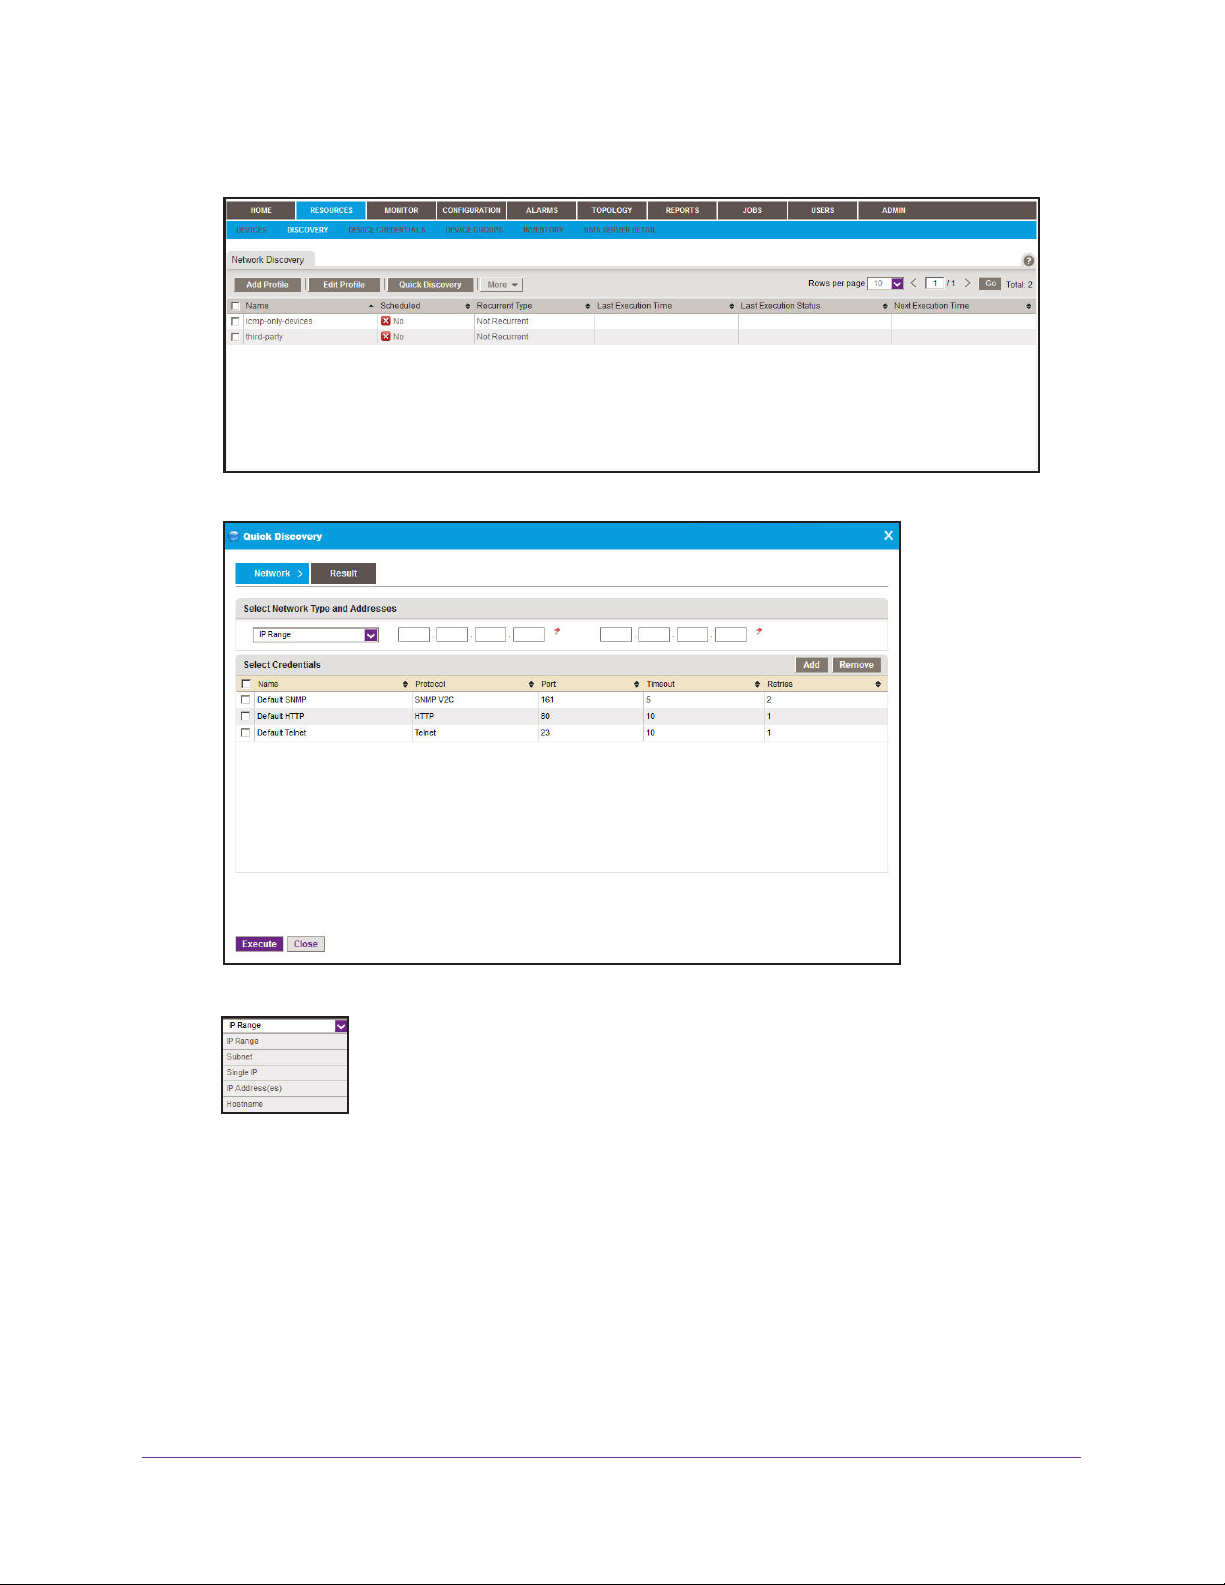
3. Click the Quick Discovery button.
4. Select the network type and addresses.
Depending on your network type selection, a different Quick Discovery screen might
display.
You can screen by IP address range, IP subnet address, a single IP address, a list of IP
addresses, or the device host name.
5. Enter the IP information for the discovery search.
6. Select the credentials that pertain to the devices on your network.
7. Click the Execute button.
Resource Management
20
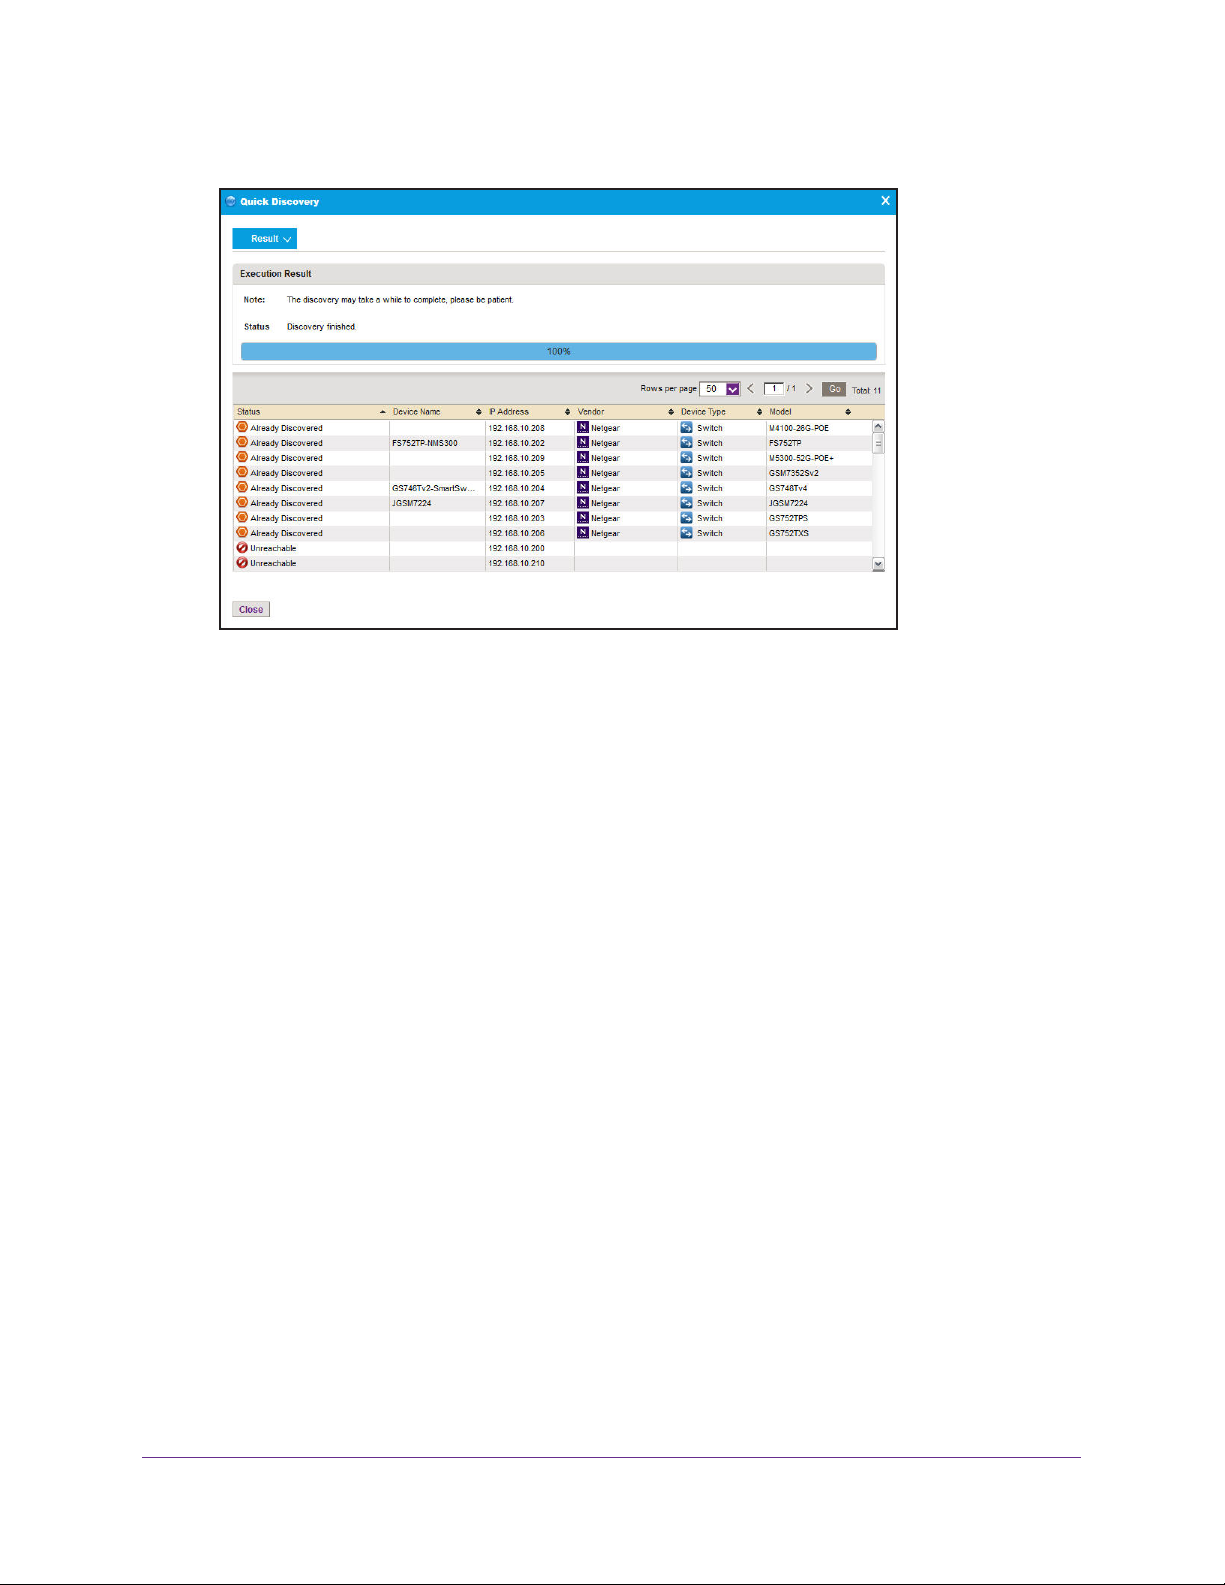
NMS300 Network Management System
When quick discovery has completed, a screen similar to the following displays:
When a credential failure occurs, a common reason is that the device login information
has changed from its default. When you get a credential failure, add or edit the credential
and then run the discovery procedure again. For more information, see Add a Device
Credential on page 21.
8. Click the Close button.
The Quick Discovery screen closes.
You can view and modify the information for a particular device. For more information,
see View Device Information on page 30.
Add a Device Credential
Device credentials are the user names, passwords, and SNMP community strings required to
log in to a device and obtain the information the NMS300 system requires to discover and
manage the device. The user name and password are the same user information you use to
log in to the device to perform system configuration. You must configure the correct device
credentials for any device you want NMS300 system to manage.
• If the devices do not have the default admin user password, create two new credentials in
T
NMS300 software, one for
contain either the admin user credential or the credential of another user with
administrative privileges.
elnet and another for the HTTP protocol. These credentials
• If the devices do not have the default SNMP community strings, create a credential in the
NMS300 software for the SNMP protocol that contains the matching community strings.
To add a device credential:
1. Select RESOURCES > DEVICE CREDENTIALS.
Resource Management
21
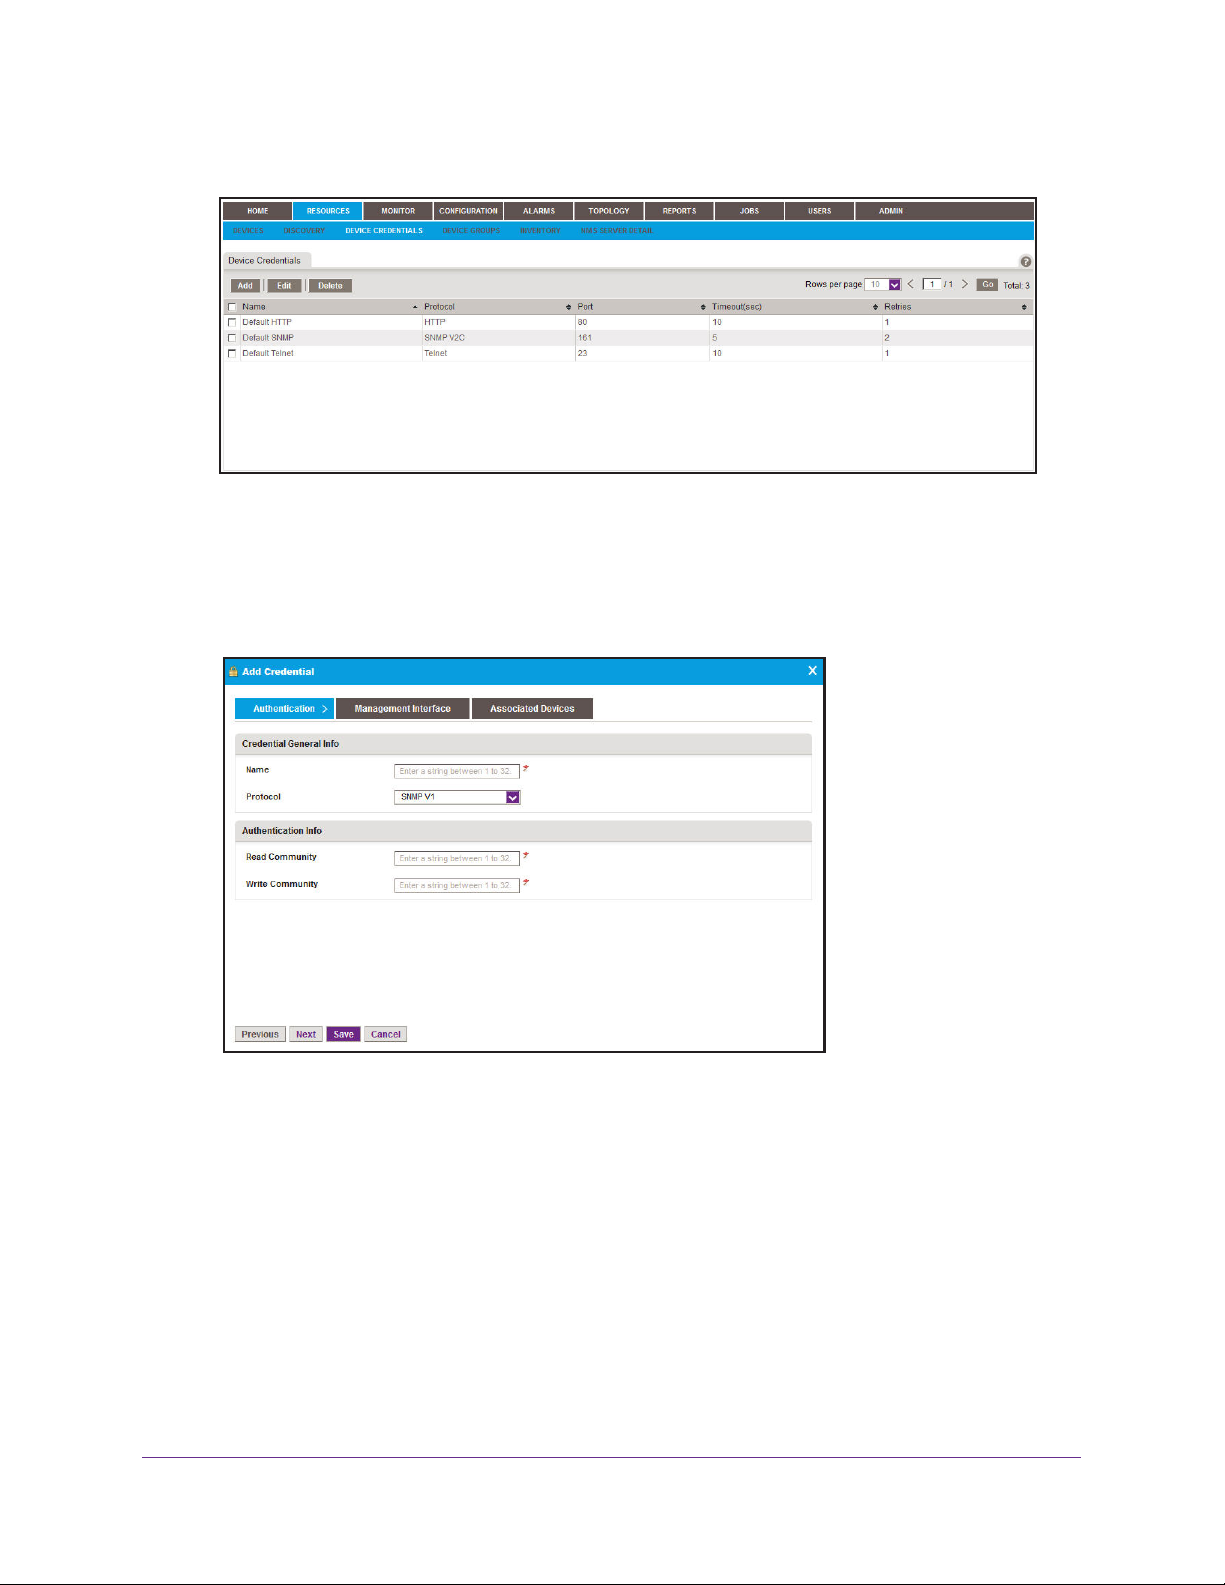
NMS300 Network Management System
A screen similar to the following displays:
2. To edit an existing device credential, select the device credential you want to edit and click
the Edit button.
A The Edit Credential screen displays, which is similar in appearance to the Add
Credential screen. For more information, see step 3 on page 22.
3. Click the Add button.
4. On the Authentication screen, enter the requested information.
Depending on your protocol selection, a different Authentication screen might display.
Resource Management
22
NMS300 Network Management System
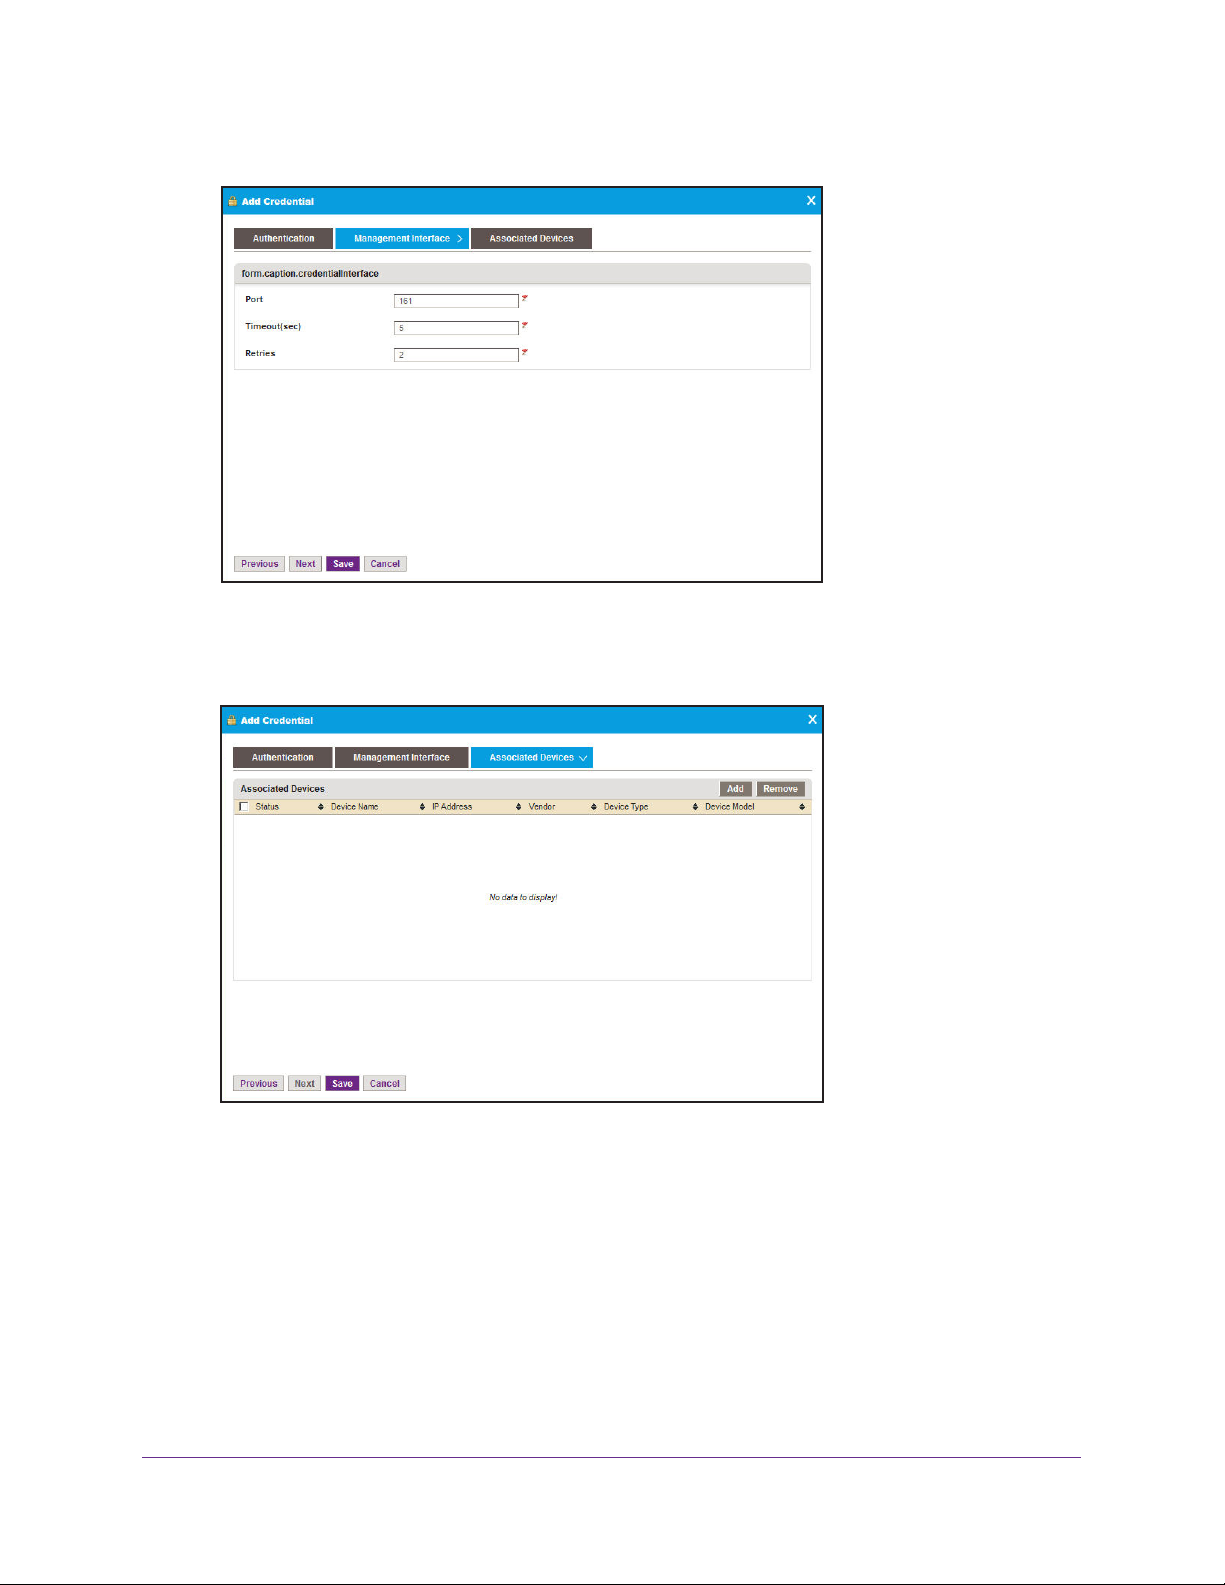
5. Click the Management Interface tab.
Depending on your previous selections, a different Management Interface screen might
display. Enter the requested information.
6. Click the Associated Devices tab.
7. (Optional) To remove devices from the device credential, select the devices you want to
remove and click the Remove button.
Resource Management
23
NMS300 Network Management System
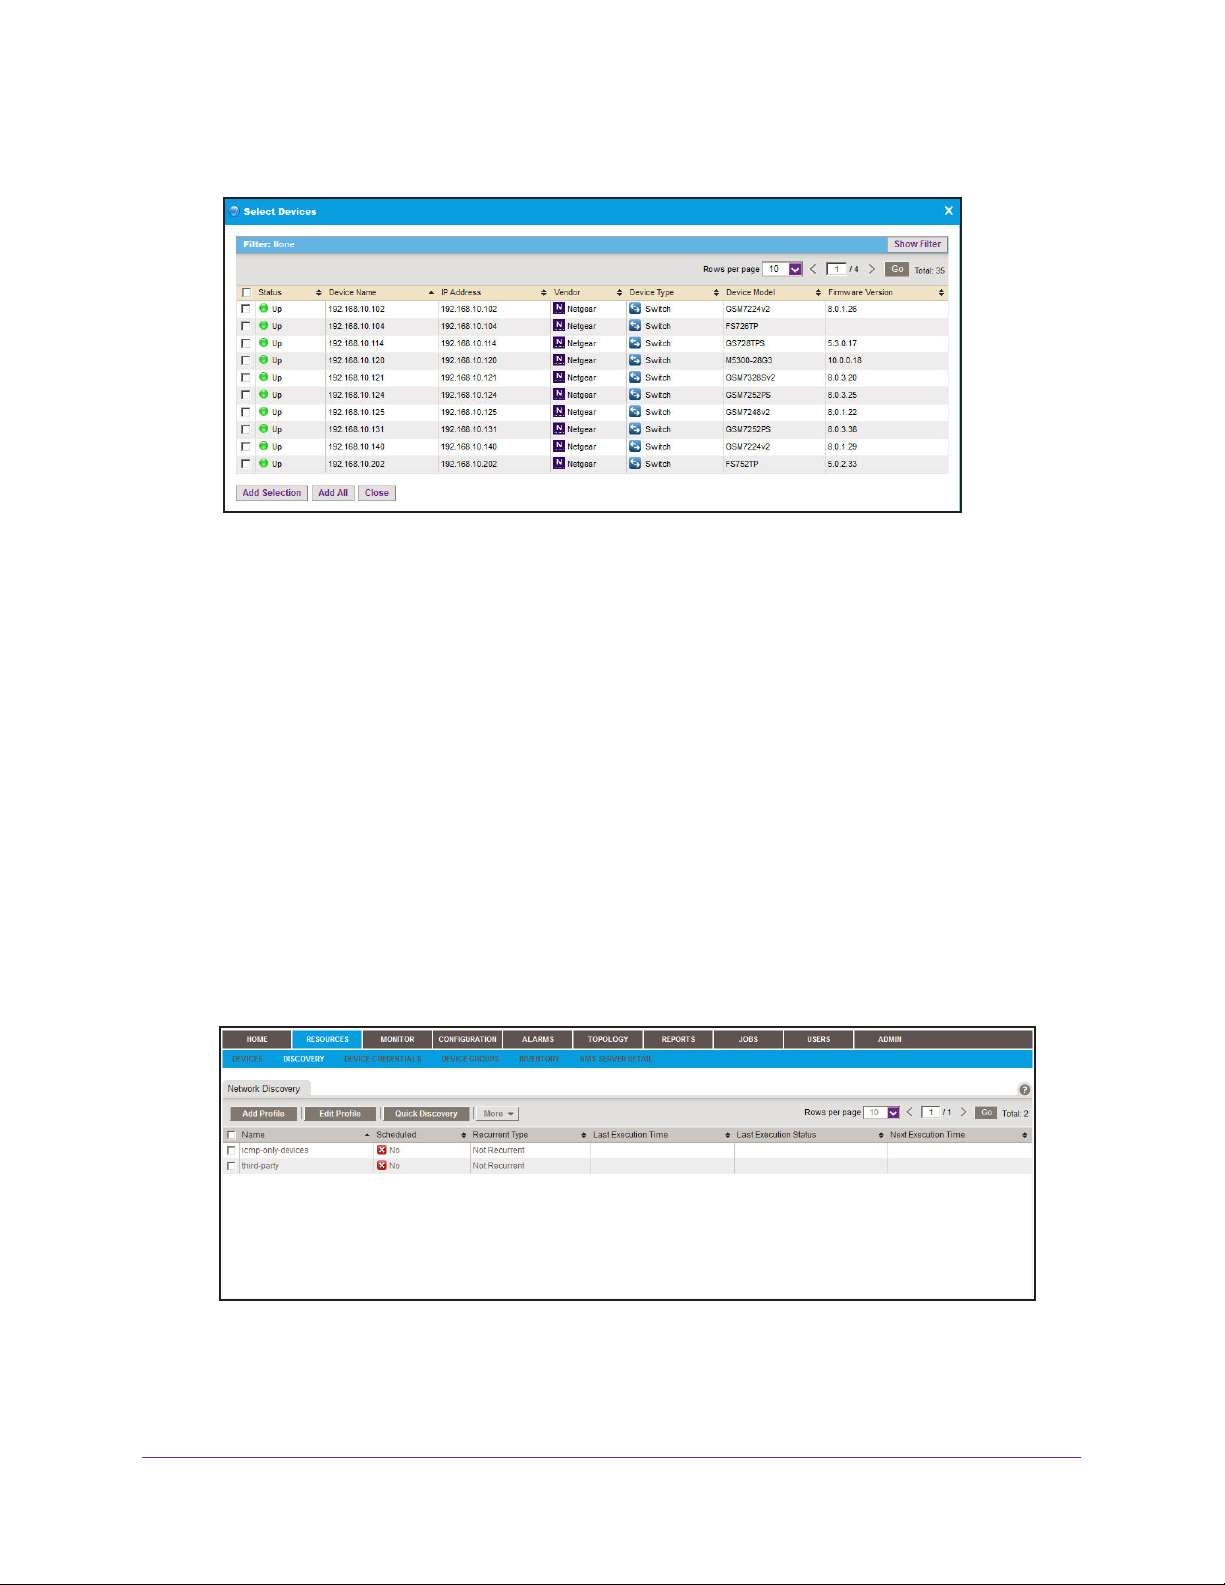
8. To add devices to the device credential, click the Add button.
9. To add one or more devices to the device credential, select the devices you want to add and
click the Add Selection button.
To add all devices to the device credential, click the Add All button.
The Select Devices screen closes and the selected devices are added to the Associated
Devices list.
10. Click the Save button.
The Add Credential screen closes and the new device credential displays in the Device
Credentials list.
Add a Discovery Profile
A discovery profile filters the network device information that the NMS300 system can detect.
To add a discovery profile:
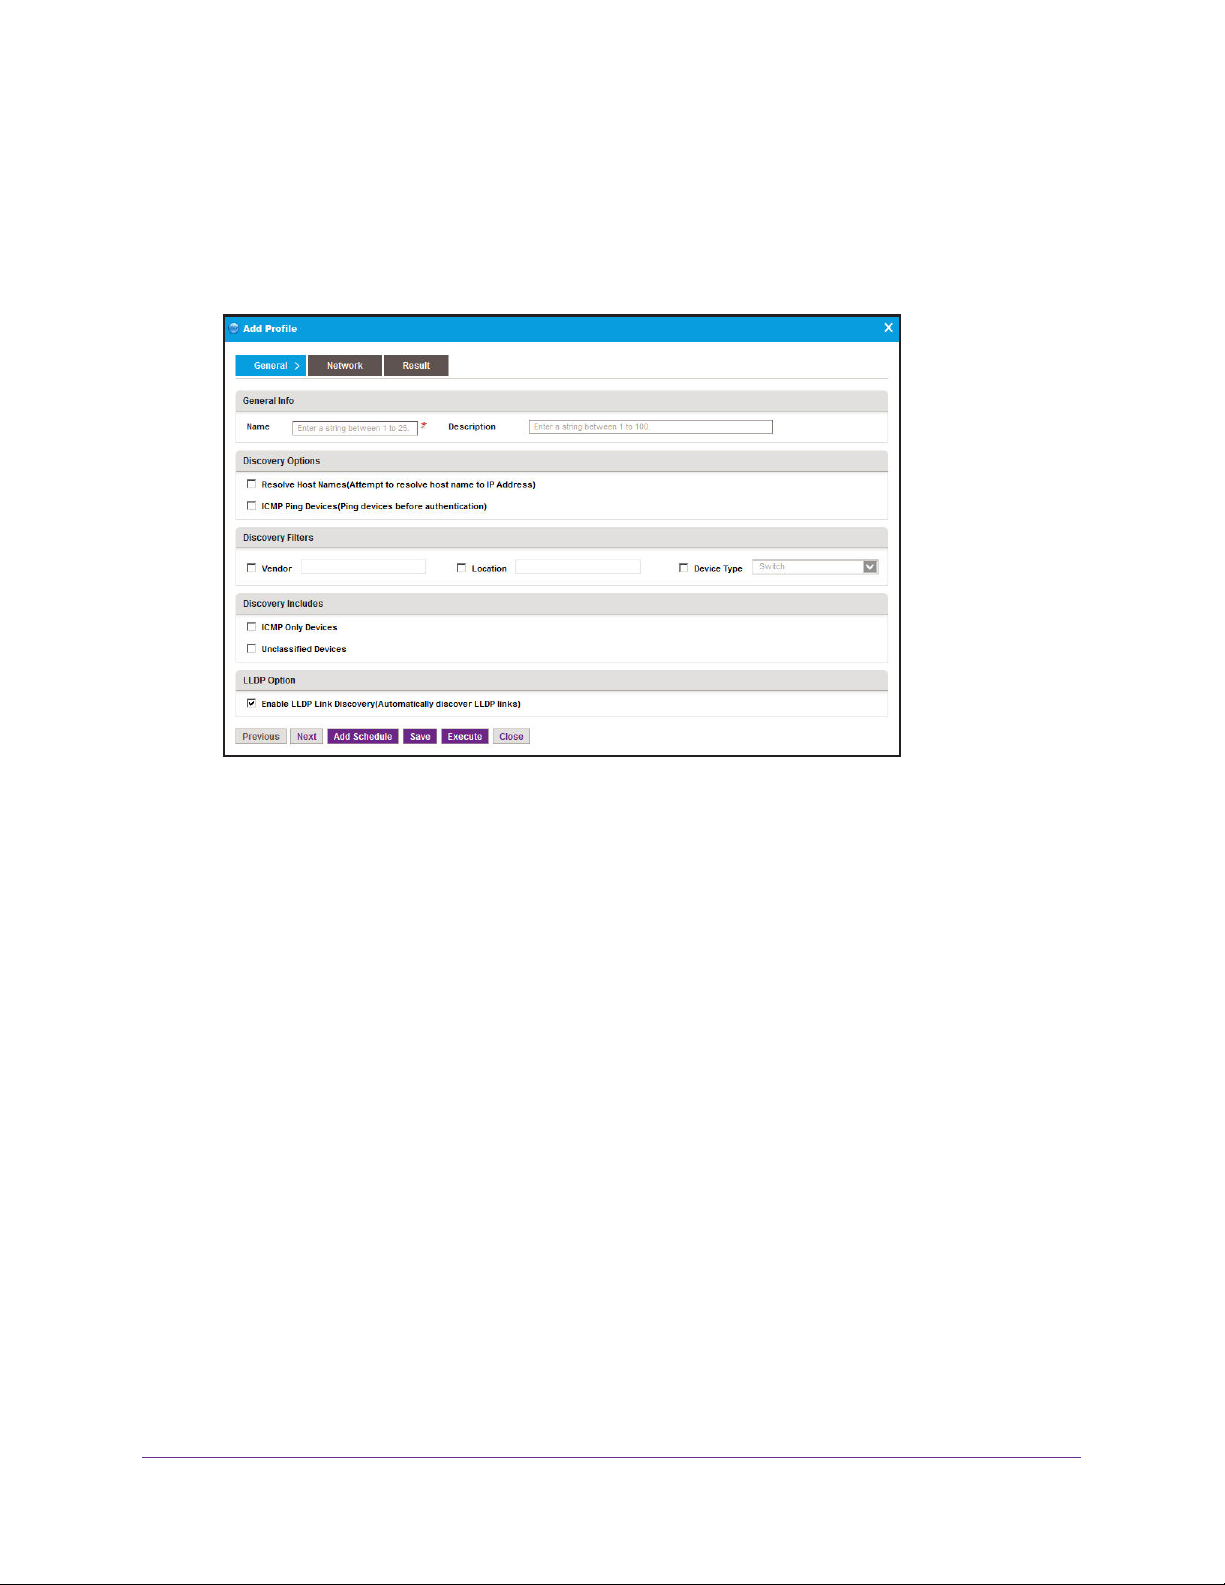
1. Select RESOURCES > DISCOVERY.
A screen similar to the following displays:
This screen lists the existing discovery profiles in the NMS300 system.
When you delete a discovery job from the Jobs list, the NMS300 system deletes the
discovery profile of the job. For more information, see Job Control on page 143.
Resource Management
24
NMS300 Network Management System
2. (Optional) To edit an existing discovery profile, select the discovery profile you want to edit
and click the Edit button.
The Edit Profile screen displays, which is similar to the Add Profile screen. For more
information, see step 3 on page 25.
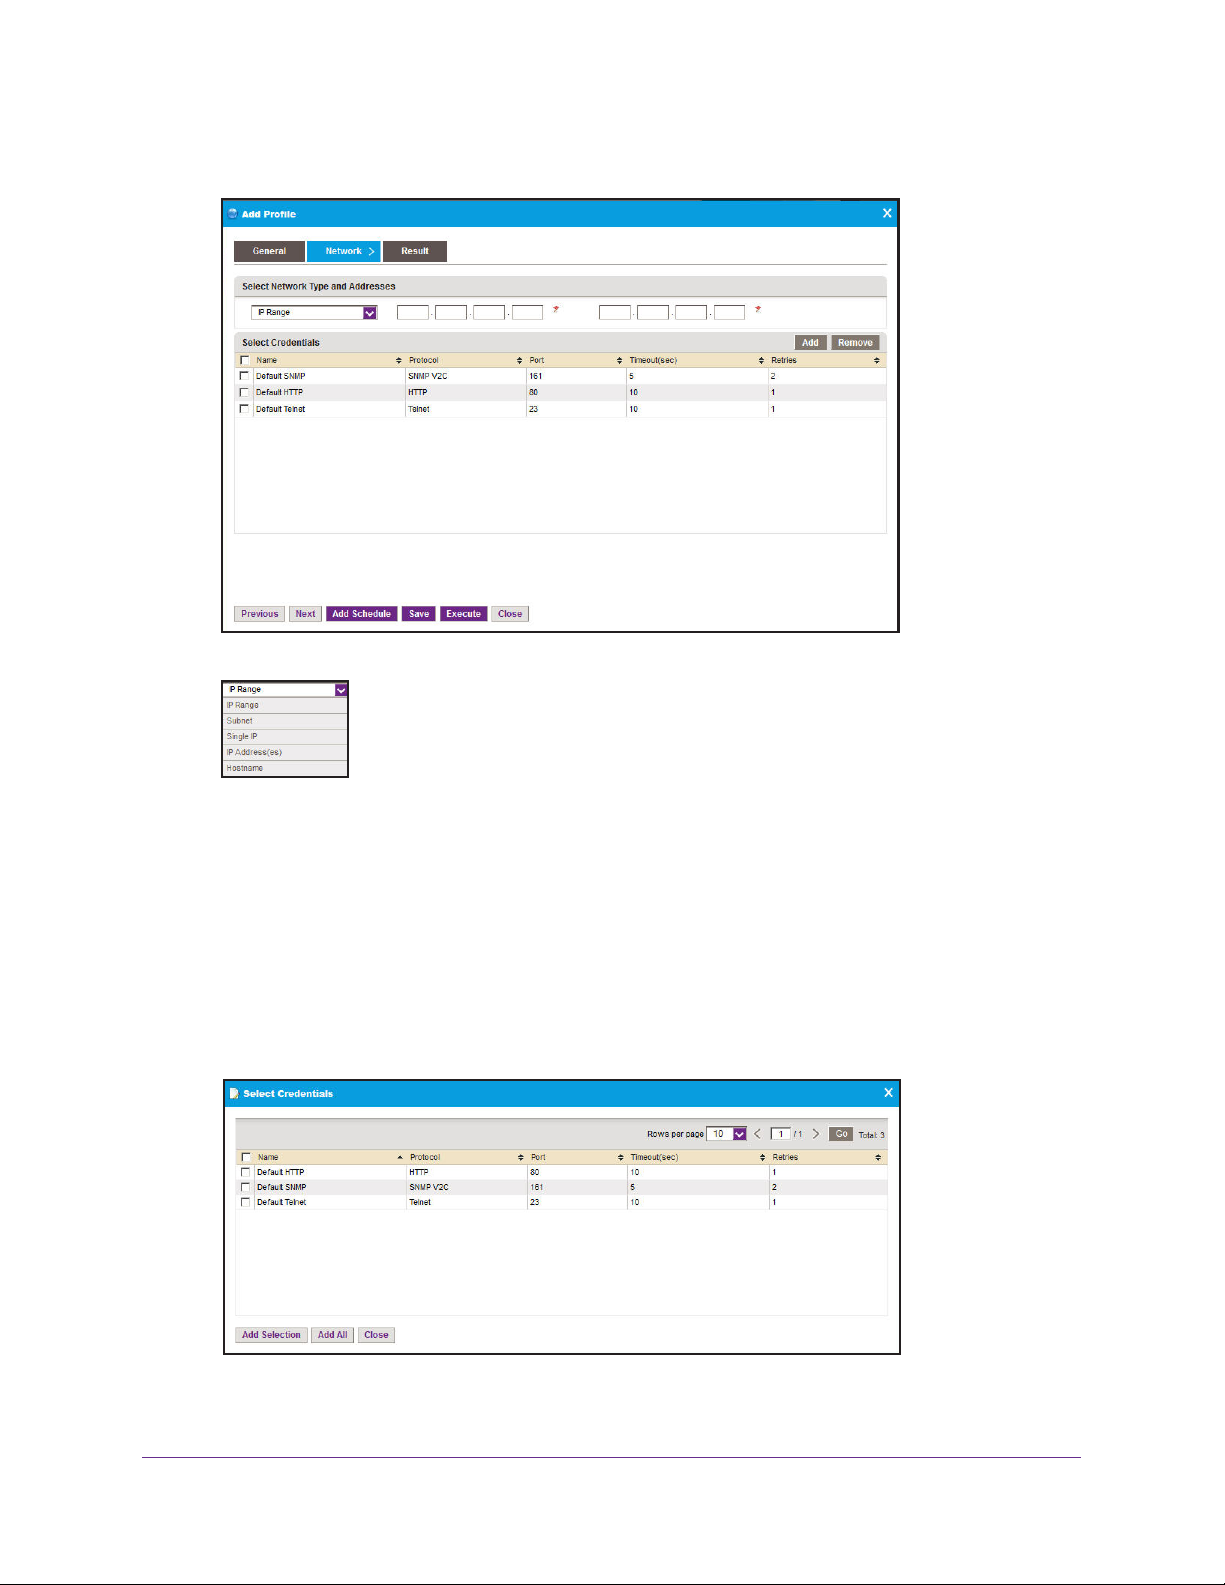
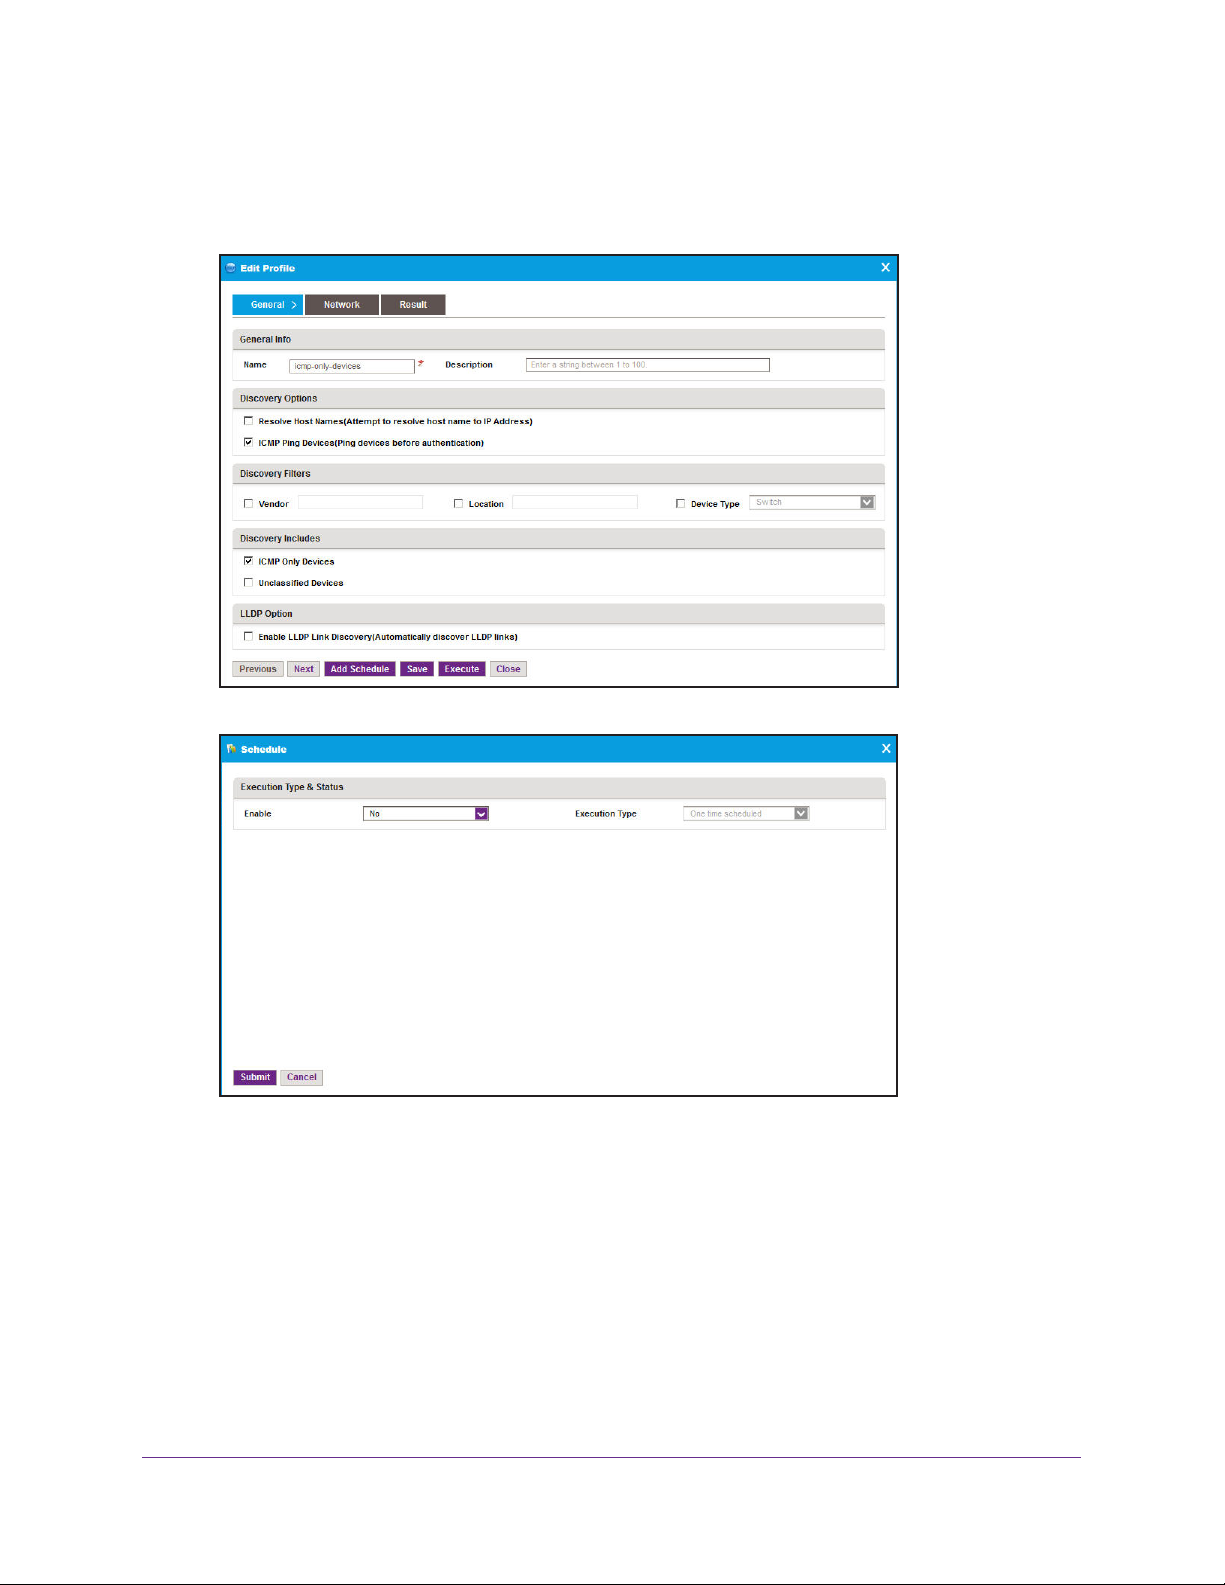
3. Click the Add Profile button.
4. Enter the requested information.
• General Info. Enter the name and description of the profile.
• Discovery Options.
- Resolve Host Names. T
o attempt to resolve a host name to an IP address, select
the Resolve Host Names (Attempt to resolve host name to IP address) radio
button.
- ICMP Ping Devices. T
o monitor the node status of third-party non-SNMP devices,
select the ICMP Ping Devices (Ping devices before authentication) radio
button.
• Discovery Filters. Select the discovery filters you want by vendor, location, and
device type.
• Discovery Includes
• LLDP Option.
. Select whether to include ICMP only and unclassified devices.
o monitor the node status of third-party non-SNMP devices, select
T
the Enable LLDP Link Discovery (Automatically discover LLDP links check box.
Resource Management
25
5. Click the Network tab.
NMS300 Network Management System
6. Select the network type.
Depending on your network type selection, one or more fields display where you enter IP
information.
You can screen by IP address range, IP subnet address, a single IP address, a list of IP
addresses, or the device host name.
7. Enter the IP information for the discovery search.
8. (Optional) T
o remove device credentials, select the device credentials you want to remove
and click the Remove button.
9. To add some of the credentials, select the credentials you want to add and click the Add
Selection
button.
To add all credentials, click the Add All button.
Resource Management
26
NMS300 Network Management System
You can add device credentials that you create. For more information, see Add a Device
Credential on page 21.
The Select Credentials screen closes and the selected credentials are added to the
Select Credentials list on the Network Screen.
10. Click the Save button.
The Add Profile screen closes and the new device credential displays in the Network
Discovery list.
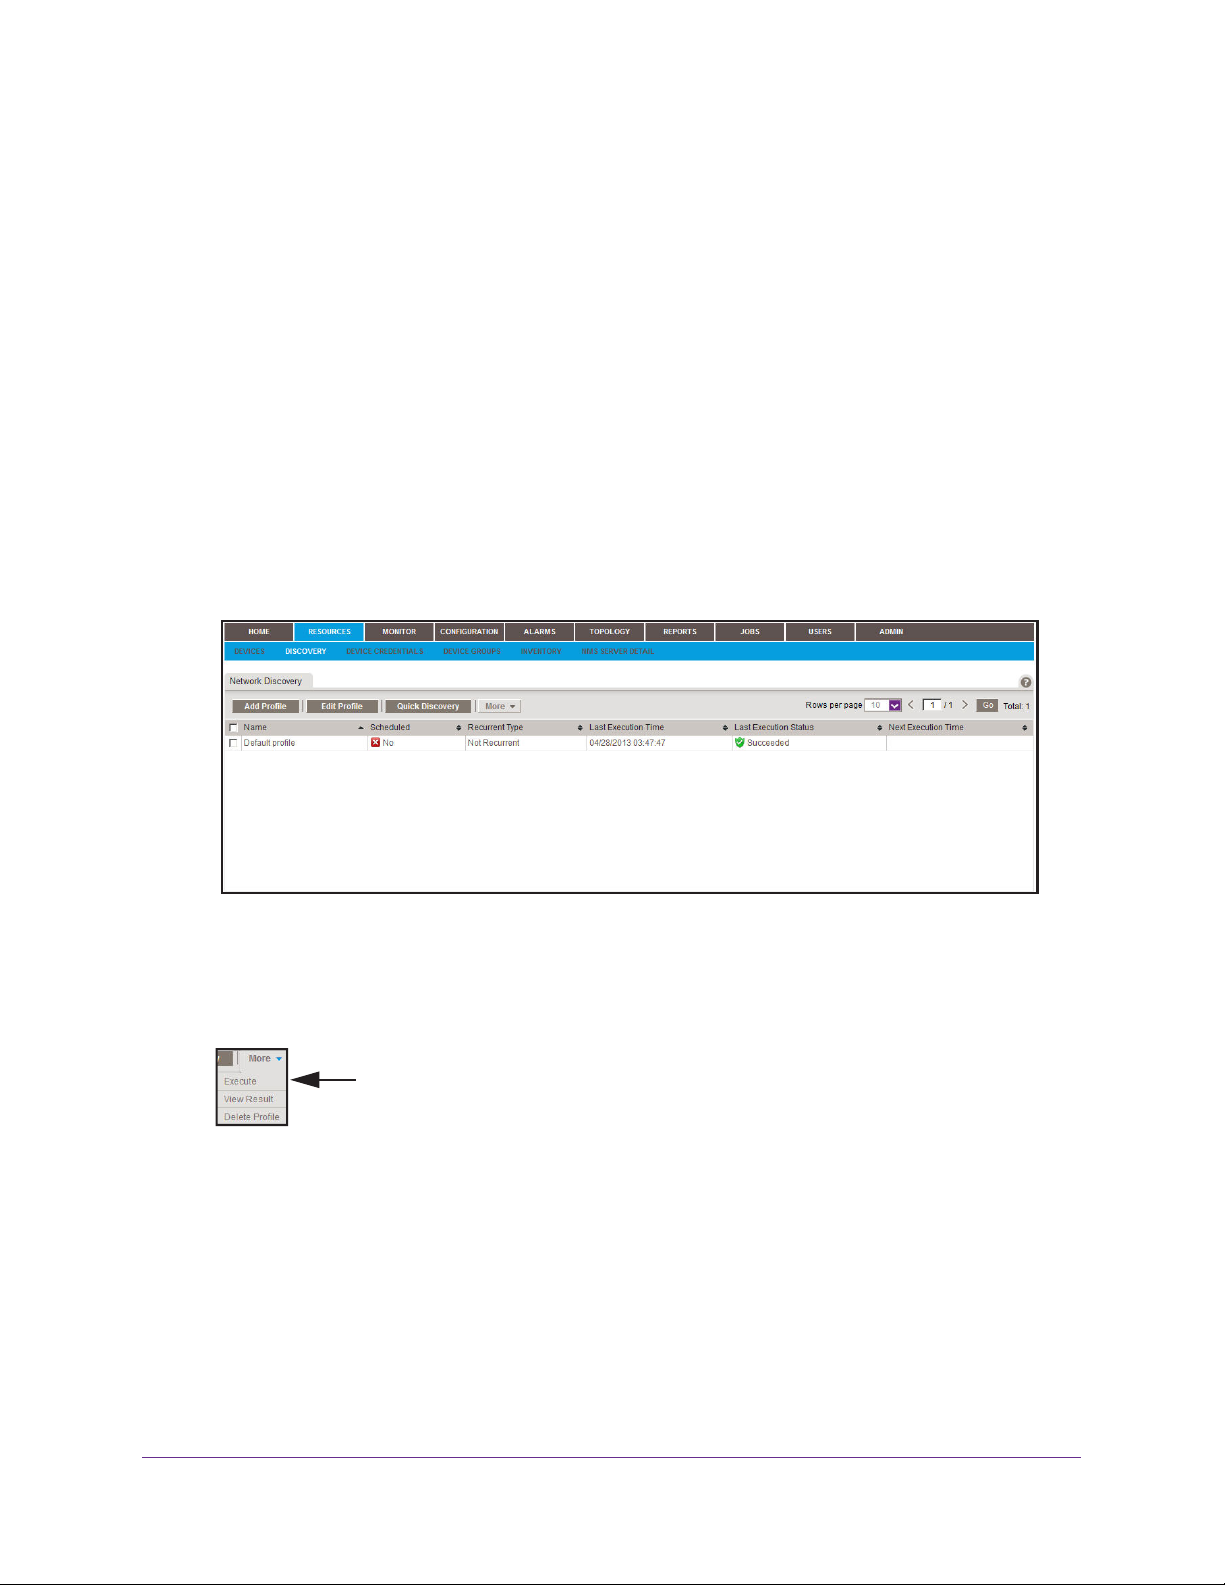
Execute a Discovery Procedure
You can execute a one-time discovery procedure immediately.
To execute a discovery procedure:
1. Select RESOURCES > DISCOVERY.
A screen similar to the following displays:
2. Select the discovery profile you want to execute.
When you delete a discovery job from the Jobs list, the NMS300 system deletes the
discovery profile of the job. For more information, see Job Control on page 143.
3. Point to More and select Execute.
Resource Management
27

NMS300 Network Management System
When discovery has completed, a screen similar to the following displays:
4. Click the Close button.
The screen closes.
Output files from completed jobs are saved for the data retention period. For more
information, see Data Retention Period on page 153.
Schedule a Discovery Procedure
You can schedule a discovery procedure to occur later. This discovery procedure can be one
time or recurrent.
To schedule a discovery procedure for future execution:
1. Select RESOURCES > DISCOVERY.
A screen similar to the following displays:
This screen lists the existing discovery profiles in the NMS300 system.
Resource Management
28
NMS300 Network Management System
When you delete a discovery job from the Jobs list, the NMS300 system deletes the
discovery profile of the job. For more information, see Job Control on page 143.
2. Select the discovery profile you want to execute and click the Edit Profile button.
3. Click the Add Schedule button.
4. To enable or disable job execution, from the Enable list, select Yes or No.
5. Specify the scheduling criteria.
Once you enable the job execution, you can specify whether the discovery procedure is
executed once or on a recurring basis.
Resource Management
29
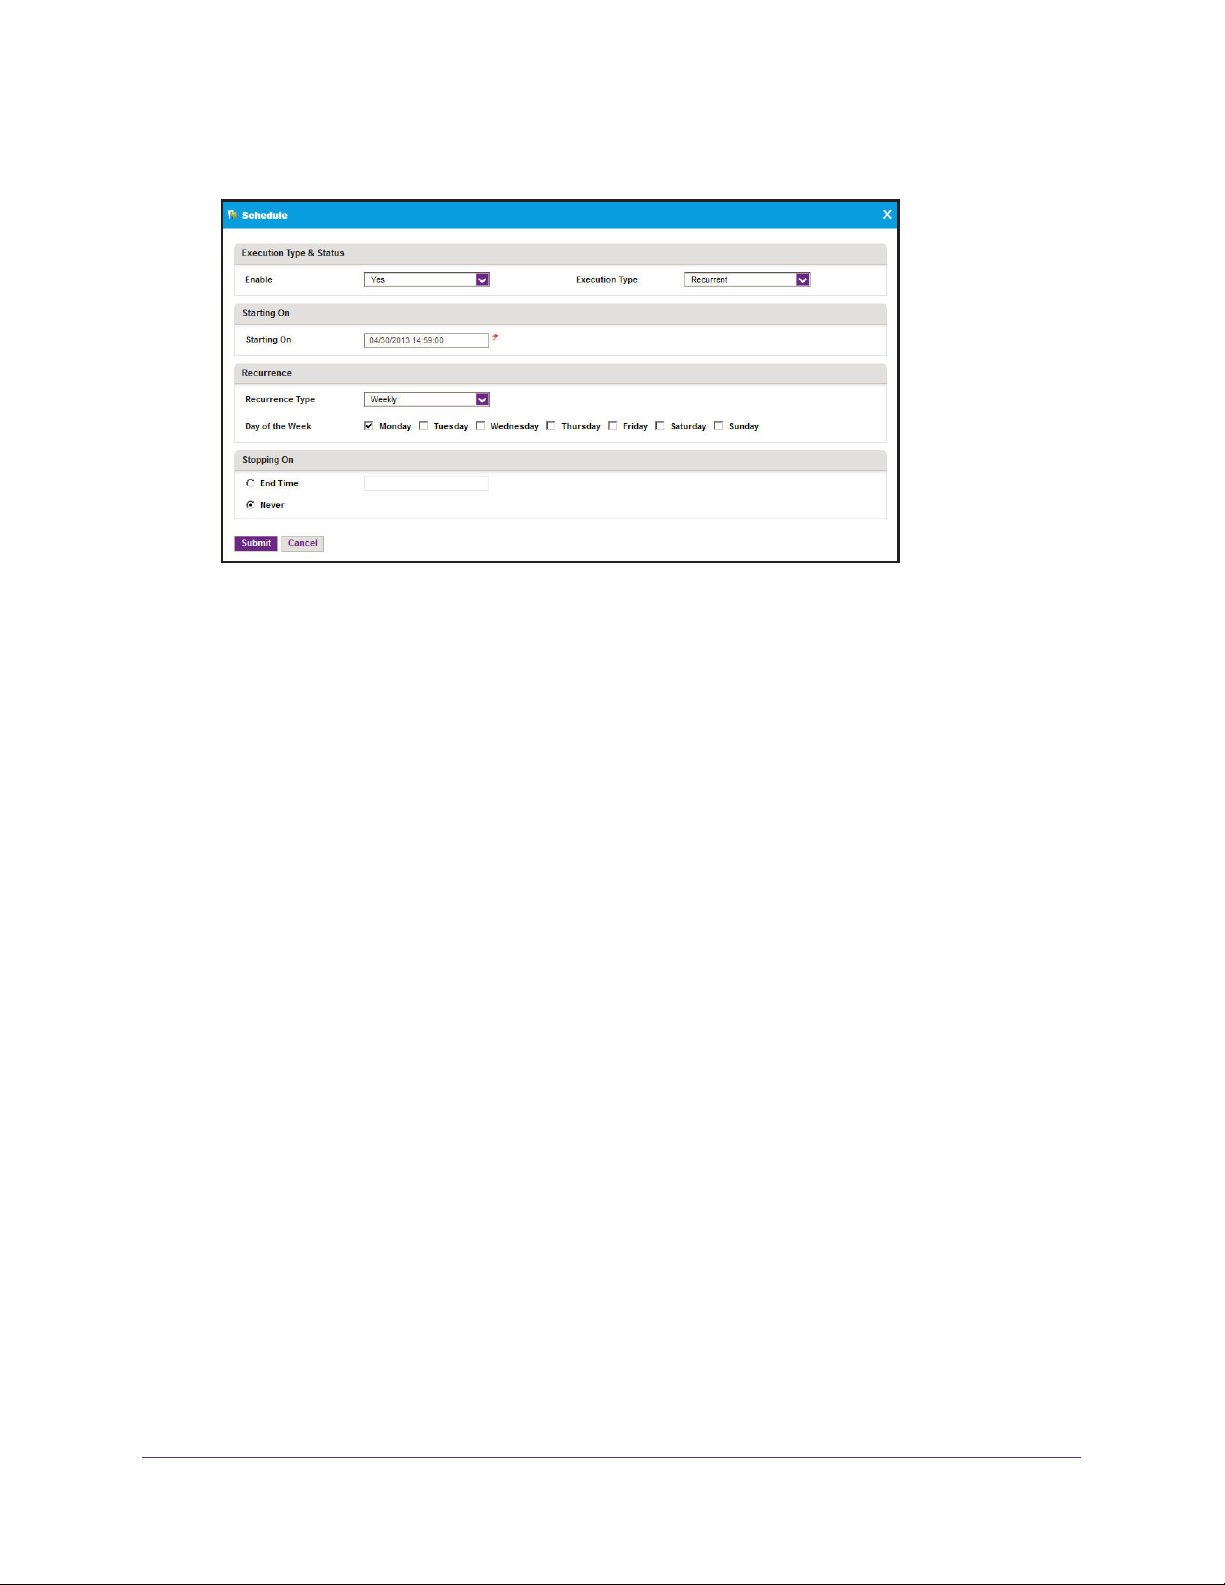
NMS300 Network Management System
Depending on your selections, the schedule screen changes.
6. Enter the schedule information.
7. Click the Submit button.
The Schedule screen closes. Your discovery procedure schedule becomes part of the
discovery profile.
8. On the Edit Profile screen, click the Save button.
Your discovery procedure is executed either once at a future time or on a recurring basis.
9. (Optional) Select JOBS > JOB MANAGEMENT.
You can enable, disable, or delete the future execution of this discovery procedure. For
more information, see Job Control on page 143.
Output files from completed jobs are saved for the data retention period. For more
information, see Data Retention Period on page 153.
Examine the Devices on Your Network
You can view and test the devices that have been discovered on your network.
You can also export a list of the devices on your network. For more information, see Export
the Device Inventory List on page 34.
Once the devices on your network are discovered and added to the inventory database, the
NMS300 system polls the devices to make sure that they are still there. Y
frequently the device inventory is polled. For more information, see Inventory Polling on
page 154.
ou can change how
View Device Information
You can see a list of devices that have been discovered in your entire network.
Resource Management
30
Loading...