


 Loading...
User Manual
Nighthawk Mesh WiFi 6 System
Models:
Mesh WiFi 6 Router Model MR60
Mesh WiFi 6 Satellite Model MS60
|
NETGEAR, Inc. |
June 2020 |
350 E. Plumeria Drive |
202-12018-03 |
San Jose, CA 95134, USA |

Nighthawk Mesh WiFi 6 System
Support and Community
Visit netgear.com/support to get your questions answered and access the latest downloads.
You can also check out our NETGEAR Community for helpful advice at community.netgear.com.
Regulatory and Legal
Si ce produit est vendu au Canada, vous pouvez accéder à ce document en français canadien à https://www.netgear.com/support/download/.
(If this product is sold in Canada, you can access this document in Canadian French at https://www.netgear.com/support/download/.)
ForregulatorycomplianceinformationincludingtheEUDeclarationofConformity,visit https://www.netgear.com/about/regulatory/.
See the regulatory compliance document before connecting the power supply.
For NETGEAR’s Privacy Policy, visit https://www.netgear.com/about/privacy-policy.
By using this device, you are agreeing to NETGEAR’s Terms and Conditions at https://www.netgear.com/about/terms-and-conditions. If you do not agree, return the device to your place of purchase within your return period.
Trademarks
©NETGEAR, Inc. NETGEAR and the NETGEAR Logo are trademarks of NETGEAR, Inc. Any non-NETGEAR trademarks are used for reference purposes only.
2

Contents
Chapter 1 Overview |
|
Router hardware and LED overview................................................... |
8 |
Router hardware features................................................................ |
8 |
Router LED behavior........................................................................ |
9 |
Satellite hardware and LED overview.............................................. |
10 |
Satellite hardware features........................................................... |
10 |
Satellite LED behavior................................................................... |
11 |
Router and Satellite labels................................................................. |
11 |
Connect your router........................................................................... |
12 |
Place your satellite.............................................................................. |
13 |
Sync your satellite with your router.................................................. |
13 |
Chapter 2 Connect to the Network and Access the Router |
|
Connect to the network..................................................................... |
16 |
Connect to the network using a wired connection.................... |
16 |
Find and connect to the WiFi network........................................ |
16 |
WiFi connection using WPS.......................................................... |
16 |
Types of logins.................................................................................... |
17 |
Use a web browser to access the router.......................................... |
17 |
Automatic Internet Setup.............................................................. |
17 |
Log in to the router........................................................................ |
19 |
Install and manage your Mesh system with the Nighthawk app... |
19 |
Change the language........................................................................ |
20 |
Chapter 3 Specify Your Internet Settings |
|
Use the Internet Setup Wizard.......................................................... |
22 |
Manually set up the Internet connection......................................... |
22 |
Specify an Internet connection without a login.......................... |
22 |
Specify an Internet connection that uses a login....................... |
24 |
Specify IPv6 Internet connections.................................................... |
25 |
Requirements for entering IPv6 addresses................................. |
26 |
Use auto detect for an IPv6 Internet connection........................ |
26 |
Set up an IPv6 6to4 tunnel Internet connection......................... |
27 |
Set up an IPv6 pass-through Internet connection...................... |
29 |
Set up an IPv6 fixed Internet connection.................................... |
29 |
Set up an IPv6 DHCP Internet connection.................................. |
31 |
3

Nighthawk Mesh WiFi 6 System
Set up an IPv6 PPPoE Internet connection.................................. |
32 |
Use auto config for an IPv6 Internet connection........................ |
34 |
Set up an IPv6 6rd Internet connection....................................... |
35 |
Manage the MTU size......................................................................... |
37 |
MTU concepts................................................................................. |
37 |
Change the MTU size.................................................................... |
38 |
Chapter 4 Control Access to the Internet |
|
Enable access control to allow or block access to the Internet.... |
41 |
Manage network access control lists............................................... |
42 |
Use keywords to block Internet sites............................................... |
43 |
Block services from the Internet....................................................... |
45 |
Delete keywords from the blocked list............................................ |
46 |
Prevent blocking on a trusted computer......................................... |
46 |
Schedule when to block Internet sites and services...................... |
47 |
Set up security event email notifications......................................... |
48 |
Chapter 5 Optimize Performance |
|
Use Dynamic QoS to optimize Internet traffic management........ |
51 |
Enable Dynamic QoS..................................................................... |
51 |
Enable or disable the automatic QoS database update........... |
52 |
Manually update the dynamic QoS database............................ |
52 |
Improve network connections with Universal Plug and Play........ |
53 |
Enable or disable AX WiFi................................................................. |
54 |
Chapter 6 Manage Network Settings |
|
View or change the WAN settings.................................................... |
57 |
Set up a default DMZ server.............................................................. |
58 |
Change the Router’s Device Name.................................................. |
59 |
Change the LAN TCP/IP settings...................................................... |
59 |
Specify the IP addresses that the router assigns............................ |
61 |
Disable the DHCP server feature in the router............................... |
62 |
Manage reserved LAN IP addresses................................................ |
63 |
Reserve an IP address.................................................................... |
63 |
Edit a reserved IP address............................................................ |
64 |
Delete a reserved IP address entry.............................................. |
64 |
Use the WPS wizard for WiFi connections....................................... |
65 |
Change the WiFi password or the WiFi security............................. |
66 |
Set up the router as a WiFi access point.......................................... |
67 |
Set up a bridge for a port group or VLAN tag group.................... |
68 |
Set up a bridge for a port group.................................................. |
68 |
Set up a bridge for a VLAN tag group........................................ |
69 |
Set up an IPTV port........................................................................ |
70 |
Manage custom static routes............................................................ |
71 |
4

Nighthawk Mesh WiFi 6 System
Set up a static route....................................................................... |
72 |
Edit a static route........................................................................... |
73 |
Delete a static route....................................................................... |
73 |
Enable or disable implicit beamforming......................................... |
74 |
Chapter 7 Manage Your Router |
|
Update the router and satellite firmware........................................ |
76 |
Check for firmware updates......................................................... |
76 |
Manually update the firmware..................................................... |
77 |
Manually update satellite firmware.............................................. |
77 |
Manually update router firmware................................................ |
78 |
Change the admin password............................................................ |
79 |
Enable admin password reset........................................................... |
79 |
Reset the admin password................................................................ |
80 |
View information about the router and the Internet and WiFi |
|
settings................................................................................................. |
81 |
Display the statistics of the Internet port......................................... |
82 |
Check the Internet connection status.............................................. |
83 |
View and manage logs of router activity......................................... |
84 |
View devices currently on the network............................................ |
85 |
Monitor Internet traffic....................................................................... |
85 |
Manage the router configuration file............................................... |
87 |
Back up the settings....................................................................... |
87 |
Erase the settings........................................................................... |
87 |
Restore the settings....................................................................... |
88 |
Remote access.................................................................................... |
89 |
Set up remote management........................................................ |
89 |
Use remote access......................................................................... |
90 |
Remotely access your router using the Nighthawk app................ |
90 |
Return the router or satellite to its factory default settings........... |
91 |
Use the Reset button..................................................................... |
91 |
Erase the settings........................................................................... |
91 |
Chapter 8 Manage Port Forwarding and Port Triggering |
|
Manage Port Forwarding to a Local Server..................................... |
94 |
Set Up Port Forwarding to a Local Server................................... |
94 |
Add a Custom Port Forwarding Service..................................... |
95 |
Edit a Port Forwarding Service..................................................... |
96 |
Delete a Port Forwarding Entry.................................................... |
97 |
Application Example: Make a Local Web Server Public........... |
97 |
How the Router Implements the Port Forwarding Rule............ |
98 |
Port Triggering.................................................................................... |
98 |
Add a Port Triggering Service...................................................... |
99 |
Enable Port Triggering................................................................ |
100 |
5

Nighthawk Mesh WiFi 6 System
ApplicationExample:PortTriggeringforInternetRelayChatport |
|
triggering...................................................................................... |
100 |
Chapter 9 Use VPN to Access Your Network |
|
Set up a VPN connection................................................................. |
103 |
Specify VPN Service in the Router.................................................. |
103 |
Install OpenVPN Software............................................................... |
104 |
Install OpenVPN Software on Your Windows Computer....... |
104 |
Install OpenVPN Software on Your Mac Computer................ |
107 |
Install OpenVPN Software on an iOS Device........................... |
108 |
Install OpenVPN Software on an Android Device................... |
108 |
Use a VPN Tunnel on Your Windows Computer.......................... |
109 |
Use VPN to Access Your Internet Service at Home...................... |
111 |
Set Up VPN Client Internet Access in the Router..................... |
111 |
Block VPN Client Internet Access in the Router....................... |
112 |
Use a VPN Tunnel to Access Your Internet Service at Home..113 |
|
Chapter 10 Troubleshooting |
|
Quick Tips.......................................................................................... |
115 |
Sequence to Restart Your Network........................................... |
115 |
WiFi Settings................................................................................. |
115 |
Network Settings.......................................................................... |
115 |
The Router and Satellite Do Not Sync........................................... |
115 |
Cannot Log In to the Router............................................................ |
116 |
Cannot Access the Internet............................................................. |
117 |
Troubleshoot Internet Browsing..................................................... |
118 |
Troubleshoot PPPoE........................................................................ |
118 |
Troubleshoot WiFi Connectivity..................................................... |
119 |
Troubleshoot Your Network Using the Ping Utility...................... |
120 |
Test the LAN Path to Your Router.............................................. |
120 |
Test the Path From Your Computer to a Remote Device....... |
121 |
Chapter 11 Supplemental Information |
|
Factory Settings................................................................................ |
124 |
Factory Settings for Router Model MR60.................................. |
124 |
Factory Settings for Satellite Model MS60............................... |
125 |
Technical Specifications.................................................................. |
127 |
Technical Specifications for Router Model MR60.................... |
127 |
Technical Specifications for Satellite Model MS60.................. |
129 |
6

1
Overview
The Mesh WiFi 6 router (model MR60) connects to your modem or gateway. The Mesh WiFi 6 satellite (model MS60) connects to the Mesh WiFi 6 router and extends the WiFi signal throughout your home.
This manual describes how to manage your Mesh WiFi 6 system from your router web interface. You can manage your satellite from the router web interface.
This chapter contains the following sections:
•Router hardware and LED overview
•Satellite hardware and LED overview
•Router and Satellite labels
•Connect your router
•Place your satellite
•Sync your satellite with your router
Formoreinformationaboutthetopicscoveredinthismanual,visitthesupportwebsite at https://www.netgear.com/support/.
Note: This manual supports the Mesh WiFi 6 router (model MR60) and Mesh WiFi 6 satellite (model MS60). This manual also supports any Mesh WiFi 6 system kits.
7

Nighthawk Mesh WiFi 6 System
Router hardware and LED overview
ThefollowingsectionsareanoverviewoftherouterhardwarefeaturesandLEDbehavior.
Router hardware features
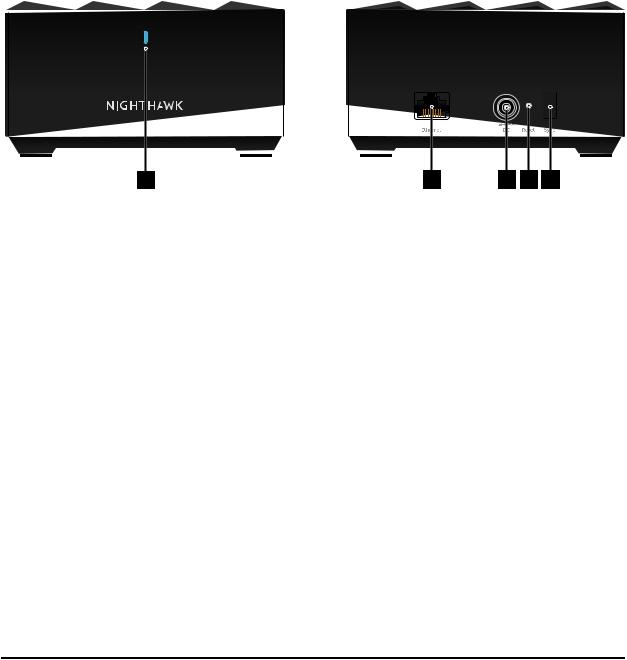
The following figure shows the router hardware features.
1
Figure 1. Router front and back views
1.Router LED
2.Ethernet port
3.Internet port
4.Power connector
5.Reset button
6.Sync button
2 |
3 |
4 |
5 |
6 |
Overview |
8 |
User Manual |
Nighthawk Mesh WiFi 6 System
Router LED behavior
The following table describes the LED behavior for the LED that is on the front of the router.
Table 1. Router LED behavior
LED color |
Description |
|
Pulsing white |
The router LED pulses white for one of the following reasons: |
|
|
• |
You connected the power adapter to the router. Now the router is booting and |
|
|
attempting to sync with the satellite. |
|
• |
You pressed the Sync button and the router is attempting to sync with the satellite. |
|
• |
You pressed the Reset button and the router is resetting to its factory default settings. |
Solid blue |
The router finished booting, is connected to the Internet, and is working normally. This |
|
|
color stays on all the time if the router is working normally. |
|
Solid amber |
The router is unable to connect to the Internet. |
|
Pulsing amber |
The router's firmware is corrupted. |
|
Overview |
9 |
User Manual |
Nighthawk Mesh WiFi 6 System
Satellite hardware and LED overview
The following sections are an overview of the satellite hardware features and LED behavior.
Satellite hardware features
The following figures shows the satellite hardware features.
1 |
2 |
3 |
4 |
5 |
Figure 2. Satellite front and back views
1.Satellite LED
2.Ethernet port
3.Power connector
4.Reset button
5.Sync button
Overview |
10 |
User Manual |

Nighthawk Mesh WiFi 6 System
Satellite LED behavior
The following table describes the LED behavior for the LED that is on the front of the satellite.
Table 2. Satellite LED behavior
LED color |
Description |
|
Pulsing white |
The satellite LED pulses white for one of the following reasons: |
|
|
• |
You connected the power adapter to the satellite. Now the satellite is booting and |
|
|
attempting to sync with the router. |
|
• |
You pressed the Sync button and the satellite is attempting to sync with the router. |
|
• |
YoupressedtheResetbuttonandthesatelliteisresettingtoitsfactorydefaultsettings. |
Solid blue |
The satellite finished booting, is synced with the router, and is working normally. This |
|
|
color stays on all the time if the satellite is working normally. |
|
Solid amber |
The the satellite failed to sync with the router. Move your satellite closer to the router (or |
|
|
closer to your other satellite if you own more than one satellite). |
|
Pulsing red |
The satellite's firmware is corrupted. |
|
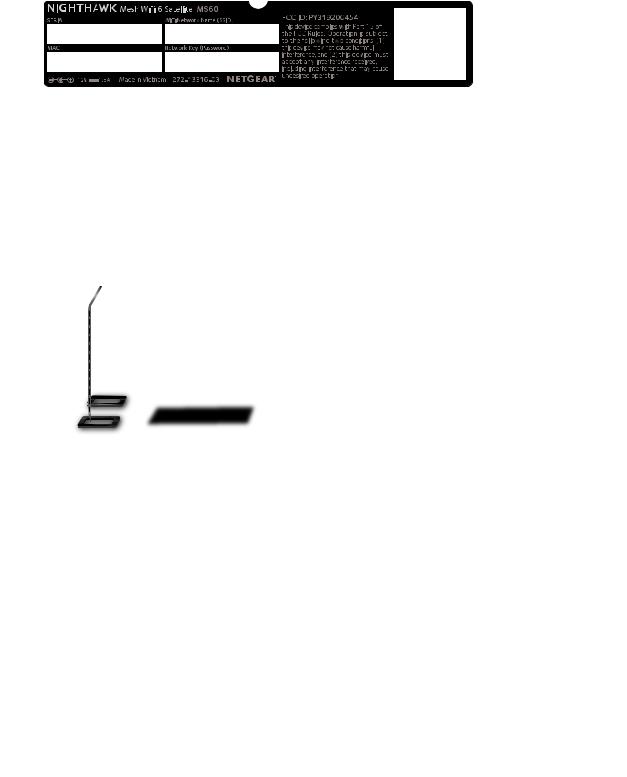
Router and Satellite labels
The router label shows the login information, the router WiFi network name and password, the router's MAC address, and the router's serial number. The following is an example of what the router label might look like:
Figure 3. Router label
Overview |
11 |
User Manual |
Nighthawk Mesh WiFi 6 System
The satellite label also displays the WiFi network name and password, the satellite’s MACaddress,andthesatellite’sserialnumber. Thefollowingisanexampleofwhatthe satellite label might look like:
Figure 4. Satellite label
Connect your router
Power on your router and connect it to a modem.
Figure 5. Connect your router
To connect your router:
1.Unplug your modem’s power, leaving the modem connected to the wall jack for your Internet service.
If your modem uses a battery backup, remove the battery.
2.Plug in and turn on your modem.
If your modem uses a battery backup, put the battery back in.
3.ConnectyourmodemtotheInternetportofyourrouterwiththeEthernetcablethat came with your router.
4.Connectthepoweradaptertoyourrouterandplugthepoweradapterintoanoutlet.
Overview |
12 |
User Manual |

Nighthawk Mesh WiFi 6 System
5.If the Router LED does not light, make sure that the power adapter is properly connected to your router and power outlet.
Place your satellite
Yoursatellitemustbewithinrangeofyourrouter’sWiFisignalinorderforittosyncwith yourrouter.Useyoursatellite'sLEDtohelpyoudeterminewheretoplaceyoursatellite.
Figure 6. Place your satellite
If you own more than one satellite, your satellites can sync with each other or with your router. Place your satellites so that they are within range of each other or the router. However, at least one satellite must be within range of your router.
Sync your satellite with your router
Thesatellitethatcomeswithyourrouterispresettoautomaticallyfindandsynctoyour router's WiFi signal.
To sync your satellite:
1.Place your satellite.
For more information, see Place your satellite on page 13.
2.Connect the satellite to a power source.
The satellite LED pulses white. The satellite automatically finds the router’s WiFi signal and attempts to sync to the router.
Overview |
13 |
User Manual |

Nighthawk Mesh WiFi 6 System
The satellite LED then lights one of the following colors:
•Blue. The router and satellite successfully synced, and the connection between the router and satellite is good.
•Amber. The router and satellite failed to sync. Move the satellite closer to the router and try again.
3.If the satellite LED is amber, do the following:
a. Unplug your satellite, move the satellite closer to the router, and plug it back in. b. Press the Sync button on the back of the router.
c. Within two minutes, press the Sync button on the back of the satellite.
Thesatelliteattemptstosynctotherouter. ThesatelliteLEDlightsblueoramber as described in Step 2 of this procedure.
4. If you own more than one satellite, repeat these steps to sync your other satellite.
Overview |
14 |
User Manual |

2
ConnecttotheNetworkandAccess
the Router
You can connect to the router’s WiFi networks or use a wired Ethernet connection. This chapter explains the ways you can connect and how to access the router and log in.
The chapter contains the following sections:
•Connect to the network
•Types of logins
•Use a web browser to access the router
•Install and manage your Mesh system with the Nighthawk app
•Change the language
15

Nighthawk Mesh WiFi 6 System
Connect to the network
You can connect to the router’s network through a wired or WiFi connection. If you set upyourcomputertouseastaticIPaddress,changethesettingssothatitusesDynamic Host Configuration Protocol (DHCP).
Connect to the network using a wired connection
You can connect your computer to the router using an Ethernet cable and join the router’s local area network (LAN).
To connect your computer to the router with an Ethernet cable:
1.Make sure that the router is receiving power (its Router LED is lit).
2.Connect an Ethernet cable to an Ethernet port on your computer.
3.Connect the other end of the Ethernet cable to the Ethernet port on the router. Your computer connects to the local area network (LAN).
Find and connect to the WiFi network
To find and select the WiFi network:
1.Make sure that the router is receiving power (its Router LED is lit).
2.On your computer or WiFi device, find and select the WiFi network. The WiFi network name is on the router label.
3.Join the WiFi network and enter the WiFi password. The password is on the router label.
Your device connects to the WiFi network.
WiFi connection using WPS
You can connect your WPS-enabled device to the router’s WiFi network with Wi-Fi Protected Setup (WPS) or you can find and select the WiFi network.
To use WPS to connect to the WiFi network:
1.Make sure that the router is receiving power (its Router LED is lit).
2.Check the WPS instructions for your WPS-enabled device.
3.Press the Sync button on the router.
Connect to the Network and |
16 |
User Manual |
Access the Router |
|
|

Nighthawk Mesh WiFi 6 System
4.Within two minutes, on your WPS-enabled device, press its WPS button or follow its instructions for WPS connections.
Your WPS-enabled device connects to the WiFi network.
Types of logins
Separate types of logins serve different purposes. It is important that you understand the differences so that you know which login to use when.
Several types of logins are associated with the router:
•ISPlogin. The login that your Internet service provider (ISP) gave you logs you in to your Internet service. Your ISP gave you this login information in a letter or some other way. If you cannot find this login information, contact your ISP.
•WiFinetworkkey,WiFipassphrase,orWiFipassword. Yourrouterispresetwith a unique WiFi network name (SSID) and password for WiFi access. This information is on the router label.
•NETGEAR account login. The free NETGEAR account that you need to register your router and manage your subscriptions. If you do not own a NETGEAR account, you can create one.
•Router login. The router login password that you need to log in to the router with the admin user name when you use a web browser to access the router.
Use a web browser to access the router
When you connect to the network (either with WiFi or with an Ethernet cable), you can useawebbrowsertoaccesstheroutertovieworchangeitssettings. Whenyouaccess the router, the software automatically checks to see if your router can connect to your Internet service.
Automatic Internet Setup
You can set up your router automatically, or you can use a web browser to access the routerandsetupyourroutermanually. Beforeyoustartthesetupprocess,getyourISP information and make sure that the computers and devices in the network are using the settings described here.
Connect to the Network and |
17 |
User Manual |
Access the Router |
|
|

Nighthawk Mesh WiFi 6 System
WhenyourInternetservicestarts,yourInternetserviceprovider(ISP)typicallygivesyou all the information needed to connect to the Internet. For DSL service, you might need the following information to set up your router:
•The ISP configuration information for your DSL account
•ISP login name and password
•Fixed or static IP address setting (special deployment by ISP; this setting is rare)
If you cannot locate this information, ask your ISP to provide it. When your Internet connection is working, you no longer need to launch the ISP login program on your computer to access the Internet. When you start an Internet application, your router automatically logs you in.
The NETGEAR installation assistant runs on any device with a web browser. Installation and basic setup takes about 15 minutes to complete.
To automatically set up your router:
1.Make sure that the router is powered on.
2.Make sure that your computer or mobile device is connected to the router with an Ethernet cable (wired) or over WiFi with the preset security settings listed on the label.
Note: If you want to change the router’s WiFi settings, use a wired connection to avoid being disconnected when the new WiFi settings take effect.
3.Launch a web browser.
The page that displays depends on whether you accessed the router before:
•ThefirsttimeyousetuptheInternetconnectionforyourrouter,thebrowsergoes to http://www.routerlogin.net and the Configuring the Internet Connection page displays.
•IfyoualreadysetuptheInternetconnection,enter http://www.routerlogin.net in the address field for your browser to start the installation process.
4.Follow the onscreen instructions. The router connects to the Internet.
5.IfthebrowserdoesnotdisplaytheNETGEARinstallationassistant,dothefollowing:
•Make sure that the computer is connected to an Ethernet port on the router or satellite or to the mesh WiFi network.
•Make sure that the router is receiving power and that its Router LED is lit.
•Close and reopen the browser or clear the browser cache.
•Browse to http://www.routerlogin.net.
Connect to the Network and |
18 |
User Manual |
Access the Router |
|
|

Nighthawk Mesh WiFi 6 System
•If the computer is set to a static or fixed IP address (this setting is uncommon), change it to obtain an IP address automatically from the router.
6.If the router does not connect to the Internet, do the following:
a. Reviewyoursettings. Makesurethatyouselectedthecorrectoptionsandtyped everything correctly.
b. ContactyourISPtoverifythatyouareusingthecorrectconfigurationinformation. c. Read Troubleshooting on page 114.
If problems persist, register your NETGEAR product and contact NETGEAR Technical Support.
Log in to the router
When you first connect to your router and launch a web browser, the browser automatically displays the router web interface. If you want to view or change settings for the router later, you can use a browser to log in to the router web interface.
To log in to the router:
1.Launch a web browser from a computer or mobile device that is connected to the router network.
2.Enter http://www.routerlogin.net.
Note: You can also enter http://www.routerlogin.com or http://192.168.1.1. The procedures in this manual use http://www.routerlogin.net.
A login window opens.
3.Enter the router admin user name and password.
The user name is admin. The password is the one that you specified the first time that you logged in. The user name and password are case-sensitive.
The BASIC Home page displays.
Install and manage your Mesh system with the Nighthawk app
WiththeNighthawkapp,youcaneasilyinstallandmanageyourmeshsystem. Theapp automaticallysyncsanysatellitesthatarenearby,updatesyoumeshsystemtothelatest
Connect to the Network and |
19 |
User Manual |
Access the Router |
|
|

Nighthawk Mesh WiFi 6 System
firmware, allows you to personalize your WiFi network, and even helps register your mesh system with NETGEAR.
The Nighthawk app is available for iOS and Android mobile devices.
Note: If you own any satellites, make sure they are powered on before installing your mesh system with the Nighthawk app.
To install your mesh system using the Nighthawk app:
1.To download the app, visit Nighthawk-app.com.
2.On your mobile device, tap Settings > Wi-Fi and find and connect to your router’s WiFi network.
Yourrouter’sWiFinetworkname(SSID)andnetworkkey(WiFipassword)areonthe router label.
If the label includes a QR code, you can scan the QR code to join the router’s WiFi network.
3.Launch the Nighthawk app on your mobile device.
4.Follow the prompts on the app to install your mesh system and connect to the Internet.
Change the language
By default, the language that displays when you log in to the router web interface is set to Auto.
To change the language:
1.Launch a web browser from a computer or mobile device that is connected to the router network.
2.Enter http://www.routerlogin.net. A login window opens.
3.Enter the router admin user name and password.
The user name is admin. The password is the one that you specified the first time that you logged in. The user name and password are case-sensitive.
The BASIC Home page displays.
4.In the upper right corner, select a language from the menu.
5.When prompted, click the OK button to confirm this change. The page refreshes with the language that you selected.
Connect to the Network and |
20 |
User Manual |
Access the Router |
|
|
3
Specify Your Internet Settings
Usually,thequickestwaytosetuptheroutertouseyourInternetconnectionistoallow your router to detect the Internet connection automatically when you first access the routerwebinterface.YoucanalsocustomizeandmanuallyspecifyyourInternetsettings.
This chapter contains the following sections:
•Use the Internet Setup Wizard
•Manually set up the Internet connection
•Specify IPv6 Internet connections
•Manage the MTU size
21

Nighthawk Mesh WiFi 6 System
Use the Internet Setup Wizard
You can use the Setup Wizard to detect your Internet settings and automatically set up your router. The Setup Wizard is not the same as the pages that display the first time you connect to your router to set it up.
To use the Setup Wizard:
1.Launch a web browser from a computer or mobile device that is connected to your mesh network.
2.Enter http://www.routerlogin.net. A login window opens.
3.Enter the router admin user name and password.
The user name is admin. The password is the one that you specified the first time that you logged in. The user name and password are case-sensitive.
The BASIC Home page displays.
4.Select ADVANCED > Setup Wizard. The Setup Wizard page displays.
5.Select the Yes radio button.
If you select the No radio button, you are taken to the Internet Setup page (see Manually set up the Internet connection on page 22).
6.Click the Next button.
The Setup Wizard searches your Internet connection for servers and protocols to determine your Internet configuration.
Manually set up the Internet connection
You can view or change the router’s Internet connection settings.
Specify an Internet connection without a login
To specify the Internet connection settings:
1.Launch a web browser from a computer or mobile device that is connected to your mesh network.
2.Enter http://www.routerlogin.net. A login window opens.
Specify Your Internet Settings |
22 |
User Manual |

Nighthawk Mesh WiFi 6 System
3.Enter the router admin user name and password.
The user name is admin. The password is the one that you specified the first time that you logged in. The user name and password are case-sensitive.
The BASIC Home page displays.
4.Select Internet.
The Internet Setup page displays.
5.In the Does your Internet connection require a login? section, leave the No radio button selected.
6.If your Internet connection requires an account name or host name, click the Edit button in the Account Name section and enter the account name.
7.IfyourInternetconnectionrequiresadomainname,typeitinthe DomainName(If Required) field.
For the other sections on this page, the default settings usually work, but you can change them.
8.Select an Internet IP Address radio button:
•Get Dynamically from ISP. Your ISP uses DHCP to assign your IP address. Your ISP automatically assigns these addresses.
•Use Static IP Address. Enter the IP address, IP subnet mask, and the gateway IP addressthatyourISPassigned. ThegatewayistheISProutertowhichyourrouter connects.
9.Select a Domain Name Server (DNS) Address radio button:
•Get Automatically from ISP. Your ISP uses DHCP to assign your DNS servers. Your ISP automatically assigns this address.
•UseTheseDNSServers.IfyouknowthatyourISPrequiresspecificservers,select this option. Enter the IP address of your ISP’s primary DNS server. If a secondary DNS server address is available, enter it also.
10.Select a Router MAC Address radio button:
•Use Default Address. Use the default MAC address.
•Use Computer MAC Address. The router captures and uses the MAC address of the computer that you are now using. You must use the one computer that the ISP allows.
•Use This MAC Address. Enter the MAC address that you want to use.
11.Click the Apply button. Your settings are saved.
Specify Your Internet Settings |
23 |
User Manual |

Nighthawk Mesh WiFi 6 System
12.Click the Test button to test your Internet connection.
If the NETGEAR website does not display within one minute, see Troubleshooting on page 114.
Specify an Internet connection that uses a login
To view or change the basic Internet setup:
1.Launch a web browser from a computer or mobile device that is connected to your mesh network.
2.Enter http://www.routerlogin.net. A login window opens.
3.Enter the router admin user name and password.
The user name is admin. The password is the one that you specified the first time that you logged in. The user name and password are case-sensitive.
The BASIC Home page displays.
4.Select Internet.
The Internet Setup page displays.
5.In the Does your Internet connection require a login? section, select the Yes radio button.
6.FromtheInternetServiceProvidermenu,selecttheencapsulationmethod:PPPoE,
L2TP, or PPTP.
7.In the Login field, enter the login name that your ISP gave you. This login name is often an email address.
8.In the Password field, type the password that you use to log in to your Internet service.
9.If your ISP requires a service name, type it in the Service Name (if Required) field.
10.FromtheConnectionModemenu,selectAlwaysOn,DialonDemand,orManually Connect.
11.To change the number of minutes until the Internet login times out, in the Idle Timeout (In minutes) field, type the number of minutes.
ThisishowlongtherouterkeepstheInternetconnectionactivewhennooneonthe network is using the Internet connection. A value of 0 (zero) means never log out.
12.Select an Internet IP Address radio button:
Specify Your Internet Settings |
24 |
User Manual |

Nighthawk Mesh WiFi 6 System
•Get Dynamically from ISP. Your ISP uses DHCP to assign your IP address. Your ISP automatically assigns these addresses.
•Use Static IP Address. Enter the IP address, IP subnet mask, and the gateway IP addressthatyourISPassigned. ThegatewayistheISProutertowhichyourrouter connects.
13.Select a Domain Name Server (DNS) Address radio button:
•Get Automatically from ISP. Your ISP uses DHCP to assign your DNS servers. Your ISP automatically assigns this address.
•UseTheseDNSServers.IfyouknowthatyourISPrequiresspecificservers,select this option. Enter the IP address of your ISP’s primary DNS server. If a secondary DNS server address is available, enter it also.
14.Select a Router MAC Address radio button:
•Use Default Address. Use the default MAC address.
•Use Computer MAC Address. The router captures and uses the MAC address of the computer that you are now using. You must use the one computer that the ISP allows.
•Use This MAC Address. Enter the MAC address that you want to use.
15.Click the Apply button. Your settings are saved.
16.Click the Test button to test your Internet connection.
If the NETGEAR website does not display within one minute, see Troubleshooting on page 114.
Specify IPv6 Internet connections
YoucansetupanIPv6Internetconnectioniftherouterdoesnotdetectitautomatically.
To set up an IPv6 Internet connection:
1.Launch a web browser from a computer or mobile device that is connected to the router network.
2.Enter http://www.routerlogin.net. A login window opens.
3.Enter the router admin user name and password.
The user name is admin. The password is the one that you specified the first time that you logged in. The user name and password are case-sensitive.
The BASIC Home page displays.
Specify Your Internet Settings |
25 |
User Manual |

Nighthawk Mesh WiFi 6 System
4.Select ADVANCED > Advanced Setup > IPv6. The IPv6 page displays.
5.From the Internet Connection Type menu, select the IPv6 connection type:
•If you are not sure, select Auto Detect so that the router detects the IPv6 type that is in use.
•If your Internet connection does not use PPPoe or DHCP, or is not fixed, but is IPv6, select Auto Config.
Your Internet service provider (ISP) can provide this information.
6.Click the Apply button. Your settings are saved.
Requirements for entering IPv6 addresses
IPv6addressesaredenotedbyeightgroupsofhexadecimalquartetsthatareseparated by colons. You can reduce any four-digit group of zeros within an IPv6 address to a single zero or omit it. The following errors invalidate an IPv6 address:
•More than eight groups of hexadecimal quartets
•More than four hexadecimal characters in a quartet
•More than two colons in a row
Use auto detect for an IPv6 Internet connection
To set up an IPv6 Internet connection through autodetection:
1.Launch a web browser from a computer or mobile device that is connected to the router network.
2.Enter http://www.routerlogin.net. A login window opens.
3.Enter the router admin user name and password.
The user name is admin. The password is the one that you specified the first time that you logged in. The user name and password are case-sensitive.
The BASIC Home page displays.
4.Select ADVANCED > Advanced Setup > IPv6. The IPv6 page displays.
5.From the Internet Connection Type menu, select Auto Detect. The page adjusts.
Specify Your Internet Settings |
26 |
User Manual |

Nighthawk Mesh WiFi 6 System
The router automatically detects the information in the following fields:
•Connection Type. This field indicates the connection type that is detected.
•Router’sIPv6AddressonWAN.ThisfieldshowstheIPv6addressthatisacquired for the router’s WAN (or Internet) interface. The number after the slash (/) is the length of the prefix, which is also indicated by the underline (_) under the IPv6 address. If no address is acquired, the field displays Not Available.
•Router’sIPv6AddressonLAN.ThisfieldshowstheIPv6addressthatisacquired for the router’s LAN interface. The number after the slash (/) is the length of the prefix, which is also indicated by the underline (_) under the IPv6 address. If no address is acquired, the field displays Not Available.
6.Select an IP Address Assignment radio button:
•Use DHCP Server. This method passes more information to LAN devices but some IPv6 systems might not support the DHCv6 client function.
•Auto Config. This is the default setting.
This setting specifies how the router assigns IPv6 addresses to the devices on your home network (the LAN).
7.(Optional) Select the Use This Interface ID check box and specify the interface ID to be used for the IPv6 address of the router’s LAN interface.
IfyoudonotspecifyanIDhere,theroutergeneratesoneautomaticallyfromitsMAC
address.
8.Select an IPv6 Filtering radio button:
•Secured. In secured mode, which is the default mode, the router inspects both TCP and UDP packets.
•Open. In open mode, the router inspects UDP packets only.
9.Click the Apply button. Your settings are saved.
Set up an IPv6 6to4 tunnel Internet connection
The remote relay router is the router to which your router creates a 6to4 tunnel. Make sure that the IPv4 Internet connection is working before you apply the 6to4 tunnel settings for the IPv6 connection.
Specify Your Internet Settings |
27 |
User Manual |

Nighthawk Mesh WiFi 6 System
To set up an IPv6 Internet connection by using a 6to4 tunnel:
1.Launch a web browser from a computer or mobile device that is connected to the router network.
2.Enter http://www.routerlogin.net. A login window opens.
3.Enter the router admin user name and password.
The user name is admin. The password is the one that you specified the first time that you logged in. The user name and password are case-sensitive.
The BASIC Home page displays.
4.Select ADVANCED > Advanced Setup > IPv6. The IPv6 page displays.
5.From the Internet Connection Type menu, select 6to4 Tunnel. The page adjusts.
The router automatically detects the information in the Router’s IPv6 Address on LAN field. This field shows the IPv6 address that is acquired for the router’s LAN interface. The number after the slash (/) is the length of the prefix, which is also indicated by the underline (_) under the IPv6 address. If no address is acquired, the field displays Not Available.
6.Select a Remote 6to4 Relay Router radio button:
•Auto. Your router uses any remote relay router that is available on the Internet. This is the default setting.
•Static IP Address. Enter the static IPv4 address of the remote relay router. Your IPv6 ISP usually provides this address.
7.Select an IP Address Assignment radio button:
•Use DHCP Server. This method passes more information to LAN devices but some IPv6 systems might not support the DHCPv6 client function.
•Auto Config. This is the default setting.
This setting specifies how the router assigns IPv6 addresses to the devices on your home network (the LAN).
8.(Optional) Select the Use This Interface ID check box and specify the interface ID to be used for the IPv6 address of the router’s LAN interface.
IfyoudonotspecifyanIDhere,theroutergeneratesoneautomaticallyfromitsMAC
address.
9.Select an IPv6 Filtering radio button:
Specify Your Internet Settings |
28 |
User Manual |

Nighthawk Mesh WiFi 6 System
•Secured. In secured mode, which is the default mode, the router inspects both TCP and UDP packets.
•Open. In open mode, the router inspects UDP packets only.
10.Click the Apply button. Your settings are saved.
Set up an IPv6 pass-through Internet connection
To set up a pass-through IPv6 Internet connection:
1.Launch a web browser from a computer or mobile device that is connected to the router network.
2.Enter http://www.routerlogin.net. A login window opens.
3.Enter the router admin user name and password.
The user name is admin. The password is the one that you specified the first time that you logged in. The user name and password are case-sensitive.
The BASIC Home page displays.
4.Select ADVANCED > Advanced Setup > IPv6. The IPv6 page displays.
5.From the Internet Connection Type menu, select Pass Through. The page adjusts, but no additional fields display.
6.Click the Apply button. Your settings are saved.
Set up an IPv6 fixed Internet connection
To set up a fixed IPv6 Internet connection:
1.Launch a web browser from a computer or mobile device that is connected to the router network.
2.Enter http://www.routerlogin.net. A login window opens.
3.Enter the router admin user name and password.
The user name is admin. The password is the one that you specified the first time that you logged in. The user name and password are case-sensitive.
Specify Your Internet Settings |
29 |
User Manual |

Nighthawk Mesh WiFi 6 System
The BASIC Home page displays.
4.Select ADVANCED > Advanced Setup > IPv6. The IPv6 page displays.
5.From the Internet Connection Type menu, select Fixed. The page adjusts.
6.Configure the fixed IPv6 addresses for the WAN connection:
•IPv6 Address/Prefix Length. The IPv6 address and prefix length of the router WAN interface.
•Default IPv6 Gateway. The IPv6 address of the default IPv6 gateway for the router’s WAN interface.
•Primary DNS Server. The primary DNS server that resolves IPv6 domain name records for the router.
•Secondary DNS Server. The secondary DNS server that resolves IPv6 domain name records for the router.
Note: If you do not specify the DNS servers, the router uses the DNS servers that are configured for the IPv4 Internet connection on the Internet Setup page. (See Manually set up the Internet connection on page 22.)
7.Select an IP Address Assignment radio button:
•Use DHCP Server. This method passes more information to LAN devices but some IPv6 systems might not support the DHCPv6 client function.
•Auto Config. This is the default setting.
This setting specifies how the router assigns IPv6 addresses to the devices on your home network (the LAN).
8.In the IPv6 Address/Prefix Length fields, specify the static IPv6 address and prefix length of the router’s LAN interface.
IfyoudonotspecifyanIDhere,theroutergeneratesoneautomaticallyfromitsMAC
address.
9.Select an IPv6 Filtering radio button:
•Secured. In secured mode, which is the default mode, the router inspects both TCP and UDP packets.
•Open. In open mode, the router inspects UDP packets only.
10.Click the Apply button.
Specify Your Internet Settings |
30 |
User Manual |
Loading...