


 Loading...
3G Broadband Wireless
Router MBR624GU User
Manual
NETGEAR, Inc.
350 E. Plumeria Drive
San Jose, CA 95134 USA
202-10437-01 January 2009

© 2009 by NETGEAR, Inc. All rights reserved.
Trademarks
NETGEAR and the NETGEAR logo are trademarks of Netgear, Inc. Microsoft, Windows, and Windows NT are registered trademarks of Microsoft Corporation. Other brand and product names are registered trademarks or trademarks of their respective holders.
Statement of Conditions
In the interest of improving internal design, operational function, and/or reliability, NETGEAR reserves the right to make changes to the products described in this document without notice.
NETGEAR does not assume any liability that may occur due to the use or application of the product(s) or circuit layout(s) described herein.
FCC Statement
This equipment has been tested and found to comply with the limits for a Class B digital device, pursuant to Part 15 of the FCC Rules. These limits are designed to provide reasonable protection against harmful interference in a residential installation. This equipment generates, uses and can radiate radio frequency energy and, if not installed and used in accordance with the instructions, may cause harmful interference to radio communications. However, there is no guarantee that interference will not occur in a particular installation. If this equipment does cause harmful interference to radio or television reception, which can be determined by turning the equipment off and on, the user is encouraged to try to correct the interference by one of the following measures:
•Reorient or relocate the receiving antenna.
•Increase the separation between the equipment and receiver.
•Connect the equipment into an outlet on a circuit different from that to which the receiver is connected.
•Consult the dealer or an experienced radio/TV technician for help.
This device complies with Part 15 of the FCC Rules. Operation is subject to the following two conditions:
(1) This device may not cause harmful interference, and (2) this device must accept any interference received, including interference that may cause undesired operation.
FCC Caution: Any changes or modifications not expressly approved by the party responsible for compliance could void the user’s authority to operate this equipment.
The radio module has been evaluated under FCC Bulletin OET 65C (01-01) and found to be compliant to the requirements as set forth in CFR 47 Sections, 2.1093, and 15.247 (b) (4) addressing RF Exposure from radio frequency devices. This model meets the applicable government requirements for exposure to radio frequency waves.
This equipment should be installed and operated with minimum distance 20cm between the radiator & your body. For product available in the USA market, only channels 1~11 can be operated. Selection of other channels is not possible
Federal Communications Commission (FCC) Radiation Exposure Statement
This equipment complies with FCC radiation exposure limits set forth for an uncontrolled environment. In order to avoid the possibility of exceeding the FCC radio frequency exposure limits, human proximity to the antenna shall not be less than 20 cm (8 inches) during normal operation.
ii
v1.0, January 2009

European Union Statement of Compliance
Hereby, NETGEAR, Inc. declares that this router is in compliance with the essential requirements and other relevant provisions of Directive 1999/5/EC.
Èesky |
NETGEAR, Inc. tímto prohlašuje, že tento 3G Broadband Wireless Router MBR624GU |
[Czech] |
je ve shodì se základními požadavky a dalšími pøíslušnými ustanoveními smìrnice 1999/ |
|
5/ES. |
|
|
Dansk |
Undertegnede NETGEAR, Inc. erklærer herved, at følgende udstyr 3G Broadband |
[Danish] |
Wireless Router MBR624GU overholder de væsentlige krav og øvrige relevante krav i |
|
direktiv 1999/5/EF. |
|
|
Deutsch |
Hiermit erklärt NETGEAR, Inc., dass sich das Gerät 3G Broadband Wireless Router |
[German] |
MBR624GU in Übereinstimmung mit den grundlegenden Anforderungen und den |
|
übrigen einschlägigen Bestimmungen der Richtlinie 1999/5/EG befindet. |
|
|
Eesti |
Käesolevaga kinnitab NETGEAR, Inc. seadme 3G Broadband Wireless Router |
[Estonian] |
MBR624GU vastavust direktiivi 1999/5/EÜ põhinõuetele ja nimetatud direktiivist |
|
tulenevatele teistele asjakohastele sätetele. |
|
|
English |
Hereby, NETGEAR, Inc., declares that this 3G Broadband Wireless Router MBR624GU |
|
is in compliance with the essential requirements and other relevant provisions of Directive |
|
1999/5/EC. |
|
|
Español |
Por medio de la presente NETGEAR, Inc. declara que el 3G Broadband Wireless Router |
[Spanish] |
MBR624GU cumple con los requisitos esenciales y cualesquiera otras disposiciones |
|
aplicables o exigibles de la Directiva 1999/5/CE. |
|
|
Ελληνική |
ΜΕ ΤΗΝ ΠΑΡΟΥΣΑ NETGEAR, Inc. ΔΗΛΩΝΕΙ ΟΤΙ 3G Broadband Wireless Router |
[Greek] |
MBR624GU ΣΥΜΜΟΡΦΩΝΕΤΑΙ ΠΡΟΣ ΤΙΣ ΟΥΣΙΩΔΕΙΣ ΑΠΑΙΤΗΣΕΙΣ ΚΑΙ ΤΙΣ ΛΟΙΠΕΣ |
|
ΣΧΕΤΙΚΕΣ ΔΙΑΤΑΞΕΙΣ ΤΗΣ ΟΔΗΓΙΑΣ 1999/5/ΕΚ. |
|
|
Français |
Par la présente NETGEAR, Inc. déclare que l'appareil 3G Broadband Wireless Router |
[French] |
MBR624GU est conforme aux exigences essentielles et aux autres dispositions |
|
pertinentes de la directive 1999/5/CE. |
|
|
Italiano |
Con la presente NETGEAR, Inc. dichiara che questo 3G Broadband Wireless Router |
[Italian] |
MBR624GU è conforme ai requisiti essenziali ed alle altre disposizioni pertinenti stabilite |
|
dalla direttiva 1999/5/CE. |
|
|
Latviski |
Ar šo NETGEAR, Inc. deklarç, ka 3G Broadband Wireless Router MBR624GU atbilst |
[Latvian] |
Direktîvas 1999/5/EK bûtiskajâm prasîbâm un citiem ar to saistîtajiem noteikumiem. |
|
|
Lietuviø |
Šiuo NETGEAR, Inc. deklaruoja, kad šis 3G Broadband Wireless Router MBR624GU |
[Lithuanian] |
atitinka esminius reikalavimus ir kitas 1999/5/EB Direktyvos nuostatas. |
|
|
iii
v1.0, January 2009

Nederlands |
Hierbij verklaart NETGEAR, Inc. dat het toestel 3G Broadband Wireless Router |
[Dutch] |
MBR624GU in overeenstemming is met de essentiële eisen en de andere relevante |
|
bepalingen van richtlijn 1999/5/EG. |
|
|
Malti |
Hawnhekk, NETGEAR, Inc., jiddikjara li dan 3G Broadband Wireless Router |
[Maltese] |
MBR624GU jikkonforma mal-tiijiet essenzjali u ma provvedimenti orajn relevanti li hemm |
|
fid-Dirrettiva 1999/5/EC. |
|
|
Magyar |
Alulírott, NETGEAR, Inc. nyilatkozom, hogy a 3G Broadband Wireless Router |
[Hungarian] |
MBR624GU megfelel a vonatkozó alapvetõ követelményeknek és az 1999/5/EC irányelv |
|
egyéb elõírásainak. |
|
|
Polski |
Niniejszym NETGEAR, Inc. oœwiadcza, ¿e 3G Broadband Wireless Router |
[Polish] |
MBR624GU jest zgodny z zasadniczymi wymogami oraz pozosta³ymi stosownymi |
|
postanowieniami Dyrektywy 1999/5/EC. |
|
|
Português |
NETGEAR, Inc. declara que este 3G Broadband Wireless Router MBR624GU está |
[Portuguese] |
conforme com os requisitos essenciais e outras disposições da Directiva 1999/5/CE. |
|
|
Slovensko |
NETGEAR, Inc. izjavlja, da je ta 3G Broadband Wireless Router MBR624GU v skladu z |
[Slovenian] |
bistvenimi zahtevami in ostalimi relevantnimi doloèili direktive 1999/5/ES. |
|
|
Slovensky |
NETGEAR, Inc. týmto vyhlasuje, že 3G Broadband Wireless Router MBR624GU spåòa |
[Slovak] |
základné požiadavky a všetky príslušné ustanovenia Smernice 1999/5/ES. |
|
|
Suomi |
NETGEAR, Inc. vakuuttaa täten että 3G Broadband Wireless Router MBR624GU |
[Finnish] |
tyyppinen laite on direktiivin 1999/5/EY oleellisten vaatimusten ja sitä koskevien direktiivin |
|
muiden ehtojen mukainen. |
|
|
Svenska |
Härmed intygar NETGEAR, Inc. att denna [utrustningstyp] står I överensstämmelse med |
[Swedish] |
de väsentliga egenskapskrav och övriga relevanta bestämmelser som framgår av direktiv |
|
1999/5/EG. |
|
|
A printed copy of the EU Declaration of Conformity certificate for this product is provided in the MBR624GU product package.
Bestätigung des Herstellers/Importeurs
Es wird hiermit bestätigt, daß das 3G Broadband Wireless Router MBR624GU gemäß der im BMPT-AmtsblVfg 243/ 1991 und Vfg 46/1992 aufgeführten Bestimmungen entstört ist. Das vorschriftsmäßige Betreiben einiger Geräte (z.B. Testsender) kann jedoch gewissen Beschränkungen unterliegen. Lesen Sie dazu bitte die Anmerkungen in der Betriebsanleitung.
Das Bundesamt für Zulassungen in der Telekommunikation wurde davon unterrichtet, daß dieses Gerät auf den Markt gebracht wurde und es ist berechtigt, die Serie auf die Erfüllung der Vorschriften hin zu überprüfen.
Certificate of the Manufacturer/Importer
It is hereby certified that the 3G Broadband Wireless Router MBR624GU has been suppressed in accordance with the conditions set out in the BMPT-AmtsblVfg 243/1991 and Vfg 46/1992. The operation of some equipment (for example,
iv
v1.0, January 2009

test transmitters) in accordance with the regulations may, however, be subject to certain restrictions. Please refer to the notes in the operating instructions.
Federal Office for Telecommunications Approvals has been notified of the placing of this equipment on the market and has been granted the right to test the series for compliance with the regulations.
Voluntary Control Council for Interference (VCCI) Statement
This equipment is in the second category (information equipment to be used in a residential area or an adjacent area thereto) and conforms to the standards set by the Voluntary Control Council for Interference by Data Processing Equipment and Electronic Office Machines aimed at preventing radio interference in such residential areas.
When used near a radio or TV receiver, it may become the cause of radio interference. Read instructions for correct handling.
Customer Support
Refer to the Support Information Card that shipped with your 3G Broadband Wireless Router MBR624GU.
World Wide Web
NETGEAR maintains a World Wide Web home page that you can access at the universal resource locator (URL) http://www.netgear.com. A direct connection to the Internet and a Web browser such as Internet Explorer or
Mozilla Firefox are required.
Product and Publication Details
Model Number: |
MBR624GU |
Publication Date: |
January 2009 |
Product Family: |
Router |
Product Name: |
3G Broadband Wireless Router MBR624GU |
Home or Business Product: |
Home |
Language: |
English |
Publication Part Number: |
202-10437-01 |
Publication Version Number: |
1.0 |
v
v1.0, January 2009

vi
v1.0, January 2009

Contents
3G Broadband Wireless Router MBR624GU User Manual
About This Manual |
|
Conventions, Formats, and Scope ..................................................................................... |
i |
How to Use This Manual ................................................................................................... |
ii |
How to Print this Manual .................................................................................................... |
ii |
Chapter 1 |
|
Installing Your Router |
|
Unpacking Your New Router .......................................................................................... |
1-1 |
Hardware Features ......................................................................................................... |
1-1 |
Front Panel ............................................................................................................... |
1-2 |
Back Panel ............................................................................................................... |
1-3 |
Router Side Panel .................................................................................................... |
1-4 |
Router Label ............................................................................................................. |
1-4 |
Positioning Your Wireless Router ................................................................................... |
1-5 |
Connecting Your Router ................................................................................................. |
1-5 |
What You Need Before You Begin ........................................................................... |
1-5 |
Connecting the Wireless USB Modem ..................................................................... |
1-6 |
Connecting Your Router and Applying Power .......................................................... |
1-7 |
Using the Setup Wizard .................................................................................................. |
1-8 |
Using the Setup Wizard to Configure Your Router’s Internet Connection ................ |
1-8 |
Using the Setup Wizard to Configure Your Wireless Network ................................. |
1-9 |
Logging in to the Router after Installation ..................................................................... |
1-10 |
Accessing the Setup Wizard after Installation .............................................................. |
1-11 |
Manually Configuring Your Internet Settings ................................................................ |
1-12 |
Chapter 2 |
|
Wireless Network Configuration |
|
Planning Your Wireless Network .................................................................................... |
2-1 |
Wireless Placement and Range Guidelines ............................................................. |
2-2 |
1
v1.0, January 2009

Wireless Security Options ........................................................................................ |
2-3 |
Manually Configuring Your Wireless Settings ................................................................. |
2-4 |
Specifying Wireless Security .......................................................................................... |
2-7 |
Wireless Station Access Control .............................................................................. |
2-7 |
Restricting Access by MAC Address ........................................................................ |
2-8 |
Configuring WEP .................................................................................................... |
2-10 |
Configuring WPA, WPA2, or WPA/WPA2 ............................................................... |
2-11 |
Advanced Wireless Settings ......................................................................................... |
2-12 |
Using Push 'N' Connect (WPS) to Configure Your Wireless Network .......................... |
2-13 |
Using a WPS Button to Add a WPS Client ............................................................. |
2-14 |
Using PIN Entry to Add a WPS Client .................................................................... |
2-15 |
Connecting Additional Wireless Client Devices After WPS Setup ................................ |
2-17 |
Adding More WPS Clients ...................................................................................... |
2-17 |
Adding Both WPS and Non-WPS Clients .............................................................. |
2-17 |
Chapter 3 |
|
Protecting Your Network |
|
Protecting Access to Your Wireless Router .................................................................... |
3-1 |
Changing the Built-In Password ............................................................................... |
3-1 |
Changing the Administrator Login Time-out ............................................................. |
3-2 |
Configuring Basic Firewall Services ............................................................................... |
3-2 |
Blocking Keywords, Sites, and Services .................................................................. |
3-3 |
Firewall Rules ................................................................................................................. |
3-5 |
Inbound Rules (Port Forwarding) ............................................................................. |
3-6 |
Outbound Rules (Service Blocking) ......................................................................... |
3-8 |
Order of Precedence for Rules .............................................................................. |
3-10 |
Services ........................................................................................................................ |
3-10 |
Defining Services ................................................................................................... |
3-11 |
Setting Times and Scheduling Firewall Services .......................................................... |
3-11 |
Setting Your Time Zone .......................................................................................... |
3-12 |
Scheduling Firewall Services ................................................................................. |
3-13 |
Chapter 4 |
|
Managing Your Network |
|
Backing Up, Restoring, or Erasing Your Settings ........................................................... |
4-1 |
Backing Up the Configuration to a File ..................................................................... |
4-1 |
Restoring the Configuration from a File ................................................................... |
4-2 |
|
|
2 |
|
v1.0, January 2009

Erasing the Configuration ......................................................................................... |
4-2 |
Upgrading the Router Firmware ..................................................................................... |
4-2 |
Network Management Information ................................................................................. |
4-3 |
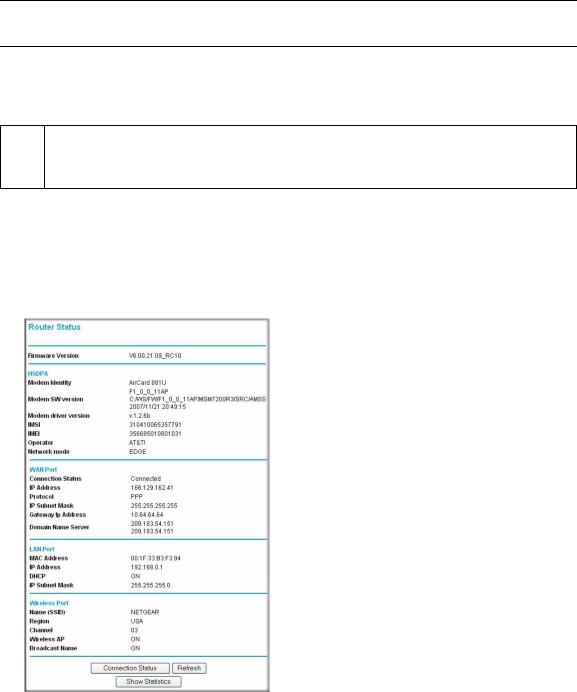
Router Status ........................................................................................................... |
4-4 |
Showing Statistics .................................................................................................... |
4-6 |
Connection Status .................................................................................................... |
4-7 |
Viewing Attached Devices ........................................................................................ |
4-8 |
Viewing, Selecting, and Saving Logged Information ................................................ |
4-9 |
Examples of Log Messages ................................................................................... |
4-11 |
Enabling Security Event E-mail Notification ................................................................. |
4-12 |
Running Diagnostic Utilities and Rebooting the Router ................................................ |
4-13 |
Enabling Remote Management .................................................................................... |
4-14 |
Configuring Remote Management ......................................................................... |
4-14 |
Chapter 5 |
|
Advanced Configuration |
|
Advanced Settings .......................................................................................................... |
5-1 |
WAN Setup ..................................................................................................................... |
5-1 |
Setting Up a Default DMZ Server ............................................................................. |
5-3 |
LAN IP Settings .............................................................................................................. |
5-3 |
DHCP Settings ......................................................................................................... |
5-6 |
Reserved IP Addresses ........................................................................................... |
5-7 |
Dynamic DNS ................................................................................................................. |
5-7 |
Configuring Dynamic DNS ....................................................................................... |
5-8 |
Using Static Routes ........................................................................................................ |
5-9 |
Static Route Example ............................................................................................... |
5-9 |
Configuring Static Routes ....................................................................................... |
5-10 |
Universal Plug and Play (UPnP) ................................................................................... |
5-11 |
Wireless Bridging and Repeating ................................................................................. |
5-12 |
Point-to-Point Bridge Configuration ........................................................................ |
5-13 |
Multi-Point Bridge Configuration ............................................................................ |
5-15 |
Repeater with Wireless Client Association ............................................................. |
5-16 |
Chapter 6 |
|
Troubleshooting |
|
Basic Functioning ........................................................................................................... |
6-1 |
Troubleshooting Access to the Router Main Menu ......................................................... |
6-2 |
3
v1.0, January 2009

Troubleshooting the ISP Connection .............................................................................. |
6-4 |
Obtaining a WAN IP Address ................................................................................... |
6-4 |
Troubleshooting PPPoE or PPPoA .......................................................................... |
6-5 |
Troubleshooting Internet Browsing .......................................................................... |
6-5 |
Troubleshooting a TCP/IP Network Using the Ping Utility .............................................. |
6-6 |
Testing the LAN Path to Your Router ....................................................................... |
6-6 |
Testing the Path from Your Computer to a Remote Device ..................................... |
6-7 |
Restoring the Default Configuration and Password ........................................................ |
6-7 |
Problems with Date and Time ......................................................................................... |
6-8 |
Appendix A
Technical Specifications
Appendix B
Related Documents
4
v1.0, January 2009
About This Manual
The NETGEAR® 3G Wireless Router MBR624GU describes how to install, configure, and troubleshoot the 3G Broadband Wireless Router MBR624GU. The information in this manual is intended for readers with intermediate computer and Internet skills.
Conventions, Formats, and Scope
The conventions, formats, and scope of this manual are described in the following paragraphs:
• Typographical Conventions. This manual uses the following typographical conventions:
Italic |
Emphasis, books, CDs, file and server names, extensions |
|
|
Bold |
User input, IP addresses, GUI screen text |
|
|
Italic |
URL links |
|
|
• Formats. This manual uses the following formats to highlight special messages:
 Note: This format is used to highlight information of importance or special interest.
Tip: This format is used to highlight a procedure that will save time or resources.
Warning: Ignoring this type of note might result in a malfunction or damage to the equipment.
•Scope. This manual is written for the Wireless Router according to these specifications:
Product Version |
3G Broadband Wireless Router MBR624GU |
|
|
Manual Publication Date |
January 2009 |
|
|
i
v1.0, January 2009
3G Broadband Wireless Router MBR624GU User Manual
For more information about network, Internet, firewall, and VPN technologies, see the links to the NETGEAR website in Appendix B, “Related Documents”.
Note: Product updates are available on the NETGEAR, Inc. website at
http://kbserver.netgear.com/products/MBR624GU.asp.
How to Use This Manual
The HTML version of this manual includes the following:
•Buttons,  and
and  , for browsing forward or backward through the manual one page at a time.
•A  button that displays the table of contents and an
  button. Double-click on a link in the table of contents or index to navigate directly to where the topic is described in the manual.
•A  button to access the full NETGEAR, Inc. online knowledge base for the product model.
•Links to PDF versions of the full manual and individual chapters.
How to Print this Manual
To print this manual you can choose one of the following options, according to your needs.
•Printing a page in the HTML view.
Each page in the HTML version of the manual is dedicated to a major topic. Use the Print button on the browser toolbar to print the page contents.
•Printing a chapter.
Use the PDF of This Chapter link at the top left of any page.
–Click the PDF of This Chapter link at the top left of any page in the chapter you want to print. The PDF version of the chapter you were viewing opens in a browser window.
–Your computer must have the free Adobe Acrobat reader installed in order to view and print PDF files. The Acrobat reader is available on the Adobe website at http://www.adobe.com.
ii
v1.0, January 2009
3G Broadband Wireless Router MBR624GU User Manual
–Click the print icon in the upper left of the window.
Tip: If your printer supports printing two pages on a single sheet of paper, you can save paper and printer ink by selecting this feature.
•Printing the full manual.
Use the Complete PDF Manual link at the top left of any page.
–Click the Complete PDF Manual link at the top left of any page in the manual. The PDF version of the complete manual opens in a browser window.
–Click the print icon in the upper left of the window.
Tip: If your printer supports printing two pages on a single sheet of paper, you can save paper and printer ink by selecting this feature.
iii
v1.0, January 2009

3G Broadband Wireless Router MBR624GU User Manual
iv
v1.0, January 2009

Chapter 1
Installing Your Router
Congratulations on your purchase of the 3G Broadband Wireless Router MBR624GU. Before you begin installing your router, check the package contents (see “Unpacking Your New Router” on page 1-1). Become familiar with the front and back panels of your router—especially the LEDs— and the important information on the router label (see “Hardware Features” on page 1-1). Then, read the section on “Positioning Your Wireless Router” on page 1-5 to ensure that you have selected the best location to install your router.
This chapter describes how to set up the router on your Local Area Network (LAN) and connect to the Internet. It describes how to set up your router for Internet access and configure basic wireless connectivity.
Unpacking Your New Router
Your router should contain the following items:
•3G Broadband Wireless Router MBR624GU
•AC power adapter (varies by region)
•Category 5 (Cat 5) Ethernet cable
•USB docking station
•3G Broadband Wireless Router MBR624GU Installation Guide
•Warranty and Support Information cards
If any of the parts are incorrect, missing, or damaged, contact your NETGEAR dealer. Keep the carton, including the original packing materials, in case you need to return the product for repair.
Hardware Features
Before you install and connect your router, take a moment to become familiar with the front and back panels of the router—especially the LEDs on the front panel.
1-1
v1.0, January 2009
3G Broadband Wireless Router MBR624GU User Manual
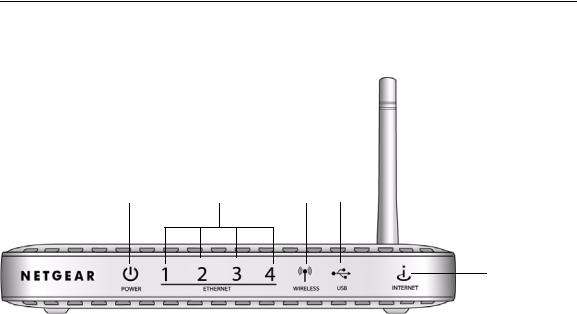
Front Panel
The router front panel shown below contains status LEDs.
1 |
2 |
3 |
4 |
5
Figure 1-1
You can use the LEDs to verify various conditions. The following table describes each LED..
Table 1. LED Descriptions
LED |
Activity |
Description |
|
|
|
|
|
|
|
Solid green |
Power is supplied to the router. |
1. |
Power, |
Solid red |
POST (Power-On Self-Test) failure or device malfunction. |
|
factory |
Off |
Power is not supplied to the router. |
|
reset |
Factory reset |
During a reset, lights momentarily, blinks red three times, and then |
|
|
|
turns green as the gateway resets to the factory defaults. |
|
|
Solid green |
The powered device is connected to the associated Ethernet Local |
|
|
Blinking green |
Area Network (LAN) port, which is operating at 100 Mbps. |
|
|
Data is being transmitted or received at 100 Mbps. |
|
2. |
Ethernet |
Solid Amber |
The powered device is connected to the associated Ethernet Local |
|
ports 1-4 |
Blinking amber |
Area Network (LAN) port, which is operating at 10 Mbps. |
|
|
Data is being transmitted or received at 10 Mbps. |
|
|
|
Off |
No link is detected on this port, or no cable or no powered device is |
|
|
|
connected to the associated port. |
|
|
|
|
|
|
Solid green |
The wireless access point is enabled. |
3. |
Wireless |
Blinking green |
Data is being transmitted or received over the wireless link. |
|
|
Off |
The wireless access point is disabled. |
1-2 |
Installing Your Router |
v1.0, January 2009
|
|
|
|
3G Broadband Wireless Router MBR624GU User Manual |
|
|
|
|
|
Table 1. |
LED Descriptions (continued) |
|||
|
|
|
|
|
|
|
|
Solid green |
The wireless USB modem is attached to the USB port. |
4. |
USB |
|
Blinking green |
Data is being transmitted or received. |
|
|
|
Off |
No link is detected on this port, or the USB modem is powered off. |
|
|
|
Solid green |
The router is connected to the Internet. The LED will remain solid |
|
|
|
|
green if the Internet session is dropped due to an idle time-out, but an |
|
|
|
|
ADSL connection is still present. If the session is dropped for any |
5. |
Internet |
|
Blinking green |
other reason, the LED will turn off. |
|
The router is connected to the Internet and traffic is passing through |
|||
|
|
|
||
|
|
|
Red |
the device. |
|
|
|
No Internet connection. |
|
|
|
|
Off |
The router is powered off. |
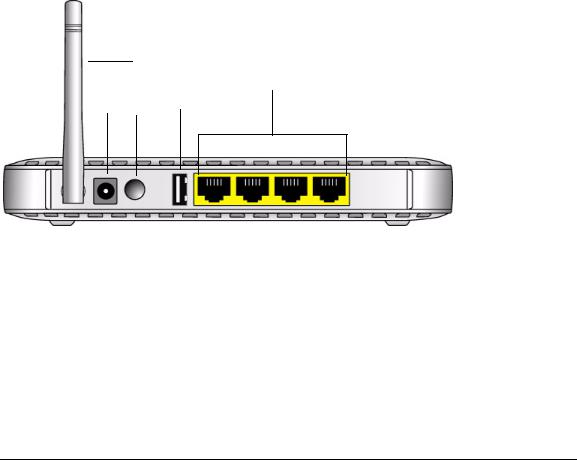
Back Panel
1
5
2 3 4
4
Figure 1-2
The router ports are color-coded to distinguish your Internet port from the other four ports that connect to the wired computer(s) on your LAN. The rear panel contains the following elements:
1.Wireless antenna
2.AC power adapter input
3.Power switch
4.USB port for connecting a wireless USB modem (sold separately).
5.Four local Ethernet RJ-45 LAN ports for connecting the router to the local computers
Installing Your Router |
1-3 |
v1.0, January 2009
3G Broadband Wireless Router MBR624GU User Manual
Router Side Panel
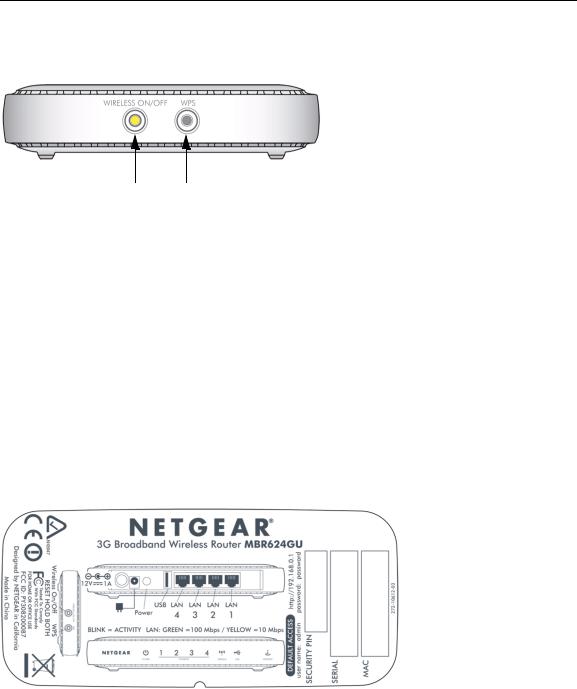
The side panel of the router has a Wireless On/Off button and a WPS button.
Wireless WPS
On/Off
Figure 1-3
•WPS. You can use the Wi-Fi Protected Setup (WPS) feature with clients on the network that are Wi-Fi certified and WPA capable. See “Using Push 'N' Connect (WPS) to Configure Your Wireless Network” on page 2-13.
•Wireless On/Off. By default, the router is set up to work as a wireless access point. Pressing this button turns the wireless access point feature off and on. You can also do this through the Wireless Settings screen (see the link to your User Manual on the Resource CD.)
•Factory default settings. Pressing both buttons at the same time resets the unit the factory default settings.
Router Label
The label on the back of the router shows the router’s MAC address, serial number, and factory default login information.
Figure 1-4
1-4 |
Installing Your Router |
v1.0, January 2009

3G Broadband Wireless Router MBR624GU User Manual
Positioning Your Wireless Router
The router lets you access your network from virtually anywhere within the operating range of your wireless network. However, the operating distance or range of your wireless connection can vary significantly depending on the physical placement of your router. For example, the thickness and number of walls the wireless signal must pass through may limit the range. For best results, place your router:
•Near the center of the area where your computers and other devices will operate, preferably within line of sight to your wireless devices.
•Accessible to an AC power outlet and near Ethernet cables for wired computers.
•In an elevated location such as a high shelf, keeping the number of walls and ceilings between the router and your other devices to a minimum.
•Away from electrical devices which are potential sources of interference, such as ceiling fans, home security systems, microwaves, or the base for a cordless phone.
•Away from any large metal surfaces, such as a solid metal door or aluminum studs. Large expanses of other materials such as glass, insulated walls, fish tanks, mirrors, brick, and concrete can also affect your wireless signal.
Note: Failure to follow these guidelines can result in significant performance degradation or an inability to wirelessly connect to the Internet.
Connecting Your Router
Your wireless USB modem (sold separately) must be activated before you install the router. For a list of compatible wireless USB modems, see the NETGEAR website at http://www.netgear.com. To configure the router during installation, you need a computer with an Ethernet port. Your computer must be configured with DHCP (most PCs are).
What You Need Before You Begin
You need to prepare the following before you can set up your router:
•A wireless USB modem (sold separately) with Internet service activated and coverage in your location.
Installing Your Router |
1-5 |
v1.0, January 2009
3G Broadband Wireless Router MBR624GU User Manual
•Your computer must be set up to use DHCP to get its TCP/IP configuration from the router. This is usually the case. For help with DHCP, see the documentation that came with your computer, or see the link to the online document in “Preparing a Computer for Network Access” on page B-1.
Connecting the Wireless USB Modem
1.At the location where you will install the router, connect your activated USB modem to your computer. Follow the instructions from your Internet Service Provider (ISP) to connect to the Internet from your computer.
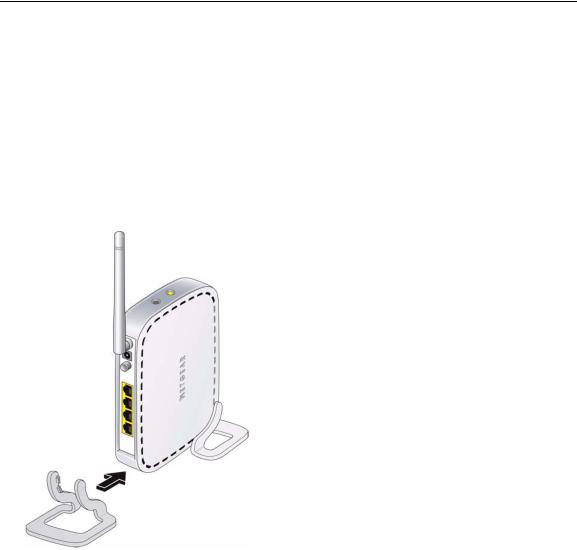
2.Place the router in its vertical stand, and adjust the antenna.
Figure 1-5
For best performance, place the router in a location where your USB modem Internet connection is strong, such as on a desk near a window instead of on the floor.
3.Connect your wireless USB modem with activated Internet service to the USB port on the rear panel of the router.
4.If your wireless USB modem has a separate antenna, adjust it as needed.
5.On your computer, close the software that you used to connect to the Internet.
1-6 |
Installing Your Router |
v1.0, January 2009

3G Broadband Wireless Router MBR624GU User Manual
Connecting Your Router and Applying Power
1.Connect one end of the Ethernet cable that came with your router into a LAN port on the router, and the other end into the Ethernet port of your computer.
Figure 1-6
2. Plug in the power adapter to your router, and push the Power button on the rear panel.
Figure 1-7
Installing Your Router |
1-7 |
v1.0, January 2009
3G Broadband Wireless Router MBR624GU User Manual
3. Verify that the following LEDs on the front of the router light up:
• Power. Power is supplied to the router.
• |
2 LAN. Your computer is securely connected to this LAN port on the router. |
• USB. Your wireless USB modem is securely connected to the router.
• Wireless. There is a wireless signal from the router.
• Internet. This LED is red because the router is not connected to the Internet.
Using the Setup Wizard
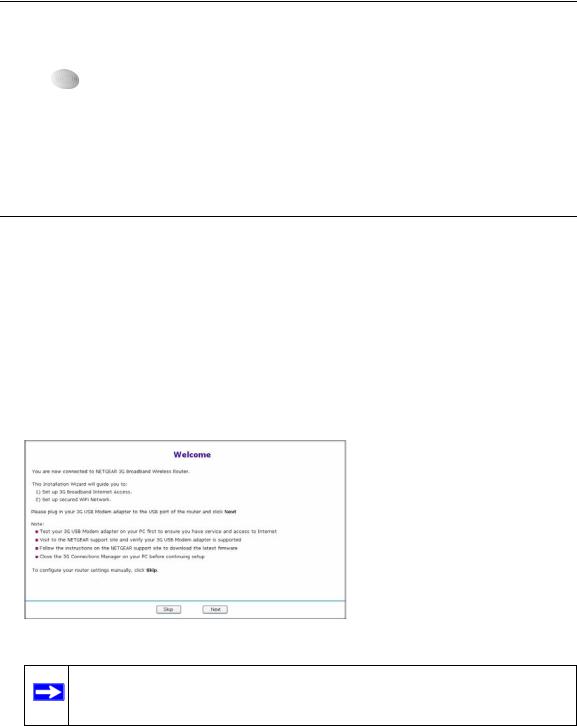
The NETGEAR Setup Wizard helps you to configure your Internet connection and wireless network. The Setup Wizard guides you through the setup process. You can also manually configure your router (see “Accessing the Setup Wizard after Installation” on page 1-11).
Using the Setup Wizard to Configure Your Router’s Internet Connection
1.From the Ethernet connected computer, open a Web browser.
2.Connect to the router by typing http://192.168.0.1 or www.routerlogin.com in the address field of your browser. The Setup screen displays:
Figure 1-8
Note: If you connect to the router after initial configuration, a log in prompt displays. See “Logging in to the Router after Installation” on page 1-10”.
1-8 |
Installing Your Router |
v1.0, January 2009
3G Broadband Wireless Router MBR624GU User Manual
3.Click Next, and the Setup Wizard configures your router’s Internet connection.
4.When the Internet connection is working, a Connection Success message displays.
5.To proceed to wireless network configuration, click Next. See “Using the Setup Wizard to Configure Your Wireless Network” on page 1-9.
 Note: If your Internet connection is not working, see Chapter 6, “Troubleshooting”.
Using the Setup Wizard to Configure Your Wireless Network
The Setup Wizard prompts you to change the router password and enter wireless settings.
1.Enter the settings:
•Password. The router has its own user name and password, which are admin and password, both in lowercase letters. You can change the password.
•Region. Depending on your location, you might be prompted to select the region where the router will operate.
•Wireless Network Name (SSID). The name that identifies your wireless network. The default is NETGEAR.
Note: The SSID is case-sensitive. NETGEAR is not the same as Netgear or netgear.
•Secure Your Wireless Network. For initial wireless setup, click No. When your wireless connections are working, NETGEAR strongly recommends that you implement wireless security. For more information about wireless security, see Chapter 2, “Wireless Network Configuration”.
A summary of your settings is displayed. You should either click Print to print the settings or write them down. Save this information in a secure location for future reference.
2.Click Finish. Your browser automatically goes to the NETGEAR website to verify that the Internet connection is working.
3.For each wireless computer or device that will connect wirelessly to the router, configure its wireless network name (SSID) to match the router.
4.Verify that each wireless computer or device can connect to the Internet via the router.
Installing Your Router |
1-9 |
v1.0, January 2009
3G Broadband Wireless Router MBR624GU User Manual
Logging in to the Router after Installation
When you first connect to your router during installation, a Setup Wizard appears. After the initial configuration, you can use your Web browser to log into the router.
Note: Your computer must be configured for DHCP. For help with configuring DHCP, see  the documentation that came with your computer or see the link to the online
document in “Preparing a Computer for Network Access” on page B-1.
To log in to the router:
1.Open a Web browser on your computer, and connect to the router by typing http://192.168.0.1 or www.routerlogin.com in the address field of your browser.
2.When prompted, enter the router user name and password (admin and password, both in lowercase letters). The Router Status screen displays:
Figure 1-9
1-10 |
Installing Your Router |
v1.0, January 2009

3G Broadband Wireless Router MBR624GU User Manual
For more information about the information displayed in the Router Status screen, see “Router Status” on page 4-4.
You can use different methods to configure your router.
•Select Setup Wizard from the router menu to set up your Internet connection and wireless network configuration. See “Accessing the Setup Wizard after Installation” on page 1-11.
•You can manually configure the router settings. See “Manually Configuring Your Internet Settings” on page 1-12.
•Your router’s Push 'N' Connect feature supports Wi-Fi Protected Setup (WPS), which is compatible with WPA or WPA2 security. Select Add WPS Client to use Push 'N' Connect to add WPS compatible, WPA-capable clients to your wireless network. See “Using Push 'N' Connect (WPS) to Configure Your Wireless Network” on page 2-13.
Accessing the Setup Wizard after Installation
1.Log in to the router as described in the previous section, “Logging in to the Router after Installation” on page 1-10.
2.Select Setup Wizard to go to the Setup Wizard screen:
Figure 1-10
Installing Your Router |
1-11 |
v1.0, January 2009
3G Broadband Wireless Router MBR624GU User Manual
3.Click Next.
The Setup Wizard prompts you to configure your Internet connection and wireless network as described in “Using the Setup Wizard to Configure Your Router’s Internet Connection” on page 1-8 and “Using the Setup Wizard to Configure Your Wireless Network” on page 1-9.
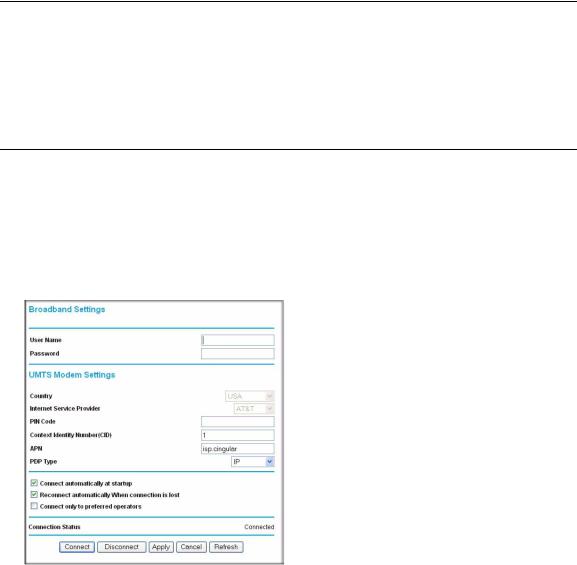
Manually Configuring Your Internet Settings
In order to connect to the network,an active broadband service account is required. Please contact your ISP for username,password and the network name.
To manually configure your Internet settings:
1.Log in to the router as described in the previous section.
2.Select Broadband Settings, and the following screen displays:
Figure 1-11
Table 1-1. Broadband Settings fields
Fields and Checkboxes |
Description |
|
|
Username |
Internet account login username |
|
|
Password |
Internet account password for authentication |
|
|
Pin code |
Pin code of the SIM card, where applicable |
|
|
|
|
1-12 |
Installing Your Router |
v1.0, January 2009

|
3G Broadband Wireless Router MBR624GU User Manual |
|
|
Table 1-1. Broadband Settings fields (continued) |
|
|
|
Fields and Checkboxes |
Description |
|
|
Network name/APN |
ISP network name |
|
|
PDP type |
Type of packet data protocol |
|
|
Connect automatically at startup |
If this checkbox is selected, the modem automatically connects to the |
|
network when powered up. This should be selected after login |
|
information is provided. |
|
|
Reconnect automatically when |
If this check box is selected, the modem will attempt to reconnect to the |
connection is lost |
network when the connection is lost. Under normal situation, this |
|
setting should be selected. |
Connect only to preferred |
If this checkbox is cleared (not selected) the unit may roam to any |
operators |
available operator in range and may incur roaming charges. |
Connection status |
Current WAN port status |
|
|
The following buttons are available:
•Click Connect when you want to manually connect to the network.
•Click Disconnect when you want to manually disconnect from current network.
•Click Apply when you finish changing the settings.
•Click Cancel to discard changes.
•Click Refresh to update connection status.
Installing Your Router |
1-13 |
v1.0, January 2009

3G Broadband Wireless Router MBR624GU User Manual
1-14 |
Installing Your Router |
v1.0, January 2009
Chapter 2
Wireless Network Configuration
For a wireless connection, the SSID, also called the wireless network name, and the wireless security setting must be the same for the router and wireless computers or wireless adapters. NETGEAR strongly recommends that you use wireless security.
Warning: Computers can connect wirelessly at a range of several hundred feet. This can allow others outside of your immediate area to access your network.
This chapter includes:
•“Planning Your Wireless Network”
•“Manually Configuring Your Wireless Settings” on page 2-4
•“Specifying Wireless Security” on page 2-7
•“Advanced Wireless Settings” on page 2-12
•“Using Push 'N' Connect (WPS) to Configure Your Wireless Network” on page 2-13
•“Connecting Additional Wireless Client Devices After WPS Setup” on page 2-17
Planning Your Wireless Network
For compliance and compatibility between similar products in your area, the operating channel and region must be set correctly.
To configure the wireless network, you can either specify the wireless settings, or you can use WiFi Protected Setup (WPS) to automatically set the SSID and implement WPA/WPA2 security.
•To manually configure the wireless settings, you must know the following:
–SSID. The default SSID for the router is NETGEAR-3G.
–The wireless mode (802.11g, or 802.11b) that each wireless adapter supports.
–Wireless security option. To successfully implement wireless security, check each wireless adapter to determine which wireless security option it supports.
2-1
v1.0, January 2009

3G Broadband Wireless Router MBR624GU User Manual
See “Manually Configuring Your Wireless Settings” on page 2-4.
•Push 'N' Connect (WPS) automatically implements wireless security on the router while, at the same time, allowing you to automatically implement wireless security on any WPS-enabled devices (such as wireless computers and wireless adapter cards). You activate WPS by pressing a WPS button on the router, clicking an onscreen WPS button, or entering a PIN number. This generates a new SSID and implements WPA/WPA2 security.
To set up your wireless network using the WPS feature:
–Use the WPS button on the side of the router (there is also an onscreen WPS button ), or enter the PIN of the wireless device.
–Make sure that all wireless computers and wireless adapters on the network are Wi-Fi certified and WPA or WPA 2 capable, and that they support WPS configuration.
See “Using Push 'N' Connect (WPS) to Configure Your Wireless Network” on page 2-13.
Wireless Placement and Range Guidelines
The range of your wireless connection can vary significantly based on the physical placement of the router. The latency, data throughput performance, and notebook power consumption of wireless adapters also vary depending on your configuration choices.
For best results, place your router according to the following guidelines:
•Near the center of the area in which your PCs will operate.
•In an elevated location such as a high shelf where the wirelessly connected PCs have line-of- sight access (even if through walls).
•Away from sources of interference, such as PCs, microwave ovens, and 2.4 GHz cordless phones.
•Away from large metal surfaces.
•Put the antenna in a vertical position to provide the best side-to-side coverage. Put the antenna in a horizontal position to provide the best up-and-down coverage.
•If using multiple access points, it is better if adjacent access points use different radio frequency channels to reduce interference. The recommended channel spacing between adjacent access points is 5 channels (for example, use Channels 1 and 6, or 6 and 11).
The time it takes to establish a wireless connection can vary depending on both your security settings and placement. WEP connections can take slightly longer to establish. Also, WEP encryption can consume more battery power on a notebook computer.
2-2 |
Wireless Network Configuration |
v1.0, January 2009
Loading...