


 Loading...
Home Security Touchscreen
HSS101
User Manual
350 East Plumeria Drive
San Jose, CA 95134
USA
April 2011 202-10834-01 v1.0

Home Security Touchscreen HSS101
© 2011 NETGEAR, Inc. All rights reserved
No part of this publication may be reproduced, transmitted, transcribed, stored in a retrieval system, or translated into any language in any form or by any means without the written permission of NETGEAR, Inc.
Technical Support
Thank you for choosing NETGEAR. To register your product, get the latest product updates, get support online, or for more information about the topics covered in this manual, visit the Support website at http://support.netgear.com.
Phone (US & Canada only): 1-888-NETGEAR
Phone (Other Countries): Check the list of phone numbers at
http://support.netgear.com/app/answers/detail/a_id/984
Trademarks
NETGEAR, the NETGEAR logo, and Connect with Innovation are trademarks and/or registered trademarks of NETGEAR, Inc. and/or its subsidiaries in the United States and/or other countries. Information is subject to change without notice. Other brand and product names are registered trademarks or trademarks of their respective holders. © 2011 NETGEAR, Inc. All rights reserved.
Statement of Conditions
To improve internal design, operational function, and/or reliability, NETGEAR reserves the right to make changes to the products described in this document without notice. NETGEAR does not assume any liability that may occur due to the use, or application of, the product(s) or circuit layout(s) described herein.
2

Contents
Chapter 1 Introduction
Box Contents . . . . . . . . . . . . . . . . . . . . . . . . . . . . . . . . . . . . . . . . . . . . . . . . 6
Hardware Features. . . . . . . . . . . . . . . . . . . . . . . . . . . . . . . . . . . . . . . . . . . . 7
Product Label . . . . . . . . . . . . . . . . . . . . . . . . . . . . . . . . . . . . . . . . . . . . . . . . 8
Home Screen . . . . . . . . . . . . . . . . . . . . . . . . . . . . . . . . . . . . . . . . . . . . . . . . 9
System Information. . . . . . . . . . . . . . . . . . . . . . . . . . . . . . . . . . . . . . . . . . . 10
Access Codes. . . . . . . . . . . . . . . . . . . . . . . . . . . . . . . . . . . . . . . . . . . . . . . 10
Entering Numbers and Letters . . . . . . . . . . . . . . . . . . . . . . . . . . . . . . . . . . 11
Numeric Keypad . . . . . . . . . . . . . . . . . . . . . . . . . . . . . . . . . . . . . . . . . . . 11
Alpha Keypad . . . . . . . . . . . . . . . . . . . . . . . . . . . . . . . . . . . . . . . . . . . . . 12
Chapter 2 Security Bar
Security Bar Buttons. . . . . . . . . . . . . . . . . . . . . . . . . . . . . . . . . . . . . . . . . . 14
Emergency Button . . . . . . . . . . . . . . . . . . . . . . . . . . . . . . . . . . . . . . . . . . . 14
System Icon . . . . . . . . . . . . . . . . . . . . . . . . . . . . . . . . . . . . . . . . . . . . . . . . 15
Sensors Screen . . . . . . . . . . . . . . . . . . . . . . . . . . . . . . . . . . . . . . . . . . . 16
Bypassing Sensors. . . . . . . . . . . . . . . . . . . . . . . . . . . . . . . . . . . . . . . . . 17
ARM and DISARM Buttons . . . . . . . . . . . . . . . . . . . . . . . . . . . . . . . . . . . . 18
Arm Button . . . . . . . . . . . . . . . . . . . . . . . . . . . . . . . . . . . . . . . . . . . . . . . 18
DISARM Button . . . . . . . . . . . . . . . . . . . . . . . . . . . . . . . . . . . . . . . . . . . 19
Quick Exit . . . . . . . . . . . . . . . . . . . . . . . . . . . . . . . . . . . . . . . . . . . . . . . . 19
Trouble Arming . . . . . . . . . . . . . . . . . . . . . . . . . . . . . . . . . . . . . . . . . . . . 19
Subdisarm the System . . . . . . . . . . . . . . . . . . . . . . . . . . . . . . . . . . . . . . 20
Chapter 3 Widgets
System Widgets . . . . . . . . . . . . . . . . . . . . . . . . . . . . . . . . . . . . . . . . . . . . . 23
Cameras . . . . . . . . . . . . . . . . . . . . . . . . . . . . . . . . . . . . . . . . . . . . . . . . . 23
Lights . . . . . . . . . . . . . . . . . . . . . . . . . . . . . . . . . . . . . . . . . . . . . . . . . . . 24
Thermostats . . . . . . . . . . . . . . . . . . . . . . . . . . . . . . . . . . . . . . . . . . . . . . 25
Night Mode . . . . . . . . . . . . . . . . . . . . . . . . . . . . . . . . . . . . . . . . . . . . . . . 26
Clock. . . . . . . . . . . . . . . . . . . . . . . . . . . . . . . . . . . . . . . . . . . . . . . . . . . . 26
Internet Widgets . . . . . . . . . . . . . . . . . . . . . . . . . . . . . . . . . . . . . . . . . . . . . 27
News. . . . . . . . . . . . . . . . . . . . . . . . . . . . . . . . . . . . . . . . . . . . . . . . . . . . 27
Photos . . . . . . . . . . . . . . . . . . . . . . . . . . . . . . . . . . . . . . . . . . . . . . . . . . 29
Sports . . . . . . . . . . . . . . . . . . . . . . . . . . . . . . . . . . . . . . . . . . . . . . . . . . . 32
Traffic . . . . . . . . . . . . . . . . . . . . . . . . . . . . . . . . . . . . . . . . . . . . . . . . . . . 33
Weather . . . . . . . . . . . . . . . . . . . . . . . . . . . . . . . . . . . . . . . . . . . . . . . . . 35
Daily Word . . . . . . . . . . . . . . . . . . . . . . . . . . . . . . . . . . . . . . . . . . . . . . . 36
3

Home Security Touchscreen HSS101
Chapter 4 Settings
Settings Button Options . . . . . . . . . . . . . . . . . . . . . . . . . . . . . . . . . . . . . . . 38 Security . . . . . . . . . . . . . . . . . . . . . . . . . . . . . . . . . . . . . . . . . . . . . . . . . . . 38 Screen . . . . . . . . . . . . . . . . . . . . . . . . . . . . . . . . . . . . . . . . . . . . . . . . . . . . 41 Background Image . . . . . . . . . . . . . . . . . . . . . . . . . . . . . . . . . . . . . . . . . 41 Screen Saver . . . . . . . . . . . . . . . . . . . . . . . . . . . . . . . . . . . . . . . . . . . . . 42 Add Widgets to the Screen Saver List . . . . . . . . . . . . . . . . . . . . . . . . . . 43 Change the Playing Time of a Widget . . . . . . . . . . . . . . . . . . . . . . . . . . 44 Remove a Widget from the Screen Saver List . . . . . . . . . . . . . . . . . . . . 44 Specify Screen Saver Start Time . . . . . . . . . . . . . . . . . . . . . . . . . . . . . . 45 Test the Screen Saver . . . . . . . . . . . . . . . . . . . . . . . . . . . . . . . . . . . . . . 45 Clean Screen . . . . . . . . . . . . . . . . . . . . . . . . . . . . . . . . . . . . . . . . . . . . . 46 Sounds . . . . . . . . . . . . . . . . . . . . . . . . . . . . . . . . . . . . . . . . . . . . . . . . . . . . 46 Access Codes . . . . . . . . . . . . . . . . . . . . . . . . . . . . . . . . . . . . . . . . . . . . . . 47 Add a User Access Code . . . . . . . . . . . . . . . . . . . . . . . . . . . . . . . . . . . . 48 Change The Master Access Code . . . . . . . . . . . . . . . . . . . . . . . . . . . . . 49 Change A User Access Code. . . . . . . . . . . . . . . . . . . . . . . . . . . . . . . . . 50 Delete a User Access Code . . . . . . . . . . . . . . . . . . . . . . . . . . . . . . . . . . 50 Installer. . . . . . . . . . . . . . . . . . . . . . . . . . . . . . . . . . . . . . . . . . . . . . . . . . . . 51 Time Zone . . . . . . . . . . . . . . . . . . . . . . . . . . . . . . . . . . . . . . . . . . . . . . . . . 51
Chapter 5 Troubleshooting
Dark Screen . . . . . . . . . . . . . . . . . . . . . . . . . . . . . . . . . . . . . . . . . . . . . . . . 53
Wi-Fi Connection . . . . . . . . . . . . . . . . . . . . . . . . . . . . . . . . . . . . . . . . . . . . 53
Cameras. . . . . . . . . . . . . . . . . . . . . . . . . . . . . . . . . . . . . . . . . . . . . . . . . . . 54
Appendix A Notification of Compliance
Index
4

1. Introduction |
1 |
Getting to know the touch screen |
The Home Security Touchscreen HSS101 helps you manage your home security system through an interactive touch screen. It provides a simple, safe, and connected experience that is integrated with your home security system.
When you turn the system on, the initial screen is the Home screen that gives you ready access to all of the Home Security Touchscreen features. Touch an icon, button, or control anywhere within the system to access the corresponding features and services.
This chapter covers the following topics:
•Box Contents
•Hardware Features
•Home Screen
•System Information
•Access Codes
•Entering Numbers and Letters
5
Home Security Touchscreen HSS101
Box Contents
The box contains the touch screen, power supply, and URL card. The URL card has the link to this user manual. The rechargeable battery is inside the unit. When the battery runs low, plug the power supply into a power source to recharge the battery.
Note: Do not try to take the battery out of the unit.
Figure 1. Touch screen, power cord, and URL card
Introduction
6

Home Security Touchscreen HSS101
Hardware Features
The Home Security Touchscreen has the Home button, stand, memory card slot, and controls shown here and described below.
Home button |
USB port AC power |
|
adapter input |
Memory card slot |
Stand |
Figure 2. Home button, memory card slot, stand, and controls |
|
•Home button. The white circle on the front of the touch screen is the Home button. Tap the Home button at any time to perform the following actions.
-Tap once to return to the previous screen.
-Double-tap to go to the Home Screen. See Home Screen on page 9 for information about the Home Screen.
-Press-and-hold briefly to bring up the menu dialog box for the current application.
-Press-and-hold (5 seconds or more) to bring up a dialog box where you can select to either reboot or shut down the touch screen.
•Memory card slot. Insert a memory card into this slot.
•Stand. Open the stand to put the touch screen in an upright position.
•A/C power adapter input. Plug the power cord into the A/C power adapter input to recharge the battery or to run on electricity instead of the battery.
•USB port. You can plug a USB dongle into the USB port.
Introduction
7
Home Security Touchscreen HSS101
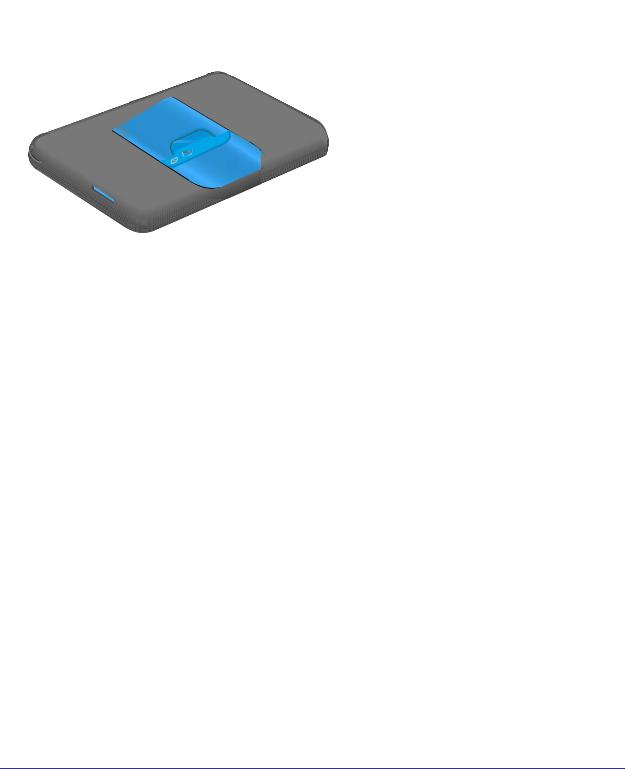
Product Label
The Home Security Touchscreen product label is on the back under the stand.
Product label
Figure 3. The product label is under the stand
The label includes the integrated circuit identification number (IC ID). This number identifies the product and its manufacturer.
IC ID: 4054A-10400150
Figure 4. Product label with IC ID near the bottom
Introduction
8
Home Security Touchscreen HSS101
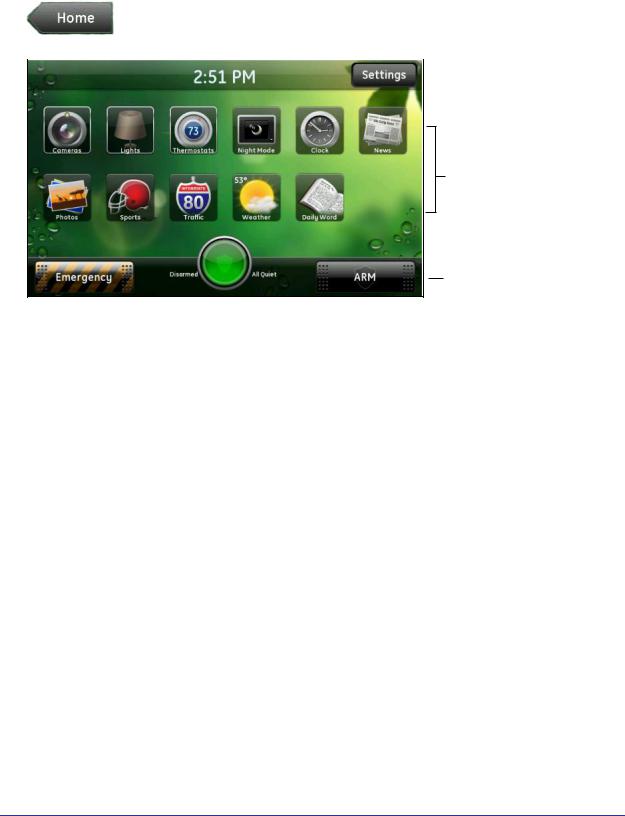
Home Screen
The Home screen is a gateway to all of the screens, buttons, controls, and icons available to you for monitoring your home system.
LOGO |
|
|
Settings button |
|
|
System & Internet widget icons
Security bar
Figure 5. Home screen icons, buttons, and controls
•Logo. A logo displays in the top-left corner of the Home screen (not shown, but indicated by the word Logo).
-Touch the logo to display the system information described in System Information on page 10.
-Note that every lower-level screen has a Home button in the top-left corner. Touch the Home button to return to the Home screen from anywhere within the system.
•Current time. Touch the time at the top of the screen to display the date. The date reverts to the current time after five seconds, or you can touch the date to display the time again.
•Settings button. Touch Settings in the top-right corner to change your touch screen settings. You can also touch the Settings button on other screens to change the settings associated with that screen. See Chapter 4, Settings, for more information about your touch screen settings.
•Widget icons. Touch each icon to display the Touch Screen widget it represents. See
Chapter 3, Widgets, for details.
•Security bar. The Security bar consists of the buttons and information along the bottom of the screen that provide access to the most frequently used functionality supported by your security system. See Chapter 2, Security Bar, for information about these features.
Introduction
9

Home Security Touchscreen HSS101
System Information
Touch the logo and then Version Information to display technical information about your Home Security Touchscreen. If you ever need to contact technical support, they might request some of the information from this screen.
Most of the information on the Version Information screen is text, but in the top-right corner are the icons shown at left. These icons provide information about the signal strength of your Wi-Fi and cellular connections between the gateway and the Home Security Touchscreen. The curved bars at the top indicate your Wi-Fi signal strength:
•White. The Home Security Touchscreen and gateway are communicating using Wi-Fi.
•Red. The Home Security Touchscreen and gateway are not communicating using Wi-Fi. If you connect with an Ethernet cable instead of Wi-Fi, this icon is red.
The double arrow indicates the broadband connection status of the gateway.
•White. The gateway is communicating with the server.
•Red. The gateway is not communicating with the server. The bars at the bottom indicate your cellular signal strength.
•White bars. White bars indicate the signal strength of the Home Security Touchscreen's cellular connection. Five bars represents the best signal strength.
•Red dashes. Five red dashes indicate that the Home Security Touchscreen has no cellular connection.
See Chapter 5, Troubleshooting, for ways to improve your signal strength.
Access Codes
Some actions require that you enter an access code. The Home Security Touchscreen supports three types of access codes, and they are briefly described here. You access the access code settings with the Settings button. See Access Codes on page 47.
•Master code. The main access code for the Security panel. The master access code is required to add, edit, or delete user access codes, and to change certain settings.
•User code. Access codes for additional users. They are generally given to family members and service workers. User codes are used to arm and disarm the Security panel, but they cannot disarm parts of (subdisarm) the Security panel or make changes to the master code or other user access codes. The Security panel is one of the security settings that is accessed with the Settings button. See Security Panel on page 40 for information about the Security panel and other related topics.
Note: The Security panels on some systems have only a master access code.
• Installer code. A code used by the system installer to access advanced features during installation.
Introduction
10
Home Security Touchscreen HSS101
Entering Numbers and Letters
In general, the Home Security Touchscreen lets you make selections by touching an icon or button on the screen. In some cases, you have to enter numbers or letters with the numeric or alpha keypads as applicable.
Numeric Keypad
The numeric keypad displays whenever you are required to enter a numeric value, such as your access code or a zip code. As you touch each number, the number displays at the top of the keypad. However, if you enter an access code, each number displays as an asterisk (*) for security purposes. To delete the last character entered, touch DELETE, which displays after you start entering characters. When the number is complete, touch OK.
Figure 6. Enter a numeric value
Introduction
11
Home Security Touchscreen HSS101
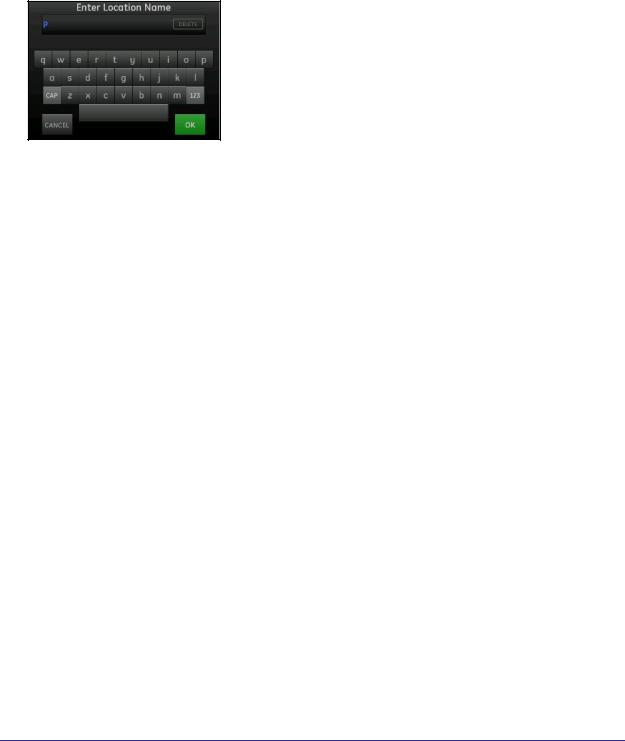
Alpha Keypad
The alpha keypad displays whenever you have to enter text and numbers for more advanced text input, such as location names in the Traffic widget. As you touch each character, it displays at the top of the keypad.
Figure 7. Enter text and numbers
•To enter a capital letter, touch CAP and then the letter.
•To enter numbers or symbols, touch 123. Touch ABC to return to entering letters.
•To delete the last character entered, touch DELETE, which displays after you start entering characters. You can touch and hold DELETE to delete multiple characters faster.
•When your input is complete, touch OK.
Introduction
12

2. Security Bar |
2 |
Securing your home |
The Security bar runs along the bottom of the Home screen, and provides access to the security system functions. The screens you access from the Security bar let you do things like arm and disarm the system or change the display when a door opens, motion is detected, or a sensor has a low battery.
This chapter covers the following topics:
•Security Bar Buttons
•Emergency Button
•System Icon
•ARM and DISARM Buttons
13
Home Security Touchscreen HSS101
Security Bar Buttons
Going left to right, the Security bar has an Emergency button, a System icon, and an ARM/DISARM button. These features are introduced here and described below.
|
|
|
|
|
|
|
|
|
|
|
|
|
|
|
|
Emergency button |
System icon |
ARM/DISARM button |
|
Figure 8. Security bar along the bottom of the screen
•Emergency button. Touch this button to display your configured panic buttons.
•System icon. Touch this icon to display the overall status of your security system, including sensor information.
•ARM/DISARM button. Touch this button to display the options for changing the arm state of your security system. See ARM and DISARM Buttons on page 18 for details.
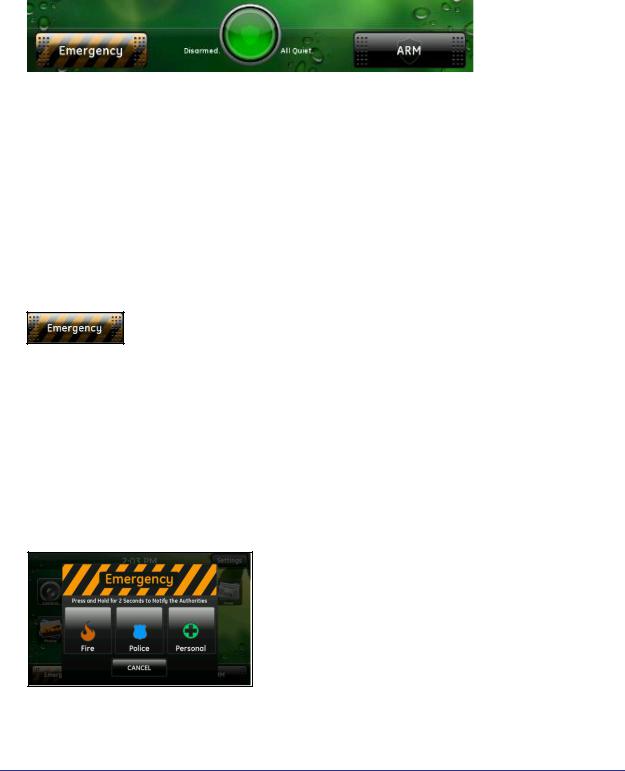
Emergency Button
The Emergency button lets you send an alarm directly to the central monitoring station to indicate a fire, police, or personal emergency. The Fire button sends an immediate alarm without any delay. The Police and
Personal buttons provide a very brief delay so you can cancel the alarms before they are sent, if necessary.
Touch the Emergency button in the Security bar on the Home screen to display the individual emergency buttons. Touch and hold the appropriate button for 2 seconds to send an alarm. These buttons are the same as the panic buttons configured on the Security panel and described in Security Panel on page 40. Be aware that if no panic buttons are configured on the Security panel, the Emergency button does not display in the Security bar.
Note: Depending on how your Security Panel keypad panic buttons are configured, the screen might look different from the screen shown here.
Figure 9. Fire, Police, and Personal emergency buttons
Security Bar
14
Home Security Touchscreen HSS101
System Icon
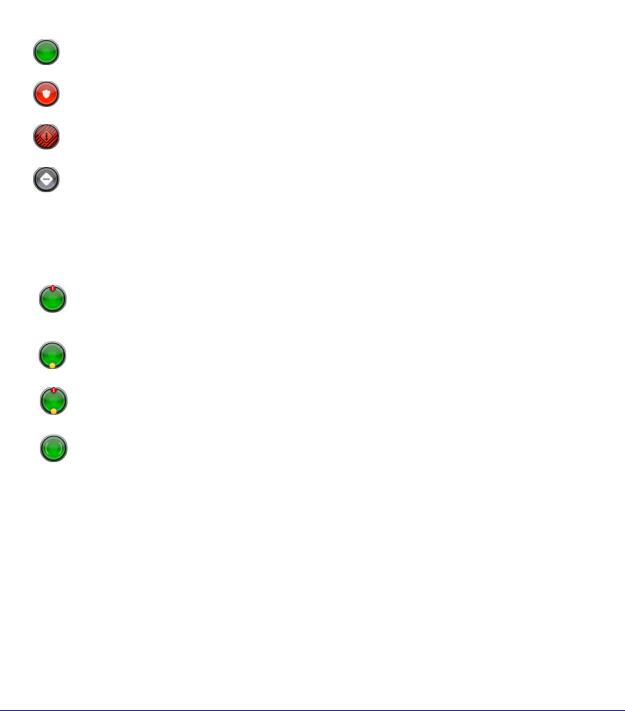
The System icon is available from the Security bar, and a smaller version of it displays on most other screens. It is a graphical representation of the overall status of your system with text on either side that provides more information such as whether the system is armed or disarmed.
The System icon colors indicate its state:
Icon |
Definition |
|
|
|
The security system is disarmed. |
|
|
|
The security system is armed for either all sensors or wIndows only. |
|
|
|
There is an alarm state that requires immediate attention. |
|
|
|
The Security Panel or gateway is offline. |
|
|
Smaller symbols display on the green or red system icons when there is more information:
Icon |
Definition |
|
|
|
A red diamond indicates a sensor or security system problem, such as |
|
AC power loss, low battery, no cellular connection, no broadband |
|
connection, panel communication trouble, or certain tamper conditions. |
|
|
|
A yellow circle indicates that doors or windows are open. A number |
|
appears in the yellow circle to indicate the number of open sensors. |
|
|
|
When a red diamond and a yellow circle display, it indicates a problem |
|
with a sensor or Security panel or both, or an open door or window. |
|
|
|
Wave forms around the shield indicate that motion is detected. |
|
|
Security Bar
15
Home Security Touchscreen HSS101
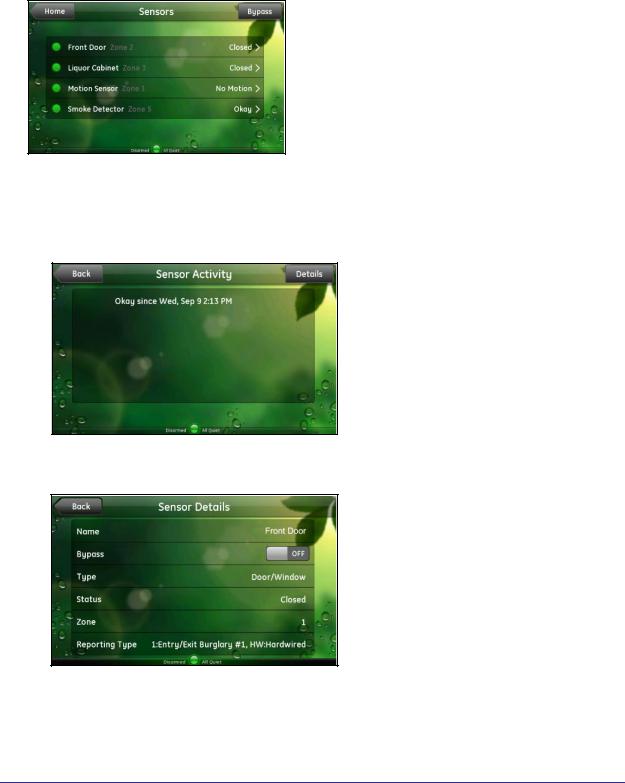
Sensors Screen
Touch the System icon to display the Sensors screen with a list of all sensors installed at your site and their current status.
Figure 10. Front door, liquor cabinet, motion sensor, and smoke detector
•Touch the Bypass button in the top-right corner to display the Sensor Bypass screen. See Bypassing Sensors on page 17 for more information.
•Touch any of the sensors listed on this screen to view that sensor’ recent activity.
Figure 11. Sensor activity status
•Touch the Details button to view more information about that sensor.
Figure 12. Get details on any of the listed sensors
Security Bar
16
Home Security Touchscreen HSS101
Bypassing Sensors
Use the bypass function to temporarily disarm a sensor that would otherwise trigger an alarm. In general, you can bypass sensors only when they are active and capable of generating an alarm. This feature is useful in the following situations:
•The system is already armed and you want to open a particular non-entry door or window (for example, to let the cat out).
•You need to temporarily disable an otherwise always-on sensor, such as a smoke detector, when you are cooking a very smoky dish. Do not forget to turn the smoke detector back on when you are done!
Note: The Security panel on some systems lets you temporarily disable all always-on sensors by setting the system to Subdisarm. On some systems, Subdisarm is not an option and you have to bypass the sensors (direct bypass). Some sensors cannot be bypassed. See Subdisarm the System on page 20 for more information.
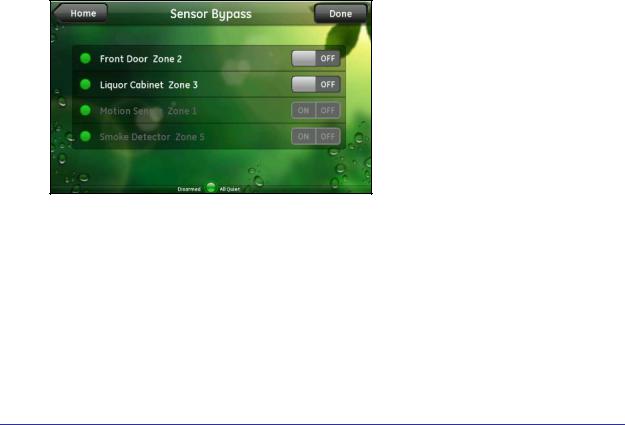
•When you touch Bypass on the Sensors screen, the Sensor Bypass screen displays with a list of all of your sensors and the bypass state of each. If your system allows it, you can temporarily bypass a sensor by switching its On/Off switch to On.
In the following screen, the motion sensor and smoke detector are not assigned to groups that allow bypassing. The front door and liquor cabinet (door and window sensors) are assigned to groups that allow bypassing, so theirs are the only active bypass switches.
Figure 13. Choose sensors to temporarily bypass
When you no longer want to bypass a sensor, switch it to Off either on this screen or on the Sensor Details screen. On some systems, you have to arm and then disarm the system through the Security panel to turn the bypass off. Note that this sequence turns bypass off for all sensors.
Security Bar
17

Home Security Touchscreen HSS101
ARM and DISARM Buttons
When your system is disarmed, the ARM button displays on the Security bar. To arm the system, touch ARM. The ARM button lets you arm your entire system when you are leaving the house, or only your doors and windows when you are staying home.
Arm Button
When you touch ARM, the Arm options display. Depending on which Security panel you have and which options are enabled, one or more of the following options might appear on this screen:
Arm All or Arm Away. Any triggered security-related sensor (including interior motion detectors and interior doors) results in an alarm and notifies the appropriate authority.
If you select this option but the system does not detect an entry/exit door being opened and closed afterwards, the Security panel arms doors and windows as described in the following paragraph.
Arm Doors & Windows or Arm Stay. Only events associated with your exterior doors and windows trigger an alarm. This mode is useful when someone is at home but wants the system to be armed. The system ignores interior sensors in this mode.
The Home Security Touchscreen does not currently support the Arm Motions or Arm Night Stay options that are available on some Security panels. If you set Arm Motions or Arm Night Stay on the security keypad, the touch screen status indicates that the system is in the Armed Motions or Armed Night Stay state.
Entry Delay or Entry/Exit Delay. This option is not available on all Security panels. If it is available and turned on, the security system allows a prescribed amount of time for you to:
•Enter the access code after you open the entry door. A keypad displays the number of seconds remaining to enter the access code before the Security panel sounds an alarm.
•Open, walk out, and close the door when exiting. A count-down timer displays on the System icon, indicating how much time you have left to exit the premises. At the end of that time, the system is armed, and if anyone opens a door or window or triggers a motion sensor, the Security panel sounds an alarm. If this option is available and turned off, there is no delay. The alarm sounds as soon as the entry/exit door opens.
Note: The only time you should turn off the entry delay is when you are staying in the house or using a button remote such as a key fob.
Exit Sound or Silent Exit. This option is not available on all Security panels. The exit delay is the amount of time between the time you send the arm command to the Security panel and the time the entry/exit door is actually armed. It is the amount of time you are allowed to exit the premises through the entry/exit door without setting off an alarm.
• When this option is off, the Security panel chimes after you send the arm command until the exit delay period is complete.
Security Bar
18

Home Security Touchscreen HSS101
•When this option is on, the Security panel does not chime during the exit delay. Turning this option on is useful when you want to leave the house and arm the security system, but you do not want to wake people who are sleeping in the house.
•Except for Silent Exit, these settings remain in effect until you explicitly change them.
•When the system is armed, the system icon changes to red, and the ARM button changes to DISARM.
DISARM Button
To disarm the system, touch DISARM, enter your access code, and touch OK. Refer to the documentation for your Security panel for more information about arming and disarming the security system.
Quick Exit
When your security system is armed, you can use the Quick Exit method to quickly open and close an entry/exit door without fully disarming the system. The Quick Exit method temporarily disarms the entry/exit doors and arms them again after a brief period of time (generally 120 seconds, depending on your system configuration). You might find it convenient to use this method when you want to take in your mail or newspaper or let someone in, but do not want to disarm the system fully and then re-arm it a moment later.
To use the Quick Exit method, touch DISARM but do not enter the security code when the numeric keypad displays.
The system disarms entry/exit doors and displays the numeric keypad in anticipation of receiving the code. At this point, you can safely open a door or window once and close it again without entering the code. When the door or window closes, and you do not enter the code after the configured period of time, the security system returns to the previous armed state, and the numeric keypad disappears.
Trouble Arming
If you attempt to arm the system when a sensor is in a faulted state such as when a door or window is open, the Trouble Arming warning appears.
Figure 14. Trouble Arming warning
Security Bar
19
Loading...