

Page 1

NETGEAR ProSAFE VPN Client
Version 5.5 and Earlier Versions
User Manual
April 2013
202-10684-05
350 East Plumeria Drive
San Jose, CA 95134
USA
Page 2

NETGEAR ProSAFE VPN Client
Support
Thank you for selecting NETGEAR products.
After installing your device, locate the serial number on the label of your product and use it to register your product
at https://my.netgear.com. You must register your product before you can
NETGEAR recommends registering your product through the NETGEAR
support, visit http://support.netgear.com.
Phone (US & Canada only): 1-888-NETGEAR.
Phone (Other Countries): Check the li
http://support.netgear.com/general/cont
st of phone numbers at
act/default.aspx.
use NETGEAR telephone support.
website. For product updates and web
Trademarks
NETGEAR, the NETGEAR logo, and Connect with Innovation are trademarks and/or registered trademarks of
NETGEAR, Inc. and/or its subsidiaries in the United States and/or other countries. Information is subject to change
without notice. NETGEAR, Inc. All rights reserved.
Revision History
Publication Part Number Version Publish Date Comments
202-10684-05 – April 2013 • Entirely reorganized and rewrote the manual
task-based manual.
as a
• Described new features in the following
sections:
- VPN Client Features
- Configure PKI Options
- Software Setup Command Reference
- Customize How the VPN Client Handles
Readers and Certificates
• Described changes in the global parameters
faults (see Configure the Global VPN
de
Parameters).
202-10684-04 v1.0 April 2012 Minor new features and improvemen
Remote Sharing pane.
202-10684-03 v1.0 May 30, 2011 Major revision to document the new format of the
use
r interface and some new features such as the
enhanced capability to change languages.
202-10684-02 v1.1 December 2010 Minor editorial changes and addition of an index.
202-10684-02 v1.0 December 2010 Reorganization an d revision
202-10684-01 v1.0 June 2010 First publication.
of the entire manual.
ts such as the
2
Page 3

Contents
Chapter 1 Introduction
Chapter 2 Install the Software
How to Use This Manual . . . . . . . . . . . . . . . . . . . . . . . . . . . . . . . . . . . . . . .8
VPN Client Features. . . . . . . . . . . . . . . . . . . . . . . . . . . . . . . . . . . . . . . . . . .8
VPN Client Licenses (Lite and Professional) and Supported Features . . .10
Linux Appliance Support . . . . . . . . . . . . . . . . . . . . . . . . . . . . . . . . . . . . . .11
References and Useful Websites. . . . . . . . . . . . . . . . . . . . . . . . . . . . . . . .12
Software Installation. . . . . . . . . . . . . . . . . . . . . . . . . . . . . . . . . . . . . . . . . .14
Launch the VPN Client. . . . . . . . . . . . . . . . . . . . . . . . . . . . . . . . . . . . . . . .14
Trial Software Evaluation . . . . . . . . . . . . . .
License Number Concepts. . . . . . . . . . . . . . . . . . . . . . . . . . . . . . . . . . . . .17
Software Activation. . . . . . . . . . . . . . . . . . . . . . . . . . . . . . . . . . . . . . . . . . .17
Software Activation Wizard
Troubleshoot Software Activation. . . . . . . . .
Software Upgrade Concepts . . . .
Software Uninstallation. . . . . . . . . . . . . . . .
. . . . . . . . . . . . . . . . . . . . . . . . . . . . . . . . . . .18
. . . . . . . . . . . . . . . . . . . . . . . .14
. . . . . . . . . . . . . . . . . . . . .20
. . . . . . . . . . . . . . . . . . . . . . . . . . . . .21
. . . . . . . . . . . . . . . . . . . . . . . .22
Chapter 3 Overview of the User Interface
Overview of the User Interface Components . . . . . . . . . . . . . . . . . . . . . . .24
Configuration Panel Screen . . . . . . . . . . . . . . . . . . . . . . . . . . . . . . . . . . . .24
Main Menu . . . . . . . . . . . . . . . . . . . . . . . . . . . . . . . . . . . . . . . . . . . . . . .25
Status Bar. . . . . . . . . . . . . . . . . . . . . . . . . . . . . . . . . . . . . . . . . . . . . . . .26
About Screen . . . . . . . . . . . . . . . . . . . . . . . . . . . . . . . . . . . . . . . . . . . . .26
Options Screen. . . . . . . . . . . . . . . . . . . . . . . . . . . . . . . . . . . . . . . . . . . .27
Wizards. . . . . . . . . . . . . . . . . . . . . . . . . . . . . . . . . . . . . . . . . . . . . . . . . .27
System Tray Icon and System Tray Menu . . . . . . . . . . . . . . . . . . . . . . . . .27
System Tray Pop-Up Screens . . . . . . . . . . . . . . . . . . . . . . . . . . . . . . . . . .30
Connection Panel Screen. . . . . . . . . . . . . . . . . . . . . . . . . . . . . . . . . . . . . .31
VPN Console Active Screen. . . . . . . . . . . . . . . . . . . . . . . . . . . . . . . . . . . .33
Keyboard Shortcuts . . . . . . . . . . . . . . . . . . . . . . . . . . . . . . . . . . . . . . . . . .34
Chapter 4 Create VPN Tunnel Connections
Use the Configuration Wizard to Create a VPN Tunnel Connection . . . . .36
Open and Close VPN Tunnels with the User Interface . . . . . . . . . . . . . . .39
High-Level Steps to Manually Create a VPN
Manually Configure Authentication or Phase 1 . . . . . . . . . . . . . . . . . . . . .41
Configure Authentication . . . . . . . . . . . . . . . . . . . . . . . . . . . . . . . . . . . .42
Tunnel Connection . . . . . . .40
3
Page 4

NETGEAR ProSAFE VPN Client
Configure Advanced Authentication. . . . . . . . . . . . . . . . . . . . . . . . . . . .44
Manually Configure IP Security or Phase 2 . . . . . . . . . . . . . . . . . . . . . . . .49
High-Level Steps to Specify a Cer
Configure the Global VPN Parameters . . . . . . . . . . . . . . . . . . . . . . . . . . .55
tificate for User Authentication . . . . . . .53
Chapter 5 Advanced Configuration Options
Configure How VPN Tunnels Are Opened. . . . . . . . . . . . . . . . . . . . . . . . . 59
Configure a Tunnel to Open Automatically. . . . . . . . . . . . . . . . . . . . . . . 59
Configure a VPN Tunnel to Open before Windows Logon. . . . . . . . . . .60
Open a Tunnel with a Double-Click on a Deskt
Configure Alternate DNS and WINS Servers. . . . . . . . . . . . . . . . . . . . . . .63
Configure Scripts . . . . . . . . . . . . . . . . . . . . . . . . . . . . . . . . . . . . . . . . . . . . 64
Configure Remote Sharing. . . . . . . . . . . . . . . . . . . . . . . . . . . . . . . . . . . . .66
USB Mode . . . . . . . . . . . . . . . . . . . . . . . . . . . . . . . . . . . . . . . . . . . . . . . . .68
Enable a New USB Drive with a VPN Configuration . . . . . . . . . . . . . . .68
To Configure Tunnels to Open Automatically w
Certificate Management . . . . . . . . . . . . . . . . . . . . . . . . . . . . . . . . . . . . . . .73
Certificate Concepts. . . . . . . . . . . . . . . . . . . . . . . . . . . . . . . . . . . . . . . .73
Import Certificates . . . . . . . . . . . . . . . . . . . . . . . . . . . . . . . . . . . . . . . . . 73
View and Assign Certificates . . . . . . . . . . . . . . . . . . . . . . . . . . . . . . . . . 77
View Certificate Details. . . . . . . . . . . . . . . . . . . . . . . . . . . . . . . . . . . . . . 79
Use Certificates from USB Tokens and Smart Cards. . . . . . . . . . . . . . .80
Troubleshoot Certificates . . . . . . . . . . . . . . . . . . . . . . . . . . . . . . . . . . . . 82
Configure PKI Options . . . . . . . . . . . . . . . . . . . . . . . . . . . . . . . . . . . . . .84
VPN Configuration Management . . . . . . . . . . . . . . . . . . . . . . . . . . . . . . . . 86
Import a VPN Configuration . . . . . . . . . . . . . . . . . . . . . . . . . . . . . . . . . .87
Export a VPN Configuration . . . . . . . . . . . . . . . . . . . . . . . . . . . . . . . . . .87
Merge VPN Configurations. . . . . . . . . . . . . . . . . . . . . . . . . . . . . . . . . . .89
Split a VPN Configuration. . . . . . . . . . . . . . . . . . . . . . . . . . . . . . . . . . . .89
Easily Import a VPN Configuration and Open a Tunnel
Configure Access Control. . . . . . . . . . . . . . . . . . . . . . . . . . . . . . . . . . . . . .92
Configure the User Interface . . . . . . . . . . . . . . . . . . . . . . . . . . . . . . . . . . . 94
Configure VPN Client Startup Mode and N
Configure Languages. . . . . . . . . . . . . . . . . . . . . . . . . . . . . . . . . . . . . . . . .97
op Icon . . . . . . . . . . . . .62
ith a USB Drive. . . . . . . 72
. . . . . . . . . . . . . 91
etwork Interface Detection . . . 95
Chapter 6 VPN Client Software Setup and Network Deployment
Software Setup and Deployment Concepts . . . . . . . . . . . . . . . . . . . . . . .101
Software Setup File Example. .
Software Setup Command Requirements . . . .
Examples of Options that You Can Include in a Software Setup File. .102
Software Setup Command Reference . . . . . . .
Customize VPN Client Display and Access for End Users . . . . . . . . . . .108
Display the Configuration Panel Screen after Startup . . . . . . . . . . . . .109
Display the Connection Panel Screen after Startup. . . . . . . . . . . . . . .109
Display the System Tray Menu Only after St
Require a Password to Access the Config
Limit Usage to the System Tray Menu and Require a
. . . . . . . . . . . . . . . . . . . . . . . . . . . . . .101
. . . . . . . . . . . . . . . . . . 102
. . . . . . . . . . . . . . . . . . . .103
artup . . . . . . . . . . . . . . . .109
uration Panel Screen . . . . .110
4
Page 5

NETGEAR ProSAFE VPN Client
Password to Access Other Screens . . . . . . . . . . . . . . . . . . . . . . . . . . .111
Configure Which Items of the System Tray Menu Are Visible . . . . . . .111
VPN Client Silent Software Setup Deployment
Create a Silent VPN Client Software Setup . . . . . . . . . . . . . . . . . . . . .112
Deploy a VPN Client Software Setup from a CD-ROM . . . . . . . . . . . .113
Deploy a VPN Client Software Setup from a
Deploy a VPN Client Software Setup Using a Batch Script . . . . . . . . .115
Deploy a VPN Client Software Setup from a
Deliver a VPN Configuration to an End User . . . . . . . . . . . . . . . . . . . . . .117
Embed a VPN Configuration in a VPN
Setup Deployment . . . . . . . . . . . . . . . . . . . . . . . . . . . . . . . . . . . . . . . .118
Export and Deploy a VPN Configuration . . . . . . . . . . . . . . . . . . . . . . .119
Command-Line Interface Command Reference. . . . . . . . . . . . . . . . . . . .120
Customize the VPN Client Using CLI Commands . . . . . . . . . . . . . . . . . .123
Open or Close a VPN Tunnel. . . . . . . . . . . . . . . . . . . . . . . . . . . . . . . .123
Close All Active Tunnels and Close the VPN Client. . . . . . . . . . . . . . .124
Import, Export, Add, or Replace the VPN Conf
Customize How the VPN Client Handles R
Customize the vpnsetup.ini File . . . . . . . . . . . . . . . . . . . . . . . . . . . . . .126
Customize the vpnconf.ini File . . . . . . . . . . . . . . . . . . . . . . . . . . . . . . .129
to End Users . . . . . . . . .112
Shortcut . . . . . . . . . . . . .114
Network Drive. . . . . . . . .116
Client Software
iguration. . . . . . . . . . . .124
eaders and Certificates. . . . .126
Chapter 7 Troubleshoot the VPN Client
Overview. . . . . . . . . . . . . . . . . . . . . . . . . . . . . . . . . . . . . . . . . . . . . . . . . .133
Resolve Firewall Interference. . . . . . . . . . . . . . . . . . . . . . . . . . . . . . . . . .133
Typical Errors . . . . . . . . . . . . . . . . . . . . . . . . . . . . . . . . . . . . . . . . . . . . . .133
PAYLOAD_MALFORMED Error (Wrong
INVALID_COOKIE Error. . . . . . . . . . . . . . . . . . . . . . . . . . . . . . . . . . . .134
no keystate Error . . . . . . . . . . . . . . . . . . . . . . . . . . . . . . . . . . . . . . . . .134
received remote ID other than expected Error
NO_PROPOSAL_CHOSEN Error (Phase 1) . . . . . . . . . . . . . . . . . . . .135
NO_PROPOSAL_CHOSEN Error (Phase 2) . . . . . . . . . . . . . . . . . . . .135
INVALID_ID_INFORMATION Error . . . . . . . . . . . . . . . . . . . . . . . . . . .136
Other Common Problems. . . . . . . . . . . . . . . . . . . . . . . . . . . . . . . . . . . . .137
There Is No Response to a Phase 1 Request . . . . . . . . . . . . . . . . . . .137
The Console Shows Only SEND and RECV . . . . . . . . . . . . . . . . . . . .137
There Is No Response to a Phase 2 Requests . . . . . . . . . . . . . . . . . .138
A Tunnel No Longer Opens . . . . . . . . . . . . . . . . . . . . . . . . . . . . . . . . .138
A VPN Tunnel Is Up but You Cannot Ping the Remo
View the Logs. . . . . . . . . . . . . . . . . . . . . . . . . . . . . . . . . . . . . . . . . . . . . .139
Phase 1 [SA]). . . . . . . . . . . .134
. . . . . . . . . . . . . . . . . . .135
te Endpoint. . . . .138
Appendix A Configure the VPN Client with a NETGEAR Router
Introduction. . . . . . . . . . . . . . . . . . . . . . . . . . . . . . . . . . . . . . . . . . . . . . . .142
Sample VPN Network Topology. . . . . . . . . . . . . . . . . . . . . . . . . . . . . . . .142
Configure the SRX5308 VPN Router . . . . . . . . . . . . . . . . . . . . . . . . . . . .144
Use the VPN Wizard to Configure a Client-to-Router VPN Connec
Manually Configure a Client-to-Router VPN C
Configure the VPN Client . . . . . . . . . . . . . . . . . . . . . . . . . . . . . . . . . . . . .155
onnection . . . . . . . . . . .150
tion144
5
Page 6

NETGEAR ProSAFE VPN Client
Use the Configuration Wizard to Configure the VPN Client . . . . . . . . .155
Manually Configure the VPN Client . . . . . . . . . . . . . . . . . . . . . . . . . . .160
Establish a VPN Connection . . . . . . . . . . . . . . . . . . . . . . . . . . . . . . . . . .166
Index
6
Page 7

1. Introduction
The VPN Client supports all Windows versions and allows you to establish secure connections
over the Internet, for example, between a remote worker and the corporate Intranet. IPSec is the
most secure way to connect to the enterprise because it provides strong user authentication and
strong tunnel encryption with the ability to work with existing network and firewall settings.
This chapter includes the following sections:
• How to Use This Manual
• VPN Client Features
• VPN Client Licenses (Lite and Professional) and Supported Features
• Linux Appliance Support
• References and Useful Websites
Note: For more information about the topics covered in this manual, visit
the support website at http://support.netgear.com.
1
Note: Firmware updates with new features and bug fixes are made
available from time to time on
products can regularly check the site a
or you can check for and download new firmware manually. If the
features or behavior of your product do not match what is described
in this guide, you might need to update your firmware.
downloadcenter.netgear.com. Some
nd download new firmware,
7
Page 8

NETGEAR ProSAFE VPN Client
How to Use This Manual
This manual is primarily intended for network administrators who need to implement the VPN
Client for end users.
The manual explains how to use the user interface
to configure the VPN Client. An exception
is Chapter 6, VPN Client Software Setup and Network Deployment. That chapter describes
how to use software setup commands, how to use CLI commands, and how to configure
initializa
tion files to preconfigure the VPN Client software setup before deployment to end
users, to remotely install or upgrade the VPN Client, and to centrally manage VPN
configurations.
VPN Client Features
The VPN Client has the following features.
Table 1. List of features
Feature Specifications
Windows versions • Windows 2000 32-bit
• Windows XP 32-bit SP3
• Windows Server 2003 32-bit
• Windows Server 2008 32/64-bit
• Windows Vista 32/64-bit
• Windows 7 32/64-bit
• Windows 8 32/64-bit
Languages Arabic, Chinese (simplified), Czech, Danish, D
German, Greek, Hindi, Hungarian, Italian, Japanese, Korean, Norwegian Polish,
Portuguese, Russian, Serbian, Slovenian, Spanish, Thai, and Turkish.
Connection modes • Supports peer-to-peer connections (point-to
computers that have the VPN Client installed).
• Supports peer-to-gateway connections, for example
the VPN Client installed and NETGEAR platform that supports VPN.
• Supports connection types such as dial-u
WiFi.
• Allows IP range networking.
• Runs in a Remote Desktop Protocol (RDP) connection session.
Tunneling protocols • Full Internet Key Exchange (IKE) support: the IKE implementation is based on the
OpenBSD 3.1 impleme
with existing IPSec routers and gateways.
• Full IPSec support:
- Main mode and aggressive mode
- MD5, SHA-1, and SHA-256 hash algorithms
- Change IKE port
ntation (ISAKMPD). This provides the best compatibility
Introduction
utch, English, Farsi, Finnish, French,
-point connections between two
, between a computer that has
p, DSL, cable, GSM/GPRS, 3G, 4G, and
8
Page 9

NETGEAR ProSAFE VPN Client
Table 1. List of features (continued)
Feature Specifications
NAT Traversal • NAT Traversal Draft 1 (enhanced), Draft 2, and Draft 3 (full implementation),
including:
- NAT OA support
- NAT keep-alive
- NAT-T aggressive mode
• Forced NAT-Traversal mode
SIP/VoIP support Support for Session Initiation Protocol (SIP) and Voice over IP (VoIP) traffic in a VPN
nel on Window Vista, Windows 7, and Windows 8.
tun
Encryption Provides the following encryption algorithms:
• 3DES, DES, and AES 128/192/256-bit encryption
• Support for Diffie-Hellman group 1 (768 bits), group 2 (1024 bits), group 5
536 bits), and group 14 (2048 bits)
(1
User authentication Supports the following user authentication methods:
• Pre-shared keying and X509 certificate support. Compatible with most of the
rrently available IPSec gateways.
cu
• Extended authentication (AUTH).
• Flexible certificates: PEM, PKCS#12 certificates ca
user interface. Ability to configure one certificate per tunnel.
• Hybrid authentication method.
n be directly imported from the
Certificate storage capabilities:
• USB token and smart card support
• Personal Certificate Store support
• VPN configuration file
Remote login:
• Gina mode supported on Windows 2000 and Wi ndows XP to enable Windows
ogon using a VPN tunnel or enable to log in on a local machine.
l
• Credential providers supported on Windows Vista and Windows 7 to enable
indows logon using a VPN tunnel or enable to log in on a local machine.
W
Dead Peer Detection Dead Peer Detection (DPD) is an IKE exten
peer.
Redundant Gateway The Redundant Gateway feature provides a highly reliable secure connection to a
corporate network. The Redundant Gateway feature allows the VPN Client to open an
IPSec tunnel with an alternate gateway if the primary gateway is down or not
responding.
Mode Config Mode Config is an IKE extension that ena
configuration to the remote user’s machine (that is, the VPN Client). With Mode Config,
you can access all servers on the remote network by using their network name (for
example, \\myserver\marketing\budget) instead of their IP address.
USB drive You can save VPN configurations and security ele
and so on) to a USB drive to remove security information (for example, user
authentication) from the computer. You can automatically open and close tunnels when
plugging in or removing the USB drive. You can attach a VPN configuration to a specific
computer or to a specific USB drive.
sion (RFC3706) for detecting a dead IKE
bles the VPN gateway to provide LAN
ments (certificates, pre-shared key,
Introduction
9
Page 10

NETGEAR ProSAFE VPN Client
Table 1. List of features (continued)
Feature Specifications
Smart card and USB
token
Log console All phase messages are logged for testing or staging purposes.
Flexible user
rface
inte
Scripts Scripts or applications can be launched automaticall
Configuration
nagement
ma
Live update Ability to check for online updates.
The VPN Client can read certificates from smart cards to make full use of existing
corporate ID or employee cards that carry digital credentials.
You can easily import smart card ATR codes
models that are not yet in the software.
• Silent install and invisible graphical interface allow network administrators to
deploy solutions while preventing user misuse of configurations.
• Small Connection Panel screen and VPN Configuration Panel screen can be
ilable to end users separately with access control.
ava
• Drag and drop VPN configurations into the VPN Client.
• Keyboard shortcuts to easily navigate the VPN Client.
and after a tunnel opens, or before and after a tunnel is closed).
• User interface and command-line interface (CLI).
• Password-protected VPN configuration file.
• Specific VPN configuration file can
• Embedded demo VPN configuration to test and debug with online servers.
• Ability to prevent software upgrade or unin
to enable new smart card and USB token
y on events (for example, before
be provided within the setup.
stallation if protected by password.
VPN Client Licenses (Lite and Professional) and Supported Features
NETGEAR products can include a license for the VPN Client Lite or for a 30-day trial copy of
the VPN Client Professional, or for both. The following table lists the features that are
included in the VPN Client Lite and VPN Client Professional versions. When you launch the
VPN Client, you can purchase a license for the VPN Client and activate (register) either the
VPN Client Professional or VPN Client Lite.
Introduction
10
Page 11

NETGEAR ProSAFE VPN Client
The following table compares the features of the VPN Client Professional and VPN Client
Lite.
Table 2. Feature comparison between VPN Client Lite and VPN Client Professional
VPN Client Functions Lite Pro
Configuration Configuration Wizard
X-Auth
Mode Config
DNS/WINS server manual configuration
Hybrid mode –
IKE/NAT-T ports can be modified –
Control Connection Panel
Console logs
Disable split tunneling
Dead Peer Detection
System tray popup
GUI protection (password) –
Auto Open (Windows on startup on traffic detection) –
Start VPN tunnel before Windows logon –
Easy deployment by command-line interface (CLI ) –
Advanced Features Multitunnel configurations –
Redundant Gateways
Scripts –
USB mode –
Linux Appliance Support
The VPN Client supports several versions of Linux IPSec VPN such as StrongS/WAN and
FreeS/WAN. The VPN Client is compatible with most of the IPSec routers and appliances
that are based on those Linux implementations.
Introduction
11
Page 12

NETGEAR ProSAFE VPN Client
References and Useful Websites
These references and websites are for the ProSAFE VPN Client Lite and ProSAFE VPN
Client Professional, both of which are developed by TheGreenBow.
• Access to VPNG01
http://support.netgear.com/product/VPNG01L
• Access to VPNG05
http://support.netgear.com/product/VPNG05L
• VPNG01L/VPNG05L FAQs:
http://kb.netgear.com/app/answers/detail/a_id/14903
• TheGreenBow IPSec VPN Client:
http://www.thegreenbow.com/vpn.html
• TheGreenBo
http://www.thegreenbow.com/vpn_doc.html
The documents that you can access from this link are ba
Client. The NETGEAR ProSAFE VPN Client Lite and ProSAFE VPN Client Professional
are developed by TheGreenBow, so configuration is likely identical or similar.
Note: For documentation about the legacy ProSAFE VPN Client that was
w VPN documentation and manuals:
developed by SafeNet, see the following NETGEAR sites:
http://support.netgear.com/product/VPN01L
http://support.netgear.com/product/VPN05L
L product information and a 30-day trial software version:
L product information and a 30-day trial software version:
sed on TheGreenBow VPN
Introduction
12
Page 13

2. Install the Software
This chapter describes installation of the VPN Client and related processes. The chapter
includes the following sections:
• Software Installation
• Launch the VPN Client
• Trial Software Evaluation
• Software Activation
• Software Upgrade Concepts
• Software Uninstallation
2
13
Page 14

NETGEAR ProSAFE VPN Client
Software Installation
The VPN Client software installation does not require specific information and is
self-explanatory. After completing the installation, you are asked to reboot your computer.
However, if your operating system is Windows 8, Windows 7, or Windows Vista, you can
install the VPN Client software without rebooting your computer.
After you have rebooted and logged in to your computer, the VPN Client Activation Wizard
screen displays. The information
a trial license or activate a permanent license:
about how to proceed depends on whether you want to use
• If you do
• If you purchased a p
wnloaded a free trial software version, see Trial Software Evaluation on page 14.
ermanent license, see Software Activation on page 17.
Launch the VPN Client
After you have installed the VPN Client software, there are three methods to launch the VPN
Client:
• On
• In the
• From the S
The VPN Client creates new rules in the Windows firewall (V
so that VPN traffic is enabled: UDP ports 500 and 450 0 are authorized both for authentication
(phase 1) traffic and for IPSec (phase 2) traffic.
your desktop, double-click the VPN Client shortcut.
taskbar, click the VPN Client icon.
tart menu, select the path to the VPN Client, for example:
Start > All Programs > NETGEAR > NETGEAR VPN Client.
Note: If your operating system is Windows 8, Windows 7 or Windows Vista,
can select a check box to automatically run the VPN Client after software
you
installation.
ista and later operating systems)
If you use an earlier Windows operating system or anothe
firewall rules to enable the VPN Client. For information, see Resolve Firewall Interference on
page 133.
r firewall, you might have to create
Trial Software Evaluation
The VPN Client is available as a free trial version. The evaluation period is limited to 30 days.
After the evaluation period has expired, the VPN Client becomes disabled. By purchasing
and activating a permanent license, you can transfer the trial version to a permanent version
and access the VPN Client indefinitely. For more information, see License Number Concepts
on page 17 and Software Activation on p
age 17.
Install the Software
14
Page 15
NETGEAR ProSAFE VPN Client
To use the VPN Client during the evaluation period:
1. In the taskbar, click the VPN Client icon.
For other methods to launch the VPN Client, see Launch the VPN Client on p
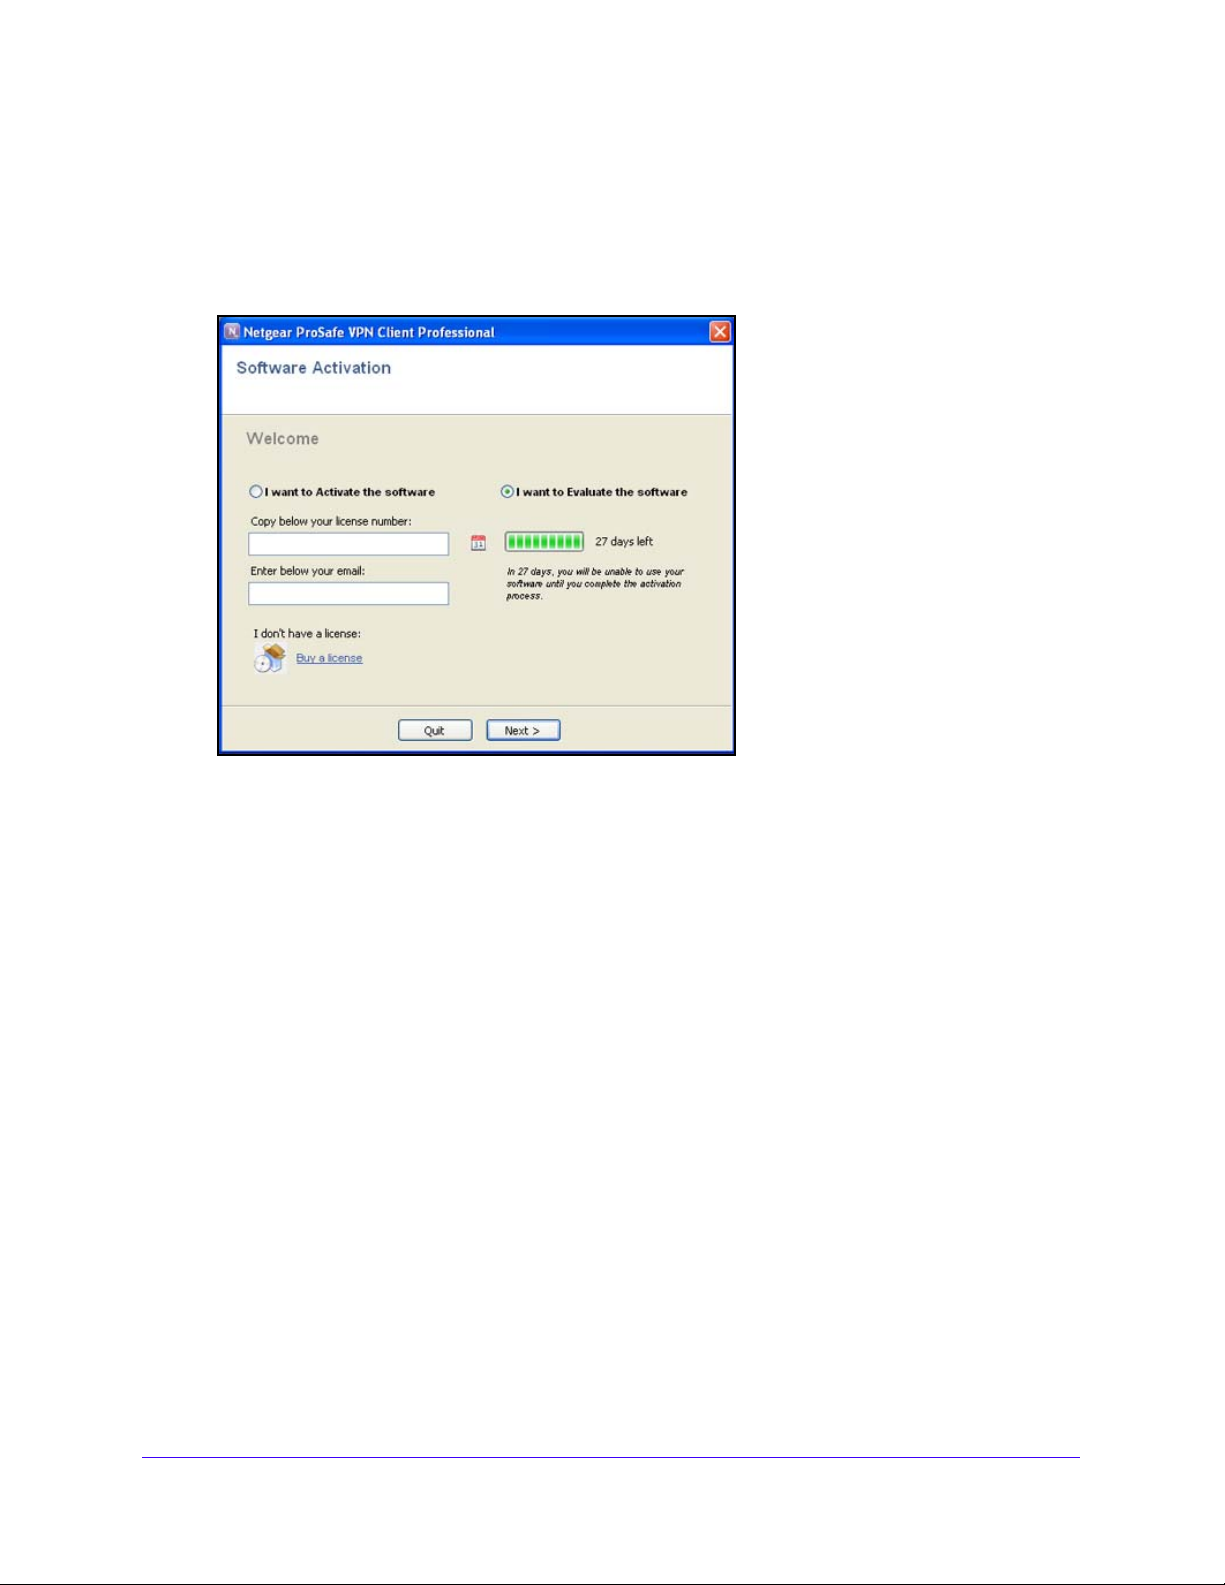
The Software Activation screen displays:
2. Select th
e I want to Evaluate the software radio button.
You do not need to enter a license number and email address to activate the trial
sof
tware.
age 14.
3. Click Next.
The Configuration screen displays, and the user interface is accessible.
During the evaluation period, the Software Activation scree
n displays each time that you start
the VPN Client. The remaining days of the evaluation period are displayed next to the
calendar icon on the right of the screen. You can also see the remaining time of the
evaluation period on the About screen (see About Screen on p
age 26).
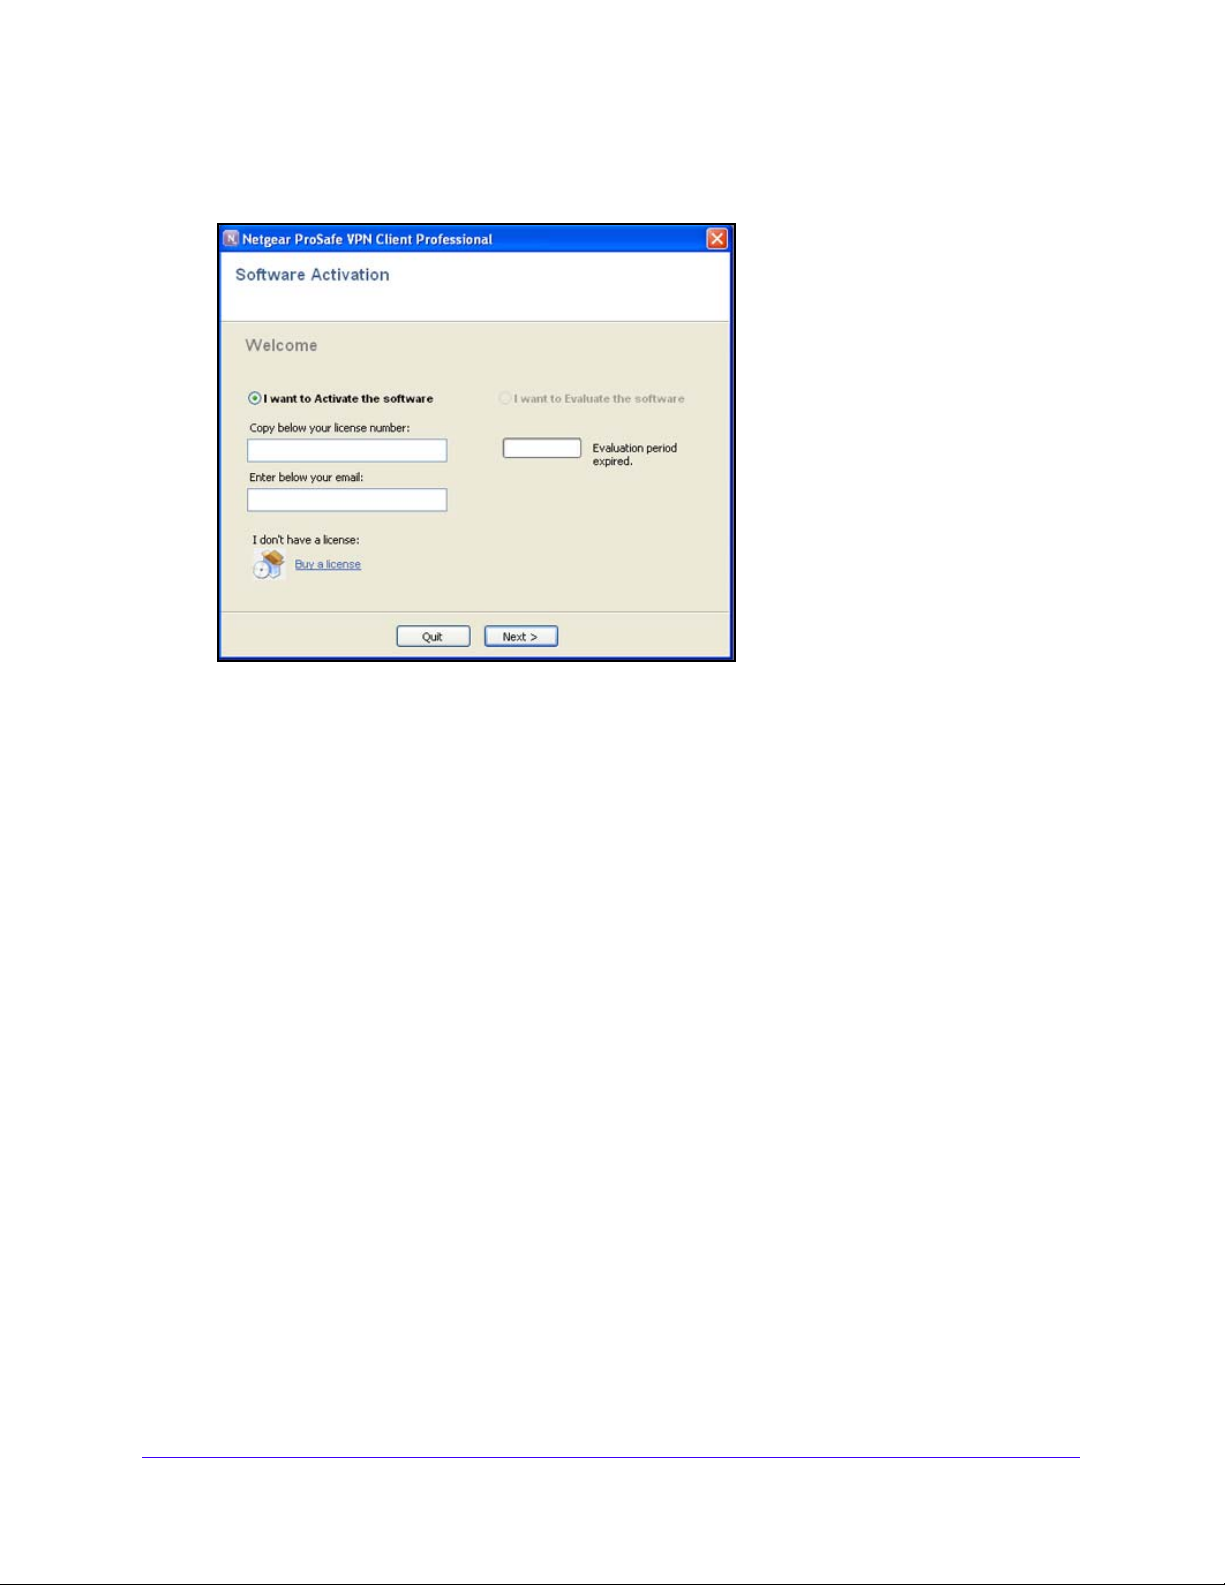
When the evaluation period expires, the following occurs:
he I want to Activate the software radio button is automatically selected.
• T
he I want to Evaluate the software radio button is masked out.
• T
• T
he message Evaluation period expired is displayed.
• T
he software is disabled.
When the evaluation period has expired, in order
for you to use the VPN Client, you need to
purchase and activate a permanent license. You can purchase and activate a permanent
license while you are still in the evaluation period or after the evaluation period has expired.
Install the Software
15
Page 16
NETGEAR ProSAFE VPN Client
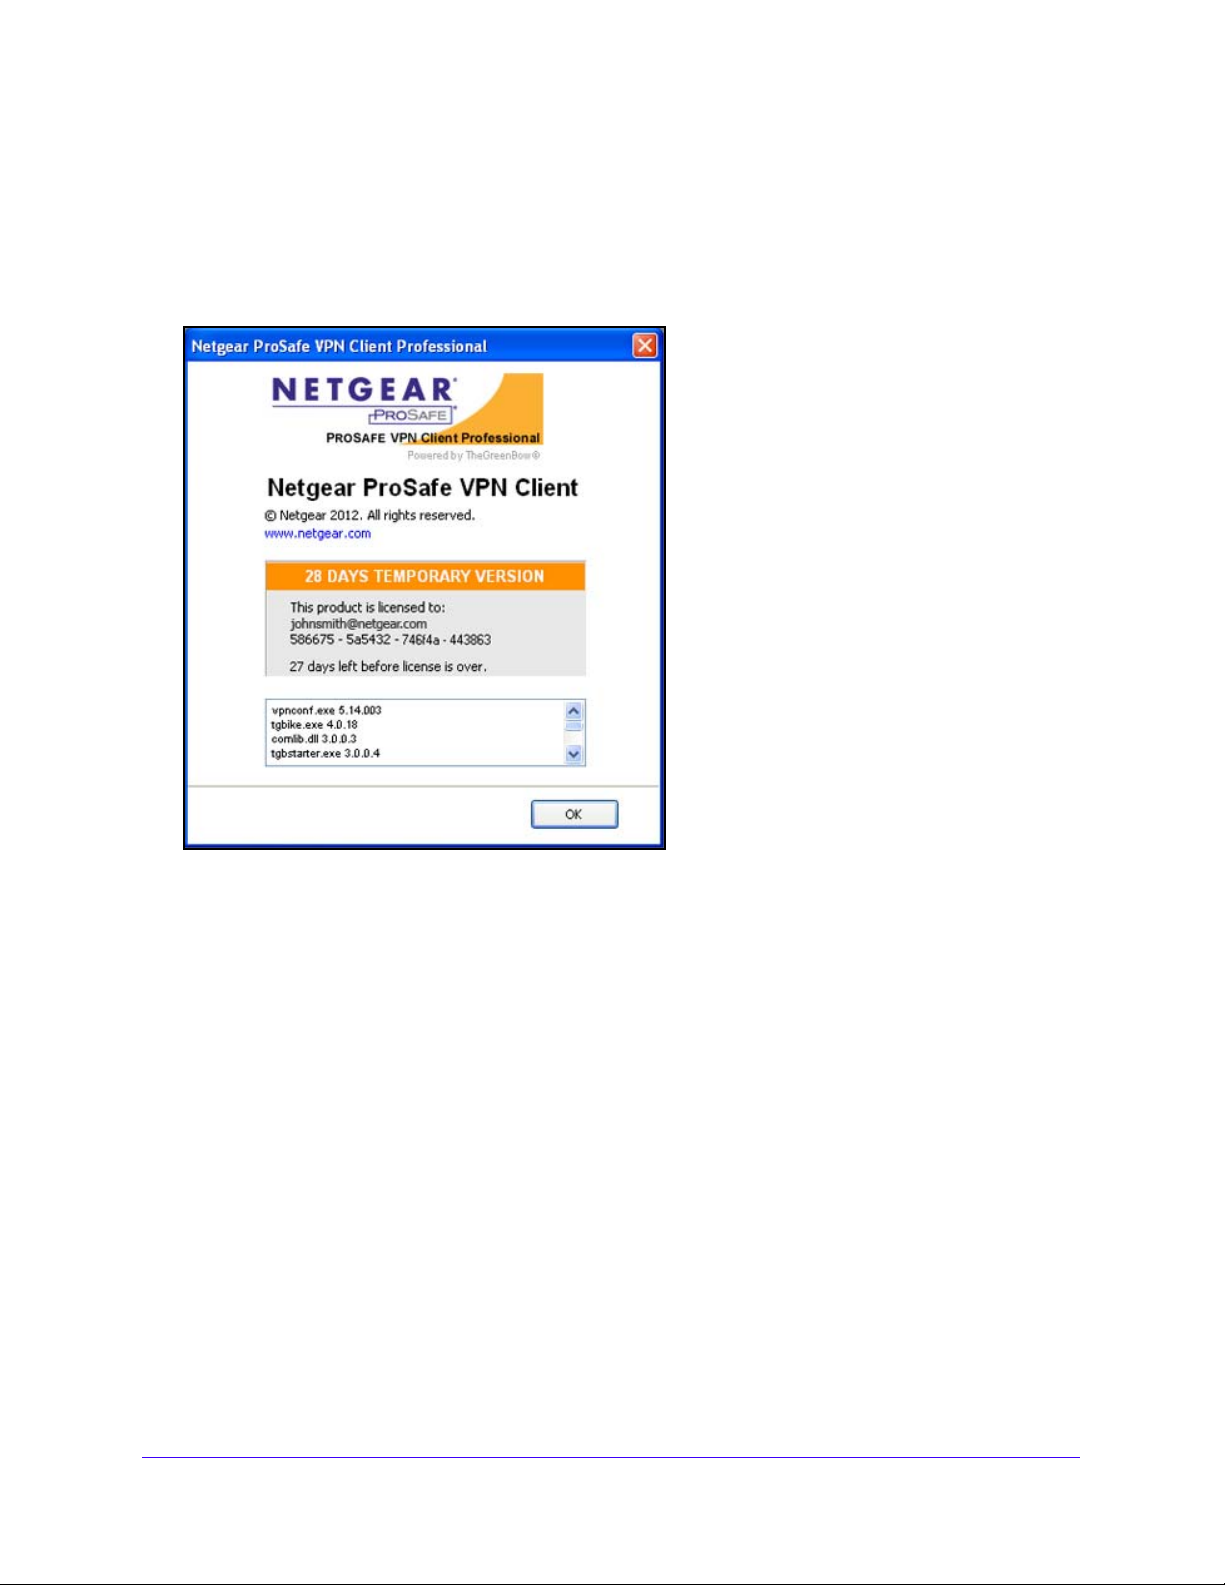
To view the remaining time of the evaluation period from VPN Client’s user interface:
From the main menu of the Connection Panel screen, select ? > About.
(When you launch the VPN Client, the Configuration Panel screen displays by default.)
The About screen displays, showing the number of days that
remain in the evaluation period:
To buy a permanent license:
1. In the t
askbar, click the VPN Client icon.
For other methods to launch the VPN Client, see Launch the VPN Client on p
age 14.
Install the Software
16
Page 17
NETGEAR ProSAFE VPN Client
The Software Activation screen displays. The following figure shows the Software
Activation screen after the evaluation period has expired:
2. Click the Bu
The NETGEAR website displays. Follow the
permanent license.
3. Af
ter you have purchased a license, follow the procedure in Software Activation, to activate
the permanent license.
y a license link.
instructions onscreen to purchase a
License Number Concepts
A license number is attached to a single computer after activation. However, you can
deactivate the license number (see Software Uninstallation on
another computer.
You can also change the license number at any time, but
Client before you can reinstall the VPN Client with another license number.
After activation, save the license key number. You might need it again to reactivate your
tware if a problem has occurred. Also, keep the CD label for technical support.
sof
page 22) and transfer it to
you first need to uninstall the VPN
Software Activation
When you purchase a permanent license, you are required to activate it before you can use
the VPN Client.
Install the Software
17
Page 18
NETGEAR ProSAFE VPN Client
Software Activation Wizard
In order for you to use the VPN Client beyond the evaluation period, you need to activate the
VPN Client license on your computer. You need the license number or key and an email
address.
To activate your software using the Activation Wizard:
1. Make su
re that your computer is connected to the Internet.
2. Do one of the following:
• If you
did not yet launch the VPN Client:
In the taskbar, click the VPN Client icon.
For other methods to launch the VPN Client, see Launch the VPN Client on p
• If you
From the main menu on the Configuration Panel screen, se
already launched the VPN Client and the user interface is accessible:
lect ? > Activation Wizard.
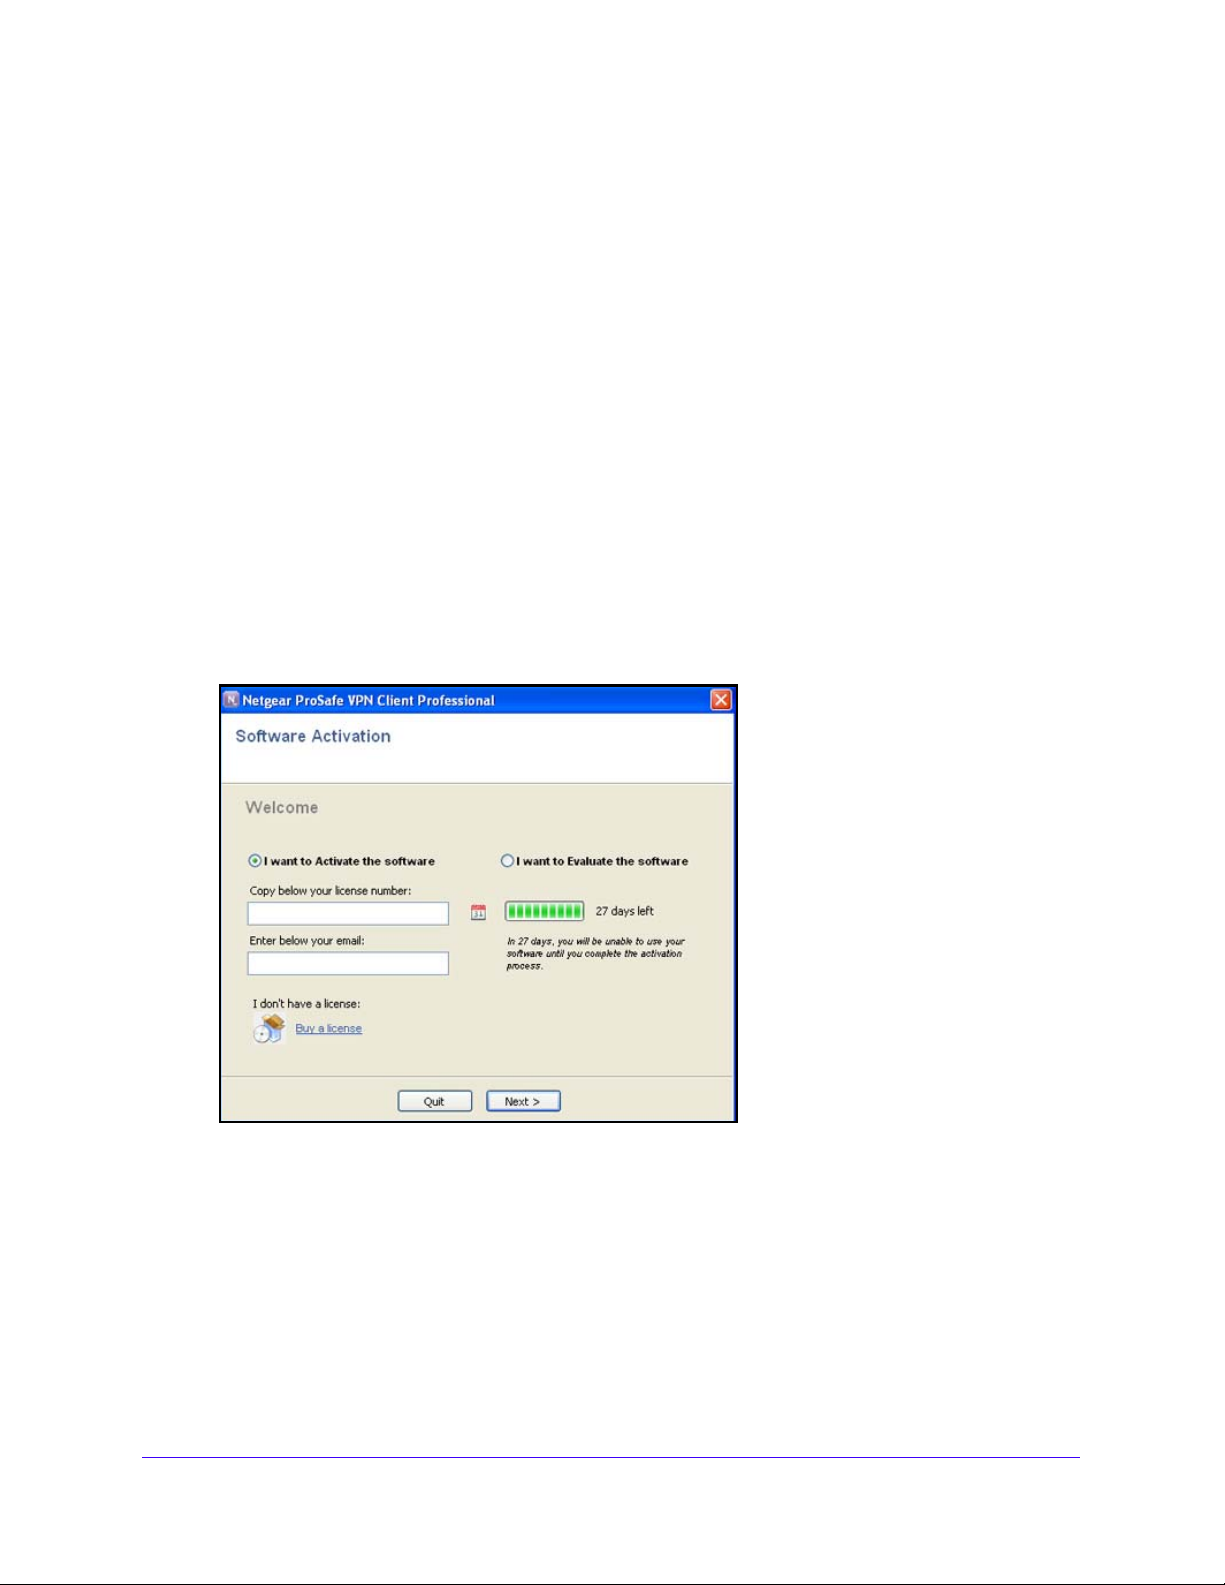
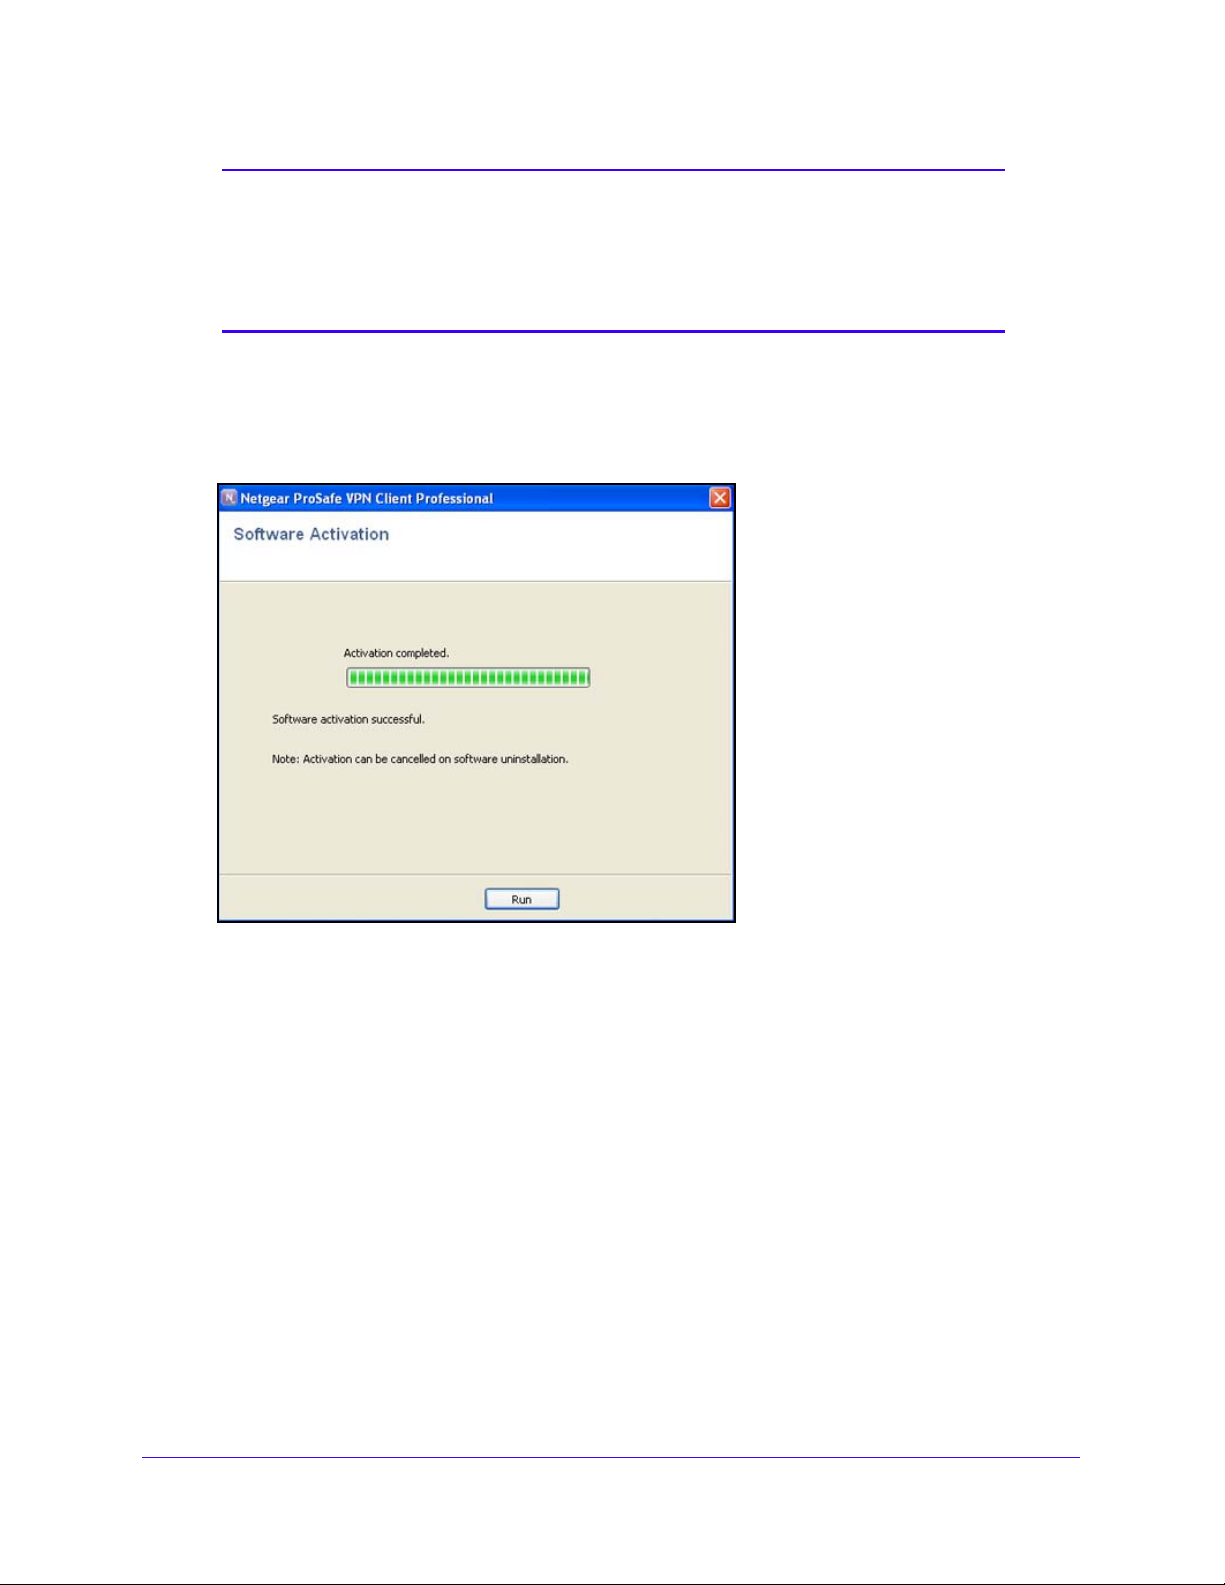
The Software Activation screen displays. The following figure shows the Software
Activation screen
when the evaluation period has not yet expired:
age 14.
3. Select the I want to Activate the software radio button.
4. Enter
5. Enter your
your permanent license number.
email address.
Your email address is used to send you the activation confirmation.
Install the Software
18
Page 19
NETGEAR ProSAFE VPN Client
Note: The email address might not be required. If the network
administrator suppresses display of the Email address field during
the software setup, the Software Activation Wizard does not display
the Email address field. Suppression can be used to centralize all
software activation confirmation emails to a single email address.
6. Click Next.
The Activat
ion Wizard attempts to automatically connect to the activation server to
activate the VPN Client software. The progress bar shows the activation progress.
When the activation is complete, the screen shows
whether the activation was successful
and displays messages associated with the outcome (see also Troubleshoot Software
Activation on p
age 20).
7. (Optional,
and only if an error occurs) Click the More information about this error link.
For troubleshooting information, see the following section, Troubleshoot Software
Activation.
8. Click Run.
The VPN Client relaunches with the new lice
nse. The Configuration screen displays and
the user interface is accessible.
Install the Software
19
Page 20
NETGEAR ProSAFE VPN Client
Troubleshoot Software Activation
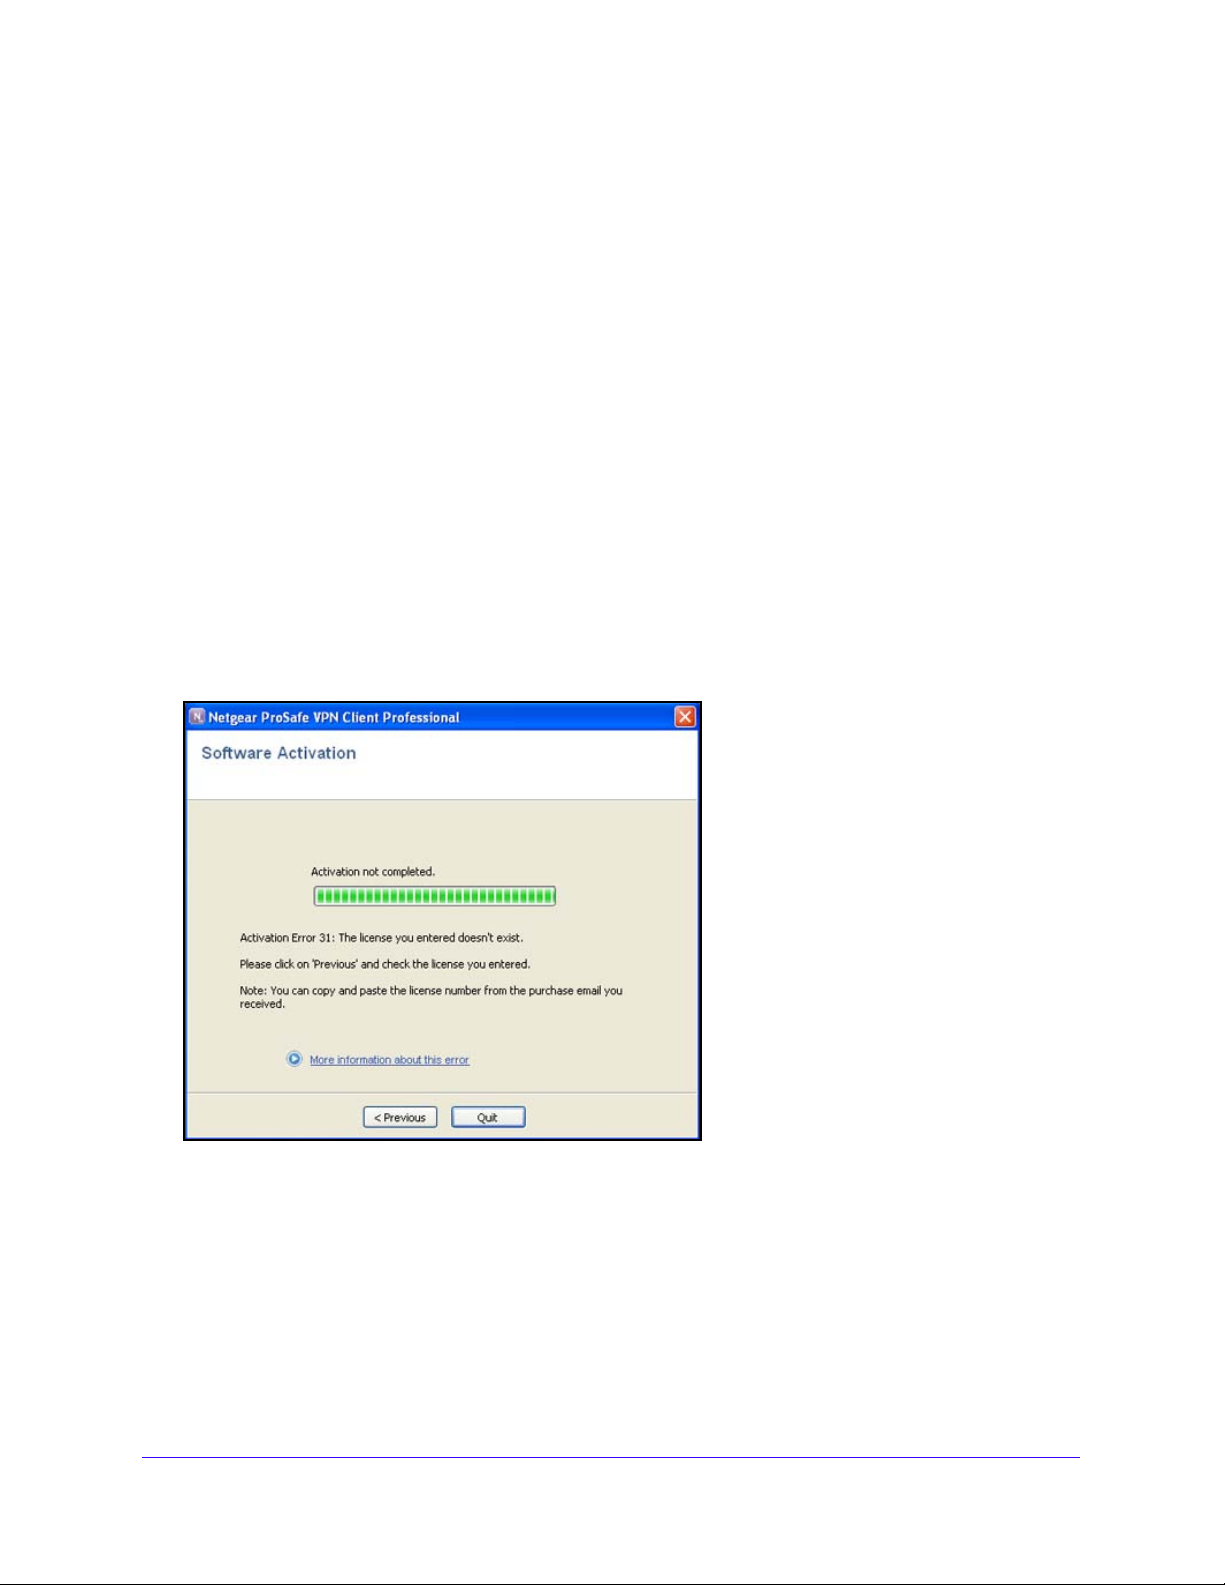
Errors can occur during the activation process. Each activation error type is displayed on the
Software Activation screen.
You can resolve most of errors by carefully checking the following:
erify that you entered the correct license number. (Error 031 indicates that the license
• V
number was not found.)
• Y
our license number could already be activated (Error 033). Contact NETGEAR support.
our license number cannot be used for activation (Error 034). Contact NETGEAR
• Y
support.
• A firewall might
block communication with the activation server (Error 053 or Error 054).
Find out if a personal or corporate firewall is blocking communications.
• The a
ctivation server might be temporarily unreachable. Wait a few minutes and try
again.
All activation errors are listed at www.netgear.com/support.
The following two figures show example
s of activation errors.
Figure 1. Activation Error 31
Install the Software
20
Page 21
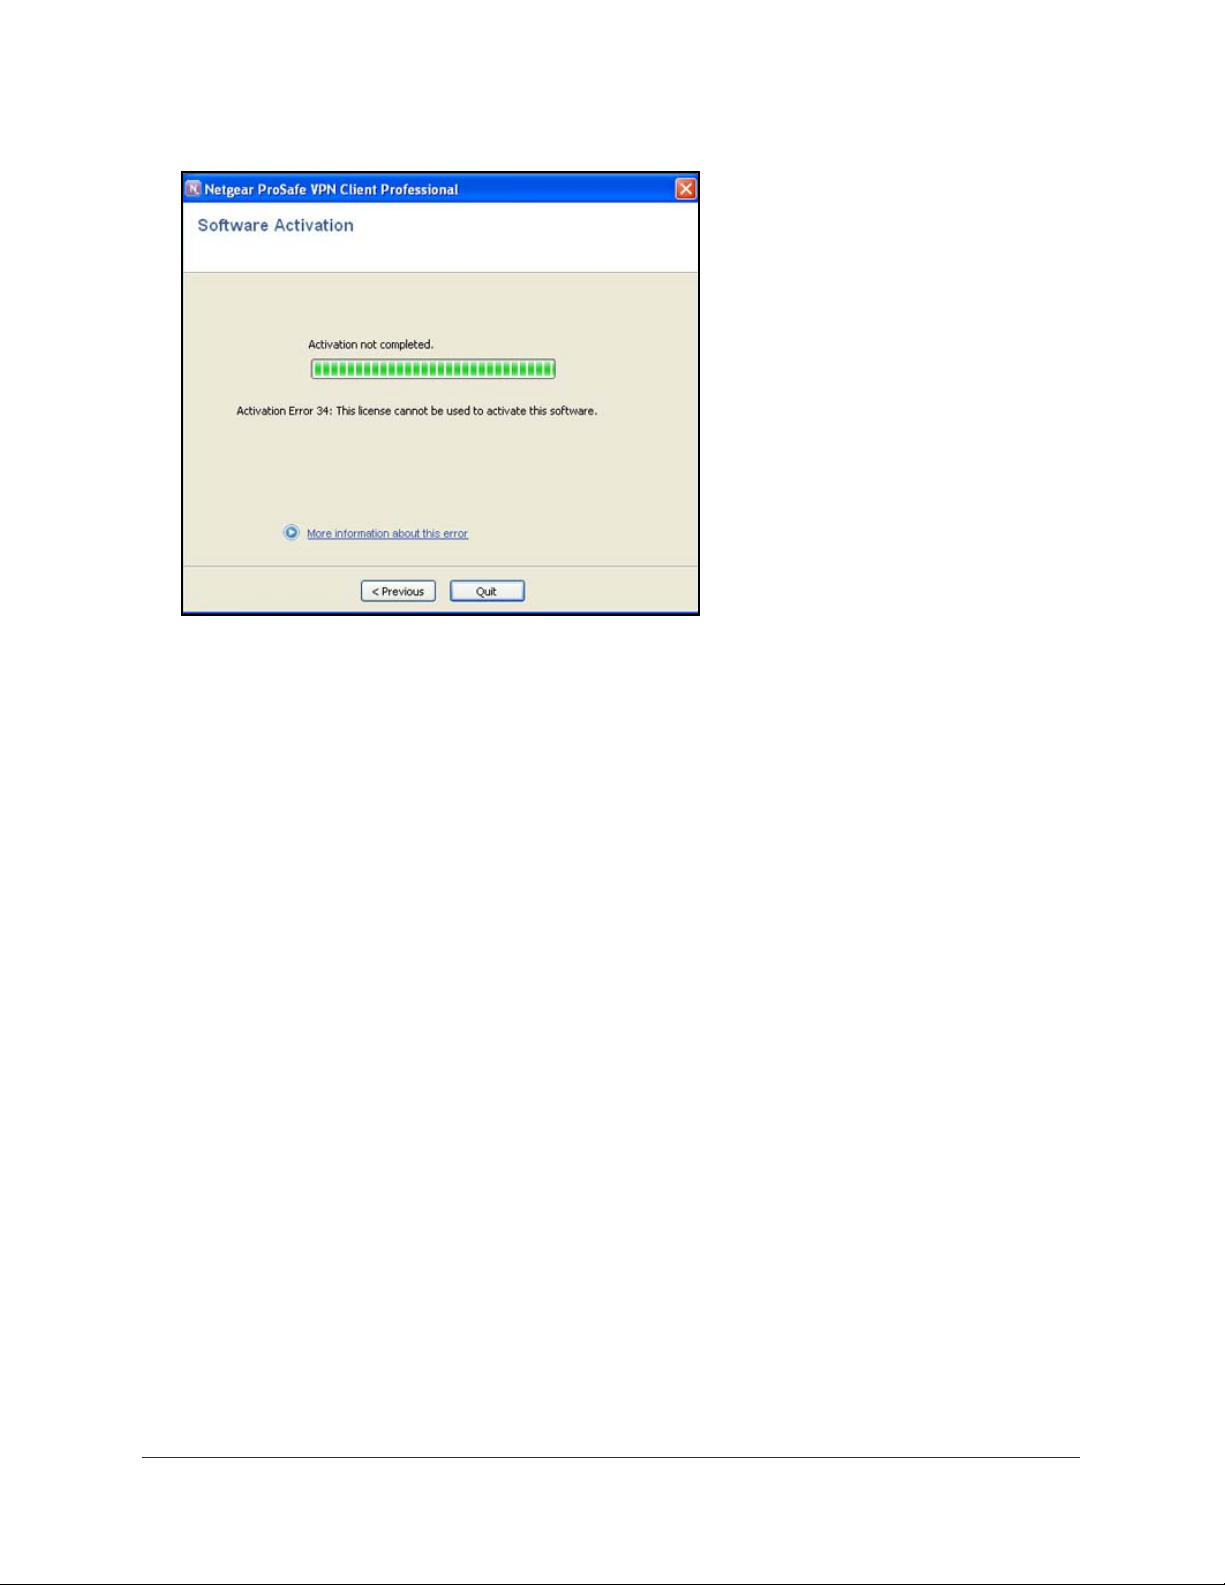
Figure 2. Activation Error 34
NETGEAR ProSAFE VPN Client
Software Upgrade Concepts
You need to reactivate the VPN Client after each software upgrade. Depending on your
maintenance contract, a software upgrade activation might be rejected. Carefully read the
recommendations in this section.
To check the status of the VPN Client’s software release:
From the main menu of the Connection Panel screen, select ? > Check f
The NETGEAR website displays. You can check if
the VPN Client is running that latest
software release or download a new software release.
The success of a software upgrade activation depends on your maintenance contract:
• During th
e maintenance period (which starts from your first activation), all software
upgrades are allowed.
• I
f the maintenance period has expired or if you have no maintenance contract, only
maintenance software upgrades are allowed. Maintenance software upgrades are
identified by the last digit of a version.
Example: Your maintenance period has expired and your current software release is
.12. You can upgrade to releases 3.13 through 3.19 but not to release 3.20, 3.30, 4.00,
3
or 5.00.
If you want to subscribe or extend your maintenan
ce period, contact NETGEAR by email at
or Update.
Install the Software
21
Page 22

NETGEAR ProSAFE VPN Client
Note: The VPN configuration is saved during a software upgrade and
automatically reenabled within the new release.
Note: If you have specified a password for access control (see Configure
Access Control on p
upgrade the software.
age 92), you need to enter it to be able to
Software Uninstallation
To transfer a license to a new computer, you need to uninstall the software from the old
computer. Deactivation of the license on the old computer occurs automatically if the
computer is connected to the Internet. The license can then be used to activate the VPN
Client on a new computer.
If your computer is not connected to the Interne
contact NETGEAR support by email at [email protected], or call the technical center to
inactivate your license.
There are several methods to uninstall the VPN Client sof
operating system, these methods might differ slightly from the following procedures.
Tip: Af
To uninstall the VPN Client through the Control Panel:
1. Make su
2. Select S
3. Double-click Programs and
double-click Add or Remove Programs.)
4. Right-click the NETGEA
you need to select Remove.)
To uninstall the VPN Client through the All Programs menu:
1. Make su
2. Select S
3. Select the p
ter uninstallation, save the license key number . You might need it again
to reactivate your software. Also, keep the CD label for technical support.
re that your computer is connected to the Internet.
tart > Control Panel.
Features. (In some Windows versions, you need to
R VPN Client and select Uninstall. (In some Windows versions,
re that your computer is connected to the Internet.
tart > All Programs.
ath to the VPN Client, for example:
t and you need to inactivate your license,
tware. Depending on your Windows
Start > All Programs > NETGEAR > NETGEAR VPN Client.
4. Select the uninst
all option.
Install the Software
22
Page 23

3. Overview of the User Interface
This chapter describes the user interface for the VPN Client. The chapter includes the following
sections:
• Overview of the User Interface Components
• Configuration Panel Screen
• System Tray Icon and System Tray Menu
• System Tray Pop-Up Screens
• Connection Panel Screen
• VPN Console Active Screen
• Keyboard Shortcuts
3
23
Page 24
NETGEAR ProSAFE VPN Client
Tree list pane
Configuration pane
Main menu
Status bar
Overview of the User Interface Components
The VPN Client is fully autonomous and can start and stop tunnels without user intervention,
depending on traffic to certain destinations. However, it requires a VPN configuration.
The VPN Client configuration is defined in a VPN con
interface allows creating, modifying, saving, exporting, or importing the VPN configurations
together with security elements such as a pre-shared key or certificates.
The user interface consists of the following components:
• Config
• Connection
• Main menus
• System t
• S
• Wizards
• Preferen
uration Panel
Panel
ray icon and pop-up screens
tatus bar
ces
figuration file. The software user
Configuration Panel Screen
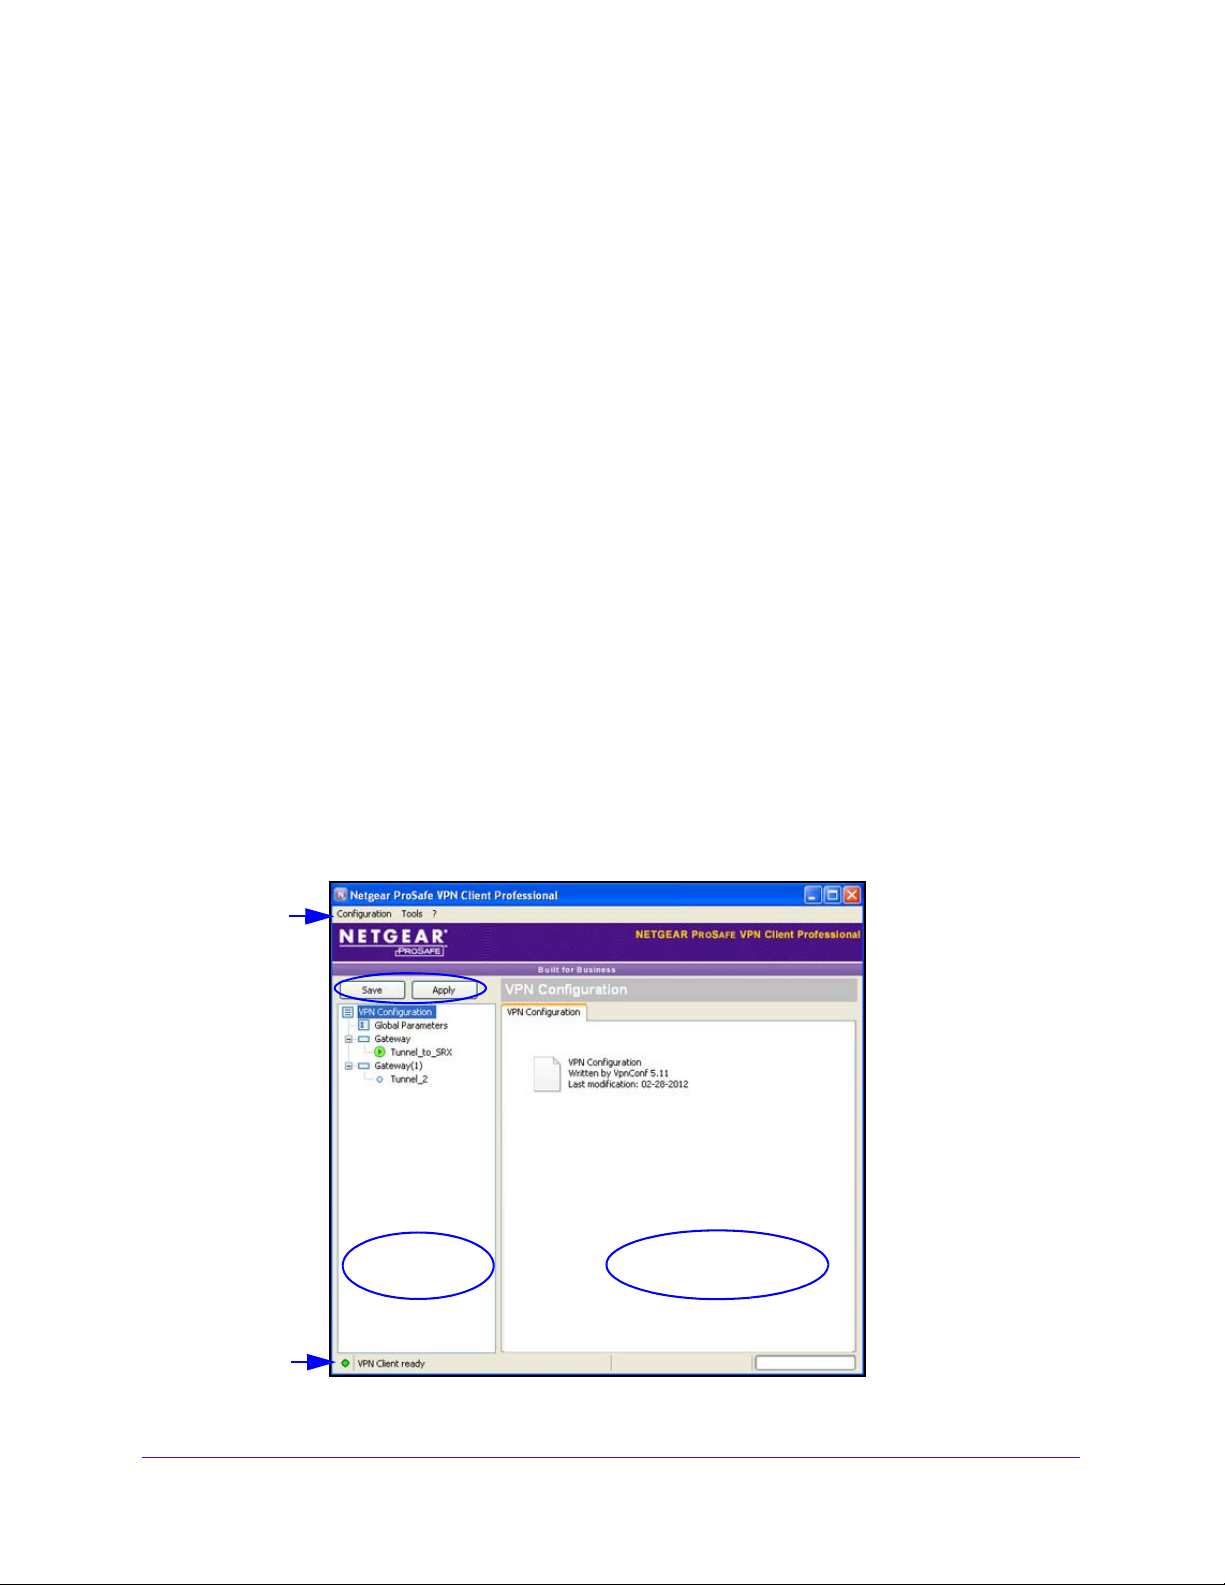
When you launch the VPN Client, the Configuration Panel screen displays by default. (The
following figure shows configured VPN tunnels, which would be absent if you launched the
Configuration Panel for the first time.)
Figure 3. Configuration Panel screen
Overview of the User Interface
24
Page 25

NETGEAR ProSAFE VPN Client
The Configuration Panel screen enables you to configure VPN tunnels, and consists of the
following components:
• Main
• T
• A tr
• A configuration p
• S
menu (at the top of the screen), showing the Configuration, Tools, and ? menu
selections.
he Save and Apply buttons in the left column of the screen:
- Save. The
saved to the startup configuration. The next time that you start the VPN Client, the
configuration is present.
- Appl
to the startup configuration. The next time that you start the VPN Client, the
configuration is no longer present.
ee list pane (in the left column of the screen) that contains the Global Parameters
button and all authentication phase names (that is, phase 1 names) with their associated
IPSec configuration names (that is, phase 2 names or tunnel names).
settings for each tree level.
tatus bar (at the bottom of the screen).
Note: For information about restricting access to the Configuration Panel
VPN tunnel is saved for immediate and future use. The VPN tunnel is
y. The VPN tunnel is saved for immediate use only . The VPN tunnel is not saved
ane (in the right column of the screen) that shows the associated
screen, see
For information about hiding the Configuration Panel link from the
system tray menu, see Configure the User Interface on page 94.
Configure Access Control on page 92.
Main Menu
The main menu lets you make the following selections:
• Confi
• T
• ?. Let
guration. Lets you import and export a VPN configuration, select the location of the
VPN configuration (locally stored on the computer or on a USB drive), access the
Configuration Wizard, and quit the VPN Client.
ools. Lets you access the Connection Panel, access the Console screen, reset the IKE
settings, and access the Option screen to configure miscellaneous preferences such as
the way the VPN Client starts and the language of the VPN Client.
s you access online help, check for software updates, connect to the NETGEAR
website to purchase a license online, access the Activation Wizard, and access the About
screen.
Note: Some selections that are available from the Configuration menu are
also available by right-clicking a component of the tree list pane in
the Configuration Panel screen.
Overview of the User Interface
25
Page 26
NETGEAR ProSAFE VPN Client
Statu s Bar
The status bar at the bottom displays the following information:
• The ra
ready; gray indicates not ready.)
• The
VPN Client Ready, or Apply VPN configuration).
• The p
configuration.
dio button indicates whether the VPN Client is ready for use. (Green indicates
text to the right of the radio button provides the status of the VPN Client (for example,
rogress bar at the very right displays the progress when you apply or save the
About Screen
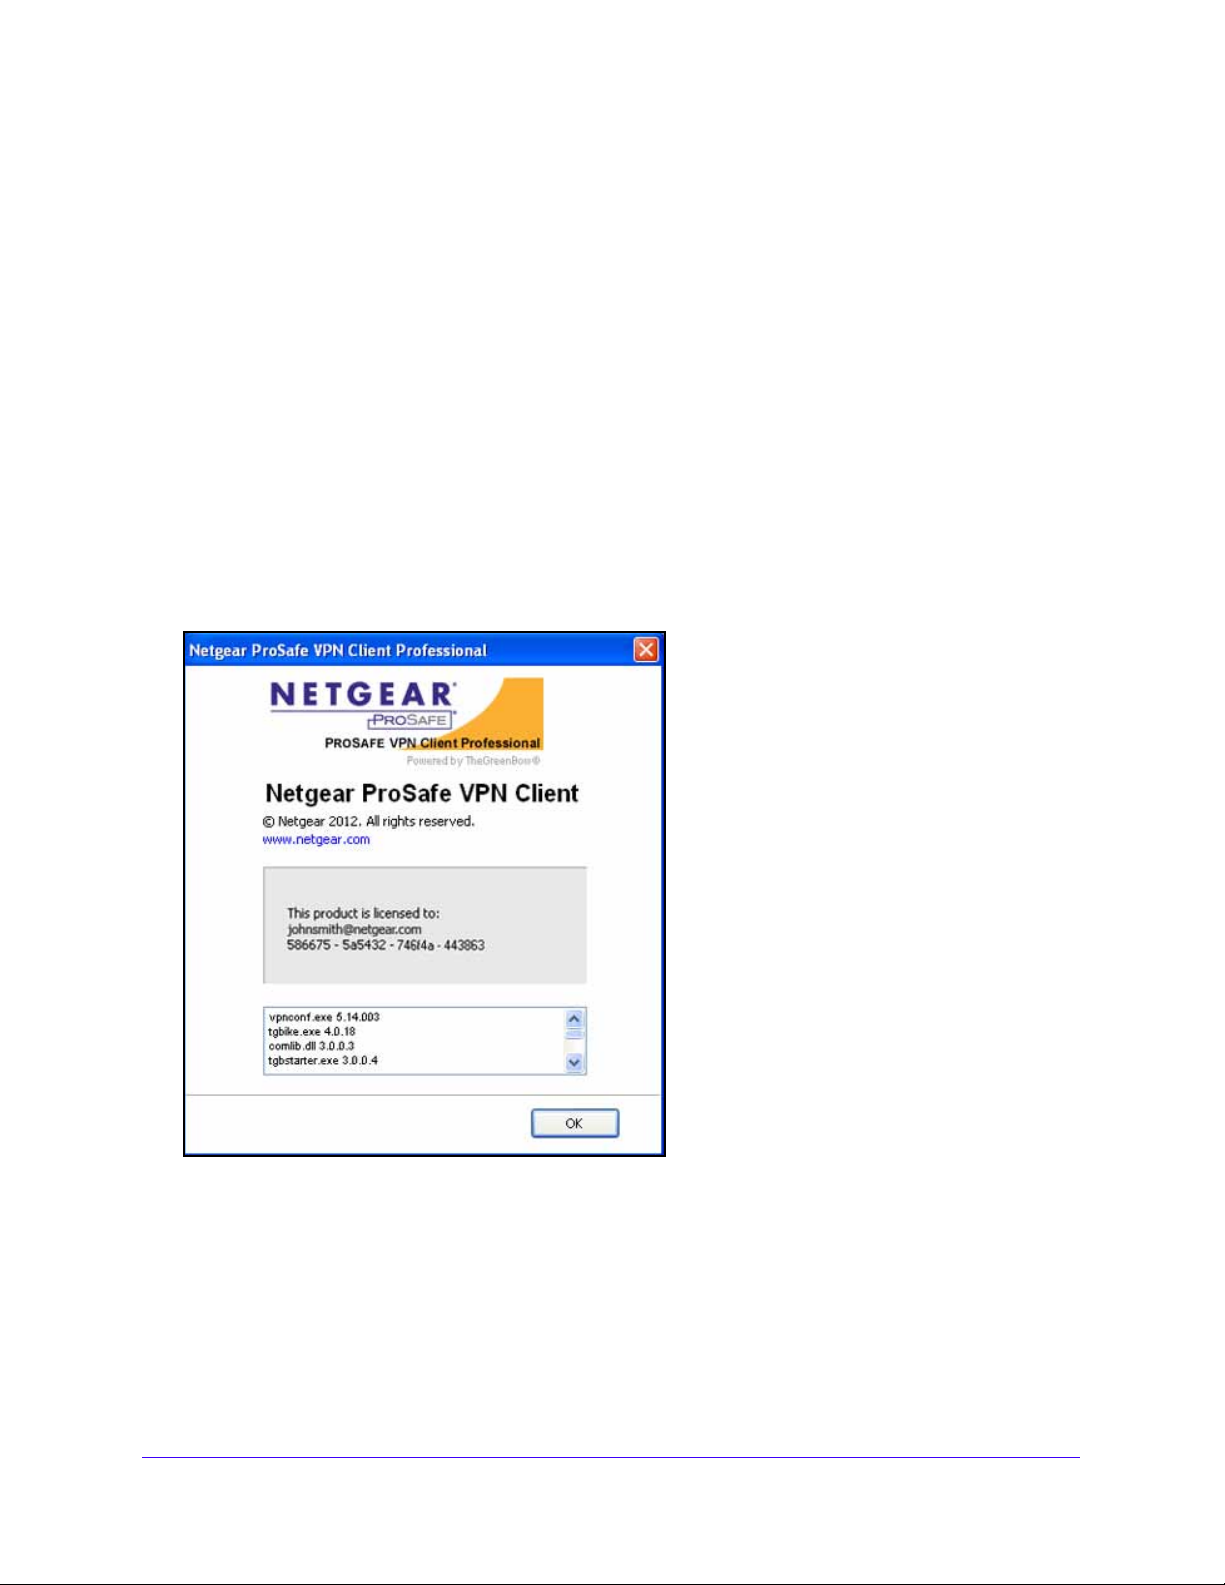
The About screen that you can access by clicking the question mark (?) on the main menu
provides the VPN Client software release number and sof tware activation information. There
is also a URL to the NETGEAR website.
Figure 4. About screen
Overview of the User Interface
26
Page 27

NETGEAR ProSAFE VPN Client
Options Screen
This screen is available in the VPN Client Professional but not in the VPN Client Lite.
The Options screen, which you access by selecting Tools > Options from the main menu,
has four tabs that provide access to the following panes:
• V
iew pane. From the View pane, you can configure access control to the user interface
(see Configure Access Control on p
interface (see Configure the User Interface on
• General
configure detection of the state of the network interface (see Configure VPN Client
Startup Mode and Network Interface Detection on
• PKI Options
checked, accessed, and read (see Configure PKI Options on p
• L
anguage pane. From the Language pane, you can select the language for the user
interface and modify the default translations (see Configure Languages on p
pane. From the General pane, you can configure the startup mode and
pane. From the PKI Options pane, you can configure how certificates are
age 92) and change the appearance of the user
page 94).
page 95).
age 84).
age 97).
Wizards
There are several wizards available:
• VPN Configurati
from the main menu (for more information, see Use the Configuratio n W izard to Create a
VPN Tunnel Connection on p
• Sof
• USB Mode W
• Certific
tware Activation Wizard. Access this wizard by selecting ? > Activation Wizard
from the main menu (for more information, see Software Activation Wizard on p
main menu (for more information, see USB Mode o
ate Export Wizard. Access this wizard in the following way:
1. On the
2. On the
3. Select Cop
For more information, see View Certificate Details on p
Certificate pane, select View Certificate.
View Certificate screen, click the Details tab.
on Wizard. Access this wizard by selecting Configuration > Wizard
age 36).
izard. Access this wizard by selecting File > Move to USB Drive from the
n page 68).
y to File.
age 79.
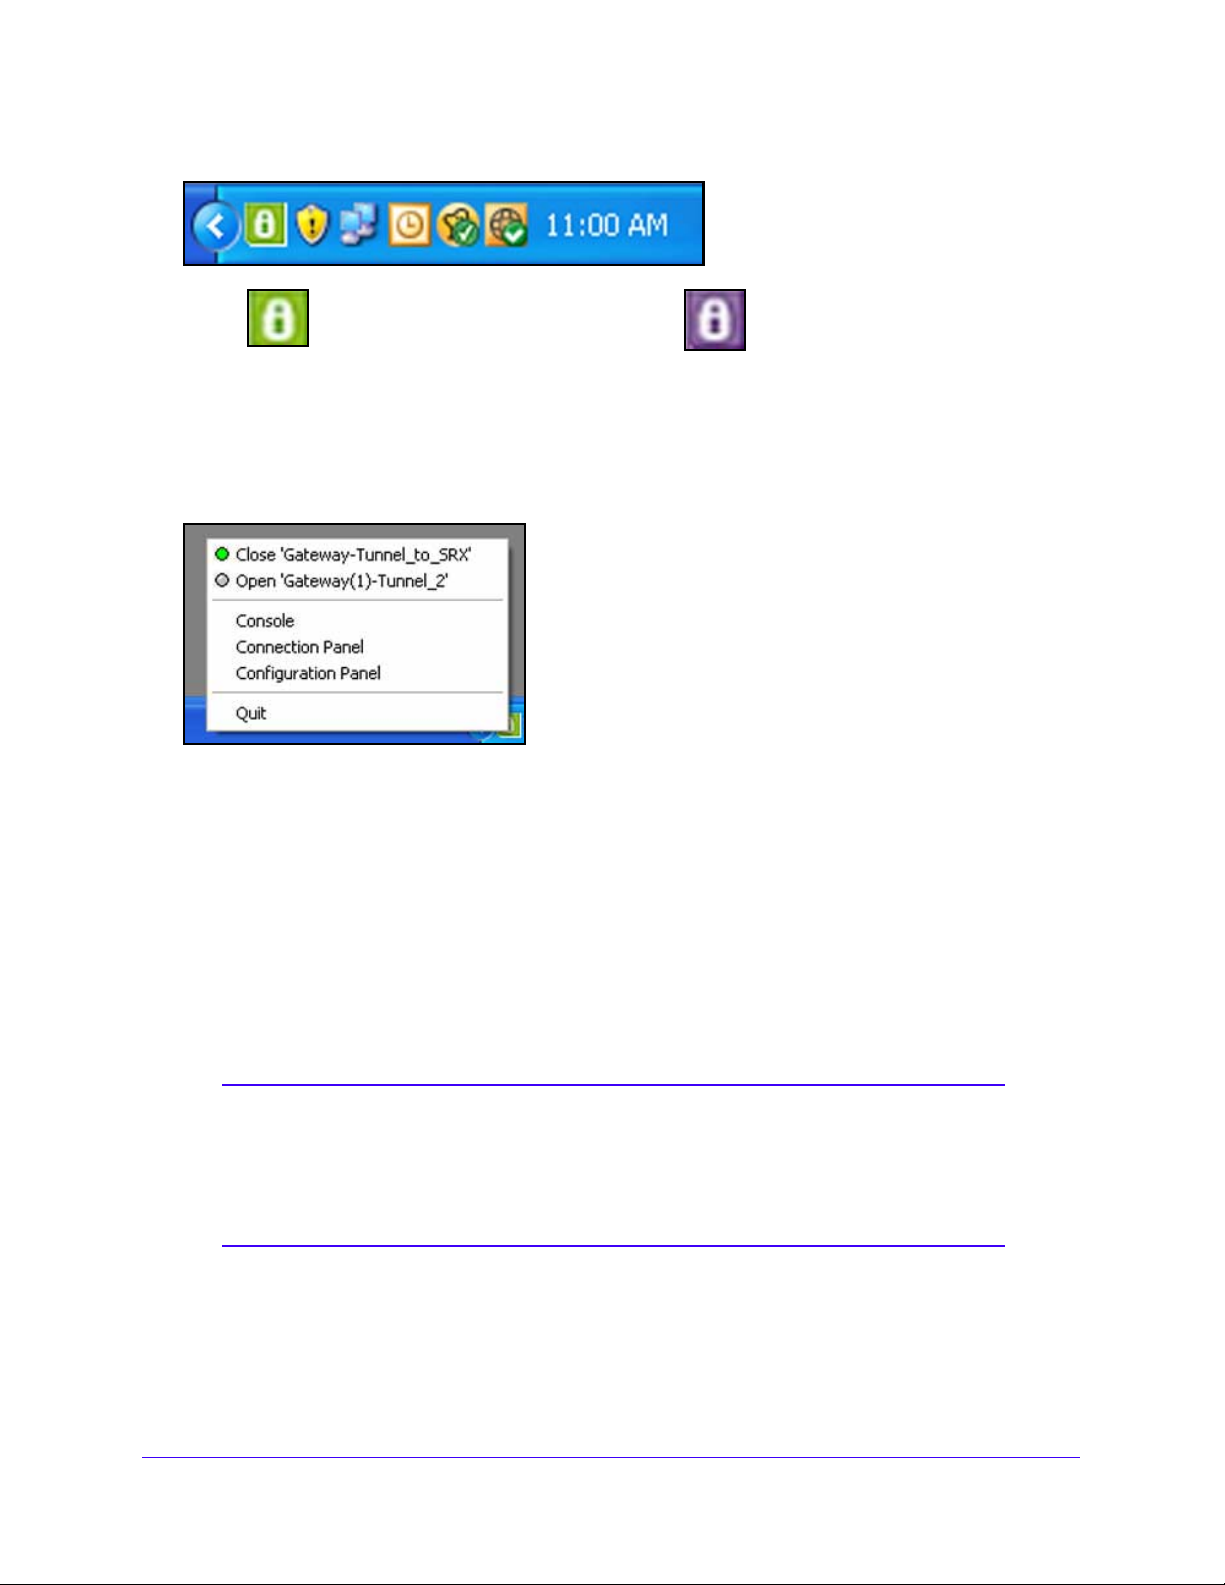
System Tray Icon and System Tray Menu
After you have launched the VPN Client (see Launch the VPN Client on page 14), the VPN
Client displays an icon in the system tray that indicates whether a tunnel is opened, using a
color c
ode.
age 18).
Overview of the User Interface
27
Page 28
NETGEAR ProSAFE VPN Client
Purple icon:
no VPN tunnel opened.
Green icon:
at least one VPN tunnel opened.
Figure 5. VPN Client icon colors in the system tray
To open the system tray menu:
Right-click the purple VPN Client icon in the system tray.
The system tray menu displays:
By default, the system tray menu shows the following links from top to bottom:
• Configured tunne
ls with their status. You can open or close tunnels by selecting Open
'<gateway name-tunnel name>' or Close '<gateway name-tunnel name>'.
• Console.
• Connectio
Clicking the link opens the VPN Console Active screen.
n Panel. Clicking the link opens the Connection Panel screen, which lets you
open and close VPN tunnels and displays information about VPN tunnels.
• Configuration
Panel. Clicking the link opens the Configuration Panel screen, which lets
you create and configure VPN tunnels.
• Qui
t. Clicking the link closes all established VPN tunnels, then closes the VPN Client.
Note: The Quit link for the system tray menu is disabled in the VPN Client
Lite. For the VPN Client Professional, you can remove this link
during the software setup through the menuitem software setup
command (see
Configure Which Items of the System Tray Menu Are
Visible on page 111).
Overview of the User Interface
28
Page 29
NETGEAR ProSAFE VPN Client
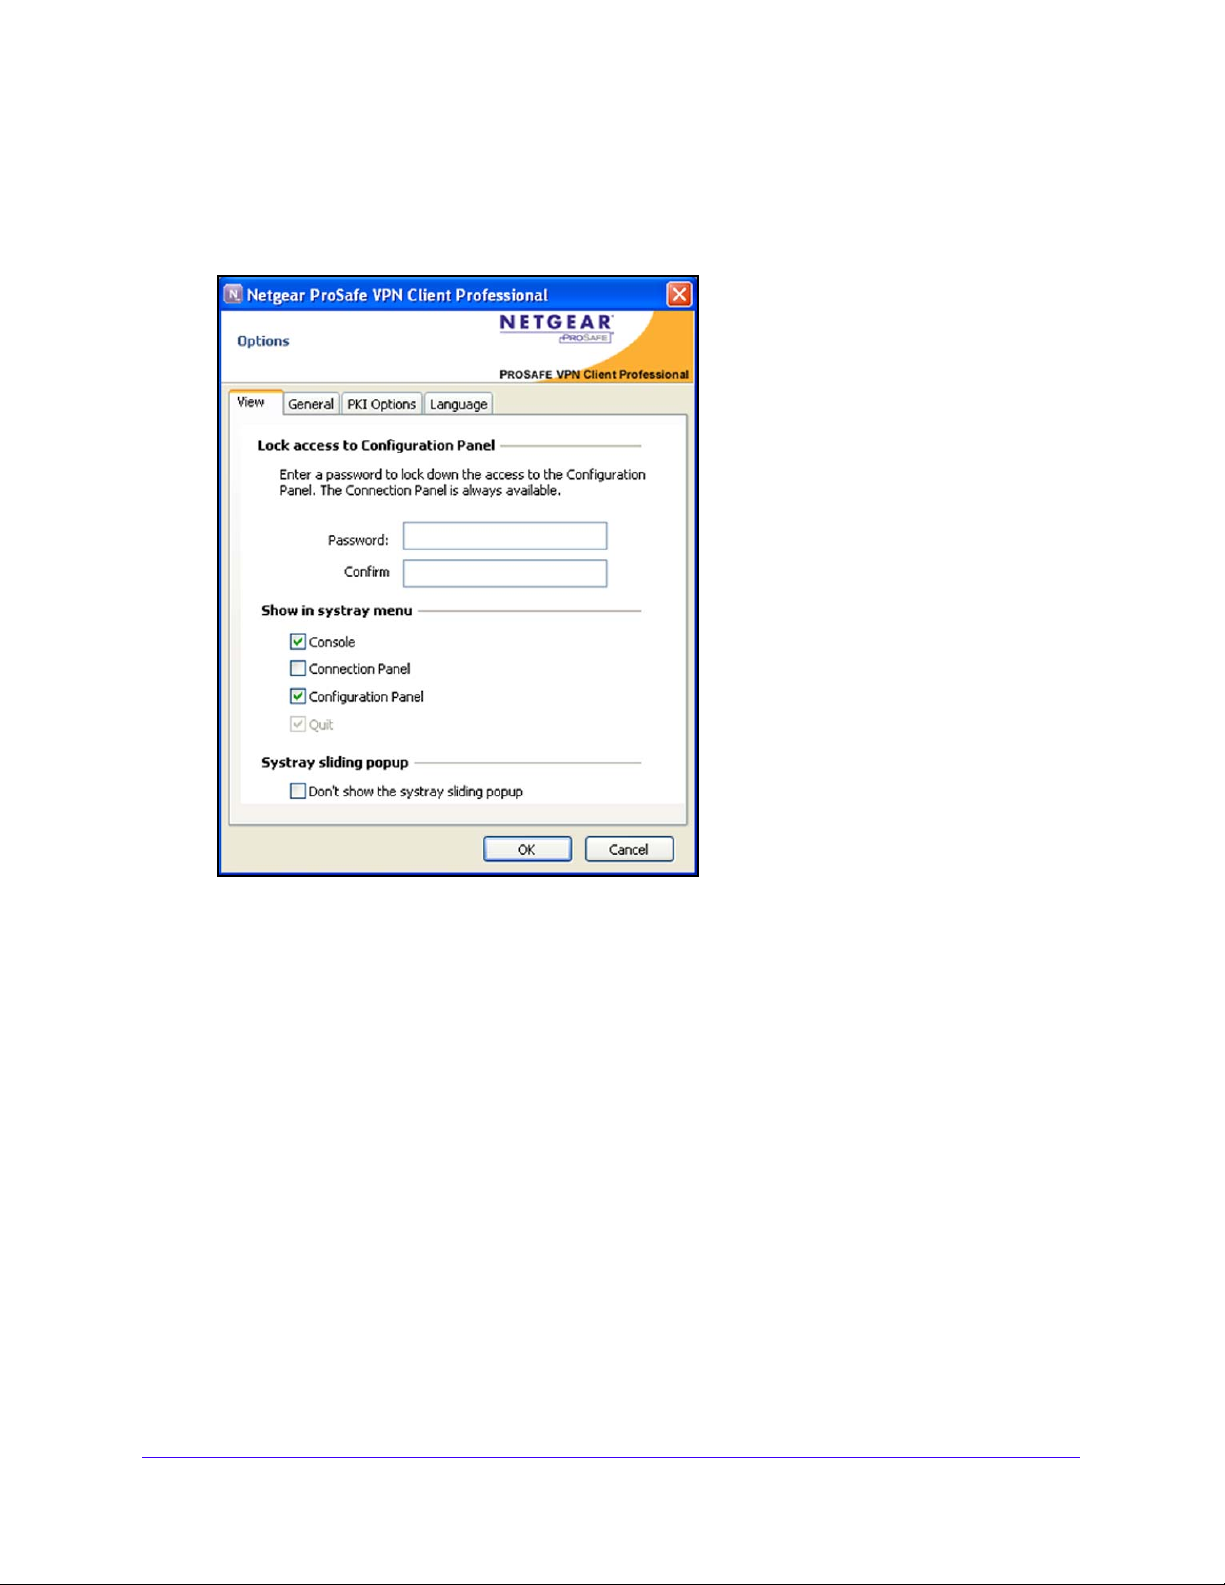
To hide one or more links from the system menu tray:
1. From the main menu, select Tools > Options.
The Options screen displays. The View pane is selected by default.
2. In the Sho
w in systray menu section of the screen, configure which links are hidden in the
system tray menu:
• Cons
• Conn
ole. Clear the check box to hide the Console link from the system menu tray.
ection Panel. Clear the check box to hide the Connection Panel link from the
system menu tray.
• Confi
guration Panel. Clear the check box to hide the Configuration Panel link from
the system menu tray.
Note: The Quit check box is disabled. You cannot disable the Quit link in the
system tray menu fr
om the View pane. For information about disabling the Quit
link in the system tray menu, see Configure Which Items of the System Tray
Menu Are Visible on pag
e 111.
3. Click OK.
Overview of the User Interface
29
Page 30
NETGEAR ProSAFE VPN Client
System Tray Pop-Up Screens
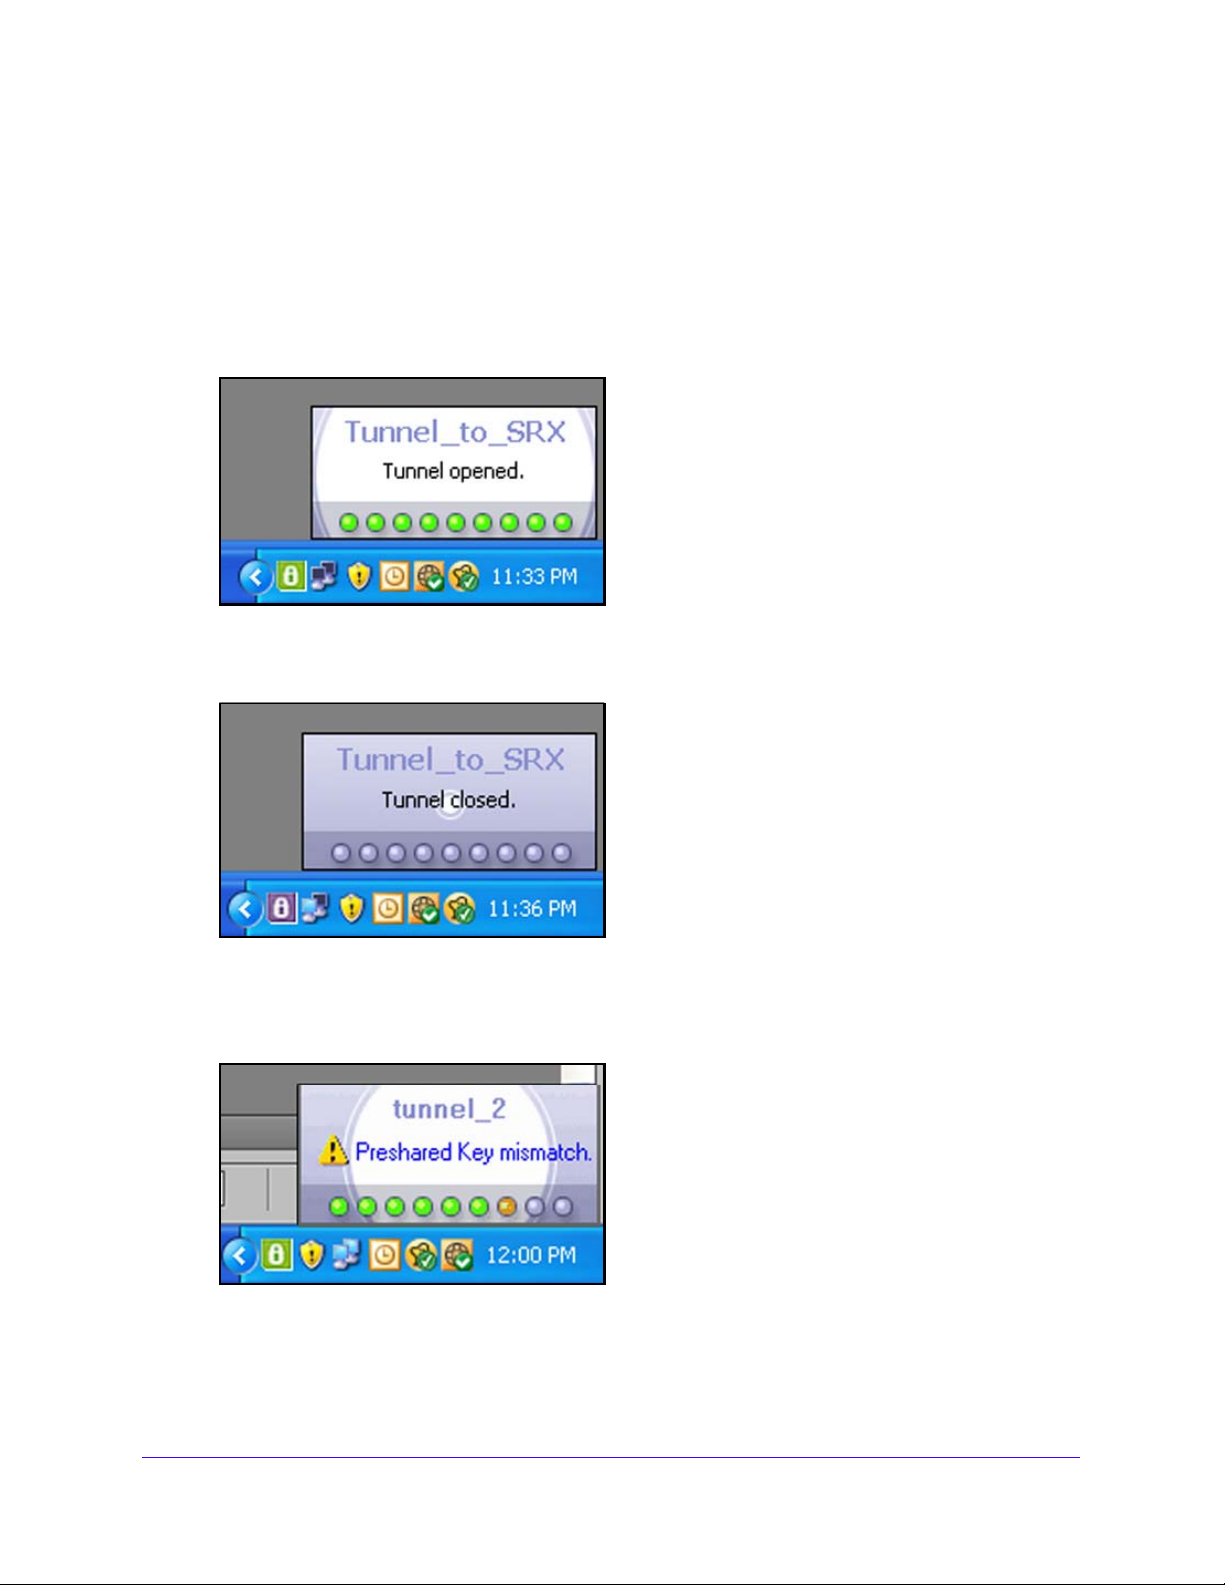
When a VPN tunnel opens or closes, by default, a small pop-up screen comes out from the
system tray icon and shows the following:
• VPN tunnel opening with dif ferent phases. The pop-up screen disappea rs after 6 seconds
unless you move the mouse over the screen.
Figure 6. Tunnel opened pop-up screen
• VPN tunnel closing, followed by tunnel closed.
Figure 7. Tunnel closed pop-up screen
• If the VPN tunnel cannot open, the screen might display an error or warning with a link to
more information.
Figure 8. Pre-shared key mismatched pop-up screen
Overview of the User Interface
30
Page 31
NETGEAR ProSAFE VPN Client
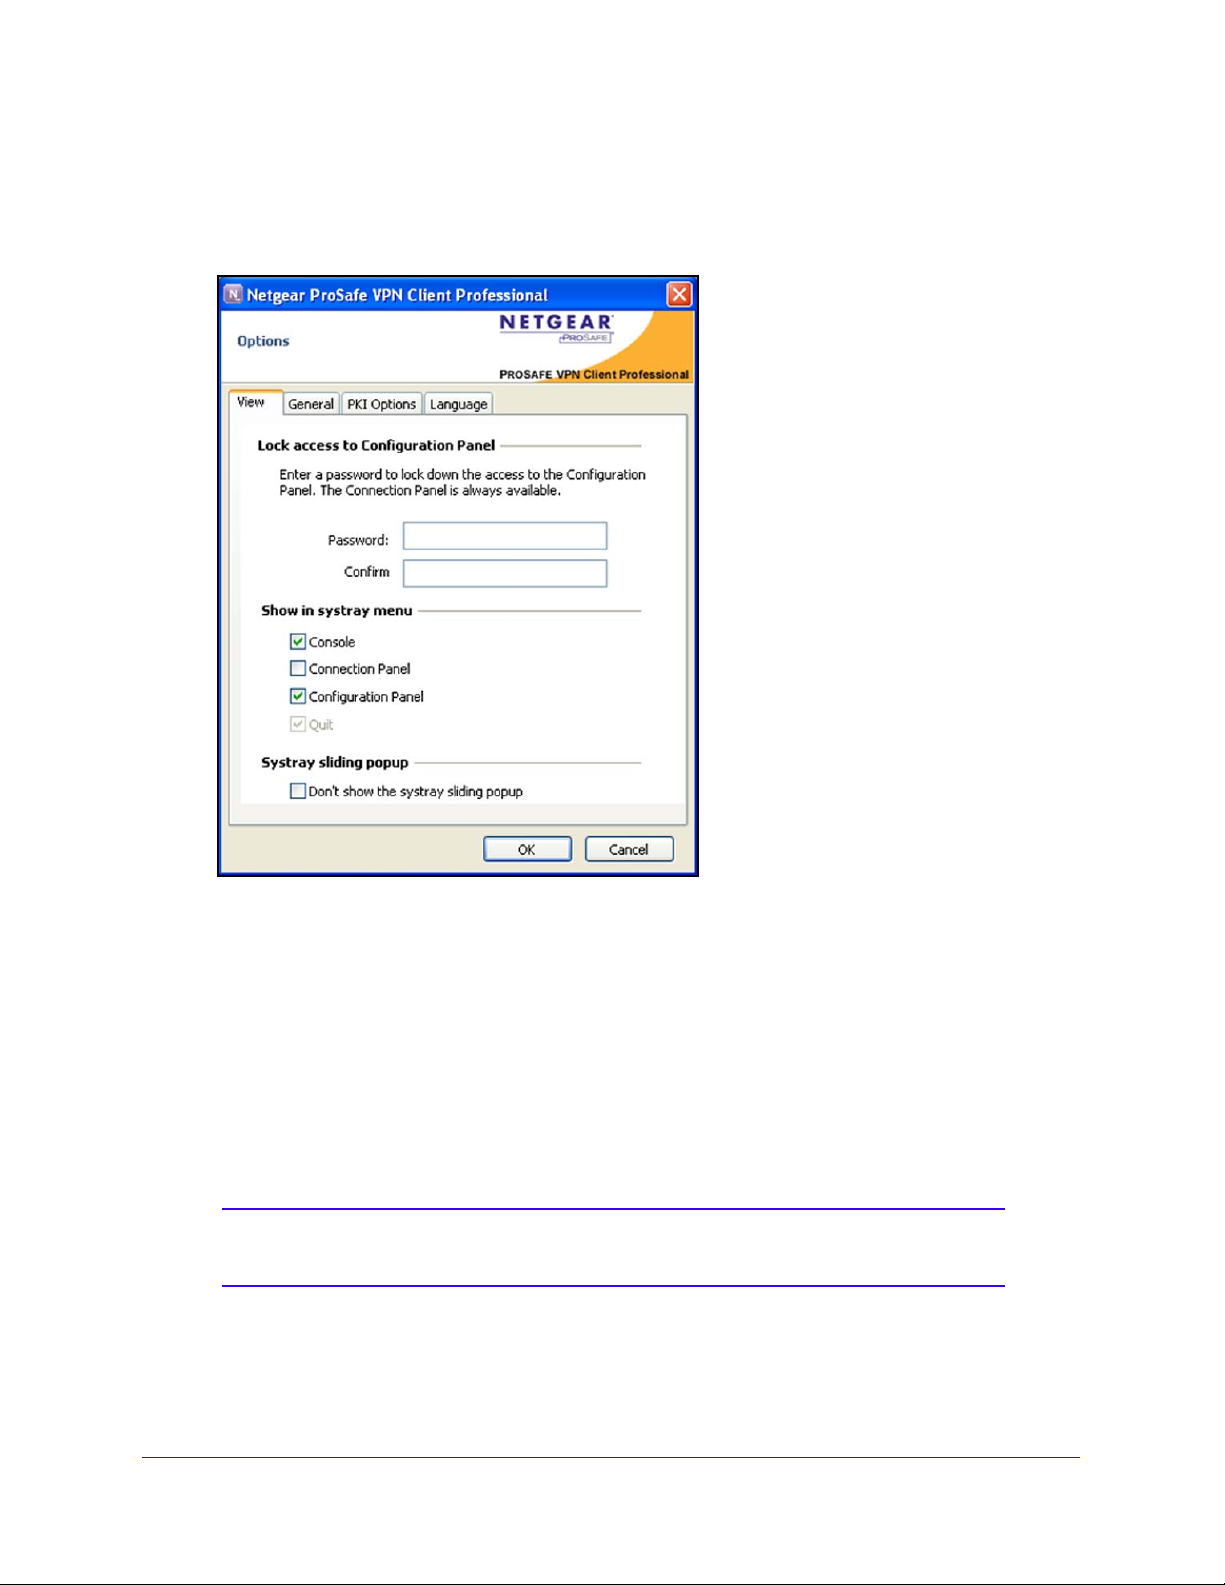
To disable the systray pop-up screens:
1. From the main menu of the Configuration Panel, select Tools > Options.
The Options screen displays. The View pane is selected by default.
2. In the syst
popup check box.
3. Click OK.
ray sliding pop-up section of the pane, select the Don’t show the systray sliding
Connection Panel Screen
The Connection Panel screen enables you to open and close each tunnel that has been
configured. If a network administrator has configured the VPN tunnels, the end user needs
access only to the Connection Panel screen to open and close tunnels.
Note: For information about hiding the Connection Panel link from the
system tray menu, see Configure the User Interface on page 94.
Overview of the User Interface
31
Page 32
NETGEAR ProSAFE VPN Client
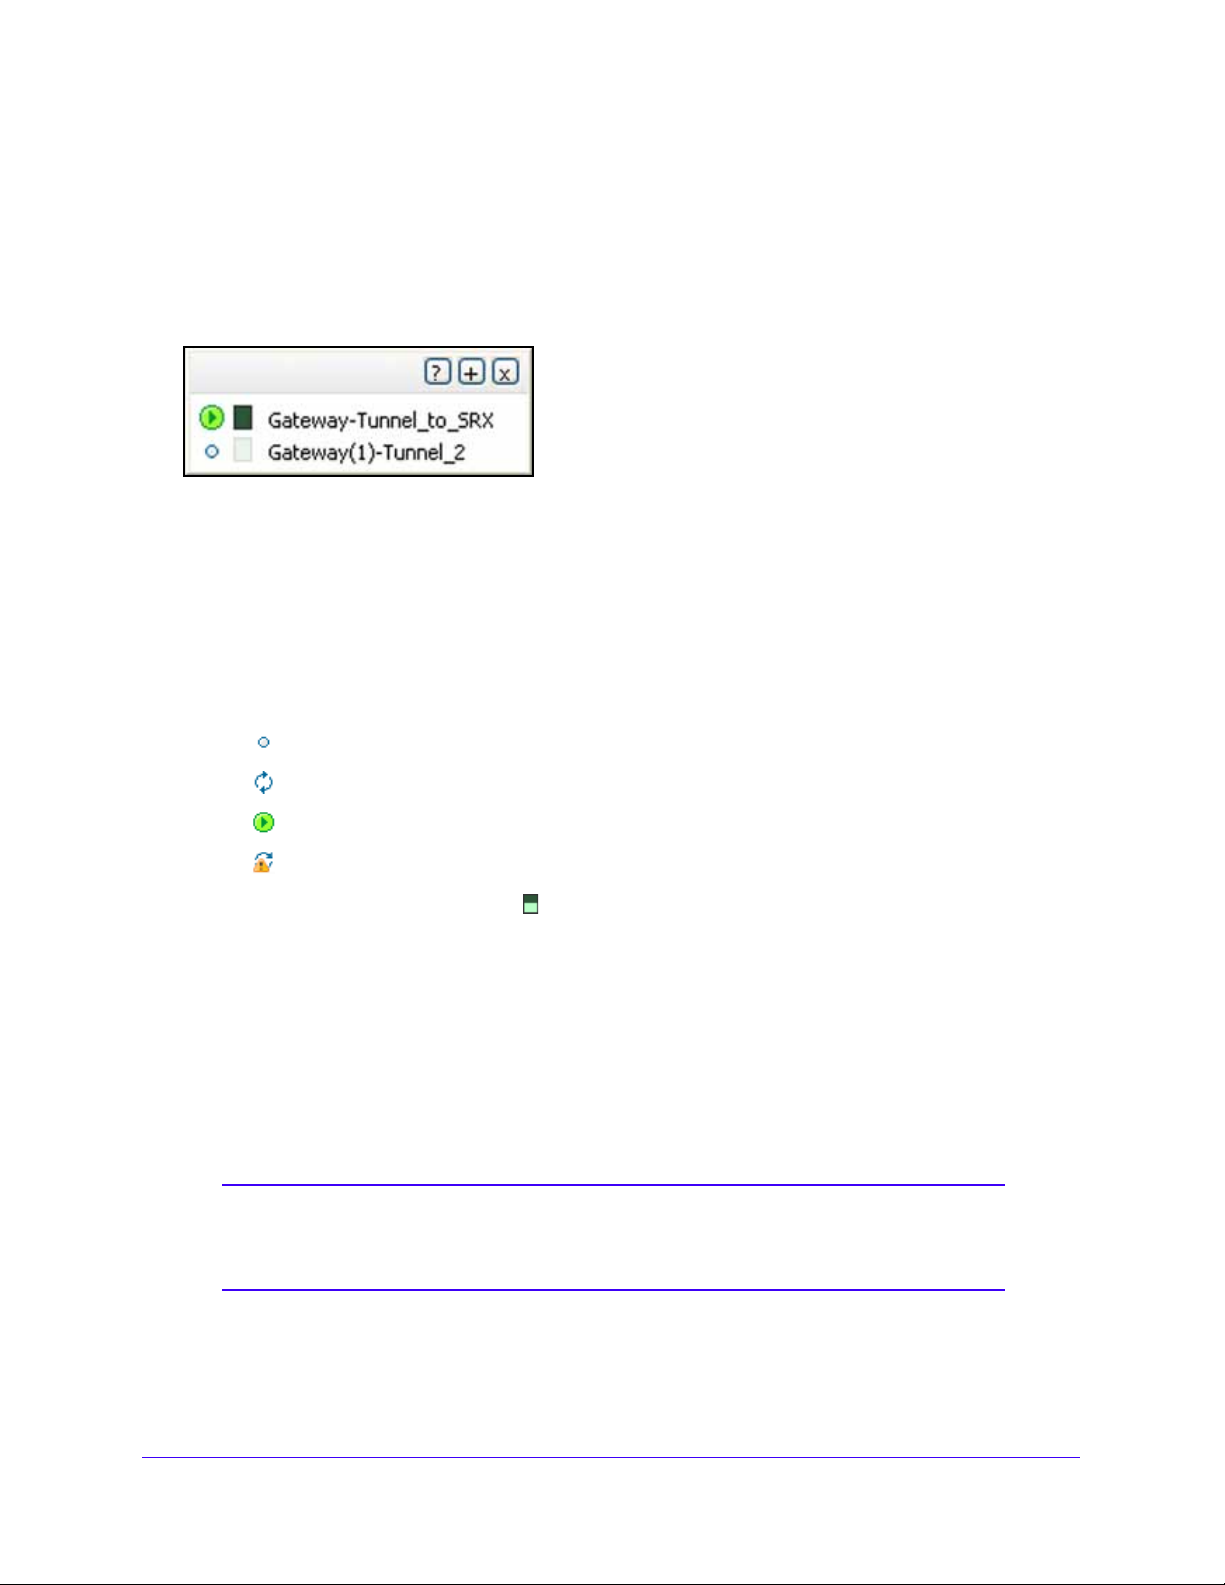
To open the Connection Panel screen:
Use one of the following methods:
• Select T
ools > Connection Panel from the main menu on the Configuration Panel
screen.
• Right-click
the system tray icon and select Connection Panel.
The Connection Panel screen enables you to open, close, and receive information about
eve
ry tunnel that has been configured. If a network administrator has configured the VPN
tunnels, the end user needs access to the Connection Panel screen only to open and close
tunnels.
The Connection Panel screen consists of the following components:
• For ea
- An icon th
ch tunnel, the following components:
at shows the status of the tunnel:
The tunnel is closed.
The tunnel is being opened.
The tunnel is open.
An incident occurred during the opening or closure of the tunnel.
- A rect
angular traffic gauge ( ) that shows the traffic volume passing through the
tunnel.
- The
connection name (tunnel name) in the format authentication phase name–IPSec
configuration name.
• Three
icons in the upper right corner:
- ?. Opens the Abo
- +. Opens the Conf
- x. Clo
ses the Connection Panel screen.
ut screen.
iguration Panel screen.
Note: You can switch back and forth between the Connection Panel
screen and the Configuration Panel screen by using the Ctrl + Enter
shortcut.
Overview of the User Interface
32
Page 33
NETGEAR ProSAFE VPN Client
VPN Console Active Screen
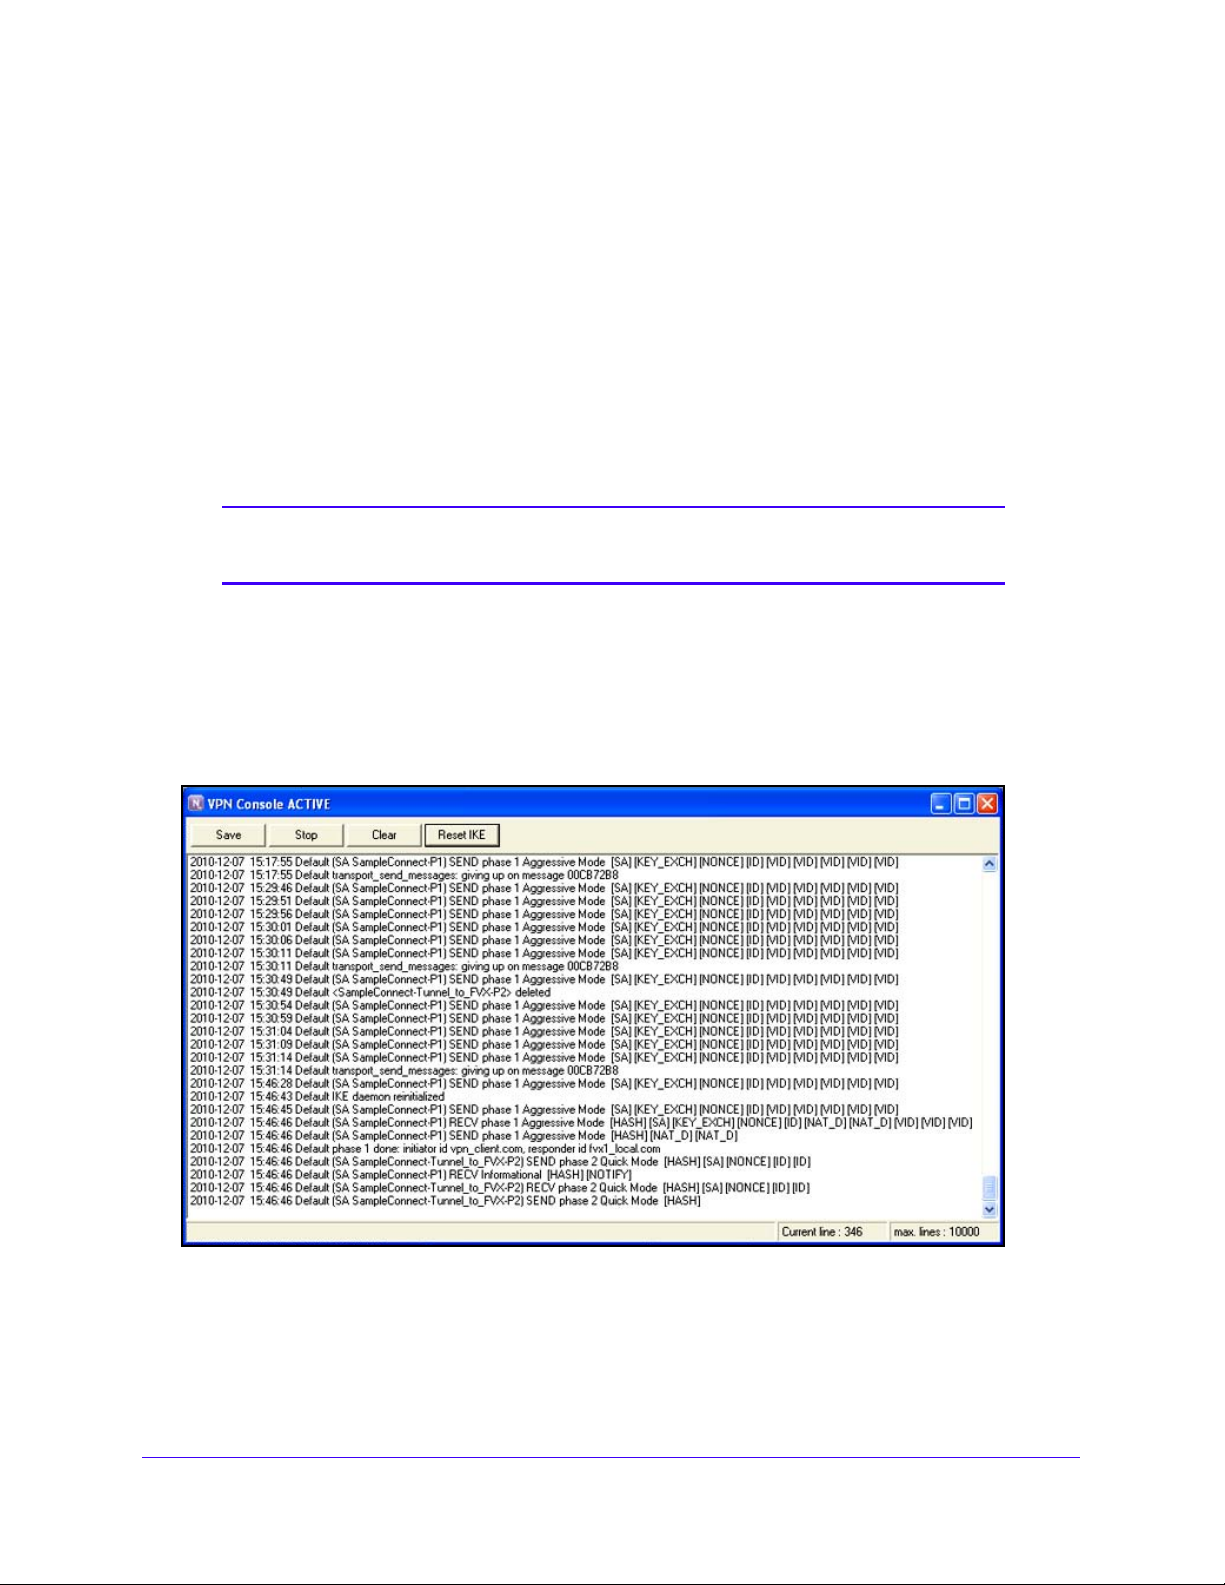
The VPN Console Active screen allows you to analyze how VPN tunnels are set up or fail to
be set up, which can be useful if you are a network administrator and need to configure a
secure network. The messages on the VPN Console Active screen are mostly IKE
messages.
Y ou can also enable debugging mode, which is also
become large rather quickly.
The VPN Console Active screen and trace mo
diagnose tunnel problems and software’s incidents.
Note: For information about hiding the Console link from the system tray
menu, see Configure the User Interface on page 94.
To display the VPN Console Active screen:
Use one of the following methods:
n system tray menu, click the Console link.
• I
• F
rom the main menu of the Console Panel screen, select Tools > Console.
referred to as trace mode. The trace logs
de can help you or NETGEAR support to
The buttons on the VPN Console Active screen have the following functions:
• Save. Saves th
• St
art or Stop. Start s or stops the collection of logs. Only one of these buttons is d isplayed
onscreen at a time.
e current logs in a file without overwriting previous logs.
Overview of the User Interface
33
Page 34

NETGEAR ProSAFE VPN Client
• Clear. Removes the content from the screen.
• Reset IKE. Rest
To enable debugging mode:
arts the IKE process.
1. Go
to the Console Panel screen.
2. On your keyboard, press Ctrl + Alt + T.
The status bar displays the message T
race Mode is ON (Ctrl+Alt+T).
Keyboard Shortcuts
The user interface supports the following keyboard shortcuts.
Table 3. Keyboard shortcuts
Shortcut Action
General shortcuts
Ctrl + Enter Lets you switch back and forth between the Confi
If the Configuration Panel is protected with a password, you are asked for this password
when you switch to the Configuration Panel.
Ctrl + D Opens the VPN Console for network debugging.
Ctrl + Alt + T Activates the trace mode for the generation of logs.
Ctrl + Alt + R Resets the IKE settings.
Shortcuts for the tree list pane of the Configuration Panel screen (see Figure 3 on p
guration Panel and the Connection Panel.
age 24)
F2 Lets you edit the name of a selected phase.
Del Lets you delete the selected phase or the entire VPN configuration.
To delete the entire VPN configuration, first select the VPN configuration.
Ctrl + O Opens the VPN tunnel of the selected phase 2.
Ctrl + W Closes the VPN tunnel of the selected phase 2.
Ctrl + C Copies the selected phase.
Ctrl + V Pastes the selected phase.
Ctrl + N Creates a new phase:
• To create a phase 1, first select the VPN configura tion.
• To create a phase 2, first select the ph ase 1.
Ctrl + S Saves and applies a VPN configuration.
Overview of the User Interface
34
Page 35

4. Create VPN Tunnel Connections
This chapter describes how to create VPN tunnels. The chapter includes the following sections:
• Use the Configuration Wizard to Create a VPN Tunnel Connection
• Open and Close VPN Tunnels with the User Interface
4
• High-Level Steps to Manually Cr
• Manually Configure Authentication or Phase 1
• Manually Configure IP Security or Phase 2
• High-Level Steps to Specify a Certificate for User Authentication
• Configure the Global VPN Parameters
eate a VPN Tunnel Connection
35
Page 36
NETGEAR ProSAFE VPN Client
203.0.113.101
gateway.mydomain.com
192.168.1.2
192.168.1.100
192.168.1.4
192.168.1.3
Use the Configuration Wizard to Create a VPN Tunnel
Connection
The VPN Client provides a Configuration Wizard that lets you create a VPN configuration in
three easy steps. This Configuration Wizard is designed for remote computers that need to
be connected to a corporate LAN through a VPN gateway and for peer-to-peer connections.
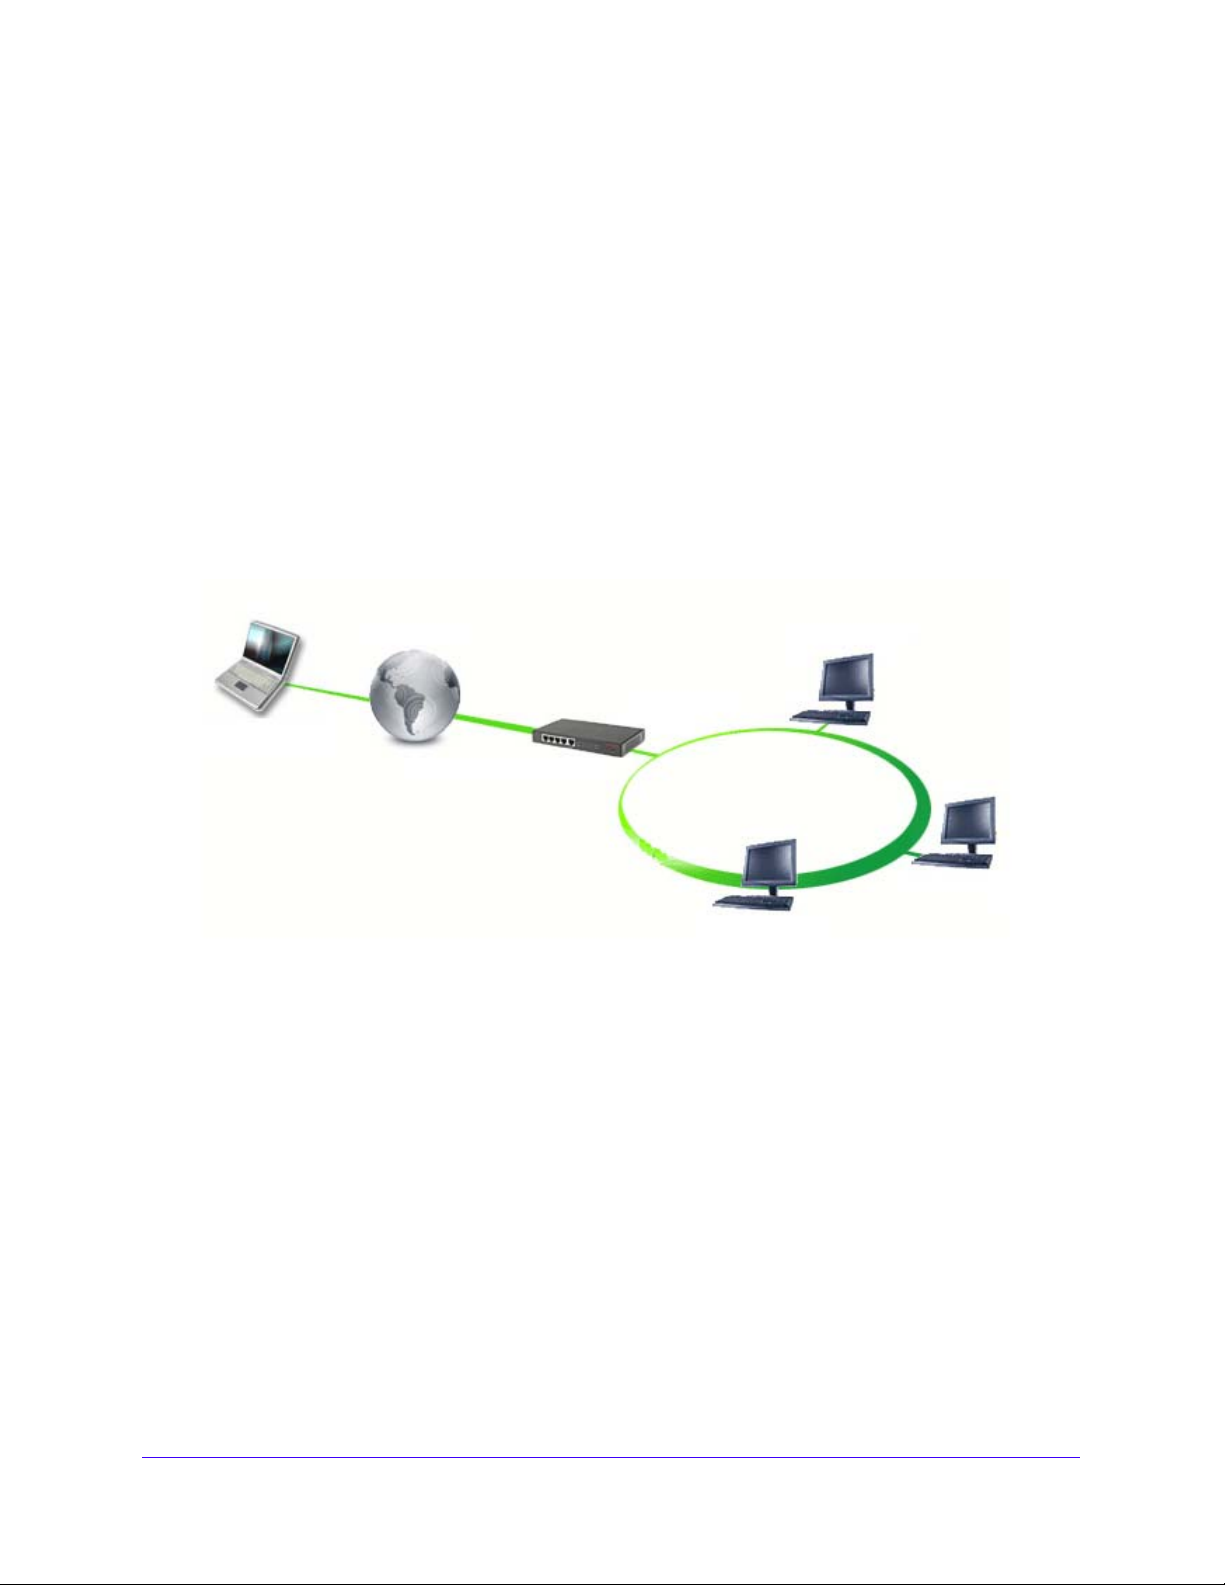
The configuration in the fo
• The re
• The re
mote computer has a dynamically provided public IP address.
mote computer connects to the corporate LAN behind a VPN gateway that has a
llowing figure has the following characteristics:
DNS address with the name gateway.mydomain.com.
• The corpora
te LAN address is 192.168.1.xxx, that is, the remote computer must reach a
server with the IP address 192.168.1.100.
Figure 9. VPN connection from a remote computer to a corporate LAN
Create VPN T unnel Connections
36
Page 37
NETGEAR ProSAFE VPN Client
To create a VPN tunnel connection between the remote computer and the corporate
LAN:
1. From the main menu on the Configuration Panel screen, select Configuration >
Wizard.
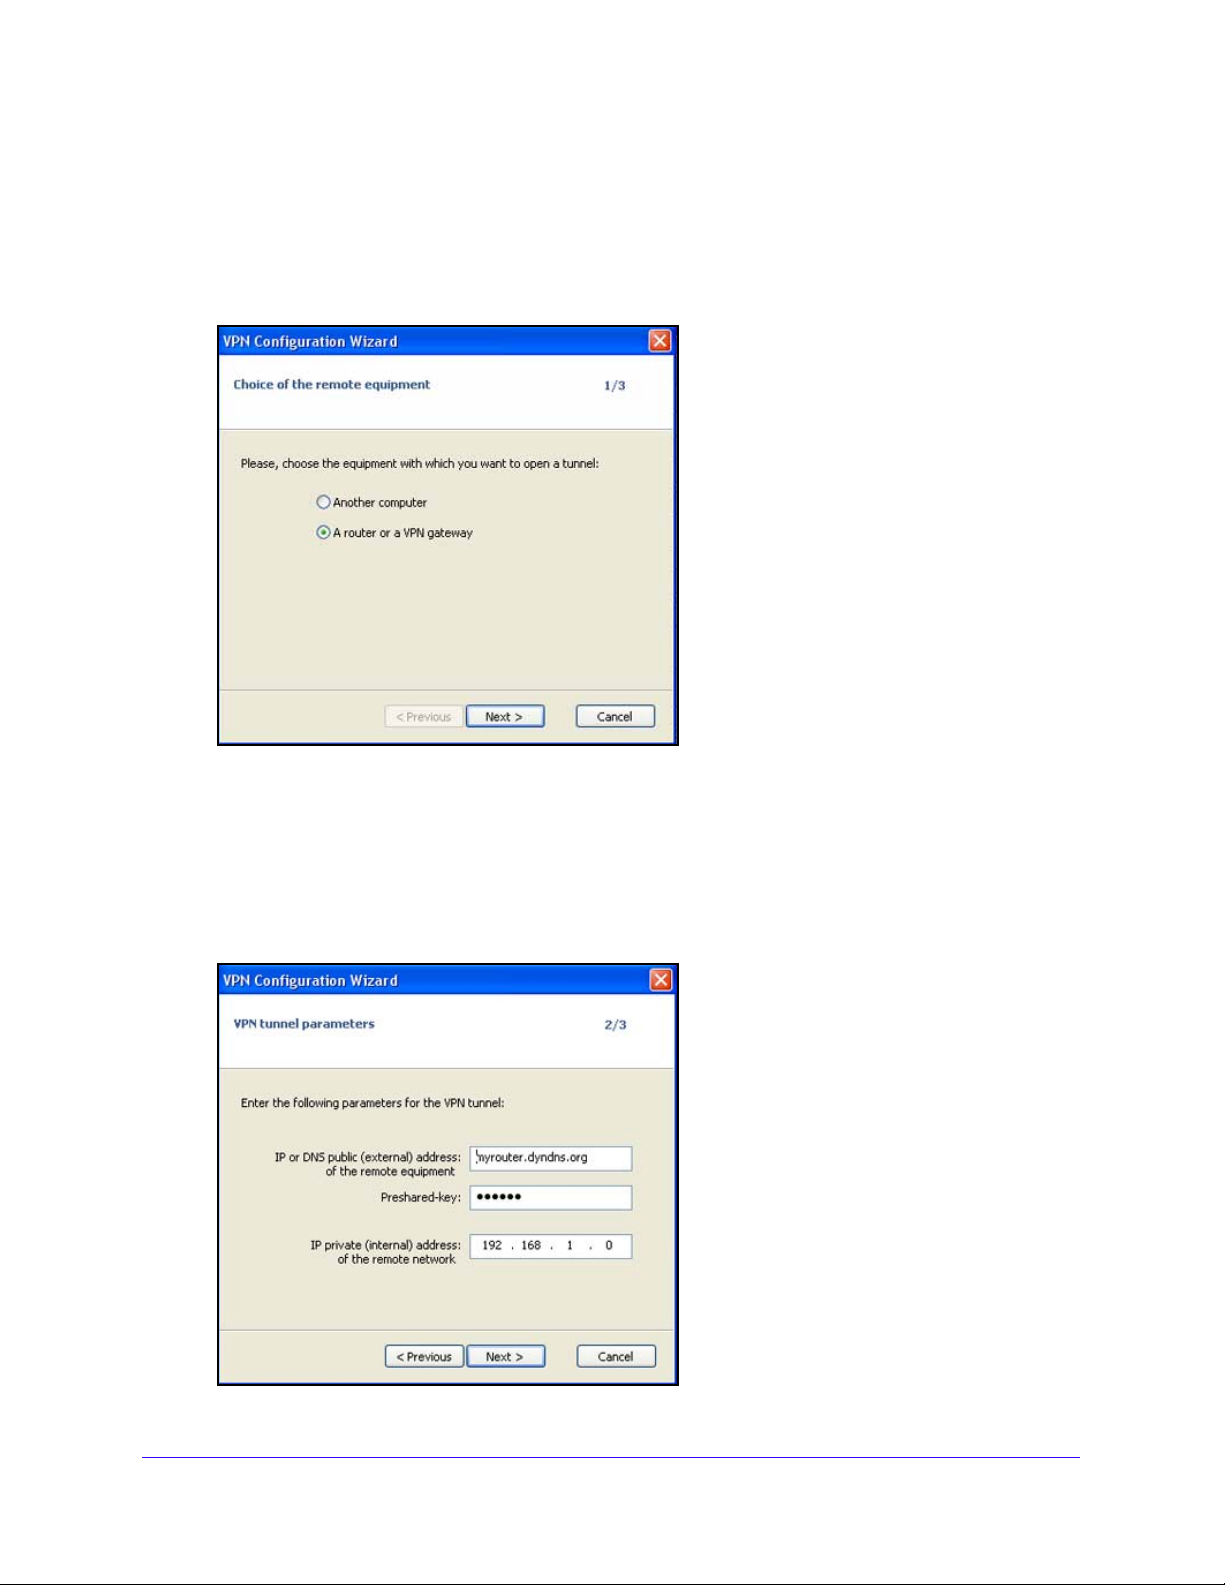
The VPN Client Configuration Wizard Step 1/3 screen displays:
2. Select th
The options are Anothe
e equipment to connect to.
r computer and A router or a VPN gateway.
In this configuration, select the A router or a VPN gate
3. Click Next.
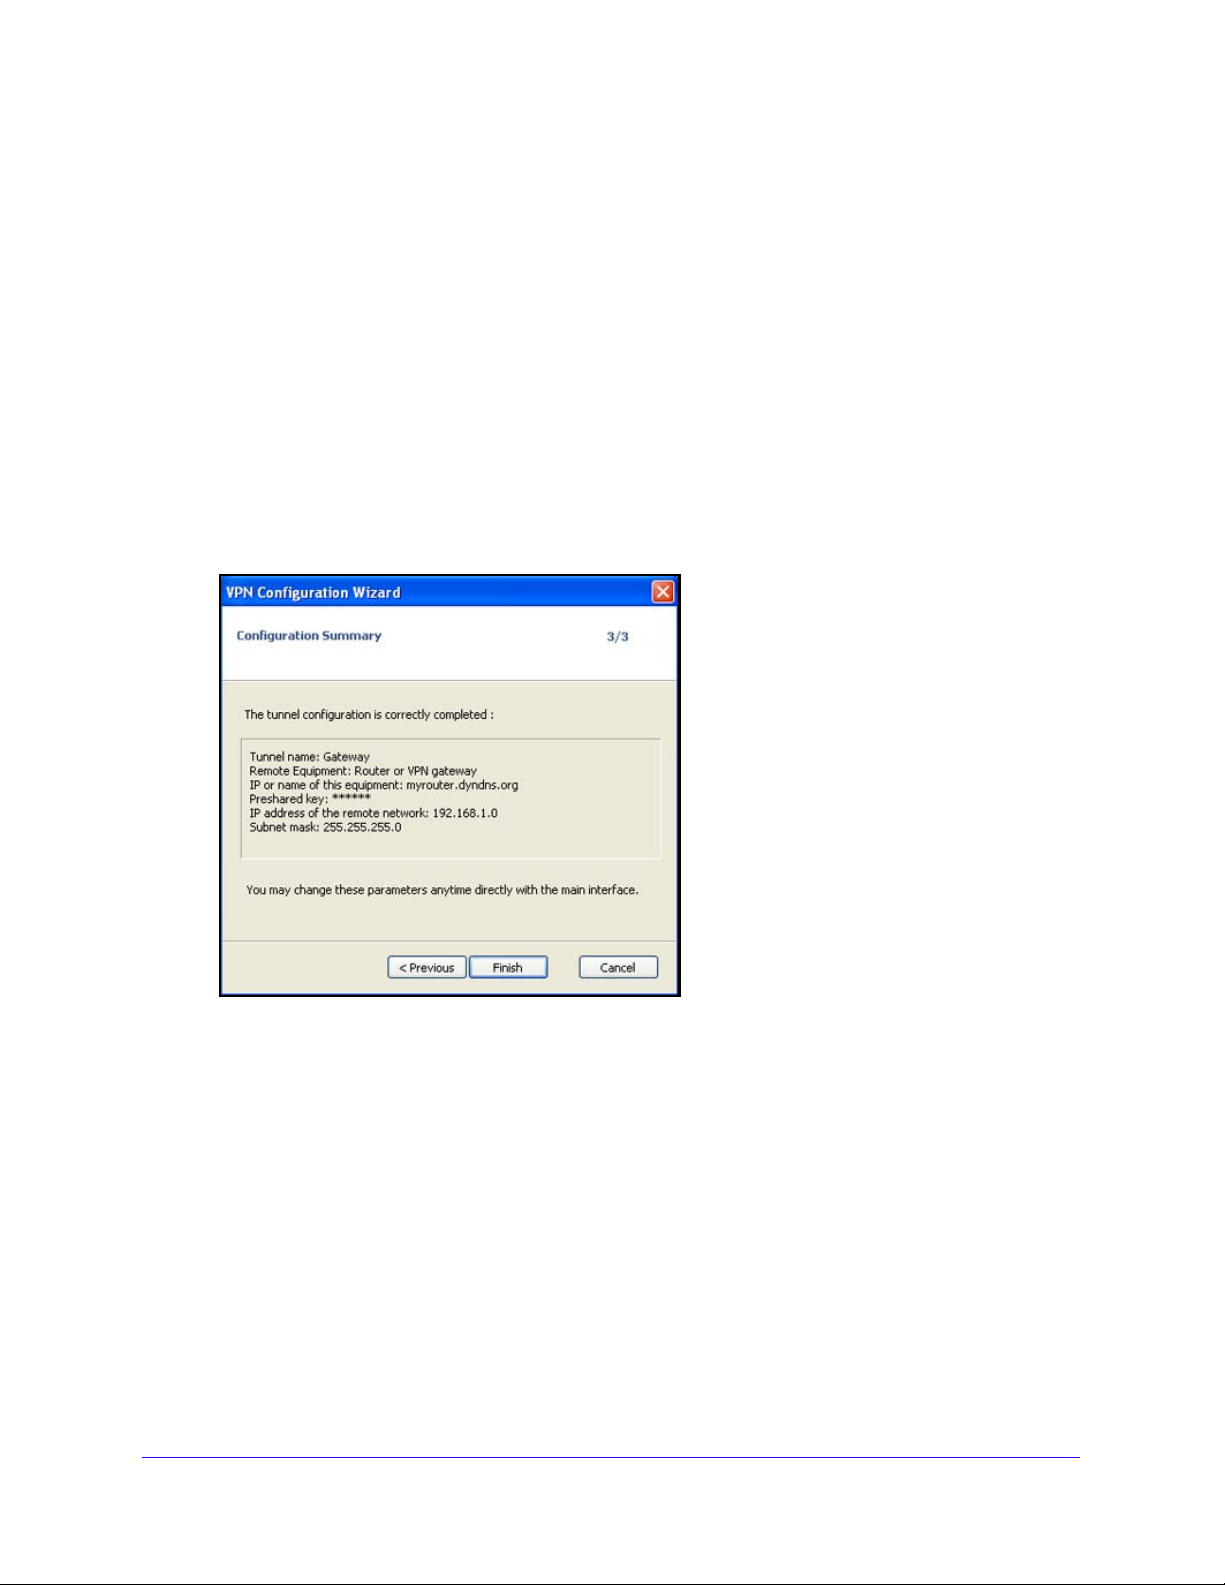
The VPN Client Configuration Wizard Step 2/3 screen displays:
way radio button.
Create VPN T unnel Connections
37
Page 38
NETGEAR ProSAFE VPN Client
4. Specify the following VPN tunnel parameters:
• IP or DNS p
ublic (external) address of the remote equipment. The public (WAN)
IP address of the remote gateway.
In this example, enter ga
myrouter.dyndns.org.)
• Pre
shared key. The pre-shared key that must also be defined on the remote
gateway.
• IP private
(internal) address of the remote network. The IP address of the remote
network.
In this example, enter 1
92.168.1.0.
5. Click Next.
The VPN Client Configuration Wizard
teway.mydomain.com. (By default, the screen displays
Step 3/3 screen displays:
This screen is a summary screen of the new VPN configuration. If necessary, you can
cify other settings such as certificates and virtual IP addresses on the Configuration
spe
Panel screen.
6. Click Fi
To open the newly created tunnel:
1. From the ma
nish.
in menu on the Configuration Panel screen, select Tools > Connection
Panel.
2. Double-click the newly created
tunnel (Gateway-Tunnel).
Create VPN T unnel Connections
38
Page 39

NETGEAR ProSAFE VPN Client
Open and Close VPN Tunnels with the User Interface
You can open a tunnel only after the VPN configuration has been specified. The following
table provides an overview of the methods that are available to open and close VPN tunnels
with the user interface.
For information about how to open tunnels automatically, see Configure How VPN Tunnels
Are Opened on
For information about how to open tunnels using CLI commands, see Customize the VPN
Client Using CLI Commands on p
Table 4. Methods to open and close VPN tunnels from the user interface
page 59.
age 123.
User Interface
Components
Configuration Panel screen
Connection Panel screen Double-click the tunnel (anywhere, the
System tray icon
The Configuration Panel screen and Connection Pan
Methods to Open a Tunnel Methods to Close an Open Tunnel
1. Click the IPSec configuration name
efault, Tunnel).
(by d
2. Press Ctr
1. Right-click the IPSec configuration
name (by defaul
2. Select Op
icon, gauge, or name)
1. Right-click the tunnel.
2. Click Open tunnel.
1. Click the tunnel.
2. Press Ctrl + O.
1. Right-click the system tray icon.
2. Click the IPSec configuration name
(by d
l + O.
t, Tunnel).
en tunnel.
efault, Tunnel).
el screen show an icon to the left of the
VPN tunnel that indicates the status of the tunnel:
1. Click the IPSec configuration name
y default, Tunnel).
(b
2. Press Ctrl + W.
1. Right-click the IPSec configuration
name (by defaul
2. Select Cl
Double-click the tunnel (anywhere, the
icon, gauge, or name).
1. Right-click the tunnel.
2. Click Close tunnel.
1. Click the tunnel.
2. Press Ctrl + W.
1. Right-click the system tray icon.
2. Click the IPSec configuration name
y default, Tunnel).
(b
t, Tunnel).
ose tunnel.
The tunnel is closed.
The tunnel is configured to open automatically when traffic is detected.
The tunnel is being opened.
The tunnel is open.
An incident occurred during the open
Create VPN T unnel Connections
ing or closure of the tunnel.
39
Page 40
NETGEAR ProSAFE VPN Client
High-Level Steps to Manually Create a VPN Tunnel Connection
Using the Configuration Wizard is the easiest way to create a VPN tunnel, but the
configuration and security options are limited. A manual configuration gives you all the
options to customize a VPN tunnel to your specific needs and network.
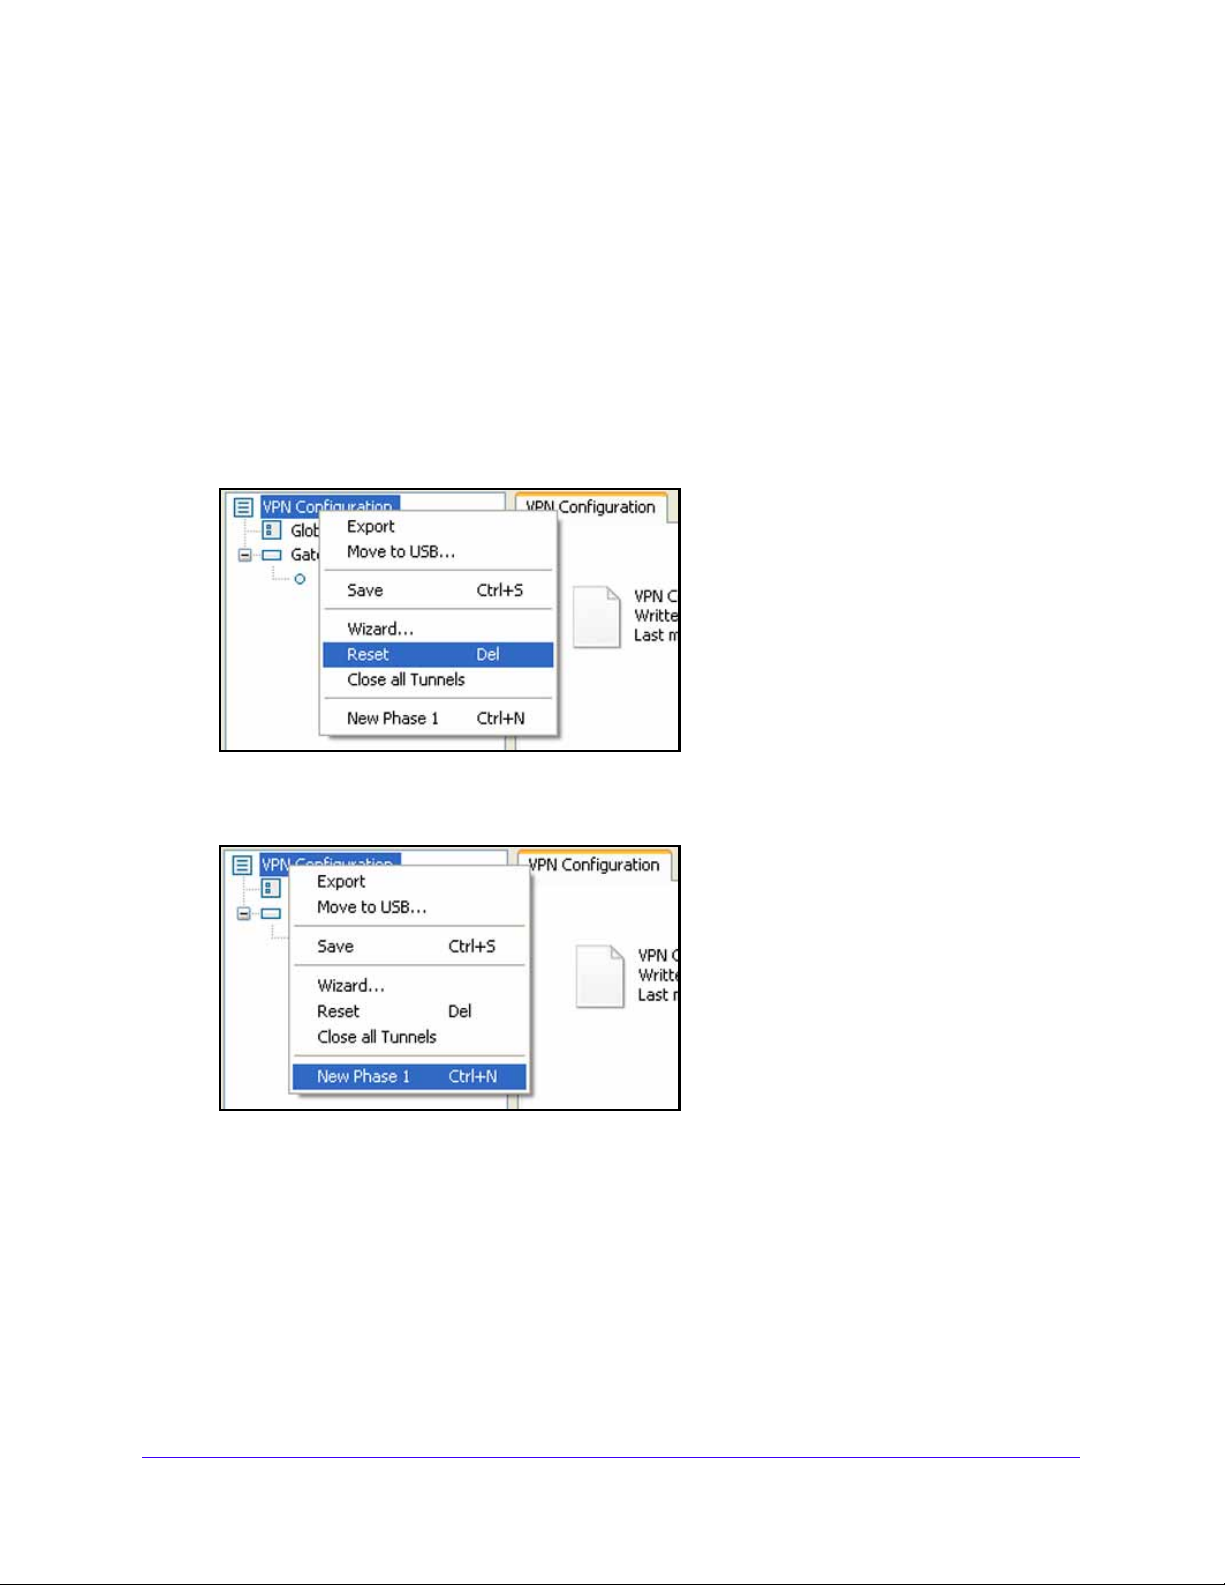
To manually create a VPN tunnel from the Configuration Panel screen:
1. I
n t he tree list pane of the Configuration Panel screen, right-click VPN Configuration.
2. Select Res
et.
1. I
n t he tree list pane of the Configuration Panel screen, right-click VPN Configuration.
2. Select New Ph
The Authentication pane displays in the right column of the Configuration Panel screen.
3. Configu
computer.
For more information, see Manually Configure Authentication or Phase 1 on p
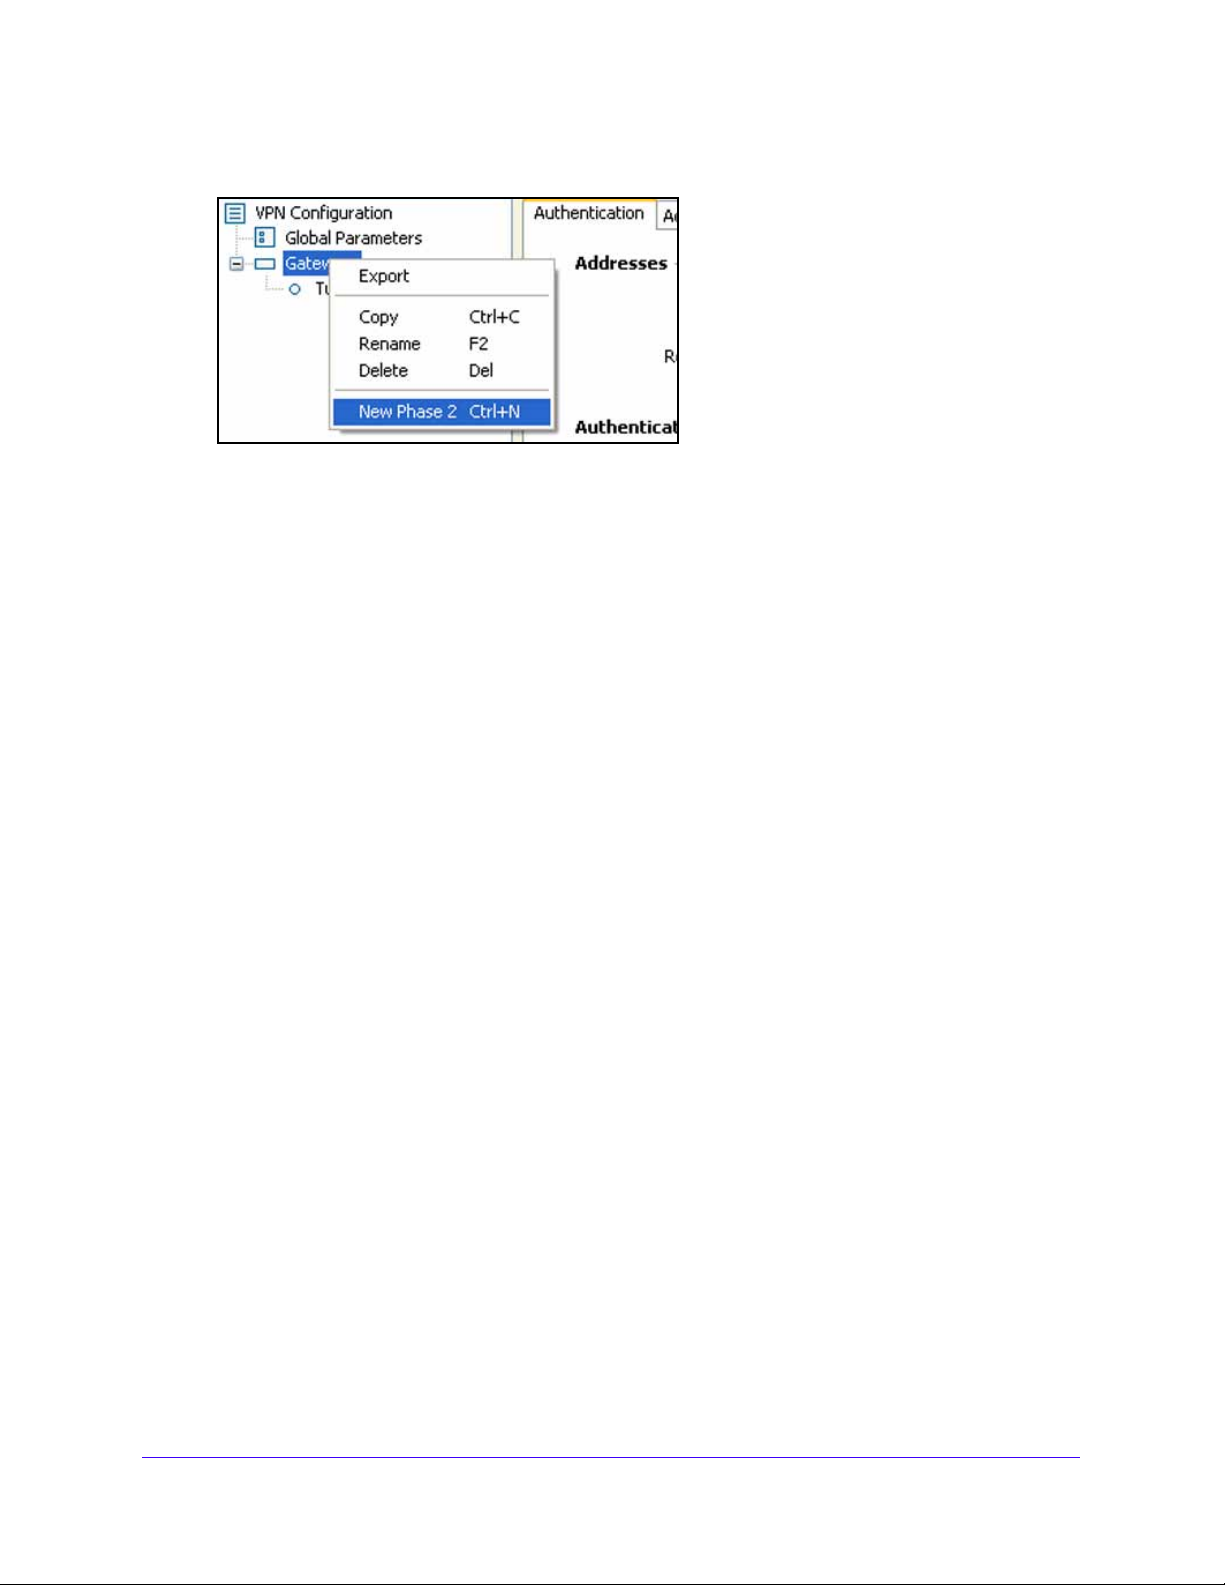
n t he tree list pane of the Configuration Panel screen, right-click Gateway (which is the
4. I
default name of the new phase 1 configuration).
re the authentication that enables you to connect to the remote gateway or
ase 1.
age 41.
Create VPN T unnel Connections
40
Page 41
NETGEAR ProSAFE VPN Client
5. Select New Phase 2.
The IPSec pane displays in the right column of the Configuration Panel screen.
pecify the IPSec configuration that enables the VPN Client to communicate securely with
6. S
the remote gateway or computer.
For more information, see Manually Configure IP Security or Phase 2 o
7. Click Save.
8. Right
9. Click Op
-click the tunnel that you just configured.
en Tunnel.
The new VPN tunnel op
ens.
n page 49.
Manually Configure Authentication or Phase 1
The Authentication pane that opens in the Configuration Panel screen lets you specify the
settings for the authentication phase, which is also referred to as phase 1 or as the Internet
Key Exchange (IKE) negotiation phase. The purpose of phase 1 is to negotiate IKE policy
sets, authenticate the peers, and set up a secure channel between the peers. As part of
phase 1, each end system must identify and authenticate itself to the other.
You can specify settings for several authentication ph
establish IPSec VPN connections with several gateways or other computers (peer-to-peer
connections).
A pre-shared key is the authentication method that is the easiest to implement but is also the
kest in terms of security. The VPN Client supports the following authentication methods,
wea
which are listed in the order of increased security (from weakest to strongest security):
ases, enabling one computer to
• Pre
• S
• Dynamic e
• Cert
• Cert
• Cert
-shared key (see Configure Authentication on page 42).
tatic extended authentication (Configure Advanced Authentication on page 44).
xtended authentication (see Configure Advanced Authentication on page 44).
ificate stored in the VPN security policy (see Configure Authentication on page 42
and Certificate Management o
ificate in the Windows Certificate Store (see Configure Authentication on page 42
and Certificate Management o
ificate on smart card or token (see Configure Authentication on page 42 and
Certificate Management on p
n page 73).
n page 73).
age 73).
Create VPN T unnel Connections
41
Page 42
NETGEAR ProSAFE VPN Client
Configure Authentication
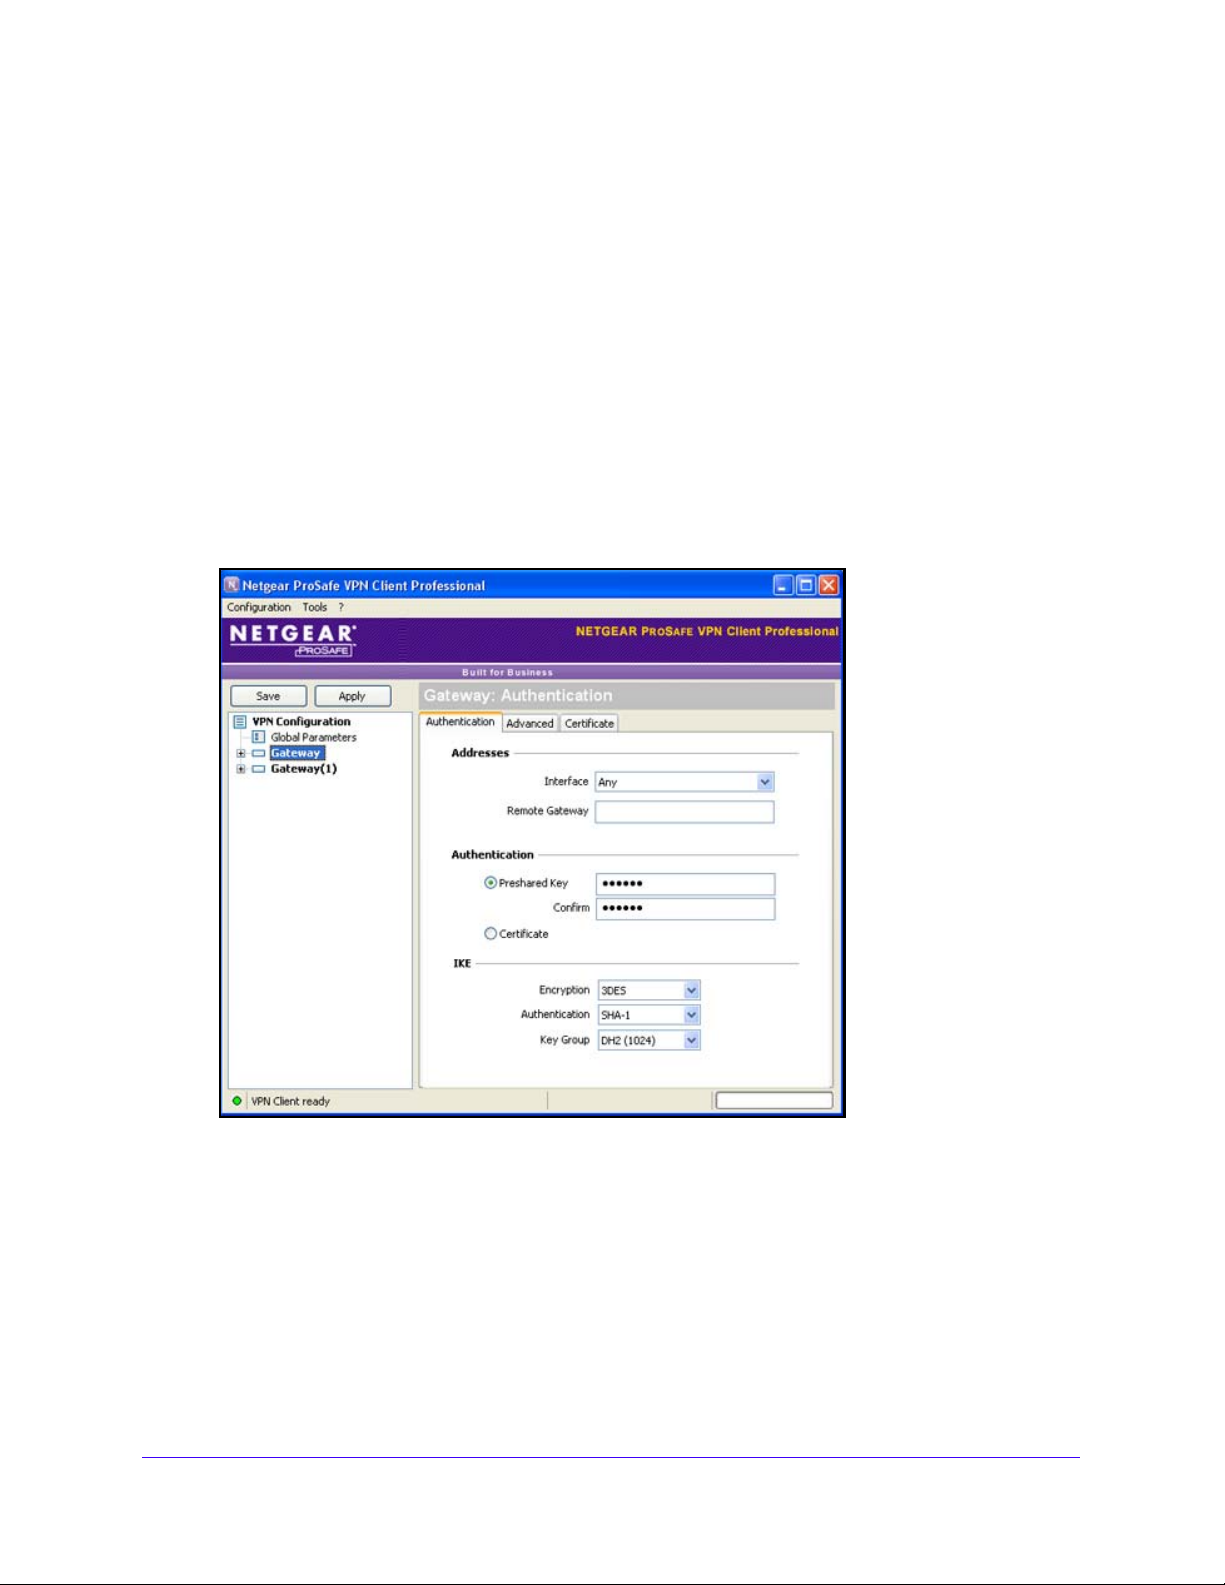
The Authentication pane lets you create authentica tion settings or edit existing authentication
settings.
To create authentication settings:
1. In the t
2. Select New Ph
ree list pane of the Configuration Panel screen, right-click VPN Configuration.
ase 1.
The VPN Client creates an auth e nt ic at io n ph as e with the name Gateway or Gateway(x), in
which x is a
3. Click th
The Authentication pane displays in the Con
number.
e new authentication phase name.
figuration Panel screen, with the
Authentication tab selected by default.
4. (Opt
ional) Change the name of the authentication settings (the default is Gateway):
a. Right-click
the authentication phase name.
b. Select Rename.
c. Enter a ne
w name.
d. Click anywhere in the tree
list pane.
Create VPN T unnel Connections
42
Page 43

NETGEAR ProSAFE VPN Client
5. Configure the settings as described in the following table.
Setting Description
Interface From the Interface drop-down men
computer through which the VPN connection is established. If the IP address changes (when it
is received dynamically from an ISP or router), select Any.
Note: If your selection of the Interface drop-down menu
exist on the computer, Any is used automatically.
Remote
Gateway
Preshared
y
Ke
Certificate (Optional) The X509 certificate th
IKE Encryption The encryption algorithm that is used during the authentication phase. Select
Enter the IP address or DNS address of the remote gateway. This field is mandatory .
Enter the password or key that is shared with the remote gateway. You need to enter the same
password or key in the Confirm field.
Certificate tab to open the Certificate pane that lets you select the certificate source. You can
use a PEM file, PKCS#21 file, smart card, or token, or a certificate from the Personal Certificate
Store. Specify only one certificate per tunnel.
For information about certificates, see
one of the following from the drop-down menu:
• DES.
• 3DES. T
• AES128.
• AES192.
• AES256.
u, select the IP address of the network interface of the
refers to an IP address that does not
at the VPN Client uses. On the IPSec pane, click the
Certificate Management on page 73.
his is the default setting.
Authentication The authentication algorithm that is used du
Select one of the following from the drop-down menu:
5.
• MD
• SHA-1. T
• SHA-256.
Key Group The Diffie-Hellman key length that is
Select one of the following from the drop-down menu:
• DH1 (768).
• DH2 (1024
• DH5 (1536
• DH14
his is the default setting.
(2048).
6. Click Save.
To edit existing authentication settings:
1. I
n the tree list pane of the Configuration Panel screen, select an existing authentication
phase name (for example, Gateway in the previous figure).
The Authentication pane displays in the Configuration Pane
Authentication tab selected by default.
ring the authentication phase.
used during the authentication phase.
). This is the default setting.
).
l screen, with the
Create VPN T unnel Connections
43
Page 44
NETGEAR ProSAFE VPN Client
2. (Optional) Change the name of the authentication settings (the default is Gateway):
a. Right-click
the authentication phase name.
b. Select Rename.
c. Enter a ne
d. Click anywhere in the tree
w name.
list pane.
3. Configu
re the settings as described in the previous table.
4. Click Save.
Configure Advanced Authentication
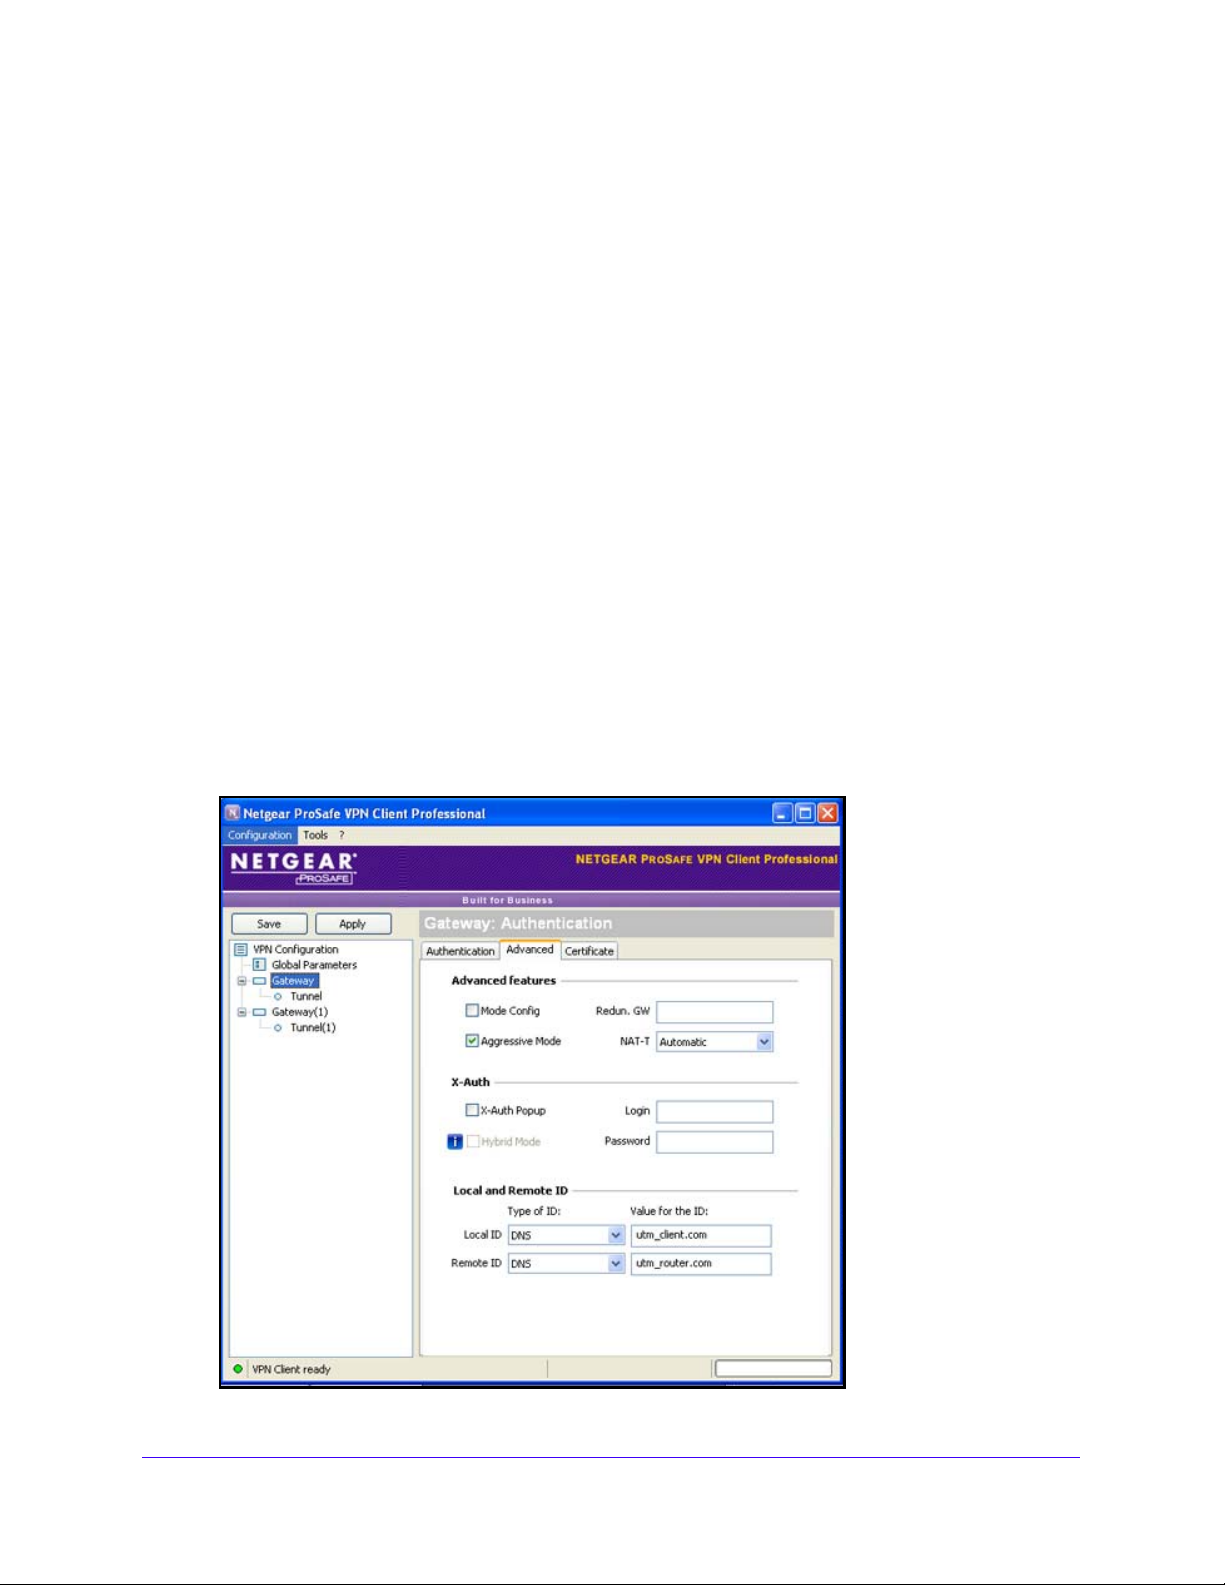
For authentication settings (phase 1 settings), the advanced configuration settings apply to
all its associated IPSec configurations (phase 2 settings).
To configure advanced authentication settings:
1. In the t
name for which you want to configure the advanced settings (for example, Gateway in
the following figure).
The Authentication pane displays.
2. In
The Advanced authentication pane displays:
ree list pane of the Configuration Panel screen, cl ic k t h e au t hentication phase
the Authentication pane, click the Advanced tab.
Create VPN T unnel Connections
44
Page 45

NETGEAR ProSAFE VPN Client
3. Configure the settings as described in the following table.
Setting Description
Advanced features
Mode Config Select the M
the VPN Client to receive VPN configuration information from the remote VPN
gateway. (The remote VPN gateway must support the Mode Config feature.) When
the Mode Config feature is enabled, the following information is negotiated between
the VPN Client and the remote VPN gateway during the authentication phase:
• Virtual IP address of the VPN Client
• DNS server address (optional)
• WINS server address (optional)
Note: The virtual IP address that is issued by the remote VPN gateway is displayed
in the VPN Clie
Note: If the Mode Config feature is not avai
gateway, manually specify the DNS and WINS server addresses on the VPN Client.
For more information, Configure How VPN Tunnels Are Opened on
Aggressive Mode The Aggressive Mode check box is selected by default to enable the VPN Client to
use aggressive mode as the negotiation mode with the remote VPN gateway. Clear
the check box to disable aggressive mode.
Redund.GW Enter the IP address or URL of an alternate VPN gateway in the Redund.GW field to
ble the VPN Client to open an IPSec tunnel with an alternate gateway when the
ena
primary VPN gateway is down, goes down, or stops responding.
An alternate gateway is used under the following circumstances:
• If
several attempts (determined by the value in the Retransmission field—the
default is 5 attempts—in the Parameters pane of the Co
(see Configure the Global VPN Parameters on page 55), the VPN Client uses
the alternate gateway as the new tunnel endpoint. The interval between two
attempts is about 10 seconds.
• If a tunnel is successfully established with the primary gateway with the D
Pear Detection (DPD) feature (see Configure the Global VPN Parameters on
page 55) but the primary gateway stops responding to DPD messages.
ode Config check box to enable the Mode Config feature, which allows
nt Address field on the IPSec pane with the IPSec tab selected.
lable or not supported on the remote VPN
page 59
the VPN Client cannot contact the primary gateway to establish a tunnel. After
nfiguration Panel screen
ead
Note: The same connection rules apply if the alternate gateway goes down or stops
nding. This means that the VPN Client could switch between the primary and
respo
alternate gateways until you click Save or Apply or close and exit the VPN Client.
Note: If the primary gateway can be reached but tun
there are VPN configuration errors), the VPN Client does not attempt to establish a
tunnel with the alternate gateway. In this case, you must first resolve the configuration
errors.
nel establishment fails (that is,
Create VPN T unnel Connections
45
Page 46

NETGEAR ProSAFE VPN Client
Setting Description
NAT-T From the NAT-T drop-down menu, select one of the following NAT T raversal (NAT-T)
modes:
ables the VPN Client and VPN gateway to negotiate NAT-T. This
X-Auth
• Automatic. En
is the default setting.
rced. Enables the VPN Client to force NAT-T by encapsulating IPSec packets
• Fo
into UDP frames, allowing packet traversal through intermediate NAT routers.
abled. Prevents the VPN Client and VPN gateway from negotiating NAT-T.
• Dis
X-Auth Popup Extended authentication (XAUTH) is an
If extended authentication is
check box to enable a pop-up screen in which the login name and password can be
entered during the authentication phase. This pop-up screen displays each time
when authentication is required to open a tu nnel with a remote VPN gateway. If
XAUTH authentication fails, the tunnel establishment fails too.
Note: If you enter a name in the Login field and a password in the Password field,
pop-up screen does not display, and the tunnel is established if the credentials
the
match those on the gateway. (This method is referred to as static extended
authentication.) However, this defeats the purpose of extende d authentication.
NETGEAR recommends that you do not enter a name and password on the
Advanced authentication pane but let the user enter these credentials. (This method
is referred to as dynamic extended authentication.)
For more information, see Extended Authentication o
Hybrid Mode Select the Hy
Login field and a password in the Password field.
Note: Hybrid Mode requires you to configure a certificate for the authe
phase (see Configure Authentication on page 42) and to select Extended
authentication (XAUTH), that is, the X-Auth Popup check box.
Hybrid mode is an authenticatio
phase. Hybrid mode assumes an asymmetry between the authenticating entities.
One entity, typically an edge device (for example, a firewall), authenticates using
standard public key techniques (in signature mode), while the other entity, typically a
remote user, authenticates using challenge response techniques. At the end of the
authentication phase, these authentication methods are used to establish an IKE SA
that is unidirectionally authenticated. To ensure that the IKE is bidirectionally
authenticated, the authentication phase is immediately followe d by an extended
authentication (XAUTH) to authenticate the remote user. The use of these
authentication methods is referred to as hybrid authentication mode.
brid Mode check box to enable this mode, and enter a name in the
configured on the gateway, select the X-Auth Popup
n method that is used within the authentication
extension to the IKE protocol.
n page 47.
ntication
The VPN Client implements the RFC
Note:
draft-ietf-ipsec-isakmp-hybrid-auth-05.txt.
Create VPN T unnel Connections
46
Page 47

NETGEAR ProSAFE VPN Client
Setting Description
Local and Remote ID
Local ID The local ID is the identity that the VPN Client transmits to the VPN gateway during
authentication phase. From the Local ID drop-down menu, select one of the
the
following types of IDs, and enter the associated value for the ID in the field to the
right:
Address. Enter a standard IP address (for example, 195.100.205.101).
• IP
• DNS. Enter
mydomain.com).
• DER ASN1 DN. Enter a certi
Management on page 73). If you do not enter a certificate, the IP address of the
VPN Client is used.
• Sub
ject from X509. These fields are automatically set when you import a
certificate (see Import Certificates on page 73).
a fully qualified domain name (FQDN) (for example,
ficate issuer (for more information, see Certificate
Note: If a VPN tunnel closes because the computer ha
VPN tunnel does not reopen automatically when the network becomes available
again.
Remote ID The remote ID is the identity that the VPN Clie
during the authentication phase. From the Remote ID drop-down menu, select one of
the following types of IDs, and enter the associated value for the ID in the field to the
right:
Address. Enter a standard IP address (for example, 203.0.113.4).
• IP
• DNS. Enter
gateway.mydomain.com).
• DER ASN1 DN. Enter a certi
Management on page 73). If you do not enter a certificate, the IP address of the
VPN gateway is used.
a fully qualified domain name (FQDN) (for example,
ficate issuer (for more information, see Certificate
nt receives from the VPN gateway
s changed its IP address, the
4. Click Save.
Extended Authentication
IKE is an important element of the public key infrastructure (PKI) that defines how security
credentials are exchanged over the IPSec tunneling protocol. For extended authentication
(XAUTH), IPSec negotiation requires the definition of a login name and password on the
remote VPN gateway. The VPN Client supports several authentication protocols, including
CHAP and one-time password (OTP).
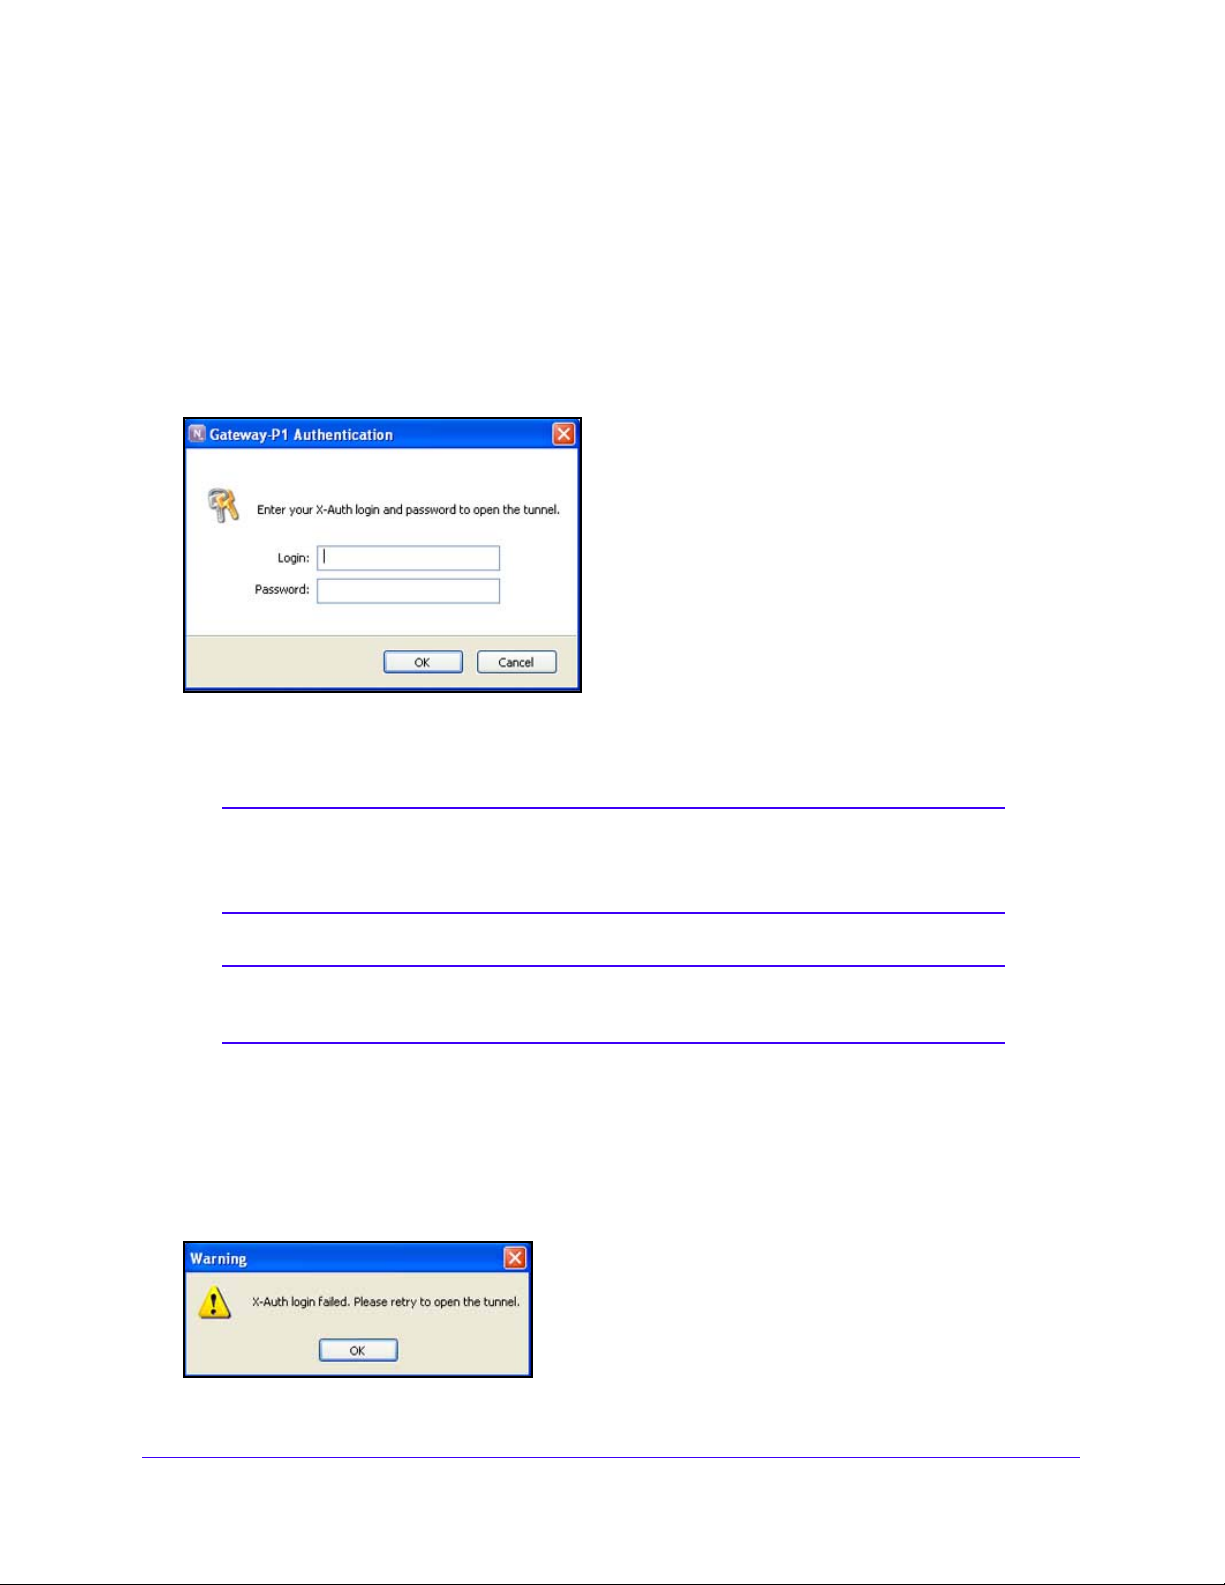
After you have configured XAUTH, an end user needs to enter credentials to be able to open
tunnel.
a
Create VPN T unnel Connections
47
Page 48
NETGEAR ProSAFE VPN Client
High-level steps to configure XAUTH:
1. Configure extended authentication on the remote VPN gateway.
2. Select the X-
Auth Popup check box on the Advanced authentication pane of the VPN
Client.
3. Click Save.
When an end user opens a tunnel, the end user needs to enter credentials on the XAUTH
pop-u
p screen.
Figure 10. XAUTH pop-up screen
The credentials need to match those on the remote VPN gateway.
Note: The XAUTH pop-up screen displays each time when authentication
is required to open a tunnel with a remote VPN gateway. If XAUTH
authentication fails, the tunnel establishment fails too.
Note: In a multiple VPN tunnel configuration, the name of the VPN tunnel
displays in the pop-up screen.
The end user has some time to enter the credentials. If the time allowed to enter XAUTH
credentials expires, a warning screen displays and the end user has to reopen the VPN
tunnel. The expiration time depends on the settings of the X-Auth timeout field on the
Parameters pane of the Connection Panel screen (see Configure the Global VPN
Parameters on p
Figure 11. X-Auth login failed warning
age 55).
Create VPN T unnel Connections
48
Page 49
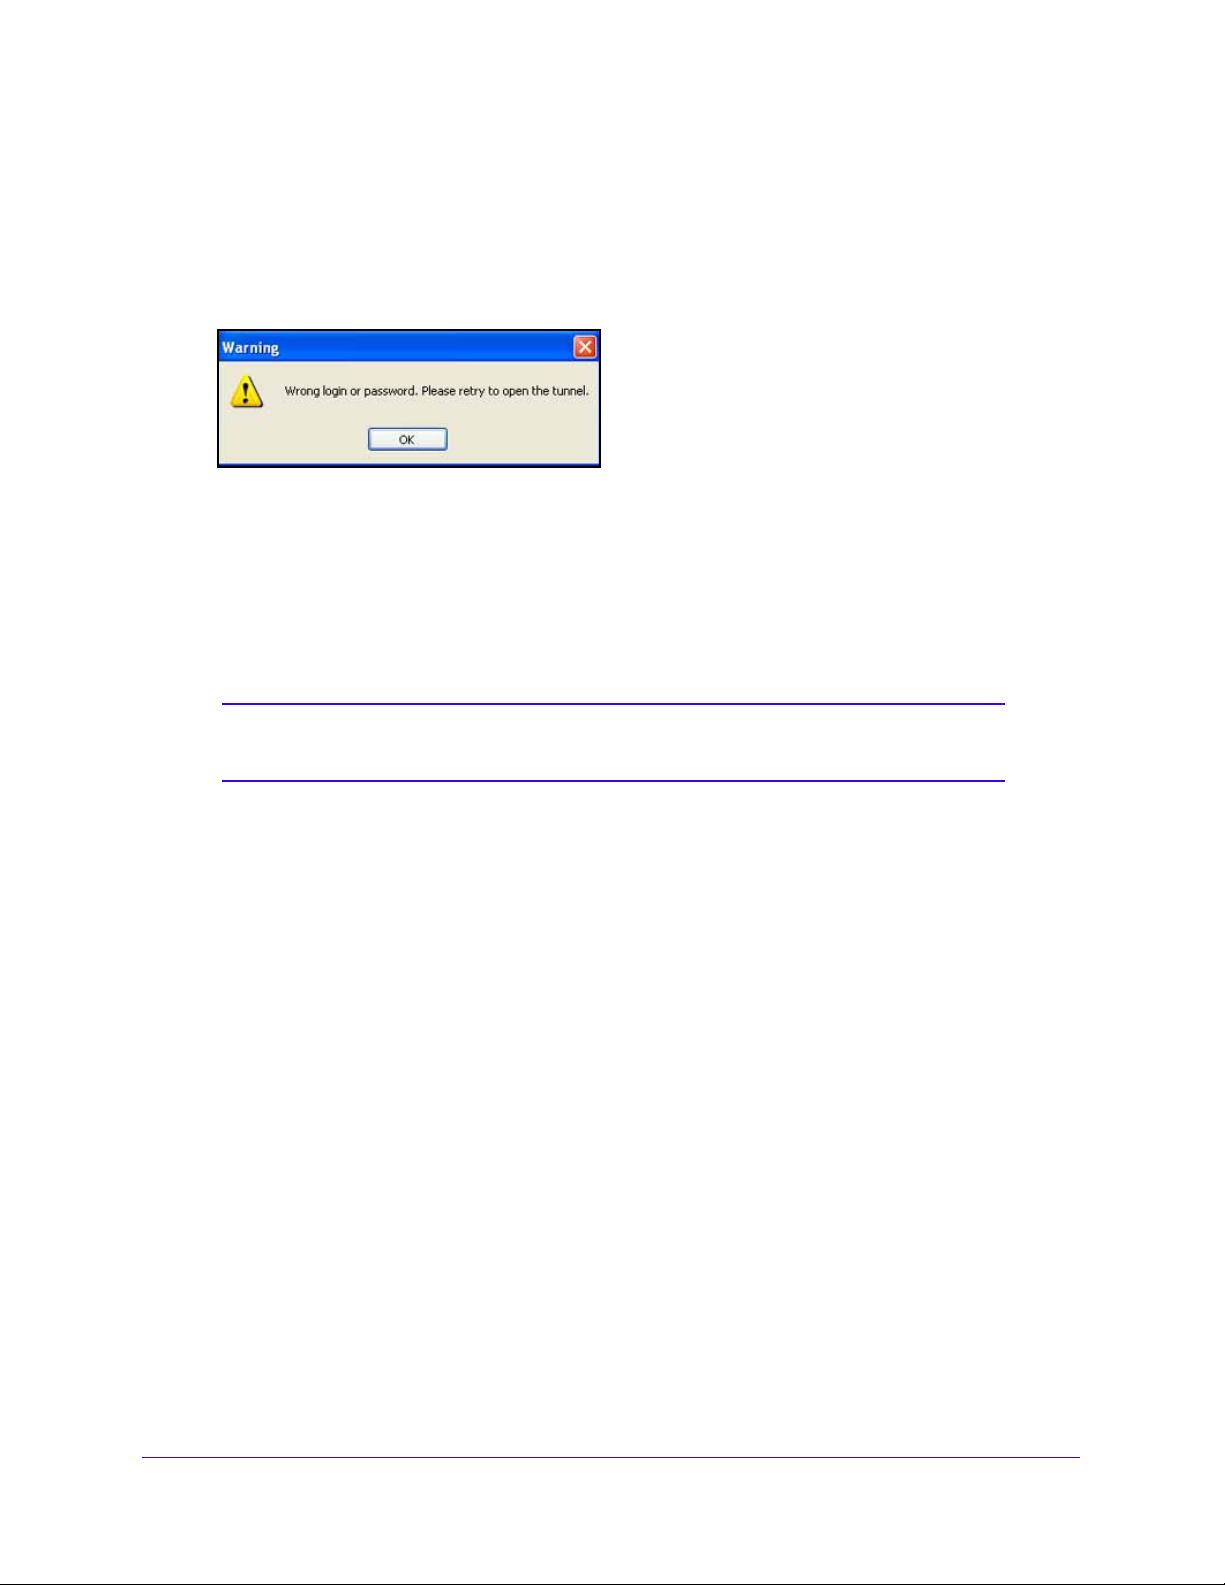
NETGEAR ProSAFE VPN Client
The way that credentials are verified depends on the VPN gateway. When a VPN gateway
detects an incorrect login name or password, one of the following actions can occur:
he XAUTH screen displays again.
• T
• A pop-u
again.
Figure 12. Wrong login or password warning
p warning similar to the following one alerts the user to try to open the VPN tunnel
Manually Configure IP Security or Phase 2
The purpose of the IPSec configuration, which is also referred to as phase 2, is to negotiate
the IP security settings that are applied to the traffic that goes through the tunnels.
Note: Y ou can create several IPSec configurations (phase 2 settings) for a
single set of authentication settings (phase 1 settings).
To create an IPSec configuration:
n the tree list pane of the Configuration Panel screen, right-click an existing
1. I
authentication phase name (for example, Gateway in the following figure).
2. Select New Phase
The VPN Client creates an IPSec configuration with
which x is a number.
2.
the name Tunnel or Tunnel(x), in
Create VPN T unnel Connections
49
Page 50
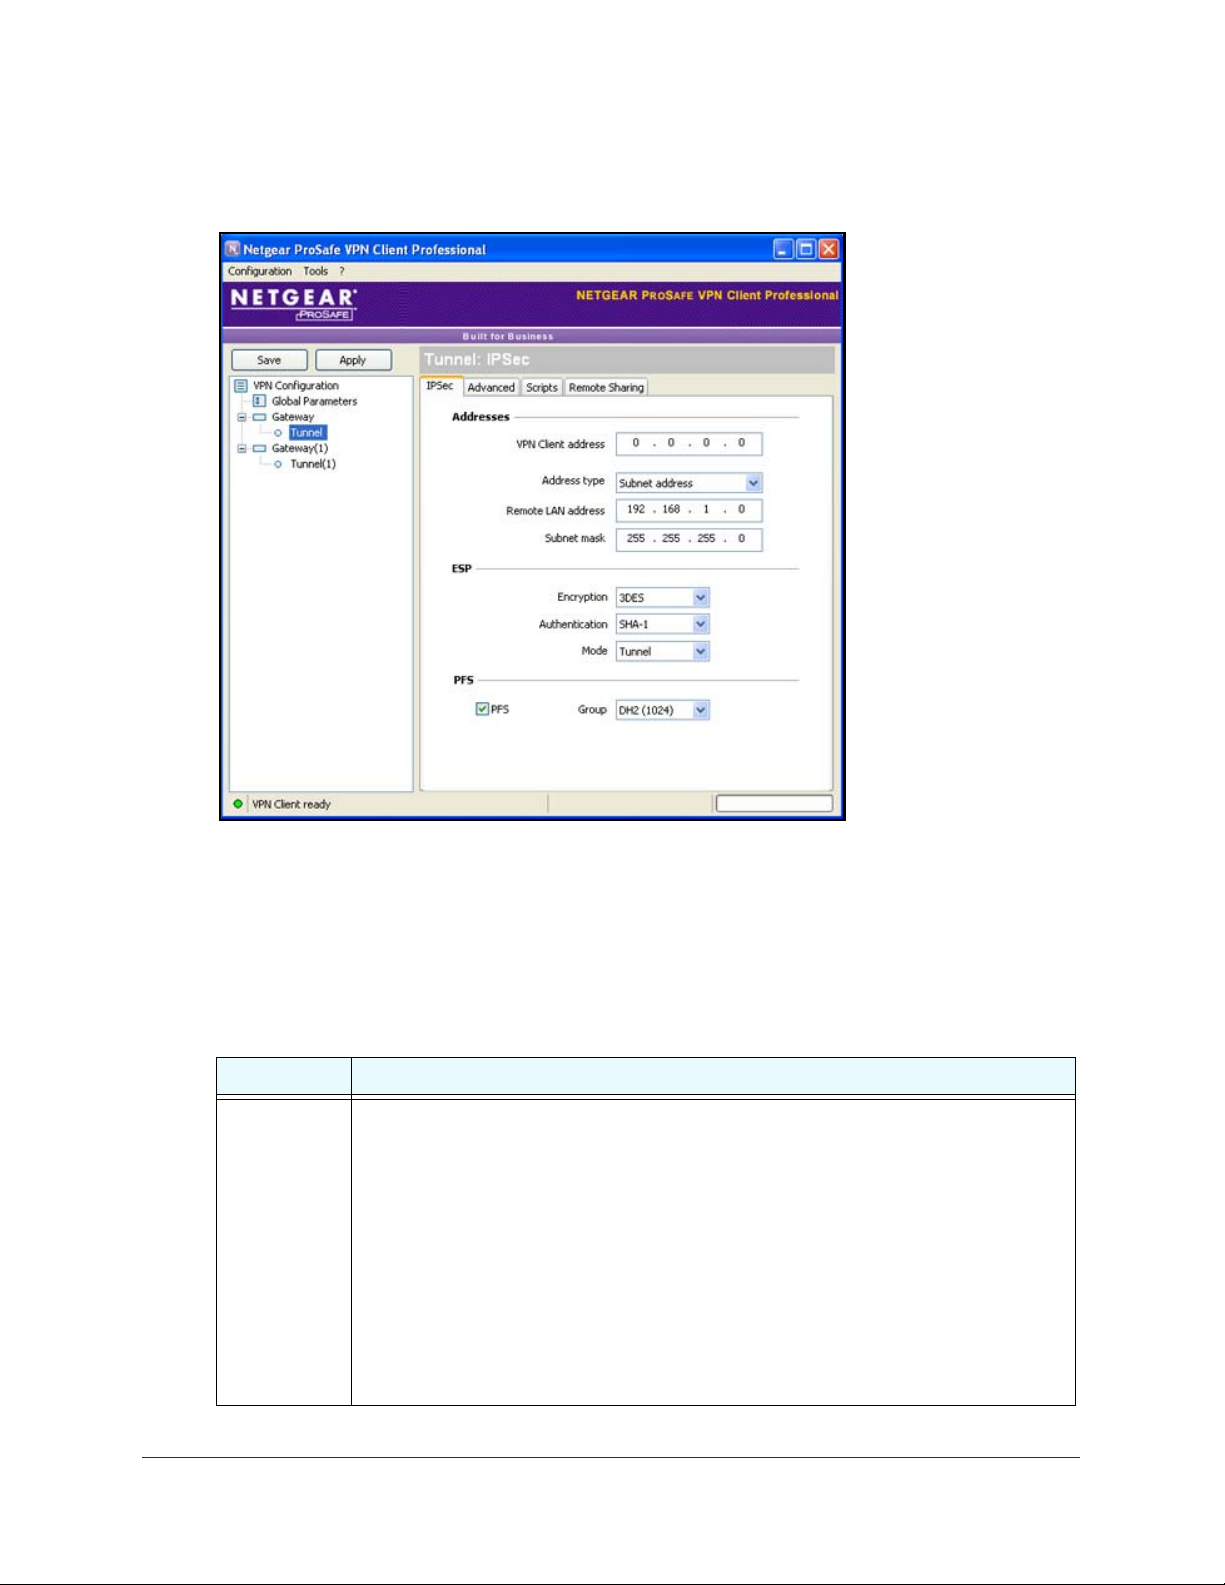
NETGEAR ProSAFE VPN Client
The IPSec pane displays in the Configuration Panel screen, with the IPSec tab selected
by default.
3. (Opt
ional) Change the name of the IPSec configuration (the default is Tunnel):
a. Right-click
the IPSec configuration name.
b. Select Rename.
c. Enter a ne
w name.
d. Click anywhere in the tree
4. Configu
Setting Description
VPN Client
ad
re the settings as described in the following table.
Enter the virtual IP address that the VPN Client uses in the remote LAN; the computer (for
dress
which the VPN Client opened a tunnel) appears in the LAN with this IP address. This IP
address can belong to the remote LAN subnet. You can also enter 0.0.0.0 as the IP
address.
Both the local IP address of your computer and th
same subnet. To enable such a configuration, select the Automatically open this tunnel
on traffic detection check box on the Advanced IPSec pane (see Configure How VPN
Tunnels Are Opened on
traffic with the remote LAN is allowed but communication with the local network becomes
impossible.
Note: If Mode Config is enabled and the remote VPN gateway has issued an IP address
to the VPN
list pane.
e remote LAN address can be part of the
page 59). When the VPN tunnel is opened in this configuration, all
Client, the IP address is displayed in the VPN Client address field.
Create VPN T unnel Connections
50
Page 51

NETGEAR ProSAFE VPN Client
Setting Description
Address type From the Address type drop-down menu, select the remote endpoint’s type of address that
the VPN Client can communicate with after the VPN tunnel has been established.
Depending on your selection, the pane adjusts to display the associated address fields:
ngle address. The remote endpoint is a single computer. Fill in the Remote host
• Si
address and Subnet Mask fields.
• Sub
• Ran
net address. The remote endpoint is a LAN. Fill in the Remote LAN address and
Subnet Mask fields.
To force all traffic from the computer to pass through the VPN tunnel, select Subnet
address, and enter 0.0.0.0 as the subnet mask.
ge address. The remote endpoint is a LAN that consists of a range of addresses.
Fill in the Start address and End address fields.
Note: When you select R
Automatically open this tunnel on traffic detection check box on the Advanced IPSec
pane (see Configure How VPN Tunnels Are Opened on p
opens when traffic is detected for a specific range of IP addresses. However, this range of
IP addresses must be specified in the configuration of VPN gateway.
Single address Remote host address
Subnet address Remote LAN address
Subnet Mask
Range address Start address
End address
ESP Encryption The encryption algorithm that is used du
phase. Select one of the following from the drop-down menu:
• DES.
• 3D
• AES128.
• AES192.
• AES256.
Authentication The authentication algorithm that is used
phase. Select one of the following from the drop-down menu:
• MD5.
• SHA-1. Th
• SHA-2
ange address from the drop-down menu and the
Enter the addresses.
ES. This is the default setting.
is is the default setting.
56.
age 59), the tunnel automatically
ring the IPSec configuration
during the IPSec configuration
Mode IPSec encapsulation mode. Select one of the following from the
drop-down menu:
nnel. The mode that is commonly used when either end of a
• Tu
security association (SA) is a security gateway or when both ends
of an SA are security gateways that function as proxies for the hosts
behind them. Tunnel mode encrypts both the payload and the entire
header (UDP/TCP and IP). This is the default setting.
• Transport. The mode in which traffic is destined for a security
gateway that functions as a host. (For example, you could use
transport mode for SNMP commands.) Transport mode encrypts
only the payload, not the IP header.
Create VPN T unnel Connections
51
Page 52

NETGEAR ProSAFE VPN Client
Setting Description
PFS Select the PFS check box to specify a Perfect Forward Secrecy (PFS) key length that is
used during the IPSec configuration phase. Then, specify a group. By default, the PFS
check box is selected.
Group Select one of the following from the drop-down menu:
• DH1 (768
• DH2 (102
• DH5 (1536).
• DH14 (2048).
).
4). This is the default setting.
5. (Optional) Click the Advanced tab.
The Advanced IPSec pane opens, allowing you to
opened and to configure alternate servers (for more information, see Configure How VPN
Tunnels Are Opened on p
6. (Opt
ional) Click the Scripts tab.
age 59).
The IPSec Scripts pane opens, allowing you to specify scripts. (For information, see
Configure Scripts on
page 64.)
7. Click Save.
8. (Opt
ional) Open the newly configured tunnel:
a. In the
b. Click Open T
tree list pane, right-click the IPSec configuration name (for example, Tunnel).
unnel.
(When the tunnel is opened, the button changes to Close Tunnel.)
To edit an existing IPSec configuration:
1. In the t
ree list pane of the Configuration Panel screen, click an existing IPSec
configuration name (for example, Tunnel in the previous figure).
The IPSec pane displays in the Conf
iguration Panel screen, with the IPSec tab selected
by default.
2. (Opt
ional) Change the name of the IPSec configuration (the default is Tunnel):
a. Right-click
the IPSec configuration name.
b. Select Rename.
c. Enter a ne
w name.
configure how VPN tunnels are
d. Click anywhere in the tree
3. Configu
4. (Opt
re the settings as described in the previous table.
ional) Click the Advanced tab.
The Advanced IPSec pane opens, allowing you to
list pane.
configure how VPN tunnels are
opened and to configure alternate servers (for more information, see Configure How VPN
Tunnels Are Opened on p
age 59).
Create VPN T unnel Connections
52
Page 53
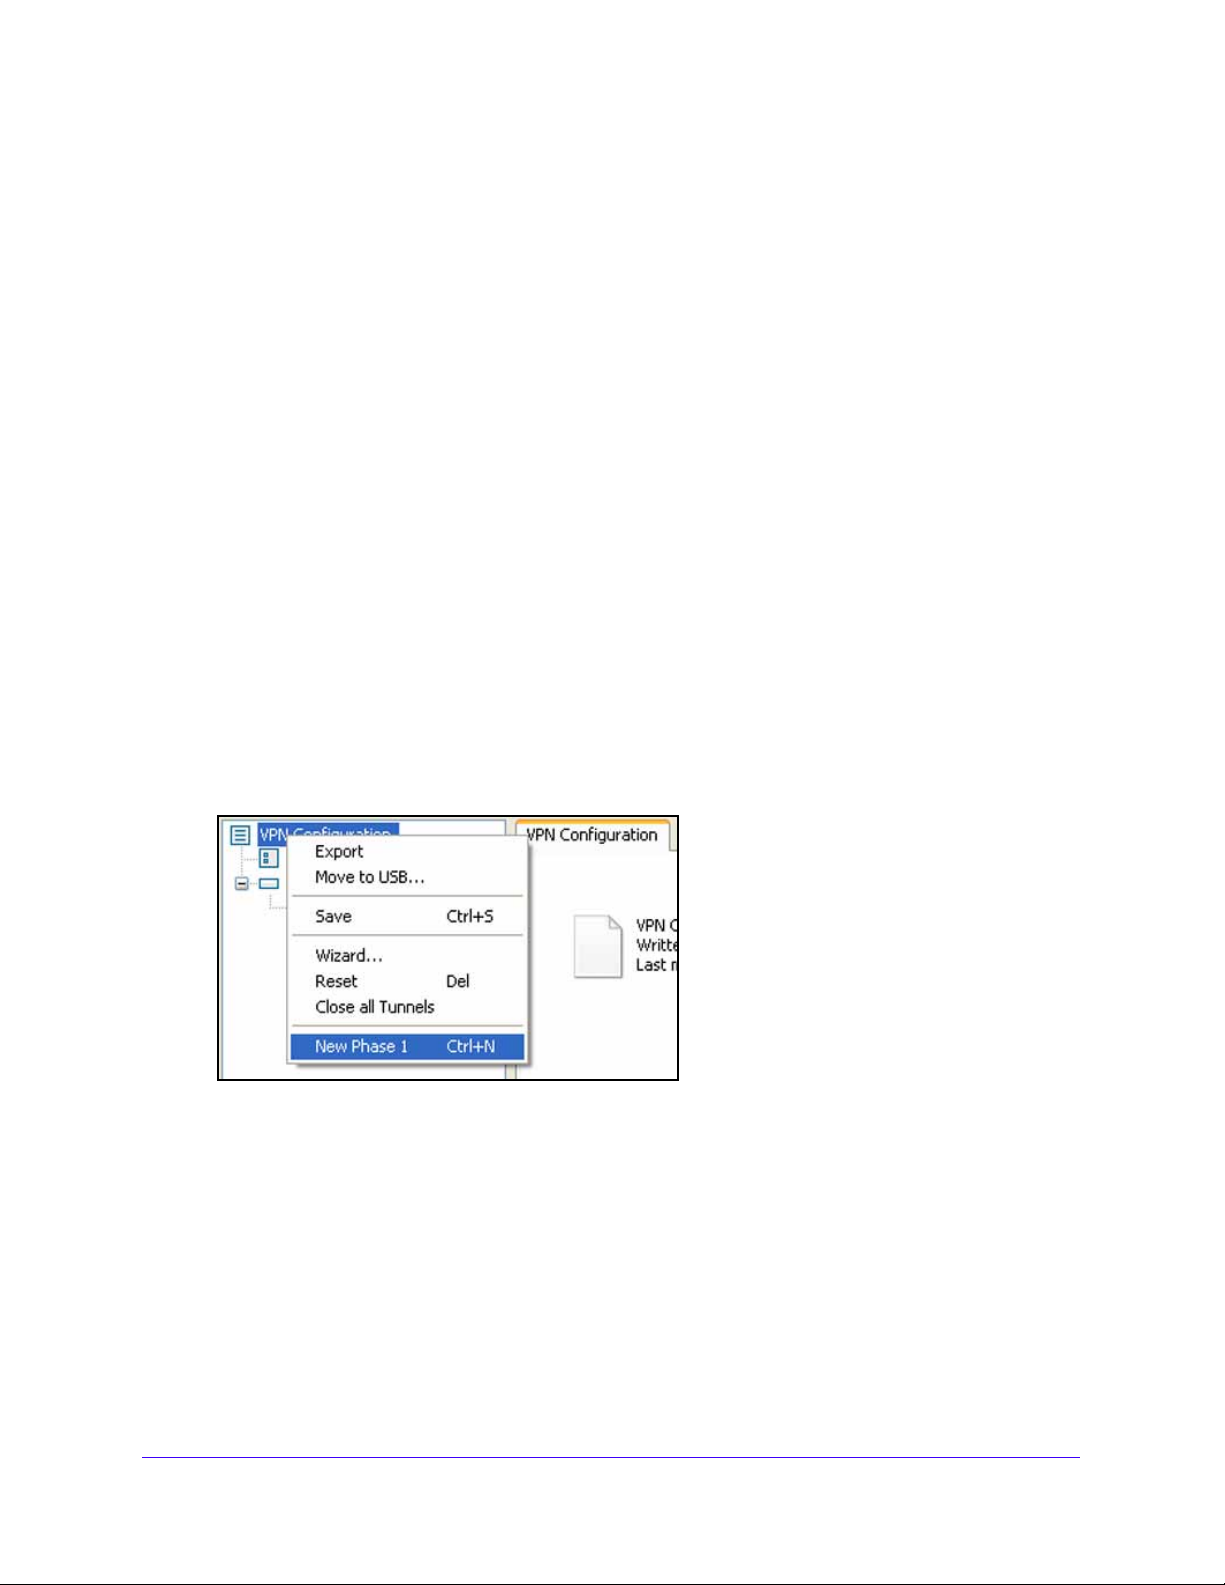
NETGEAR ProSAFE VPN Client
5. (Optional) Click the Scripts tab.
The IPSec Scripts pane opens, allowing you to specify script
Configure Scripts on p
6. Click Save.
7. (Optional) Ope
n the tree list pane, right-click the IPSec configuration name (for example, Tunnel).
a. I
b. Click Ope
(When the tunnel is opened, the button changes to Close Tunnel.)
n the modified tunnel:
n Tunnel.
age 64.)
s. (For information, see
High-Level Steps to Specify a Certificate for User Authentication
Certificates provide the highest level of security in the user authentication process. For
information about certificates, see Import Certificates o
provides high-level steps only.
To configure new authentication settings (phase 1 settings), configure an associated
IPSec configuration (phase 2 settings), and specify a certificate for the tunnel:
1. Crea
te authentication settings (phase 1 settings).
For more information, see Configure Authentication on
n page 73. The following procedure
page 42.
2. Conf
igure the advanced authentication settings.
For more information, see Configure Advanced Authentication on p
Create VPN T unnel Connections
53
age 44.
Page 54
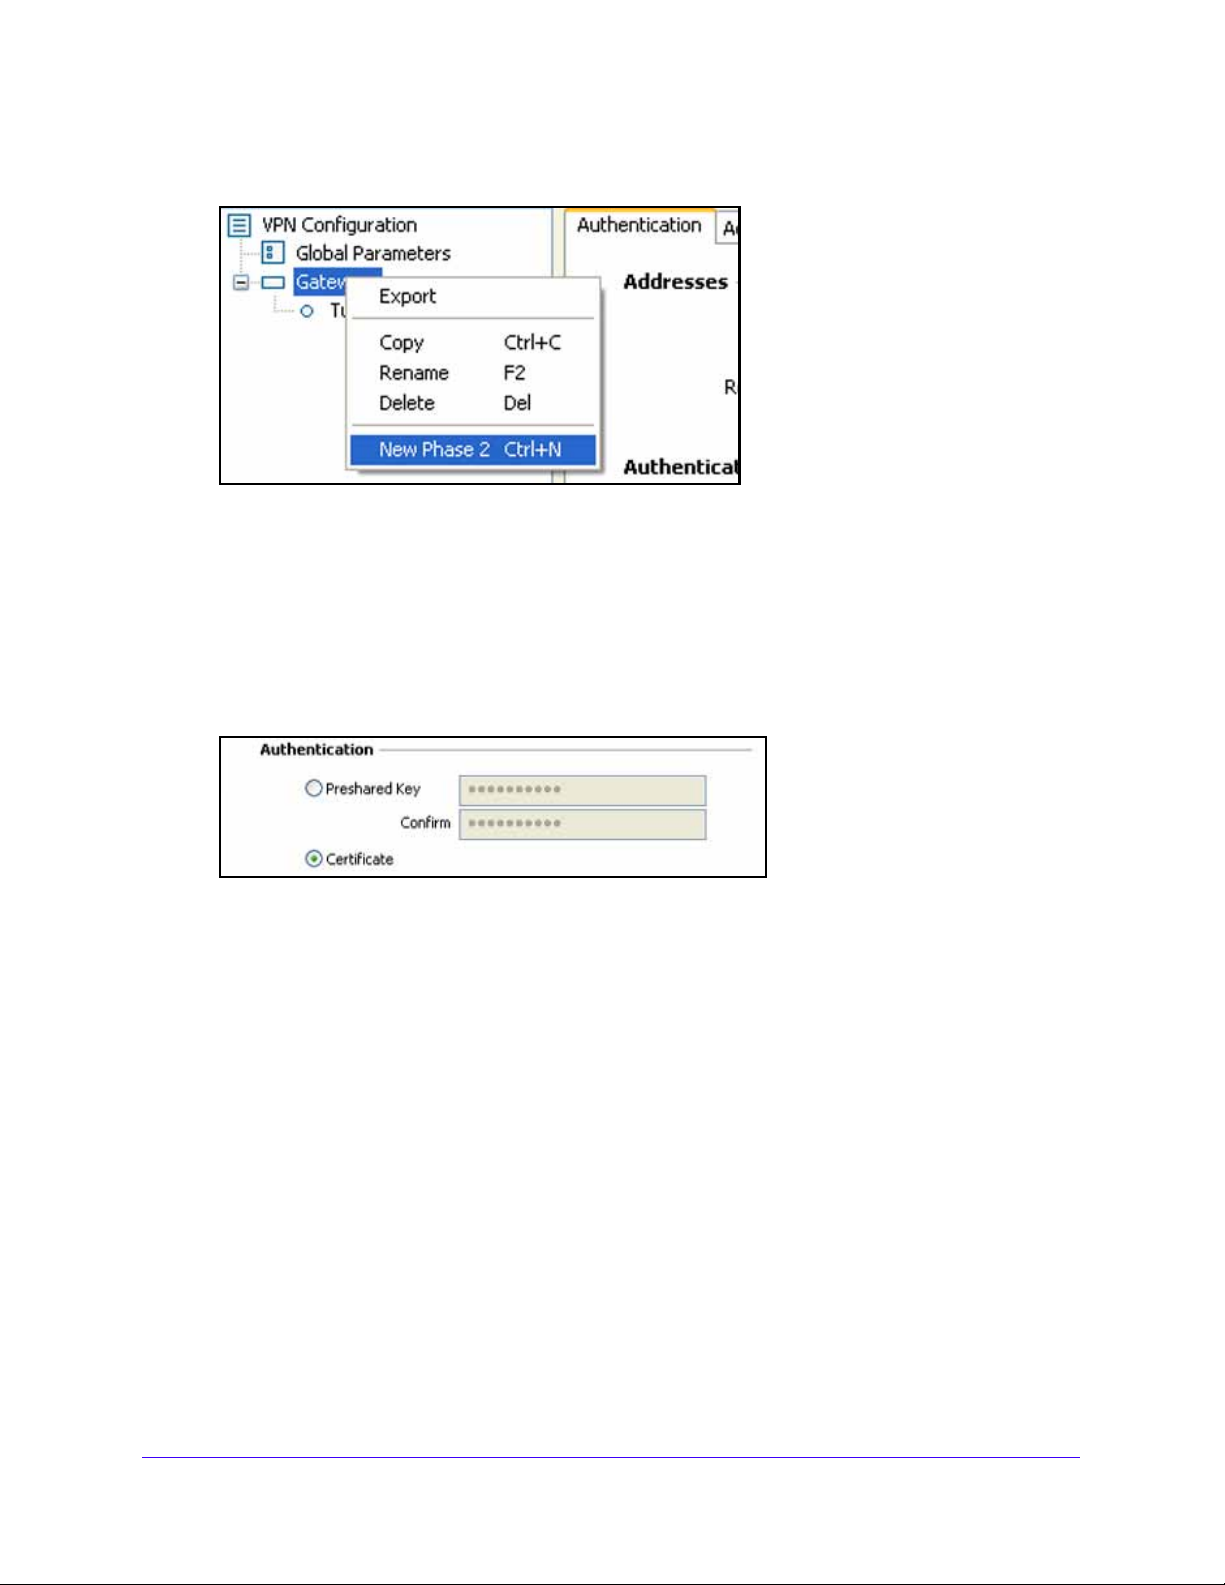
NETGEAR ProSAFE VPN Client
3. Add an IPSec configuration.
4. Configu
re the IPSec settings (phase 2 settings).
For more information, see Manually Configure IP Security or Phase 2 on p
5. Go back to the Aut
6. Click the Advan
hentication pane.
ced tab.
The Advanced authentication pane displays.
elect the Certificate radio button.
7. S
age 49.
Create VPN T unnel Connections
54
Page 55
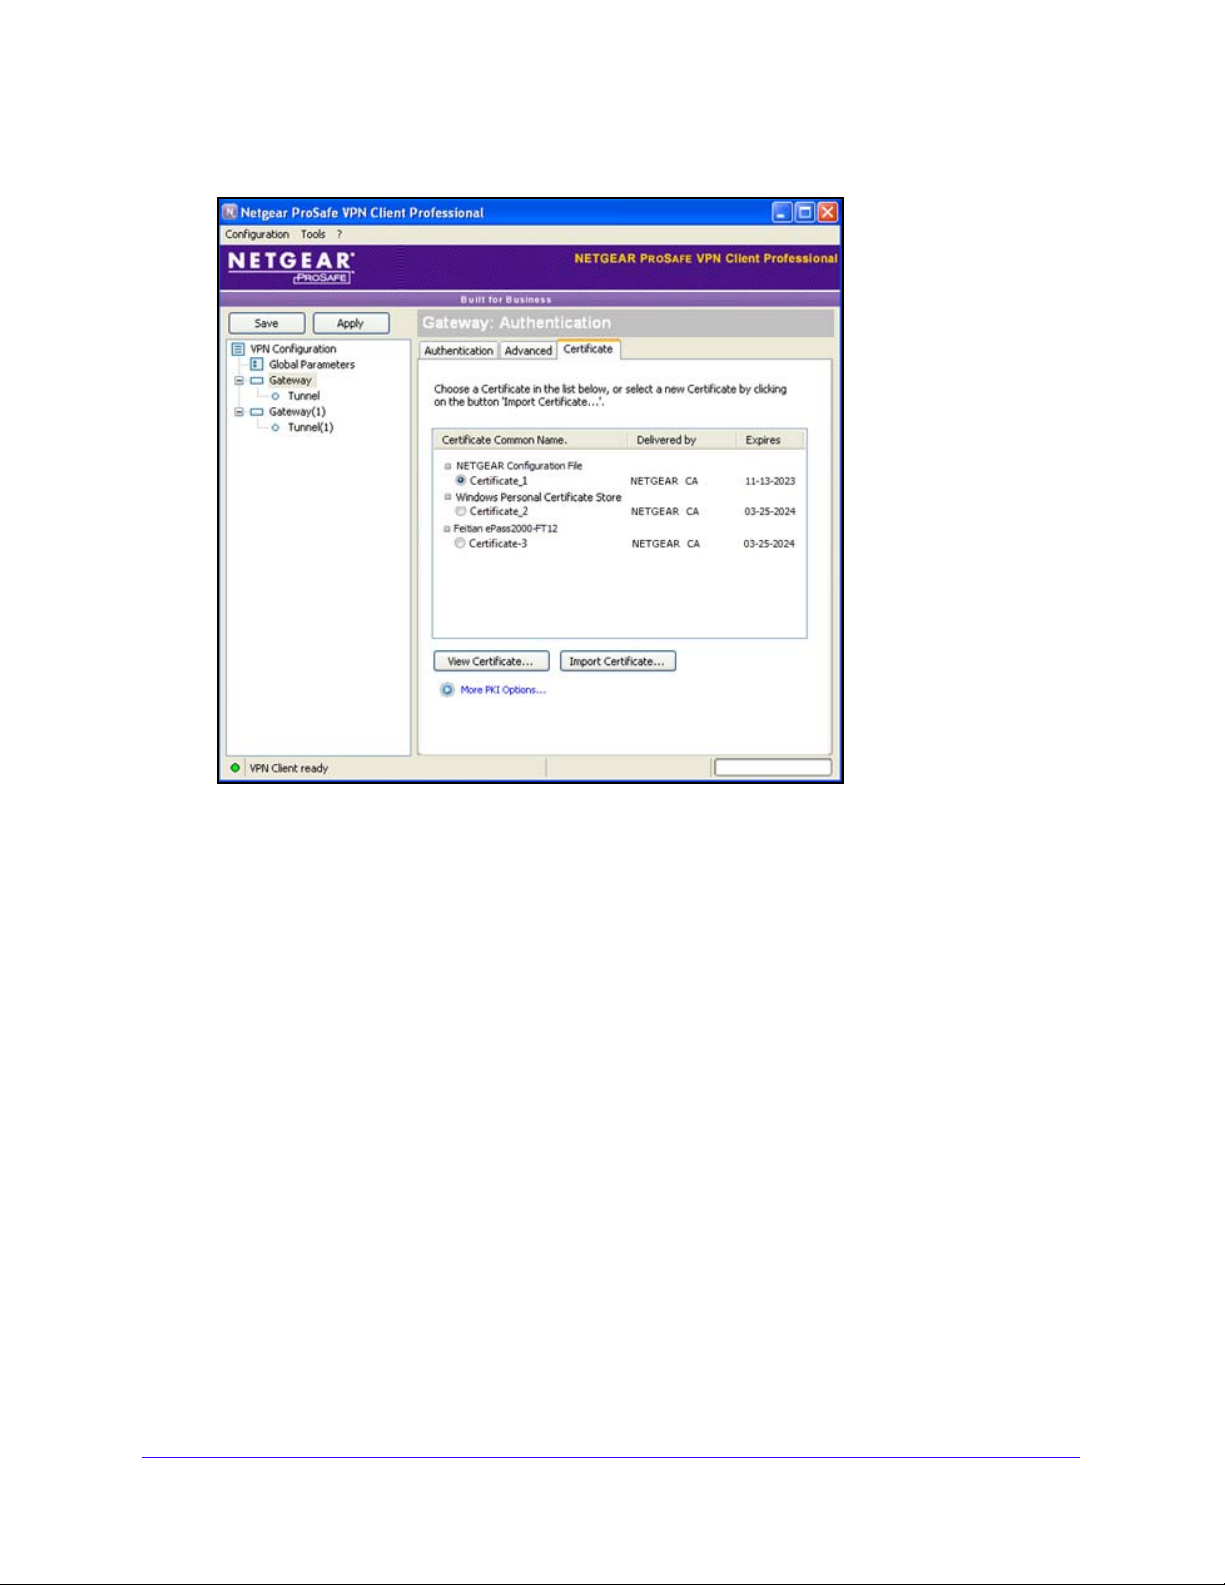
NETGEAR ProSAFE VPN Client
The Certificate pane displays automatically:
8. (Optional)
a. Cli
For more information, see Import Certificates on p
b. Click OK.
9. From the list of certif
For more information, see View and Assign Certificates o
10. Click Save.
Import a certificate:
ck Import Certificate.
age 73).
icates, select the radio button for the certificate that you want to use.
n page 77.
Configure the Global VPN Parameters
The global parameters are generic settings that apply to all VPN tunnels that you create. The
default global parameters work well for most VPN configurations. You can modify the global
parameters for your specific network. The default settings are shown in the table in the
following procedure.
To configure global parameters:
1. Click Glob
al Parameters in the left column of the Configuration Panel screen.
Create VPN T unnel Connections
55
Page 56
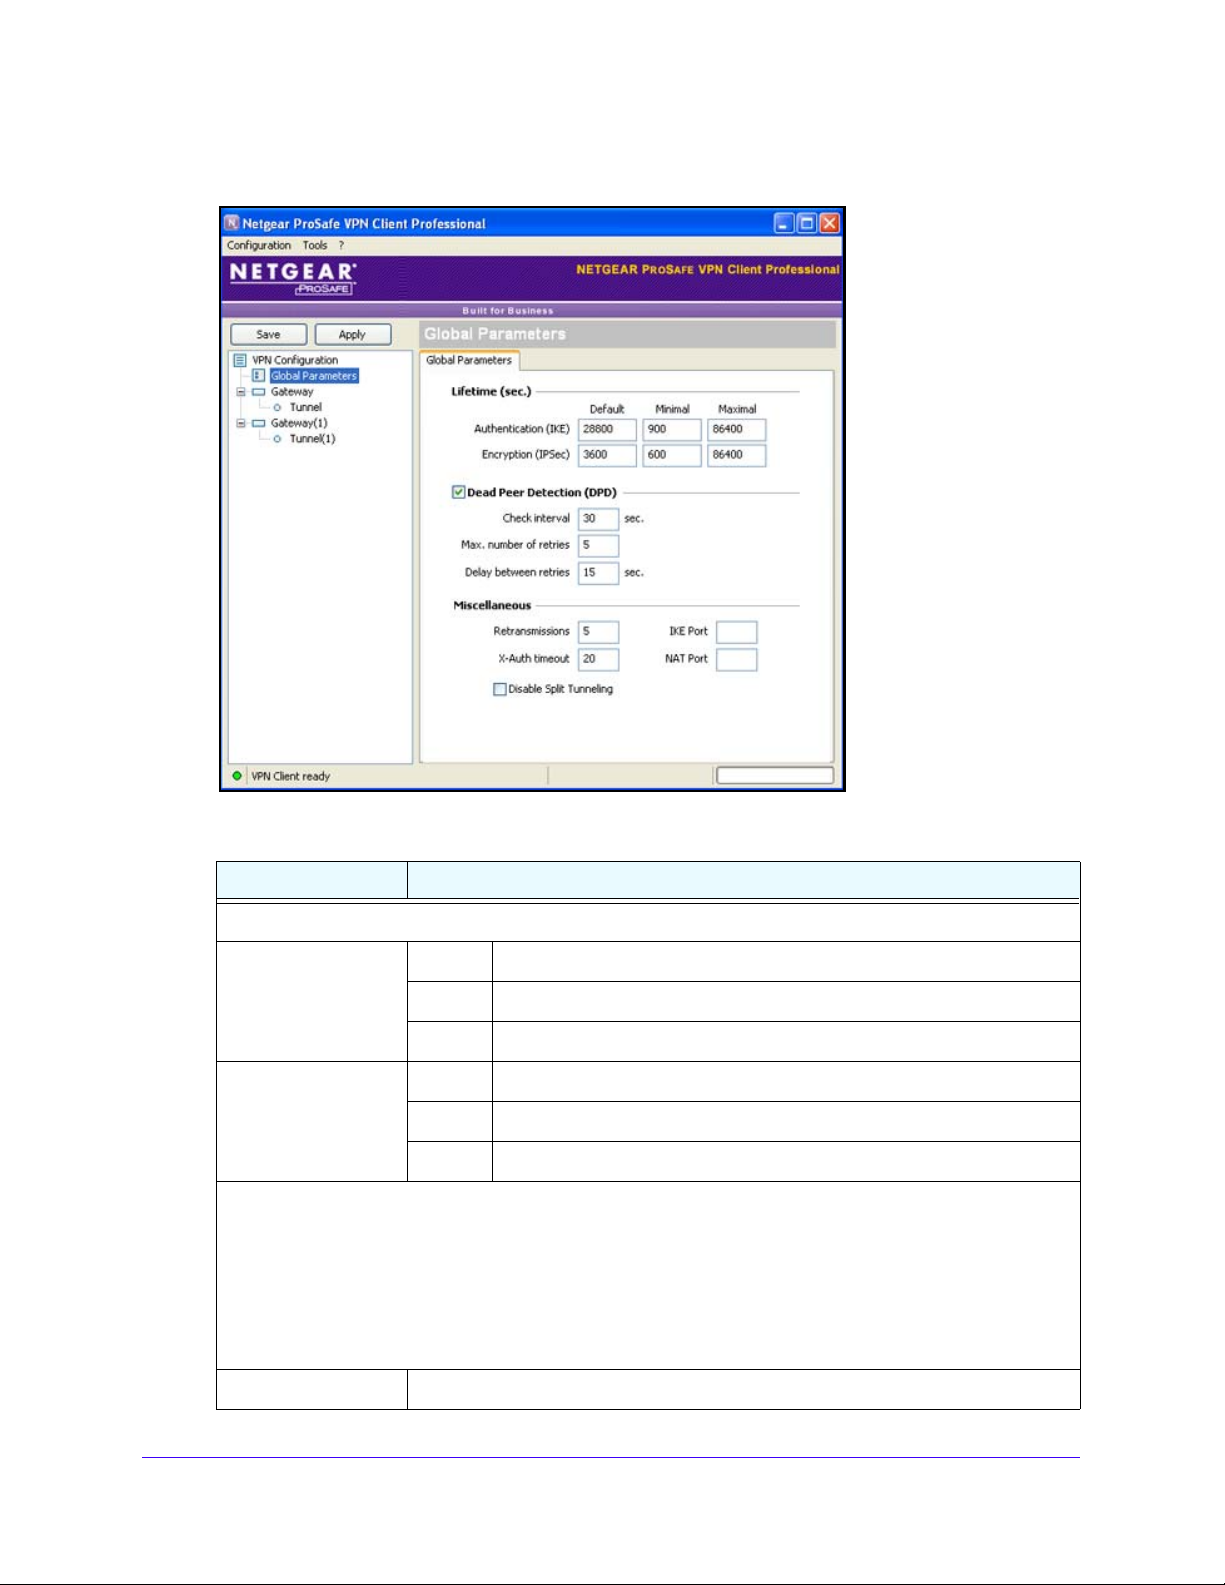
NETGEAR ProSAFE VPN Client
The Global Parameters pane displays in the Configuration Panel scree n.
2. Configu
Setting Description
Lifetime (sec.)
Authentication (IKE) Default Enter the default lifetime for IKE rekeying. The default is 28800 sec.
Encryption (IPSec) Default Enter the default lifetime for IPSec reke
Dead Peer Detection (DPD)
DPD is an Internet Key Exchange (IKE) extension (RFC370
Detection (DPD) check box is selected by default; if you want to disable DPD, clear the check box.
The IPSec VPN Client uses DPD under the following circumstances:
• To detect a dead peer and to dele te the associated open SA in the VPN Client.
• To restart IKE negotiations with an alternat e ga
Check interval (sec.) Enter the interval between DPD messages. The def a ul t is 30 sec.
re the settings as described in the following table.
Minimal Enter the minimum lifetime
Maximal Enter the maximum lifetime for IKE rekeying. The default is 86400 sec.
Minimal Enter the minimum lifetime
Maximal Enter the maximum lifetime for IPSec rekeying. The default is 86400 sec.
teway, if you have configured one (see Configure How
VPN Tunnels Are Opened on page 59).
for IKE rekeying. The default is 900 sec.
ying. The default is 3600 sec.
for IPSec rekeying. The default is 600 sec.
6) for detecting a dead IKE peer. The Dead Peer
Create VPN T unnel Connections
56
Page 57

NETGEAR ProSAFE VPN Client
Setting Description
Max. number of retries Enter the number of times that DPD messages are sent when no reply is received
from the peer. The default number is 5 times.
Delay between retries
ec.)
(s
Miscellaneous
Retransmissions Enter the number of times that a messa
X-Auth timeout Enter the time that is allowed to users to enter their XAUTH credentials. The default
IKE Port Enter the default UDP port that is used
NAT Port Enter the default NAT port that is used d
Enter the interval between DPD messages when no reply is received from the peer.
The default is 15 sec.
ge should be retransmitted before the
attempts are stopped. The default number is 5 times.
is 20 sec.
in the IKE negotiation during the
authentication phase. The default port is 500 (which is not displayed in the IKE Port
field).
Note: Some firewalls do not allow IKE port 500, or outgoing traffic on port 50 0
t not be allowed. If you change the IKE port number, the remote gateway must
migh
be able to reroute the incoming traffic that is associated with a port other than IKE
port 500.
uring the IPSec negotiation. The default
port is 4500 (which is not displayed in the NAT Port field).
Note: Some firewalls do not allow NAT port 4500, or outgoing traffic on port 4500
t not be allowed. If you change the NAT port number, the remote gateway must
migh
be able to reroute the incoming traffic that is associated with a port other than NAT
port 4500.
Disable Split
unneling
T
3. Click Save.
Select this check box to limit traffic to encrypted traffic and force all traffic to go
through the VPN tunnel.
Create VPN T unnel Connections
57
Page 58

5. Advanced Configuration Options
This chapter describes the advanced configuration options. The chapter includes the following
sections:
• Configure How VPN Tunnels Are Opened
• Configure Alternate DNS and WINS Servers
• Configure Scripts
• Configure Remote Sharing
• USB Mode
• Certificate Management
• VPN Configuration Management
• Configure Access Control
• Configure the User Interface
• Configure VPN Client Startup Mode and Network Interface Detection
• Configure Languages
5
58
Page 59
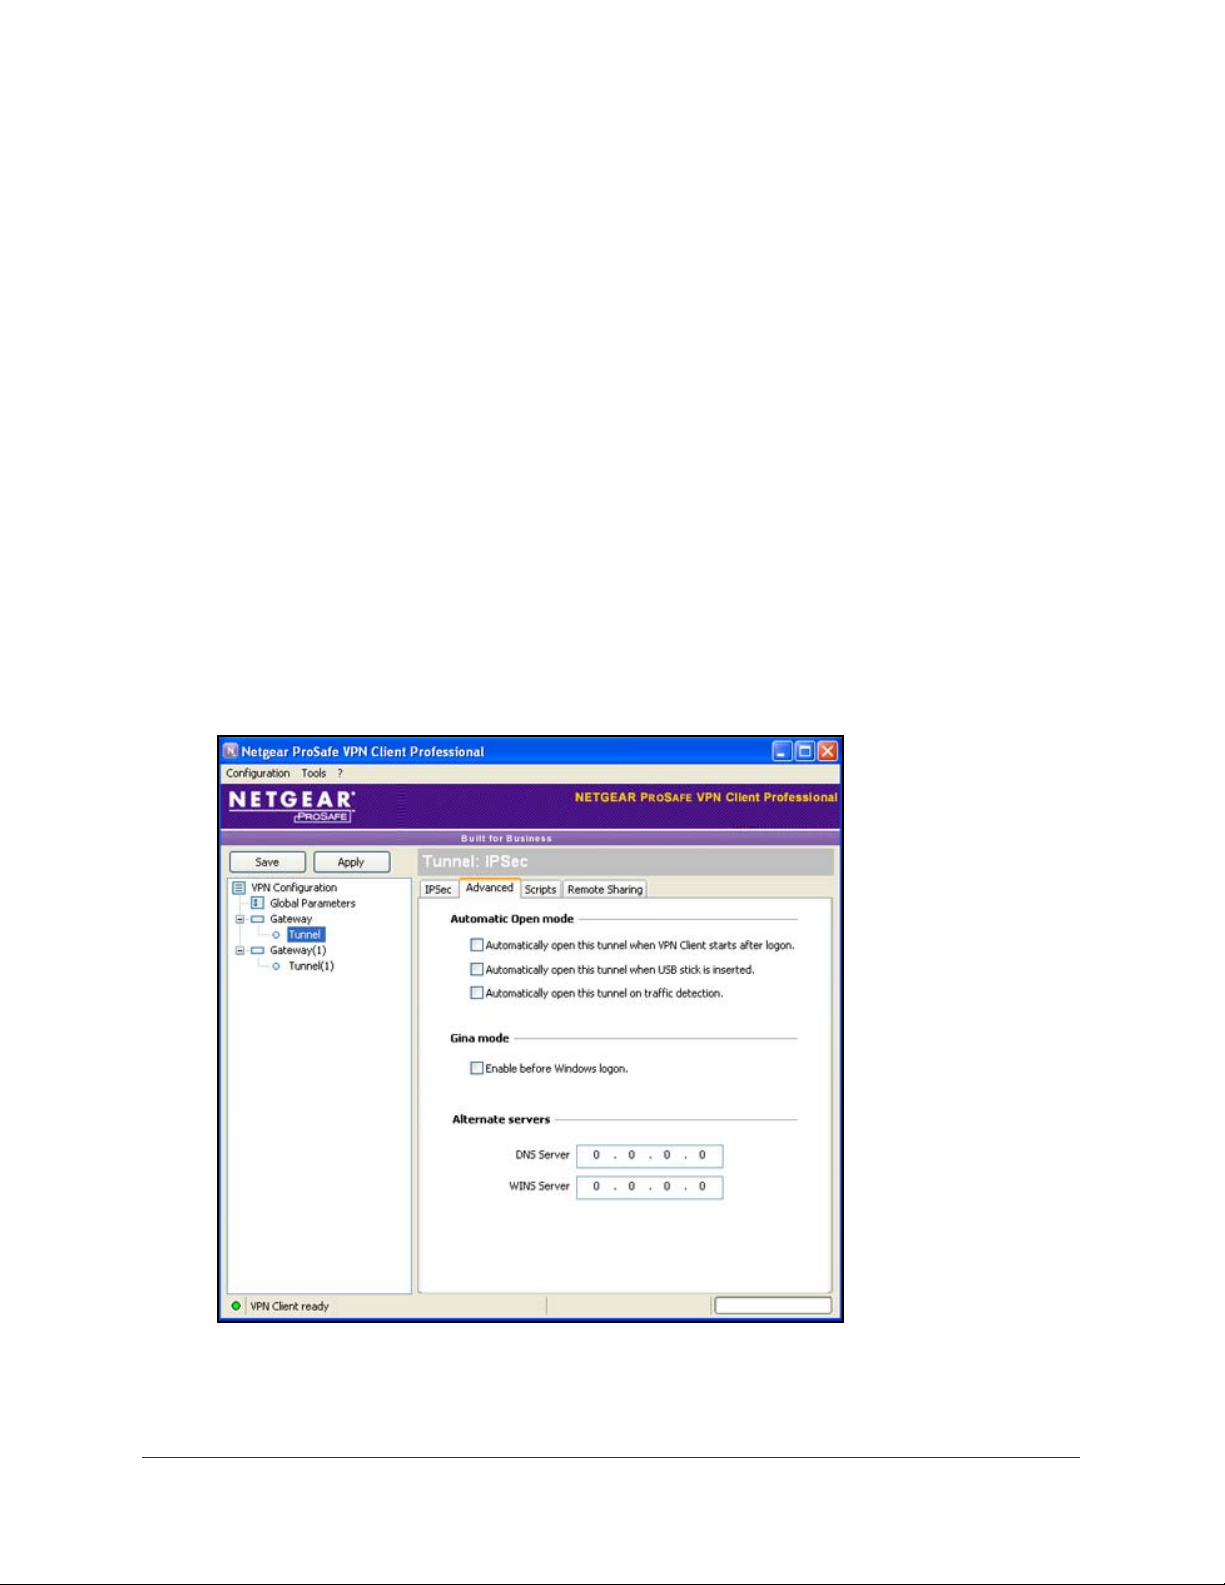
NETGEAR ProSAFE VPN Client
Configure How VPN Tunnels Are Opened
You can configure a VPN tunnel to open automatically. Automatic tunnel opening is an
advanced IPSec setting that applies only to the associated IPSec configuration (phase 2
settings) for a VPN tunnel. That is, automatic tunnel opening is not a global setting for the
VPN Client.
Configure a Tunnel to Open Automatically
The Advanced IPSec pane provides various options that let you configure a tunnel to open
automatically.
To configure tunnels to open automatically:
n the tree list pane of the Configuration Panel screen, click the IPSec configuration
1. I
name (that is, the tunnel) for which you want to configure the advanced settings (for
example, Tunnel in the following figure).
The IPSec pane displays.
2. In the IPSec p
The Advanced IPSec pane displays:
ane, click the Advanced tab.
Advanced Configuration Options
59
Page 60

NETGEAR ProSAFE VPN Client
3. Configure the settin gs as described in the following table.
Setting Description
Automatic Open mode
Note: When you select any of these check boxes, the VPN Cli
these advanced settings apply.
Automatically open this tunnel
en the VPN Client starts
wh
after login.
Automatically open this tunnel
when USB
Automatically open this tunnel
on traffic detection.
Gina Mode
Enable before Windows logon. Select this check box to enable Windows Gina mode for Windows 2000 or
stick is inserted.
Select this check box to automatically open the tunnel when the VPN Client
starts after you have logged in. (For more information, see Open a Tunnel
with a Double-Click on a Desktop Icon on page 62.)
Select this check box to automatically open the tunnel when you insert an
external USB drive in to the computer. (For more information, see USB
Mode on page 68).
Note: This check box is disab
Select this check box to automatically open the tunnel when the VPN Client
detects traffic.
dows XP or to enable Windows credential providers for Windows Vista
Win
indows 7.
or W
Gina mode and credential providers al
Windows logon process. This can be useful when a corporate employee
database is used for logon and the remote computer needs to connect to
the corporate network before processing the Windows logon.
For more information, see the section following this table, Configure a VPN
Tunnel to Open before Windows Logon.
ent automatically opens the tunnel to which
led before Windows logon.
low a tunnel to be used for the
Note: When Gina mode or credential providers is enabled, the Scripts
e is disabled.
pan
4. Click Save.
Configure a VPN Tunnel to Open before Windows Logon
You can manually or automatically open one or more VPN tunnels before Windows logon by
using a Windows logon technology that is referred to as credential providers in Windows 7
and W
indows Vista and as Gina mode in Windows XP and Windows 2000.
Advanced Configuration Options
60
Page 61
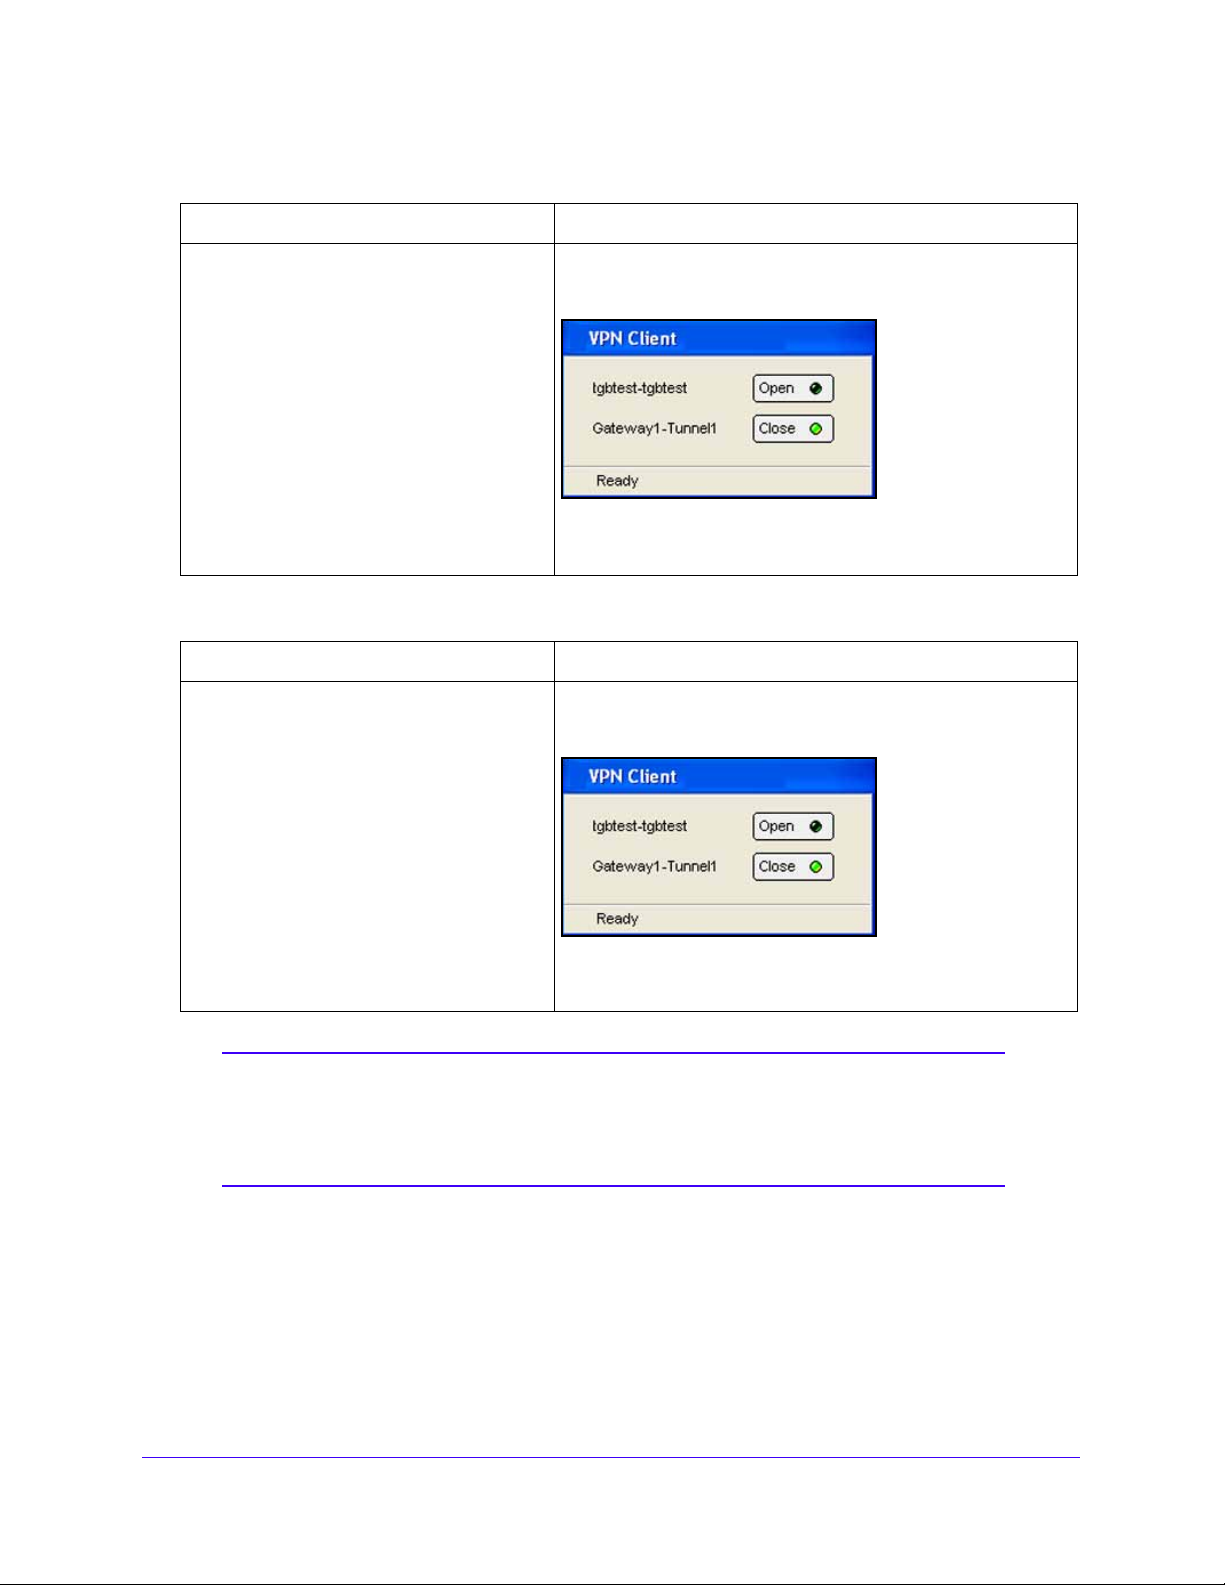
NETGEAR ProSAFE VPN Client
To manually open a VPN tunnel before Windows logon:
Procedure VPN Client Behavior
1. Go to the Configuration Panel screen.
2. Open the Advanced IPSec pane.
3. Select the Enable before Windows
logon check box.
4. Clear the Automatically open this
tunnel on traffic detection check box.
For more information, see Configure How
VPN Tunnels Are Opened on page 59.
Before Windows logon, the following pop-up screen displays to
allow you to open the required VPN tunnel.
The pop-up screen lists all VPN tunnels for which you have
selected the Enable before Windows logon check box on the
Advanced IPSec pane.
To configure a VPN tunnel to open automatically before Windows logon:
Procedure VPN Client Behavior
1. Go to the Configuration Panel screen.
2. Open the Advanced IPSec pane.
3. Select the Enable before Windows
logon check box.
4. Select the Automatically open this
tunnel on traffic detection check box.
For more information, see Configure How
VPN Tunnels Are Opened on page 59.
Before Windows logon, the following pop-up screen displays to
show the VPN tunnels that are opened automatically.
The pop-up screen lists all VPN tunnels for which you have
selected the Enable before Windows logon check box on the
Advanced IPSec pane.
Note: To enable a VPN tunnel to automatically open on traffic detection
after Windows logon, select the Automatically open this tunnel on
traffic detection check box and ensure that the Enable before
Windows logon check box is cleared.
The following information applies to tunnels for which you have selected the Enable before
Windows logon check box on the Advanced IPSec pane:
• Y
ou cannot hide the pop-up screen that appears before Windows logon.
• I
f two tunnels have been configured to automatically open on traffic detection but only
one tunnel is configured to be enabled before Windows logon, both tunnels might open
automatically before Windows logon when the IKE services are running.
Advanced Configuration Options
61
Page 62
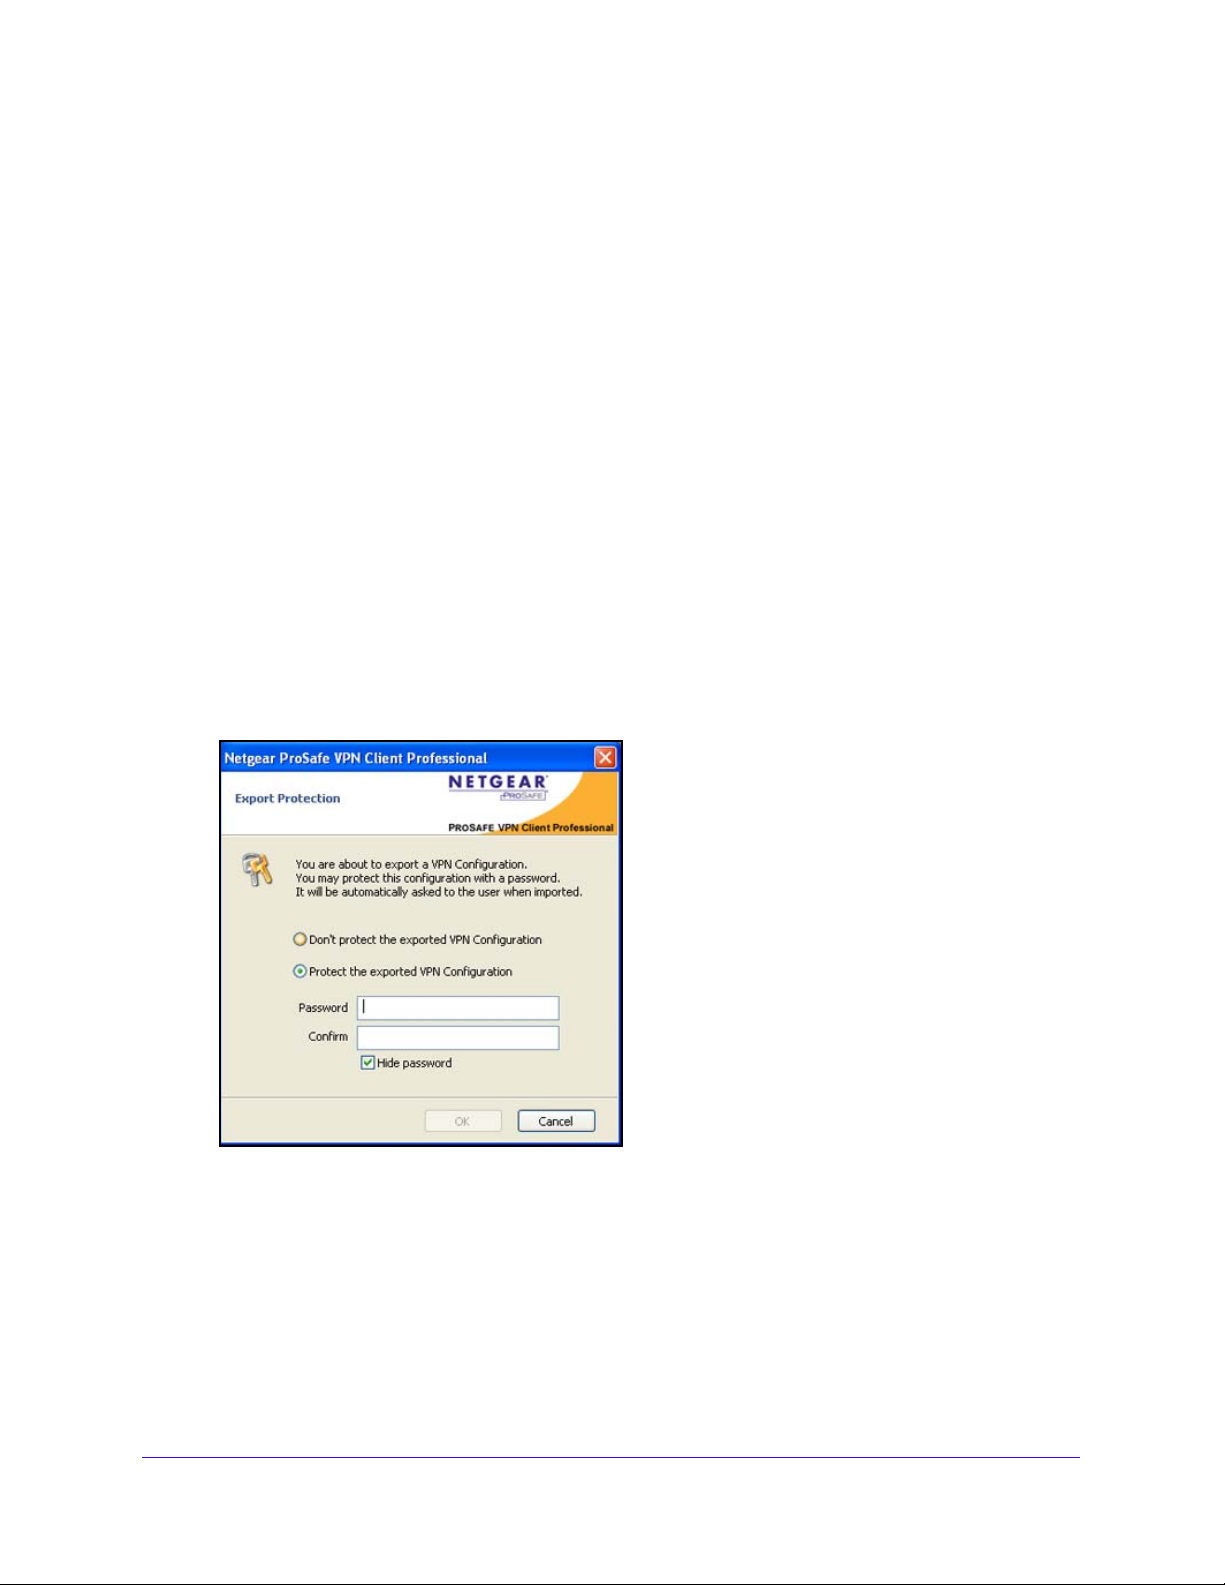
NETGEAR ProSAFE VPN Client
• Scripts that you might have configured are disabled.
• The VPN Client cannot f
unction in USB mode (see USB Mode on page 68).
• The Mode
addresses (see Configure How VPN Tunnels Are Opened on p
• When
Config feature is disabled, so you might have to specify DNS or WINS server
age 59).
extended authentication (XAUTH) is enabled (see Extended Authentication on
page 47), a pop-up screen displays when tunnels open to enable you to enter the login
name and password.
• When
you use a USB token or smart card, a pop-up screen displays when tunnels open
to enable you to enter the PIN code.
Open a Tunnel with a Double-Click on a Desktop Icon
The following procedure lets you create a desktop icon for easy opening of a VPN tunnel.
To configure a tunnel to open with a double-click on a desktop icon:
1. In the Advanced auth
Automatically open this tunnel when the VPN Client starts after login check box.
2. From t
he main menu on the Configuration Panel screen, select Configuration > Export.
The Export Protection screen displays:
entication pane of the Configuration Panel screen, select the
3. Select one of the fo
• Don’t protect
• Pro
tect the exported VPN Configuration. The VPN configuration file requires a
password before it can be opened.
a. (Op
b. Enter a p
c. En
tional) Clear the Hide password check box.
assword in the Password field.
ter the same password in the Confirm field.
llowing radio buttons:
the exported VPN Configuration.
Advanced Configuration Options
62
Page 63

4. Click OK.
NETGEAR ProSAFE VPN Client
5. Navigat
6. T
ype a name for the VPN configuration file.
An exported VPN configuration file has a .tgb extension. Do not change this extension.
The VPN configuration is exported.
7. Place
Figure 13. VPN configuration shortcut icon
When you double-click the desktop icon, the VPN Client opens with the specified VPN
configuration, and the tunnel is then automatically opened.
e to the location where you want to save the VPN configuration file.
a shortcut of the VPN configuration file on the desktop.
Configure Alternate DNS and WINS Servers
Alternate DNS and WINS servers are part of an advanced IPSec setting that applies only to
the associated IPSec configuration (phase 2 settings) for a VPN tunnel. That is, these
alternate servers do not apply to the global setting of the VPN Client.
You can configure the alternate servers only when the Mod
When the Mode Config feature is enabled (see Configure Advanced Authentication on
page 44), the Alternate server fields are disabled.
To configure alternate DNS and WINS servers:
n the tree l ist pane of the Configuration Panel screen, click t he IPS ec con f igura tion n ame
1. I
(that is, the tunnel) for which you want to configure the advanced settings (for example,
Tunnel in the following figure).
The IPSec pane displays.
2. In the IPSec p
ane, click the Advanced tab.
e Config feature is disabled.
Advanced Configuration Options
63
Page 64
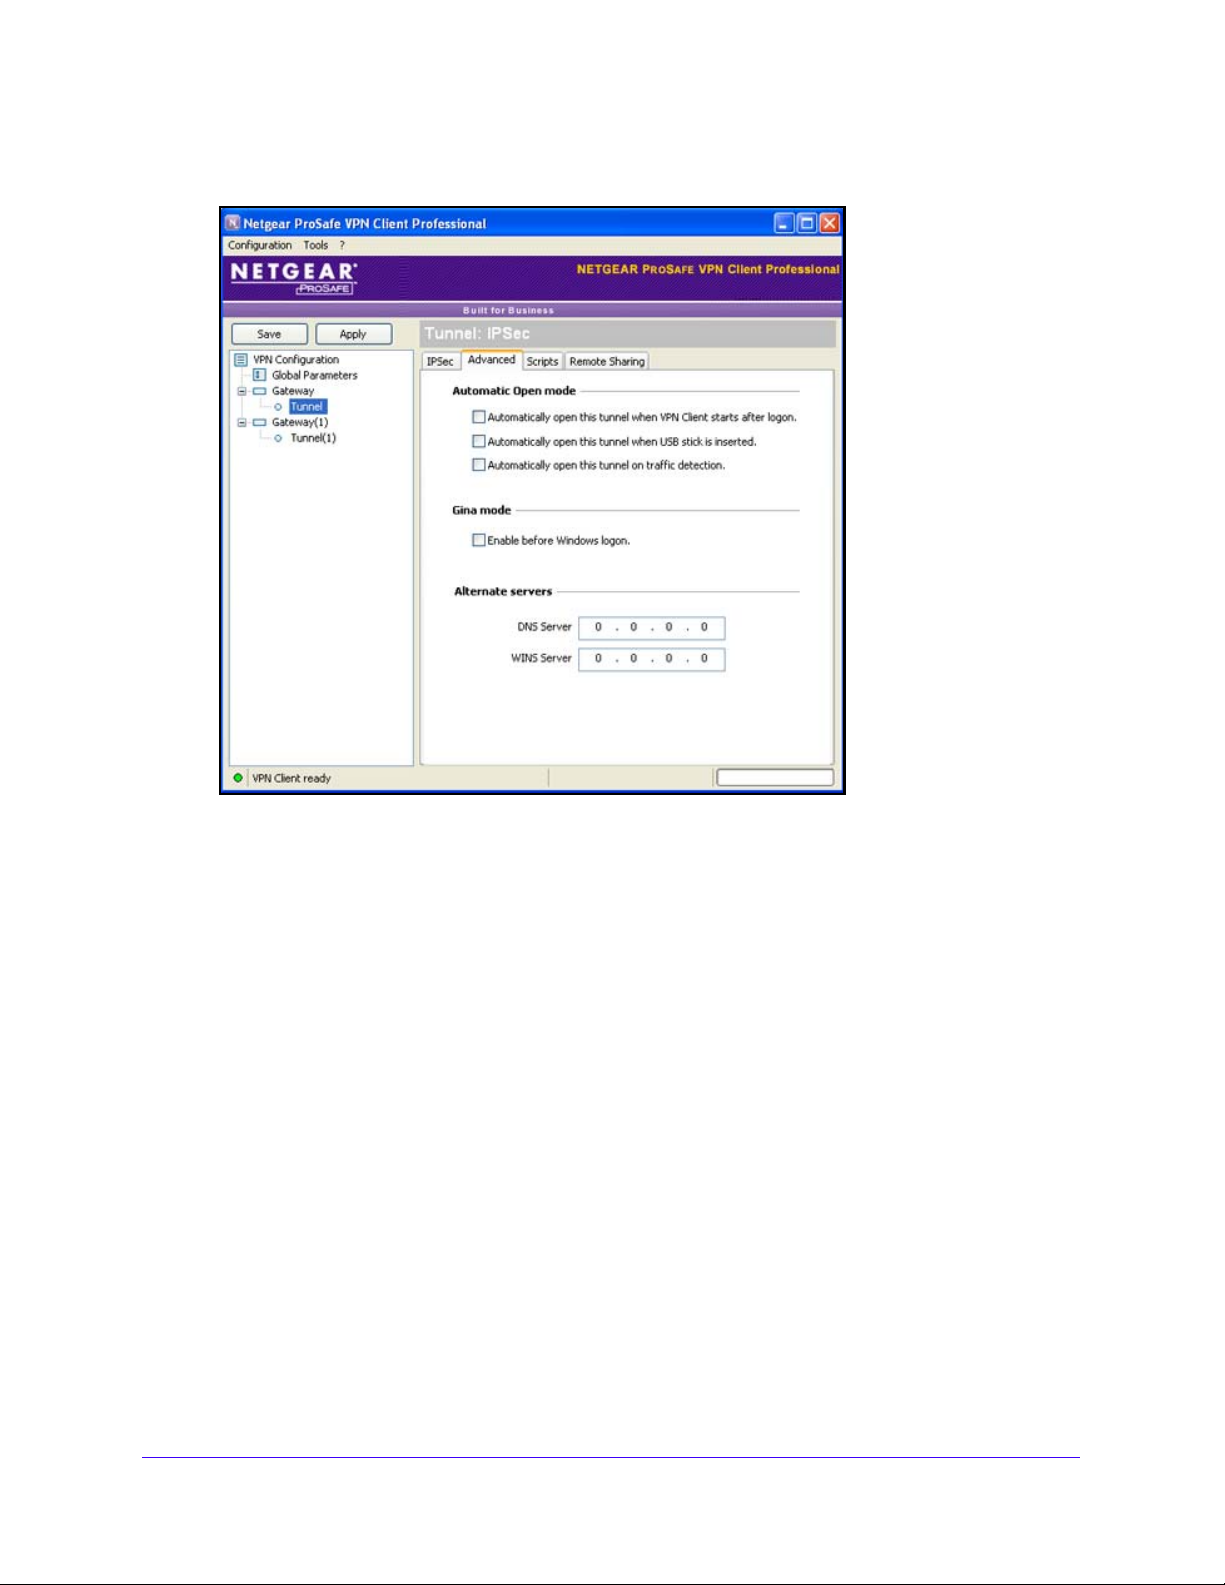
NETGEAR ProSAFE VPN Client
The Advanced IPSec pane displays:
3. (Opt
4. Click Save.
ional) In the Alternate Server section, configure the following settings:
• DNS Server.
server is used to resolve intranet addressing while the tunnel is open.
If Mode Config is enabled, the DNS server address that is issued by the remote VPN
gateway is displa
• WINS Server. Enter the IP add
server is used to resolve intranet addressing while the tunnel is open.
If Mode Config is enabled, the WINS server address that is issued by the remote VPN
gateway is displa
Enter the IP address of the DNS server of the remote LAN. The DNS
yed in this field.
ress of the WINS server of the remote LAN. The WINS
yed in this field.
Configure Scripts
This feature enables you to specify and execute scripts (including batches and applications)
at each step of a tunnel connection for various purposes. For example, you can use a script
to detect the current software release, to detect the database availability before launching a
backup application, to configure the network, or to detect whether a software application is
running or a logon procedure is specified.
Advanced Configuration Options
64
Page 65
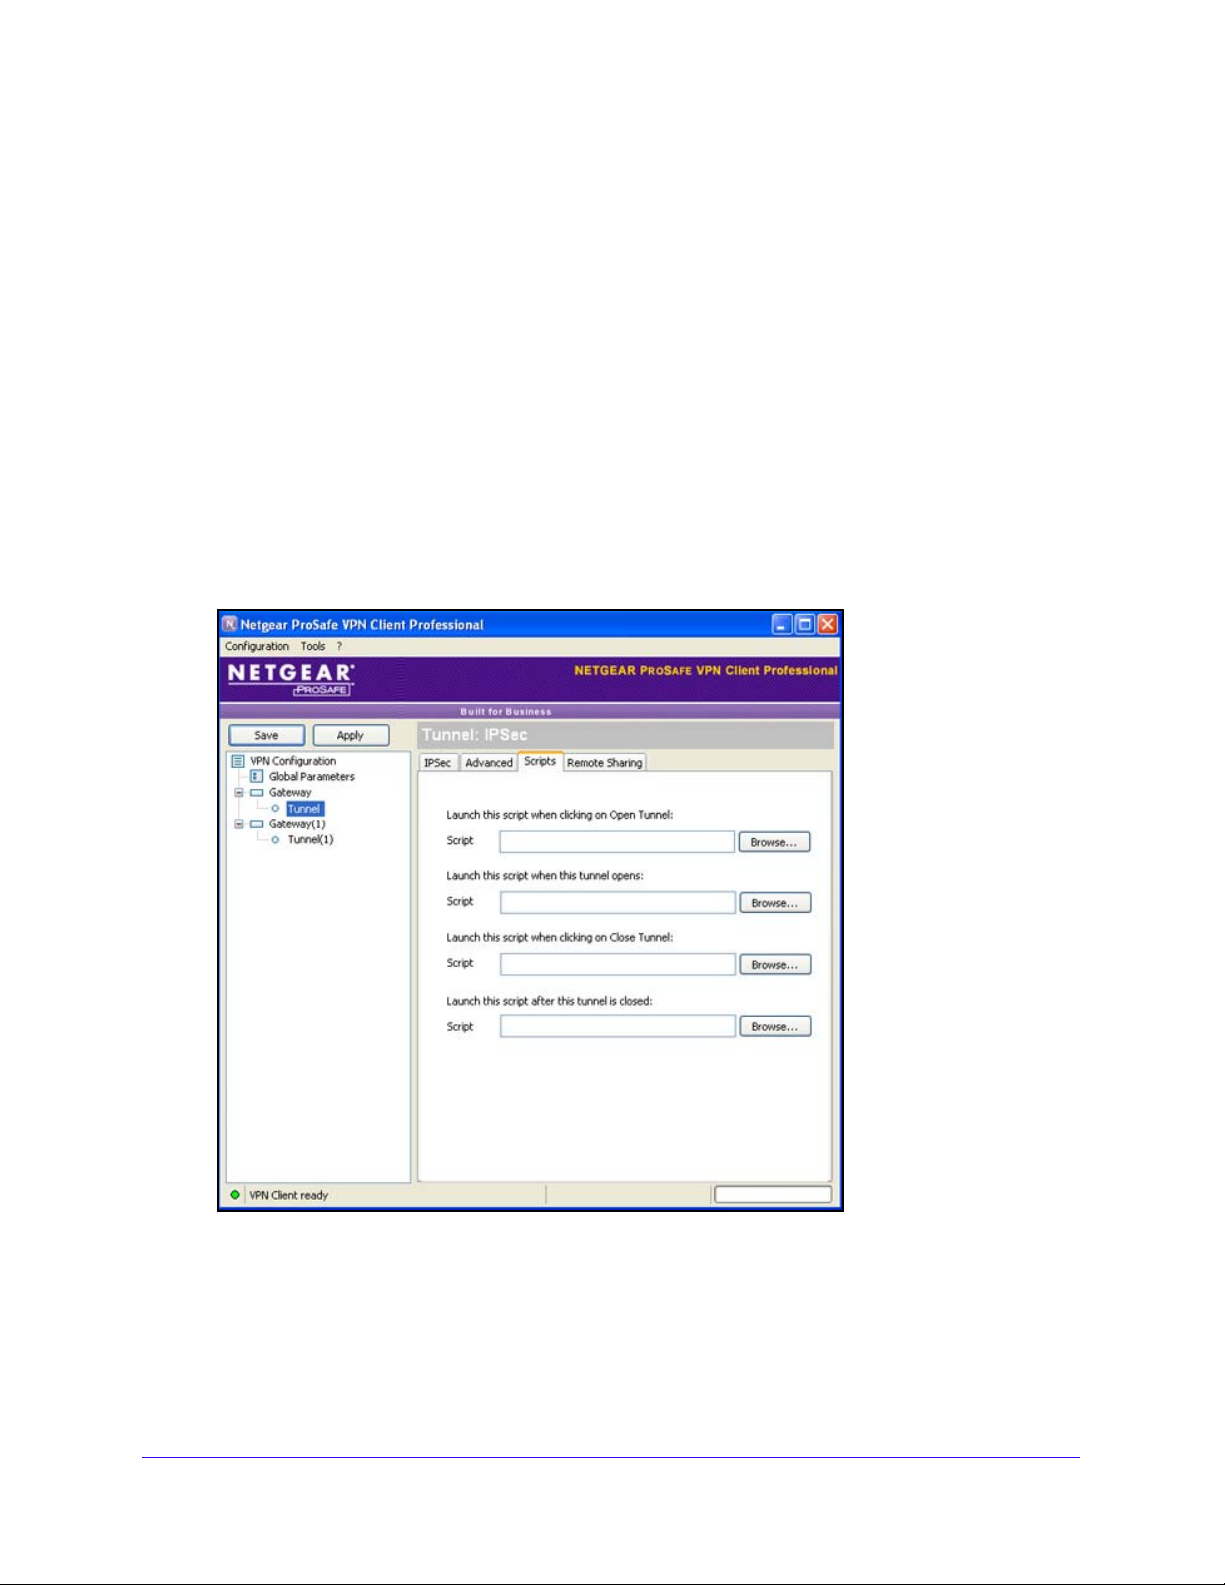
NETGEAR ProSAFE VPN Client
You can specify and execute several scripts for each step of a VPN tunnel opening and
closing process:
• Bef
• Af
• Bef
• Af
To configure scripts:
1. I
ore the tunnel is opened
ter the tunnel is opened
ore the tunnel closes
ter the tunnel is closed
n the tree l ist pane of the Configuration Panel screen, click t he IPS ec con f igura tion n ame
(that is, the tunnel) for which you want to configure the advanced settings (for example,
Tunnel in the following figure).
The IPSec pane displays.
2. In the IPSec p
ane, click the Scripts tab.
The Scripts pane displays:
3. Click Br
owse to navigate to a script file and open it.
You can open up to four script files in the Scripts pane:
aunch this script when clicking on Open Tunnel.
• L
aunch this script when this tunnel opens.
• L
Advanced Configuration Options
65
Page 66

NETGEAR ProSAFE VPN Client
• Launch this script when clicking on Close Tunnel.
• Launch this script after this tunnel is closed.
4. Click Save.
To configure a web page to open automatically when a VPN tunnel opens:
1. In the I
The Scripts pane displays.
2. In
you want to open.
For example, enter http://support.netgear.com/product/VPNG05L.
3. Click Save.
When the tunnel for which the script is defined opens, the web page opens automatically.
PSec pane of the Configuration Panel screen, click the Scripts tab.
the Launch this script when this tunnel opens field, enter the URL of the web page that
Configure Remote Sharing
This feature enables you to specify remote computers that you can connect to for desktop
sharing after the VPN tunnel has been established.
To add a computer for remote sharing:
1. In the
tree list pane of the Configuration Panel screen, click the IPSec configuration name
(that is, the tunnel) for which you want to configure the advanced settings (for example,
Tunnel in the following figure).
The IPSec pane displays.
the IPSec pane, click the Remote Sharing tab.
2. In
Advanced Configuration Options
66
Page 67
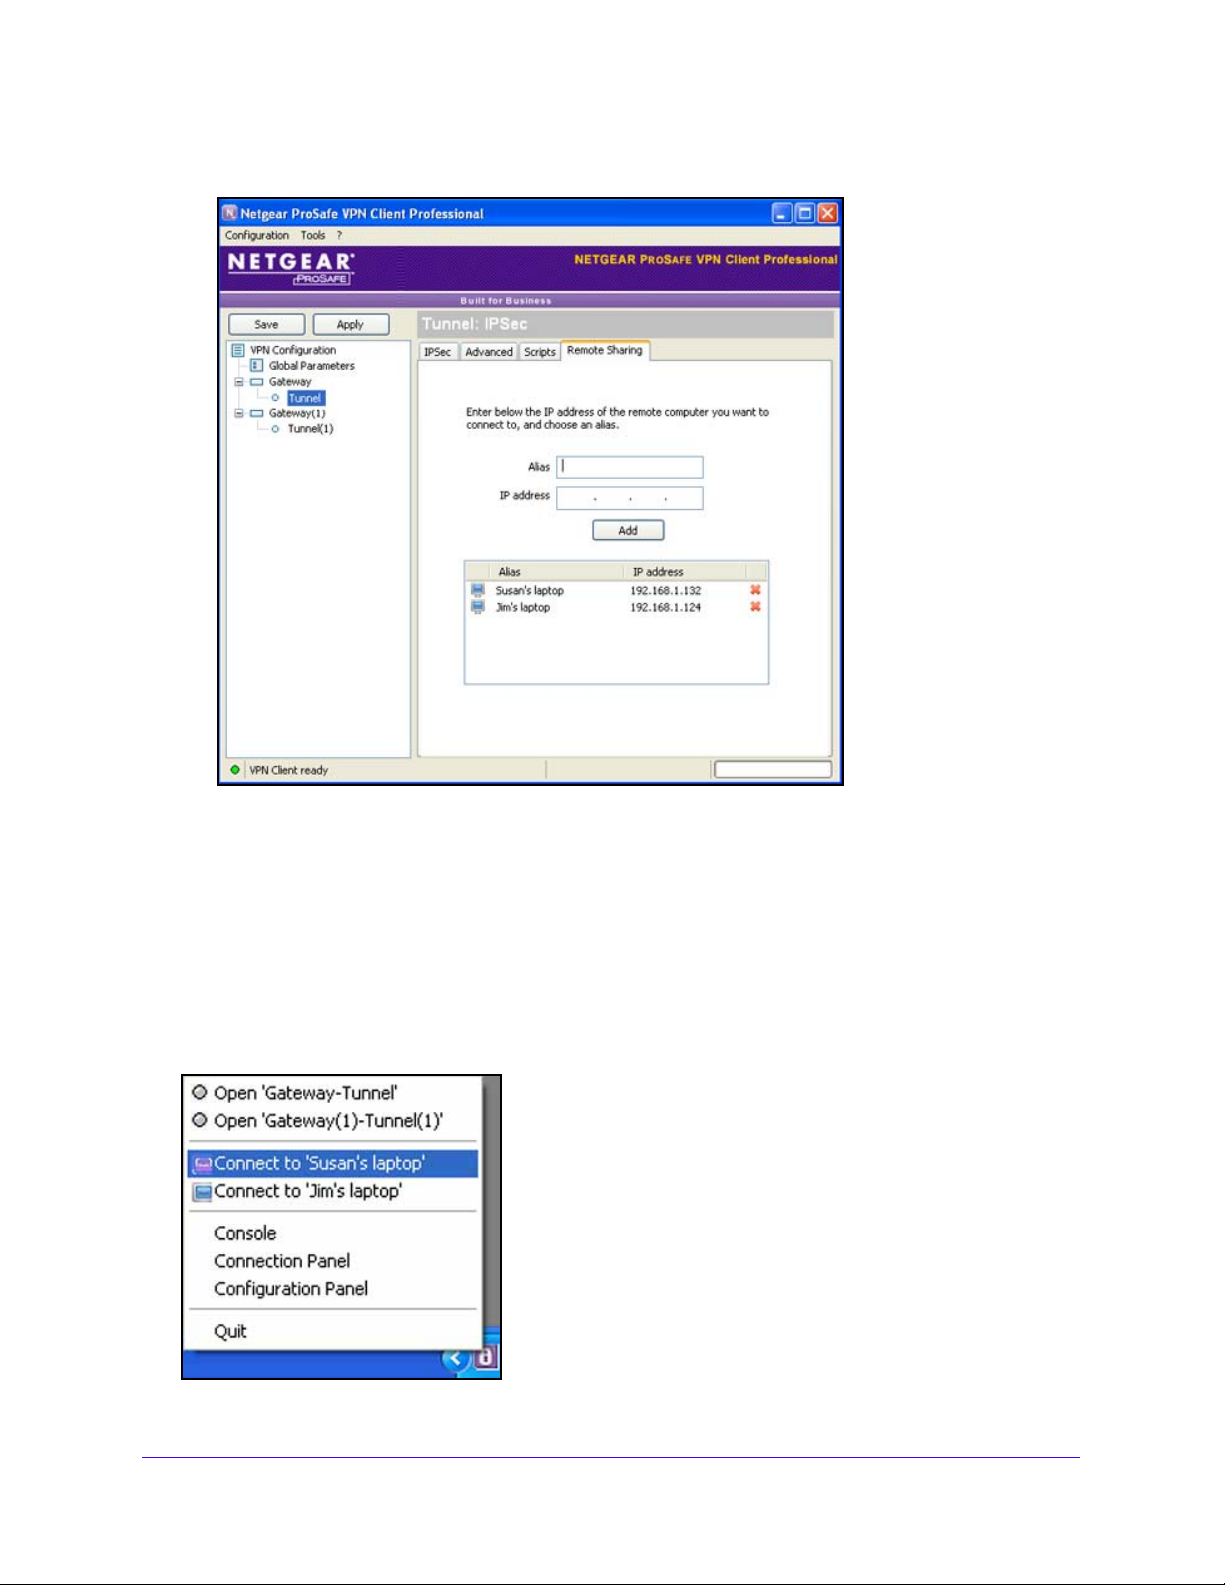
NETGEAR ProSAFE VPN Client
The Remote Sharing pane displays:
3. In the Alias field
4. In the IP
address field, enter the IP address for the remote computer.
, enter a name for the remote computer.
This IP address needs to be an address in the subnet or IP range of the remote LAN.
5. Click Add.
The computer is added to the computer to the table.
After you have defined a remote computer, you can connect to
it from the system tray menu.
The VPN tunnel with which the remote computer is associated opens automatically.
Figure 14. Remote computer option in the system tray menu
Advanced Configuration Options
67
Page 68

NETGEAR ProSAFE VPN Client
USB Mode
The VPN Client lets you save VPN configurations and VPN security elements such as
pre-shared keys and certificates onto a USB drive to allow you to do the following:
• Limit a VPN configuration to a specific computer
configuration can be used only on a specific computer.
• Limit a
VPN configuration can be used only with a specific USB drive.
After you have moved a VPN configuration and it
removed the USB drive, you then just need to insert the USB drive into a computer to
automatically open the tunnels. When you remove the USB drive from the computer, all open
tunnels are automatically closed.
This section includes the following subsections:
• Enable a New USB Drive with a VPN Configuration
• To Configure Tunnels to Open Auto
VPN configuration to a specific USB drive. VPN tunnels that are defined in the
matically with a USB Drive
. VPN tunnels that are defined in the VPN
s security elements onto a USB drive and
Enable a New USB Drive with a VPN Configuration
You can enable a new USB drive by copying a VPN configuration and its security elements
onto it in one of the following ways:
• From the main
and copy the VPN configuration file onto the USB drive.
• Use th
e USB Mode Wizard.
menu of the Configuration Panel screen, select Configuration > Export,
Advanced Configuration Options
68
Page 69
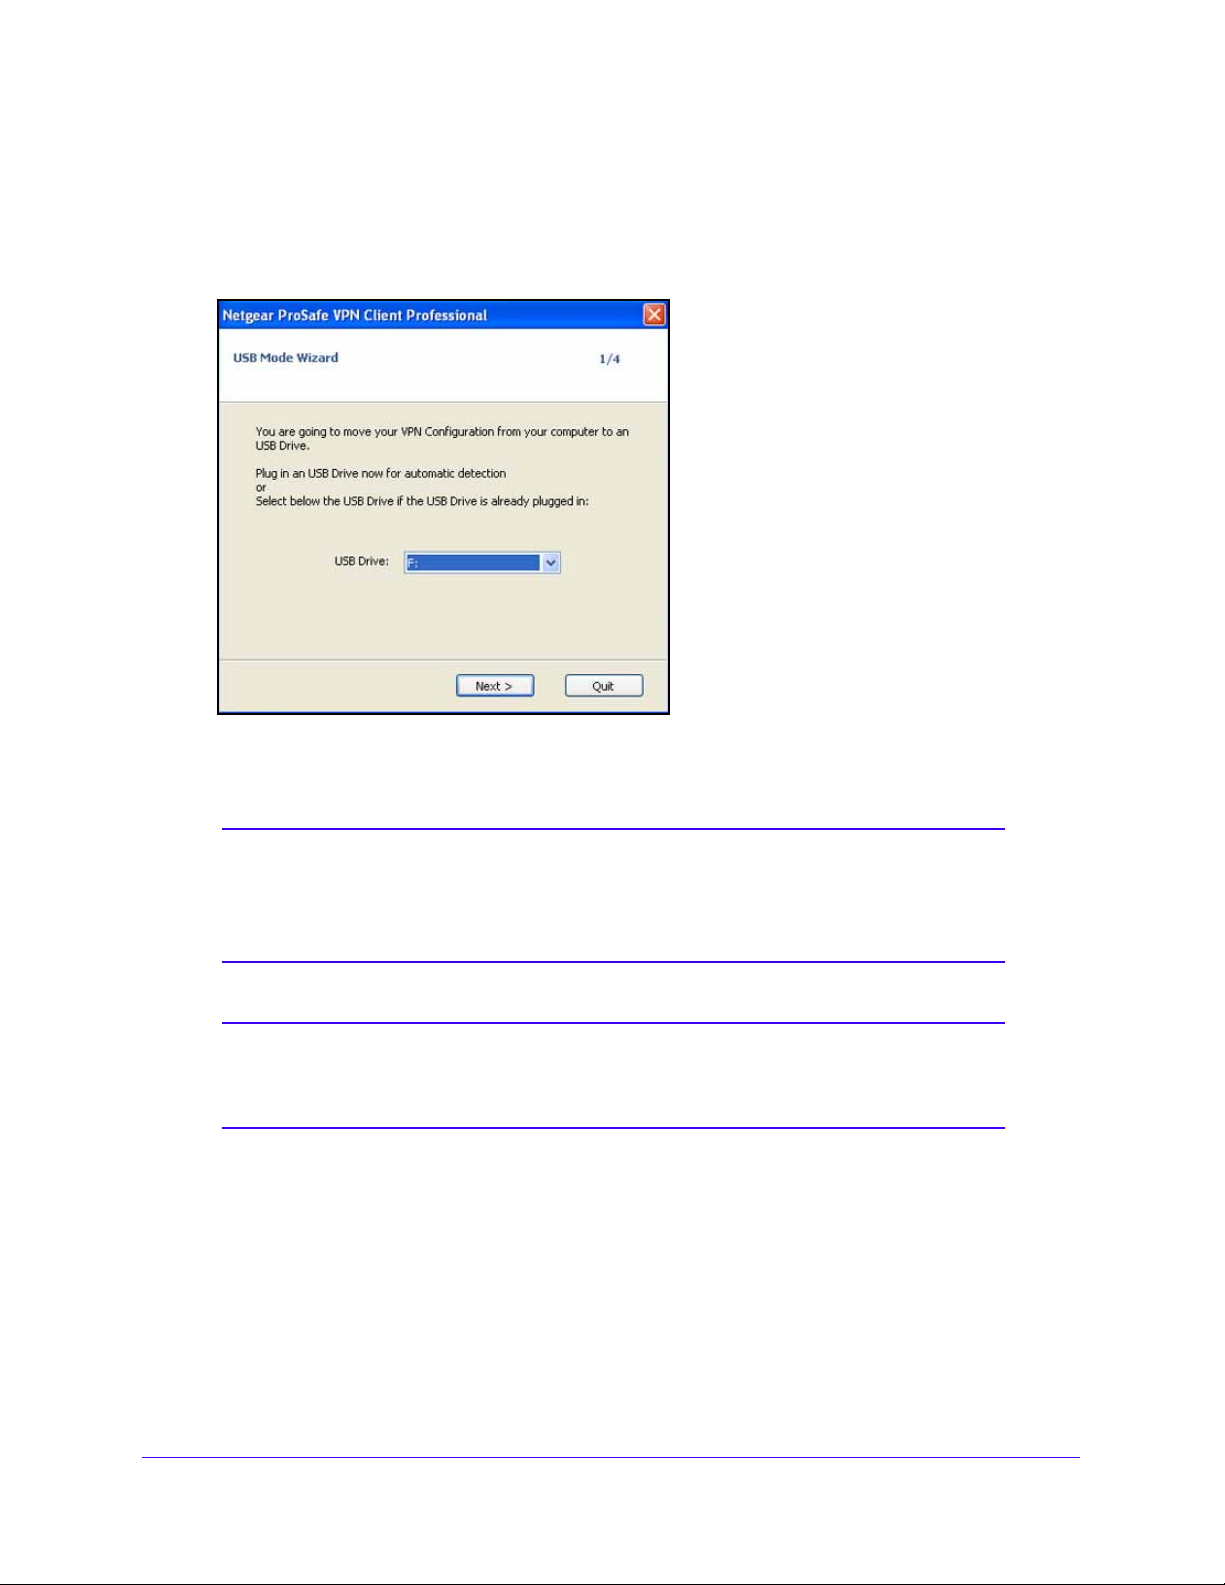
NETGEAR ProSAFE VPN Client
To start the USB Mode Wizard and copy VPN configuration onto a USB drive:
1. From the main menu of the Configuration Panel screen, select Configuration > Move
to USB Drive.
The USB Mode Wizard 1/4 screen displays:
If one or more USB drives are already inserted, the VPN Client detects and displays
hem. In the previous figure, drive F: is selected.
t
Note: If you insert a USB drive with a VPN configuration while the USB
Mode Wizard 1/4 screen is displayed, and the VPN Client detects
that the USB drive is the only one in the computer, the VPN Client
automatically displays the next screen, USB Mode Wizard 2/4.
Note: If you insert a USB drive with a VPN configuration while another
USB drive with another VPN configuration is already inserted, a
warning message asks you to remove one of the USB drives.
2. Click Next.
Advanced Configuration Options
69
Page 70
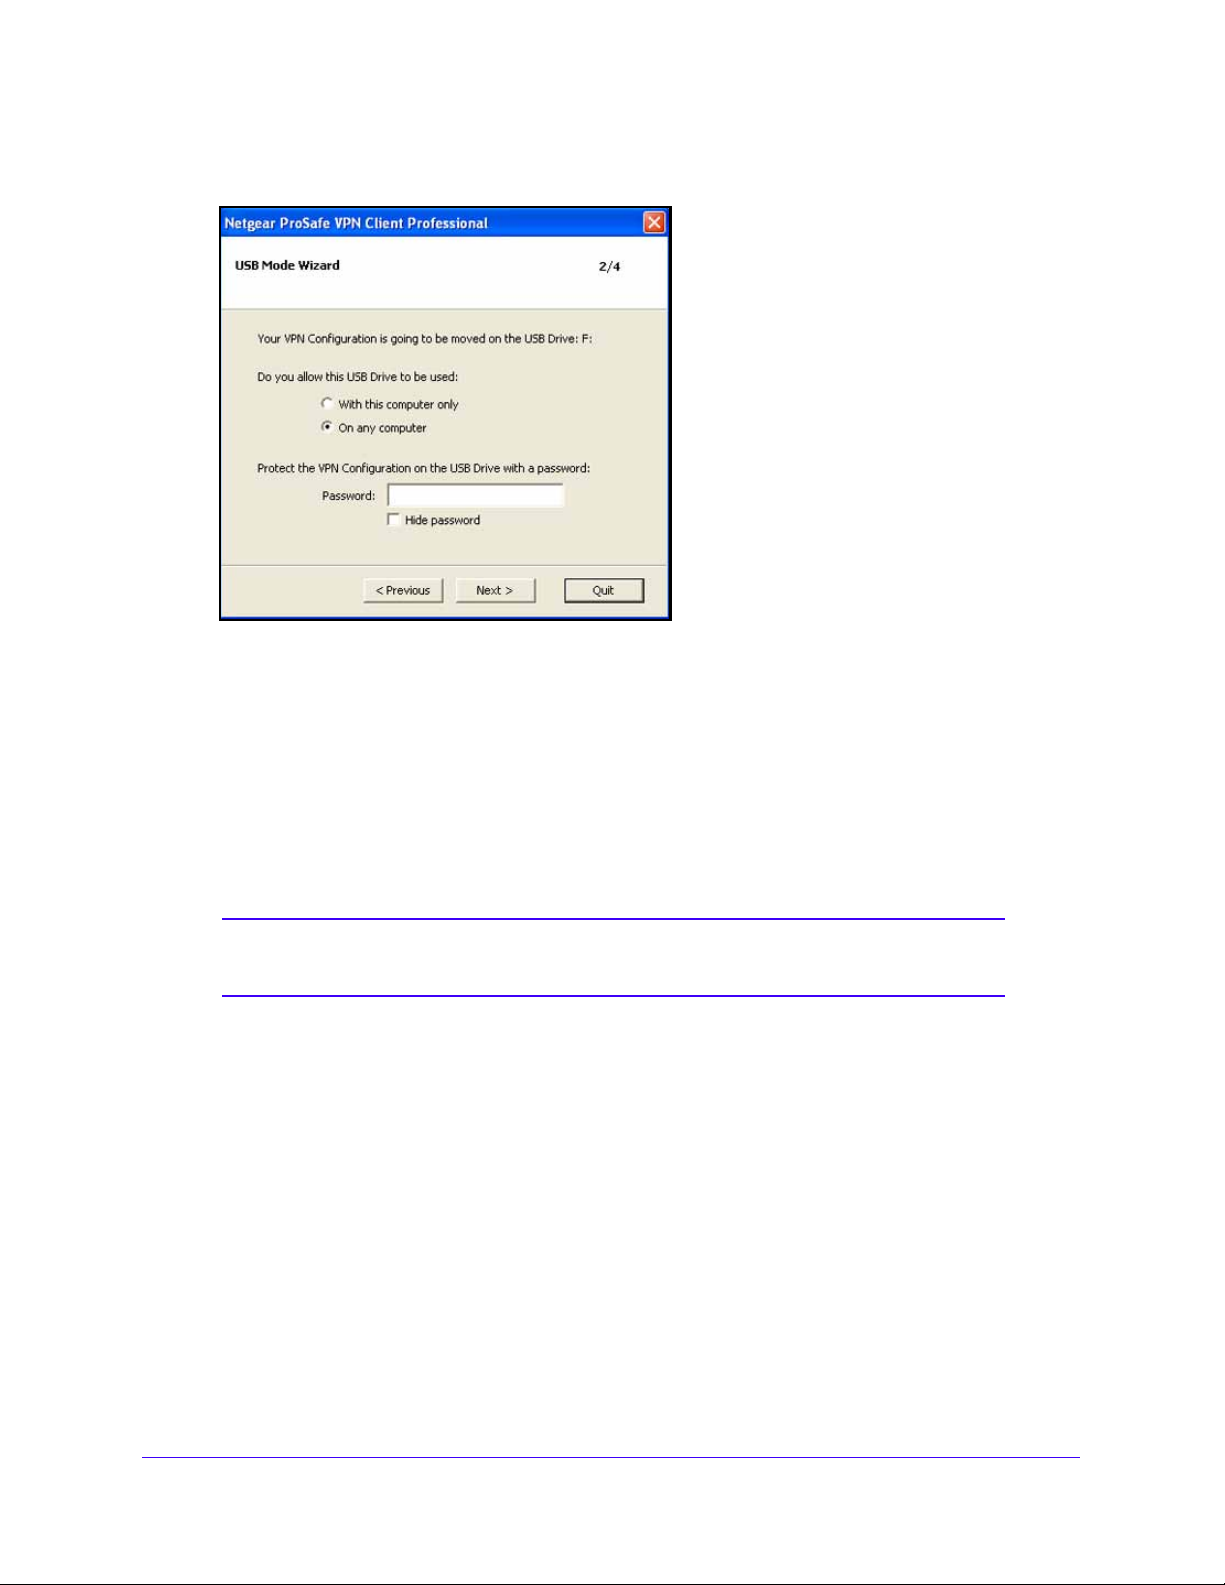
NETGEAR ProSAFE VPN Client
The USB Mode Wizard 2/4 screen displays:
3. Select one of the fo
• W
ith this computer only. The VPN tunnels that are defined in the VPN configuration
llowing security options:
can be used only on this specific computer.
• On any
computer. The VPN tunn els that are defined in the VPN configuration can be
used with this USB drive only, but on any computer.
4. (Opt
ional) Protect the VPN configuration with a password by entering one in the Password
field.
5. (Opt
ional) Select the Hide password check box to make the passport invisible.
Note: At this step in the wizard, if you remove the USB drive, the wizard
automatically returns to the USB Mode Wizard 1/4 screen.
6. Click Next.
Advanced Configuration Options
70
Page 71
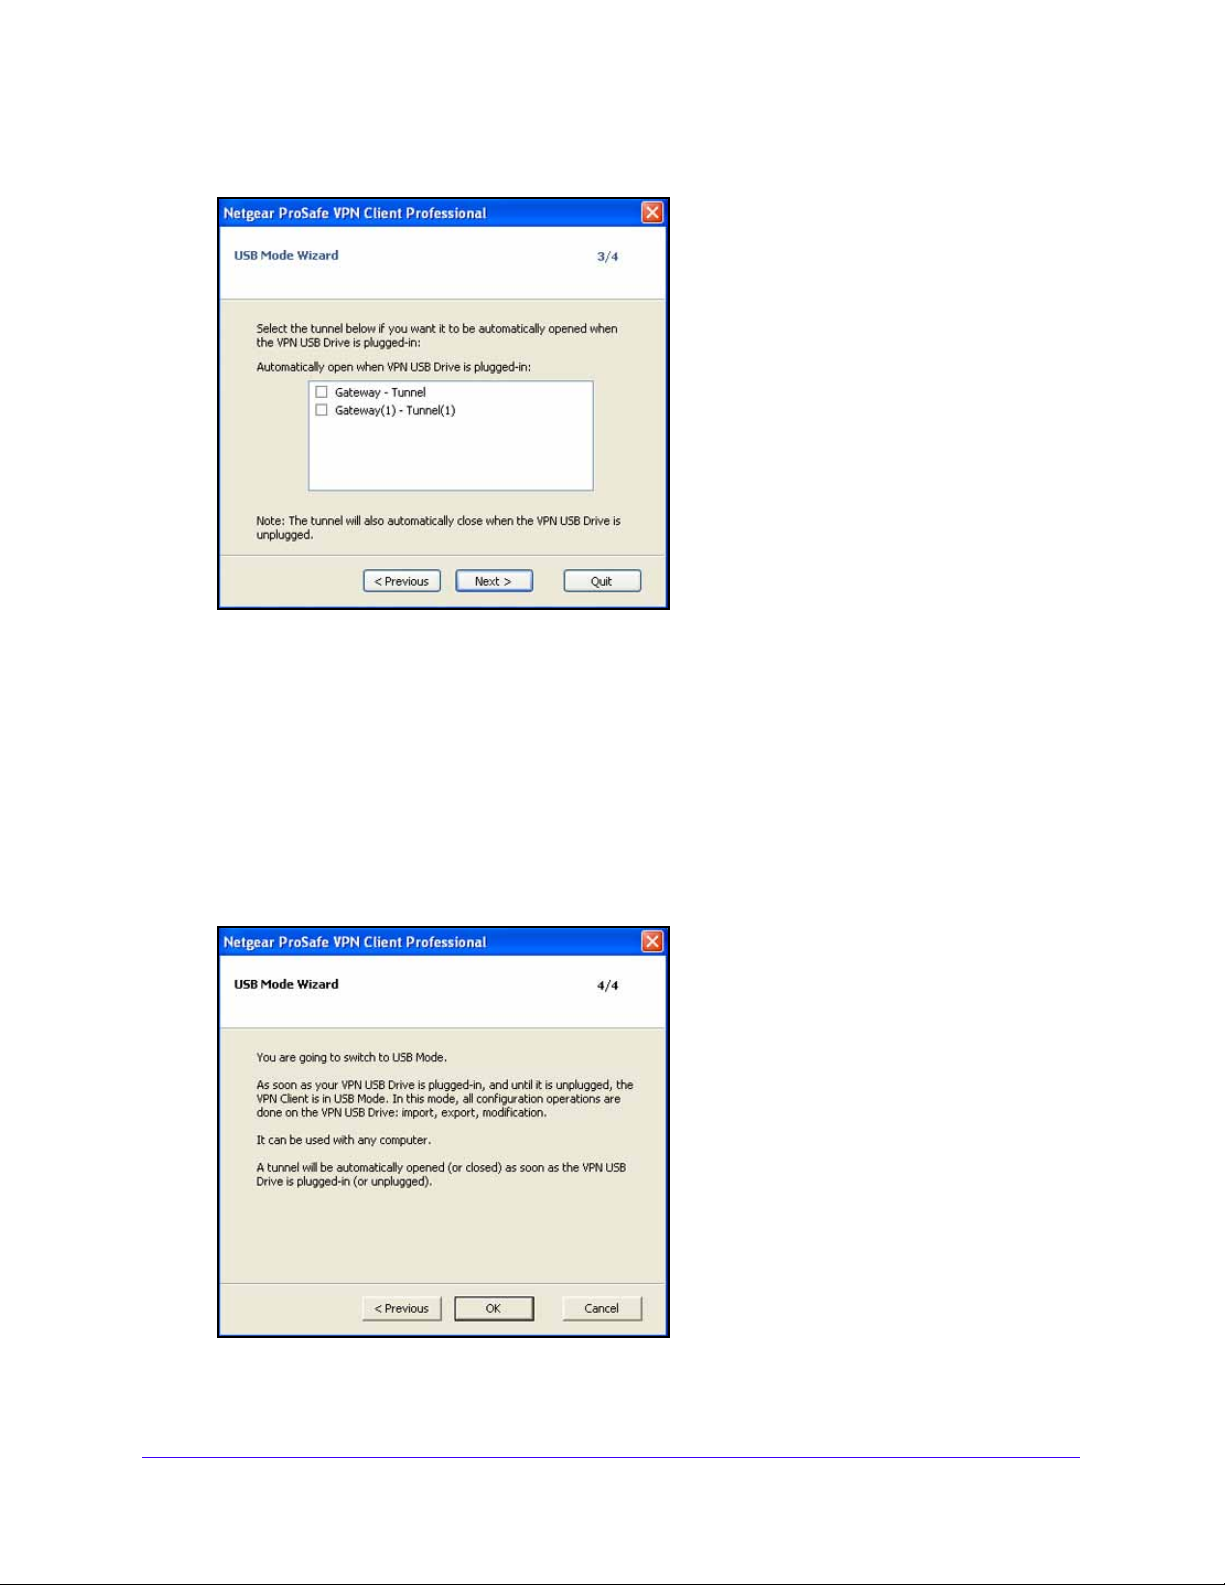
NETGEAR ProSAFE VPN Client
The USB Mode Wizard 3/4 screen displays:
pecify the tunnel or tunnels that you want to open automatically by selecting the associated
7. S
check boxes.
Tip: I
f there is only one tunnel configured, select the Automatically open
this tunnel when USB stick is inserted check box on the Advanced
IPSec screen (see Configure How VPN Tunnels Are Opened on
page 59).
8. Click Next.
USB Mode Wizard 4/4 screen displays. This screen is a summary screen.
9. Click OK.
Advanced Configuration Options
71
Page 72

NETGEAR ProSAFE VPN Client
The USB settings are saved. The VPN configuration and its associated security
information are now removed from the computer and copied onto the USB drive; the VPN
Client is now functioning in USB mode.
Note: When you remove the USB drive from the computer, the VPN
configuration is reset, that is, an empty configuration displays in the
Configuration Panel screen. The next time that the VPN Client starts
without the USB drive that contains the VPN configuration inserted,
the VPN configuration is not present in the VPN Client.
Note: The VPN Client does not let you change the password or computer
association that is on the USB drive. However, you can export the
VPN configuration to a local disk, remove the USB drive, import the
VPN configuration in the VPN Client, and start the USB mode wizard
again to specify a new password or a new association with a
computer. Fo r information about importing and exporting, see
a VPN Configuration on page 87.
Import
To Configure Tunnels to Open Automatically with a USB Drive
After you have enabled a USB drive with a VPN tunnel configuration, you can configure the
VPN Client to open the tunnel automatically when you insert the USB drive.
To enable a tunnel to open automatically when you insert a USB drive:
n the t r e e l is t p an e o f the Configuration Panel screen, click t he t u n n e l fo r w h i c h y o u w a n t
1. I
to configure the advanced settings.
The IPSec pane displays.
the IPSec pane, click the Advanced tab.
2. In
The Advanced IPSec pane displays.
3. On the
is inserted check box.
Advanced IPSec pane, select the Automatically open this tunnel when USB stick
Note: If there is more than one tunnel configured, make sure that, on the USB
Mod
e Wizard 3/4 screen, you have selected which tunnel or tunnels should be
opened. For more information, see Enable a New USB Drive with a VPN
Configuration on p
age 68.
4. (Opt
ional) Insert a USB drive that contains a VPN configuration.
The tunnel opens automatically.
Advanced Configuration Options
72
Page 73

NETGEAR ProSAFE VPN Client
Note: If you insert a USB drive without a VPN configuration, or if you do not
insert a USB drive, the VPN Client starts in local mode and uses a VPN
configuration that is available on the local disk.
Certificate Management
This section includes the following subsections:
• Certificate Concepts
• Import Certificates
• View and Assign Certificates
• Use Certificates from USB Tokens and Smart Cards
• Troubleshoot Certificates
• Configure PKI Options
Certificate Concepts
The VPN Client can use X509 certificates from various sources:
• PEM format file (also ref
• PKCS#12 f
• Per
• USB token or
The Certificate pane displays these certificate sources and lets you select a certificate for a
p
configuration to another computer.
Certificates can be stored on a USB token or smart
PIN code; the VPN Client uses these certificates dynamically while establishing a tunnel.
The VPN Client does not create certificates. You ca
software such as Microsoft Certificates Server or OpenSSL or purchase certificates from the
Microsoft Certificate Store. You can store certificates on USB tokens and smart cards.
For information about how to specify if and how a certificate is validated, which certificate is
u
page 84.
sonal Certificate Store
articular tunnel. One certificate is bound to one tunnel. You can easily export the
sed, and which USB token or smart card reader is used, see Configure PKI Options on
ormat file (also referred to as P12 certificate)
smart card
erred to as PEM certificate)
card for which access is protected by a
n create certificates by using third-party
Import Certificates
You can import several certificates and assign each certificate to a different tunnel to enable
the VPN Client to connect to various gateways that are part of different a public key
infrastructure (PKI).
For each tunnel, you can import and assign one PEM certificate and one P12 certificate.
Advanced Configuration Options
73
Page 74
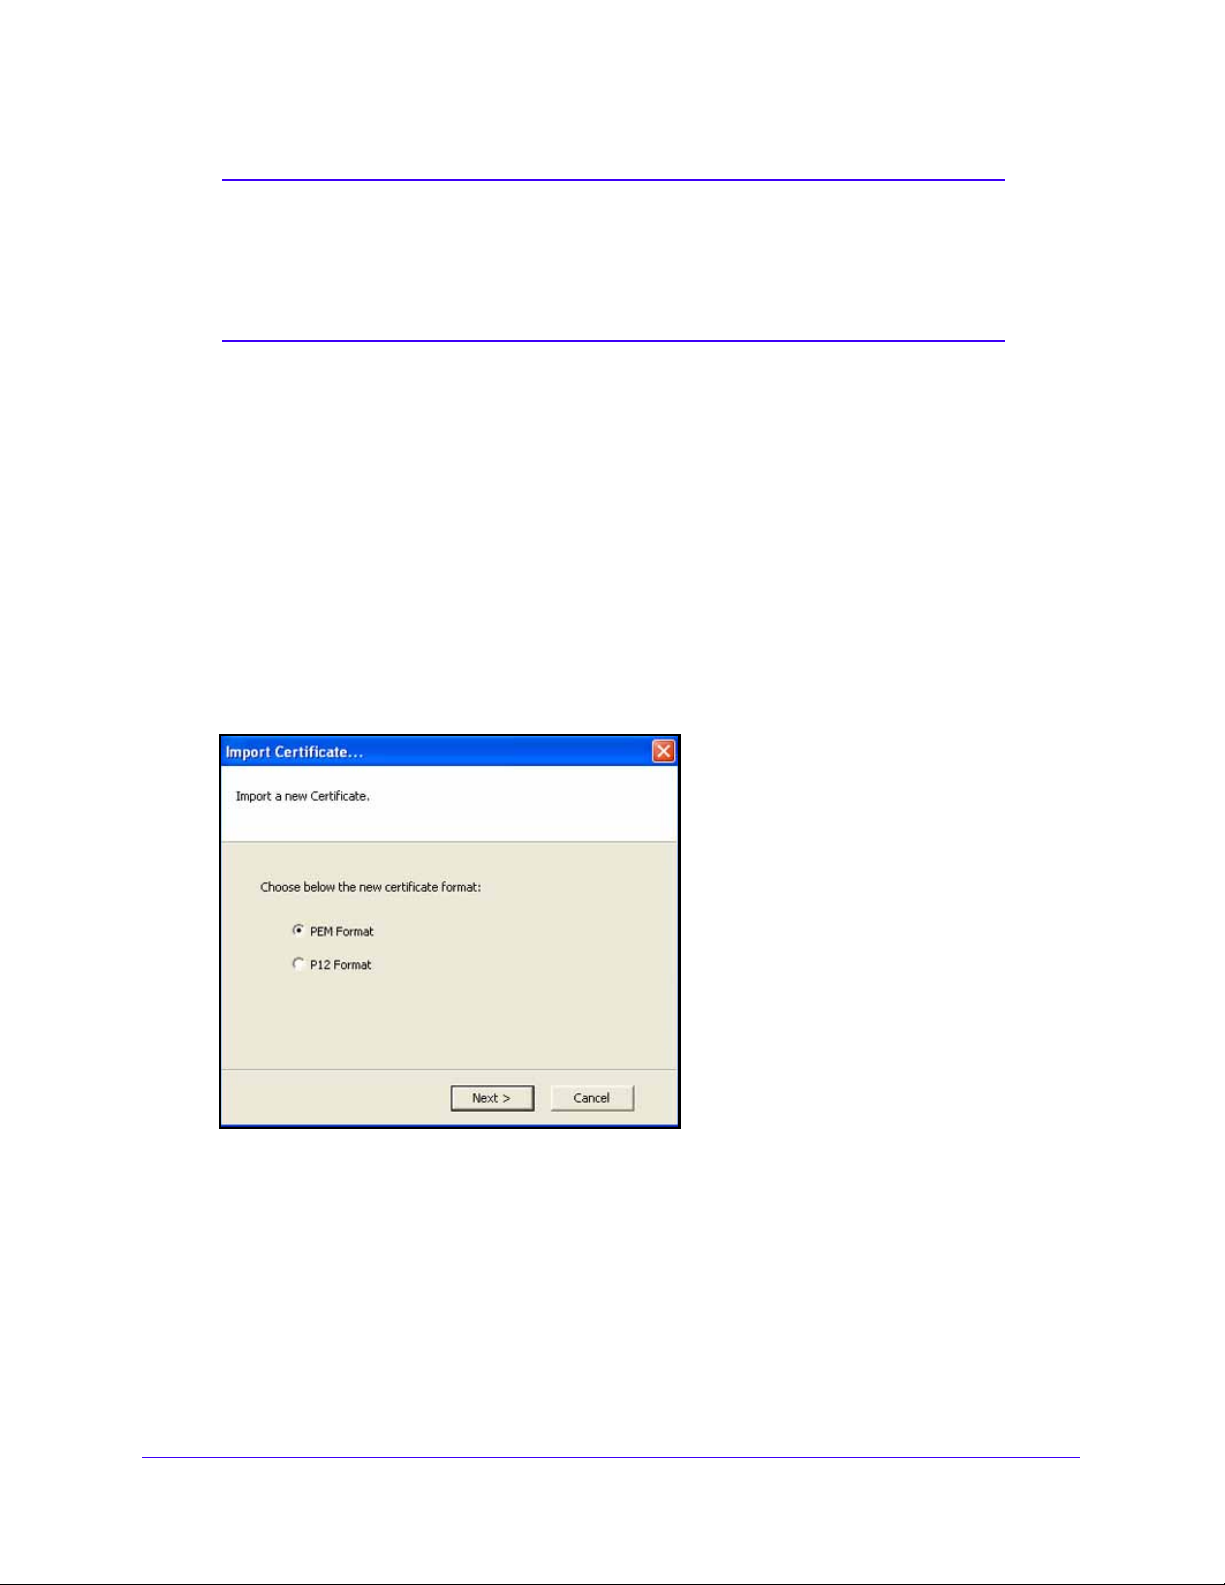
NETGEAR ProSAFE VPN Client
Note: After you have imported a PEM or P12 certificate, the Local ID fields
on the associated Advanced authentication pane are automatically
set: the left field is set to Subject from X509 and the right field
contains values from the certificate. For more information, see
Configure Advanced Authentication on page 44.
PEM Certificates
To import a PEM certificate in a tunnel configuration:
1. In the t
ree list pane of the Configuration Panel screen, cl ic k t h e au t hentication phase
name for which you want to import a certificate.
The Authentication pane displays.
the Authentication pane, click the Certificate tab .
2. In
The Certificate pane displays.
3. Click Im
port Certificate.
The Import Certificate screen displays:
4. Select the PE
5. Click Next.
M Format radio button.
Advanced Configuration Options
74
Page 75
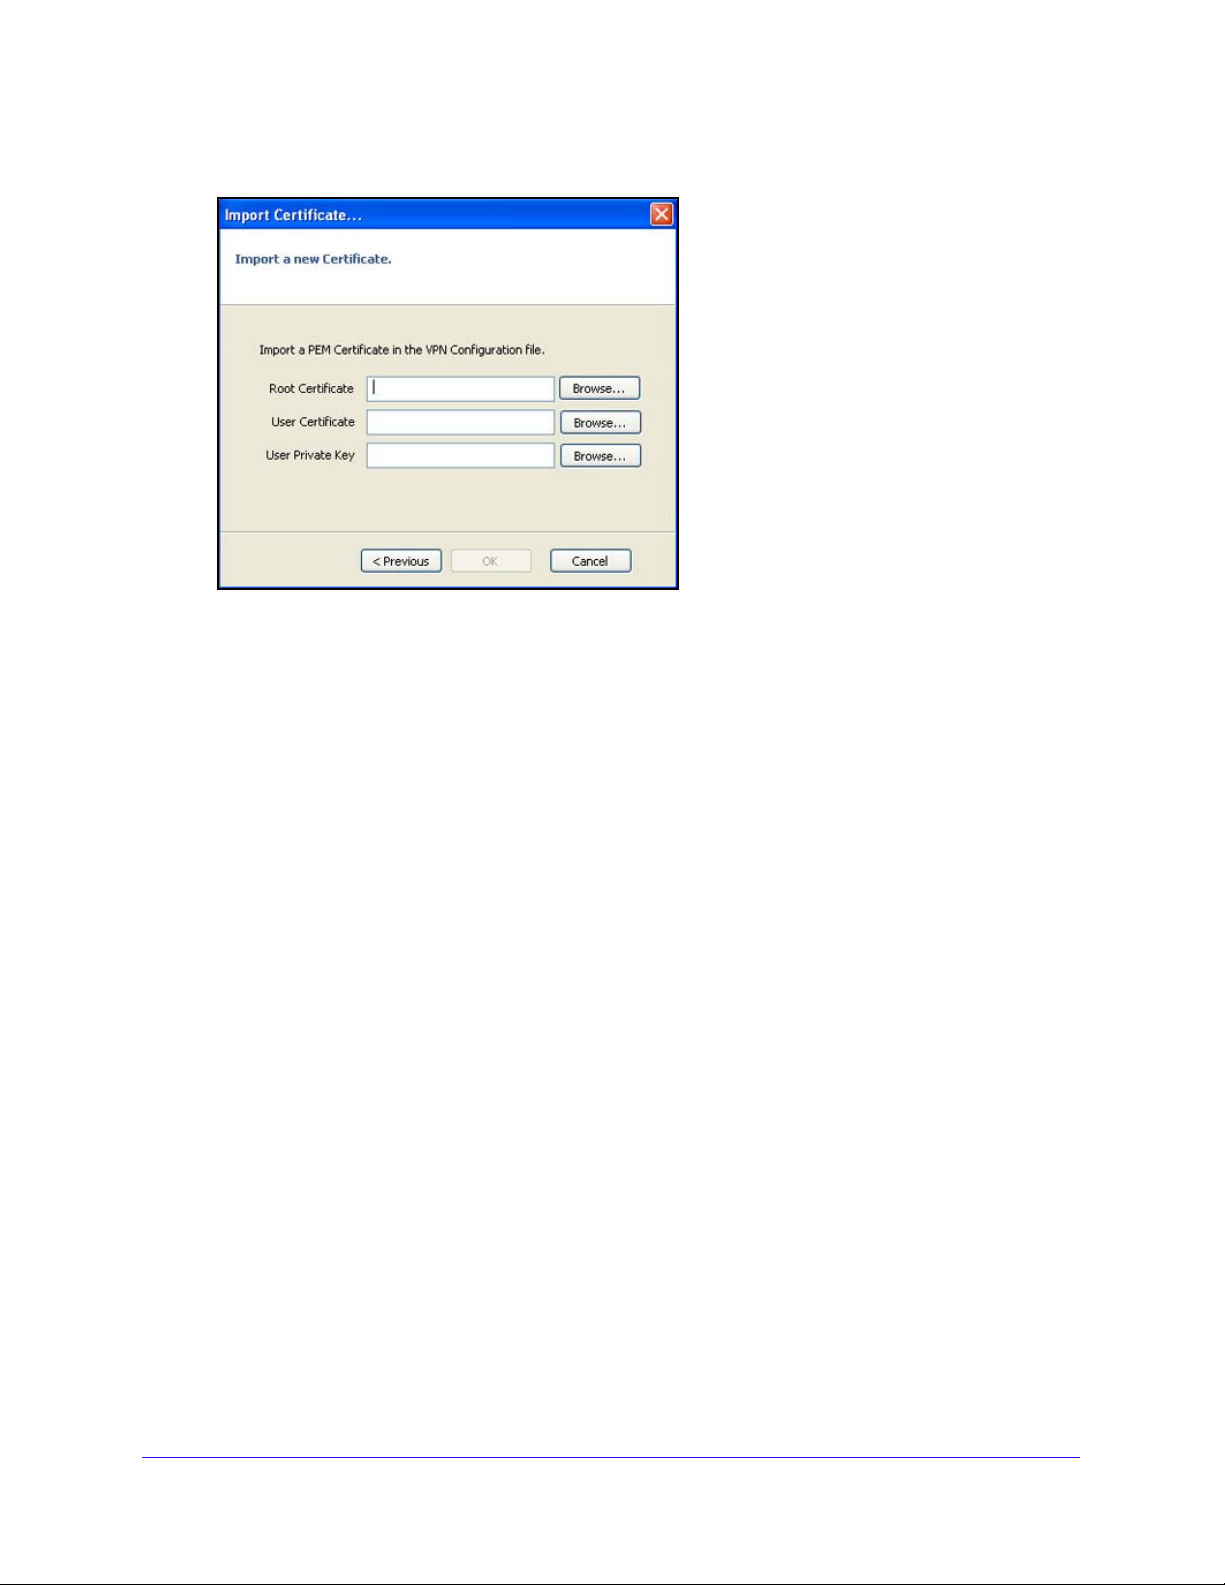
NETGEAR ProSAFE VPN Client
6. The (PEM) Import Certificate screen displays:
7. Import
• Root Ce
the three PEM certificate files:
rtificate. Click Browse, and locate the root certificate file that you want to
import. This file has either a .pem or a .crt extension.
• Use
r Certificate. Click Browse, and locate the user certificate file that you want to
import. This file has either a .pem or a .crt extension.
• Use
r Private Key. Click Browse, and locate the user private key file that you want to
import. This file has a .key extension.
Note: A PEM certificate file that includes a user private key cannot be
ncrypted or protected with a password.
e
8. Click OK.
The certificate is imported, and the Certificate pane displays the certificate.
9. Click Save.
P12 Certificates
To import a P12 certificate in a tunnel configuration:
n th e tr ee l ist pan e of the Configuration Panel screen, c lic k th e au thentication phase
1. I
name for which you want to import a certificate.
The Authentication pane displays.
2. In the Aut
hentication pane, click the Certificate tab.
The Certificate pane displays.
3. Click Import Ce
rtificate.
Advanced Configuration Options
75
Page 76
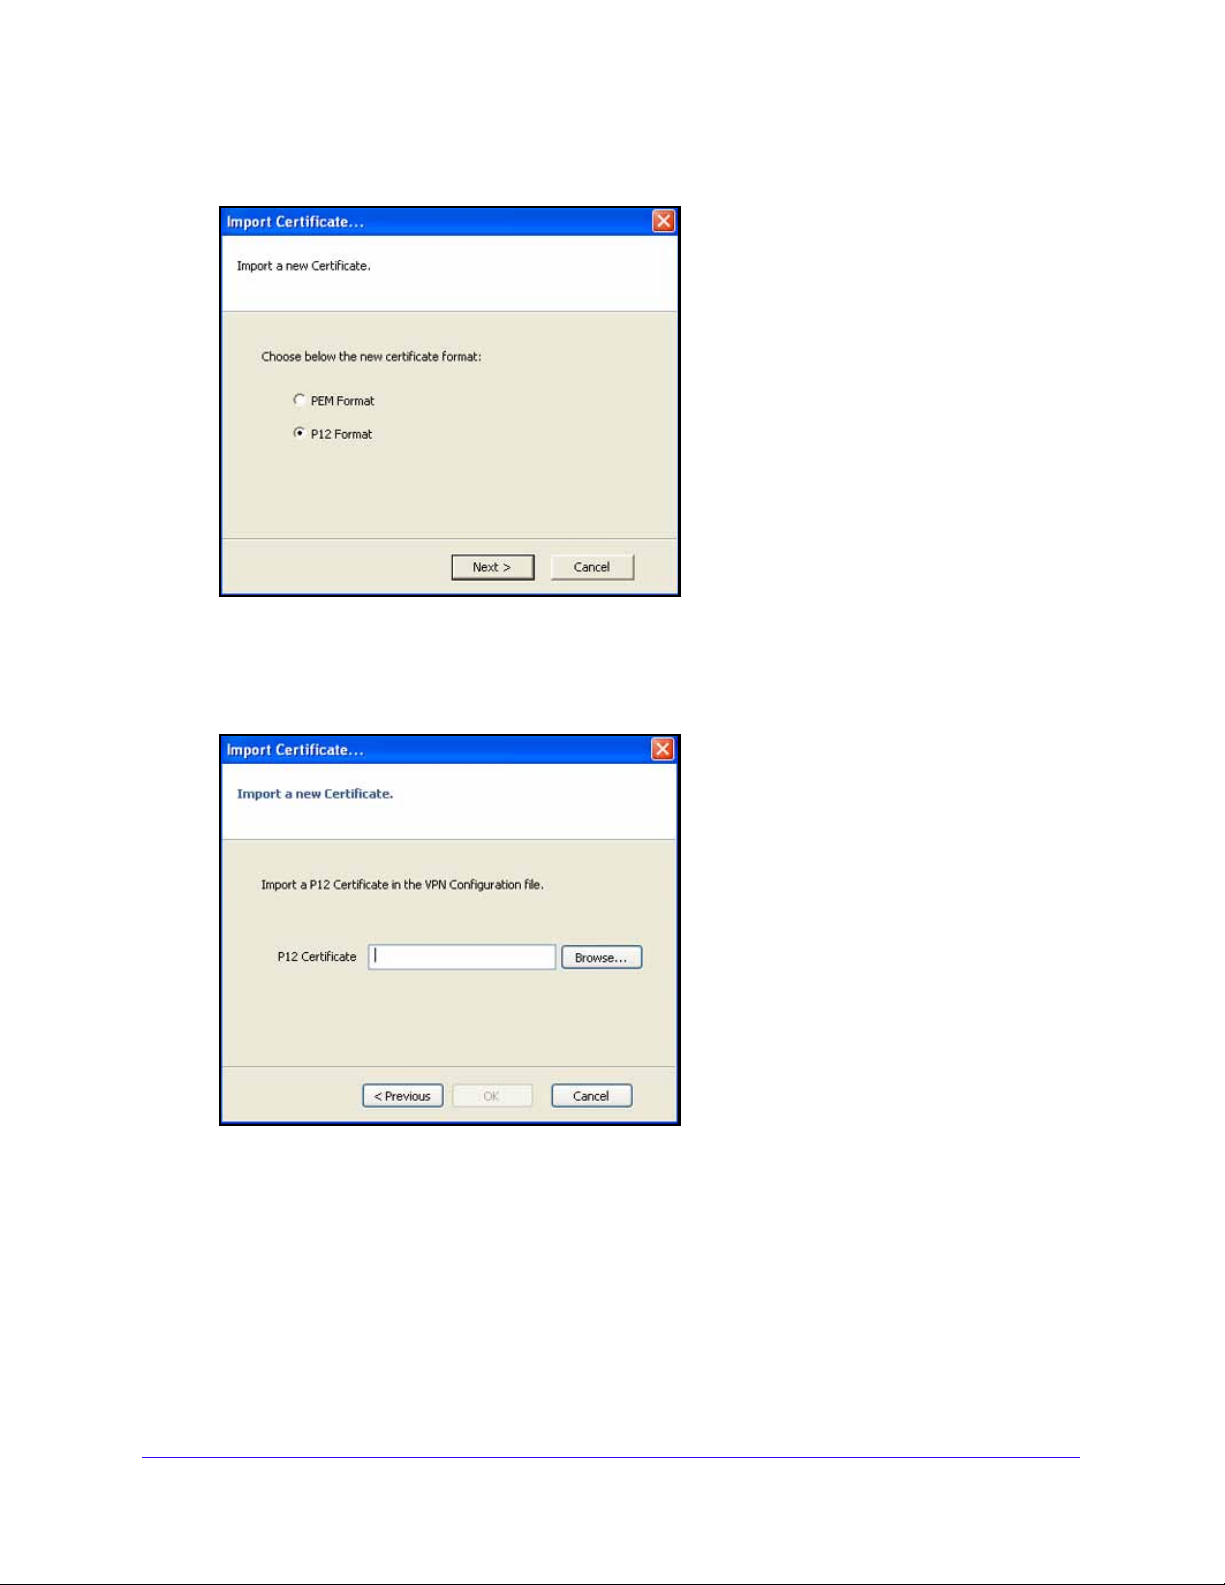
NETGEAR ProSAFE VPN Client
The Import Certificate screen displays:
4. Select the P1
2 Format radio button.
5. Click Next.
The (P12) Import Certificate screen displays:
6. Click Br
owse, and locate and open the certificate file that you want to import.
This file can have either a .p12 or a .pfx extension.
7. Click OK.
Advanced Configuration Options
76
Page 77
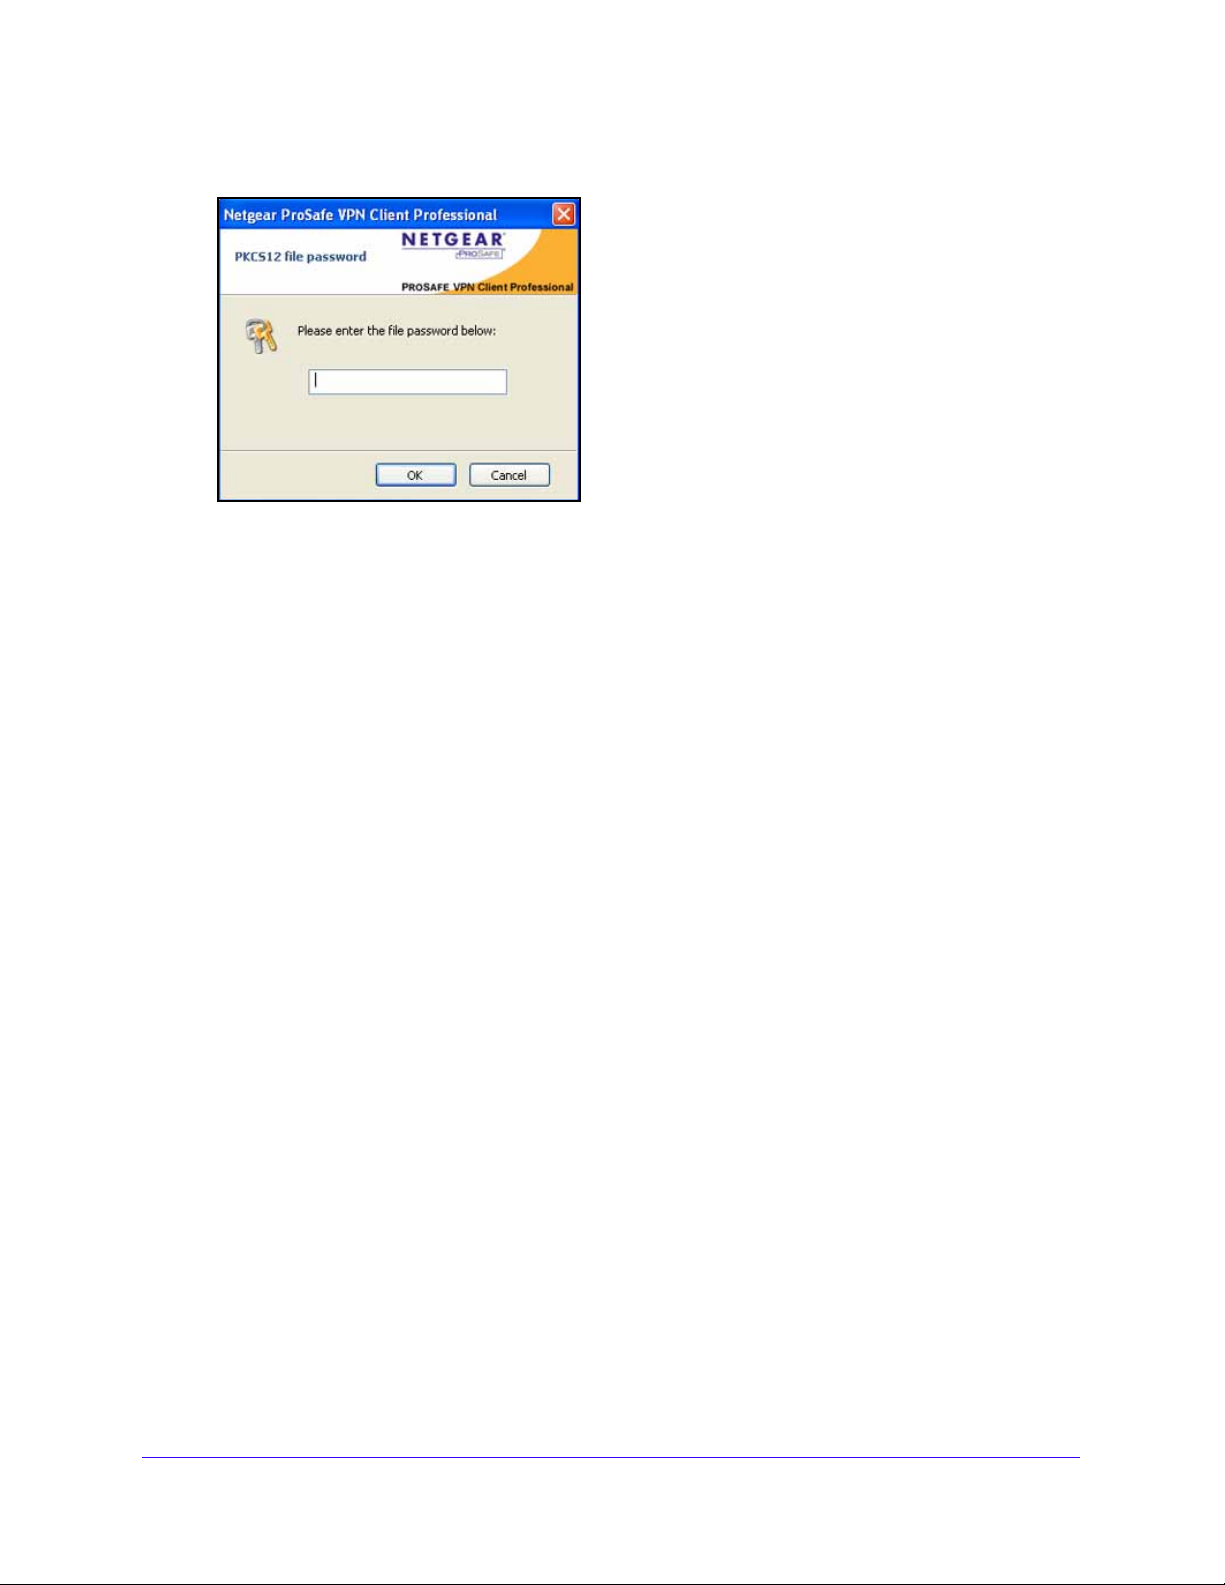
NETGEAR ProSAFE VPN Client
The PKCS12 password file screen displays:
8. Ente
r the password.
9. Click OK.
The certificate is imported, and the Certificate pane displays the certificate.
10. Click Save.
View and Assign Certificates
The Certificate pane lets you can view and assign certificates that you have imported in the
VPN Client.
To view certificates and assign a certificate to a tunnel:
n th e tr ee l ist pan e of the Configuration Panel screen, c lic k th e au thentication phase
1. I
name for which you want to configure a certificate (for example, Gateway in the
following figure).
The Authentication pane displays.
2. Select th
The Certificate pane displays.
e Certificate radio button.
Advanced Configuration Options
77
Page 78
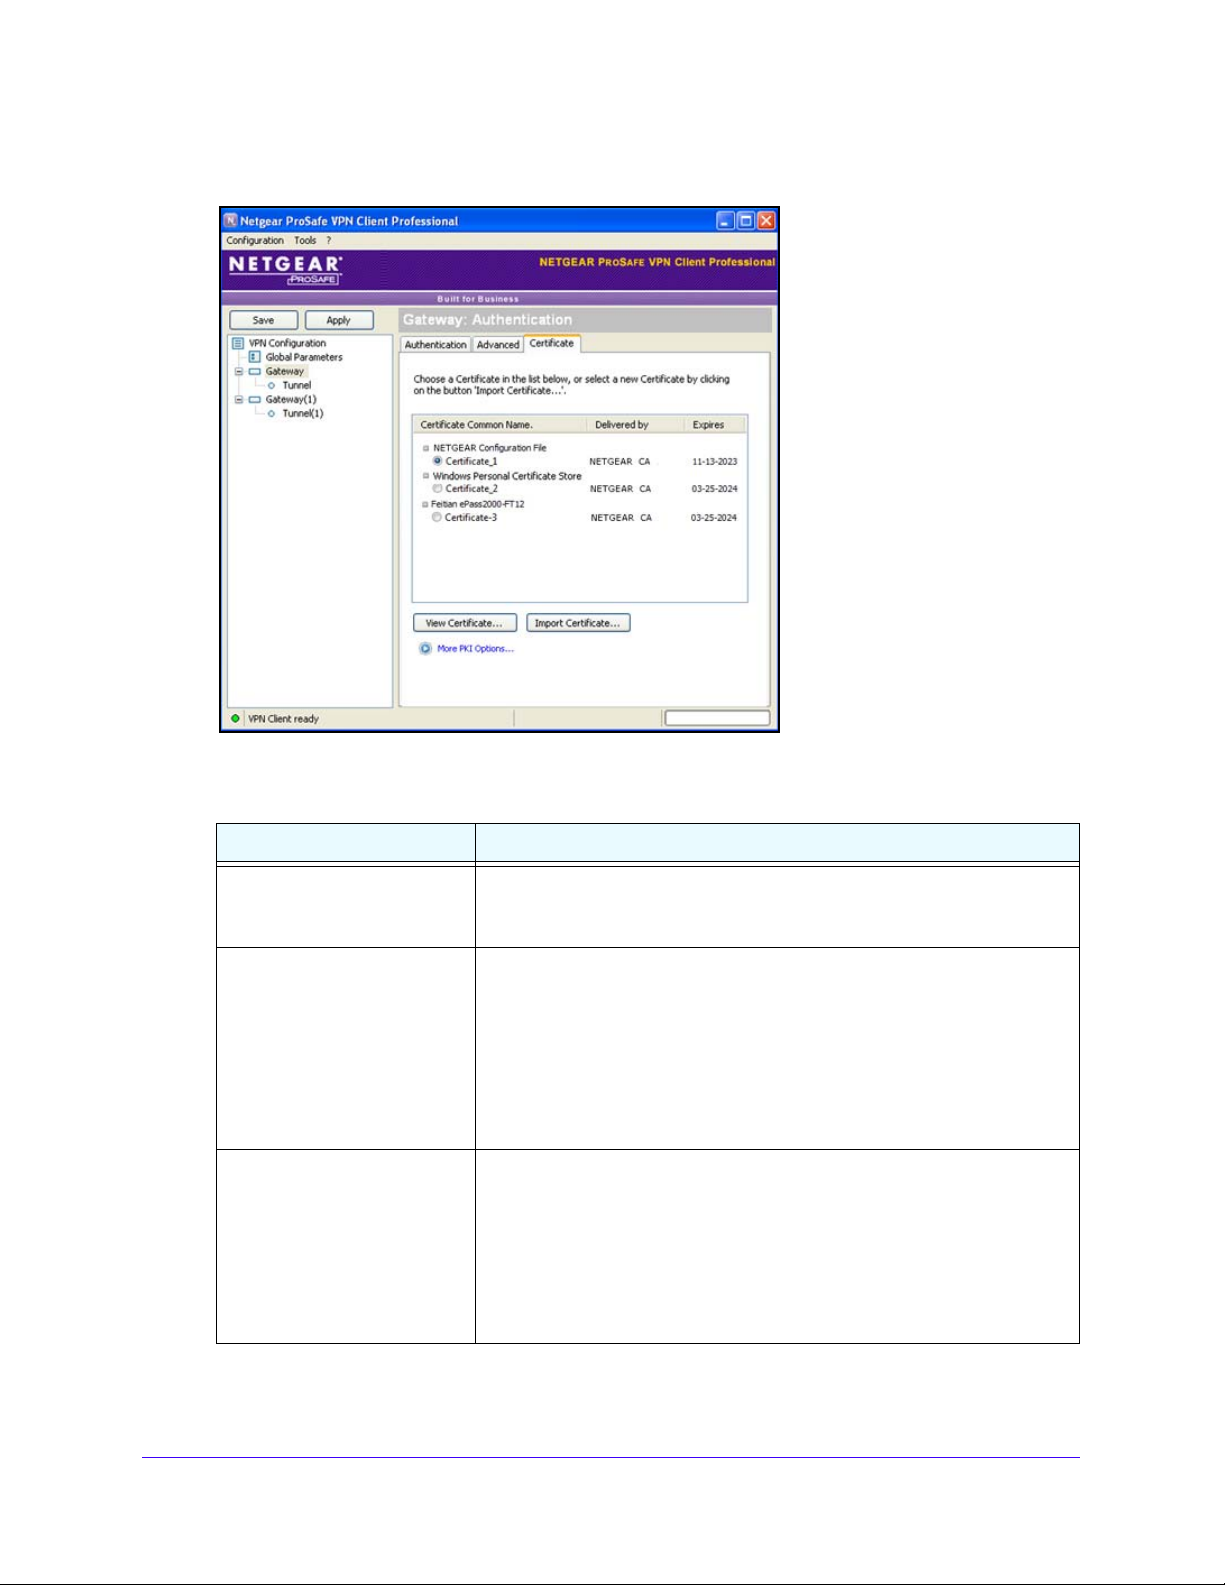
NETGEAR ProSAFE VPN Client
3. (Optional) If the Cer tif ica te pane doe s n ot d isp la y, clic k th e Certificate tab.
The previous figure shows several sources from which you can sele
ct certificates. These
sources are described in the following table.
Source Description
NETGEAR configuration file Certificates are located in the VPN configuration file that the VPN Client
uses. These certificates have been imported previously from another
source such as a certificate file or the Microsoft Certificate Store.
Windows Personal Certificate
ore
St
USB token or smart card (such
eitian ePass2000-FT21)
as F
Certificates are located in the Personal Certificate Store. To be visible and
usable, certificates need to be certified and in the correct location:
• Certi
• Certificates need to be located in the
Certificates are located on one or more USB tokens and smart cards and
are configured on the VPN Client. For you to use a certificate from a USB
token or smart card, the USB token or smart card needs to be plugged into
the computer.
ficates need to be certified by a certificate authority (CA), and the
certificate status needs to be OK (see also Troubleshoot Certificates
on page 82).
Personal Certificate Store to
represent the personal identity of the user attempting to connect to a
corporate network.
Note: When you remove the USB token or smart card from the computer,
certificate remains displayed on the Certificates pane but cannot be
the
used until you plug the USB token or smart card back into the computer.
Advanced Configuration Options
78
Page 79

NETGEAR ProSAFE VPN Client
4. Select one certificate from the list by selecting its associated radio button.
You can select and assign only one certificate to a tunnel.
5. (Optional) Click t
he More PKI Options link.
The PKI Options pane of the Options screen displays. For information about how to
configure th
ese options, see Configure PKI Options on p
age 84.
6. Click Save.
View Certificate Details
You can view many details about a certificate, such as the certificate issuer, the period during
which the certificate is valid, the signature algorithm, and type of public key.
To view the details of a certificate:
n th e tr ee l ist pan e of the Configuration Panel screen, c lic k th e au thentication phase
1. I
name for which you want to view a certificate.
The Authentication pane displays.
2. In the Aut
The Certificate pane displays.
3. Select th
4. Click V
The View Certificate screen displays (this can take up to 30 seconds), with the General
t
ab selected by default.
hentication pane, click the Certificate tab.
e certificate for which you want to view the details from the certificate list.
iew Certificate.
5. Click the Det
ails tab.
Advanced Configuration Options
79
Page 80
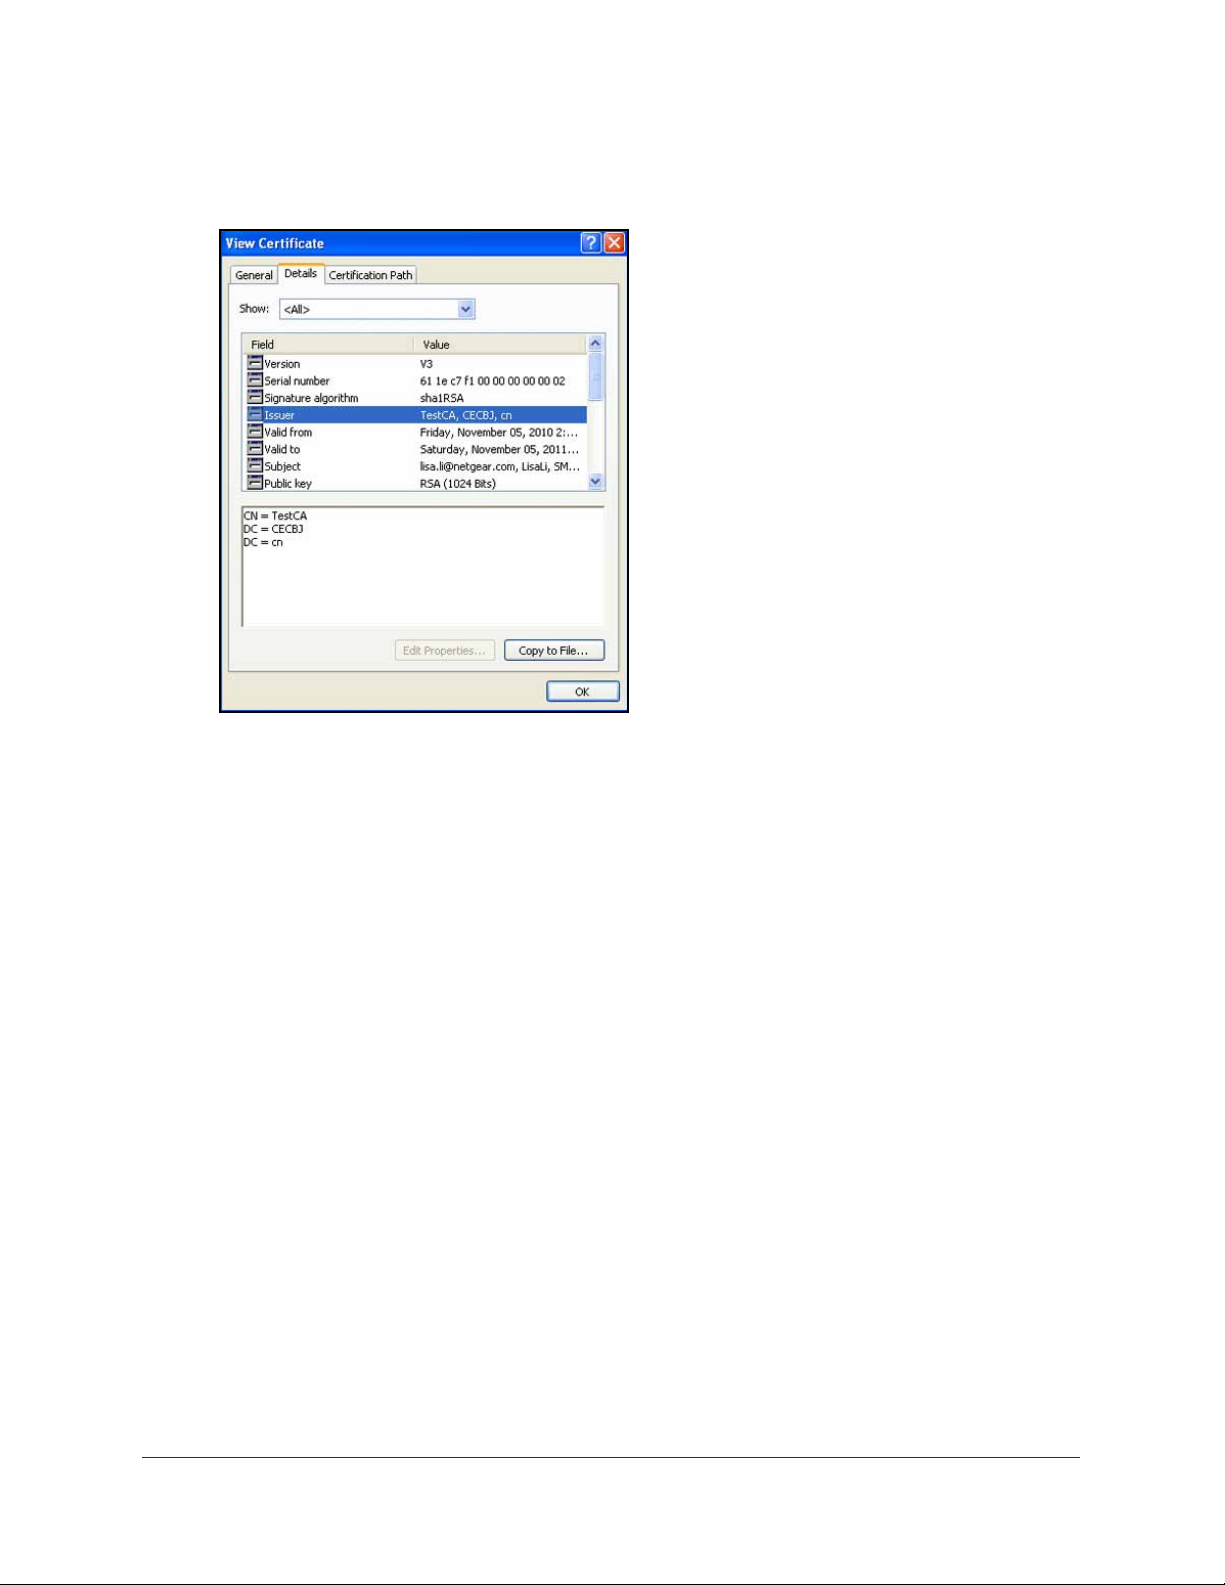
NETGEAR ProSAFE VPN Client
The certificate details display. You can display the details of a certificate by clicking fields
such as Issuer, Valid from, Valid to, and Subject.
6. (Opt
ional) Click the Certification Path tab.
The certification path (a chain of related certificates) displays.
7. (Op
tional) Click Copy to File.
The Certificate Export Wizard opens. This wizard enables you to export the certificate to a
file.
8. Click OK.
The View Certificate screen closes.
Use Certificates from USB Tokens and Smart Cards
The VPN Client can read certificates from USB tokens and smart cards. Smart cards can
contain X509 certificates that can be protected by a PIN code.
To configure a tunnel with a certificate from a USB token or smart card:
1. Insert a USB to
2. If
requested as part of USB token or smart card reader identification process, enter the PIN
code.
Note: If the PIN code is incorrect, the VPN Client displays a message that the
token or smart card will be locked out after three consecutive attempts to
USB
access the USB token or smart card with an incorrect PIN code.
ken or smart card into the computer.
Advanced Configuration Options
80
Page 81
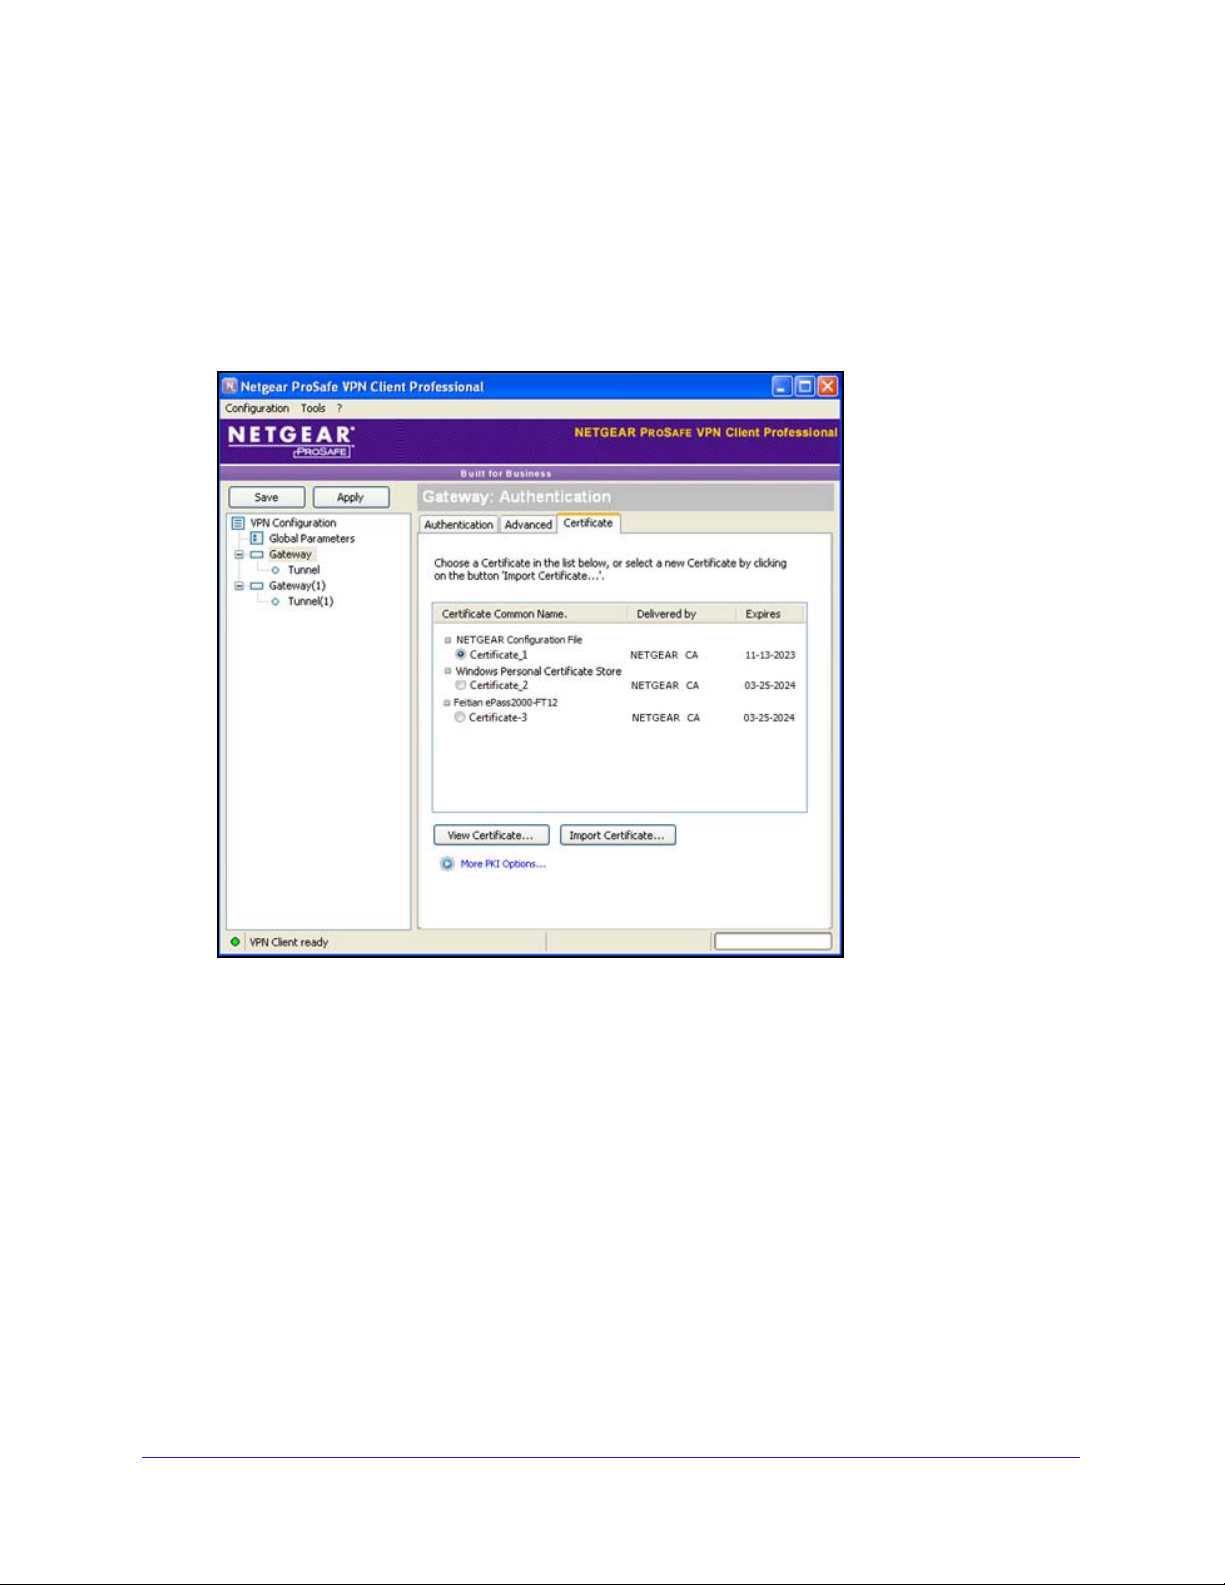
3. Click OK.
NETGEAR ProSAFE VPN Client
4. In the tre
e list pane of the Configuration Panel screen, click the authentication phase name
for which you want to use the certificate from the USB token or smart card.
The Authentication pane displays.
5. In the Aut
hentication pane, click the Certificate tab.
The Certificate pane displays:
The certificates from the USB token or smart card have been automatically imported and
d
isplay in the certificates list.
6. Select a cert
7. (Optional) Click t
ificate by selecting its radio button.
he More PKI Options link.
The PKI Options pane of the Options screen displays. For information about how to
configure th
ese options, see Configure PKI Options on p
age 84.
8. Click Save.
Open a Tunnel with Certificates from a USB Token or Smart Card
When you have configured a tunnel to use a certificate from a USB token or smart card, you
need to enter the PIN code that is associated with the USB token or smart card each time
that the tunnel is opened (except for automatic VPN renegotiations).
Advanced Configuration Options
81
Page 82
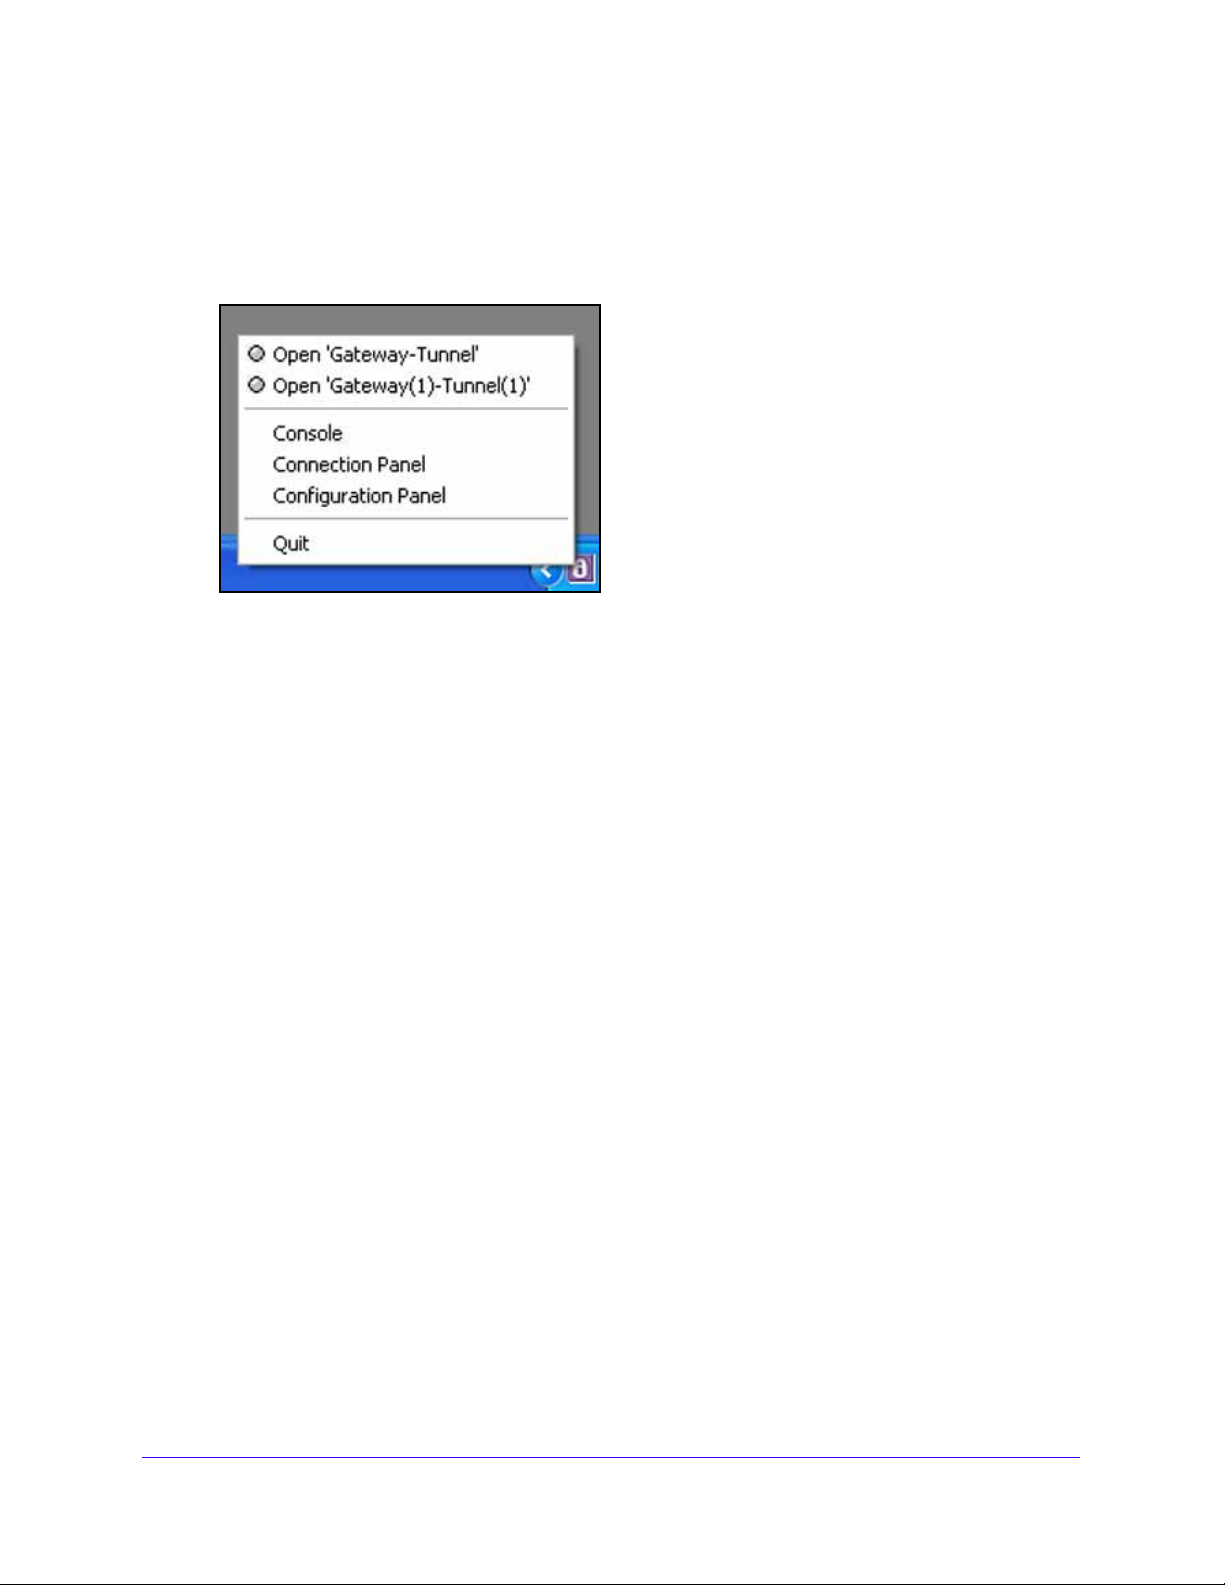
NETGEAR ProSAFE VPN Client
To open a tunnel with a certificate from a USB token or smart card:
1. Ensure that either the smart card reader is inserted in the computer and contains a
smart card or the USB token is inserted in the computer.
2. Right-c
3. E
The tunnel opens.
lick the system tray icon, and select Open '<gateway name-tunnel name>'.
nter the PIN code that is associated with the USB token or smart card.
Troubleshoot Certificates
This section provides information about troubleshooting USB tokens, smart cards, and the
Personal Certificate Store.
Troubleshoot USB Tokens and Smart Cards
When an error occurs while you use a USB token or smart card, a small warning icon
displays next to the token name. Click this warning icon to open a pop-up screen that
provides more information about the error. One of the following errors might occur:
• Error. T
Resolution. Reinsert th
• Error. T
readers).
Resolution. Inst
smart card, and restart the computer.
• Error. T
Resolution. Ensu
represent the personal identity of the user.
oken not found: previously plugged in but not at this time.
e USB token or smart card.
oken found but no middleware to access it (often required when using smart card
all the software (middleware) that enables your computer to read the
oken and store found but no certificate found.
re that the certificate is located in the Personal Certificate Store to
Advanced Configuration Options
82
Page 83
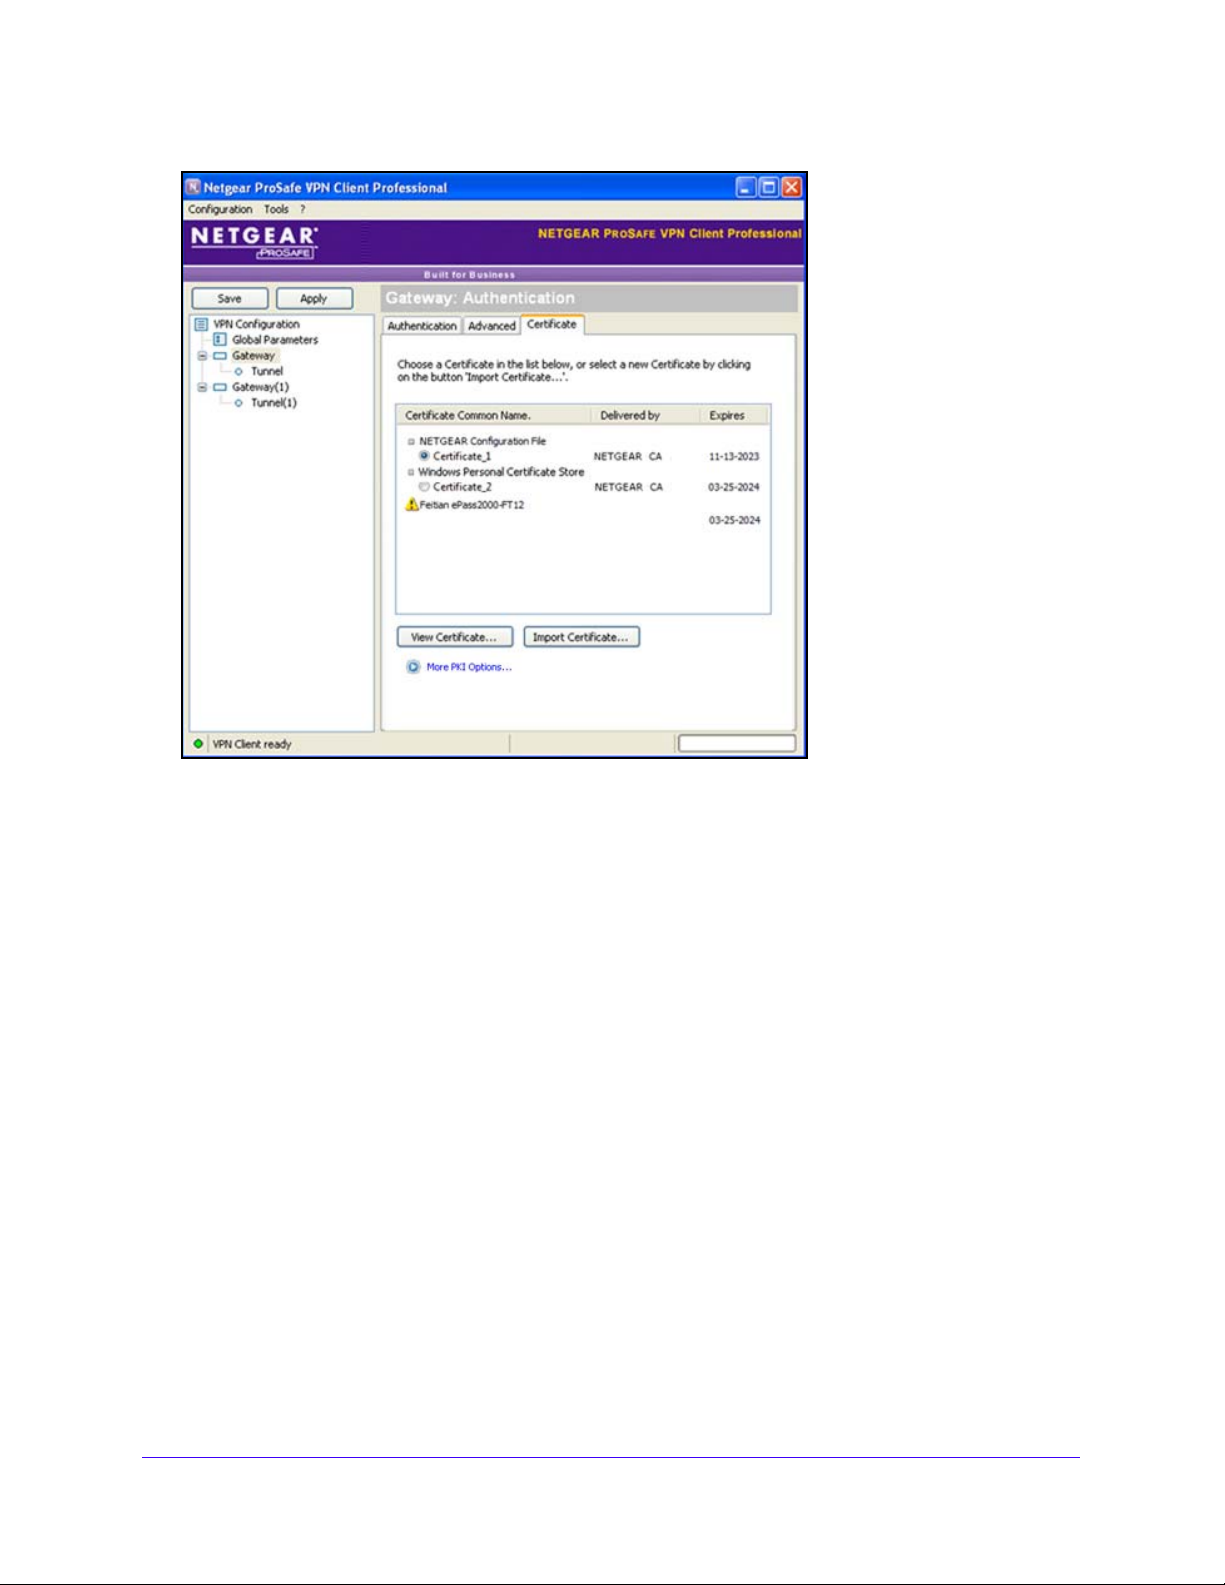
NETGEAR ProSAFE VPN Client
Figure 15. Example of a certificate error
Troubleshoot the Personal Certificate Store
To prevent errors in the Personal Certificate Store, ensure the following:
• Cert
• Cert
Windows provides a Certificate Management tool that
issues. To open this tool from your computer, select Start > Run > certmgr.msc.
ificates need to be certified by a certificate authority (CA), and the certificate status
must be OK.
ificates need to be located in the Personal Certificate Store to represent the personal
identity of the user.
you can use to troubleshoot certificate
Advanced Configuration Options
83
Page 84
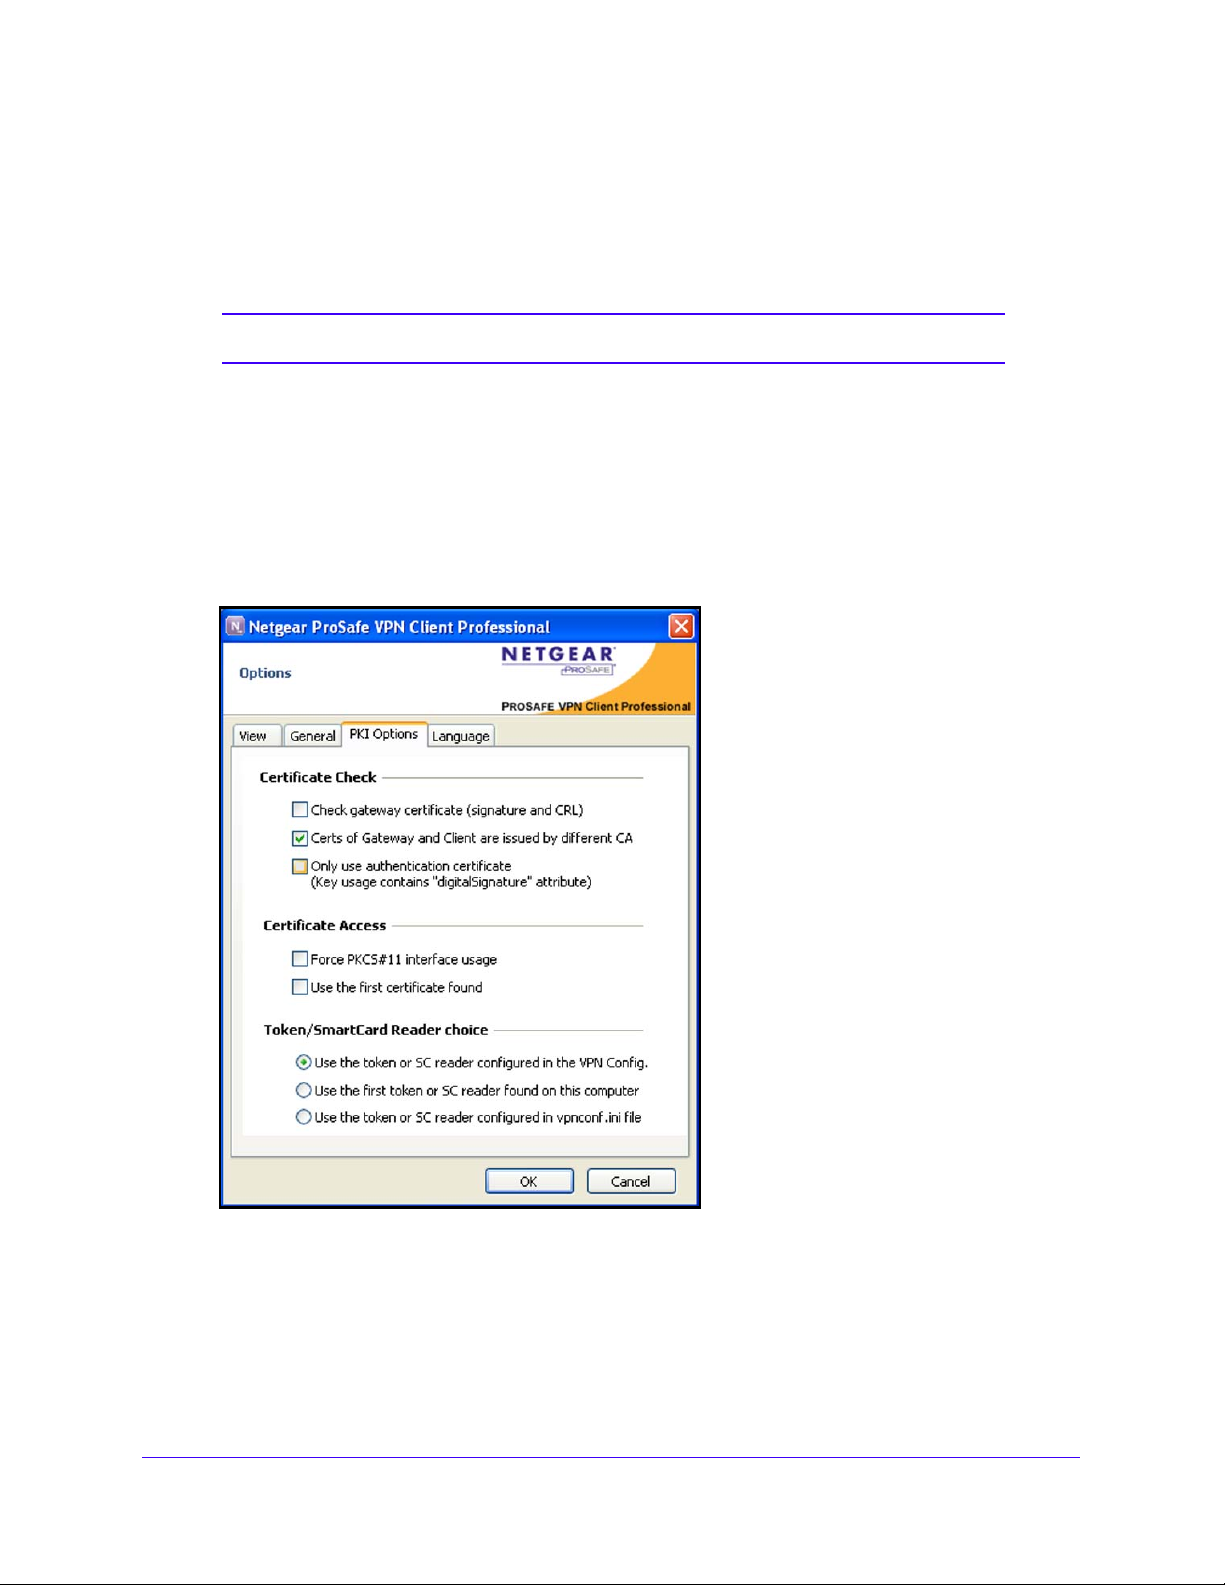
NETGEAR ProSAFE VPN Client
Configure PKI Options
The PKI Options pane lets you specify if and how a certificate is validated, which certificate is
used, and which USB token or smart card reader is used.
Note: The PKI Options pane is not available in the VPN Client Lite.
To configure the public key infrastructure (PKI) options:
1. From the ma
in menu, select Tools > Options.
The Options screen displays. The View pane is selected by default.
2. Click the PKI
Options tab.
The PKI Options pane displays:
Advanced Configuration Options
84
Page 85

NETGEAR ProSAFE VPN Client
3. Configure the settings as described in the following table:
Setting Description
Certificate Check
Check gateway certificate (signature
and CRL
Certs of Gateway and Client are
issued by dif
Only use authentication certificate
(Ke
“digitalSignature” attribute)
)
ferent CA
y usage contains
Select this check box to force the VPN Client to validate the
certificate of the VPN gateway during the opening of the tunnel.
The certificate expiration date is vali
certificates in the certification chain and the associated Certificate
Revocation Lists (CRLs) are validated.
For this option to function, make sure that:
• The root certificate, intermediate certificates, and the server
rtificate are imported into the Windows Certificate Store.
ce
• The CRLs for the certificate of the
into the Windows Certificate Store or are downloadable.
By default, this check box is cleared and the VPN Client does not
ate the certificate of the VPN gateway during the opening of the
valid
tunnel.
Select this check box to allow the VPN Client and the VPN gateway
to use certificates from different certificate authorities.
By default, this check box is cleared and the VPN Client and VPN
y need to use certificates from the same certificate authority.
gatewa
Select this check box to force the VPN Client to use only an
authentication certificate for which the digitalSignature key
extension is configured.
This option lets you specify a parti
ones. For example, this is useful when several certificates with the
same subject are stored on a smart card or token.
By default, this check box is cleared and the VPN Client can use
any certi
ficate.
dated, and the signatures of the
VPN gateway are imported
cular certificate among multiple
Certificate Access
Force PKCS#11 interface usage Select this check box to force the VPN Client to use only PKCS #11
iddleware to access tokens or smart cards.
m
By default, this check box is cleared and the VPN Client uses
tographic service provider (CSP) middleware to access smart
cryp
cards or tokens.
Use the first certificate found Select this check box to force the
certificate that it detects on a specified smart card or token,
regardless of the subject of the certificate that might be configured
in the Local ID field on the Advanced authentication pane (see
Configure Advanced Authentication o
By default, this check box is cleared and the VPN Client can use
any certi
ficate.
VPN Client to use the first
n page 44).
Advanced Configuration Options
85
Page 86

NETGEAR ProSAFE VPN Client
Setting Description
Token/SmartCard Reader choice
Use the token or SC reader
configured in the VPN config
Use the first token or SC reader found
n this computer
o
Use the token or SC reader
configured in vpnconfig.ini file
Select this check box to force the VPN Client to first look for smart
card readers and token readers that are stored in the VPN
configuration.
By default, this check box is cleared and the VPN Client can use
ny smart card readers and token readers.
a
The VPN Client uses the first smart card reader or token reader that
it detects on the computer.
By default, this check box is cleared and the VPN Client can use
ny smart card readers and token readers.
a
Select this check box to force the VPN Client to first look for smart
card readers and token readers that are stored in the vpnconf.ini
configuration file.
For information about how to modify the vpnconfig.ini file, see
Customize How the VPN Client Hand
on page 126.
By default, this check box is cleared and the VPN Client can use
any smart card readers and token readers.
4. Click OK.
VPN Configuration Management
les Readers and Certificates
A VPN configuration is a file that contains the configuration and tunnel information of the VPN
Client. You import an existing VPN configuration, export your current VPN configuration,
merge your current VPN configuration with an existing VPN configuration, split your current
VPN configuration, and perform other tasks in relation to a VPN configuration.
Note: For information about how to use the command-line interface (CLI)
to perform tasks with a VPN configuration file, see
Import, Export,
Add, or Replace the VPN Configuration on page 124.
This section includes the following subsections:
• Imp
ort a VPN Configuration
• Export a VPN Configuration
• Merge VPN Configurations
• Split a VPN Configuration
• Easily Import a VPN Configuration and Open a Tunnel
Advanced Configuration Options
86
Page 87
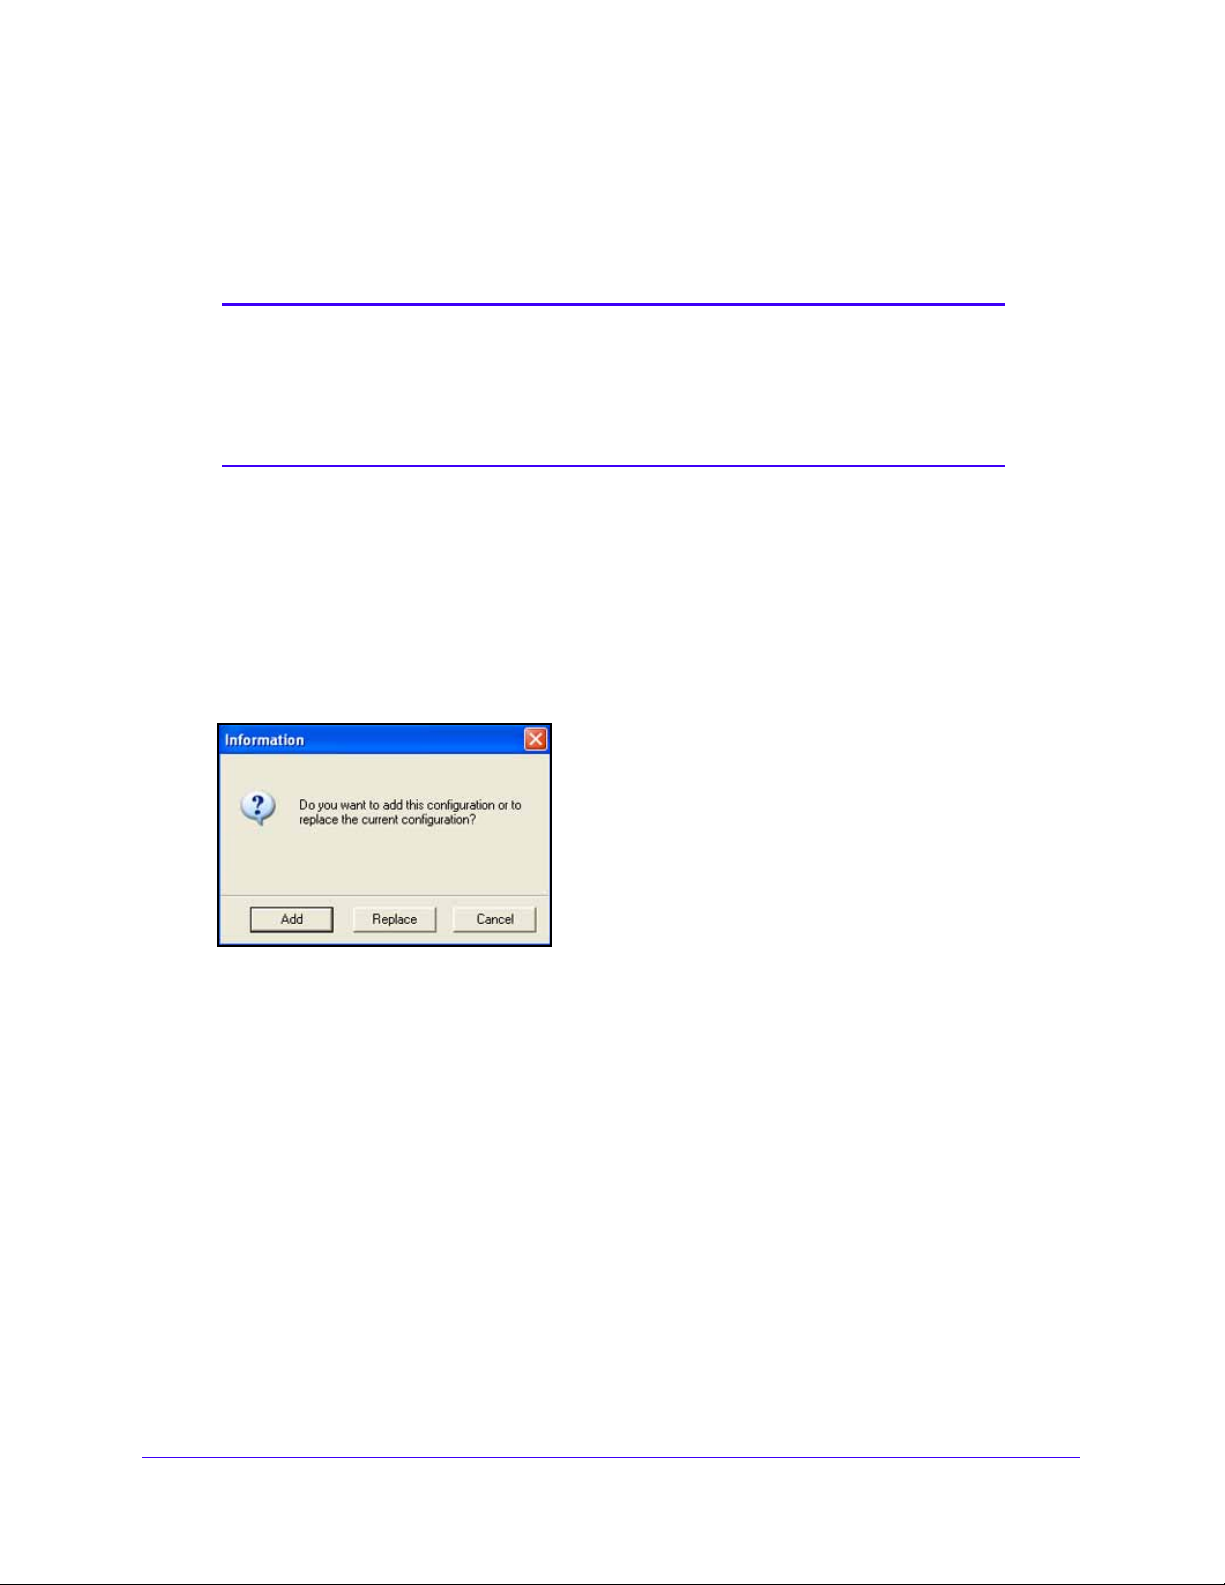
NETGEAR ProSAFE VPN Client
Import a VPN Configuration
The VPN Client can import or export a VPN configuration. A network administrator typically
uses this capability to prepare a configuration and deliver it to end users.
Note: When you import a VPN configuration while the VPN Client is
functioning in USB mode with a USB drive inserted in the computer,
the file is automatically saved on the USB drive. If the VPN Client is
functioning in USB mode but no USB drive is inserted in the
computer, you cannot import or export a VPN configuration.
To import a VPN configuration:
rom the main menu on the Configuration Panel screen, select Configuration >
1. F
Import.
2. Navigat
3. Click Op
An Information screens displays:
4. Click one of the following but
• Add.
• Rep
The imported VPN configuration displays in
screen.
e to the location of the VPN configuration file that you want to import.
en.
tons:
Adds the imported VPN configuration to the existing VPN configuration.
lace. Replaces the existing VPN configuration with the imported VPN
configuration.
the tree list pane of the Configuration Panel
Export a VPN Configuration
When you export authentication settings (phase 1 settings), the associated IPSec
configurations (phase 2 settings) are also exported, including certificates that might have
been defined in the IPSec configuration, and global parameters.
Advanced Configuration Options
87
Page 88
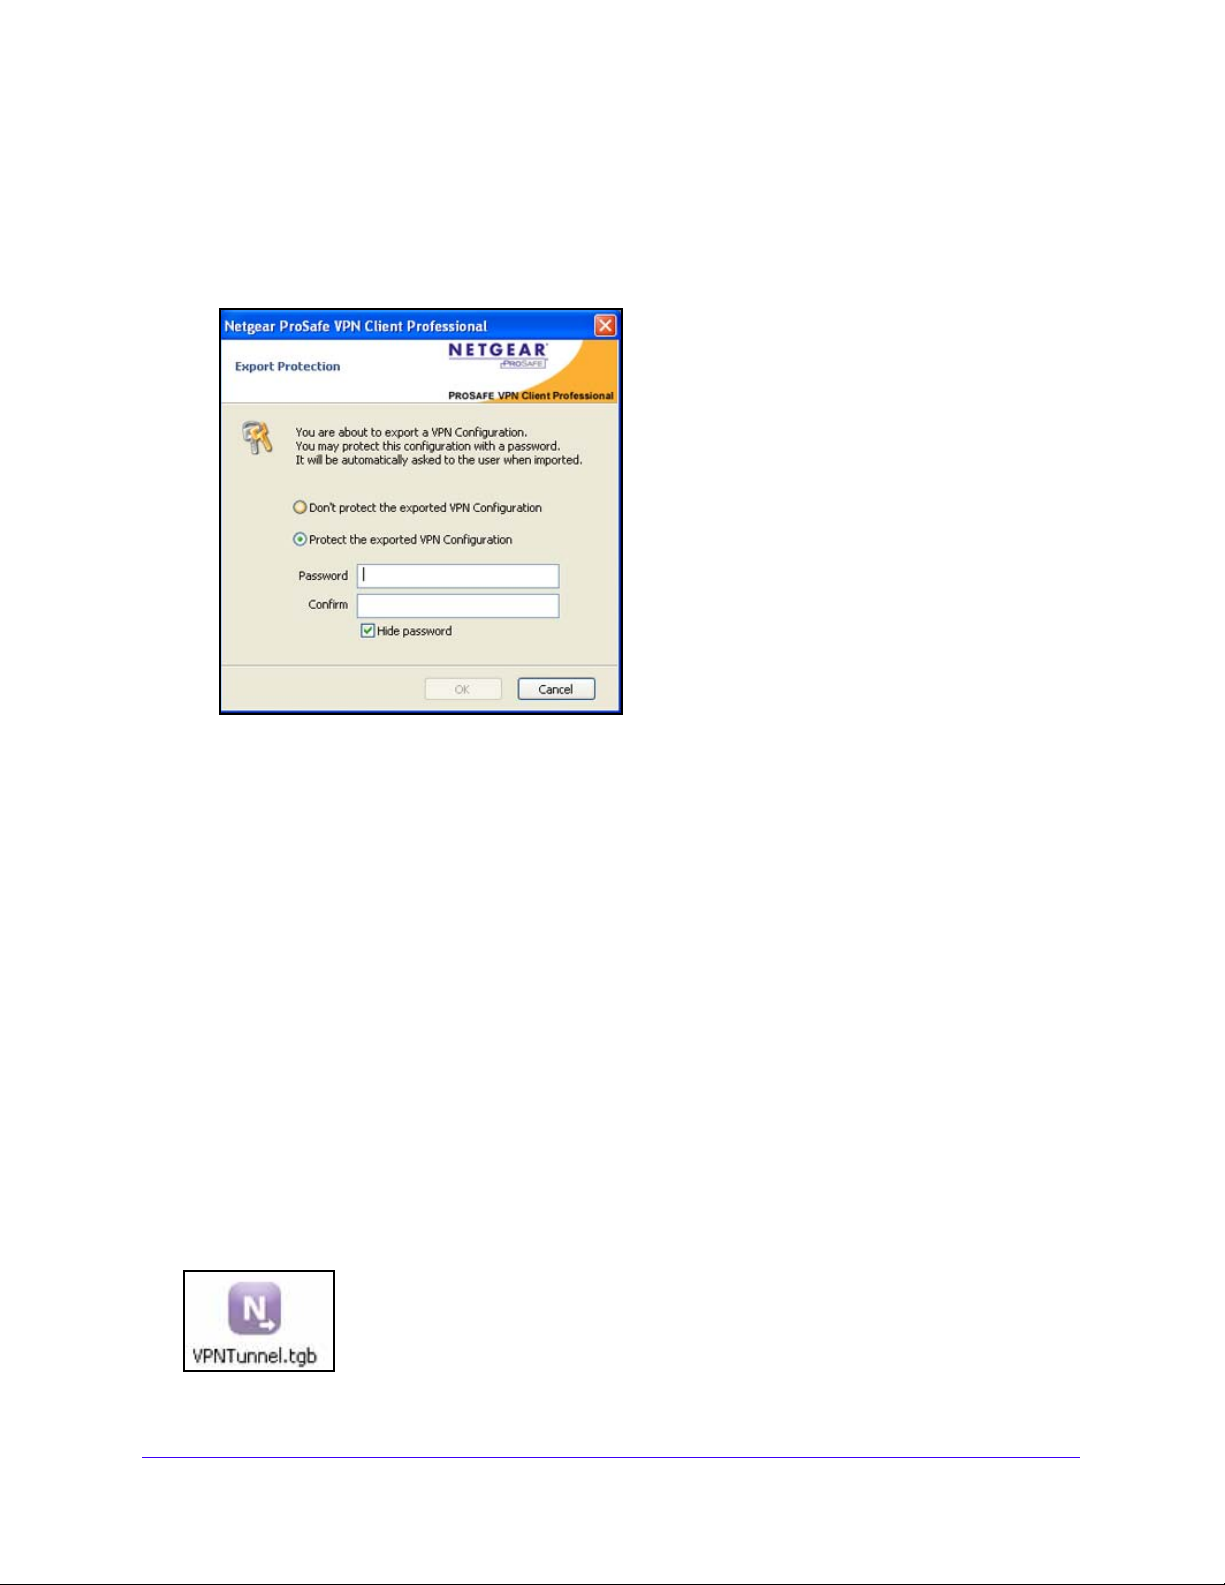
NETGEAR ProSAFE VPN Client
To export a VPN configuration:
1. From the main menu on the Configuration Panel screen, select Configuration >
Export.
The Export Protection screen displays:
As a security measure, you can specify a password for the exported file.
2. Select one of the fo
• Don’t protect
• Pro
tect the exported VPN Configuration. The VPN configuration file requires a
llowing radio buttons:
the exported VPN Configuration.
password before it can be opened.
a. (Op
b. Enter a p
c. En
tional) Clear the Hide password check box.
assword in the Password field.
ter the same password in the Confirm field.
3. Click OK.
4. Navigate to th
5. T
ype a name for the VPN configuration file.
An exported VPN configuration file has a .tgb extension. Do n
e location where you want to save the VPN configuration file.
ot change this extension.
6. Click Save.
You can now forward the VPN configuration or navigate to the location of the VPN
figuration and double-click the VPN configuration shortcut icon to start the VPN Client.
con
Figure 16. VPN configuration shortcut icon
Advanced Configuration Options
88
Page 89

NETGEAR ProSAFE VPN Client
Merge VPN Configurations
You can import one or several tunnels into an existing VPN configuration. A network
administrator typically uses this capability to merge a new VPN configuration with new
gateways into an existing VPN configuration and deliver it to end users. There are several
methods that you can use to merge VPN configurations.
Regardless of how you import a VPN configuration, th
f at least one tunnel is already configured before you import and add the VPN
• I
configuration, global parameters are not imported.
• If
you import and replace the VPN configuration, or if no tunnel is configured when you
import and add the VPN configuration, global parameters are imported.
• I
f there is a tunnel name conflict between an existing and an imported VPN configuration,
the VPN Client automatically resolves this conflict by adding an increment between
parentheses—for example, tunnel_office(1)—to the imported tunnel name.
To merge a VPN configuration with your current VPN configuration:
1. Do o
2. Navigat
3. Click Op
4. Click Add.
ne of the following:
• F
rom the main menu on the Configuration Panel screen, select Configuration >
Import.
• Drag
An Information screens displays.
and drop a new VPN configuration onto the tree list pane of the Configuration
Panel screen.
e to the location of the VPN configuration file that you want to import.
en.
e following rules apply:
The imported VPN configuration is merged with yo
ur current VPN configuration.
Split a VPN Configuration
You can split and export a single tunnel configuration from an existing VPN configuration. A
network administrator typically uses this capability to split an existing large VPN configuration
into a smaller VPN configuration and deliver it to end users.
When you split and export an IPSec configuration (phase 2 settings), the associated
a
uthentication settings (phase 1 settings) are also exported, including certificates that might
have been defined in the authentication settings, and global parameters.
To export a single tunnel configuration:
1. I
n th e tr ee l ist pan e of the Configuration Panel screen, right-cli ck the IPS ec c onf ig ura tio n
name (that is, the tunnel) for which you want to export the tunnel configuration (for
example, Tunnel in the following figure).
Advanced Configuration Options
89
Page 90
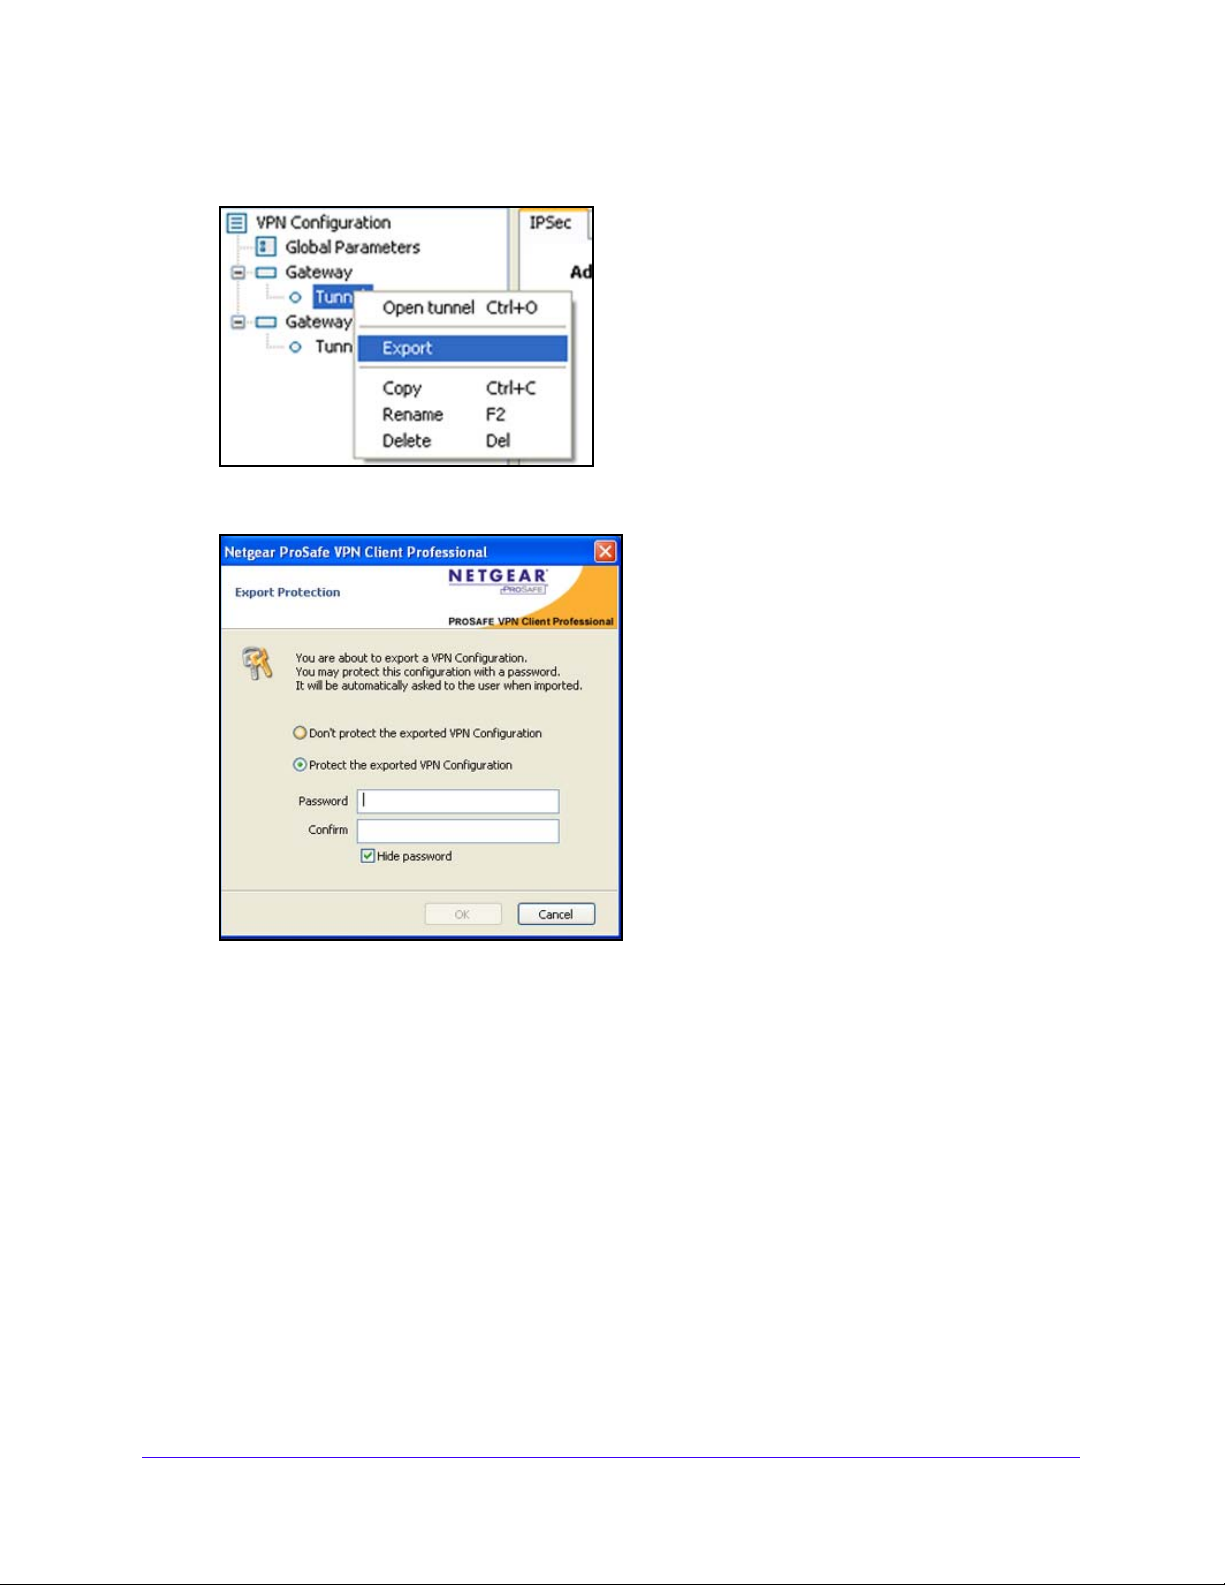
NETGEAR ProSAFE VPN Client
2. Select Export.
The Export Protection screen displays:
As a security measure, you can specify a password for the exported file.
3. Select one of the fo
• Don’t protect
• Pro
tect the exported VPN Configuration. The VPN configuration file requires a
llowing radio buttons:
the exported VPN Configuration.
password before it can be opened.
a. (Op
b. Enter a p
c. En
tional) Clear the Hide password check box.
assword in the Password field.
ter the same password in the Confirm field.
4. Click OK.
5. Navigate to th
ype a name for the VPN configuration file.
6. T
An exported VPN configuration file has a .tgb extension. Do n
e location where you want to save the VPN configuration file.
ot change this extension.
7. Click Save.
Advanced Configuration Options
90
Page 91

NETGEAR ProSAFE VPN Client
You can now forward the VPN configuration or navigate to the location of the VPN
configuration and double-click the VPN configuration shortcut icon to start the VPN Client.
Figure 17. VPN configuration shortcut icon
Easily Import a VPN Configuration and Open a Tunnel
You can create various VPN configurations on the Windows desktop and open a tunnel by
double-clicking a VPN configuration icon (that is, a file with a .tgb extension) or use a
drag-and-drop procedure to add the VPN configuration to the existing configuration or
replace the existing VPN configuration.
Note: You can include a preconfigured VPN configuration in the VPN Client
software setup. A network administrator typically uses this capability to
deploy a preconfigured VPN Client in a single package to end users.
For information about this capability, see
in a VPN Client Software Setup Deployment on page 118.
Embed a VPN Configuration
The following procedure provides high-level steps only.
To create a VPN configuration shortcut icon on the desktop and easily open a tunnel:
1. Con
figure a tunnel on the Configuration Panel screen.
For information about how to configure a VPN tunnel, see Use the Configuration Wizard
to Create a VPN Tunnel Connection on p
a VPN Tunnel Connection on p
2. Conf
igure the tunnel to automatically open when the VPN Client starts after login.
age 40.
For more information, see Configure How VPN Tunnels Are Opened on p
3. Export
the VPN configuration onto your computer desktop.
For more information, see Export a VPN Configuration on
4. T
o open the VPN tunnel, do one of the following:
• Dou
• Use a dra
ble-click the VPN configuration icon.
g-and-drop procedure to add the VPN configuration to the existing
age 36 or High-Level Steps to Manually Create
age 59.
page 87.
configuration or replace the existing VPN configuration:
a. Drag
and drop the VPN configuration icon onto the Configuration Panel.
b. Click Add or click Replace.
c. Click Apply or click Save.
The VPN tunnel is opened.
Advanced Configuration Options
91
Page 92
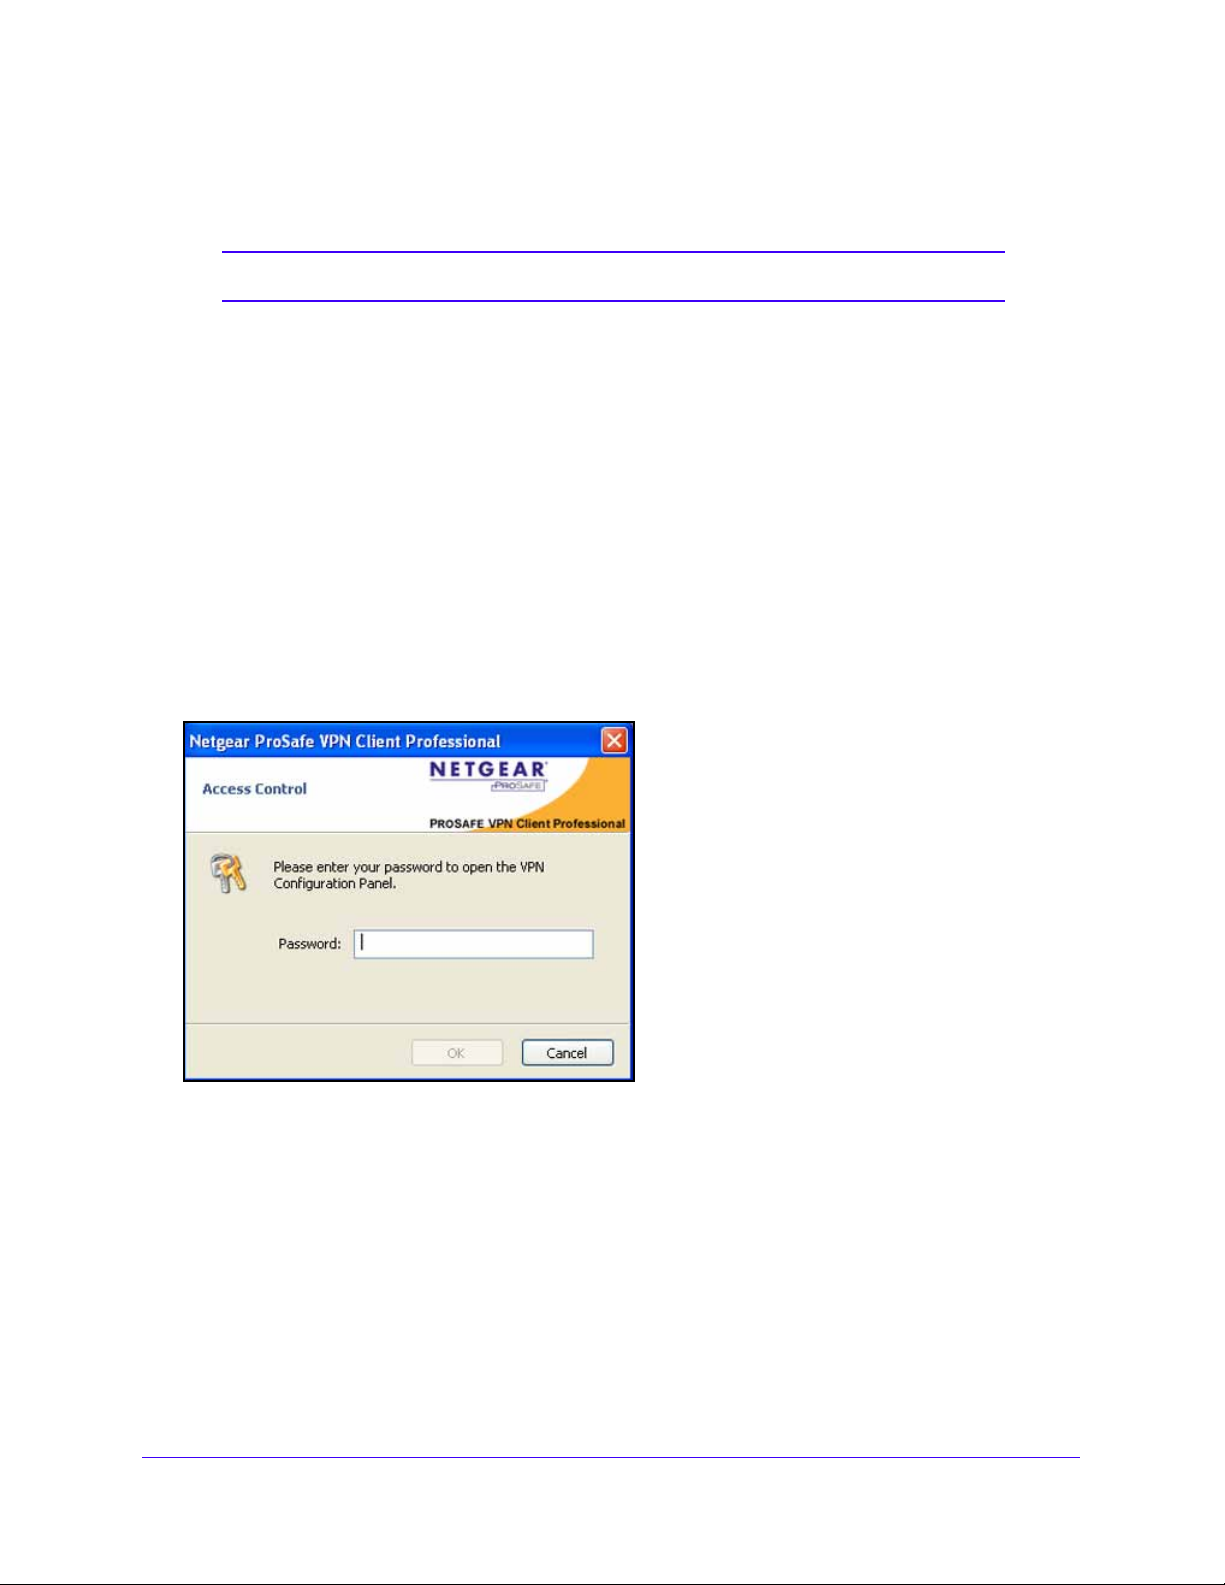
NETGEAR ProSAFE VPN Client
Configure Access Control
Note: This option is not available in the VPN Client Lite.
Access control is a feature that is intended for use by a network administrator . It allows you to
restrict access to the Connection Panel screen and the system tray menu with a password
and to lock access to the Configuration Panel screen to prevent users from modifying the
VPN configuration. Only the Configuration Panel screen can be protected with a password;
the Connection Panel screen cannot.
When access control is enabled, you are asked for the password under the following
circumst
ances:
• When
• When
• When
In all of these circumstances, the Access Control screen d
Figure 18. Access Control screen
When access control is enabled, you cannot open the Configuration Panel screen by
double-clicking the desktop icon or by using the Start menu; when you right-click the system
tray icon, the options are limited to accessing the VPN Console, opening and closing the
configured tunnels, and closing the VPN Client.
you click (or double-click) the VPN Client icon in the system tray.
you switch from the Connection Panel screen to the Configuration Panel screen.
you start a software upgrade.
isplays.
Advanced Configuration Options
92
Page 93
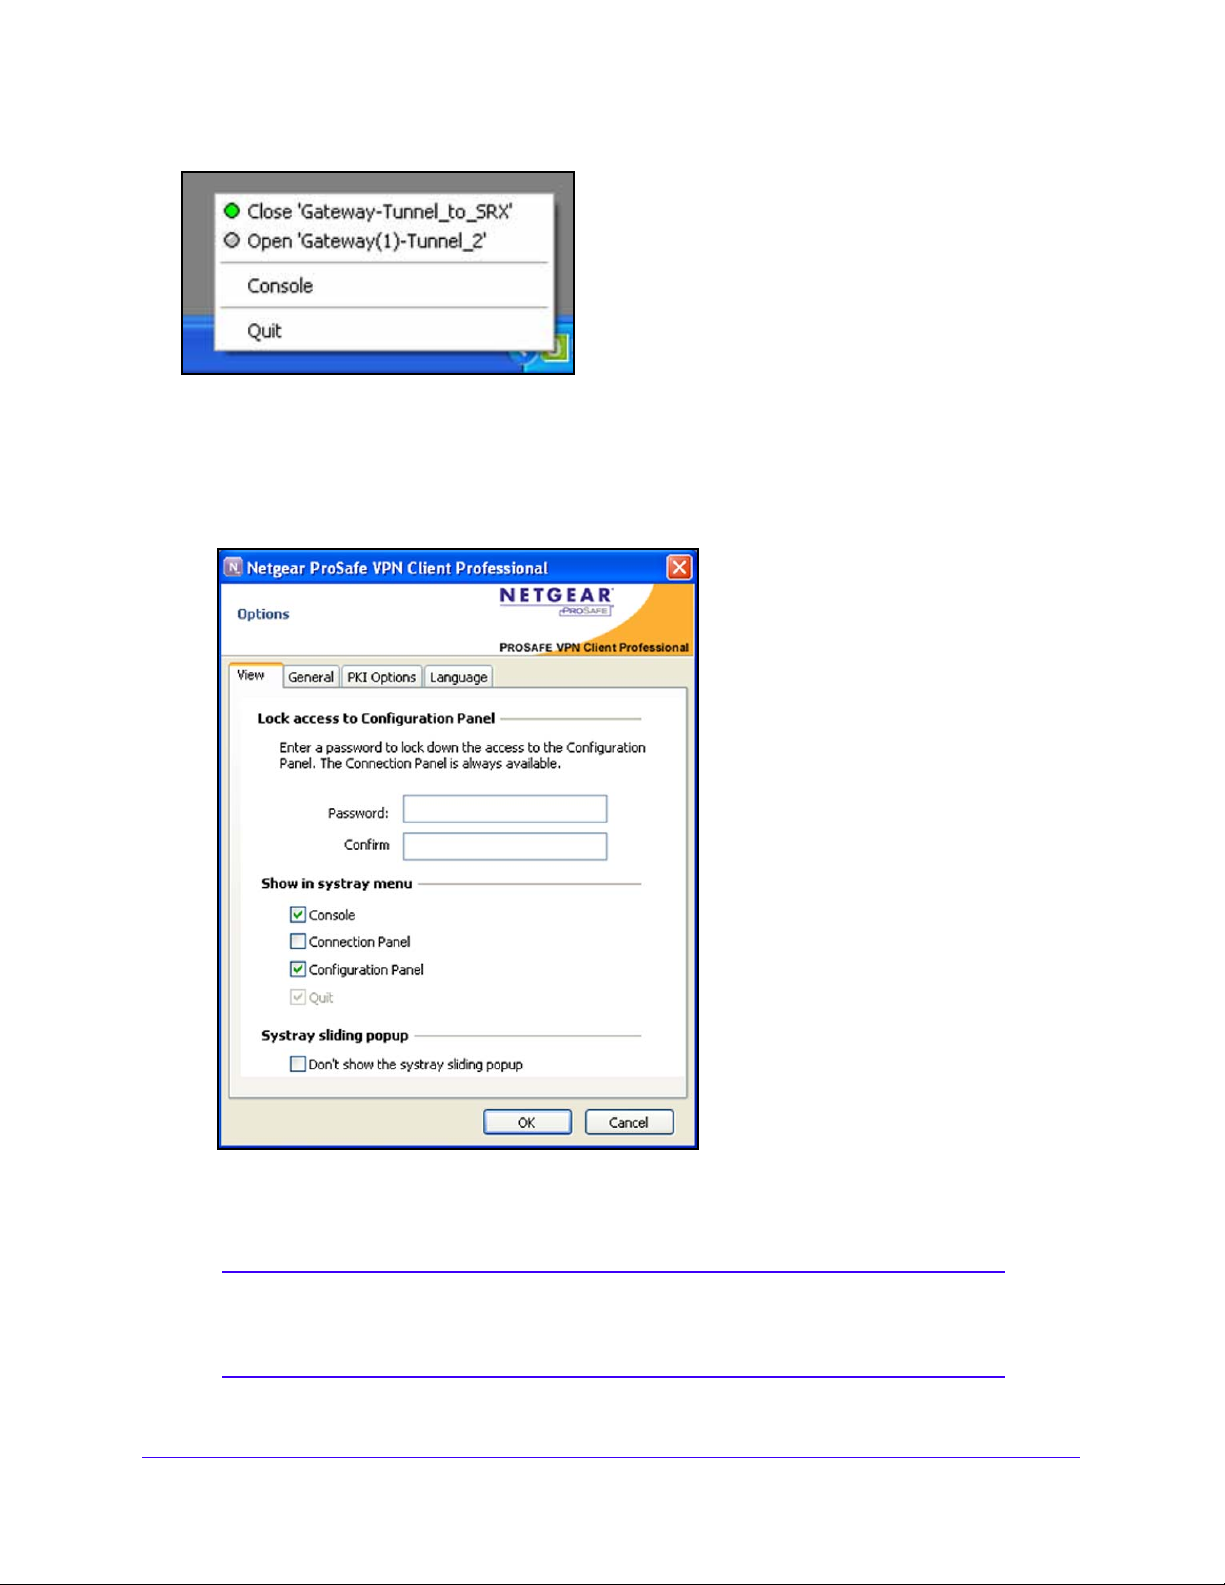
NETGEAR ProSAFE VPN Client
Figure 19. System tray menu with access control en ab l ed
To configure access control:
1. F
rom the main menu, select Tools > Options.
The Options screen displays. The View pane is selected by default.
2. Ente
r a password in the Password and Confirm fields.
3. Click OK.
Note: You can also configure this password as an option of the software
setup (see
Require a Password to Access the Configuration Panel
Screen on page 110).
Advanced Configuration Options
93
Page 94
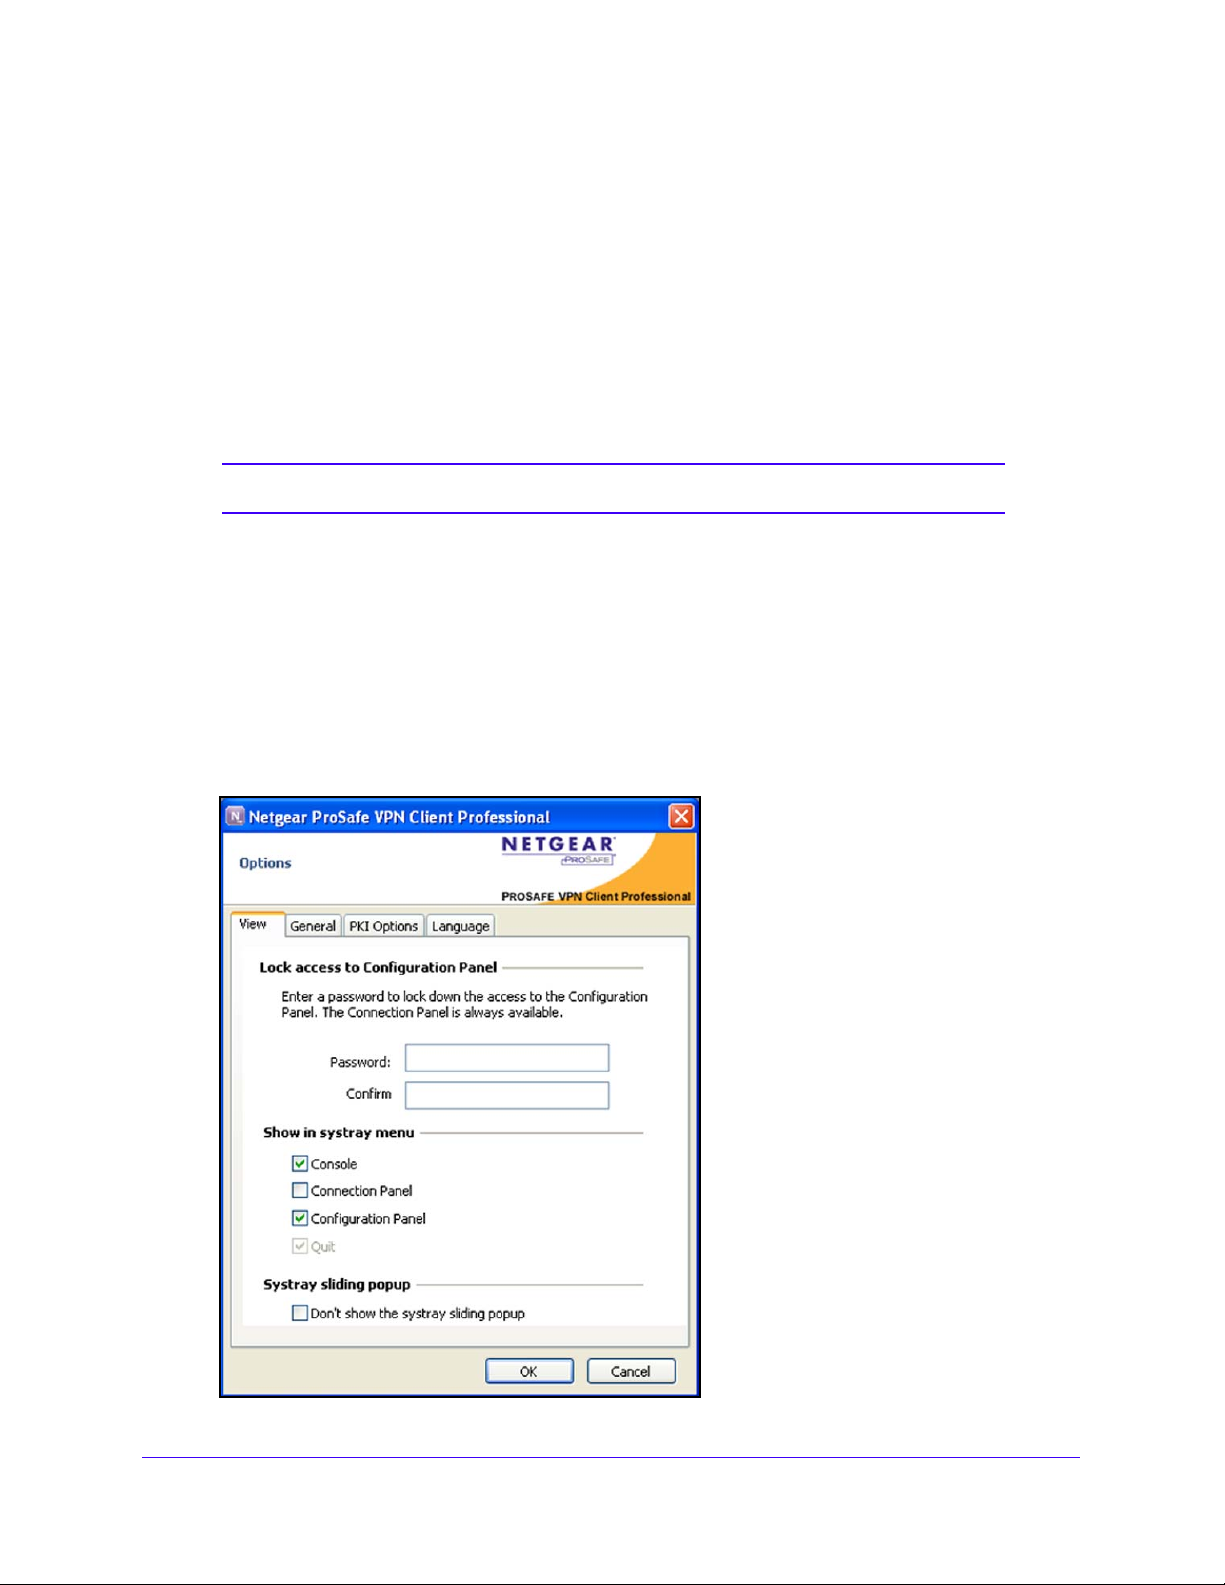
NETGEAR ProSAFE VPN Client
To remove access control:
1. From the main menu, select Tools > Options.
The Options screen displays. The View pane is selected by default.
2. Clear the
3. Click OK.
Password and Confirm fields.
Configure the User Interface
Note: The View pane is not available in the VPN Client Lite.
The View pane lets you configure the system tray menu items such as the Console,
Connection Panel, and Configuration Panel, and the pop-up screens in the system tray
(which are referred to as the systray sliding pop-ups). In this way, a network administrator can
limit the access that the user interface provides or even completely hide the user interface.
To configure the user interface and systray pop-up screens:
1. From the ma
The Options screen displays. The View pane is selected by default.
in menu of the Configuration Panel, select Tools > Options.
Advanced Configuration Options
94
Page 95

NETGEAR ProSAFE VPN Client
2. (Optional) In the Show in systray menu section of the pane, select any or all of the following
items to be hidden in the user interface by clearing the associated check boxes:
• Cons
• Conn
ole.
ection Panel.
• Confi
Note: The Quit check box is disabled. You cannot disable the Quit link in the
system tray menu fr
link in the system tray menu, see Configure Which Items of the System Tray
Menu Are Visible on pag
3. (Optional)
systray sliding popup check box to hide the system tray pop-up scre en in the user
interface.
4. Click OK.
guration Panel.
om the View pane. For information about disabling the Quit
e 111.
In the systray sliding pop-up section of the pane, select the Don’t show the
Configure VPN Client Startup Mode and Network Interface Detection
Note: These options are not available in the VPN Client Lite.
The General pane lets you specify if the VPN Client starts automatically after you have
logged in to Windows and whether the VPN Client detects disconnection of the network
interface.
To configure the VPN Client startup mode and network interface failure detection:
rom the main menu, select Tools > Options.
1. F
The Options screen displays. The View pane is selected by default.
2. Click the General ta
b.
Advanced Configuration Options
95
Page 96
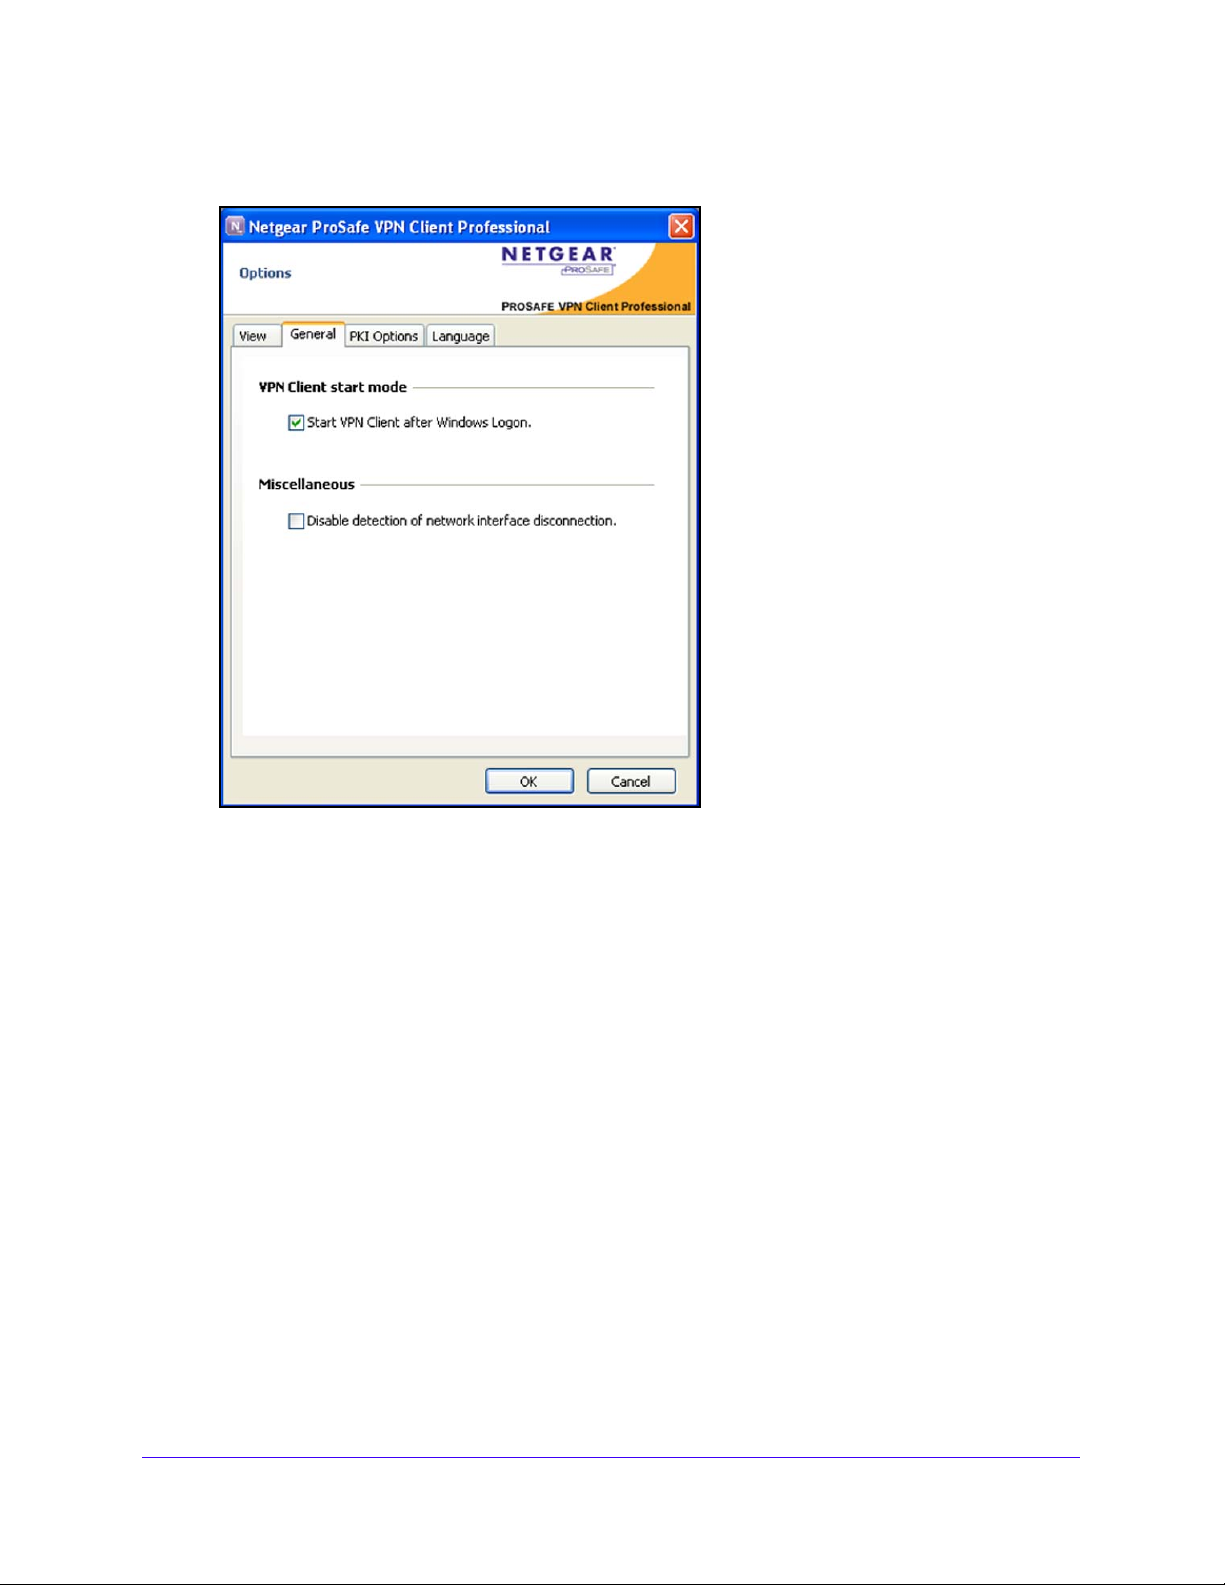
The General pane displays:
NETGEAR ProSAFE VPN Client
3. (Opt
ional) Clear the Start VPN Client after Windows Logon check box to prevent the VPN
Client from starting after you have logged in to Windows.
In this case, you need to manually start the VPN Client or use a script to start it.
By default, the check box is selected to start the VPN Client
after you have logged in to
Windows.
Note: You can also configure how the VPN Client starts in the software setup
(see Customize VPN Client Display
4. (Opt
ional) Select the Disable detection of network interface disconnection check box to
and Access for End Users on page 108).
enable network interface failure detection.
By default, the check box is cleared to disable
the detection of interface disconnection so
that the VPN Client keeps tunnels open when the network interface disconnects
momentarily . This type of behavior occurs when the interface that is used to open tunnels,
such as a WiFi, GPRS, or 3G interface, is unstable.
5. Click OK.
Advanced Configuration Options
96
Page 97
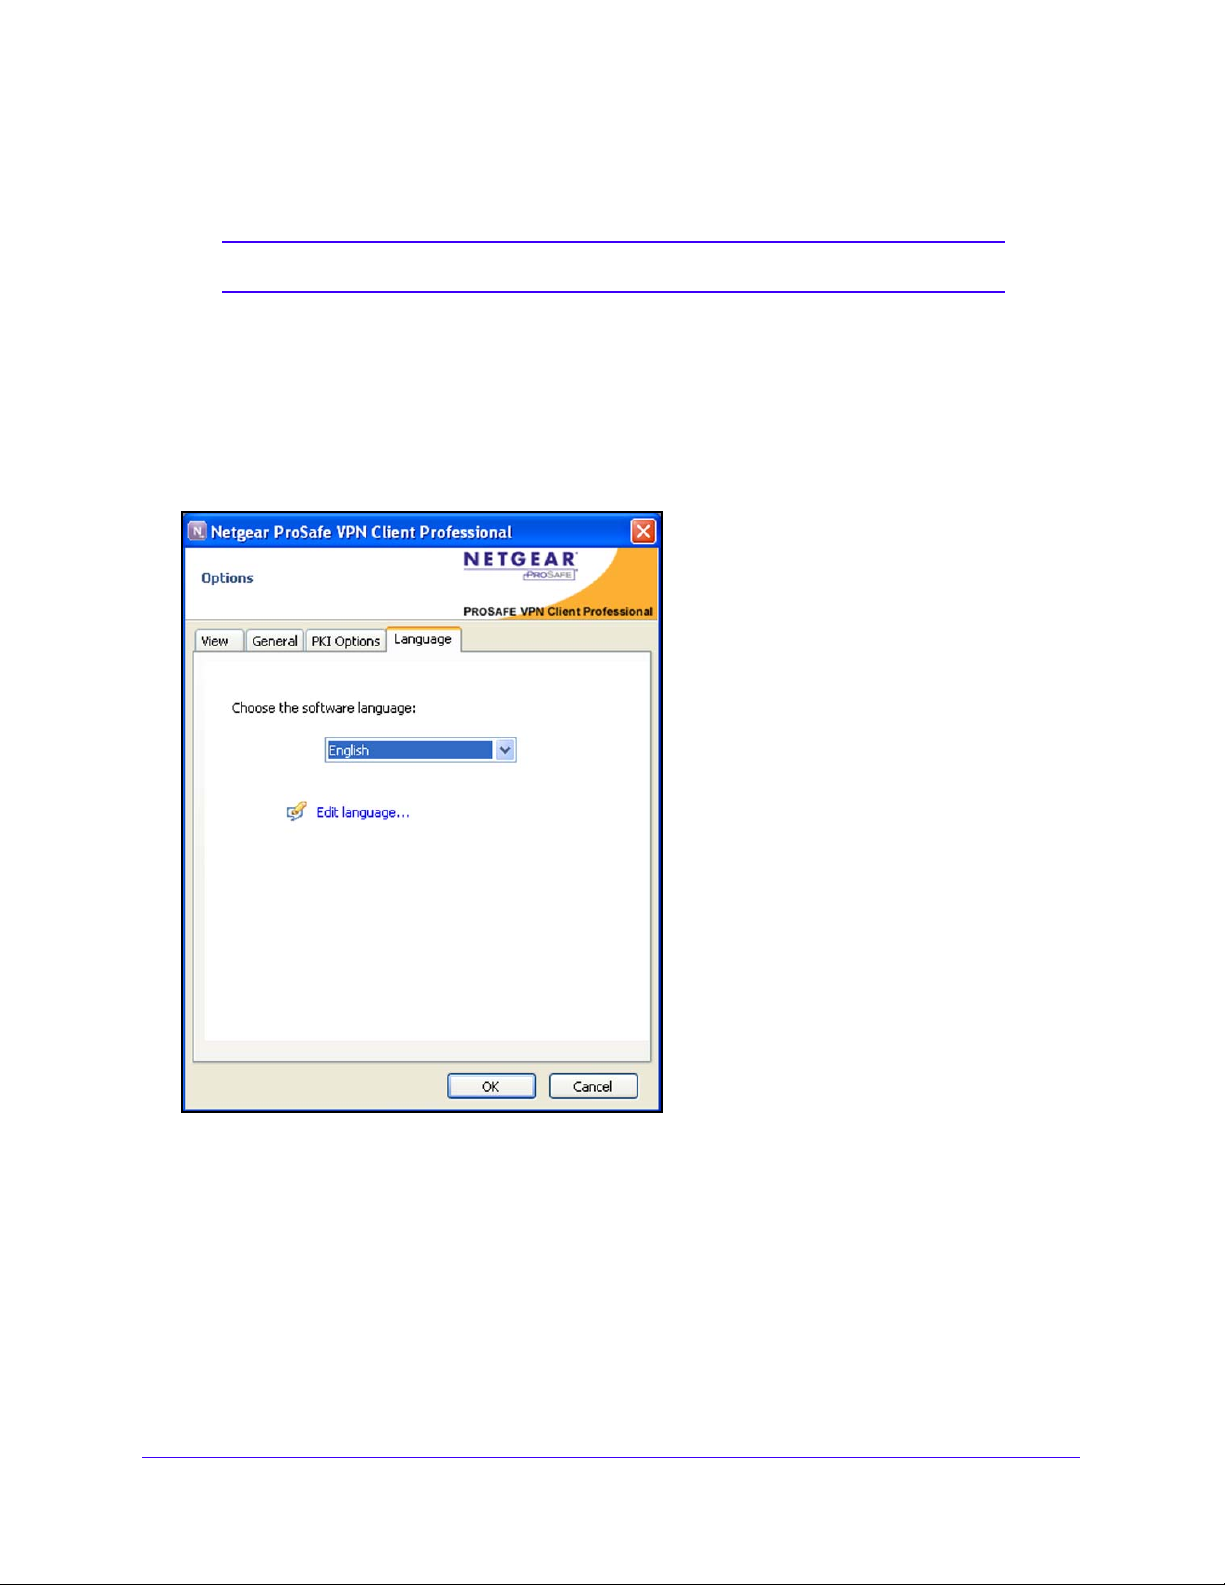
NETGEAR ProSAFE VPN Client
Configure Languages
Note: This option is not available in the VPN Client Lite.
The Language pane includes a drop-down menu that lets you change the VPN Client
language without having to restart the VPN Client. You can also manually edit the translation
in a very easy way, or even translate an existing language into another language that is not
yet supported on the VPN Client to create a new localization.
For a list of the supported languages, see Table 1 on p
age 8.
Figure 20. Language pane
If you modify the existing translation, do not change the following characters, which are
generic expressions:
• %
s is replaced by a string.
• %
d is replaced by a number.
• \
n stands for carriage return.
• & u
nderlines the characters that follow it.
Advanced Configuration Options
97
Page 98
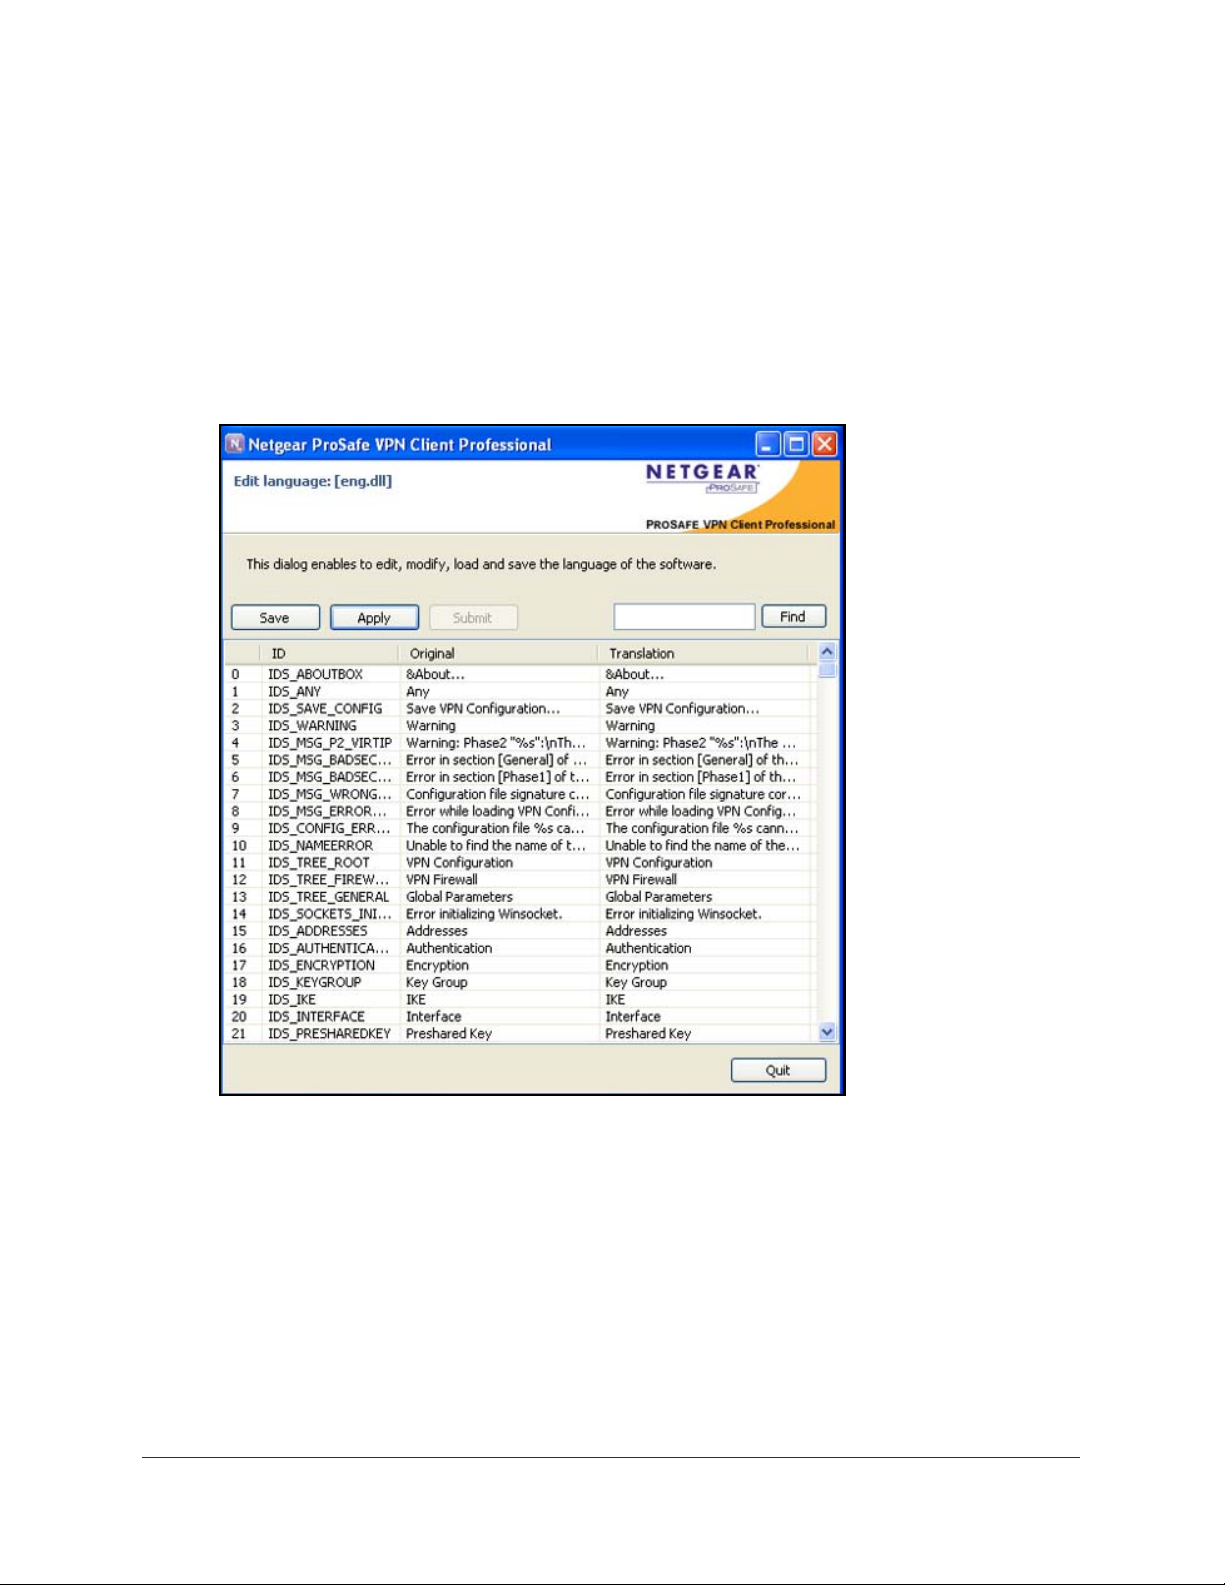
NETGEAR ProSAFE VPN Client
Also note the following restrictions:
• The IDS_DATE_FORMAT is %m-%d-%Y. Modify the date only if you know the
appropriate syntax.
• Do not t
To modify the translation:
ranslate IDS_SC_P11_3.
1. Click Edit lan
guage.
The Edit language screen displays:
2. Select the row that you want to change.
four columns:
• line n
• ID. The n
• Origin
• T
3. Enter your
umber.
ame of the string.
al. The string in English.
ranslation. The translated string.
alternate translation in the pop-up screen.
4. Click OK.
Advanced Configuration Options
A pop-up screen displays and shows the following
98
Page 99

5. Do one of the following:
• Click Save t
o save the .lng file in the Language folder of the VPN Client software
directory.
• Click Apply to
immediately show the new translation in the user interface.
NETGEAR ProSAFE VPN Client
Note: The saved file is added as a new sele
ction in the language drop-down
menu of the Language pane. The name of the new selection is the name of the
original language followed by an exclamation mark. For example, if you change
the English language file, the new language option that is shown in the
drop-down menu is English!
6. Click Qu
it.
The Language pane closes.
Advanced Configuration Options
99
Page 100

6. VPN Client Software Setup and
Network Deployment
The VPN Client is designed to be easily deployed and managed. It implements several features
that enable a network administrator to preconfigure the VPN Client software setup before
deployment to end users, to remotely install or upgrade the VPN Client, and to centrally manage
VPN configurations. This chapter includes the following sections:
• Software Setup and Deployment Concepts
• Software Setup Command Reference
• Customize VPN Client Display a
• VPN Client Silent Software Setup Deployment to End Users
• Deliver a VPN Configuration to an End User
• Command-Line Interface Command Reference
• Customize the VPN Client Using CLI Commands
• Customize How the VPN Client Handles Readers and Certificates
Note: The information in this chapter is typically used by network
administrators.
nd Access for End Users
6
100
 Loading...