


User Manual
Nighthawk M2
Next Gen Gigabit LTE Mobile Router
Model MR2100
|
NETGEAR, Inc. |
February 2019 |
350 E. Plumeria Drive |
202-11898-02 |
San Jose, CA 95134, USA |

Nighthawk M2
Support
Direct all calls and support for PIN numbers, SIM card registration, account and billing information, network services, and other general enquiries to Telstra at 13 22 00.
Direct general enquiries to Telstra at livechat.telstra.com.
See your warranty card for warranty and service information.
Foradditionalinformation,visitwww.netgear.com/supporttoaccessthefullusermanual (this document) and to download firmware updates.
Compliance
Forregulatorycomplianceinformation,visithttp://www.netgear.com/about/regulatory.
See the regulatory compliance document before connecting the power supply.
Trademarks
© NETGEAR, Inc., NETGEAR and the NETGEAR Logo are trademarks of NETGEAR, Inc. Any non-NETGEAR trademarks are used for reference purposes only.
2

Contents
Chapter 1 Get Started |
|
Get to Know Your Mobile Router........................................................ |
9 |
Top Front View................................................................................. |
9 |
Power Button.................................................................................... |
9 |
Status LED....................................................................................... |
10 |
LCD Screen..................................................................................... |
10 |
Rear View........................................................................................ |
11 |
Optional Accessories..................................................................... |
13 |
Install the SIM Card and the Battery................................................. |
13 |
Download the NETGEAR Mobile App............................................. |
15 |
Power On Your Mobile Router.......................................................... |
15 |
Set Up the Mobile Router.................................................................. |
16 |
Set Up the Mobile Router Using the Touch Screen................... |
16 |
Use a Web Browser to Set Up the Mobile Router...................... |
16 |
Use the Mobile App to Set Up the Mobile Router..................... |
17 |
External Antennas............................................................................... |
17 |
Chapter 2 Connect to the Mobile Router |
|
Connect to the Mobile Router Network........................................... |
20 |
WiFi Connection............................................................................. |
20 |
Tethered Connection.................................................................... |
21 |
Use the Touch Screen to Access the Mobile Router...................... |
21 |
Use the NETGEAR Mobile App to Access the Mobile Router...... |
21 |
Use a Web Browser to Access the Mobile Router.......................... |
23 |
Access the Moble Router Directly From the Touch Screen.......... |
24 |
Chapter 3 Manage Battery Usage and Charging |
|
Extend Battery Life.............................................................................. |
26 |
Use the Mobile Router Without a Battery........................................ |
26 |
Recharge the Battery.......................................................................... |
26 |
Quick Charge the Battery............................................................. |
27 |
Recharge the Battery From a Wall Socket.................................. |
27 |
Recharge the Battery From a Computer USB Port.................... |
28 |
Use the USB Type C Cable to Charge Only................................ |
28 |
Use the Mobile Router to Jump Boost Another Device................ |
29 |
Change the LCD Screen Display...................................................... |
30 |
3

Nighthawk M2 Model MR2100
Change the LCD Screen Display Settings From a Web |
|
Browser........................................................................................... |
30 |
Battery Tips.......................................................................................... |
30 |
General Battery Safety....................................................................... |
31 |
Appropriate Batteries and Chargers................................................ |
32 |
Battery Disposal.................................................................................. |
32 |
Chapter 4 Manage Your Internet Connection |
|
View Your Data Usage....................................................................... |
34 |
View Data Usage on the Mobile Router LCD............................. |
34 |
View Data Usage From the NETGEAR Mobile App................... |
35 |
View Data Usage From a Web Browser...................................... |
35 |
Offload Your Mobile Internet Connection...................................... |
36 |
Enable Data Offloading From the NETGEAR Mobile App....... |
37 |
Enable WiFi Data Offloading From a Web Browser.................. |
38 |
Enable Ethernet Data Offloading From a Web Browser........... |
38 |
Specify Cellular Settings.................................................................... |
39 |
Specify Cellular Settings From the NETGEAR Mobile App...... |
39 |
Specify Cellular Settings From a Web Browser.......................... |
40 |
Chapter 5 Control Internet Access |
|
Access Control.................................................................................... |
44 |
Set Up Access Control From the Touch Screen......................... |
44 |
Set Up Access Control From the NETGEAR Mobile App......... |
44 |
Set Up Access Control From a Web Browser............................. |
45 |
Turn Off USB Tethering...................................................................... |
45 |
Turn Off USB Tethering From the Touch Screen....................... |
46 |
Turn Off USB Tethering From the NETGEAR Mobile App........ |
46 |
Turn Off USB Tethering From a Web Browser........................... |
46 |
Manage Website Filters..................................................................... |
47 |
Set Up a Schedule for Internet Access............................................. |
48 |
Edit a Schedule Rule.......................................................................... |
49 |
Delete a Schedule Rule...................................................................... |
49 |
Enable SIM Security............................................................................ |
50 |
Enable SIM Security From the NETGEAR Mobile App.............. |
50 |
Enable SIM Security From a Web Browser................................. |
50 |
Enable Port Forwarding..................................................................... |
51 |
Set Up Port Filtering........................................................................... |
52 |
Enable DMZ......................................................................................... |
53 |
Chapter 6 Specify Mobile Router Network Settings |
|
Select a WiFi Profile............................................................................ |
55 |
Select a WiFI Profile From the Touch Screen............................. |
55 |
Select a WiFi Profile From the NETGEAR Mobile App.............. |
55 |
4

Nighthawk M2 Model MR2100
Select a WiFi Profile From a Web Browser................................. |
56 |
Manage WiFi Settings........................................................................ |
56 |
Specify WiFi Settings From the Touch Screen........................... |
56 |
Specify WiFi Settings From the NETGEAR Mobile App............ |
57 |
Specify WiFi Settings From a Web Browser............................... |
57 |
Use WPS to Connect to the Mobile Router WiFi Network............ |
58 |
Use WPS From the Touch Screen................................................ |
58 |
Use WPS From the NETGEAR Mobile App................................. |
58 |
Use WPS From a Web Browser.................................................... |
59 |
Universal Plug-N-Play......................................................................... |
59 |
Turn UPnP Off or On From the NETGEAR Mobile App............ |
60 |
Turn UPnP Off or On From a Web Browser................................ |
60 |
Enable IP Pass-Through Mode.......................................................... |
61 |
Specify the IP Addresses That the Mobile Router Assigns............ |
61 |
Disable the DHCP Server Feature in the Mobile Router................ |
62 |
Chapter 7 Share Media and Storage |
|
Manage Shared Storage Devices..................................................... |
65 |
USB Device Requirements............................................................ |
65 |
Connect a USB Storage Device.................................................... |
65 |
View Storage Device Usage and Capacity...................................... |
66 |
Manage Files on the Mobile Router................................................. |
66 |
Upload Media Files to Mobile Router Storage........................... |
66 |
Use the NETGEAR Mobile App to Manage Files on the Mobile |
|
Router.............................................................................................. |
67 |
Play Media........................................................................................... |
67 |
Chapter 8 Manage Your Mobile Router Network |
|
View the Network Information.......................................................... |
70 |
View Mobile Router Network Status................................................. |
70 |
ViewMobileRouterStatusFromtheNETGEARMobileApp.... |
70 |
View Mobile Network Device Status From a Web Browser...... |
70 |
View WiFi Details................................................................................ |
71 |
View a Network Map.......................................................................... |
71 |
View a Network Map From the NETGEAR Mobile App............ |
71 |
View a Network Map From a Web Browser................................ |
72 |
View Connected Devices................................................................... |
72 |
ViewtheConnectedDevicesFromtheNETGEARMobileApp.72 |
|
View the Connected Devices From a Web Browser.................. |
72 |
Update the Mobile Router Firmware............................................... |
73 |
Update Firmware From the Touch Screen................................. |
73 |
Update Firmware From an Alert.................................................. |
73 |
Update Firmware From the NETGEAR Mobile App.................. |
73 |
Update the Firmware From the Web Page................................. |
74 |
5

Nighthawk M2 Model MR2100
Change the admin Password............................................................ |
74 |
Manage SMS Messages..................................................................... |
75 |
Manage Messages From the Touch Screen............................... |
75 |
Manage Messages From the NETGEAR Mobile App................ |
76 |
View or Delete Messages From a Web Browser........................ |
76 |
Manage the LED Settings.................................................................. |
76 |
Back Up and Restore the Mobile Router Settings.......................... |
77 |
Back Up the Mobile Router Settings............................................ |
77 |
Restore the Mobile Router Settings............................................. |
78 |
Factory Reset....................................................................................... |
79 |
Factory Reset From the NETGEAR Mobile App......................... |
79 |
Factory Reset From the Touch Screen........................................ |
79 |
Factory Reset From a Web Browser............................................ |
80 |
Factory Reset Using the Reset Button......................................... |
80 |
Reboot the Mobile Router................................................................. |
81 |
Reboot the Mobile Router From the Touch Screen................... |
81 |
Reboot the Mobile Router From the NETGEAR Mobile App.... |
81 |
Reboot the Mobile Router From a Web Browser...................... |
82 |
Power Off the Mobile Router............................................................ |
82 |
Power Off the Mobile Router Manually....................................... |
82 |
PowerOfftheMobileRouterFromtheNETGEARMobileApp.83 |
|
Power Off the Mobile Router From a Web Browser.................. |
83 |
View Details About Your Mobile Router.......................................... |
84 |
View Mobile Router Details From the Touch Screen................. |
84 |
View Mobile Router Details From the NETGEAR Mobile App..84 |
|
View Mobile Router Details From a Web Browser..................... |
84 |
Chapter 9 Frequently Asked Questions |
|
Why can’t my device connect to the mobile router?..................... |
86 |
Why can’t I access the Internet?........................................................ |
86 |
Why is the signal indicator always low?........................................... |
86 |
Why is the download or upload speed slow?................................. |
87 |
What do I do if I forget my admin login password?....................... |
87 |
TheLCDisnotlit.HowdoIknowifthemobilerouterisstillpowered |
|
on?........................................................................................................ |
87 |
How do I find my computer’s IP address?....................................... |
87 |
How do I find my computer’s IP address on a Windows 7, |
|
Windows Vista, or Windows XP device?..................................... |
88 |
How do I find my computer’s IP address on a Windows 8 |
|
device?............................................................................................ |
88 |
How do I find my computer’s IP address on a Mac OS X |
|
device?............................................................................................ |
88 |
HowdoIfindmycomputer’sIPaddressondevicesrunningother |
|
operating systems?........................................................................ |
89 |
6

Nighthawk M2 Model MR2100
How do I find a device’s MAC address?.......................................... |
89 |
HowdoIfindadevice’sMACaddressonaWindows7,Vista,or |
|
XP device?....................................................................................... |
89 |
How do I find a device’s MAC address on a Windows 8 |
|
device?............................................................................................ |
89 |
HowdoIfindadevice’sMACaddressonaMacOSXdevice?.90 |
|
Where can I find more information?................................................ |
90 |
Chapter 10 Troubleshooting |
|
Diagnostics.......................................................................................... |
92 |
The WiFi Network Name Is Not in the List of Networks................. |
92 |
The No Signal Icon Displays.............................................................. |
92 |
Cannot Log In to the Mobile Router Using a VPN.......................... |
93 |
The Mobile Router Cannot Connect to a Computer Running |
|
Windows Vista..................................................................................... |
93 |
The Mobile Router Does Not Connect to the Cellular Network.... |
93 |
Appendix A Specifications |
|
Mechanical Specifications................................................................. |
96 |
Environmental Specifications............................................................ |
96 |
Supported RF Bands.......................................................................... |
96 |
7

1
Get Started
ThischapterprovidesanoverviewoftheM2NextGenerationGigabitLTEMobileRouter Model MR2100 and instructions for how to set up your mobile router and connect to the Internet.
The chapter covers the following topics:
•Get to Know Your Mobile Router on page 9
•Install the SIM Card and the Battery on page 13
•Download the NETGEAR Mobile App on page 15
•Power On Your Mobile Router on page 15
•Set Up the Mobile Router on page 16
•External Antennas on page 17
Note: Firmware updates with new features and bug fixes are available at downloadcenter.netgear.com. Some products regularly check the site and download newfirmware,oryoucancheckforanddownloadnewfirmwaremanually.Ifthefeatures orbehaviorofyourproductdoesnotmatchwhatisdescribedinthismanual,youmight need to update your firmware.
8
Nighthawk M2 Model MR2100
Get to Know Your Mobile Router
Your mobile router lets you create a WiFi access point in any location with cellular networkcoverage.UseaWiFiaccesspointtoconnectyourcomputerormobiledevices to your service provider’s mobile broadband network and connect to the Internet.
Your mobile router can receive power from any of the following sources:
•Rechargeable battery included with the mobile router
•Wall socket using the AC adapter and USB cable
•USB port on your computer
Top Front View
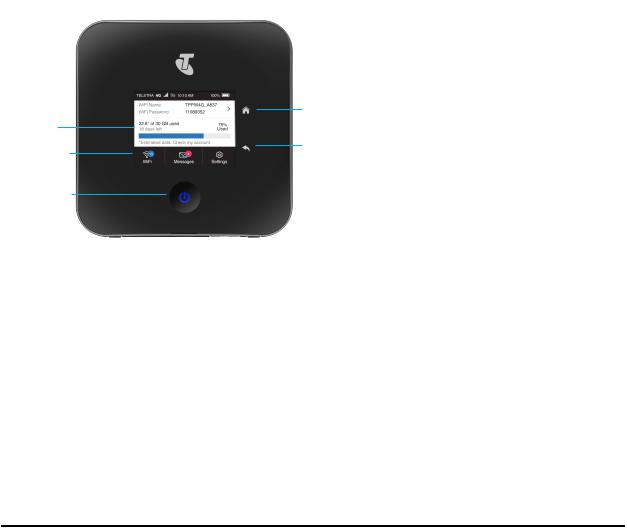
The following figure shows the top front view of the mobile router
Home
Touch screen
Back
Touch to navigate
Touch to turn on or o
Figure 1. Mobile router buttons and features
Power Button
Use the Power button to wake the mobile router and to power the device on and off. The Power button is on upper side panel of the mobile router (see Top Front View on page 9).
Get Started |
9 |
User Manual |

Nighthawk M2 Model MR2100
Table 1. Power button usage
Desired Result |
Action |
Turn on the mobile router. |
Press and hold the Power button for three seconds. |
Turn off the mobile router. |
Press and hold the Power button for five seconds. |
Wake the mobile router. |
Press and quickly release the Power button. |
Status LED
The status LED indicates the mobile router’s connection status.
Table 2. LED indicator patterns
LED |
What the Pattern Means |
Slow blue blink |
The mobile router is ready. |
Fast blue blink |
The mobile router is transferring data. |
Slow amber blink |
The mobile router is not ready. |
LCD Screen
The LCD screen displays information shown in the following figure.
Get Started |
10 |
User Manual |

Nighthawk M2 Model MR2100
2 3 4
1
Figure 2. LCD screen
Number Description
1Data usage
2Network type
3Signal strength
4Activeuplinkordownlink(displaysonlyduringdatatransfer)
Rear View
The following figure shows the rear view of the mobile router.
Get Started |
11 |
User Manual |
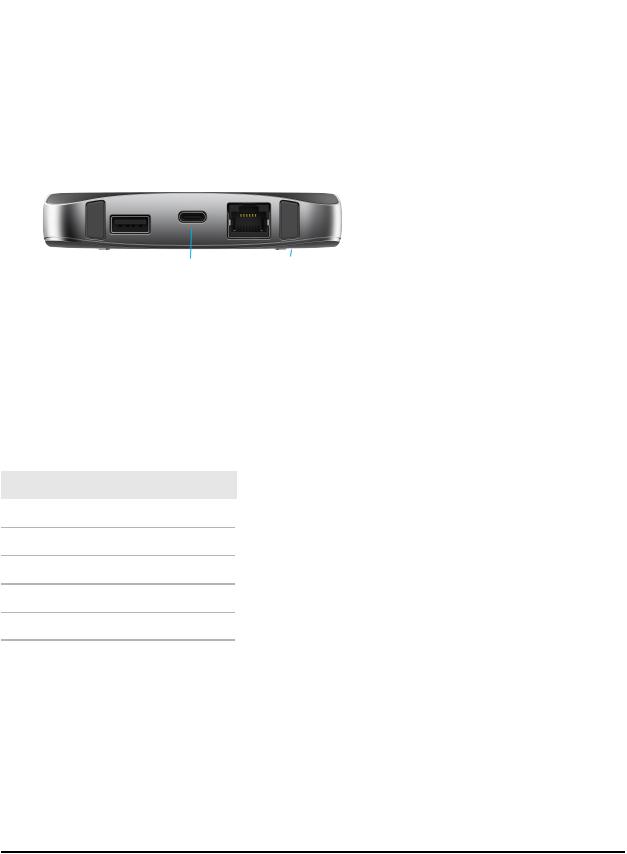
Nighthawk M2 Model MR2100
|
|
|
|
|
|
5 |
|
|
|
|
|
|
|
1 |
2 |
3 |
4 |
|||
Figure 3. Mobile router rear view
Number Description
1RF connector 1
2USB type A port
3USB type C port
4LAN/WAN (Ethernet) port
5RF connector 2
The mobile router rear panel includes the following ports and connectors:
•USB type A port. Connect a USB storage device or charge a smartphone.
For information about USB storage devices, see Connect a USB Storage Device on page 65.
For information about charging a smartphone, see Use the Mobile Router to Jump Boost Another Device on page 29.
•USBtypeCport.ConnecttheUSBtype-Ccablethatcameinthepackagetorecharge the battery or for a tethered connection to a computer.
Get Started |
12 |
User Manual |

Nighthawk M2 Model MR2100
For more information about recharging the battery, see Recharge the Battery From a Wall Socket on page 27 and Recharge the Battery From a Computer USB Port on page 28.
A tethered connection to a computer lets you access the mobile router from a web browser without a WiFi connection. See Tethered Connection on page 21.
•LAN/WANport.YoucanconnectanEthernet-compatibledevicetothisport.Devices connected to the mobile router over WiFi and devices connected to this port can send and receive information to each other.
When you are using an Ethernet connection, you can use the USB type C cable and the AC adapter to recharge the mobile router battery.
Note: You can use an Ethernet connection and a tethered USB connection at the same time to access the mobile router.
Forinformationaboutoffloadingdata,seeOffloadYourMobileInternetConnection on page 36.
For information about how to use a charge-only tethered connection, see Use the USB Type C Cable to Charge Only on page 28.
•RF antenna connectors. Two RF connectors for an optional MIMO antenna. Formoreinformationaboutconnectinganexternalantenna,see ExternalAntennas on page 17.
Optional Accessories
The following optional accessories are also supported:
•Optional antennas (sold separately)
For more information, visit netgear.com/telstraaccessories.
Install the SIM Card and the Battery
To obtain an activated SIM card, contact Telstra.
Get Started |
13 |
User Manual |

Nighthawk M2 Model MR2100
1
2
5
4
3
Number Description
1Cover
2SIM card slot
3Battery
4Enlargement of battery contacts
5Reset
To install the SIM card and the battery:
1.Make sure that power to the mobile router is off.
2.Remove the cover on the bottom of the mobile router.
Place your thumbs on the arrows on the cover and press down while sliding the cover up.
3.Carefully slide the SIM card into the slot.
4.Align the battery connectors and insert the battery.
Get Started |
14 |
User Manual |

Nighthawk M2 Model MR2100
5.f you purchased a SD card, insert the card into the SD slot.
6.Replace the mobile router cover.
Download the NETGEAR Mobile App
TheNETGEARMobileappletsyousetupthemobilerouter. Afterinitialsetup,youcan use the app to view or change the mobile router settings. You can also use it to play and share media, and enable the travel router feature.
To download the NETGEAR Mobile app:
1.Connect your mobile device to the Internet.
2.Open a web browser.
3.Visit http://netgear.com/mobileapp.
4.Download the NETGEAR Mobile app.
Power On Your Mobile Router
Touch to turn on or o
To power on your mobile router:
Press the Power button on your mobile router.
The LED lights blue.
Get Started |
15 |
User Manual |

Nighthawk M2 Model MR2100
Set Up the Mobile Router
Ifyouareathome,werecommendthatyouusewebbrowseraccesstosetupthemobile router, but you can also use the NETGEAR Mobile app to set up the mobile router.
Set Up the Mobile Router Using the Touch Screen
The first time you start the mobile router, you can set the admin password, and change the WiFi name and WiFi password, using the Touch Screen.
1.Tap Let's go.
2.Tap Customize.
3.Tap Name my WiFi
4.Type a name for the WiFI and then tap Done.
5.Tap Create a password and then type a password.
6.Tap Done.
7.Do one of the following:
•To accept the default admin password, tap Skip and use the default admin password
•To specify another admin password, tap Create admin password, type a password, and then tap Done.
Use a Web Browser to Set Up the Mobile Router
To set up the mobile router:
1.Connect your computer to the mobile router WiFi network. ToviewthemobilerouterWiFinetworkname,tapthe Power buttontowakeupthe LCD.
Note: You can also use a tethered connection to access the mobile router from a computer. Forinformationabouthowtodothis,see TetheredConnection onpage 21.
2.Launch a web browser.
3.Enter http://m.home or http://192.168.1.1.
Get Started |
16 |
User Manual |

Nighthawk M2 Model MR2100
Youarepromptedtochangethepasswordfortheadminusernameandtochange the WiFi name and WiFi password.
Note: The default password for the admin user name is admin. We strongly recommend that you change this password to a more secure password.
4. Follow the onscreen instructions to set up your mobile router.
Use the Mobile App to Set Up the Mobile Router
To set up the mobile router:
1.Launch the NETGEAR Mobile app.
The app prompts you to change the password for the admin user name and to change the WiFi name and WiFi password.
Note: The default password for the admin user name is admin. We strongly recommend that you change this password to a more secure password.
2.Follow the onscreen instructions to set up your mobile router.
External Antennas
Usinganexternalantennamightberecommendedinareasoflowercoveragetoimprove yourdeviceperformance.MIMODualRFantennasareavailablefromyourretailer.Insert the connector carefully to avoid damage to your device.
Get Started |
17 |
User Manual |

Nighthawk M2 Model MR2100
Figure 4. External antennas with RF connectors
Get Started |
18 |
User Manual |

2
Connect to the Mobile Router
This chapter covers the following topics:
•Connect to the Mobile Router Network on page 20
•Use the NETGEAR Mobile App to Access the Mobile Router on page 21
•Use a Web Browser to Access the Router on page 23
19

Nighthawk M2 Model MR2100
Connect to the Mobile Router Network
YoucanconnectyourcomputersandmobiledevicestothemobilerouterWiFinetwork. You can also connect a computer to the mobile router through a tethered connection using the USB cable that came in the package with the mobile router.
Note: If you set up your computer to use a static IP address, change the settings so that it uses Dynamic Host Configuration Protocol (DHCP).
WiFi Connection
YoucanfindandselecttheWiFinetworkoryoucanconnecttotherouter’sWiFinetwork with Wi-Fi Protected Setup (WPS). For information about using WPS, see Use WPS to Connect to the Mobile Router WiFi Network on page 58.
To find and connect to the WiFi network:
1.Make sure that the mobile router is powered on.
2.Check to make sure that WiFi is enabled on your computer or mobile device and search for WiFi networks.
SeethefollowingtableorthemanualforyourWiFi-enableddeviceforfurtherdetails on searching for WiFi networks.
Device |
Instructions |
Windows |
Click the Internet Access icon, which is usually found on the bottom |
computer |
right side of your screen. |
Mac computer |
Go to the WiFi menu and select Network. |
Mobile devices |
Go to the Settings menu and tap the WiFi icon. |
3.Select the WiFi name that is displayed on your mobile router screen.
4.Enter the WiFi password exactly as shown on the mobile router screen. The password is case-sensitive.
Your computer or mobile device connects to the WiFi network.
Connect to the Mobile Router |
20 |
User Manual |
Nighthawk M2 Model MR2100
Tethered Connection
To connect the mobile router to the USB port on your computer:
Attach one end of the USB (type C) cable to the mobile router and plug the other end into the USB port on your computer.
YourcomputerautomaticallyconnectstothemobilerouterLAN(localareanetwork). Thefirsttimeyouconnectthisway,yourcomputermightdisplaynotificationsabout detecting a new device.
Note: If you want to use data offloading with a tethered USB connection, use WiFi offloading instead of Ethernet offloading. Tethered USB access is not supported duringEthernetoffloading.Formoreinformationaboutoffloading,seeOffloadYour Mobile Internet Connection on page 36.
Use the Touch Screen to Access the Mobile Router
The first time you start the mobile router, you can set the admin password using the Touch Screen or access the mobile router directly.
UsetheNETGEARMobileApptoAccessthe
Mobile Router
You use the NETGEAR Mobile app to set up the mobile router. After initial setup, you can launch the app again and use it to log in to the mobile router to view or change its settings.
Connect to the Mobile Router |
21 |
User Manual |

Nighthawk M2 Model MR2100
To log in to the mobile router from the NETGEAR Mobile app:
1.On your smartphone, connect to the mobile router’s WiFi network.
2.Launch the NETGEAR Mobile app.
You might be prompted to enter the admin password. During setup, you were prompted to change this password (the default password is admin).
3.If prompted, enter the admin password.
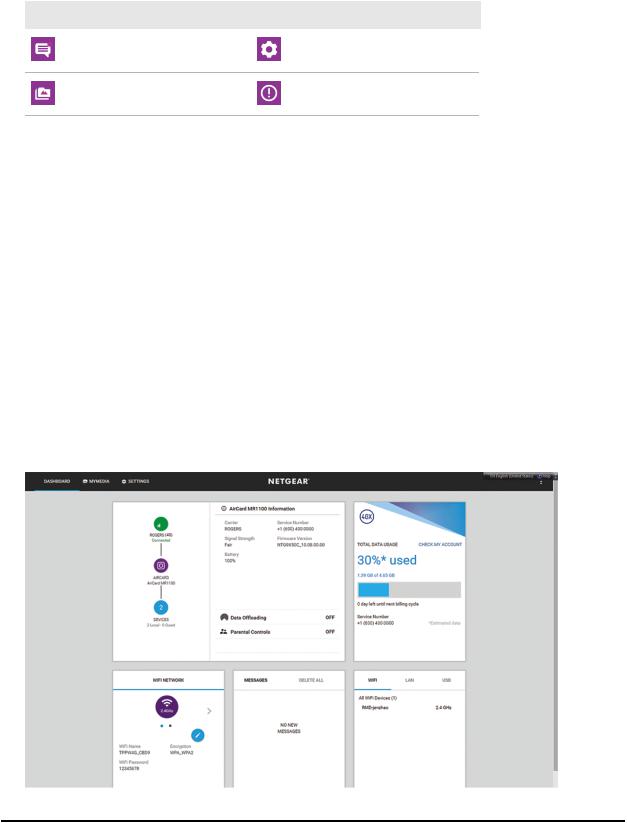
The app displays the following information:
•Notifications
•Data usage as provided by your carrier
•Your cellular and WiFi signals and battery
•Current WiFi band (swipeable)
•WiFi name and password
•Connected devices.
4.Swipe down.
The dashboard displays the icons shown in the following table.
Icon |
Description |
Icon |
Description |
|
WiFi |
|
Storage |
|
Offloading |
|
Security |
|
Number of connected |
|
Network Map |
|
devices |
|
|
Connect to the Mobile Router |
22 |
User Manual |
Nighthawk M2 Model MR2100
(Continued)
Icon |
Description |
Icon |
Description |
|
Messages |
|
Settings |
|
Media |
|
Power |
Use a Web Browser to Access the Mobile Router
When you connect to the network (either with WiFi or with a tethered connection), you can use a web browser to access the mobile router to view or change its settings.
To log in to the mobile router from a web browser:
1.From a computer that is connected to your network, launch a web browser.
2.Enter http://m.home or http://192.168.1.1. A login window opens.
3.Enter the router user name and password.
The user name is admin. The user name and password are case-sensitive.
Connect to the Mobile Router |
23 |
User Manual |

Nighthawk M2 Model MR2100
Access the Moble Router Directly From the
Touch Screen
1.Press the Power button to wake up the mobile router.
2.Tap the LCD screen to unlock the screen.
Connect to the Mobile Router |
24 |
User Manual |

3
Manage Battery Usage and
Charging
This chapter includes the following sections:
•Extend Battery Life on page 26
•Use the Mobile Router Without a Battery on page 26
•Recharge the Battery on page 26
•Use the Mobile Router to Jump Boost Another Device on page 29
•Change the LCD Screen Display on page 30
•Battery Tips on page 30
•General Battery Safety on page 31
•Appropriate Batteries and Chargers on page 32
•Battery Disposal on page 32
25

Nighthawk M2 Model MR2100
Extend Battery Life
Themobilerouter,bydefault,isconfiguredtooptimizebatterylife.Ifyourmobilerouter is plugged in for an extended period of time, the mobile router automatically reduces charging levels to help protect battery life.
The following factors affect battery life:
•Standby time
•Data throughput
•Mobile broadband signal strength (the better the signal, the longer the battery life)
•WiFi range
•Dual-bandWiFi(whenallofyourdevicessupport5GHzWiFi,dual-bandWiFiallows faster downloads but uses more power)
•Usage of a USB storage device
To extend the battery life, use any of the following methods:
•Adjust WiFi settings.
•Adjust display settings.
•Remove the USB storage device.
Use the Mobile Router Without a Battery
If you connect your mobile router to a power adapter that supports Quick Charge 2.0 or 3.0, you can remove the battery. We recommend operating without the battery in applications where the mobile router is used for extended periods, such as using the mobile router as a fixed router.
Recharge the Battery
The battery comes partially charged. You can recharge the battery from a wall socket or from the USB port on your computer. Recharging from a wall socket is faster than recharging from a USB port.
TurnoffUSBtetheringifyouonlywanttochargeyourmobilerouterwithyourcomputer. For more information, see Turn Off USB Tethering on page 45.
Manage Battery Usage and |
26 |
User Manual |
Charging |
|
|

Nighthawk M2 Model MR2100
Quick Charge the Battery
The mobile router supports Quick Charge 2.0 technology. You can charge the mobile router battery with a Quick Charge–certified power adapter, which charges the battery upto75percentfasterthanregularpoweradaptersbyincreasingthechargingpower.
The current rating on the Quick Charge–certified power adapter must be greater than 1.5A.
Recharge the Battery From a Wall Socket
To recharge the battery from a wall socket:
1.Attach one end of the micro USB cable to the connector on the right on the mobile router and attach the other end to the wall charger (included).
2.Plug the wall charger into a wall socket.
The Battery icon on the LCD indicates that the battery is charging.
Note: The battery continues to charge when the mobile router is powered off. If your battery does not charge, check the following:
•Is the mobile router hot? If you are in a low-coverage area, are transferring a lot ofdata,orleftthemobilerouterinahotlocation,theinternaltemperatureofthe mobile router can rise above 45°C. In these conditions, the battery cannot be charged due to safety limits with lithium-ion battery technology.
•Make sure that the USB cable and the AC wall charger are connected securely and are working correctly.
•If the wall socket is controlled by a switch, make sure that the switch is in the power-on position.
Manage Battery Usage and |
27 |
User Manual |
Charging |
|
|

Nighthawk M2 Model MR2100
Recharge the Battery From a Computer USB Port
To recharge the battery from the USB port on your computer:
Attach one end of the micro USB cable to the mobile router and plug the other end into the USB port on your computer.
The Battery icon on the LCD indicates that the battery is charging.
Note: TheLCDgoesintosleepmodeafterasettimetoextendbatterylife.Towake up the LCD, tap the Power button.
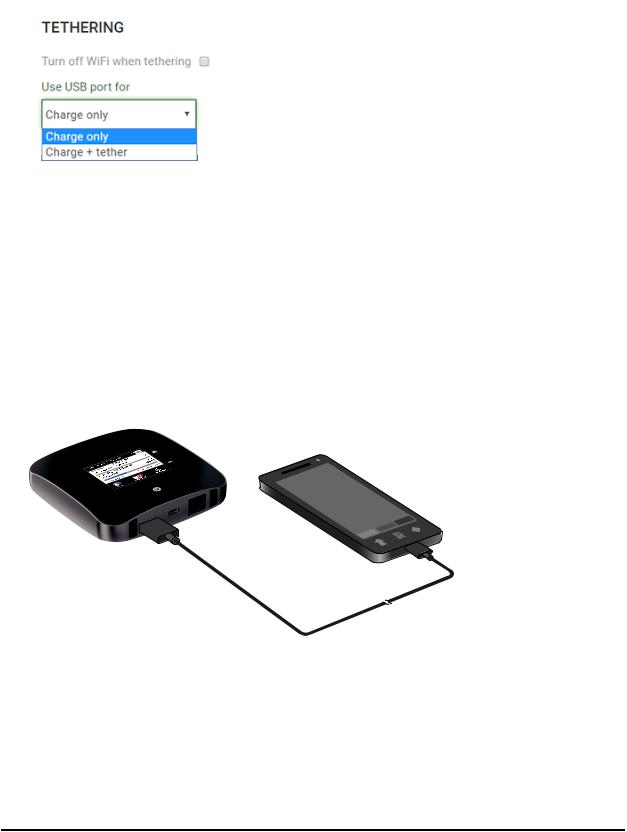
Use the USB Type C Cable to Charge Only
You can log in to the mobile router and specify a setting so that the USB type C cable isusedonlyforchargingandnottoaccessthemobilerouterusingawebbrowser. You mightwanttodothisifyouareusingtheEthernetportandawallsocketisnotavailable to charge the mobile router.
To specify a USB type C cable charge-only setting:
1.From a computer that is connected to your network, launch a web browser.
2.Enter http://m.home or http://192.168.1.1. A login window opens.
3.Enter the router user name and password.
The user name is admin. The user name and password are case-sensitive. The mobile router dashboard displays.
4.Select Setup > Router Setup. The Router Setup page displays.
Manage Battery Usage and |
28 |
User Manual |
Charging |
|
|
Nighthawk M2 Model MR2100
5. In the TETHERING section, select Charge only.
Yoursettingsaresaved. WhenyouconnecttheUSBtypeCcable,themobilerouter battery charges, but you cannot use the tethered connection to access the mobile router with a web browser.
Use the Mobile Router to Jump Boost Another Device
If your smartphone or other device is low on or out of battery power, you can give it a boost by connecting it to the mobile router’s USB port A connector.
Figure 5. Jump boost begins automatically once the devices are connected
Manage Battery Usage and |
29 |
User Manual |
Charging |
|
|
 Loading...