


Contents
Important information . . . . . . . . . . . . . . . . . . . . . . . . . . . . . 27
Safety instructions . . . . . . . . . . . . . . . . . . . . . . . . . . . . . . . . . 27
Before using your appliance for the first time . . . . . . . . . 28
Filling up the pipe system . . . . . . . . . . . . . . . . . . . . . . . . . . . . 28
Controls . . . . . . . . . . . . . . . . . . . . . . . . . . . . . . . . . . . . . . . . . 29 Preparation . . . . . . . . . . . . . . . . . . . . . . . . . . . . . . . . . . . . . . 32
General . . . . . . . . . . . . . . . . . . . . . . . . . . . . . . . . . . . . . . . . . . 32 Using espresso/coffee beans . . . . . . . . . . . . . . . . . . . . . . . . 32 Adjusting the grinding unit . . . . . . . . . . . . . . . . . . . . . . . . . . . 32 Using ground espresso/coffee powder . . . . . . . . . . . . . . . . . 33 Preparing hot water . . . . . . . . . . . . . . . . . . . . . . . . . . . . . . . . 33 Steam for heating drinks . . . . . . . . . . . . . . . . . . . . . . . . . . . . 34 Steam for frothing milk . . . . . . . . . . . . . . . . . . . . . . . . . . . . . . 34
Changing settings / programming . . . . . . . . . . . . . . . . . . . 35
Programming . . . . . . . . . . . . . . . . . . . . . . . . . . . . . . . . . . . . . 35 Language . . . . . . . . . . . . . . . . . . . . . . . . . . . . . . . . . . . . . . . . 36 Water hardness . . . . . . . . . . . . . . . . . . . . . . . . . . . . . . . . . . . . 36 Filter setting . . . . . . . . . . . . . . . . . . . . . . . . . . . . . . . . . . . . . . . 37 Temperature . . . . . . . . . . . . . . . . . . . . . . . . . . . . . . . . . . . . . . 37 Current time . . . . . . . . . . . . . . . . . . . . . . . . . . . . . . . . . . . . . . 37 Timer . . . . . . . . . . . . . . . . . . . . . . . . . . . . . . . . . . . . . . . . . . . . 38 Energy saving mode . . . . . . . . . . . . . . . . . . . . . . . . . . . . . . . . 38 Displaying number of brews . . . . . . . . . . . . . . . . . . . . . . . . . . 38 RESET function . . . . . . . . . . . . . . . . . . . . . . . . . . . . . . . . . . . . 38
System messages . . . . . . . . . . . . . . . . . . . . . . . . . . . . . . . . 39 Cleaning the appliance . . . . . . . . . . . . . . . . . . . . . . . . . . . . 40 Descaling the appliance . . . . . . . . . . . . . . . . . . . . . . . . . . . 43 Eliminating minor faults yourself . . . . . . . . . . . . . . . . . . . . 45 Guarantee . . . . . . . . . . . . . . . . . . . . . . . . . . . . . . . . . . . . . . . 46
Deutsch . . . . . . . . . . . . . . . . . . . . . . . . . . . . . . . . . . . . . . . 3
Français . . . . . . . . . . . . . . . . . . . . . . . . . . . . . . . . . . . . . . . 47
Italiano . . . . . . . . . . . . . . . . . . . . . . . . . . . . . . . . . . . . . . . . 72
Nederlands . . . . . . . . . . . . . . . . . . . . . . . . . . . . . . . . . . . . 95
Türkçe . . . . . . . . . . . . . . . . . . . . . . . . . . . . . . . . . . . . . . . . 117
25

|
1 |
d button |
||
|
||||
Controls |
||||
2 |
•on" button 2 |
|||
|
||||
|
3 |
Rotary knob for adjusting the filling quantity |
||
|
|
x-u/8-9 |
||
|
4 |
Display with function buttons (4b) |
||
|
5 |
Rotary knob for adjusting the coffee strength /-M |
||
|
6 |
cleaning button + |
||
|
7 |
descaling button 4 |
||
|
8 |
Function selector (Coffee, steam, hot water) |
||
|
9 |
Mains switch I/0 |
||
|
10 |
Rotary knob for degree of ground coffee |
||
|
11 |
Button for releasing the drawer |
||
|
12 |
Height adjustable coffee outlet |
||
|
||||
Appliance |
||||
13 |
Hinged nozzle (froth, steam, hot water) - |
|||
components |
||||
|
dishwasher proof |
|||
|
|
|||
|
|
a |
Sleeve |
|
|
|
b |
Nozzle |
|
|
14 |
Door for brewing unit |
||
|
15 |
Ground coffee duct with cover = cleaning tablet duct |
||
|
16 |
Bean container with aroma cover |
||
|
17 |
Filter (optional accessory) |
||
|
18 |
Lid for water tank |
||
|
19 |
Detachable water tank |
||
|
20 |
Coffee dregs tray (dishwasher proof) |
||
|
21 |
Splash guard |
||
|
22 |
Tray (for residual water) |
||
|
23 |
Grille |
||
|
24 |
Contacts |
||
Information concerning disposal
Please ask your dealer or inquire at your local authority about current means of disposal.
This appliance is labelled in accordance with European Directive 2002/96/EG concerning used electrical and electronic appliances (waste electrical and electronic equipment L WEEE). The guideline determines the framework for the return and recycling of used appliances as applicable throughout the EU.
26

Important information
Safety instructions
Please read these operating instructions carefully and retain!
This appliance is designed for domestic use and for processing normal quantities of food and not for industrial use.
d Risk of electric shock
Connect and operate the appliance only in accordance with the specifications on the rating plate.
Do not use the appliance if the power cord and/or appliance are damaged.
Use the appliance inside and at room temperature only.
Keep children away from the appliance.
If a fault occurs, immediately pull out the mains plug.
Never immerse the appliance in water.
To prevent injury, repairs such as replacing a damaged cord, should be carried out by our customer service only.
Do not use the drawer for storing heavy parts and do not load.
Do not place fingers in the grinding unit. d Risk of scalding!
Grip nozzle 13 by the plastic part only. Never direct nozzle 13 at people! When steam or hot water is released, nozzle 13 may spurt initially.
d Risk of injury!
Carefully push back the drawer into the appliance to prevent fingers or hands from being pinched or crushed.
27

Before using your appliance for the first time
General
Switching on the appliance
COFFEE
Filling up the pipe system
FILL UP |
PRESS |
PIPE-SYS |
CAFE |
|
|
|
|
PIPE-SYS |
|
FILLS UP |
|
|
|
Fill the respective containers with pure water and preferably espresso or coffee beans for fully automatic machines only.
Do not use coffee beans which have been glazed, caramelised or treated with other additives containing sugar. These will block the grinding unit.
Check the water hardness with the enclosed test strip. If a value other than hardness 3 is indicated, switch on the appliance and program accordingly (see Page 36).
The water hardness can also be found out from your local water supply company.
qPress button 11 forwards and pull the drawer out of the appliance.
qConnect the coiled cable to the chassis.
qFill the water tank 19 with cold fresh water. Note the •max." mark.
qFill the bean container 16 with coffee beans.
qSet mains switch 9 to I.
qInsert the drawer.
qSet function selector 8 to U.
qPress button d 1.
iThe appliance is ready for use when the illuminated rings on button d 1 and on the 2•on" button 2 are lit green.
Note: If the appliance is being used for the first time or has not been operated for a prolonged period, the first cup of coffee will not have the full aroma and should not be drunk.
For production reasons when switched on for the first time, the water pipe system in the appliance may occasionally have to be refilled:
q Press the 2•on" button 2.
28
Selecting the language
LANGUAGE
ENGLISH
To change the display to the desired language:
qHold down button %on the display 4 for at least 3 seconds.
qPress button %until the display flashes.
qSelect the desired language with <or >.
qPress button %to save the language.
qPress the 6button.
Controls
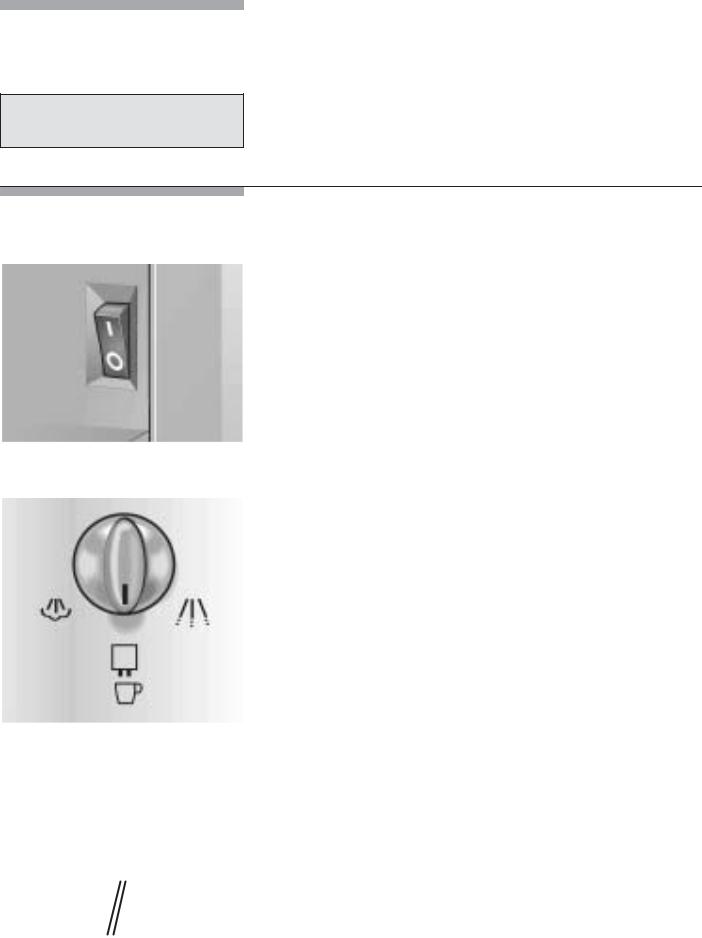
Mains switch 9
The mains switch 9 on the rear of the appliance switches the power supply on or off.
When the mains switch has been switched on, the illuminated ring on button d 1 is lit green. The appliance is in •stand by" mode.
Warning
Do not press the mains switch while the appliance is operating.
Do not switch off the appliance until it is in standby mode.
Function selector 8
Coffee, hot water or steam can be selected by rotating function selector 8.
d Risk of scalding!
When the function selector is set to 0, the nozzle may spurt slightly.
Escaping steam is very hot.
|
|
The settings are displayed: |
|
|
Coffee on U |
COFFEE |
|
|
|
|
|
|
|
Hot water on 0 |
|
|
|
WATER |
|
|
ON |
|
|
|
|
Steam on = |
|
|
|
UNIT IS |
MIND THE |
|
HEATING |
STEAM |
Displays during the brief heating up period for Steam on. |
|
|
|
|
|
|
STEAM |
|
|
ON |
|
|
|
|
|
29
UNIT IS HEATING
UNIT IS RINSING
Display 4
Display 4 indicates the settings, the processes which are running and any messages issued by the appliance.
The appliance has been programmed at the factory with standard settings for optimum operation. These settings can be changed L see •Setting/Programming" chapter.
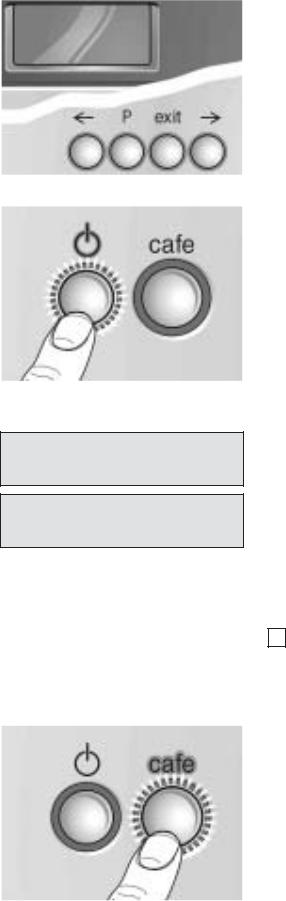
Button d 1
Button d 1 switches on the appliance or switches it to •stand by" mode.
When button d 1 is pressed, the appliance heats up and is then rinsed. The illuminated ring on button d 1 flashes during this process.
The appliance is not rinsed if:
-the appliance was still warm when switched on or
-coffee was not discharged before the appliance was switched to •stand by" mode.
Heating and rinsing processes are displayed.
While coffee is being brewed, button d 1 is assigned a Stop function. If button d 1 is pressed, the process is terminated.
i4 hours after the last coffee was brewed, a rinsing process is automatically actuated and the appliance switches to standby mode. These settings can
be changed L see •Setting/Programming" chapter.
2•on" button 2
Espresso or coffee can be brewed by pressing the 2•on" button 2. The green illuminated ring flashes while espresso or coffee is being brewed.
If the 2•on" button 2 is pressed again, the coffee brewing process is terminated.
30
ESPRESSO
2 ESPRESSO
NORMAL PLUS
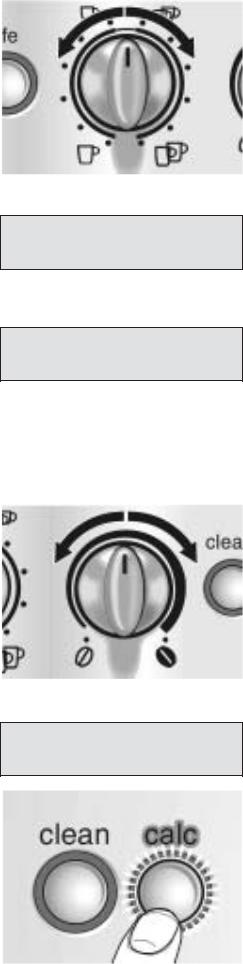
Rotary knob for adjusting the filling quantity 3 x-u/8-9
The amount of liquid is set with the rotary knob x-u/8-93.
One of 6 settings can be selected by rotating the knob in an anti clockwise direction:
SMALL ESPRESSO ESPRESSO
SMALL COFFEE COFFEE
LARGE COFFEE XXL COFFEE
One of 6 settings can be selected for 2 cups by rotating the knob in a clockwise direction:
2 SMALL ESPRESSO
2ESPRESSO
2SMALL COFFEES
2COFFEES
2LARGE COFFEES
2XXL COFFEES
Outlet 12 has two nozzles for filling 2 cups.
Rotary knob for adjusting the coffee strength 5 /-M
The amount of ground coffee is selected with rotary knob /-M5.
VERY MILD
MILD
NORMAL
NORMAL PLUS
STRONG
VERY STRONG
The selected coffee strength is displayed:
cleaning button +6 descaling button47
When the appliance requires cleaning or descaling, the illuminated ring on the cleaning button +6 or the descaling button 47 lights up red L see •Cleaning and descaling" chapter.
31
 Loading...