


 Loading...
MTH800
TETRA Handportable Terminal
Feature User Guide
6802972C35-O 11/08/2004

Contents |
|
Safety Information . . . . . . . . . . . . . . . . . . . . . . . . . . . . |
1 |
General Safety Information . . . . . . . . . . . . . . . . . . . . . . . . . . . . |
1 |
Copyright Information . . . . . . . . . . . . . . . . . . . . . . . . . . . . . . . . |
1 |
Product Specific Information . . . . . . . . . . . . . . . . . . . . . . . . . . . |
2 |
Getting Started . . . . . . . . . . . . . . . . . . . . . . . . . . . . . . . |
3 |
How to Use this Guide . . . . . . . . . . . . . . . . . . . . . . . . . . . . . . . |
3 |
Installing the Battery . . . . . . . . . . . . . . . . . . . . . . . . . . . . . . . . . |
4 |
Replacing the Battery . . . . . . . . . . . . . . . . . . . . . . . . . . . . . . . . |
5 |
Charging the Battery . . . . . . . . . . . . . . . . . . . . . . . . . . . . . . . . . |
5 |
Battery Capacity Information . . . . . . . . . . . . . . . . . . . . . . . |
6 |
Battery Maintenance . . . . . . . . . . . . . . . . . . . . . . . . . . . . . |
6 |
Attaching the Antenna . . . . . . . . . . . . . . . . . . . . . . . . . . . . . . |
8 |
Controls and Indicators . . . . . . . . . . . . . . . . . . . . . . . . . . . . . . . |
9 |
Powering On/Off (On-Off/End/Home Key) . . . . . . . . . . . . . . . . |
11 |
Powering On (Emergency Button) . . . . . . . . . . . . . . . . . . . . . . |
12 |
Powering On with Transmit Inhibit (TXI) Active . . . . . . . . . . . . . |
12 |
Unlocking the MTH800 . . . . . . . . . . . . . . . . . . . . . . . . . . . . . . . |
12 |
Locking/Unlocking the Keys/Buttons . . . . . . . . . . . . . . . . . . . . . |
13 |
Selecting Your Network . . . . . . . . . . . . . . . . . . . . . . . . . . . . . . . |
13 |
How to Hold Your MTH800 . . . . . . . . . . . . . . . . . . . . . . . . . . . . |
13 |
Use in Low Audio (Phone, PABX, and Full-duplex |
|
Private Calls) . . . . . . . . . . . . . . . . . . . . . . . . . . . . . . . . . . . |
14 |
Use in High Audio (Group and Private Calls) . . . . . . . . . . |
14 |
Lapel/Shoulder Use . . . . . . . . . . . . . . . . . . . . . . . . . . . . . |
14 |
Speakerphone Use . . . . . . . . . . . . . . . . . . . . . . . . . . . . . . |
14 |
Looking after your MTH800 . . . . . . . . . . . . . . . . . . . . . . . . . . . . |
14 |
The Display . . . . . . . . . . . . . . . . . . . . . . . . . . . . . . . . . . . . . . . . |
15 |
Home (Idle) Display . . . . . . . . . . . . . . . . . . . . . . . . . . . . . |
15 |
Status Icons . . . . . . . . . . . . . . . . . . . . . . . . . . . . . . . . . . . |
15 |
The LED Status Indicator . . . . . . . . . . . . . . . . . . . . . . . . . . . . . |
17 |
Key, Knob, and Button Overview . . . . . . . . . . . . . . . . . . . . . . . |
17 |
Soft Keys . . . . . . . . . . . . . . . . . . . . . . . . . . . . . . . . . . . . . . |
17 |
Menu Key . . . . . . . . . . . . . . . . . . . . . . . . . . . . . . . . . . . . . |
17 |
Rotary Knob . . . . . . . . . . . . . . . . . . . . . . . . . . . . . . . . . . . |
18 |
6802972C35-O
Emergency Button . . . . . . . . . . . . . . . . . . . . . . . . . . . . . . 19 Function Keys . . . . . . . . . . . . . . . . . . . . . . . . . . . . . . . . . . . . . . 19
Speaker Control Key . . . . . . . . . . . . . . . . . . . . . . . . . . . . . 21 Aliases (Names) . . . . . . . . . . . . . . . . . . . . . . . . . . . . . . . . . . . . 21 Screen Saver . . . . . . . . . . . . . . . . . . . . . . . . . . . . . . . . . . . . . . 22 Home Display Text Message . . . . . . . . . . . . . . . . . . . . . . . . . . 22 Terminal Disable/Enable . . . . . . . . . . . . . . . . . . . . . . . . . . . . . . 23 Selecting TMO or DMO Operation . . . . . . . . . . . . . . . . . . . . . . 23
General . . . . . . . . . . . . . . . . . . . . . . . . . . . . . . . . . . . . . . . 23 Entering TMO or DMO . . . . . . . . . . . . . . . . . . . . . . . . . . . 24 TMO Calls . . . . . . . . . . . . . . . . . . . . . . . . . . . . . . . . . . . . . 24 DMO Calls . . . . . . . . . . . . . . . . . . . . . . . . . . . . . . . . . . . . . 25 Making Calls . . . . . . . . . . . . . . . . . . . . . . . . . . . . . . . . . . . . . . . 25 Modifying the Type of Call . . . . . . . . . . . . . . . . . . . . . . . . . . . . . 25 Receiving Calls . . . . . . . . . . . . . . . . . . . . . . . . . . . . . . . . . . . . . 25 Preemptive Calling . . . . . . . . . . . . . . . . . . . . . . . . . . . . . . . . . . 26 Receiving an Emergency Group Call during a Call . . . . . . 27 Receiving a Private PPC during a Call . . . . . . . . . . . . . . . 27 Broadcast Call . . . . . . . . . . . . . . . . . . . . . . . . . . . . . . . . . . . . . . 28 Ambience Listening (AL) . . . . . . . . . . . . . . . . . . . . . . . . . . . . . . 28 Cancelling a Call . . . . . . . . . . . . . . . . . . . . . . . . . . . . . . . . . . . . 29 Using In-call Features . . . . . . . . . . . . . . . . . . . . . . . . . . . . . . . . 29 Local Area Service . . . . . . . . . . . . . . . . . . . . . . . . . . . . . . . . . . 30
TMO Group Call . . . . . . . . . . . . . . . . . . . . . . . . . . . . . . |
32 |
General . . . . . . . . . . . . . . . . . . . . . . . . . . . . . . . . . . . . . . . . . . . |
32 |
Dual Microphone Feature . . . . . . . . . . . . . . . . . . . . . . . . . . . . . |
33 |
Selecting a Group . . . . . . . . . . . . . . . . . . . . . . . . . . . . . . . . . . . |
33 |
Using the Rotary Knob . . . . . . . . . . . . . . . . . . . . . . . . . . . |
34 |
Using the Navigation Key . . . . . . . . . . . . . . . . . . . . . . . . . |
34 |
Using Alphabetic Search . . . . . . . . . . . . . . . . . . . . . . . . . . |
34 |
Using Folder Search . . . . . . . . . . . . . . . . . . . . . . . . . . . . . |
34 |
Selecting a Folder . . . . . . . . . . . . . . . . . . . . . . . . . . . . . . . . . . . |
35 |
Using the Navigation Key . . . . . . . . . . . . . . . . . . . . . . . . . |
35 |
To Select a Folder . . . . . . . . . . . . . . . . . . . . . . . . . . . . . . . |
35 |
“My Groups” Folder . . . . . . . . . . . . . . . . . . . . . . . . . . . . . . . . . . |
35 |
Selecting My Groups . . . . . . . . . . . . . . . . . . . . . . . . . . . . . |
35 |
Adding/Deleting Groups from My Groups . . . . . . . . . . . . . |
35 |
ii

Group Scrolling Configuration . . . . . . . . . . . . . . . . . . . . . . . . . . |
35 |
Activating/deactivating Scanning . . . . . . . . . . . . . . . . . . . . . . . |
36 |
Making a Group Call . . . . . . . . . . . . . . . . . . . . . . . . . . . . . . . . . |
36 |
Receiving a Group Call . . . . . . . . . . . . . . . . . . . . . . . . . . . . . . . |
37 |
General . . . . . . . . . . . . . . . . . . . . . . . . . . . . . . . . . . . . . . . |
37 |
Receiving a Group Call in Idle Screen with Scan Off . . . . |
38 |
Receiving a Group Call in Idle Screen with Scan On . . . . |
38 |
Receiving a Group Call during an On-going Group Call . . |
39 |
Receiving an Emergency Group Call . . . . . . . . . . . . . . . . |
39 |
Receiving a Broadcast Call . . . . . . . . . . . . . . . . . . . . . . . . |
39 |
Transmit Inhibit . . . . . . . . . . . . . . . . . . . . . . . . . . . . . . . . . . . . . |
39 |
Dynamic Group Number Assignment (DGNA) . . . . . . . . . . . . . |
40 |
DGNA Reception with Notification Message . . . . . . . . . . . |
40 |
DGNA Reception without Notification Message . . . . . . . . |
41 |
DMO Group Call . . . . . . . . . . . . . . . . . . . . . . . . . . . . . . |
42 |
General . . . . . . . . . . . . . . . . . . . . . . . . . . . . . . . . . . . . . . . . . . . |
42 |
Dual Microphone Feature . . . . . . . . . . . . . . . . . . . . . . . . . . . . . |
42 |
“My Groups” Folder . . . . . . . . . . . . . . . . . . . . . . . . . . . . . . . . . . |
42 |
Selecting the My Groups Folder . . . . . . . . . . . . . . . . . . . . |
43 |
Adding/Deleting Groups from the My Groups Folder . . . . |
43 |
Selecting a Group . . . . . . . . . . . . . . . . . . . . . . . . . . . . . . . . . . . |
43 |
Selecting a Folder . . . . . . . . . . . . . . . . . . . . . . . . . . . . . . . . . . . |
43 |
Making a DMO Group Call without Gateway . . . . . . . . . . . . . . |
43 |
Making a DMO Group Call via Gateway . . . . . . . . . . . . . . . . . . |
43 |
Receiving a DMO Group Call . . . . . . . . . . . . . . . . . . . . . . . . . . |
45 |
Receiving an Emergency Group Call . . . . . . . . . . . . . . . . . . . . |
46 |
Transmit Inhibit . . . . . . . . . . . . . . . . . . . . . . . . . . . . . . . . . . . . . |
46 |
Exiting DMO . . . . . . . . . . . . . . . . . . . . . . . . . . . . . . . . . . . . . . . |
46 |
Private Call . . . . . . . . . . . . . . . . . . . . . . . . . . . . . . . . . . |
47 |
General . . . . . . . . . . . . . . . . . . . . . . . . . . . . . . . . . . . . . . . . . . . |
47 |
Dual Microphone Feature . . . . . . . . . . . . . . . . . . . . . . . . . . . . . |
47 |
Making a Private Call . . . . . . . . . . . . . . . . . . . . . . . . . . . . . . . . . . . . . |
47 |
Other Ways of Dialing . . . . . . . . . . . . . . . . . . . . . . . . . . . . . . . . |
48 |
Dialing via Contact List . . . . . . . . . . . . . . . . . . . . . . . . . . . |
48 |
Short Number Dial . . . . . . . . . . . . . . . . . . . . . . . . . . . . . . |
48 |
Recent Calls List . . . . . . . . . . . . . . . . . . . . . . . . . . . . . . . . |
48 |
One-touch Dial . . . . . . . . . . . . . . . . . . . . . . . . . . . . . . . . . |
49 |
Contents
iii
Calling a Number in a Message . . . . . . . . . . . . . . . . . . . . 49 Receiving a Private Call . . . . . . . . . . . . . . . . . . . . . . . . . . . . . . 49 Making a Private PPC (Preemptive Priority Call) . . . . . . . . . . . 49 Call Queuing . . . . . . . . . . . . . . . . . . . . . . . . . . . . . . . . . . . . . . . 50
Phone and PABX Calls . . . . . . . . . . . . . . . . . . . . . . . . . 51
General . . . . . . . . . . . . . . . . . . . . . . . . . . . . . . . . . . . . . . . . . . . 51 Dual Microphone Feature . . . . . . . . . . . . . . . . . . . . . . . . . . . . . 51 Making a Phone or PABX Call . . . . . . . . . . . . . . . . . . . . . . . . . . . . . 51
Other Ways of Dialing . . . . . . . . . . . . . . . . . . . . . . . . . . . . . . . . 52 Dialing via the Contact List . . . . . . . . . . . . . . . . . . . . . . . . 52 Speed Dial . . . . . . . . . . . . . . . . . . . . . . . . . . . . . . . . . . . . 52 One-touch Dial . . . . . . . . . . . . . . . . . . . . . . . . . . . . . . . . . 52 DTMF Overdial . . . . . . . . . . . . . . . . . . . . . . . . . . . . . . . . . 53 Recent Calls List . . . . . . . . . . . . . . . . . . . . . . . . . . . . . . . . 53 Calling a Number in a Message . . . . . . . . . . . . . . . . . . . . 53
Answering a Phone or PABX Call . . . . . . . . . . . . . . . . . . . . . . . 53
Emergency Operation . . . . . . . . . . . . . . . . . . . . . . . . . |
54 |
General . . . . . . . . . . . . . . . . . . . . . . . . . . . . . . . . . . . . . . . . . . . 54 Dual Microphone Feature . . . . . . . . . . . . . . . . . . . . . . . . . 54 Entering TMO or DMO . . . . . . . . . . . . . . . . . . . . . . . . . . . 54 Important Information . . . . . . . . . . . . . . . . . . . . . . . . . . . . 54 Emergency in TMO . . . . . . . . . . . . . . . . . . . . . . . . . . . . . . . . . . 54 Overview . . . . . . . . . . . . . . . . . . . . . . . . . . . . . . . . . . . . . . 54 Changing Folder or Group . . . . . . . . . . . . . . . . . . . . . . . . 55 Entering or Exiting Emergency Mode . . . . . . . . . . . . . . . . 55 Sending an Emergency Alarm . . . . . . . . . . . . . . . . . . . . . 56 Making an Emergency Group Call . . . . . . . . . . . . . . . . . . . . . 57 Hot Microphone Feature . . . . . . . . . . . . . . . . . . . . . . . . . . 57 Receiving an Emergency Group Call . . . . . . . . . . . . . . . . 58 Making an Emergency Private Call . . . . . . . . . . . . . . . . . . 58 Receiving an Emergency Private Call . . . . . . . . . . . . . . . . 59 Modifying the Type of Call . . . . . . . . . . . . . . . . . . . . . . . . 59
Emergency in DMO . . . . . . . . . . . . . . . . . . . . . . . . . . . . . . . . . . 59 General . . . . . . . . . . . . . . . . . . . . . . . . . . . . . . . . . . . . . . . . . . . 59 Changing Folder or Group . . . . . . . . . . . . . . . . . . . . . . . . 60 Making an Emergency Group Call . . . . . . . . . . . . . . . . . . 60 Receiving an Emergency Group Call . . . . . . . . . . . . . . . . 60
iv

GPS Location Services . . . . . . . . . . . . . . . . . . . . . . . . |
61 |
Enhancing GPS Performance . . . . . . . . . . . . . . . . . . . . . . . . . . |
62 |
GPS Icon . . . . . . . . . . . . . . . . . . . . . . . . . . . . . . . . . . . . . . . . . . |
63 |
GPS Enable/Disable . . . . . . . . . . . . . . . . . . . . . . . . . . . . . . . . . |
63 |
Entering GPS Location Service . . . . . . . . . . . . . . . . . . . . . . . . . |
64 |
Viewing Your Position . . . . . . . . . . . . . . . . . . . . . . . . . . . . |
64 |
GPS Testpage . . . . . . . . . . . . . . . . . . . . . . . . . . . . . . . . . |
65 |
Entering the Testpage . . . . . . . . . . . . . . . . . . . . . . . . . . . . |
66 |
The Menu . . . . . . . . . . . . . . . . . . . . . . . . . . . . . . . . . . . . |
69 |
To Enter the Menu Items . . . . . . . . . . . . . . . . . . . . . . . . . . . . . . |
69 |
To Return to the Previous Level . . . . . . . . . . . . . . . . . . . . . . . . |
69 |
To Exit the Menu Items . . . . . . . . . . . . . . . . . . . . . . . . . . . . . . . |
70 |
Menu Icons . . . . . . . . . . . . . . . . . . . . . . . . . . . . . . . . . . . . . . . . |
70 |
List of Menu Items . . . . . . . . . . . . . . . . . . . . . . . . . . . . . . . . . . . |
71 |
Messages . . . . . . . . . . . . . . . . . . . . . . . . . . . . . . . . . . . . . . . . . |
74 |
Contacts . . . . . . . . . . . . . . . . . . . . . . . . . . . . . . . . . . . . . . . . . . |
74 |
General . . . . . . . . . . . . . . . . . . . . . . . . . . . . . . . . . . . . . . . |
74 |
Contact Icons . . . . . . . . . . . . . . . . . . . . . . . . . . . . . . . . . . |
74 |
Creating a Contact . . . . . . . . . . . . . . . . . . . . . . . . . . . . . . |
75 |
Editing a Contact . . . . . . . . . . . . . . . . . . . . . . . . . . . . . . . . |
76 |
Deleting a Number . . . . . . . . . . . . . . . . . . . . . . . . . . . . . . |
76 |
Deleting a Contact . . . . . . . . . . . . . . . . . . . . . . . . . . . . . . |
76 |
Checking Capacity . . . . . . . . . . . . . . . . . . . . . . . . . . . . . . |
76 |
Security . . . . . . . . . . . . . . . . . . . . . . . . . . . . . . . . . . . . . . . . . . . |
77 |
PIN Protect . . . . . . . . . . . . . . . . . . . . . . . . . . . . . . . . . . . . |
77 |
Change Code . . . . . . . . . . . . . . . . . . . . . . . . . . . . . . . . . . |
78 |
Locking/Unlocking the Keypad . . . . . . . . . . . . . . . . . . . . . |
79 |
Air Encryption On/Off . . . . . . . . . . . . . . . . . . . . . . . . . . . . |
79 |
Encryption Key Deletion . . . . . . . . . . . . . . . . . . . . . . . . . . |
80 |
K Validity . . . . . . . . . . . . . . . . . . . . . . . . . . . . . . . . . . . . . . |
80 |
SCK Validity . . . . . . . . . . . . . . . . . . . . . . . . . . . . . . . . . . . |
81 |
Setup . . . . . . . . . . . . . . . . . . . . . . . . . . . . . . . . . . . . . . . . . . . . . |
81 |
Entering the Setup Sub-menu . . . . . . . . . . . . . . . . . . . . . . |
81 |
Setting the Vibrate Feature . . . . . . . . . . . . . . . . . . . . . . . . |
81 |
Setting the Ring Style . . . . . . . . . . . . . . . . . . . . . . . . . . . . |
82 |
Setting the Volume . . . . . . . . . . . . . . . . . . . . . . . . . . . . . . |
83 |
Setting the Display’s Working Language . . . . . . . . . . . . . |
83 |
Contents
v
Setting Up the Data Function . . . . . . . . . . . . . . . . . . . . . . |
83 |
Setting Group Audio . . . . . . . . . . . . . . . . . . . . . . . . . . . . . |
84 |
Setting Tones . . . . . . . . . . . . . . . . . . . . . . . . . . . . . . . . . . |
85 |
Display Features . . . . . . . . . . . . . . . . . . . . . . . . . . . . . . . . |
86 |
Setting the Display’s Vertical Flip . . . . . . . . . . . . . . . . . . . |
87 |
Setting the Text Size . . . . . . . . . . . . . . . . . . . . . . . . . . . . . |
88 |
Setting the Screen Saver . . . . . . . . . . . . . . . . . . . . . . . . . |
88 |
Setting the Backlight . . . . . . . . . . . . . . . . . . . . . . . . . . . . . |
89 |
Setting the Wallpaper . . . . . . . . . . . . . . . . . . . . . . . . . . . . |
89 |
Setting the Contrast . . . . . . . . . . . . . . . . . . . . . . . . . . . . . |
90 |
Entering More... . . . . . . . . . . . . . . . . . . . . . . . . . . . . . . . . . . . . . |
90 |
Entering Group Setup . . . . . . . . . . . . . . . . . . . . . . . . . . . . . . . . |
90 |
Entering Scan . . . . . . . . . . . . . . . . . . . . . . . . . . . . . . . . . . . . . . |
90 |
Setting Group Scanning . . . . . . . . . . . . . . . . . . . . . . . . . . |
91 |
Viewing the Active Scan List . . . . . . . . . . . . . . . . . . . . . . . |
92 |
Editing Scan Lists . . . . . . . . . . . . . . . . . . . . . . . . . . . . . . . |
93 |
My Groups (TMO/DMO) . . . . . . . . . . . . . . . . . . . . . . . . . . . . . . |
95 |
Selecting a Group from My Groups . . . . . . . . . . . . . . . . . |
95 |
Adding a Group to My Groups . . . . . . . . . . . . . . . . . . . . . |
95 |
Deleting a Group from My Groups . . . . . . . . . . . . . . . . . . |
95 |
Deleting All Groups from My Groups . . . . . . . . . . . . . . . . |
96 |
Viewing/Modifying Personal Information . . . . . . . . . . . . . . . . . . |
96 |
Recent Calls . . . . . . . . . . . . . . . . . . . . . . . . . . . . . . . . . . . . . . . |
96 |
Viewing Recent Calls . . . . . . . . . . . . . . . . . . . . . . . . . . . . |
97 |
Storing Recent Calls to Contacts . . . . . . . . . . . . . . . . . . . |
97 |
Deleting Recent Calls . . . . . . . . . . . . . . . . . . . . . . . . . . . . |
98 |
Calling from Recent Calls . . . . . . . . . . . . . . . . . . . . . . . . . |
98 |
Shortcuts . . . . . . . . . . . . . . . . . . . . . . . . . . . . . . . . . . . . . . . . . . |
99 |
Help on Creating a Menu Shortcut . . . . . . . . . . . . . . . . . . |
99 |
Creating Menu Shortcut . . . . . . . . . . . . . . . . . . . . . . . . . . |
99 |
Viewing the Menu Shortcut List . . . . . . . . . . . . . . . . . . . . |
99 |
Editing Shortcuts . . . . . . . . . . . . . . . . . . . . . . . . . . . . . . . . |
99 |
Deleting Shortcuts . . . . . . . . . . . . . . . . . . . . . . . . . . . . . . . |
100 |
Shortcut Display Messages . . . . . . . . . . . . . . . . . . . . . . . |
100 |
Menu Shortcut Use . . . . . . . . . . . . . . . . . . . . . . . . . . . . . . |
100 |
Networks . . . . . . . . . . . . . . . . . . . . . . . . . . . . . . . . . . . . . . . . . . |
101 |
Entering the Networks Sub-menu . . . . . . . . . . . . . . . . . . . |
101 |
vi

Selecting Your Network . . . . . . . . . . . . . . . . . . . . . . . . . . |
101 |
Selecting Trunked Mode . . . . . . . . . . . . . . . . . . . . . . . . . . |
102 |
Selecting Direct Mode . . . . . . . . . . . . . . . . . . . . . . . . . . . . |
102 |
Setting Transmit Inhibit (TXI) Mode . . . . . . . . . . . . . . . . . |
102 |
GPS Location Services . . . . . . . . . . . . . . . . . . . . . . . . . . . . . . . |
103 |
Messages . . . . . . . . . . . . . . . . . . . . . . . . . . . . . . . . . . . |
104 |
General . . . . . . . . . . . . . . . . . . . . . . . . . . . . . . . . . . . . . . . . . . . 104 Sending a Text Message . . . . . . . . . . . . . . . . . . . . . . . . . 104 Receiving Messages . . . . . . . . . . . . . . . . . . . . . . . . . . . . . 105 Displaying Long Text Messages . . . . . . . . . . . . . . . . . . . . 105 Entering the Messages Sub-menu . . . . . . . . . . . . . . . . . . . . . . 106 New Message . . . . . . . . . . . . . . . . . . . . . . . . . . . . . . . . . . . . . . 106 Creating a Message . . . . . . . . . . . . . . . . . . . . . . . . . . . . . 106 Sending the Message . . . . . . . . . . . . . . . . . . . . . . . . . . . . 106 Using the Inbox . . . . . . . . . . . . . . . . . . . . . . . . . . . . . . . . . . . . . 107 Inbox Icons . . . . . . . . . . . . . . . . . . . . . . . . . . . . . . . . . . . . 107 Entering the Inbox . . . . . . . . . . . . . . . . . . . . . . . . . . . . . . . 107 Reading a Message in the Inbox . . . . . . . . . . . . . . . . . . . 108 New Message Received . . . . . . . . . . . . . . . . . . . . . . . . . . 108 Handling Messages . . . . . . . . . . . . . . . . . . . . . . . . . . . . . 108 Calling a Number in a Message . . . . . . . . . . . . . . . . . . . . . . . . 109 User Defined Templates . . . . . . . . . . . . . . . . . . . . . . . . . . . . . 110 Predefined Templates . . . . . . . . . . . . . . . . . . . . . . . . . . . . . . . . 110 Sending a Status Message to a Group . . . . . . . . . . . . . . . . . . . 112 Targeted Status . . . . . . . . . . . . . . . . . . . . . . . . . . . . . . . . . . . . . 112
Writing Text . . . . . . . . . . . . . . . . . . . . . . . . . . . . . . . . . . 114
Selecting the Text Entry Mode . . . . . . . . . . . . . . . . . . . . . . . . . 114 Adding Secondary to the List of Text Entry Modes . . . . . . . . . . 114 Selecting the Text Entry Method and Language . . . . . . . . . . . . 114 Icons . . . . . . . . . . . . . . . . . . . . . . . . . . . . . . . . . . . . . . . . . . . . . 115 TAP Display . . . . . . . . . . . . . . . . . . . . . . . . . . . . . . . . . . . . . . . 116 iTAP Display . . . . . . . . . . . . . . . . . . . . . . . . . . . . . . . . . . . . . . . 116 Keys Usage . . . . . . . . . . . . . . . . . . . . . . . . . . . . . . . . . . . . . . . . . . . . . 117
Other Keys . . . . . . . . . . . . . . . . . . . . . . . . . . . . . . . . . . . . 120 Writing in iTAP Alphanumeric . . . . . . . . . . . . . . . . . . . . . . . . . . 121 Word Locking . . . . . . . . . . . . . . . . . . . . . . . . . . . . . . . . . . 122 Writing in Numeric Mode . . . . . . . . . . . . . . . . . . . . . . . . . . . . . . 122
Contents
vii
Writing in Symbol Mode . . . . . . . . . . . . . . . . . . . . . . . . . . . . . . 122 Writing in TAP Alphanumeric . . . . . . . . . . . . . . . . . . . . . . . . . . 122 Adding Words to the Dictionary . . . . . . . . . . . . . . . . . . . . . . . . . 123
What to do if... . . . . . . . . . . . . . . . . . . . . . . . . . . . . . . . . 124 Tones . . . . . . . . . . . . . . . . . . . . . . . . . . . . . . . . . . . . . . . 128 Appendix A. Accessories . . . . . . . . . . . . . . . . . . . . . . 132 Index . . . . . . . . . . . . . . . . . . . . . . . . . . . . . . . . . . . . . . . 134 Quick Reference Guide . . . . . . . . . . . . . . . . . . . . . . . . . 139
© Motorola Inc., 2004
MOTOROLA and the Stylized M Logo are registered in the U.S. Patent and Trademark Office. All other product or service names are the property of their respective owners.
viii
Safety Information
General Safety Information
•This terminal meets the applicable safety standards if used as prescribed. All operating and safety instructions are to be followed carefully.
CAUTION! Before using this product, read the operating instructions for safe usage contained in the Product Safety and RF Exposure booklet, Motorola Publication part number 6866537D38 (for Europe, Middle East and Africa regions) or 6804110J47/6804113J24 (for Asia and Pacific regions), enclosed with your radio.
•Motorola recommends the usage of Motorola approved accessories only.
•Only specialized workshops should be contacted for installation, maintenance and repair work.
•Keep this User Guide and the Product Safety and RF Exposure booklet in a safe place and make it available to other operators, and in case, that the radio is passed on to other people.
Copyright Information
The Motorola products described in this manual may include copyrighted Motorola computer programs stored in semiconductor memories or other mediums. Laws in the United States and other countries preserve for Motorola certain exclusive rights for copyrighted computer programs, including the exclusive right to copy or reproduce in any form the copyrighted computer program. Accordingly, any copyrighted Motorola computer programs contained in the Motorola prod-
Safety
1

ucts described in this manual may not be copied or reproduced in any manner without the express written permission of Motorola. Furthermore, the purchase of Motorola products shall not be deemed to grant either directly or by implication, estoppel, or otherwise, any licence under the copyrights, patents, or patent applications of Motorola, except for the normal non-exclusive royalty-free licence to use that arises by operation of the law in the sale of a product.
Product Specific Information
• |
Max. Voltage |
4.2 |
V |
• |
Max. Current |
0.5 |
A |
• |
Max. RF Power |
1 Watt |
|
• |
Max. Speaker Load |
0.5 |
Watts at 8 Ohms |
• |
Antenna Impedance |
50 Ohms |
|
•Operation Temperature Range -20° C to +60° C
• Operating Time |
Continuous / Intermittent |
Note: In general, the radio transmit and receive time (operating cycle time) is determined by the communication system. On overload, respectively on extensive use beyond the systems specifications at high ambient temperatures, the radio is protected by its thermal control, which cuts down the RF output power, thus reducing the radio coverage range.
2
Getting Started
Congratulations on your purchase of the Motorola MTH800. Enhanced TETRA features and state-of-the-art technology help to keep you in constant touch with all of your work and personal contacts.
You can operate your MTH800 in English, German, French, Spanish, Dutch, or in a language defined by your Service Provider. The default setting from factory is English. For more information, please see “Setting the Display’s Working Language” on page 83.
How to Use this Guide
This guide describes the MTH800 features as setup and preprogrammed at the factory.
Your Service Provider or your organisation may have customised your MTH800 to optimise its use for your individual needs. Check with your Service Provider or organisation to find out the differences from this guide.
Throughout the text in this publication, you will notice the following special notations used to highlight certain information or items:
Example |
Description |
|
or Select |
Key presses are shown as a key symbol or in |
|
bold print for soft key functions. |
||
|
||
More...> Networks > Indicates navigation in menu items. |
||
TXI Mode > Activate |
|
|
Contacts |
Highlighted text indicates the selection. |
|
On |
Indicates the active setting. |
|
Started Getting
3
Example |
Description |
||
|
|
|
|
Status Delivered |
Information appearing on the MTH800 display is |
||
|
|
|
shown in special print. |
|
|
|
|
<User Defined> |
Indicates a prompt or message configured by |
||
your Service Provider. |
|||
|
|
|
|
|
|
|
A Note contains additional information which is |
|
|
|
|
|
|
|
relevant to the item feature. |
|
|
|
|
Installing the Battery
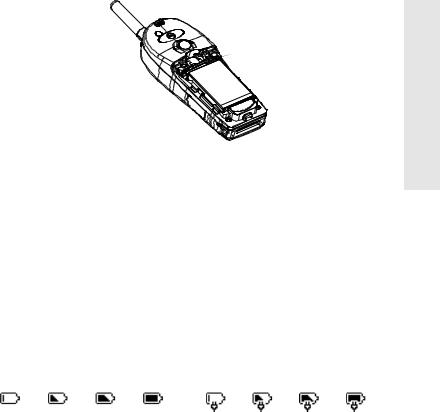
1.Remove the battery from its protective clear plastic case.
2.If necessary, remove the battery cover as shown below.
3.Insert the battery top into the compartment as illustrated.
4.Carefully press the battery silver bottom downward until it clicks into place.
5.Replace battery cover.
4
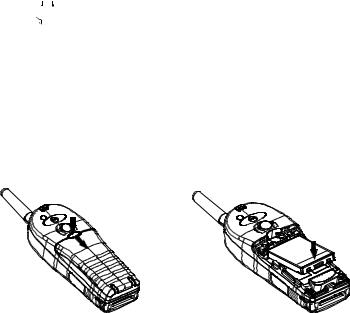
Replacing the Battery
1.To remove the battery cover, push down the cover button. Slide the cover away.
2.Push retaining clip up and then lift the top of the battery out.
3.Replace the battery.
RETAINING CLIP
Charging the Battery
Motorola approved chargers provide optimum performance. Other chargers may not fully charge your Motorola LithiumIon battery or may reduce the life of the battery.
The MTH800 can be either On or Off during charging.
1.Insert the connector on the charger into the socket at the base of the MTH800. Select the required plug adapter (UK or European type) and connect to the charger. Then plug the charger into a suitable mains socket.
2.The MTH800 displays the Charger Connected message only if the MTH800 is On when connecting the charger. If the MTH800 is Off, the display shows an icon of the battery in charging.
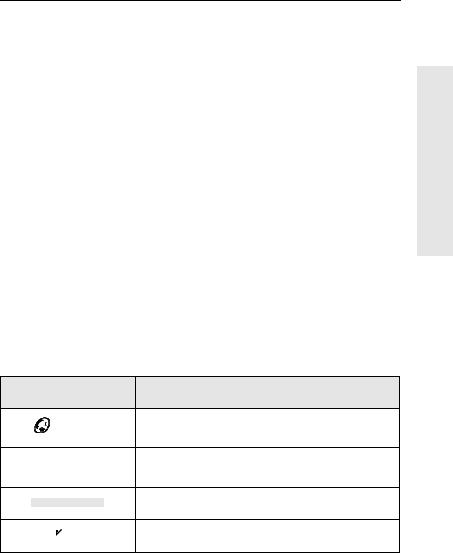
The Battery icon shows the charging status (see below).
Empty |
Full |
Empty |
Full |
Battery Capacity |
|
|
Battery Charge Progress |
Started Getting
5
Battery Capacity Information
Information |
Description |
|
|
Green icon |
Full (70% - 100% capacity) |
|
|
Yellow icon |
Middle (40%-70% capacity) |
|
|
Red icon |
Low (10% - 40% capacity) |
|
|
Empty icon |
Very low (5%-10% capacity) |
|
|
Low Battery message |
Less than 5% capacity |
|
|
Battery Maintenance
The performance of the rechargeable battery delivered with your terminal depends on the way the battery is treated.
Therefore, to comply with the Motorola warranty for batteries and to assure high performance and a long life cycle of your Motorola rechargeable battery, please read and follow the maintenance rules stated below.
Storage
Do not store your battery where the temperatures will exceed 65 ° C or fall below -20 ° C.
New Lithium-Ion batteries (i.e.batteries that have never been charged before) may be stored for up to 2 years (with up to 50% of maximum charge) in well ventilated, cool and dry areas with some capacity loss in life cycle.
Batteries, which have already been charged and then stored for more than 2 months should be recharged overnight (1416 hours) before use.
6

Extending Battery Life
A battery is an expendable part and may need replacing during the life of the terminal.To ensure maximum service life of your handset, always replace the battery with a genuine Motorola replacement.
In order to ensure maximum life from your battery, do not place the handset and/or battery in the charger, unless you really want to charge the battery.
Battery Charging Temperature
Your charger will only charge your battery when it is at temperature range of 1 °C to 37°C.
This is due to the fact that the internal battery cell can be charged in the temperature range of 0 °C to 45 °C.
As the temperature gets colder (close to 0 °C) less capacity is stored in the battery.
If, during charging, the temperature is out of range, the battery might not be fully charged since the charging is temporarily stopped until the temperature becomes suitable.
The range of battery operation is from 0 °C to +45 °C in charger mode and from -10 °C to +60 °C in discharge (application) mode.
First Time Battery Charging
Always charge your new battery/(whichever type) overnight (14-16 hours) before using it.This is referred to as Initialising and will ensure maximum battery start capacity.
Battery Charging Rules
Generally, to reduce the number of charge cycles as much as you can wait for Low Battery message to charge as this will ensure maximum battery life.
Do not use your charger as a terminal stand or leave your terminal and fully charged battery connected to the charger whilst not charging. Continuous charging will shorten the battery life.
Started Getting
7
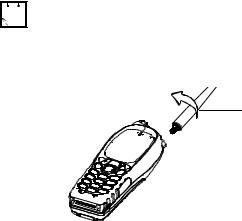
Attaching the Antenna
Turn the MTH800 Off before installing or removing the antenna.
Insert the bottom of the antenna into the screw-in base on the top of the MTH800. Turn counter clockwise until snug. Do not force.
Turn counter-clockwise to attach
8
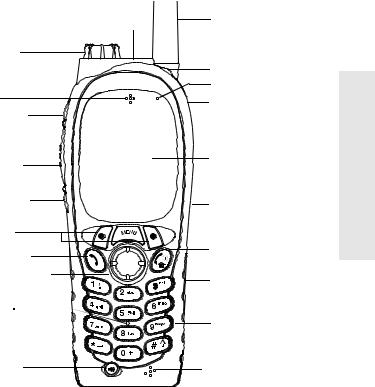
Controls and Indicators
21. Emergency Key |
1. |
Antenna |
|
(on top of the MTH800) |
|||
20. Rotary Knob |
|
|
|
(on top of the MTH800) |
2. LED |
||
|
|||
19. Earpiece |
3. |
Top Microphone |
|
4. |
External Antenna |
||
|
|||
17b. Programmable |
|
Connector |
|
Side Key |
|
(back of the MTH800) |
|
(at the side of the MTH800) |
|
|
|
18. PTT Side Key |
5. |
Alphanumeric |
|
|
Display |
||
(at the side of the MTH800) |
|
||
|
|
||
17a. Programmable |
6. Menu Key |
||
Side Key |
|||
(at the side of the MTH800)
16.Soft Keys (2) |
7. On-Off/End/Home |
|
15. Send Key |
||
key |
||
14. Four-Way Navigation |
8. Audio Accessory |
|
Key |
Connector (at the side |
|
13. Speaker |
of the MTH800) |
|
|
||
(under keypad) |
9. Alphanumeric |
|
|
||
|
Keypad |
|
12. Speaker |
10. Bottom Microphone |
|
Control Key |
||
|
|
11. Accessory |
|
Connector |
|
|
||
|
(at the base of the MTH800) |
||
|
|
|
|
Number |
Description |
||
|
|
|
|
1 |
Antenna |
||
|
|
|
|
2 |
LED (Indicator) |
||
|
|
|
|
3 |
Top Microphone |
||
|
Activated during half-duplex, high-audio calls such as |
||
|
Group Calls. |
||
Started Getting
9
Number |
Description |
|
|
4 |
External Antenna Connector |
|
Used with the digital car kit to connect the RF signal to the |
|
external antenna. |
|
(At the back of the MTH800) |
5 |
Colour Display |
|
Provides alphanumeric text and images within 65,536 |
|
colours and 130 x 130 pixels with backlighting and scalable |
|
fonts. |
6 |
Menu Key |
|
Used to enter the main menu and the context sensitive |
|
menu. |
7 |
On-Off/End//Home Key |
|
Press and hold to turn the MTH800 On/Off. |
|
Press to end calls. |
|
Press to return to the Home display (idle screen). |
8 |
Audio Accessory Connector |
|
(At the side of the MTH800) |
9 |
Alphanumeric Keypad |
|
Use the keypad to enter alphanumeric characters for |
|
dialing, contact entries and text messages. |
10 |
Bottom Microphone |
|
Activated during half-duplex and full-duplex, low-audio calls |
|
such as Phone Calls. |
11 |
Accessory Connector |
|
Provides connection for accessories. |
|
(At the base of the MTH800) |
12 |
Speaker Control Key |
|
Selects earpiece (low audio) or speaker (high audio) |
13 |
Speaker (under keypad) |
|
|
14 |
Four-Way Navigation Key |
|
Press up, down, left or right for list scrolling, while moving |
|
around the menu hierarchy, or for alphanumeric text |
|
editing. |
15 |
Send Key |
|
Used to initiate or answer full-duplex calls (such as Phone |
|
Calls), or send status and text messages. |
10
Number |
Description |
|
|
|
|
|
|
16 |
Soft Key(s) |
|
|
|
Press to select the option that appears in the display |
|
|
|
directly above the left or right soft key. |
|
|
17 |
Programmable Side Keys 1 and 2 |
|
|
|
Default programming: upper Side key activates/deactivates |
|
|
|
|
||
|
Backlight; lower Side key activates Screen Saver. |
|
|
|
(See also No. 19) |
|
Getting |
18 |
Push-To-Talk Button (PTT) |
|
|
|
Press and hold this side button to talk in half-duplex calls, |
|
|
|
release it to listen. |
|
|
|
Press to send status and text messages. |
|
Started |
19 |
Earpiece |
|
|
|
|
||
|
|
|
|
20 |
Programmable Rotary Knob |
|
|
|
Default programming: “Dual” - Press the knob to toggle |
|
|
|
between “volume” and “list”. Side keys (No. 17) operate as |
|
|
|
programmed. |
|
|
21 |
Programmable Emergency Button (on top of the MTH800) |
|
|
|
|||
|
Press and hold to enter Emergency mode, and send |
|
|
|
Emergency Alarms (as programmed). Press and hold to |
|
|
|
start an Emergency Private Call (half-duplex or full-duplex). |
|
|
|
When the MTH800 is Off, press and hold to power on in |
|
|
|
Emergency Operation or in standard mode (as |
|
|
|
programmed). |
|
|
Before using your MTH800 for the first time, remove the plastic lens protector from the display, and charge battery overnight to ensure battery is initialised to it’s full capacity.
Powering On/Off (On-Off/End/Home Key)
To power On, press and hold  . Your MTH800 performs a selfcheck and registration routine. After successful registration, the MTH800 is in service.
To power Off, press and hold  . You will hear a beep and the Powering Off message is displayed.
11

Powering On (Emergency Button)
Press and hold the Emergency button to power On.
The MTH800 will power On in Emergency Operation or in standard mode (as programmed).
Powering On with Transmit Inhibit (TXI) Active
!
W A R N I N G
Transmit Inhibit is a feature allowing you to switch off transmission before entering a Radio-Frequency (RF) sensitive area. To activate
this feature, press |
E |
and select More...> Networks > TXI Mode |
|
M NU |
|
> Activate. |
|
|
Pressing the Emergency button, even if Transmit Inhibit is activated, causes the MTH800 to transmit immediately. The MTH800 must NOT be within the RF sensitive area when entering Emergency Operation.
The TXI Mode remains active at power On. You will be asked whether to leave the TXI Mode On or not.
Ensure you have left the RF sensitive area before deactivating Transmit
!Inhibit.
W A R N I N G
Press the Yes key to deactivate the TXI Mode. If the MTH800 was previously used in Trunked Mode, it will register to the network. If the MTH800 was previously used in Direct Mode, it will remain in Direct Mode.
Press No in Trunked Mode and the MTH800 powers down; press No in DMO and you remain in DMO with TXI selected.
Unlocking the MTH800
Your MTH800 may be locked at power up.
To unlock the MTH800 after powering on, enter the code at the prompt. The MTH800 enters the default Home display.
The unlock code is originally set to 0000. Your Service Provider may change this number before you receive your terminal.
12

Locking/Unlocking the Keys/Buttons
Press |
E |
. |
|
M NU |
|
When there is an incoming call and the keypad is locked, you can still use
PTT, Rotary knob,  ,
,  and
and  .
.
The Emergency button is not locked. Pressing the Emergency button unlocks all keys.
Selecting Your Network
Before you start operating your MTH800, you can select the network you want your MTH800 to be registered to. For detailed information, see “Networks” on page 101.
How to Hold Your MTH800
The terminal has two microphones: a top microphone for half-duplex dispatcher calls and a bottom microphone for fullduplex telephone-like calls.
A call can be placed in high or low audio. To activate low or high audio, see page 21.
In high audio the user transmits via the top microphone and listens via the internal speaker.
In low audio the user speaks into the bottom microphone and listens via the earpiece.
Group and Private Calls are half-duplex calls and can be placed in high or low audio.
Phone, PABX, and full-duplex Private Calls are placed in low audio. The speakerphone feature allows to hold Phone, PABX, and full-duplex Private Calls via the MTH800 internal speaker.
Started Getting
13
Use in Low Audio (Phone, PABX, and Full-duplex Private Calls)
When placing or receiving a call and while speaking, hold your MTH800 as you would a telephone. Speak into the bottom microphone. Listen via the earpiece.
Keep antenna at least 2.5 centimetres from your head and body.
Use in High Audio (Group and Private Calls)
Hold MTH800 in a vertical position with its top microphone 5.0 to 10 centimetres away from your mouth. Speak into the top microphone. Listen via the terminal's internal speaker.
Keep antenna at least 2.5 centimetres from your head and body.
Lapel/Shoulder Use
For Group and Private Calls turn your head towards your shoulder/lapel, and speak directly into the top microphone. Listen via the terminal's internal speaker.
Speakerphone Use
Place the MTH800 30 to 60 centimetres away from you. In a noisy environment, you may want to move the MTH800 closer to you for better transmission.
Looking after your MTH800
Never leave your MTH800 or battery in extreme temperatures (over 60 ° C)—for example, behind windscreen in very hot, direct sunlight. Do not immerse your MTH800 in water.
To clean your MTH800, use a moistened or antistatic cloth. DO NOT use a dry or electrostatically charged cloth.
14
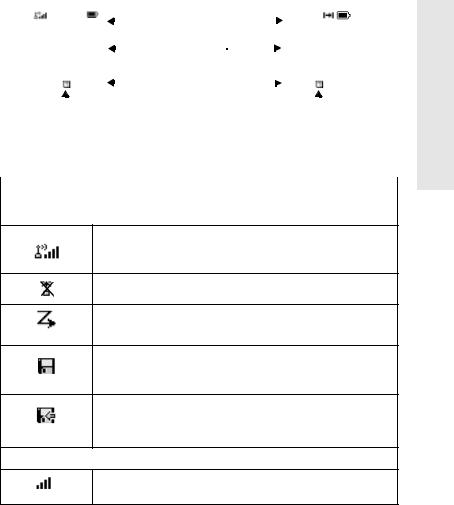
The Display
Home (Idle) Display
A powered-on, idle terminal shows the following typical
Home display:
Trunked Mode Home Display |
|
|
|
|
|
|
Direct Mode Home Display |
||||||||||||||
|
Network 1 |
|
|
|
|
|
|
status icon area |
|
|
|
|
|
|
|
|
|
|
|||
|
|
|
|
|
|
|
|
|
|
|
|
|
|
|
|
||||||
|
|
|
|
|
|
|
|
|
|
|
|
|
|
|
|
||||||
|
Folder 1 |
|
|
|
|
|
text display area |
|
|
|
|
DMO Folder 1 |
|
||||||||
|
Talkgroup 1 |
|
|
|
|
|
|
|
|
|
|
Talkgroup 1 |
|
||||||||
|
Hello |
|
|
|
|
|
|
|
|
|
|
Hello |
|
||||||||
|
|
|
|
|
|
|
|
|
soft key area |
|
|
|
|
|
|
|
|
||||
|
Optns |
|
Contcs |
|
|
|
|
|
|
|
|
|
Optns |
|
Contcs |
||||||
|
|
|
|
|
|
|
|||||||||||||||
|
|
|
|
|
|
|
|
menu/context sensitive icon |
|
|
|
|
|
|
|
|
|||||
|
|
|
|
|
|
|
|
|
|
|
|
|
|
|
|
||||||
|
|
|
|
|
|
|
|
|
|
|
|
|
|
|
|
||||||
Status Icons
Status icons appear when your phone is engaged in certain activities or when you have activated certain features.
Status Icon |
Description |
|
|
Trunked Mode Operation
Signal Strength (TMO)
Allows you to check signal strength. More bars indicate a stronger signal.
No Service
Scan
Indicates scanning is activated in the MTH800.
Data Connected
Displayed when the MTH800 is successfully connected to an external device and ready for data transfer.
Data Transmit/Receive
Displayed when the MTH800 is transferring data to/receiving data from the external device (laptop or desktop PC).
Direct Mode Operation
Signal Strength (DMO)
Indicates an incoming Direct Mode Group Call.
Started Getting
15
Status Icon |
Description |
|
|
Direct Mode
Displayed when the MTH800 is in Direct Mode.
DMO Gateway
Indicates that gateway is selected. The icon has three states: Solid—while the MTH800 is synchronised with the gateway. Flashing—while the MTH800 is not synchronised or during attachment.
No icon—during a radio to radio call, i.e. not using a gateway.
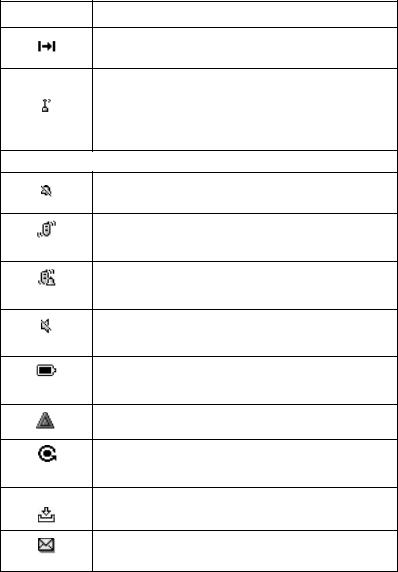
General Icons
All Tones Off
Indicates that all alert tones are off in the MTH800.
Vibrate On
Indicates that the MTH800 will vibrate to alert you of an incoming call.
Vibrate and Ring
Indicates that the MTH800 will vibrate and ring to alert you of an incoming call.
Speaker Off (Low Audio)
Indicates that the audio will sound through the earpiece. (See detailed explanation of Speaker Control Key.)
Battery Strength
Shows the charge in your battery. Full icon is full charge.
Emergency
Appears while the MTH800 is in Emergency Operation.
List Scrolling
Displayed to indicate that the Rotary knob use is list scrolling, as long as this use is selected.
New Message Has Arrived
Indicates a new message just arrived.
New Message(s) in Inbox
Indicates that you have unread messages in your Inbox.
16

The LED Status Indicator
The LED indicator shows the in-service states of your MTH800. Please refer to the table below.
Indicator |
Status |
|
|
|
|
|
|
Solid green |
In use |
|
|
|
|
|
Getting |
Flashing green |
In service |
|
|
|
|
||
|
|
|
|
Solid red |
Out of service |
|
|
|
|
|
|
Flashing red |
Connecting to a network/ |
|
Started |
|
Entering DMO |
|
|
|
|
|
|
|
|
|
|
Solid orange |
Transmit Inhibit (TXI) in service/ |
|
|
|
Channel busy in DMO |
|
|
|
|
|
|
Flashing orange |
Incoming call |
|
|
|
|
|
|
No indication |
Switched off |
|
|
|
|||
|
|
|
|
Key, Knob, and Button Overview
Soft Keys
Press  or
or  to select the option that appears in the screen directly above the left or right soft key. In this example, Contcs is displayed above the key. Pressing
  enters the contact list. In the user guide, this action is described as “press Contcs”.
Menu Key
Press |
E |
to enter: |
|
M NU |
|
Network 1
Folder 1
Talkgroup 1
Hello
Optns 

 Contcs
•The menu (when there is no on-going activity). The MTH800 menus allow you to control your MTH800 settings. Menus are organised in a hierarchy. See “List of Menu Items” on page 71. The menu options provide access to a further list of options called a sub-menu.
17
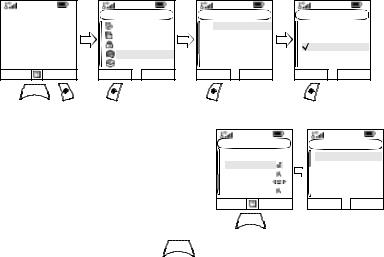
•The context sensitive menu (when  icon is on) to view a list of items for the current menu.
Examples of Menu and Sub-menus:
The example below shows how to setup the Vibrate function in the terminal.
1st Sub-menu |
2nd Sub-menu |
3rd Sub-menu |
Network 1 |
Main Menu |
||
Messages |
|||
Folder 1 |
Contacts |
||
Talkgroup 1 |
Security |
||
Hello |
Setup |
|
|
Optns |
Contcs |
More... |
|
Select |
Back |
||
Setup |
|
Vibrate |
|
Ring Style |
|
Set Volume |
|
Language |
|
Data Setup |
|
Select |
Back |
Vibrate |
|
Vibe & Ring |
|
Vibe Only |
|
Ring Only |
|
Details... |
|
Select |
Back |
MENU
Example of Context Sensitive Menu
This example shows the screen when editing a name listed in the contact list. From the Home display, press Contcs. Scroll to the name
Contacts |
|
[New Contact] |
|
David |
|
Ann |
|
Ray |
|
2255 |
|
Select |
Back |
E |
|
M |
NU |
Contacts Menu |
|
Edit |
|
Delete number |
|
Delete contact |
|
New contact |
|
Capacity |
|
Select |
Back |
you wish to edit. Press
M
ENU
.
The context sensitive menu opens up, allowing you to choose among the entries.
Rotary Knob
The Service Provider can program the Rotary knob to one of the following uses:
1.Dual Control - the knob is used as both a Volume control and to scroll through Lists. Press the knob to toggle between Vol-
ume and List (default programming).
2. List Control - the knob is used to scroll lists or menu items. In this case volume control is always via the Side keys.
3.Volume Control - the knob is used only as a volume control; turn clockwise to increase the audio volume level.
18
Press and hold the Rotary knob to lock it, press and hold it again to unlock. Powering Off also unlocks a locked Rotary knob.
Emergency Button
Press and hold this button to enter Emergency Operation.
When the MTH800 is powered down, press and hold this button to power On in Emergency Operation (if configured by your Service Provider).
See “Emergency Operation” on page 54.
Function Keys
 For information on the function assigned to each Side or Numeric key, please refer to your Service Provider.
 The required time you need to press the Side or Numeric keys to activate a
  one-touch function is set as default to 1 second. This time may be set, however, by your Service Provider.
Side Keys
The Rotary knob and Side key programming are paired:
Rotary Knob Programming |
Side Key Programming |
|
|
|
|
Dual Control |
Programmed to a one-touch function |
|
|
|
|
List Control |
: Volume Up |
|
: Volume Down |
||
|
||
|
|
|
Volume Control |
Programmed to a one-touch function |
|
|
|
When the Rotary knob is programmed to Volume Control or Dual Control, the Side keys support the one-touch feature that allows you to select or activate commonly used features by pressing and holding a single key. By default, the upper side key is set to “Backlight On/Off” and the lower side key is set to “Screen Saver On”. Please check with your Service Provider.
Started Getting
19

Programmable Numeric Keys
The MTH800 supports the one-touch feature that allows you to select/activate commonly used features by pressing and holding a numeric key. Your Service Provider should program the numeric keys with the relevant features.
The following table lists the programmable features and their availability in specific MTH800 states/modes. For detailed information on the features, see the relevant section in the user guide.
Feature |
Description |
|
|
Talkgroup Switch |
Switch to a specific talkgroup |
|
|
Talkgroup Scan |
Toggles on/off the Talkgroup Scan function |
|
(TMO only) |
|
|
Home Revert |
Puts the MTH800 back Home display. |
|
|
DMO/TMO |
Toggles between DMO and TMO |
|
|
Status Message |
Sends a dedicated status message to a |
|
dedicated address (TMO only) |
|
|
Text Message Template |
Sends a predefined/user defined template to |
|
a dedicated address (TMO only) |
|
|
Call Dial (Private, Phone, |
Initiates a call to a predefined entry in the |
PABX) |
contact list (TMO only) |
|
|
Vertical Flip Display |
Toggles on/off vertical flip |
|
|
Transmit Inhibit (TXI) |
Toggles between activated and deactivated |
|
TXI Mode. |
|
|
Screen Saver |
Activates screen saver. |
|
|
Backlight Adjustment |
Toggles on/off backlight. |
|
|
If dialing via one-touch numeric key is enabled, one-touch dial is disabled (see page 52).
20
Loading...