


MTP3150
Table of contents
 Loading...
Mobile Release 17.0
MTP3150 Feature User
Guide
APRIL 2018
©
2018 Motorola Solutions, Inc. All rights reserved
*68015000797*
68015000797-EE (en-US)

68015000797-EE (en-US)
Contents
Contents
List of Figures............................................................................................................12
List of Tables............................................................................................................. 13
Copyrights................................................................................................................. 14
Chapter 1: General Information............................................................................... 15
1.1 Safety Information..................................................................................................................15
1.2 Icon Conventions................................................................................................................... 15
1.3 Using this Guide.................................................................................................................... 15
1.4 Feature and Service Availability............................................................................................ 16
Chapter 2: Getting Started........................................................................................17
2.1 Product Technical Information............................................................................................... 17
2.2 Before Power On................................................................................................................... 18
2.2.1 Attaching the Antenna..............................................................................................18
2.2.2 Inserting the SIM Card............................................................................................. 18
2.2.3 Installing the Battery................................................................................................ 19
2.2.4 Removing the Battery.............................................................................................. 19
2.2.5 Charging the Battery................................................................................................ 20
2.2.6 Battery Charging Indications....................................................................................20
2.2.7 Low Battery Indication..............................................................................................21
2.3 Controls and Indicators..........................................................................................................21
2.4 Display................................................................................................................................... 24
2.4.1 Configurable Idle Screen......................................................................................... 25
2.5 Status Icons........................................................................................................................... 26
2.6 Powering On the Radio..........................................................................................................29
2.7 PIN Code Authentication....................................................................................................... 29
2.7.1 Unlocking Your Radio.............................................................................................. 29
2.7.2 Unblocking Your Radio............................................................................................ 29
2.8 Locking or Unlocking the Keys or Buttons............................................................................. 30
2.9 Holding Your Radio................................................................................................................30
2.10 High or Low Audio Toggle................................................................................................... 31
2.10.1 Using High Audio................................................................................................... 31
2.10.2 Using Low Audio.................................................................................................... 31
2.11 During a Call........................................................................................................................ 31
2.12 Entering TMO or DMO Mode...............................................................................................31
2.13 Selecting Talkgroups........................................................................................................... 32
2.13.1 Talkgroup Icons Selection......................................................................................32
2

68015000797-EE (en-US)
Contents
2.14 One-Touch Buttons..............................................................................................................34
Chapter 3: Modes...................................................................................................... 37
3.1 Trunked Mode Operation.......................................................................................................37
3.1.1 Entering TMO Mode.................................................................................................37
3.1.2 Making Group Calls in TMO.....................................................................................37
3.1.3 Receiving Group Calls in Idle...................................................................................38
3.1.4 Receiving Group Calls during Ongoing Group Calls................................................38
3.1.5 Dynamic Group Number Assignment (DGNA).........................................................38
3.1.5.1 DGNA Reception........................................................................................38
3.1.5.2 DGNA Auto Select Group.......................................................................... 39
3.1.5.3 DGNA Auto Reselect Group...................................................................... 39
3.1.5.4 Viewing DGNA Talkgroups........................................................................ 39
3.1.6 Broadcast Call..........................................................................................................39
3.1.6.1 Broadcast Calls Initiated by Users............................................................. 39
3.1.6.2 Initializing Broadcast Calls......................................................................... 39
3.1.7 Phone and Private Automatic Branch Exchange (PABX) Calls............................... 40
3.1.8 Assistance Call........................................................................................................ 40
3.1.9 Call Modification.......................................................................................................40
3.2 Local Site Trunking................................................................................................................ 40
3.2.1 Entering Local Site Trunking....................................................................................41
3.2.2 Exiting Local Site Trunking...................................................................................... 41
3.3 Direct Mode Operation...........................................................................................................42
3.3.1 Entering DMO Mode................................................................................................ 42
3.3.2 Making Group Calls in DMO.................................................................................... 42
3.3.3 Receiving Group Calls in Idle...................................................................................42
3.3.4 Selecting DMO Communications Options................................................................43
3.3.5 DMO Private Priority Call......................................................................................... 43
3.3.6 Talkgroup for Individual Calls...................................................................................43
3.3.7 Network Monitor.......................................................................................................44
3.3.7.1 Enabling Network Monitor.......................................................................... 44
3.3.8 Communication through Repeaters......................................................................... 45
3.3.9 Communication through Gateways..........................................................................45
3.3.10 Gateway and Repeater Synchronization............................................................... 46
3.4 Transmit Inhibit Mode............................................................................................................ 46
3.5 Emergency Operations.......................................................................................................... 47
3.5.1 Emergency Alarm.................................................................................................... 47
3.5.2 Emergency Group Call.............................................................................................48
3.5.2.1 Making Emergency Group Calls................................................................ 48
3.5.2.2 Receiving Emergency Group Calls............................................................ 48
3

68015000797-EE (en-US)
Contents
3.5.3 Non-Tactical Emergency..........................................................................................49
3.5.4 Emergency Individual Calls (Private or MSISDN)....................................................49
3.5.5 Emergency SDS Status........................................................................................... 49
3.5.6 Emergency Hot Microphone.................................................................................... 49
3.5.7 Alternating Hot Microphone..................................................................................... 49
3.5.8 Silent Emergency Mode...........................................................................................50
3.5.9 Invisible Emergency.................................................................................................51
3.5.10 Emergency Alert.................................................................................................... 51
3.5.11 Disaster Alert......................................................................................................... 51
3.5.11.1 Initializing Disaster Alert Calls..................................................................52
3.5.12 Exiting Emergency Operations.............................................................................. 52
3.6 Repeater Mode...................................................................................................................... 52
Chapter 4: Main Menu...............................................................................................54
4.1 Scrolling through the Menu....................................................................................................54
4.2 Menu Icons............................................................................................................................ 54
4.3 Messages.............................................................................................................................. 55
4.3.1 New Message.......................................................................................................... 55
4.3.1.1 Sending Messages to Private/Phone......................................................... 56
4.3.1.2 Sending Messages to Groups....................................................................56
4.3.1.3 Sending Store and Forward Messages......................................................56
4.3.1.4 Delivery Report.......................................................................................... 57
4.3.2 Inbox........................................................................................................................ 58
4.3.2.1 Entering the Inbox...................................................................................... 59
4.3.2.2 Receiving New Messages..........................................................................59
4.3.2.3 Using Submenus in the Inbox and the Outbox...........................................59
4.3.2.4 Embedded Number.................................................................................... 60
4.3.2.5 Storing Numbers from Messages...............................................................60
4.3.2.6 Calling Numbers in Messages................................................................... 60
4.3.2.7 Making Group Calls on the Talkgroup of the Message Sender................. 61
4.3.2.8 Immediate Message...................................................................................61
4
4.3.3 Outbox..................................................................................................................... 61
4.3.4 Call-Out (CO) Box....................................................................................................62
4.3.4.1 Call-Out Icons............................................................................................ 62
4.3.5 Radio Messenging System (RMS) Box....................................................................62
4.3.6 Wireless Application Protocol (WAP) Box................................................................62
4.3.7 Templates................................................................................................................ 62
4.3.7.1 Sending User-Defined Templates.............................................................. 63
4.3.7.2 Managing User-Defined Templates........................................................... 63
4.3.8 Predefined Templates..............................................................................................63

68015000797-EE (en-US)
Contents
4.3.8.1 Viewing Predefined Templates.................................................................. 63
4.3.8.2 Sending Predefined Templates..................................................................63
4.3.9 Status Messages..................................................................................................... 64
4.3.9.1 Viewing a Status Message Number........................................................... 64
4.3.9.2 Sending Status Messages......................................................................... 64
4.3.9.3 Targeted Status Messages........................................................................ 64
4.3.10 Sending an RMS Status.........................................................................................65
4.3.11 Additional Address................................................................................................. 66
4.3.11.1 Enabling or Disabling Additional Address................................................ 66
4.3.11.2 Selecting Additional Address................................................................... 66
4.3.11.3 Viewing Additional Address......................................................................66
4.3.11.4 Entering New Additional Address.............................................................67
4.3.11.5 Editing Additional Address....................................................................... 67
4.3.11.6 Deleting Additional Address..................................................................... 67
4.3.12 Call-Out Availability................................................................................................68
4.3.12.1 Setting Call-Out Availability......................................................................68
4.4 Contacts.................................................................................................................................68
4.4.1 Creating Contacts.................................................................................................... 69
4.4.2 Editing Contacts.......................................................................................................69
4.4.3 Deleting Numbers.................................................................................................... 69
4.4.4 Deleting Contacts.....................................................................................................70
4.4.5 Checking Capacity................................................................................................... 70
4.4.6 Dialing through the Contact List...............................................................................70
4.5 Browser..................................................................................................................................70
4.6 Security..................................................................................................................................71
4.6.1 PIN Protect...............................................................................................................71
4.6.1.1 Protecting the Radio with a PIN Code........................................................71
4.6.1.2 Changing PIN Codes................................................................................. 71
4.6.2 Setting Keypad Lock................................................................................................ 71
4.6.2.1 Keypad Lock Notification............................................................................72
4.6.2.2 Setting Automatic Keylock Delay............................................................... 72
4.6.2.3 Setting Keylock on Startup.........................................................................72
4.6.3 Air Encryption...........................................................................................................72
4.6.3.1 Viewing Air Encryption State......................................................................72
4.6.3.2 Deleting User Keys.................................................................................... 73
4.6.4 K Validity.................................................................................................................. 73
4.6.4.1 Verifying K Validity..................................................................................... 73
4.6.5 SCK (Air Interface Encryption Class 2)....................................................................73
4.6.5.1 TMO SCK...................................................................................................74
5

68015000797-EE (en-US)
Contents
4.6.5.2 DMO SCK.................................................................................................. 74
4.6.5.3 Changing DMO SCK.................................................................................. 74
4.6.6 Covert Mode............................................................................................................ 74
4.6.6.1 Activating Covert Mode.............................................................................. 75
4.6.7 Remote Control........................................................................................................75
4.6.7.1 Status Remote Control...............................................................................75
4.6.7.2 SDS Remote Control..................................................................................76
4.6.7.3 Setting Remote Control..............................................................................76
4.7 Setup..................................................................................................................................... 76
4.7.1 Ring Style.................................................................................................................76
4.7.1.1 Setting Ring Style.......................................................................................76
4.7.2 Set Volume.............................................................................................................. 77
4.7.2.1 Setting Volume...........................................................................................77
4.7.3 Language................................................................................................................. 77
4.7.3.1 Setting Language....................................................................................... 77
4.7.4 Data Setup............................................................................................................... 78
4.7.4.1 Setting Data Function.................................................................................78
4.7.5 Audio........................................................................................................................78
4.7.5.1 Audio Profiles............................................................................................. 78
4.7.5.2 Howling Suppression................................................................................. 79
4.7.5.3 Audio Toggle.............................................................................................. 79
4.7.5.4 Volume Adjustment Mode.......................................................................... 79
4.7.6 Tones....................................................................................................................... 80
4.7.6.1 Keypad Tone..............................................................................................80
4.7.6.2 All Tones.................................................................................................... 80
4.7.6.3 Talk Permit................................................................................................. 81
4.7.6.4 Clear to Send............................................................................................. 81
4.7.6.5 Periodic Alert..............................................................................................81
4.7.6.6 D-PTT Tones..............................................................................................82
4.7.7 Display..................................................................................................................... 82
4.7.7.1 Setting Flip Display.................................................................................... 82
4.7.7.2 Setting Font Level...................................................................................... 82
4.7.7.3 Setting Large Idle Font...............................................................................83
6
4.7.7.4 Setting Screen Saver................................................................................. 83
4.7.7.5 Setting Backlight........................................................................................ 83
4.7.7.6 Setting Brightness...................................................................................... 84
4.7.7.7 Setting LCD Off.......................................................................................... 84
4.7.7.8 Setting Wallpaper.......................................................................................84
4.7.8 Time and Date......................................................................................................... 84

68015000797-EE (en-US)
Contents
4.7.8.1 Setting the Time Format.............................................................................85
4.7.8.2 Setting the Time Manually..........................................................................85
4.7.8.3 Setting the Date Format............................................................................. 85
4.7.8.4 Setting the Date Manually.......................................................................... 85
4.7.8.5 Setting Time Offset.................................................................................... 86
4.7.8.6 Setting Automatic Updates for the Time and Date ....................................86
4.7.9 Energy Economy......................................................................................................86
4.7.9.1 Enabling or Disabling Energy Economy.....................................................86
4.7.9.2 Viewing the Energy Economy Status......................................................... 86
4.7.10 Transmission Power Class.................................................................................... 87
4.7.10.1 Selecting RF Power................................................................................. 87
4.7.11 Accessory (Accry) Setup........................................................................................87
4.7.11.1 Selecting CORE/Other/Secondary Accessories...................................... 87
4.7.12 Book On................................................................................................................. 88
4.7.13 Rotary Knob........................................................................................................... 88
4.7.13.1 Setting Rotary Lock..................................................................................88
4.7.13.2 Setting In Keypad Lock............................................................................ 88
4.7.13.3 Setting Rotary Knob Wrap Around...........................................................88
4.7.13.4 Setting Rotary Knob Scroll Range........................................................... 89
4.7.13.5 Setting Rotary Knob Talkgroup Selection................................................ 89
4.7.13.6 Setting Rotary Knob Function Keys......................................................... 89
4.7.14 Default Setting....................................................................................................... 90
4.7.14.1 Selecting Default Setting..........................................................................90
4.8 Group Setup.......................................................................................................................... 90
4.8.1 Setting Operations Parameters................................................................................90
4.8.1.1 Standard Home Group............................................................................... 91
4.8.2 Scan.........................................................................................................................91
4.8.2.1 Activating Talkgroup Scanning...................................................................91
4.8.2.2 Setting Talkgroups in the Active Scan List.................................................91
4.8.2.3 Setting Scan Lists...................................................................................... 92
4.8.2.4 Deleting Talkgroups from Scan Lists......................................................... 92
4.8.3 My Groups............................................................................................................... 92
4.8.3.1 Adding Favorite Folders............................................................................. 92
4.8.3.2 Adding Talkgroups to Favorite Folders...................................................... 93
4.8.3.3 Editing My Folder List.................................................................................93
4.8.3.4 Deleting Talkgroup from Favorite Folders..................................................93
4.9 Individual Setup..................................................................................................................... 93
4.9.1 Trunked Mode..........................................................................................................94
4.9.1.1 Enabling or Disabling Call Waiting............................................................. 94
7

68015000797-EE (en-US)
Contents
4.9.1.2 Setting Call Forwarding..............................................................................94
4.10 Favorites.............................................................................................................................. 94
4.10.1 Adding Folders to Favorites................................................................................... 95
4.10.2 Adding Contact Numbers to Favorites................................................................... 95
4.10.3 Making Private Calls to Favorite Contact Numbers............................................... 95
4.10.4 Adding Talkgroups to Favorites............................................................................. 95
4.10.5 Managing Folders in Favorites...............................................................................96
4.10.6 Deleting Items from Favorites Folder.....................................................................96
4.10.7 Deleting All Items from Favorite Folders................................................................96
4.11 My Info................................................................................................................................. 97
4.11.1 Viewing and Modifying Personal Information.........................................................97
4.12 Recent Calls........................................................................................................................ 97
4.12.1 Viewing Recent Calls............................................................................................. 97
4.12.2 Calling from Recent Calls...................................................................................... 98
4.12.3 Storing Recent Calls to Contacts........................................................................... 98
4.12.4 Deleting Recent Calls............................................................................................ 99
4.13 Shortcuts..............................................................................................................................99
4.13.1 Creating Menu Shortcuts....................................................................................... 99
4.13.2 Editing Menu Shortcut Lists................................................................................. 100
4.14 Networks............................................................................................................................100
4.14.1 Selecting Network Operation Mode..................................................................... 100
4.14.2 Network Select.....................................................................................................100
4.14.2.1 Selecting Your Network..........................................................................100
4.14.2.2 Using Select Net Registration................................................................ 101
4.14.3 Talkgroup Network Select....................................................................................101
4.14.3.1 Selecting Your Talkgroup Network.........................................................101
4.14.3.2 Using Select TG Net Registration.......................................................... 101
4.14.3.3 Using Prefer TG Net Registration.......................................................... 101
4.14.3.4 Using Any TG Net Registration.............................................................. 102
4.15 Location............................................................................................................................. 102
4.15.1 Enabling GNSS....................................................................................................102
4.15.2 Viewing Your Position.......................................................................................... 102
4.15.3 Viewing Testpage................................................................................................ 103
4.15.4 Changing GNSS Accuracy...................................................................................103
4.15.5 Backlog................................................................................................................ 103
4.15.5.1 Enabling or Disabling Backlog............................................................... 103
4.15.5.2 Viewing Backlog Reports....................................................................... 104
4.15.5.3 Deleting All Backlog Reports..................................................................104
4.16 Packet Data....................................................................................................................... 104
8

68015000797-EE (en-US)
Contents
4.16.1 Viewing Data Statistics........................................................................................ 104
4.16.2 Viewing Encryption Status................................................................................... 105
4.17 Crypto Menu...................................................................................................................... 105
4.17.1 Enabling or Disabling SIM Card End-to-End Encryption......................................105
4.17.2 Setting Clear Call Alarm.......................................................................................106
4.17.3 Updating Encryption Keys....................................................................................106
4.17.4 Viewing OPTA......................................................................................................106
4.17.5 Setting OPTA Filter.............................................................................................. 106
4.17.6 Starting Crypto Registration.................................................................................107
4.17.7 Setting DMO Encryption Mode............................................................................ 107
Chapter 5: Features................................................................................................ 108
5.1 Ambience Listening (AL) Call.............................................................................................. 108
5.2 Buffer Full Overwrite Policy................................................................................................. 108
5.3 Call-Out................................................................................................................................108
5.3.1 Types of Call-Out Alerts.........................................................................................109
5.3.2 Call-Out Modes Interaction.................................................................................... 110
5.3.3 Call-Out Service Phases........................................................................................110
5.4 Global Navigation Satellite System (GNSS) Location Service............................................ 110
5.4.1 Enhance GNSS Performance................................................................................ 111
5.4.2 GNSS Icon............................................................................................................. 112
5.4.3 Different Location Displays.................................................................................... 112
5.4.4 GNSS Accuracy..................................................................................................... 113
5.5 Home Display Text Message...............................................................................................113
5.6 One-Touch Dial....................................................................................................................113
5.7 MS-ISDN..............................................................................................................................113
5.8 Private Call.......................................................................................................................... 113
5.8.1 Making Private Calls.............................................................................................. 114
5.9 Phone and Private Automatic Branch Exchange (PABX) Calls...........................................114
5.9.1 Making Phone or PABX Calls................................................................................ 114
5.10 Phone/PABX Speed Dial................................................................................................... 114
5.10.1 Using the Phone/PABX Speed Dial..................................................................... 115
5.11 Radio Messaging System (RMS).......................................................................................115
5.11.1 RMS Icons........................................................................................................... 115
5.12 Radio User Assignment (RUA) and Radio User Identity (RUI)..........................................116
5.13 SIM Card End-to-End Encryption...................................................................................... 116
5.14 Short Number Dial............................................................................................................. 117
5.15 Talkgroup Dialing by Index................................................................................................ 117
5.15.1 Viewing the Talkgroup Speed Number................................................................ 117
5.15.2 Selecting Talkgroups by Index.............................................................................118
9

68015000797-EE (en-US)
Contents
5.16 Terminal Temporary Disable or Enable............................................................................. 118
5.17 Writing Text........................................................................................................................118
5.17.1 Selecting Text Entry Modes................................................................................. 118
5.17.2 Selecting Text Entry Methods and Languages.................................................... 118
5.17.3 Text Entry Icons................................................................................................... 119
5.17.4 Keys Usage..........................................................................................................120
5.17.5 Writing in iTAP Alphanumeric.............................................................................. 121
5.17.6 Writing in TAP Alphanumeric............................................................................... 122
5.17.7 Word Locking....................................................................................................... 122
5.17.8 Adding Words to the Dictionary........................................................................... 123
5.18 Wireless Application Protocol (WAP).................................................................................123
5.18.1 WAP Browser.......................................................................................................123
5.18.2 Entering the Browser........................................................................................... 123
5.18.3 Entering Browser Menu Panes............................................................................ 123
5.18.4 Tips for Browsing................................................................................................. 124
5.18.4.1 Creating Bookmarks through the Navigate Pane...................................124
5.18.4.2 Creating Bookmarks through the Bookmarks Pane............................... 124
5.18.4.3 Using Bookmarks................................................................................... 124
5.18.4.4 Creating Hotkeys....................................................................................125
5.18.4.5 Using Hotkeys........................................................................................ 125
5.18.4.6 Saving Pages......................................................................................... 125
5.18.4.7 Selecting Saved Pages.......................................................................... 125
5.18.5 Disabled Packet Data Service............................................................................. 125
5.18.6 Disabled Browser Entry....................................................................................... 126
5.18.7 Browser Keys Usage........................................................................................... 126
5.18.8 Browser Menu Panes Overview...........................................................................127
5.18.9 Navigate Pane..................................................................................................... 128
5.18.10 Advanced........................................................................................................... 128
5.18.11 Bookmarks Pane................................................................................................129
5.18.11.1 Working with the Options Pane for Selected Bookmarks.....................129
5.18.11.2 Working with the Saved Pages Folder................................................. 129
5.18.12 History Pane...................................................................................................... 130
5.18.12.1 Navigating to Recently Visited URLs................................................... 130
10
5.18.13 Tools Pane.........................................................................................................130
5.18.14 Options Pane..................................................................................................... 130
5.18.15 Text Input Pane..................................................................................................130
5.18.16 WAP Push..........................................................................................................131
5.18.16.1 New WAP Messages........................................................................... 131
5.18.16.2 Viewing WAP Messages...................................................................... 132

68015000797-EE (en-US)
Contents
Appendix A: Tones..................................................................................................133
Appendix B: LED Indications.................................................................................135
Appendix C: Troubleshooting................................................................................136
Appendix D: Maintenance...................................................................................... 139
D.1 Storage................................................................................................................................139
D.2 Extending Battery Life......................................................................................................... 139
D.3 Battery Charging Temperature............................................................................................139
D.4 Additional Battery Warnings/Cautions.................................................................................139
D.5 Looking after Your Radio.................................................................................................... 140
11

68015000797-EE (en-US)
List of Figures
List of Figures
Figure 1: Charger Mode Screen............................................................................................................. 21
Figure 2: Default Home Screen with Icons............................................................................................. 24
Figure 3: Trunked Mode Operation........................................................................................................ 37
Figure 4: Direct Mode Operation............................................................................................................ 42
Figure 5: Communication through Repeaters.........................................................................................45
Figure 6: Communication through Gateways......................................................................................... 45
Figure 7: Repeater Mode Operation.......................................................................................................53
Figure 8: Call-Out Message..................................................................................................................109
12

68015000797-EE (en-US)
List of Tables
List of Tables
Table 1: Special Notations......................................................................................................................15
Table 2: Product Technical Information..................................................................................................17
Table 3: Battery Icons.............................................................................................................................21
Table 4: Controls and Indicators.............................................................................................................22
Table 5: Display......................................................................................................................................24
Table 6: Colors of the Soft Key Area...................................................................................................... 25
Table 7: Status Icons..............................................................................................................................26
Table 8: During the Call..........................................................................................................................31
Table 9: Talkgroup Icons........................................................................................................................ 32
Table 10: One-Touch Button Features .................................................................................................. 34
Table 11: Emergency Operation Dependencies.....................................................................................51
Table 12: Menu Icons............................................................................................................................. 54
Table 13: Inbox Icons............................................................................................................................. 58
Table 14: Outbox Icons.......................................................................................................................... 61
Table 15: Call-Out Icons.........................................................................................................................62
Table 16: Contact Types........................................................................................................................ 68
Table 17: Different Location Displays...................................................................................................112
Table 18: RMS Icons............................................................................................................................ 115
Table 19: Radios Interactions...............................................................................................................116
Table 20: Text Entry Screen Icons....................................................................................................... 119
Table 21: Keys Usage.......................................................................................................................... 120
Table 22: Other Keys............................................................................................................................120
Table 23: Browser Keys Interactions....................................................................................................126
Table 24: Browser Menu Panes........................................................................................................... 127
Table 25: Additional Menu Panes.........................................................................................................127
Table 26: Browser Text Input Icons......................................................................................................131
Table 27: Radio Tones......................................................................................................................... 133
Table 28: LED Status Indications......................................................................................................... 135
Table 29: Battery Charging LED Indications........................................................................................ 135
Table 30: Displayed Messages............................................................................................................ 136
13

68015000797-EE (en-US)
Copyrights
Copyrights
The Motorola Solutions products described in this document may include copyrighted Motorola
Solutions computer programs. Laws in the United States and other countries preserve for Motorola
Solutions certain exclusive rights for copyrighted computer programs. Accordingly, any copyrighted
Motorola Solutions computer programs contained in the Motorola Solutions products described in this
document may not be copied or reproduced in any manner without the express written permission of
Motorola Solutions.
©
2018 Motorola Solutions, Inc. All Rights Reserved
No part of this document may be reproduced, transmitted, stored in a retrieval system, or translated
into any language or computer language, in any form or by any means, without the prior written
permission of Motorola Solutions, Inc.
Furthermore, the purchase of Motorola Solutions products shall not be deemed to grant either directly
or by implication, estoppel or otherwise, any license under the copyrights, patents or patent
applications of Motorola Solutions, except for the normal non-exclusive, royalty-free license to use that
arises by operation of law in the sale of a product.
Disclaimer
Please note that certain features, facilities, and capabilities described in this document may not be
applicable to or licensed for use on a specific system, or may be dependent upon the characteristics of
a specific subscriber unit or configuration of certain parameters. Please refer to your Motorola
Solutions contact for further information.
Trademarks
MOTOROLA, MOTO, MOTOROLA SOLUTIONS, and the Stylized M Logo are trademarks or
registered trademarks of Motorola Trademark Holdings, LLC and are used under license. All other
trademarks are the property of their respective owners.
European Union (EU) Waste of Electrical and Electronic Equipment (WEEE)
directive
The European Union's WEEE directive requires that products sold into EU countries must have
the crossed out trash bin label on the product (or the package in some cases).
As defined by the WEEE directive, this cross-out trash bin label means that customers and end-users
in EU countries should not dispose of electronic and electrical equipment or accessories in household
waste.
Customers or end-users in EU countries should contact their local equipment supplier representative or
service centre for information about the waste collection system in their country.
14
68015000797-EE (en-US)
General Information
Chapter 1
General Information
1.1
Safety Information
RF Energy Exposure Training and Product Safety Information For Portable TwoWay Radios
IMPORTANT: Before using this product, read the RF Energy Exposure Training and Product
Safety Information for Portable Two-Way Radios shipped with your radio. The guide contains
recommendations for safe usage, important RF energy awareness and control information, as
well as regulatory information, to help ensure compliance with applicable standards and
regulations.
1.2
Icon Conventions
The documentation set is designed to give the reader more visual clues. The following graphic icons
are used throughout the documentation set.
DANGER: The signal word DANGER with the associated safety icon implies information that, if
disregarded, will result in death or serious injury.
WARNING: The signal word WARNING with the associated safety icon implies information that,
if disregarded, could result in death or serious injury, or serious product damage.
CAUTION: The signal word CAUTION with the associated safety icon implies information that,
if disregarded, may result in minor or moderate injury, or serious product damage.
CAUTION: The signal word CAUTION may be used without the safety icon to state potential
damage or injury that is not related to the product.
IMPORTANT: IMPORTANT statements contain information that is crucial to the discussion at
hand, but is not CAUTION or WARNING. There is no warning level associated with the
IMPORTANT statement.
NOTICE: NOTICE contains information more important than the surrounding text, such as
exceptions or preconditions. They also refer the reader elsewhere for additional information,
remind the reader how to complete an action (when it is not part of the current procedure, for
instance), or tell the reader where something is on the screen. There is no warning level
associated with a notice.
1.3
Using this Guide
The following special notations are used throughout the text to highlight certain information or items:
Table 1: Special Notations
Example Description
Menu key or PTT button Bold words indicate a name of a key, button, or
soft menu item.
15

68015000797-EE (en-US)
Chapter 1: General Information
Example Description
Entering TMO tone Italic words indicate a name of the tone.
Powering Off
Setup → Tones → All Tones Bold words with the arrow between indicate
1.4
Typewriter words indicate the MMI strings or
messages displayed on the radio.
navigation structure in the menu items.
Feature and Service Availability
This guide describes all available radio features and services. Your service provider may have
customized your radio to optimize its use for your individual needs. Check with your service provider to
find out the differences from this guide.
16

Chapter 2
Getting Started
This chapter contains basic information on how to use the radio.
2.1
Product Technical Information
Table 2: Product Technical Information
Description Value
Maximum Voltage 4.2 V
Maximum Current 4.7 A
Maximum RF Power 1 or 1.8 W (switchable)
68015000797-EE (en-US)
Getting Started
Maximum Speaker
Load
Antenna Impedance 50 Ω
Operating Temperature Range
Storage Temperature
Range
Ingress Protection
Rating
Audio Power Through
the Radio and Accessories
Operating Time Duty Cycle Class 4 (1 W) Class 3L (1.8 W)
Standard 1650 mAh
Battery
2150 mAh Battery 05/05/90
3400 mAh Battery 05/05/90
2 W at 16 Ω
-30 °C to +60 °C
20 °C to 30°C
IP65 and IP67
RMS: 2 W
Peak Power: 4 W
05/05/90
05/35/60
05/35/60
05/35/60
> 16 h
> 12 h
> 21 h
> 16 h
> 30 h
> 22 h
> 15 h
> 11 h
> 20 h
> 15 h
> 28 h
> 21 h
17

68015000797-EE (en-US)
Chapter 2: Getting Started
NOTICE:
The system (SwMI) determines radio transmit and receive times, which affect the actual radio
operating time.
If the radio overheats (due to high ambient temperature or other factors), thermal protection will
reduce transmitter power, which may lead to loss of communication.
You can attach a colorful o-ring to a radio antenna to distinguish radios from one another.
An RFID knob is available as an optional accessory which allows tracking radios easily. The
knob contains an RFID tag which can be read by handheld scanners greatly enhancing the
speed of radio identification. The knob is a retrofit option and can replace an existing volume
knob.
2.2
Before Power On
Read this section before you power on your radio for the first time.
2.2.1
Attaching the Antenna
Procedure:
1 Insert the screw-in base of the antenna into the antenna terminal on the top of the radio.
2 Turn clockwise until tight.
IMPORTANT: Use only the antenna intended for the radio. Make sure that the antenna
has an operating frequency engraving and a color ring at the bottom of the thread. Use of
other antennas can result in significant range loss due to poor RF performance.
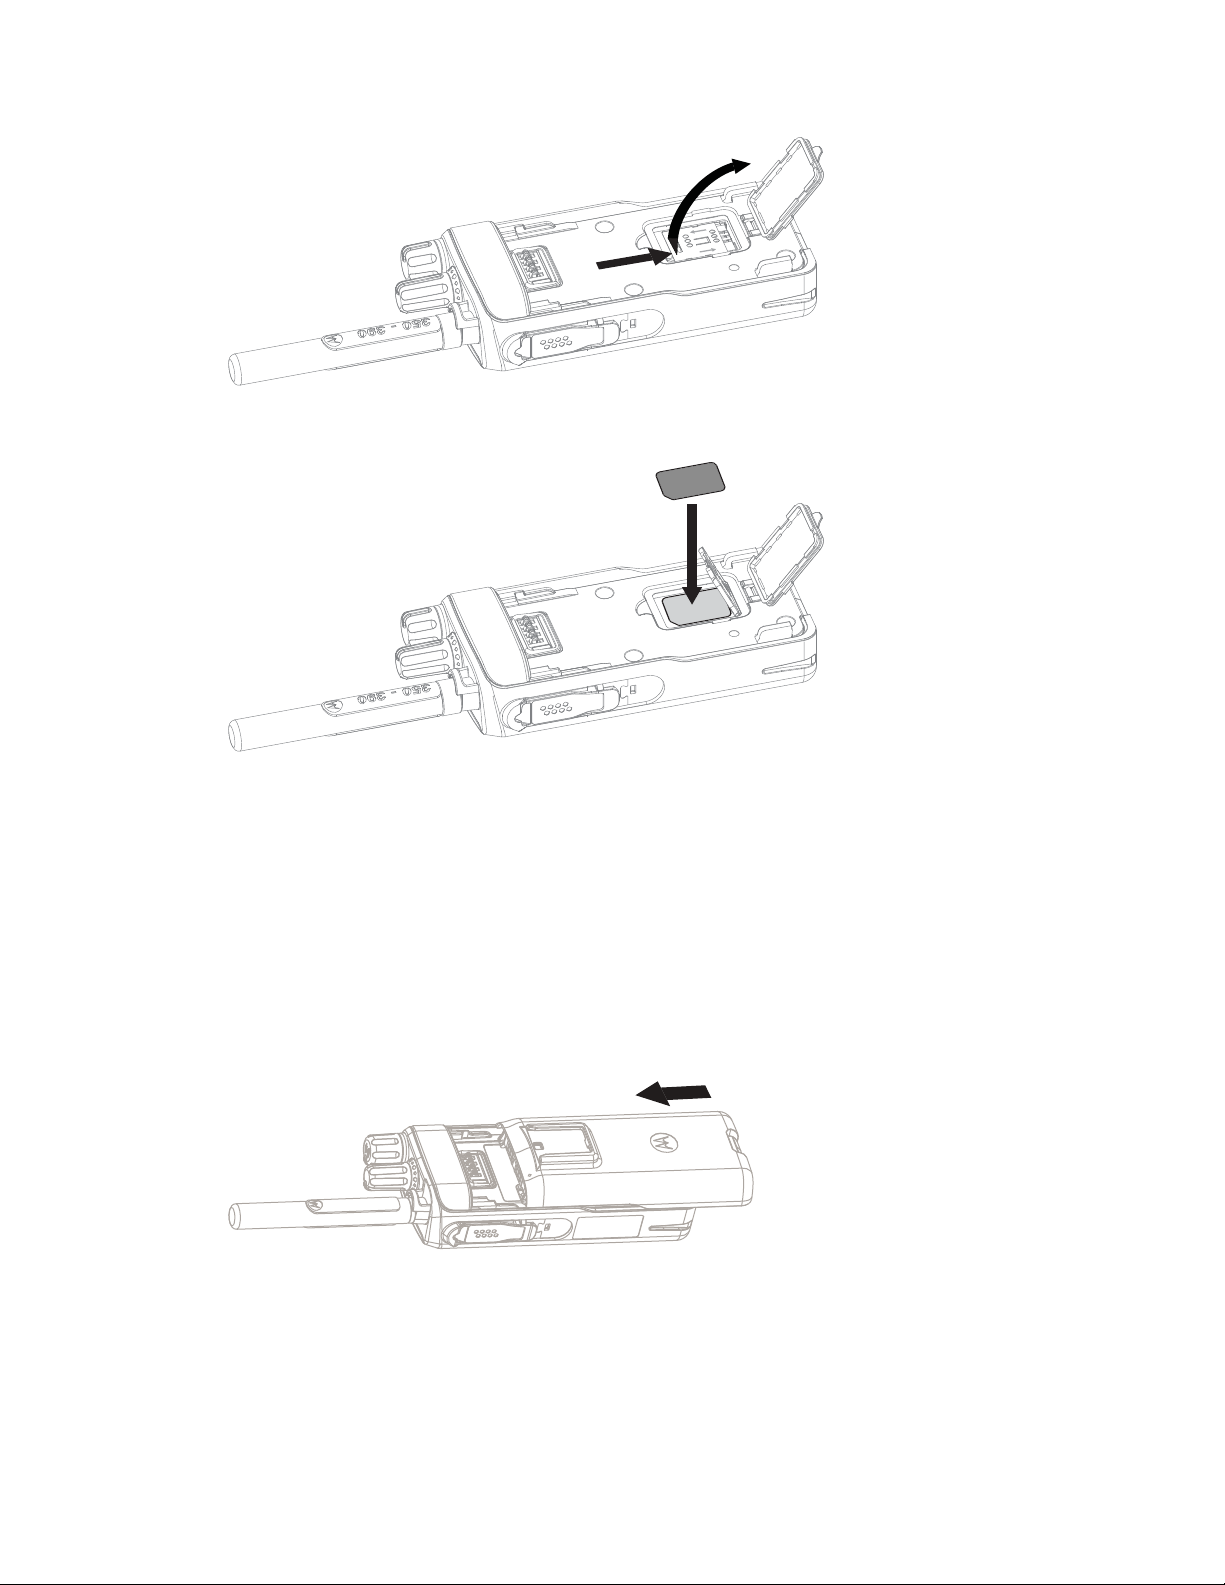
2.2.2
Inserting the SIM Card
Prerequisites: Turn off your radio before inserting the SIM card.
Procedure:
1 Remove the battery.
2 Open a plastic SIM card cover.
3 Slide a SIM card latch towards the bottom of the radio and lift the latch.
18
68015000797-EE (en-US)
Chapter 2: Getting Started
4 Place the SIM card in a socket with the contact area facing down. Pay attention to the correct
position of the notched corner.
5 Close the SIM card latch and slide it towards the top of the radio.
6 Close the plastic SIM card cover.
7 Replace the battery.
2.2.3
Installing the Battery
Procedure:
1 Insert the battery into the compartment.
2 Slide the battery towards the top of the radio until it clicks.
2.2.4
Removing the Battery
Prerequisites: Turn off the radio.
Procedure:
1 Push up and hold the latch at the bottom of the battery.
19

68015000797-EE (en-US)
Chapter 2: Getting Started
2 Slide the battery toward the bottom of the radio.
2.2.5
Charging the Battery
You can charge a battery separately or attached to a radio.
Charging a battery attached to a radio must be done with the radio turned off. The battery charges
faster when the radio is turned off.
IMPORTANT: Use only Motorola Solutions approved-chargers which provide optimal
performance. Using other chargers may fail to fully charge, or reduce the life of the battery.
Prerequisites:
Do not charge the battery in a hazardous area.
IMPORTANT: Do not connect a radio without a battery to the charger.
Procedure:
1 Connect the charger to an appropriate power source, according to the specification of the
charger.
2 Perform one of the following actions:
• Desktop chargers – insert the battery or the radio with the battery attached into the
appropriate socket of the charger. Ensure that the battery/radio made good connection with
the charger and that the LED on the charger is indicating that charging is in progress.
• Travel chargers and car chargers – connect the charger to the radio with the battery
attached. Ensure that the charger is firmly connected to the radio and that the radio display is
indicating that charging is in progress.
NOTICE: If a multi-unit charger LED indicates an error (blinking red light) when radio is
inserted and being charged with the multi-unit charger (MUC), re-insert the radio. If the
light is still red after several reconnections to MUC, the battery may be damaged or
reached its end of life.
Postrequisites: The battery may heat up during charging. After charging, make sure that the battery
and the radio are within the operating temperature range before using the radio.
2.2.6
Battery Charging Indications
When the radio is charging, it displays the Charger Mode screen. The screen displays an appropriate
Battery Charge Progress icon and charging progress expressed in percentage.
NOTICE:
To easily identify the charging status, check the Battery Charging LED Indicator. See LED
Indications on page 135.
20
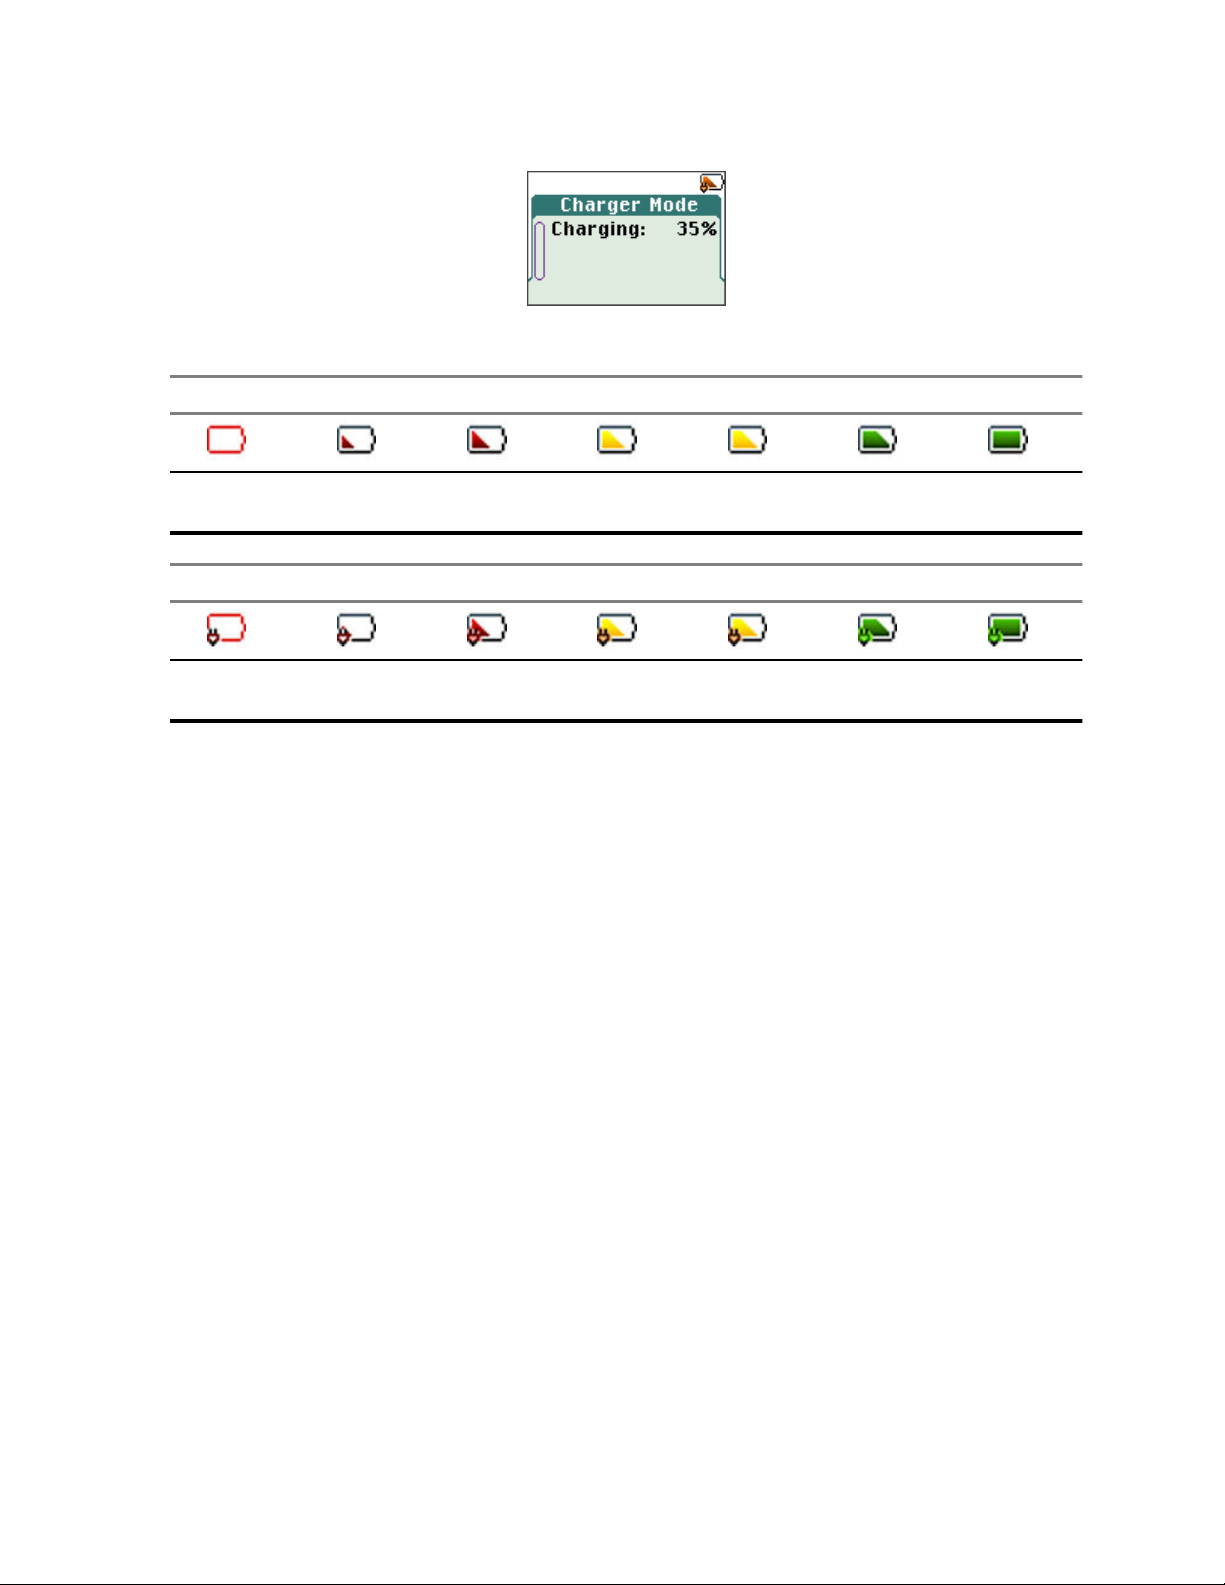
Figure 1: Charger Mode Screen
Table 3: Battery Icons
68015000797-EE (en-US)
Chapter 2: Getting Started
Battery Capacity
0%–5% 5%–15% 15%–25% 25%–40% 40%–60% 60%–80%
Battery Charge Progress
0%–5% 5%–15% 15%–25% 25%–40% 40%–60% 60%–80%
2.2.7
80%–
100%
80%–
100%
Low Battery Indication
The radio indicates low battery level by playing an audible alert when the battery charge falls to a
preset level. The low battery alert can be programmed to be 5, 10, or 20 % of remaining capacity by
your service provider. The default setting is 5 %. The service provider also configures how frequently
the alert repeats.
2.3
Controls and Indicators
21
5
7
8
6
5
4
1
13
15
7
16
17
14
12
3
2
9
19
20
11
10
18
68015000797-EE (en-US)
Chapter 2: Getting Started
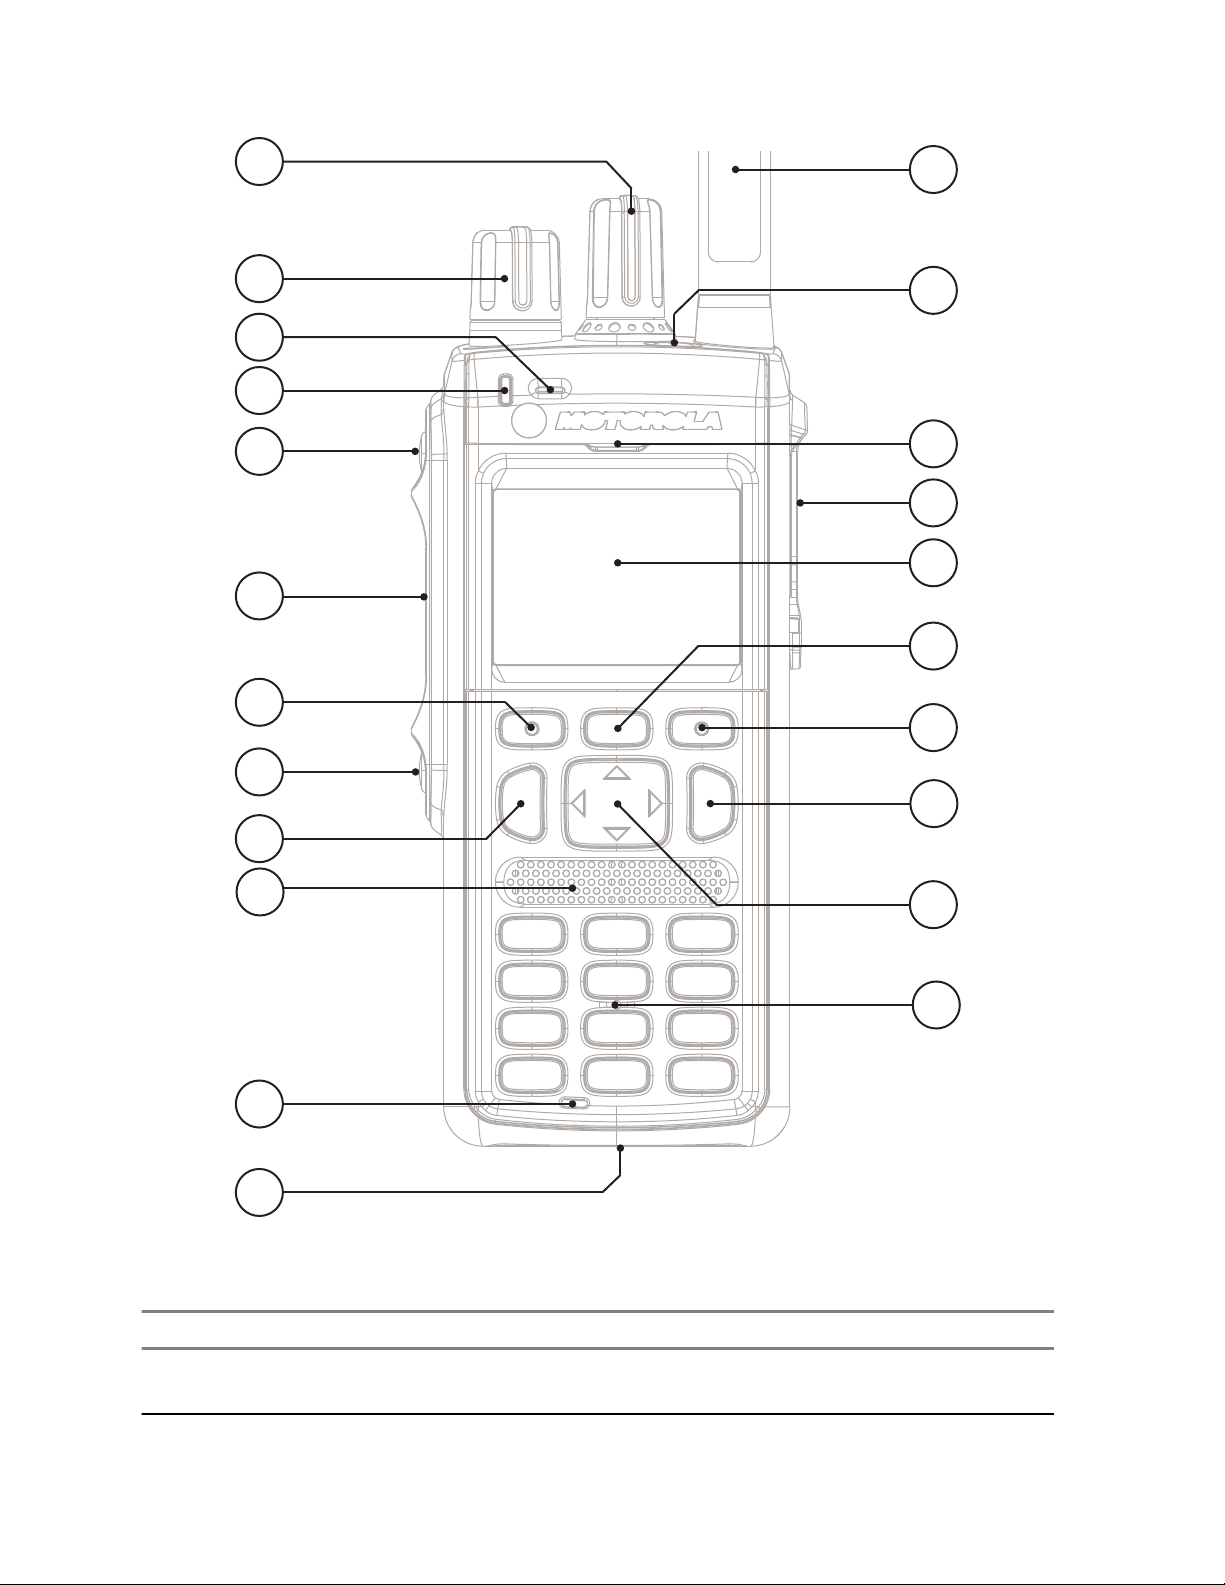
Table 4: Controls and Indicators
Annotation Description
1 Talkgroup Knob
Rotate to select a different talkgroup.
2 Volume Knob
22

Annotation Description
Rotate to set the volume.
3 Top Microphone
Activated during Simplex, high audio calls such as Group Calls.
4 LED
5 Programmable Side button
Programmable button, by default, the upper Programmable Side button is set
to the Flip Display feature and the lower Programmable Side button is set to
the Hi/Low Audio feature.
NOTICE: The required time to press and hold Programmable Side
button to activate a One-Touch Button feature is set as default to 0.1
second.
6 Push-To-Talk (PTT)
• Press and hold to talk in simplex calls or to initiate a group call, release it to
listen.
• Press to send status and text messages.
68015000797-EE (en-US)
Chapter 2: Getting Started
7 Soft key
Press Left or Right Soft key, to select the option that appears on the screen
directly above them.
8 Send key
Press to initiate or answer duplex calls, or send messages.
9 Speaker
10 Bottom Microphone
Activated during Duplex, low audio calls such as Private Calls.
11 Charger Connector
Provides connection for programming and data transfer.
12 Antenna
13 Emergency button
Press and hold Emergency button to enter Emergency operation. When your
radio is off, press and hold to power on in Emergency Mode.
14 Earpiece
Activated during Duplex calls.
15 Accessory Connector
Provides connection for accessories.
16 Display
Provides alphanumeric text and images within 65,536 colors and 132x90 pixels
with scalable fonts and contrast.
NOTICE: The Display can be in color and grayscale mode.
17 Menu key
• From the home screen, press to enter the main menu.
23

1
2
3
4
68015000797-EE (en-US)
Chapter 2: Getting Started
Annotation Description
• Used to enter the context-sensitive menu.
18 On/Off/End/Home key
• Press and hold to turn on/off your radio.
• Press to end calls.
• Press to return to the home screen.
NOTICE: If a message or notification is displayed on the radio
and the Screen Saver activates, pressing On/Off/End/Home only
deactivates the Screen Saver.
19 Navigation key
Press Up, Down, Left or Right Navigation key for list scrolling, while moving
around the menu hierarchy, or for alphanumeric text editing.
From the home screen, press to activate one of the following:
• Down Navigation key – enters Recent Calls menu item.
• Up Navigation key – changes My Groups talkgroup folder.
• Left and Right Navigation key – toggles through the talkgroups.
20 Keypad
Use the Keypad to enter alphanumeric characters for dialing, contact entries,
and text messages.
Your radio supports the One-Touch Button feature that allows you to activate
commonly used features by pressing and holding assigned key (0-9, * and #).
NOTICE: The required time to press and hold assigned key to activate a One-Touch Button feature is set as default to 1 second.
NOTICE: A detailed list of compatible accessories is included in Accessory Leaflet, part
number: 68015000843. To obtain the document, contact your service provider.
2.4
Display
This section presents the default home screen elements of the radio.
Figure 2: Default Home Screen with Icons
Table 5: Display
Annotation Description
1 Status icon area
24

Annotation Description
2 Text display area
3 Soft key area
4 Menu/Context sensitive icon
The color of the Soft key area changes according to the mode the radio is in.
Table 6: Colors of the Soft Key Area
Color Mode or State
Light blue Normal TMO and DMO Modes
Light red Emergency Mode or Disaster Alert Call
Olive Local Site Trunking Mode
Yellow Call Out – Standby
Red Call Out – Alert
Green Call Out – Accepted
68015000797-EE (en-US)
Chapter 2: Getting Started
Blue Radio Messaging Service (RMS)
Gray Radio User Assignment (RUA) – Limited service
2.4.1
Configurable Idle Screen
Your service provider can configure the information that is displayed on the idle screen below the
status icon area. The displayed information depends on the radio configuration and services
supported.
• Audio Profile Name
• BSI Registration Status
• Home Mode
• Individual Short Subscriber Identity (ISSI)
• International Talkgroup Link Alias
• Network (No Service, or Mobile Country Code (MCC)/Mobile Network Code (MNC), or Networks
Alias)
• Operational-Tactical Address (OPTA)
• Radio Status
• Range
• RMS/FMS
• RMS messages
• Scan List Alias
• Secondary Talkgroup Alias
• Talkgroup Alias
• Time and Date
Order and visibility of these items are also subject of the Configurable Idle Screen settings.
25
68015000797-EE (en-US)
Chapter 2: Getting Started
2.5
Status Icons
Status icons appear when your radio is engaged in certain activities or when you have activated certain
features.
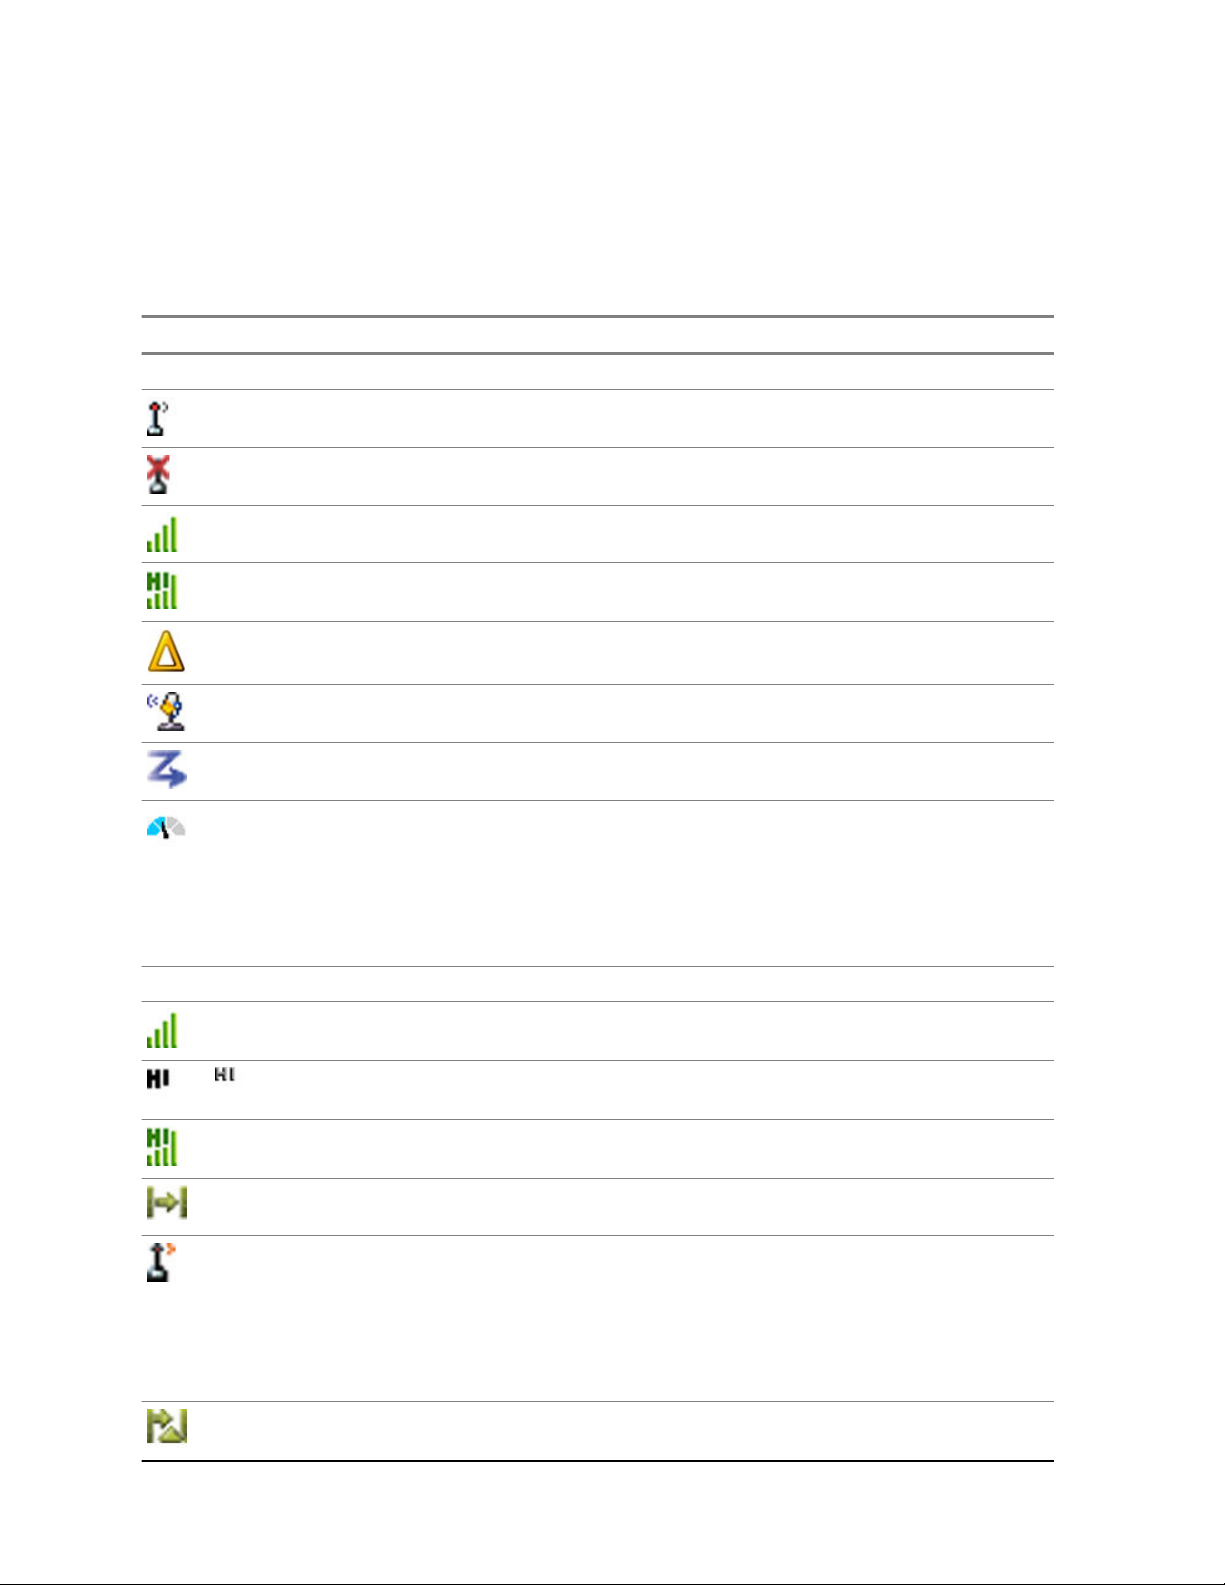
Table 7: Status Icons
Icon Description
Trunked Mode Operation (TMO)
In Service
No Service
Signal Strength – The more bars, the stronger the signal.
RF Power – Indicates that High RF Power is enabled. Shows the signal strength.
The more bars, the stronger the signal.
Migration – Indicates that the radio is registered to a foreign network.
Broadcast Call – Indicates that the radio is in a Broadcast Call.
Scan – Indicates that talkgroup scanning is activated in the radio.
Packet Data or Multi-Slot Packet Data (MSPD) – The more blue sections on the
icon, the faster the data transfer. Possible status:
• Four gray sections: context activated – data idle
• One blue: Packet Data active
• Two blue: Multi-Slot Packet Data active
Direct Mode Operation (DMO)
Direct Mode Call – Indicates that the radio is receiving a Direct Mode call. The more
bars, the stronger the signal.
High RF Power: idle or transmitting – Indicates High RF Power option is enabled
or
and the radio is either in idle mode or is transmitting a call.
High RF Power: receiving – Indicates High RF Power option is enabled and the radio is receiving a call.
Direct Mode – Indicates that radio is in Direct Mode (radio-to-radio communication).
DMO Gateway Communication Mode – Indicates that gateway is selected. The icon
has the following status:
• Solid – when the radio is synchronized with the gateway.
• Blinking – when the radio is not synchronized or during attachment.
• No icon – during radio-to-radio and repeater communication.
26
DMO Repeater Communication Mode – Indicates that the Repeater or GW + Rep
option in DMO Mode is selected. The icon has the following status:
Icon Description
• Solid – when the radio has detected the repeater (for example, when the radio
receives a presence signal).
• Blinking – when the radio has not detected the repeater or during attachment.
• No icon – during a radio-to-radio and gateway communication.
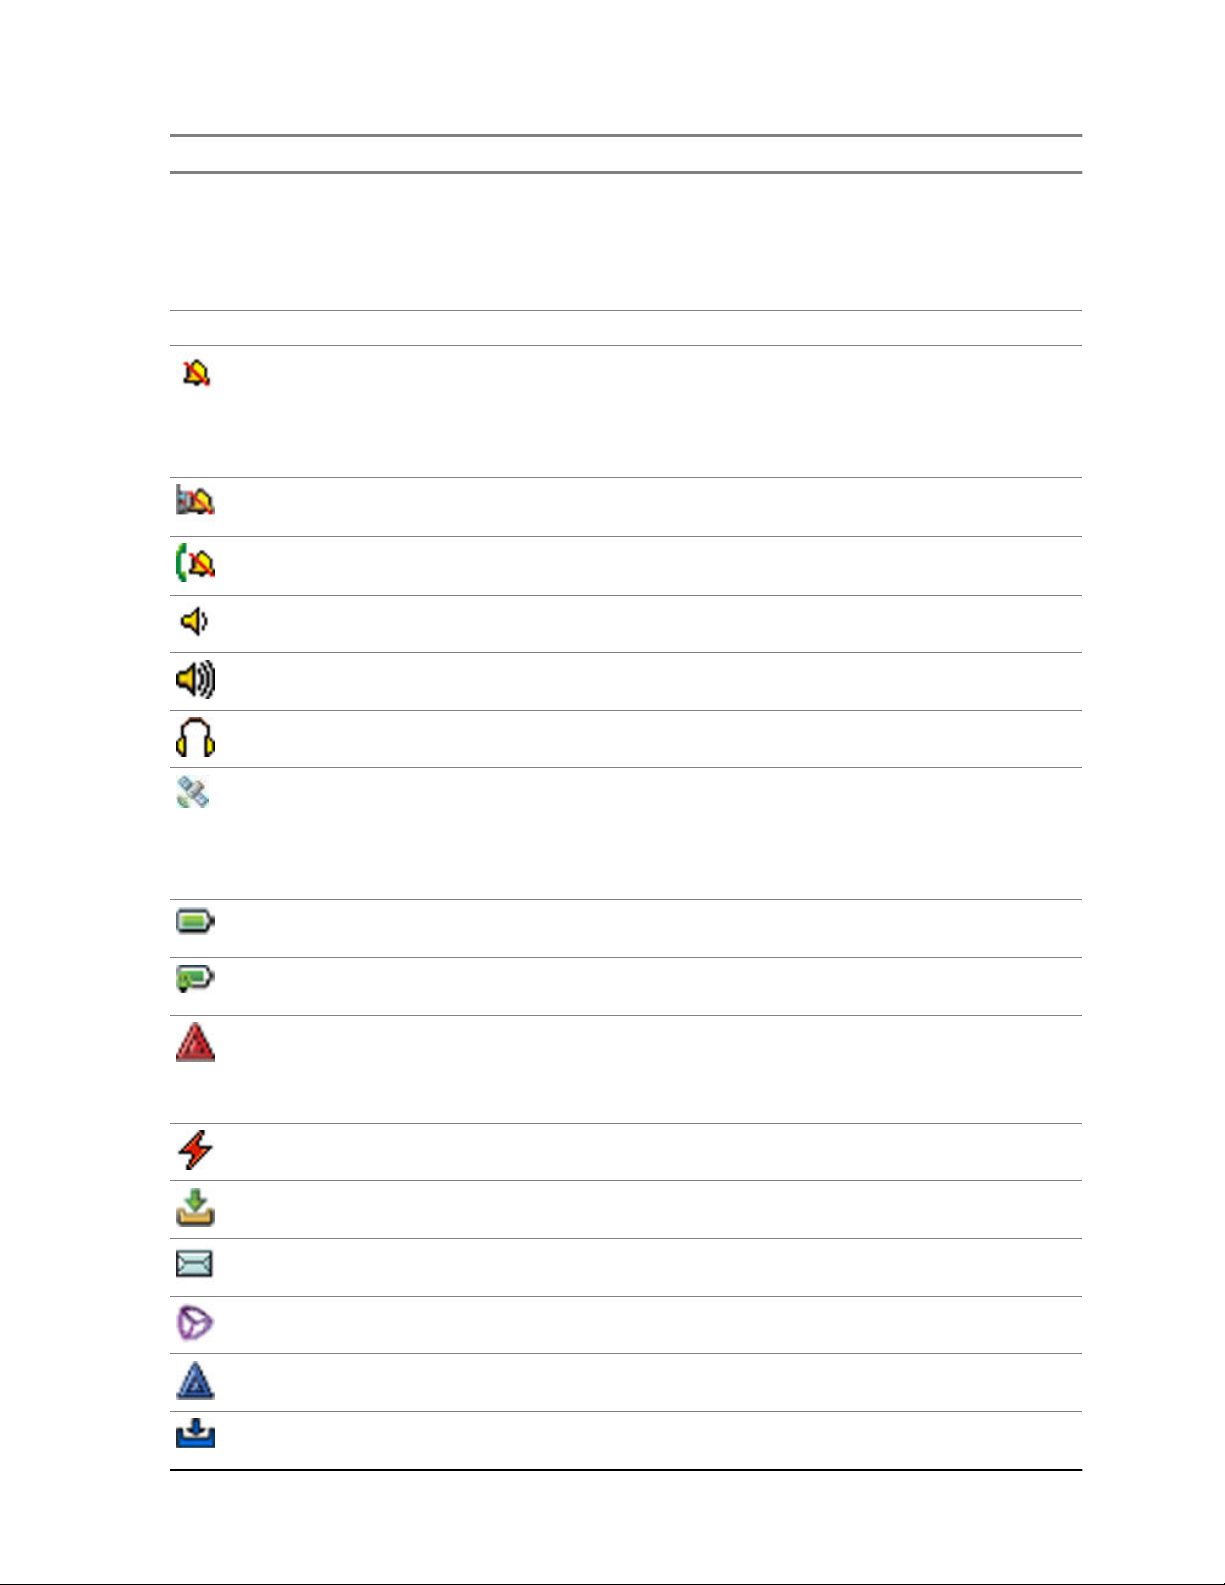
General Icons
All Tones Off – Indicates that:
• Volume is set to 0 (when Volume Adj. Mode is set to Common).
• Both simplex and duplex ring volume is set to 0 (when Volume Adj. Mode is set
to Individual).
Simplex Ring Muted – Indicates that simplex ring volume is set to 0 and duplex ring
volume is set to more than 0.
Duplex Ring Muted – Indicates that duplex ring volume is set to 0 and simplex ring
volume is set to more than 0.
Low Audio – Indicates that the audio mode is changed to low.
68015000797-EE (en-US)
Chapter 2: Getting Started
High Audio – Indicates that the audio mode is changed to high.
Earpiece Connected – Indicates that the earpiece is connected.
GNSS
• Solid – the radio has a location fix.
• Blinking – the radio is acquiring a location fix. This feature is an optional setting
and may not be enabled on your radio.
Battery Strength – Shows the charge of your battery.
Battery Charging – Indicates that the battery is charging.
Emergency – Indicates that the radio is in Emergency Operation.
• Solid – Emergency Operations initiated.
• Blinking – the radio is in emergency receiving state.
Disaster Alert Call – Indicates that the radio is in Disaster Alert Call.
New Message Has Arrived – Indicates that a new message has arrived.
New Message in Inbox – Indicates that you have unread messages in your Inbox.
Unread (New) WAP Message – Indicates that new page was loaded to the browser.
Call-Out – Indicates Call-Out alert.
Call-Out Alert Arrived – Indicates a receipt of a new Call-Out message.
27

68015000797-EE (en-US)
Chapter 2: Getting Started
Icon Description
Call-Out Alert Unread – Indicates unread alert in the CO Box.
End-to-End Encryption (E2EE)
Solid, when the E2EE is enabled:
• for the selected talkgroup,
• for the highlighted private number,
• for the manually entered private number,
• when transmitting voice in Group Calls,
• when transmitting voice in Simplex Private Calls.
Blinking, when the E2EE is enabled:
• when receiving voice in Group Calls,
• when receiving voice in Simplex Private Calls,
• during encrypted Duplex Private Calls.
Encryption Off
Blinking – Indicates that the SIM Card E2EE is disabled in DMO and TMO Modes.
or
SIM End-to-End Encryption (E2EE) in TMO
Indicates that the SIM Card E2EE is enabled in TMO Mode.
SIM End-to-End Encryption (E2EE) in DMO
Indicates that the SIM Card E2EE is enabled in DMO Mode. Numbers 1 and 2 point
to the type of DMO Encryption keys that has been selected.
SDS End-to-End Encryption (E2EE)
Indicates the E2EE status of an SDS message, or the E2EE status of a message
recipient address.
In High Security mode, when your radio processes only the encrypted information,
this icon is always visible in when you are in the messages menu, for example, In-
box.
Unread (New) WAP Message – Indicates that you have not entered WAP Box since
last WAP message was received.
Blinks when the priority is high.
WAP Message Icon – Displayed next to the priority WAP message in the message
list view.
WAP Message Time – Displayed next to the create date in the message list view.
WAP Message Expiration – Displayed next to the expiry date in the message list
view.
28
WAP Message Title Icon – Displayed next to the title along with the text in the message list view.
Keys Locked – Indicates that keys are locked.

Icon Description
Remote Control – Indicates that the radio is being remotely controlled and some
commands are being executed in the background. For example, when the radio is
being controlled by special SDS messages or triggered to send a GNSS location report.
2.6
Powering On the Radio
Procedure:
Press and hold On button.
Your radio performs a self-check and registration routine.
After successful registration, your radio is in service.
NOTICE: Your radio powers on without visible and audible notification if Covert Mode is
activated.
2.7
PIN Code Authentication
68015000797-EE (en-US)
Chapter 2: Getting Started
If pre-set by your service provider, the radio has active PIN Code Authentication, which helps you
increase security and protect your radio against unauthorized use.
The PIN code is read from the SIM card or radio programming and cannot be changed or disabled. If
you are unable to unlock the radio, you cannot send or receive any call, nor adjust the volume level
with the Rotary Knob.
You are asked to enter the PIN code each time you turn on the radio.
2.7.1
Unlocking Your Radio
Your radio may be locked at power up. To unlock it after powering on, enter the code at the prompt.
Your radio enters the default home display.
NOTICE: The unlock code is originally set to 0000. Your service provider may change this
number before you receive your radio.
2.7.2
Unblocking Your Radio
If you have entered the incorrect PIN code for more than three times (by default), use the Personal
Unblocking Key (PUK) to unblock your radio.
Procedure:
1 Radio displays Unit Blocked Enter PUK.
2 Enter the eight–digit PUK number.
NOTICE: The PUK is an eight-digit master code provided by your service provider.
3 Enter the new PIN code twice.
29

68015000797-EE (en-US)
Chapter 2: Getting Started
2.8
Locking or Unlocking the Keys or Buttons
Procedure:
1 Press Menu key and * key.
NOTICE: The Emergency button is not locked. Entering Emergency Mode unlocks all
keys.
2.9
Holding Your Radio
Your radio has two microphones: a top microphone for simplex dispatcher/private calls and a bottom
microphone for duplex telephone-like calls.
The radio is also equipped with an internal speaker for high audio (located at the middle of the unit)
and an internal earpiece for low audio (located at the top of the unit). The audio can be routed either to
the speaker or the earpiece using the Audio Toggle menu (Menu → Setup → Audio → Audio
Toggle) or the assigned One-Touch Button.
NOTICE: For best performance speak directly into the top microphone.
Simplex Calls
When using high audio, hold your radio a vertical position with its top microphone 5–10 cm away from
your mouth. Speak into the top microphone. Listen through the internal speaker. Keep the antenna at
least 2.5 cm from your head and body.
Duplex Calls
When using low audio, hold your radio as you would a telephone. Speak into the bottom microphone.
Listen through the earpiece. Keep the antenna at least 2.5 cm from your head and body.
Lapel/Shoulder Use
For Group and Private Calls turn your head towards your shoulder/lapel, and speak directly into the top
microphone. Listen through the internal speaker.
Speakerphone Use
Place your radio 30–60 cm away from you. In a noisy environment, move the radio closer to you for
better transmission.
30
Loading...