


Motorola O2
Digital Cordless Telephone with Answering Machine
Ideal for outside use
For: O211, O212, O213 and O214
Warning: Charge the handset for 16 hours before use.

Welcome...
to your new Motorola O2 Digital Cordless Telephone with digital answering machine!
•Ultra long cordless 360° range, up to 1km.1
•Rugged design and sturdy composition makes your Motorola O2 phone ideal for outdoor use.
•Dust and water resistant. Submersible in up to 1 meter of water for up to 30 minutes. Perfect for very wet environments (IP67 rated).
•Belt clip or lanyard options for flexibility when carrying around.
•Wall mountable location free base and handset charger.
•Zoom font when dialling for improved legibility.
•Inductive charging.
•Register up to 11 handsets to a single base and register each handset with up to 4 different bases.
•Answering machine with up to 25 minutes digital recording time.
•All handsets are fully cordless for locating anywhere within range of.
•200 Name and number phonebook.
•Copy phonebook entries between handsets.
•Caller ID shows you who’s calling and see details of the last 50 callers in a Calls Lists.2
•Make internal calls, transfer external calls, hold a 3-way conversation between two internal callers and an external caller.
Need help?
If you have any problems setting up or using your O2, please contact Customer Services on:
Luxembourg: 8002-5704
The Netherlands: 0800-0226749 Belgium: 0800-79171
Alternatively, you may find the answer in the ‘Help’ section at the back of this guide.
1When using the long antenna and when there is a clear line of sight between the base and handset. Any obstruction between the base and handset will reduce the range significantly.
2You must subscribe to your network provider’s Caller ID service for this feature to work. A subscription fee may be payable.
Please note that this equipment is not designed for making emergency telephone calls when the power fails. Alternative arrangements should be made for access to emergency services.

This User Guide provides you with all the information you need to get the most from your phone.
Before you make your first call you will need to set up your phone. Follow the simple instructions in ‘Getting Started’, on the next few pages.
Important
Only use the telephone line cord supplied.
|
Got everything? |
|
|
• O2 handset with standard |
• 750mAh Ni-MH battery pack (pre |
||
|
antenna |
|
installed) |
• |
O2 base |
• |
Telephone line cord |
• |
O2 charger |
• |
Long range antenna |
• Power adaptor for the base |
• 1 x Belt clip (pre installed) |
||
• Power adaptor for the charger |
• Screws and plugs for wall mounting |
||
If you have purchased an O2 multiple pack you will also have the following additional items:
•O2 handset with standard antenna
•O2 charger
•Power adaptor for the charger
•750mAh Ni-MH battery pack (pre installed)
•Long range antenna
•1 x Belt clip (pre installed)
•Screws and plugs for wall mounting
For a better tomorrow
We make every effort through our design, research, engineering and supply chain management to make better products for everyone, focusing on both social and environmental responsibility.
•Meets and / or exceeds EMEA environmental regulatory requirements.
•Eco friendly packaging with a minimum 20% post consumer recycled content.
•Phone housing is built with a minimum of 15% post consumer recycled content plastic.
•Energy efficient charger that meets EU Code of Conduct requirements.
•ECO mode function which reduces the transmitted power and energy consumption, please refer to page 37.

1. |
Getting started.................................................................... |
7 |
||
2. Getting to know your phone.......................................... |
11 |
|||
3. |
Using the phone............................................................... |
16 |
||
|
3.1 |
Switch the handset on / off.......................................................................... |
16 |
|
|
3.2 |
To make a call..................................................................................................... |
16 |
|
|
3.3 |
To make a call by pre-dialling...................................................................... |
16 |
|
|
3.4 |
To make a call using fast call keys ............................................................ |
16 |
|
|
3.5 |
To make a hands-free call.............................................................................. |
16 |
|
|
3.6 |
Call from the phonebook............................................................................... |
16 |
|
|
3.7 |
Call from the Calls Lists.................................................................................. |
17 |
|
|
3.8 |
To answer a call................................................................................................. |
17 |
|
|
3.9 |
To answer a call in hands-free..................................................................... |
17 |
|
|
3.10 |
To adjust the volume....................................................................................... |
17 |
|
|
3.11 |
Secrecy |
................................................................................................................. |
17 |
|
3.12 |
To end a call........................................................................................................ |
18 |
|
|
3.13 |
Intercom............................................................................................................... |
18 |
|
|
|
3.13.1 Make an internal call........................................................................ |
18 |
|
|
|
3.13.2 Receive an internal call................................................................... |
18 |
|
|
|
3.13.3 |
Transfer a call..................................................................................... |
18 |
|
|
3.13.4 |
3-way conference call..................................................................... |
18 |
|
3.14 |
To lock the keypad .......................................................................................... |
19 |
|
4. Phonebook......................................................................... |
20 |
|
4.1 |
To dial phonebook entries........................................................................... |
20 |
4.2 |
To store an entry............................................................................................. |
20 |
4.3 |
Entering names................................................................................................ |
20 |
4.4 |
Character map................................................................................................... |
21 |
4.5 |
To enter a pause................................................................................................ |
21 |
4.6 |
To search an entry........................................................................................... |
22 |
4.7 |
To view details of an entry........................................................................... |
22 |
4.8 |
To edit an entry................................................................................................ |
22 |
4.9 |
To copy an entry to another handset...................................................... |
22 |
4.10 |
To assign a ringtone........................................................................................ |
23 |
4.11 |
To delete an entry............................................................................................ |
23 |
4.12 |
To store a fast call number........................................................................... |
23 |
4.13 |
To clear a fast call number........................................................................... |
24 |
4.14 |
To access the phonebook during a call.................................................. |
24 |
4.15 |
To copy the phonebook to another handset........................................ |
24 |
4

|
4.16 |
To check memory status............................................................................... |
24 |
|
4.17 |
To delete all entries......................................................................................... |
24 |
5. |
Calls Lists............................................................................. |
25 |
|
|
5.1 |
New calls alert................................................................................................... |
25 |
|
5.2 |
To view details of the call............................................................................. |
25 |
|
5.3 |
To save a number from the Calls Lists to the phonebook............... |
26 |
|
5.4 |
To delete a Calls Lists entry......................................................................... |
26 |
|
5.5 |
To delete entire Calls Lists........................................................................... |
26 |
|
5.6 |
To redial the last number.............................................................................. |
27 |
|
5.7 |
To view and dial a number in the redial list............................................... |
27 |
|
5.8 |
To copy a redial number to the phonebook............................................. |
27 |
|
5.9 |
To delete a redial list entry........................................................................... |
27 |
6. |
Agenda................................................................................. |
28 |
|
|
6.1 |
To add a new event......................................................................................... |
28 |
|
6.2 |
To switch off reminder ring.......................................................................... |
28 |
|
6.3 |
To show event details..................................................................................... |
28 |
|
6.4 |
To edit an event................................................................................................ |
29 |
|
6.5 |
To delete an event........................................................................................... |
29 |
|
6.6 |
To delete all events......................................................................................... |
29 |
7. |
Clock & Alarm................................................................... |
30 |
|
|
7.1 |
To set date and time manually.................................................................. |
30 |
|
7.2 |
To set alarm....................................................................................................... |
30 |
|
7.3 |
To set time format.......................................................................................... |
30 |
8. |
Handset settings................................................................ |
31 |
|
|
8.1 |
To set the handset ringtone......................................................................... |
31 |
|
8.2 |
To set the handset ringer volume.............................................................. |
31 |
|
8.3 |
To set the receiver volume............................................................................ |
31 |
|
8.4 |
To change the handset name...................................................................... |
32 |
|
8.5 |
To change the display language................................................................ |
32 |
|
8.6 |
To change the wallpaper.............................................................................. |
32 |
|
8.7 |
To set the screensaver................................................................................... |
33 |
|
8.8 |
To set light timeout......................................................................................... |
33 |
|
8.9 |
To switch auto talk on / off.......................................................................... |
33 |
|
8.10 |
To switch key beep on / off......................................................................... |
33 |
|
8.11 |
To set PBX Access Code.............................................................................. |
34 |
5

9. Base settings...................................................................... |
35 |
|
9.1 |
To set the base ringtone............................................................................... |
35 |
9.2 |
To set the base ringer volume.................................................................... |
35 |
9.3 |
To change the dialling mode....................................................................... |
35 |
9.4 |
To set ring priority........................................................................................... |
35 |
9.5 |
To change the recall mode........................................................................... |
36 |
9.6 |
To change the System PIN........................................................................... |
36 |
9.7 |
To reset the phone.......................................................................................... |
37 |
9.8 |
To switch ECO on / off.................................................................................. |
37 |
9.9 |
To switch ECO PLUS on / off...................................................................... |
37 |
9.10 |
Default settings................................................................................................ |
38 |
10. Registration....................................................................... |
39 |
|
10.1 |
To register a handset...................................................................................... |
39 |
10.2 |
To select a base................................................................................................ |
39 |
10.3 |
To de-register a handset.............................................................................. |
40 |
11. |
Answering machine......................................................... |
41 |
|
|
11.1 |
Switch between answering machine on / off ....................................... |
41 |
|
11.2 |
To change answer delay ................................................................................. |
41 |
|
11.3 |
To switch message alert tone on / off ...................................................... |
41 |
|
11.4 |
New messages alert ........................................................................................ |
42 |
|
11.5 |
Outgoing messages ........................................................................................ |
42 |
|
11.6 |
To record a personalised OGM ................................................................... |
42 |
|
11.7 |
Voice prompts or outgoing message language .................................. |
42 |
|
11.8 |
To play or delete your personalised OGM ............................................ |
43 |
|
11.9 |
To set the answer mode OGM ................................................................... |
43 |
|
11.10 |
To record a memo .......................................................................................... |
43 |
|
11.11 |
Call screening ................................................................................................... |
44 |
|
11.12 |
Message playback .......................................................................................... |
44 |
|
11.13 |
Delete all old messages ................................................................................ |
44 |
|
11.14 |
Remote access ................................................................................................. |
45 |
|
11.15 |
To switch remote access on / off ............................................................. |
46 |
|
11.16 |
To change the remote access PIN ............................................................ |
46 |
12. |
Help |
........................................................................................ |
47 |
13. |
General ........................................................information |
49 |
|
14. |
Wall ...................................................................mounting |
55 |
|
6
1.Getting started
Location
Important
Although the O2 handset is water resistant we do not recommend you locate your main base or charger in the bathroom or other humid areas.
You need to place your O2 base within 2 metres of the mains power and telephone wall sockets so that the cables will reach. The socket-outlet should be installed near the equipment and should be easily accessible.
Make sure that it is at least 1 metre away from other electrical appliances to avoid interference. Your O2 works by sending radio signals between the
handset and base. The strength of the signal depends on where you place the base. Placing it as high as possible ensures the best signal.
Handset range
The unit has two antennas that can be used with the handset:
Standard range antenna: |
Outdoor range 600 metres1 |
|
Indoor range 50 metres1 |
Long range antenna: |
Outdoor range 1km1 |
|
Indoor range 50 metres1 |
1When there is a clear line of sight between the base and handset. Any obstruction between the base and handset will reduce the range significantly.
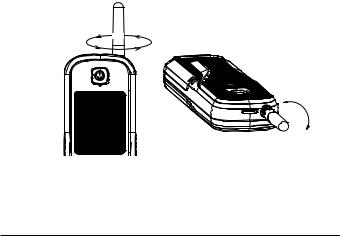
To change antennas simply unscrew (anti -clockwise) the standard range antenna on the handset and replace with the long range antenna.
Unscrew the antenna anti-clockwise
when the screen is facing you.
Unscrew
Tighten
Signal strength
The  icon on your handset indicates that you are within range of the base. When out of range of the base, the
  icon flashes. If you are on a call, you will hear a warning beep.
The line will hang up if the handset moves out of range of the base. Move closer to the base. The handset will automatically reconnect to the base.
Getting started |
7 |
Setting up
Important
The base station must be plugged into the mains power at all times. Do not connect the telephone line cord into the wall socket until the handset is fully charged. Use only the power adaptor and telephone line cord supplied with the product.
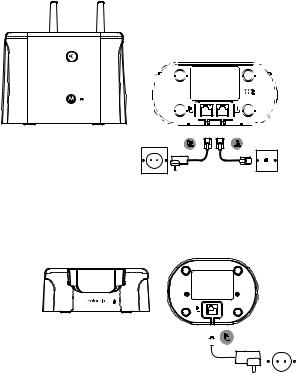
Connecting the base
1.Plug the telephone line cord into the socket marked l on the underside of the base.
2.Plug the power adaptor into the socket marked P on the underside of the base and plug the other end into the mains power wall socket. The green Power/In use light comes on and you will hear a confirmation tone.
Installing and charging the handset
|
|
|
|
|
|
|
|
|
|
|
|
|
|
|
|
|
|
|
|
|
|
|
|
|
|
|
|
|
|
|
|
|
|
|
|
8 |
|
|
|
|
Getting started |
|||
1.Plug the power adaptor into the socket marked P on the underside of the charger and plug the other end into the mains power wall socket.
2.The 750mAh Ni-MH battery pack is pre installed. If you are charging the batteries for the first time, place the handset on the charger to charge for at least 16 hours continuously.
3.When the handset is fully charged,  icon will appear steady on the display. The display will show the time and handset number (e.g. 2) to indicate that it is registered to the base. Plug the other end of the
telephone line cord (make sure that one end is already plugged into the base) into the telephone wall socket.
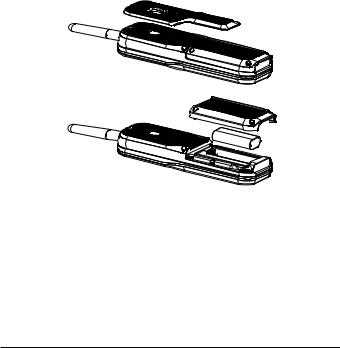
Replacing the handset battery
1.Unscrew the belt clip, then unscrew the 4 screws on the battery cover (the screws will stay attached to the battery compartment door) from the back of the handset and plug in the 750 mAh Ni-MH rechargeable battery pack supplied.
2.Replace the battery cover and screw the cover into place. Finally, screw the belt clip on.
Important
Warning! Use only the approved rechargeable Ni-MH battery pack (750mAh Ni-MH rechargeable battery pack) supplied with your O2.
Battery low
If  icon is displayed and you hear a warning beep every 30 seconds during a call, you will need to recharge the handset before you can use it again. When
charging,  icon will scroll on the display.
Getting started |
9 |

Battery performance
In ideal conditions, fully charged batteries should give up to 12 hours talk time or up to 250 hours standby time on a single charge1.
Note that new batteries do not reach their full capacity until they have been put to normal use for several days.
To keep your batteries in the best condition, leave the handset off the base for a few hours at a time.
Running the batteries right down at least once a week will help them last as long as possible.
The charge capacity of rechargeable batteries will reduce with time as they wear out, giving the handset less talk/standby time. Eventually they will need to be replaced (see page 9).
After charging your handset for the first time, subsequent charging time is about 6–8 hours a day. Batteries and handset may become warm during charging. This is normal.
1All talk and standby times are approximate and depend on features selected and usage pattern.
Welcome screen
1.The Welcome screen will briefly appear, then a list of countries is displayed.
2.Scroll U or D to your country (operator) and press Select.
The handset and base will reset to load the correct settings. The standby screen is then displayed and your phone is ready to use.
You can still make and receive calls without first selecting your country and network operator, however the Welcome screen will re-appear until you have configured your phone country settings.
Date and time
1.Press Menu, scroll D to Clock & Alarm and press Select.
2.Date & Time is highlighted. Press Select.
3.Enter the date using the format DD/MM/YY e.g. 04/08/16 for 4 August 2016.
4.Enter the time (HH:MM) and press Save.
If the current time format setting is 12 hour, select am or pm.
5.Press n to return to standby mode.
Your phone is now ready for use.
10 |
Getting started |
2.Getting to know your phone
Overview of your handset
|
|
I |
A |
|
|
B |
|
|
C |
|
Q |
D |
J |
|
E |
K |
|
F |
L |
|
|
M |
|
G |
N |
|
H |
O |
|
|
P |
|
AEarpiece
BDisplay
See page 13 for an overview of the display icons.
CScroll up / Volume up
Scroll up through lists and settings.
During a call, press to increase the earpiece and hands-free volume. When the phone is ringing, press to increase the handset ringer volume.
DMenu / OK / Secrecy
Enter the main menu.
Select the option displayed on screen.
Confirm menu option – OK is displayed on screen. Turn secrecy on/off during a call.
ERedial list / Pause
In standby mode, press to open the redial list.
Press and hold to enter a pause (P) during pre-dialling.
Getting to know your phone |
11 |

FTalk / Hands-free
Make or answer a call.
Activate and deactivate hands-free during a call.
G* / Ringer off
Dial a *.
Press and hold to switch handset ringer on or off.
HIntercom
Press to make an internal call.
IAntenna
Can be unscrewed and either a standard or long range antenna can be used. The standard length antenna is shown in the diagram.
JPhonebook menu / Clear / Back
In standby mode, press to open the phonebook menu. Clear incorrect input during text editing.
Return to previous menu.
KCalls Lists
Open the Calls Lists.
LEnd / Exit / Switch handset on/off
End a call.
When in a menu, go back to standby mode.
Press and hold to switch handset off (when in standby) or on.
MPhonebook / Scroll Down / Volume down
Open the phonebook.
Scroll down through lists and menus.
During a call, press to decrease the earpiece and hands-free volume. When the phone is ringing, press to decrease the handset ringer volume.
NChange case / Keypad lock / #
Press to change the case when entering letters / editing. Press and hold to lock the keypad.
Dial a #.
ORecall
Use recall (R) functions.
PMicrophone
QBelt clip
12 |
Getting to know your phone |
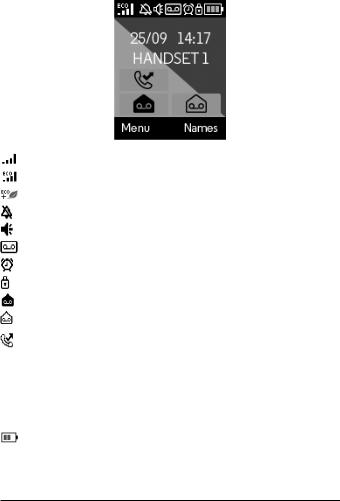
Handset display
DECT signal strength
Displays when ECO mode is on.
Displays when ECO PLUS is on
Handset ringer volume is Off.
Displays when in hands-free mode.
Displays when the answering machine is on.
The alarm clock has been set.
The keypad is locked.
Displays when you have new answering machine messages.
Displays when you have new voicemails.1
Displays when you have missed calls and new number(s) in the Calls list.2
1This feature is dependent on your Network Service provider supporting the service. A subscription fee may be payable.
2For this feature to work, you must subscribe to Caller ID Service from your network operator. A subscription fee may be payable.
The approximate power levels of your battery are indicated as follows:  Battery is fully charged
Battery is partially charged
 Battery is running low
  Battery is empty
Getting to know your phone |
13 |

Overview of the base / Charger |
|
|
|
A |
|
|
B |
|
|
C |
|
|
Base |
Charger |
A |
Paging/Find handset |
|
This function allows you to page for the handset user or locate a missing handset.
Paging calls cannot be answered by a handset.
1.Press pon the base. All handsets registered to the base will ring and display Paging Call.
2.To stop the ringing, press pon the base again or press Stop or any button on the handset.
BPower / In-use LED
Lights up when the base is plugged into the power and flashes when the handset is in-use.
CCharging LED
Indicates the handset is on the base / charger correctly and is charging.
Navigating the menus
The basic steps of navigating through the menu and on-screen options.
1.In standby mode, press the left soft key Menu. The main menu is opened.
2.Use the U or D keys to scroll through the menu.
3.Soft key options Select and Back are displayed.
4.Press the left softkey Select to open a submenu or validate an option.
5.Press the right softkey Back to go back to the previous menu level, correct a character or cancel an action.
6.Press n to return to standby mode.
Note
If you do not press any button on the handset for 30 seconds the display will automatically return to standby. It will also return to standby when the handset is placed on the charger.
14 |
Getting to know your phone |

Menu map
Answer Machine |
Clock & Alarm |
|
Play |
Date & Time |
|
Play All |
Alarm |
|
Answer On/Off |
Time Format |
|
Record Memo |
Settings |
|
Outgoing Msg. |
Set Handset |
|
Del. Messages |
Ringtone |
|
Answer Settings |
Ringer Volume |
|
Language |
Receiver Vol. |
|
Answer Mode |
Handset Name |
|
Answer Delay |
Language |
|
Message Alert |
Wallpaper |
|
Remote Access |
Screensaver |
|
Calls Lists |
Light Timeout |
|
Missed Calls |
Auto Talk |
|
Received Calls |
Key Beep |
|
Dialled Calls |
PBX Access Code |
|
Delete Calls |
Set Base |
|
Agenda |
Ringtone |
|
If there is an event, |
Ringer Volume |
|
select Options. |
Dialling Mode |
|
Add Event |
||
Ring Priority |
||
Show Details |
||
Recall Mode |
||
Edit Event |
||
System PIN |
||
Delete Event |
||
Master Reset |
||
Del. All Events |
||
ECO Mode |
||
If the list is empty: |
||
|
||
Add Event |
|
Registration
Register HS
Select Base
De-register
Names
From menu in standby:
Search Add Entry
Copy Phonebk
Memory Status
Del. Phonebook
Press D in standby and phonebook list is displayed, select
Options:
Show Details Edit Entry Copy Entry Ringtone Delete Entry Fast Call
Press Names during a call
Phonebook list is displayed, select
Options:
Add Entry Show Details Edit Entry Delete Entry
Getting to know your phone |
15 |

3.Using the phone
3.1Switch the handset on / off
1.Press and hold n to turn the handset on / off.
3.2To make a call
1.Press t.
2.Dial the telephone number.
3.3To make a call by pre-dialling
1.Enter the phone number (maximum 32 digits). If you make a mistake, press
Clear.
2.Press t to dial the phone number entered.
Note
If the dialled number matches an entry in the phonebook, the name is displayed.
3.4To make a call using fast call keys
1.Press and hold the relevant keypad number to dial the pre-stored number directly.
Note
To store a fast call number, see page 23.
3.5To make a hands-free call
1.Press t twice.
2.Dial the telephone number.
Note
During a hands-free call, press U or D to adjust the volume.
3.6Call from the phonebook
1.Press D. The first entry in the phonebook is highlighted.
2.Scroll U or D to the entry you want. Or
To search alphabetically, press the6key with the first letter of the name, e.g.
if the name begins with N, press twice. The display shows the first entry beginning with N. If required, scroll U or D to the exact entry.
3. Press t to dial the number.
16 |
Using the phone |

3.7Call from the Calls Lists
Note
You need to subscribe to your network’s Call Display service to be able to see the caller’s number in the Calls Lists.
1.Press Menu, the display shows Calls Lists and press Select.
2.Scroll U or D to highlight the calls list (Missed Calls, Received Calls, Dialled Calls, Delete Calls) you want.
3.Press Select..
4.Scroll U or D to the entry you want.
5.Press t to dial the number.
3.8To answer a call
When you receive an external call, the phone rings and External Call shows on the display.
1.Press t to answer the call.
Note
If when the handset is on the charger you would like to simply lift the handset to answer the call you will need to switch Auto Talk on, see page 33.
3.9To answer a call in hands-free
If the handset is off the charger or auto answer is switched off, press t twice to answer the call.
If the handset is on the charger and auto answer is switched on, lift the handset and press t.
Important
When the phone is ringing, avoid holding the earpiece too close to your ear as it may damage your hearing. Hands-free activation can suddenly increase the volume in the earpiece to a very high level. Make sure the handset is not too close to your ear.
Note
To switch back to earpiece mode, press t again during the call.
3.10 To adjust the volume
1. During a call, press U or D to adjust the earpiece or loudspeaker volume. The level is shown in the handset display.
3.11 Secrecy
Mute the microphone so that you can talk to someone else in the room without your caller hearing you.
1.During a call, press Secrec. or OK. The display shows Secrecy On and your caller cannot hear you.
2.Press Off to return to your caller.
Using the phone |
17 |

3.12To end a call
1.Press n or replace the handset on the cradle.
Note
After you hang up, the duration of your call is displayed for 5 seconds.
3.13Intercom
3.13.1Make an internal call
If you have more than one handset registered to the base, you can make internal calls between two handsets.
Internal CallIand Handset X displays to indicate an internal call.
1. Press followed by the number (1-11) of the handset you want to call.
Press and hold 0 to dial handset 10. Press and hold 1 to dial handset 11.
2. Press OK.
3.13.2Receive an internal call
When you receive an internal call, Internal Call and Handset X is displayed.
1.Press t to answer the call.
3.13.3Transfer a call
You can transfer an external call to another handset registered to the base.
During anIexternal call:
1. Press followed by the 0handset number (1-11) that you want to1transfer the call to. Press and hold to dial handset 10. Press and hold to dial handset 11.
2.Press OK.
3.When the other handset answers, press n to complete the transfer.
Notes
If there is no answer from the other handset and you wish to return to your external caller, press End.
Your external call resumes automatically after 100 seconds if there is no answer.
3.13.43-way conference call
You can hold a 3-way conference call between 2 internal callers and 1 external caller.
During a callIwith an external caller:
1. Press followed by the handset number (1-11) that you want to establish a conference call0. 1
Press and hold to dial handset 10. Press and hold to dial handset 11.
18 |
Using the phone |
 Loading...