


 Loading...
Operating instructions
Coffee maker
To avoid the risk of accidents or damage to the appliance, it is essential to read these instructions before it is installed and used for the first time.
en – AU, NZ |
M.-Nr. 10 648 830 |
Packaging material / Disposal of old machine
Packaging material
The packaging material used protects the machine during transportation. Please retain the original box and polystyrene pieces so that you can pack the machine securely, should you need to transport it in the future.
Disposing of your old
appliance
Electrical and electronic appliances often contain valuable materials. They also contain specific materials, compounds and components, which were essential for their correct function and safety. These could be hazardous to human health and to the environment if disposed of with your domestic waste or if handled incorrectly. Please do not, therefore, dispose of your old appliance with your household waste.
Please dispose of it at your local community waste collection / recycling centre for electrical and electronic appliances. You are also responsible for deleting any personal data that may be stored on the appliance prior to disposal. Please ensure that your old appliance poses no risk to children while being stored prior to disposal.
2

|
Contents |
Packaging material / Disposal of old machine .................................................. |
2 |
Warning and Safety instructions.......................................................................... |
6 |
Guide to the appliance ....................................................................................... |
16 |
Controls and display ........................................................................................... |
17 |
Accessories ......................................................................................................... |
18 |
Using for the first time ........................................................................................ |
19 |
Before using for the first time ................................................................................ |
19 |
Switching on for the first time ............................................................................... |
19 |
Water hardness ..................................................................................................... |
20 |
Operating principles............................................................................................ |
22 |
Filling the water container.................................................................................. |
23 |
Filling the coffee bean container ....................................................................... |
24 |
Switching the coffee machine on and off ......................................................... |
25 |
Cup heating.......................................................................................................... |
26 |
Adjusting the central spout to the correct cup height..................................... |
27 |
Making drinks ...................................................................................................... |
28 |
Making a coffee drink............................................................................................ |
28 |
Cancelling preparation .......................................................................................... |
29 |
Dispensing a double portion ................................................................................. |
29 |
Preparing several cups of coffee - Coffee pot ...................................................... |
29 |
Making coffee drinks from ground coffee ............................................................. |
30 |
Dispensing hot water (CM6350) ............................................................................ |
31 |
Preparing User profile drinks................................................................................. |
32 |
Making coffee with milk...................................................................................... |
33 |
Milk flask ............................................................................................................... |
33 |
Using bottled milk or cartons ................................................................................ |
34 |
Preparing drinks with milk ..................................................................................... |
34 |
Grinder setting..................................................................................................... |
35 |
Amount of coffee, brew temperature and pre-brewing................................... |
36 |
Amount of coffee................................................................................................... |
36 |
Brewing temperature ............................................................................................. |
36 |
Pre-brewing ground coffee.................................................................................... |
37 |
3

Contents |
|
Portion size .......................................................................................................... |
38 |
User profiles......................................................................................................... |
40 |
Calling up User profiles ......................................................................................... |
40 |
Creating a User profile........................................................................................... |
40 |
Selecting a User profile ......................................................................................... |
41 |
Changing a User profile name............................................................................... |
41 |
Deleting a profile ................................................................................................... |
41 |
Changing a User profile......................................................................................... |
41 |
Settings ................................................................................................................ |
42 |
Calling up the "Settings" menu ............................................................................. |
42 |
Changing and saving settings ............................................................................... |
42 |
Overview of available settings............................................................................... |
43 |
Language............................................................................................................... |
45 |
Time of day............................................................................................................ |
45 |
Timer ..................................................................................................................... |
45 |
Eco mode .............................................................................................................. |
46 |
Lighting.................................................................................................................. |
46 |
Info (display information) ....................................................................................... |
47 |
Locking the coffee machine (System lock ) ....................................................... |
47 |
Water hardness ..................................................................................................... |
47 |
Display brightness................................................................................................. |
47 |
Volume................................................................................................................... |
47 |
Cup heating........................................................................................................... |
47 |
Factory default....................................................................................................... |
48 |
Showroom programme (Demo mode)................................................................... |
48 |
Cleaning and care ............................................................................................... |
49 |
Quick guide ........................................................................................................... |
49 |
Cleaning by hand or in the dishwasher ................................................................. |
50 |
Drip tray and waste container ............................................................................... |
52 |
Drip tray cover ....................................................................................................... |
53 |
Water container ..................................................................................................... |
53 |
Stainless steel water intake valve filter.................................................................. |
54 |
Central spout with cappuccinatore ....................................................................... |
54 |
Stainless steel milk flask ....................................................................................... |
56 |
Milk pipework ........................................................................................................ |
56 |
Bean container and ground coffee chute.............................................................. |
57 |
Housing ................................................................................................................. |
57 |
Maintenance programmes..................................................................................... |
58 |
Opening the "Maintenance" menu ................................................................... |
58 |
Rinsing the appliance............................................................................................ |
58 |
Rinsing the milk pipework ..................................................................................... |
59 |
4

|
Contents |
Cleaning the milk pipework using the maintenance programme |
.......................... 59 |
Degreasing the brew unit and cleaning the interior............................................... |
60 |
Descaling the machine ....................................................................................... |
64 |
Problem solving guide ........................................................................................ |
66 |
Messages in the display........................................................................................ |
66 |
Unusual performance of the coffee machine ........................................................ |
69 |
Unsatisfactory results............................................................................................ |
76 |
Transporting the machine................................................................................... |
78 |
Evaporating the coffee machine............................................................................ |
78 |
Packing.................................................................................................................. |
78 |
After sales service and warranty ....................................................................... |
79 |
Saving energy ...................................................................................................... |
80 |
Electrical connection .......................................................................................... |
81 |
Installation............................................................................................................ |
82 |
Appliance dimensions......................................................................................... |
83 |
Technical data...................................................................................................... |
84 |
5

Warning and Safety instructions
This coffee machine conforms to current safety requirements. Improper use of the appliance can, however, present a risk of both personal injury and material damage.
To avoid the risk of accidents and damage to the appliance, please read these instructions carefully before installation and before using it for the first time. They contain important notes on the installation, safety, operation and care of the appliance.
Miele cannot be held liable for damage caused by non-compliance with these Warning and Safety instructions.
Keep the instructions in a safe place and pass them along to any future owner.
6

Warning and Safety instructions
Correct application
This appliance is designed for domestic use and for use in similar environments by guests in hotel or motel rooms, bed & breakfasts and other typical living quarters. This does not include common/ shared facilities or commercial facilities within hotels, motels or bed & breakfasts.
The coffee machine is not suitable for outdoor use.
The machine is intended only for the preparation of coffee based drinks such as espresso, cappuccino, latte macchiato etc. Any other usage is at the owner's risk.
This appliance is not intended for use by persons (including children) with reduced physical, sensory or mental capabilities, or lack of experience and knowledge, unless they have been given supervision or instruction concerning its use by a person responsible for their safety, and are able to recognise the dangers of misuse.
7

Warning and Safety instructions
Safety with children
Caution! Danger of burning and scalding on the dispensing spouts.
Children's skin is far more sensitive to high temperatures than that of adults.
Ensure children do not touch hot surfaces of the coffee machine or place parts of their body under the dispensing spouts.
Install the coffee machine out of reach of children.
Young children must be kept away from the machine and the mains connection cable and plug/socket.
Older children may only use the coffee machine unsupervised if they have been shown how to use it safely and recognise and understand the consequences of incorrect operation.
Children should be supervised when they are near the coffee machine. Do not allow them to play with it or to use the controls.
Cleaning may only be carried out by older children under the supervision of an adult.
Remember that coffee and espresso are not suitable drinks for children.
Risk of suffocation!
Children may be able to wrap themselves in packing material or pull it over their head with the risk of suffocation. Keep children away from any packing material.
8

Warning and Safety instructions
Technical safety
A damaged coffee machine is dangerous. Check it for any visible damage before setting it up. Never attempt to use a damaged coffee machine.
Before connecting the appliance to the mains supply, make sure that the rating on the data plate corresponds to the voltage and frequency of the household supply. This data must correspond in order to avoid the risk of damage to the appliance. Consult a qualified electrician if in any doubt.
The electrical safety of this appliance can only be guaranteed when continuity is complete between it and an effective earthing system. It is most important that this basic safety requirement is present and tested regularly and, where there is any doubt, the household wiring system should be inspected by a qualified electrician.
Reliable and safe operation of the coffee machine can only be guaranteed if it is connected to the mains electrical supply.
Do not connect the machine to the mains electricity supply by a multi-socket adapter or an extension lead. These do not guarantee the safety of the appliance (e.g. danger of overheating).
This appliance must not be installed and operated in mobile installations (e.g. on a ship).
Unplug the machine from the power supply immediately if you notice any damage or smell scorching, for example.
Ensure that the mains connection cable cannot be pinched or damaged by any sharp edges.
The mains connection cable should not hang down. Someone could trip over it with the risk of injury and the machine could be damaged.
9

Warning and Safety instructions
Only use the coffee machine in rooms where the ambient temperature is between +10 °C and +38 °C.
Danger of overheating! Ensure that there is sufficient ventilation around the coffee machine. Do not cover it with tea towels etc. whilst it is in use.
If the coffee machine is installed behind a kitchen furniture door, it may only be used with the furniture door open. This will prevent the formation of heat and humidity and subsequent damage to the appliance and/or furniture unit. Do not close the furniture door while the coffee machine is in use. Ensure the coffee machine has cooled down completely before closing the furniture door.
Protect the coffee machine from water and water spray. Do not immerse the machine in water.
Repairs and other work by unqualified persons to the machine and the connection cable could be dangerous. The manufacturer cannot be held liable for unauthorised work. Repairs may only be carried out by a Miele authorised service technician.
The manufacturer's warranty will be invalidated if the appliance is not repaired by a Miele approved service technician.
Faulty components must only be replaced by genuine Miele original spare parts. The manufacturer can only guarantee the safety of the appliance when Miele replacement parts are used.
10
Warning and Safety instructions
Before any repair work is carried out, the appliance must be completely disconnected from the electricity supply. The appliance is only completely isolated from the electricity supply when:
–it is switched off at the wall socket and the plug is withdrawn from the socket. Do not pull the mains connection cable but the mains plug to disconnect your appliance from the mains electricity supply.
–the mains circuit breaker is switched off.
Never open the outer casing of the machine. Tampering with electrical connections or components and mechanical parts is highly dangerous to the user and can cause operational faults or electric shock.
Use only Miele original spare parts. If spare parts or accessories from other manufacturers are used, the warranty will be invalidated, and Miele cannot accept liability.
11

Warning and Safety instructions
Correct use
The dispensing spouts present a danger of burning or scalding.
The liquids and steam dispensed are very hot.
Please note:
–Keep well away from the area underneath the spouts when hot liquids and steam are being dispensed.
–Heating surfaces have residual heat after use. Do not touch hot components.
–Hot liquid or steam could spatter from the nozzles. Ensure that the central spout is clean and fitted correctly.
–Water in the drip tray can also be very hot. Take care when emptying it.
CM6350: Risk of injury to the eyes!
Never look directly at the lighting or use optical instruments
(magnifying glass or similar) to look at it.
Please note the following regarding water:
–Fill the water container only with fresh, cold tap water. Hot or warm water or other liquids could damage the coffee machine.
–Change the water every day to prevent a build-up of bacteria.
–Do not use mineral water. Mineral water will cause serious limescale deposits to build up in your machine and damage it.
–Do not use water from reverse osmosis units. The machine could be damaged.
Only fill the bean container with roasted espresso or coffee beans. Do not fill the bean container with coffee beans which have been treated, e.g flavoured or caramelised, or with ground coffee.
Do not fill the bean container with any type of liquid.
12

Warning and Safety instructions
Do not use green (unroasted) coffee beans or mixtures of coffee beans which contain green coffee beans. Green coffee beans are very hard and still contain a certain amount of residual moisture. These can damage the coffee machine grinder as soon as grinding begins.
Do not use coffee beans which have been treated with caramel, sugar or other substances. Sugar will damage the coffee machine.
Do not use any caramelised ready ground coffee. The sugar in the coffee will stick to and block the brew unit of the coffee machine. The cleaning tablets for degreasing the brew unit will not remove this type of deposit.
Only use milk without additives. Additives in milk usually contain sugar and this will stick to the milk pipework.
If using cow's milk, only use pasteurised milk to prevent a buildup of bacteria in the appliance.
Do not place any alcohol mixtures which are alight underneath the central spout. The flames could ignite plastic components and cause them to melt.
Do not use naked flames, e.g. a candle, on or near the coffee machine. The coffee machine could catch fire with the risk of the fire spreading.
The machine must not be used for cleaning objects.
13

Warning and Safety instructions
Cleaning and care
Disconnect the coffee machine from the power supply before cleaning.
Clean the coffee machine and the milk flask (supplied as standard, depending on model) daily, particularly before using for the first time (see "Cleaning and care").
All parts of the milk system need to be cleaned thoroughly and regularly. Milk contains bacteria which proliferate rapidly with inadequate cleaning.
Do not clean the machine with a steam cleaner or immerse it in water as this will damage the machine. Steam or water could reach the electrical components and cause a short circuit.
Avoid spillage on appliance connectors.
Descale the coffee machine regularly depending on the water hardness level in your area. Descale the machine more frequently in areas with very hard water. Miele cannot be held liable for damage arising from insufficient descaling, the use of incorrect descaling agents or the use of a descaling agent which is not of the appropriate concentration.
Degrease the brew unit regularly with Miele cleaning tablets. Depending on the natural oil content of the coffee used, the brew unit can become blocked quite quickly.
Used coffee grounds should be disposed of with the organic rubbish or on the compost heap. Do not empty them down the sink, as they could block it.
14

Warning and Safety instructions
The following applies to appliances with stainless steel
surfaces:
Do not adhere stickers, adhesive tape or any other adhesive materials to stainless steel surfaces. The coating on the stainless steel surfaces will become damaged and lose its protective properties against soiling.
Stainless steel scratches very easily and even magnets can cause damage to the surface.
15

Guide to the appliance
a Hot water spout*
b Controls and display
c Cup heating*
d Water container
e Ground coffee chute
f Coffee bean container
g Grinder setting
(behind the service panel)
h Brew unit (behind the service panel)
*CM 6350
i Central spout with cappuccinatore
j Park position for milk pipework (behind the service panel)
k Drip tray with lid and waste container
l Milk tube aperture
m Lower panel with drip tray cover
n Stainless steel milk flask*
16

Controls and display
a On/Off sensor
For switching the coffee machine on and off
b Drink sensors
Espresso
Coffee
Cappuccino or
Latte macchiato
cDisplay
Shows information on current activity or status
d"Back"
For returning to the previous menu, cancelling unwanted actions
eArrow sensors
For showing more selection options in the display and highlighting a selection
fOK
For confirming display messages and saving settings
gOptical interface
(for service technician use only)
*CM6350
hLED
Flashes when the machine is switched on and the display is black
iSettings
For displaying and changing settings
jParameters
For displaying and changing drink settings
kUser profiles
For creating and managing profiles
lDouble portion
For dispensing two portions of a drink
mFurther programmes
More drinks such as ristretto, long coffee, caffè latte, hot milk, milk froth and hot water*
Maintenance programmes
17

Accessories
These products and other useful accessories can be ordered via the Miele webshop or directly from Miele (see back cover for contact details).
Accessories supplied
–Measuring spoon
For ground coffee
–Stainless steel milk flask MB-CM
For keeping milk cool for longer (capacity 0.5 l)
The stainless steel milk flask is not supplied with the CM6150.
–Starter set "Miele appliance care"
Various cleaning and care products, such as Miele descaling tablets, are supplied as standard. These vary depending on model.
–Cleaning brush
For cleaning the milk pipework
Optional accessories
Miele also offers a range of optional accessories, as well as cleaning and conditioning products for your coffee machine.
–Original Miele all purpose microfibre cloth
For removing finger marks and light soiling
–Cleaning agent for milk pipework
For cleaning the milk system
–Cleaning tablets
For degreasing the brew unit
–Descaling tablets
For descaling the water pipework
–Stainless steel milk flask MB-CM
For keeping milk cool for longer (capacity 0.5 l)
18
Using for the first time
Before using for the first time
Remove any protective foil and stickers from the machine. Exception: Please do not remove any labels (e.g. the data plate) which are visible when you pull out the lower panel.
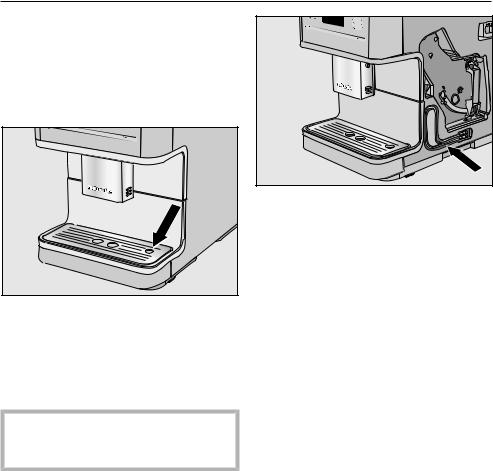
Remove the protective foil from the drip tray and place the drip tray into the lower panel.
Place the coffee machine on a flat surface that is not sensitive to water (see "Installation").
Clean the appliance thoroughly before filling it with water and coffee beans (see "Cleaning and care").
Insert the plug of the coffee machine into the socket (see "Electrical connection").
Remove the water container and fill it with fresh, cold tap water. Only fill the container up to the "max." marker.
Push the water container back into the appliance (see "Filling the water container").
Take the lid off the coffee bean container, fill it with roasted coffee beans and replace the lid (see "Filling the coffee bean container").
Useful tip: The milk tube can be stored
behind the appliance door when not in
use.
Switching on for the first time
When you switch the machine on for the first time, you will be asked to set the following settings after the Welcome message:
–Language and country
–Time of day
Touch the On/Off sensor .
"Miele - Willkommen" appears briefly in the display.
Selecting a language
Use the arrow sensors to highlight the required language. Then touch OK.
Use the arrow sensors to highlight the required country. Then touch OK.
The setting is now saved.
Setting the time of day
Touch the arrow sensors until the time of day appears.
Then touch OK.
19

Using for the first time
The setting is now saved.
The coffee machine is now set up for use. It will heat up and rinse the pipework. Water from the rinse process will come out of the central spout.
Rinse the milk pipework (see "Rinsing the milk pipework") before making drinks with milk for the first time.
Please note that the full aroma of the coffee and typical crema will not develop fully until several coffees have been made.
Switch the machine off with the On/ Off sensor. Do not unplug the power plug to switch off the coffee machine. If you unplug the coffee machine while using it for the first time, you will have to set it up for use again.
For the first coffee drinks, a larger quantity of coffee beans is ground and powder from the coffee grounds may adhere to the cover of the drip tray.
Water hardness
The water hardness level indicates how much calcium is dissolved in the water. The higher the calcium content, the harder the water, and the harder the water, the more often the coffee machine will need to be descaled.
The coffee machine measures the amount of water and steam used. Depending on the level of water hardness set, more or fewer drinks can be dispensed before the appliance needs to be descaled.
Programme the coffee machine to the water hardness level of your area so that it functions correctly and does not get damaged. At the correct time a prompt will then appear in the display to descale the appliance.
Contact your local water supplier to find out your local water hardness range if necessary.
20
Using for the first time
The machine is programmed at the factory to hardness level 3.
The machine has four programmable levels:
°dH |
mmol/l |
ppm |
Setting* |
|
|
|
(mg/l CaCO3) |
|
|
0 – 8.4 |
0 – 1.5 |
0 – 150 |
Soft 1 |
|
8.4 – 14 |
1.5 – 2.5 |
150 |
– 250 |
Medium 2 |
14 – 21 |
2.5 – 3.7 |
250 |
– 375 |
Hard 3 |
> 21 |
> 3.7 |
> 375 |
Very hard |
|
|
|
|
|
4 |
|
|
|
|
|
* The hardness level shown in the display may differ from the hardness level in your area. You must follow the values in the chart to set your machine to your local hardness level.
Setting the water hardness level
Touch .
Use the arrow sensors to select
Water hardness and touch OK.
Use the arrow sensors to highlight the required water hardness. Then touch OK.
The setting is now saved.
21
Operating principles
To operate the coffee machine, touch the sensors with your finger.
CM6350: An audible signal is generated each time a sensor is touched. You can adjust the volume of the signal tones or switch the tones off (see "Settings – Volume").
When the following appears in the display, you are in the drinks menu:
Miele
Select drink
To prepare a coffee drink, touch one of the drink sensors.
You can find more drinks in the Further
programmes menu.
Selecting a menu and
navigating within a menu
To select a menu, touch the relevant sensor. You will then be able to start an action or change settings in the menu.
Settings
Language
Time
Timer
A bar on the right-hand side indicates that further options or text are available. Use the arrow sensors to show these.
The setting which is currently selected will have a tick beside it.
If you want to select an option, touch the arrow sensors until the option you want is highlighted.
Touch the OK sensor to confirm your selection.
Leaving the menu or cancelling
an action
To exit the current menu, touch "Back"
.
22

Filling the water container
Change the water every day to prevent a build-up of bacteria.
Only use cold, fresh tap water to fill the water container.
Hot or warm water or other liquids can damage the coffee machine.
Do not use mineral water. Mineral water will cause serious limescale deposits to build up in your machine and damage it.
Press the lid on the right-hand side.
Pull the water container up by the lid to remove it.
Fill the water container with fresh, cold tap water up to the "max." marker.
Push the water container back into the appliance.
If the water container is a little high or at a slant, check whether the surface that the water container sits on is dirty. If the water container is not sitting correctly, the drain valve will not be sealed. Clean the surface if necessary.
23
Filling the coffee bean container
Fill the coffee bean container with roasted coffee or espresso beans if you want to use freshly ground coffee beans for each cup of espresso or coffee.
Alternatively, you can make coffee or espresso with ready ground coffee (see "Making coffee or espresso using ready ground coffee").
Important! Risk of damage to the grinder.
Only put roasted coffee or espresso beans in the container. Anything else, including ground coffee, will damage the grinder.
Do not fill the bean container with any type of liquid.
Important! Sugar damages the coffee machine.
Do not use coffee beans that have been treated with sugar, caramel, or other substances and do not put liquids containing sugar in the coffee bean container.
Do not use green (unroasted) coffee beans or mixtures of coffee beans which contain green coffee beans. Green coffee beans are very hard and still contain a certain amount of residual moisture. These can damage the coffee machine grinder as soon as grinding begins.
Useful tip: You can use a nut or seed grinder to grind green coffee beans. These types of grinder generally have a rotating stainless steel blade. You can then add the ground green coffee portion by portion to the ground coffee chute and make the desired coffee drink (see "Making drinks with ready ground coffee").
Take the lid off the coffee bean container.
Fill the container with roasted coffee beans.
Refit the lid.
Useful tip: Only add enough beans to last for a few days.
Contact with air causes coffee beans to lose their aroma.
24

Switching the coffee machine on and off
Switching on
Touch the On/Off sensor .
The appliance will begin rinsing after the heating-up phase. Hot water will run out of the central spout.
When Select drink appears in the display, you can prepare drinks.
If the coffee machine is already at operating temperature, rinsing will not take place.
If you do not touch any sensors or run any maintenance programmes, the display will switch itself off after approx. 7 minutes to save energy.
The right-hand LED will flash on and off as long as the machine is switched on.
Touch any one of the sensors to wake the machine up again to make a drink.
Switching off
Touch the On/Off sensor .
After a coffee has been dispensed, the pipework will be rinsed before the machine switches off.
If a drink has been made using milk, the
message Place milk pipe in drip tray will
appear in the display.
Insert the end of the milk pipe into the aperture in the drip tray, then touch
OK.
If the milk system is not rinsed out before switching off, it will have to be rinsed the next time the machine is switched on.
Switching off for longer
periods of time
If the coffee machine is not going to be used for a longer period of time, e.g. if you are going on holiday:
Empty the drip tray, the waste container and the water container.
Clean all parts thoroughly, including the brew unit.
Switch the machine off and if necessary withdraw the plug to disconnect it from the power supply.
The time of day will not be saved. It will have to be reset next time the machine is switched on.
25
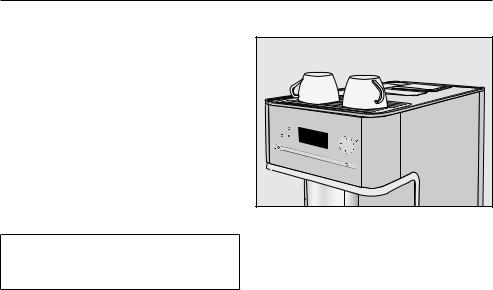
Cup heating
(CM6350) |
Pre-heating cups |
Cups should always be pre-heated to allow the flavour of the coffee to develop and be retained.
The smaller the volume of the coffee/ espresso and the thicker the cup, the more important it is to pre-heat the cup.
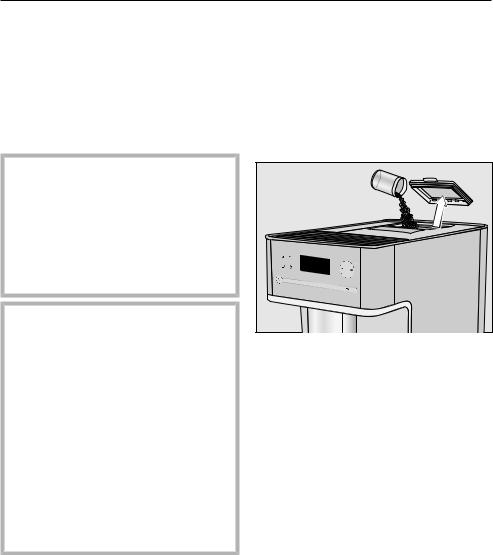
You can pre-heat cups or glasses on the cup heating surface on the top of the coffee machine.
The cup heating function must first be switched on.
The cup heating surface will be heated continually until the coffee machine is turned off.
Switching cup heating on or off
Touch .
Select Cup heating and touch OK.
Select the required option and touch
OK.
The setting is now saved.
Arrange the cups or glasses on the cup heating surface on the top of the coffee machine.
26

Adjusting the central spout to the correct cup height
You can adjust the central spout to suit the height of the cup you are using so that the coffee or espresso will not cool down as quickly and the crema will have a better consistency.
Pull the central spout down until it is at the same level as the rim of the cup.
Alternatively, push the central spout up until there is enough room to fit a larger cup or mug underneath.
27
Loading...