


Operating Instructions
Counter Top Coffee System
To prevent accidents and machine damage, read these instructions before installation or use.
en - US, CA |
M.-Nr. 09 924 540 |

Contents
IMPORTANT SAFETY INSTRUCTIONS. . . . . . . . . . . . . . . . . . . . . . . . . . . . . . . . . 5
Guide to the machine . . . . . . . . . . . . . . . . . . . . . . . . . . . . . . . . . . . . . . . . . . . . . 10
Controls and display . . . . . . . . . . . . . . . . . . . . . . . . . . . . . . . . . . . . . . . . . . . . . . 11
Accessories . . . . . . . . . . . . . . . . . . . . . . . . . . . . . . . . . . . . . . . . . . . . . . . . . . . . . 12
First use . . . . . . . . . . . . . . . . . . . . . . . . . . . . . . . . . . . . . . . . . . . . . . . . . . . . . . . . 13 Before using for the first time . . . . . . . . . . . . . . . . . . . . . . . . . . . . . . . . . . . . . . . . . 13 Turning on for the first time . . . . . . . . . . . . . . . . . . . . . . . . . . . . . . . . . . . . . . . . . . 13 Water hardness . . . . . . . . . . . . . . . . . . . . . . . . . . . . . . . . . . . . . . . . . . . . . . . . . . . 14
Operation . . . . . . . . . . . . . . . . . . . . . . . . . . . . . . . . . . . . . . . . . . . . . . . . . . . . . . . 15
Filling the water container . . . . . . . . . . . . . . . . . . . . . . . . . . . . . . . . . . . . . . . . . 16
Filling the coffee bean container . . . . . . . . . . . . . . . . . . . . . . . . . . . . . . . . . . . . 17
Turning the machine On / Off . . . . . . . . . . . . . . . . . . . . . . . . . . . . . . . . . . . . . . . 18
Cup heating . . . . . . . . . . . . . . . . . . . . . . . . . . . . . . . . . . . . . . . . . . . . . . . . . . . . . 19
Adjusting the coffee dispensers to the cup height. . . . . . . . . . . . . . . . . . . . . . 20
How to prepare beverages . . . . . . . . . . . . . . . . . . . . . . . . . . . . . . . . . . . . . . . . . 21 Coffee specialties . . . . . . . . . . . . . . . . . . . . . . . . . . . . . . . . . . . . . . . . . . . . . . . . . 21 Double portion . . . . . . . . . . . . . . . . . . . . . . . . . . . . . . . . . . . . . . . . . . . . . . . . . . . . 22 Canceling preparation . . . . . . . . . . . . . . . . . . . . . . . . . . . . . . . . . . . . . . . . . . . . . . 22 Making coffee with ground coffee . . . . . . . . . . . . . . . . . . . . . . . . . . . . . . . . . . . . . 23
Adding ground coffee. . . . . . . . . . . . . . . . . . . . . . . . . . . . . . . . . . . . . . . . . . . . 23 Making coffee with ready ground coffee . . . . . . . . . . . . . . . . . . . . . . . . . . . . . 24 Drinks with milk . . . . . . . . . . . . . . . . . . . . . . . . . . . . . . . . . . . . . . . . . . . . . . . . . . . 24 Preparing hot water . . . . . . . . . . . . . . . . . . . . . . . . . . . . . . . . . . . . . . . . . . . . . . . . 27 Preparing User profile drinks . . . . . . . . . . . . . . . . . . . . . . . . . . . . . . . . . . . . . . . . . 27
Coffee the way you like it . . . . . . . . . . . . . . . . . . . . . . . . . . . . . . . . . . . . . . . . . . 28 Grinder setting . . . . . . . . . . . . . . . . . . . . . . . . . . . . . . . . . . . . . . . . . . . . . . . . . . . . 28 Displaying and changing the parameters of a drink . . . . . . . . . . . . . . . . . . . . . . . 29 Amount of coffee . . . . . . . . . . . . . . . . . . . . . . . . . . . . . . . . . . . . . . . . . . . . . . . . . . 29 Brewing temperature . . . . . . . . . . . . . . . . . . . . . . . . . . . . . . . . . . . . . . . . . . . . . . . 30 Pre-brewing . . . . . . . . . . . . . . . . . . . . . . . . . . . . . . . . . . . . . . . . . . . . . . . . . . . . . . 30
Portion size. . . . . . . . . . . . . . . . . . . . . . . . . . . . . . . . . . . . . . . . . . . . . . . . . . . . . . 31 Changing the portion size during drink preparation . . . . . . . . . . . . . . . . . . . . . . . 31 Changing portion sizes in the "Parameters" menu . . . . . . . . . . . . . . . . . . . . . . . 33 Changing the portion size for different User profiles . . . . . . . . . . . . . . . . . . . . . . . 33
2

Contents
Profiles . . . . . . . . . . . . . . . . . . . . . . . . . . . . . . . . . . . . . . . . . . . . . . . . . . . . . . . . . 34 Accessing a profile . . . . . . . . . . . . . . . . . . . . . . . . . . . . . . . . . . . . . . . . . . . . . . . . 34 Creating a profile . . . . . . . . . . . . . . . . . . . . . . . . . . . . . . . . . . . . . . . . . . . . . . . . . . 34 Selecting a User profile . . . . . . . . . . . . . . . . . . . . . . . . . . . . . . . . . . . . . . . . . . . . . 35 Changing the name . . . . . . . . . . . . . . . . . . . . . . . . . . . . . . . . . . . . . . . . . . . . . . . . 35 Deleting a profile . . . . . . . . . . . . . . . . . . . . . . . . . . . . . . . . . . . . . . . . . . . . . . . . . . 35 Changing a profile . . . . . . . . . . . . . . . . . . . . . . . . . . . . . . . . . . . . . . . . . . . . . . . . . 36
Settings. . . . . . . . . . . . . . . . . . . . . . . . . . . . . . . . . . . . . . . . . . . . . . . . . . . . . . . . . 37 Accessing the "Settings" menu . . . . . . . . . . . . . . . . . . . . . . . . . . . . . . . . . . . . . . . 37 Changing and saving settings . . . . . . . . . . . . . . . . . . . . . . . . . . . . . . . . . . . . . . . . 37 Setting options . . . . . . . . . . . . . . . . . . . . . . . . . . . . . . . . . . . . . . . . . . . . . . . . . . . . 38 Language. . . . . . . . . . . . . . . . . . . . . . . . . . . . . . . . . . . . . . . . . . . . . . . . . . . . . . . . 39 Time of day . . . . . . . . . . . . . . . . . . . . . . . . . . . . . . . . . . . . . . . . . . . . . . . . . . . . . . 39 Timer . . . . . . . . . . . . . . . . . . . . . . . . . . . . . . . . . . . . . . . . . . . . . . . . . . . . . . . . . . . 39 Eco mode. . . . . . . . . . . . . . . . . . . . . . . . . . . . . . . . . . . . . . . . . . . . . . . . . . . . . . . . 40 Lighting . . . . . . . . . . . . . . . . . . . . . . . . . . . . . . . . . . . . . . . . . . . . . . . . . . . . . . . . . 40 Info (displaying information) . . . . . . . . . . . . . . . . . . . . . . . . . . . . . . . . . . . . . . . . . 41 Locking the coffee system (System lock ) . . . . . . . . . . . . . . . . . . . . . . . . . . . . . 41 Water hardness . . . . . . . . . . . . . . . . . . . . . . . . . . . . . . . . . . . . . . . . . . . . . . . . . . . 41 Display brightness . . . . . . . . . . . . . . . . . . . . . . . . . . . . . . . . . . . . . . . . . . . . . . . . . 41 Volume . . . . . . . . . . . . . . . . . . . . . . . . . . . . . . . . . . . . . . . . . . . . . . . . . . . . . . . . . 41 Cup heating . . . . . . . . . . . . . . . . . . . . . . . . . . . . . . . . . . . . . . . . . . . . . . . . . . . . . . 41 Factory default . . . . . . . . . . . . . . . . . . . . . . . . . . . . . . . . . . . . . . . . . . . . . . . . . . . . 42 Showroom program (demo mode) . . . . . . . . . . . . . . . . . . . . . . . . . . . . . . . . . . . . 42
Cleaning and care . . . . . . . . . . . . . . . . . . . . . . . . . . . . . . . . . . . . . . . . . . . . . . . . 43 Quick guide . . . . . . . . . . . . . . . . . . . . . . . . . . . . . . . . . . . . . . . . . . . . . . . . . . . . . . 43 Rinsing the coffee system . . . . . . . . . . . . . . . . . . . . . . . . . . . . . . . . . . . . . . . . . . . 44 Milk pipework . . . . . . . . . . . . . . . . . . . . . . . . . . . . . . . . . . . . . . . . . . . . . . . . . . . . . 45 Main dispenser with cappuccinatore . . . . . . . . . . . . . . . . . . . . . . . . . . . . . . . . . . 47 Milk container. . . . . . . . . . . . . . . . . . . . . . . . . . . . . . . . . . . . . . . . . . . . . . . . . . . . . 48 Water container . . . . . . . . . . . . . . . . . . . . . . . . . . . . . . . . . . . . . . . . . . . . . . . . . . . 49 Drip tray cover . . . . . . . . . . . . . . . . . . . . . . . . . . . . . . . . . . . . . . . . . . . . . . . . . . . . 49 Drip tray and waste container . . . . . . . . . . . . . . . . . . . . . . . . . . . . . . . . . . . . . . . . 50 Bean container and ground coffee chute . . . . . . . . . . . . . . . . . . . . . . . . . . . . . . . 51 Brew unit . . . . . . . . . . . . . . . . . . . . . . . . . . . . . . . . . . . . . . . . . . . . . . . . . . . . . . . . 51
Remove the brew unit and wash by hand . . . . . . . . . . . . . . . . . . . . . . . . . . . . 51 Degreasing the brew unit . . . . . . . . . . . . . . . . . . . . . . . . . . . . . . . . . . . . . . . . . 53 Housing . . . . . . . . . . . . . . . . . . . . . . . . . . . . . . . . . . . . . . . . . . . . . . . . . . . . . . . . . 54
3

Contents
Descaling the machine . . . . . . . . . . . . . . . . . . . . . . . . . . . . . . . . . . . . . . . . . . . . 55
Frequently Asked Questions . . . . . . . . . . . . . . . . . . . . . . . . . . . . . . . . . . . . . . . 58
Transport . . . . . . . . . . . . . . . . . . . . . . . . . . . . . . . . . . . . . . . . . . . . . . . . . . . . . . . 69 Evaporating the coffee system . . . . . . . . . . . . . . . . . . . . . . . . . . . . . . . . . . . . . . . 69 Packing . . . . . . . . . . . . . . . . . . . . . . . . . . . . . . . . . . . . . . . . . . . . . . . . . . . . . . . . . 69
Technical service and warranty . . . . . . . . . . . . . . . . . . . . . . . . . . . . . . . . . . . . . 70
Saving energy . . . . . . . . . . . . . . . . . . . . . . . . . . . . . . . . . . . . . . . . . . . . . . . . . . . 71
Installation instructions . . . . . . . . . . . . . . . . . . . . . . . . . . . . . . . . . . . . . . . . . . . 73
Packaging material / Disposal of old machine . . . . . . . . . . . . . . . . . . . . . . . . . 74
Electrical connection. . . . . . . . . . . . . . . . . . . . . . . . . . . . . . . . . . . . . . . . . . . . . . 75
Installation . . . . . . . . . . . . . . . . . . . . . . . . . . . . . . . . . . . . . . . . . . . . . . . . . . . . . . 76
Appliance dimensions . . . . . . . . . . . . . . . . . . . . . . . . . . . . . . . . . . . . . . . . . . . . . 77
Technical details . . . . . . . . . . . . . . . . . . . . . . . . . . . . . . . . . . . . . . . . . . . . . . . . . 79
Contact details . . . . . . . . . . . . . . . . . . . . . . . . . . . . . . . . . . . . . . . . . . . . . . . . . . 83
4
IMPORTANT SAFETY INSTRUCTIONS
When using electrical appliances basic safety precautions should always be followed, including the following:
Read all instructions before installation or use of the coffee system.
Please read these instructions carefully to prevent accidents and machine damage.
This appliance complies with current safety requirements. Improper use of the appliance can cause personal injury and material damage. Read this safety information carefully before operating the appliance. They contain important information on the safe installation, operation, and care of your coffee system. To avoid the risk of personal injury or damage to the coffee system, it is important that you carefully read the instructions. Miele cannot be held liable for damage caused by non-compliance with these IMPORTANT SAFETY INSTRUCTIONS.
Keep these instructions in a safe place and pass the on to any future user.
Intended use
This coffee system is not designed for commercial use. It is intended for household use and only, for the preparation of coffee, cappuccino, espresso, etc. Do not use appliance other than for its intended use. Any other use could be dangerous.
The coffee system is not suitable for outdoor use.
The machine is intended only for the preparation of coffee-based drinks such as espresso, cappuccino, latte macchiato, hot water, steam, frothed milk, etc.
Any other usage is not supported.
Persons who are unable to safely operate the appliance due to limited physical, sensory or mental capabilities, or because of a lack of experience or knowledge, may only use the appliance if they are supervised while doing so.
5

IMPORTANT SAFETY INSTRUCTIONS
Safety with children
The coffee and dispensers present a danger of burning or scaling.
Children's skin is far more sensitive to high temperatures than that of adults.
Ensure children do not touch hot surfaces of the coffee system or place parts of their body under the dispensers.
Keep the coffee system out of reach of children.
Keep children away from the machine, the power cord and outlet.
Close supervision is necessary when the coffee machine is used near children.
Never let children play with the coffee machine.
Remember that coffee and espresso are not suitable drinks for children.
Danger of suffocation!
Keep children away from any packing material.
Technical safety
Before installing the coffee system, check for externally visible damage. If the coffee system is damaged, it may pose a safety hazard and must not be used under any circumstances.
Before connecting the coffee system, check the voltage and frequency indicated on the data plate against the voltage and frequency of the household electrical supply.
This data must correspond in order to prevent damage to the coffee system. If in doubt, consult a qualified electrician.
Be certain your appliance is properly installed. To guarantee the electrical safety of this appliance, continuity must exist between the appliance and an effective grounding system. It is imperative that this basic safety requirement be met. If there is any doubt, have the electrical system of the house checked by a qualified electrician.
Do not connect the machine to the electrical supply using an extension cord.
Unplug the machine from the power supply immediately if you notice any damage or smell.
Do not operate any appliance with a damaged cord or plug or after the appliance malfunctions, or has been damaged in any manner. Return appliance to the nearest authorized service facility for examination, repair or adjustment.
6

IMPORTANT SAFETY INSTRUCTIONS
Ensure that the power cord will not be pinched or damaged by any sharp edges.
Do not let cord hang over edge of table or counter, or touch hot surfaces.
Do not place on or near a hot gas or electric burner, or in a heated oven.
The coffee system may not be used in mobile installations such as ships.
Only use the coffee system in rooms where the ambient temperature is between 50 °F / 10 °C and 100 °F /
38 °C.
Danger of overheating! Ensure that there is sufficient ventilation around the coffee system. Do not cover it with tea towels etc. while it is in use.
If the coffee system is installed behind a cabinet door, it may only be used with the cabinet door open. Do not close the cabinet door while the coffee system is in use.
Protect the coffee system from water and water spray.
Installation, maintenance and repairs may only be carried out by qualified technicians.
Repairs must only be performed by a trained technician in accordance with national and local safety regulations.
Repairs and other work by unauthorized persons could be dangerous and may void the warranty.
Defective components should be replaced by Miele original parts only. Only with original Miele parts can the manufacturer guarantee the safety of the appliance.
To disconnect, turn main switch to "0", then remove plug from wall outlet.
Unplug from outlet when not in use and before cleaning. Allow to cool before putting on or taking off parts, and before cleaning the appliance.
To protect against fire, electric shock and injury to persons do not immerse cord, plugs, or coffee machine in water or other liquid.
Use only genuine original Miele parts. If parts or accessories from other manufacturers are used, the warranty may become void.
The use of accessory attachements not recommended by Miele may result in fire, electric shock or injury to persons.
7

IMPORTANT SAFETY INSTRUCTIONS
Proper use
Danger of burning and scalding from the spouts.
The liquids and steam dispensed are very hot.
Please note:
–Keep away from the area underneath the spouts when hot liquids and steam are being dispensed.
–Do not touch hot surfaces. Use handles or knobs.
–Hot liquid or steam could spatter from the dispensers. Ensure that the main dispenser is clean and fitted correctly.
–Water in the drip tray can also be very hot. Take care when emptying it.
Clean the coffee system thoroughly before using for the first time (see "Cleaning and care").
To avoid the risk of damage to the machine, please note the following regarding water:
–Fill the water container with fresh, cold tap water only. Hot or warm water or other liquids could damage the coffee system.
–Change the water every day to prevent a build-up of bacteria.
–Do not use mineral water. Mineral water will cause lime scale deposits to build up in your machine and damage it.
–Do not use water from reverse osmosis units.
Only fill the bean container with roasted espresso or coffee beans. Do not fill the bean container with coffee beans that have been treated or with ground coffee.
Do not use raw coffee beans (green, unroasted coffee beans) or coffee blends that include raw coffee. Raw coffee beans are very hard and contain mositure that will damage the grinder.
Do not use coffee beans that have been treated with caramel, sugar or other substances. Sugar will damage the coffee system.
Only add ground coffee or cleaning tablets to the ground coffee chute. The cleaning tablets are used for degreasing the brew unit.
Do not use flavored ground coffee in the machine. The sugar content on these grounds clogs the brew unit of the machine. The cleaning tablet is not enough to remove the residue.
Only use milk without additives. Additives in milk usually contain sugar and this will stick to the milk pipework.
If using dairy milk make sure that it has been pasteurized.
Do not place flamed alcohol mixtures underneath the main dispenser. The flames could ignite plastic components and cause them to melt.
Do not place any open flame, e.g. a candle, on or near the coffee system. The coffee system could catch fire.
8

IMPORTANT SAFETY INSTRUCTIONS
Please note the following with regard to cleaning the coffee system:
–Turn the coffee system off at the main switch before cleaning.
–Clean the coffee system and milk container daily (see "Cleaning and care").
–Make sure that the milk pipework is cleaned regularly and thoroughly Milk contains natural bacteria that will multiply if the pipework is not sufficiently clean. Contamination in the coffee system can be a health hazard.
–Do not use a steam cleaner to clean this machine. Steam could reach electrical components and cause a short circuit.
Descale the coffee system regularly depending on the water hardness level in your area. Descale the machine more frequently in areas with very hard water. Miele cannot be held liable for damage arising from insufficient descaling, the use of incorrect descaling agent or the use of descaling agent that is not of the appropriate concentration.
Degrease the brew unit regularly with Miele cleaning tablets. Depending on the natural oil content of the coffee used, the brew unit can become blocked quite quickly.
Rinsing espresso/coffee grounds down the drain can cause the sink to clog. Instead, dispose of your espresso/coffee grounds appropriately as biodegradable waste (where facilities exist) or by composting.
Do not use the coffee system to clean objects.
SAVE THESE INSTRUCTIONS AND REVIEW THEM PERIODICALLY
9

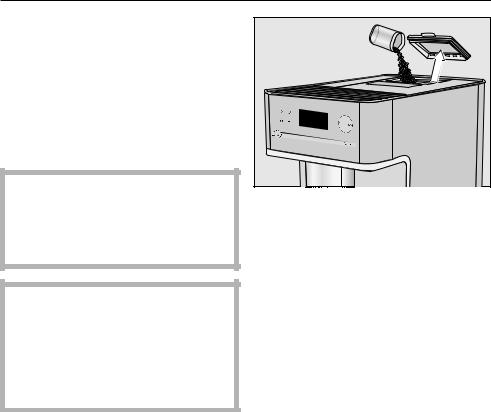
Guide to the machine
Main switch
Hot water spout
Controls and display
Cup heating
Water container
Ground coffee chute
Coffee bean container
Grinder setting
(behind the service panel)
Brew unit (behind the service panel)
Main dispenser with cappuccinatore
Park position for milk pipework (behind the service panel)
Drip tray with lid and waste container
Milk tube aperture
Holder for drip tray cover and drip tray cover
Stainless steel milk container
10
Controls and display
On/Off button |
Turns the coffee system on or off |
|
|
Drink buttons |
For making |
|
Espresso |
|
Coffee |
|
Cappuccino |
|
Latte macchiato |
|
|
Display |
Shows information on current activity or status |
|
|
"Back" |
For returning to the previous menu, canceling |
|
unwanted actions |
|
|
Arrow keys |
For showing more selection options in the display |
|
and highlighting a selection |
|
|
OK |
For confirming display messages and saving |
|
settings |
|
|
Optical interface |
(for service technician use only) |
|
|
LED |
Flashes when the machine is turned on and the |
|
display is black |
|
|
Settings |
For displaying and changing settings |
|
|
Parameters |
For changing drink settings |
|
|
Profile |
For creating and managing profiles |
|
|
Double portion |
For preparing two portions of a drink |
|
|
Additional programs More drinks such as coffee lungo, caffè latte, hot milk, milk froth and hot water
in addition to the other drinks you can find the care program, e. g. degreasing brew unit, rinsing ,...
11

Accessories
The following accessories are included depending on the model:
–Measuring scoop for ground coffee
–Stainless steel milk container MB-CM
For keeping milk cool
–Cleaning tablets
for degreasing the brew unit (starter set)
–Descaling tablets
for descaling the water pipework (starter set)
–Test strips
for determining the water hardness level
–Cleaning brush
for cleaning the milk pipework
These products and other useful accessories can be ordered via the Miele website.
Miele also offers a range of optional accessories, as well as cleaning and conditioning products for your coffee system.
–Cleaning agent for milk pipework for cleaning the milk system
–Cleaning tablets
for degreasing the brew unit
–Descaling tablets
for descaling the water pipework
–Stainless steel milk container MB-CM
For keeping milk cool for longer (capacity approx. 16.9 oz. / 0.5 l)
12
First use
Please read the operating instructions and take the time to familiarize yourself with the coffee system before using it for the first time.
Please discard the first two cups of coffee/espresso drinks when using the machine for the first time.
Before using for the first time
Set up the coffee system and remove any protective film (see "Installation").
Clean the machine thoroughly before filling it with water and coffee beans (see "Cleaning and care").
Plug in the coffee system (see "Electrical connection").
Turning on for the first time
Set the main switch on the left-hand side of the machine to the "I" position.
When you turn the machine on for the first time, the following message will appear in the display: "Miele - Willkommen".
Language
Use the arrow keys to highlight the desired language. Then touch OK.
Use the arrow keys to highlight the desired country. Then touch OK.
The setting is now saved.
Time of day
Touch the arrow keys until the current hour appears.
Then touch OK.
Touch the arrow keys until the current minutes appear.
Then touch OK.
The setting is now saved.
"Set up successfully completed" will now appear in the display.
The message "Fill and replace the water container" appears in the display.
Fill the water container with cold, fresh tap water.
Tip: To get the most out of your coffee system and to set it up for your specific requirements, please continue to work through these operating instructions.
13
First use
Water hardness
The water hardness level indicates how much calcium is dissolved in the water. The higher the calcium content, the harder the water, and the harder the water, the more often the coffee system will need to be descaled.
The coffee system measures the amount of water used and steam made. Depending on the level of water hardness set, more or fewer drinks can be dispensed before the appliance needs to be descaled.
Program the coffee system to the water hardness level of your area so that it functions correctly and does not get damaged. At the correct time a prompt will then appear in the display to descale the appliance.
You can program four hardness levels on the machine:
Water hardness |
Water |
Setting |
|
hardness |
(water |
|
level in your |
hardness |
|
area |
level) |
|
|
|
0 - 8.7 gr/gal |
Soft |
Soft 1 |
(0 - 8.4 °dH) |
|
|
|
|
|
8.7 - 14.6 gr/gal |
Medium |
Medium 2 |
(8.4 - 14 °dH) |
|
|
|
|
|
14.6 - 21.2 gr/gal |
Hard |
Hard 3 |
(14 - 21 °dH) |
|
|
|
|
|
21.2 gr/gal |
Hard |
Very hard 4 |
( 21 °dH |
|
|
|
|
|
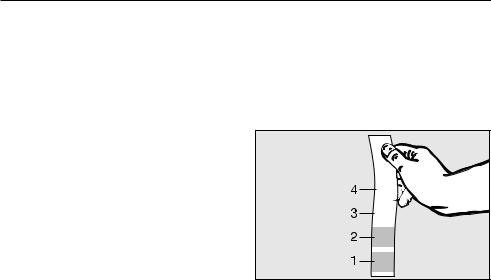
Determining the water hardness
You can measure the water hardness yourself using the enclosed test strip. Alternatively, your local water authority will be able to tell you the hardness of water in your area.
Dip the strip in your drinking water for approximately one second, then shake off any excess water. The result will be evident after about a minute.
You can now set the water hardness level for the coffee system.
Setting the water hardness level
Touch .
Use the arrow keys to highlight "Water hardness".
Then touch OK.
Use the arrow keys to highlight the desired water hardness. Then touch OK.
The setting is now saved.
14

Operation
To operate the coffee system, touch the keys with your finger.
When the following appears in the display, you are in the drinks menu:
Miele
Select drink
To prepare a coffee drink, touch one of the drink sensors.
You can find more drinks in the "More programs" menu.
Selecting a menu and navigating within a menu
To select a menu, touch the relevant button. You will then be able to start an action or change settings in the menu.
Settings
Language
Time of day
Timer
A scroll bar at the right of the display shows that additional options or text are available. Use the arrow keys to display these.
You will be able to identify the current active setting by the check .
To select an option:
Touch the and arrow keys until the option you want is highlighted.
To confirm your choice:
Touch OK.
Leaving the menu or canceling an action
To exit the current menu:
Touch .
If you do not touch a sensor for a period of time, the machine returns to the drinks menu.
15
Filling the water container
The quality of the water and the quality of the coffee beans play an important part in the quality of the coffee or espresso.
Important! Bacteria can cause infection.
It is important to empty and fill the container with fresh tap water every day to avoid the risk of bacteria building up.
Hot or warm water or other liquids can damage the coffee system.
Do not use mineral water in the water container. It will cause serious lime scale deposits to build up in your machine and damage it.
Press the lid on the right-hand side.
Pull the water container up by the lid to remove it.
Fill the water container with fresh, cold tap water up to the "max." marker.
Replace the water container.
Tip: If the water container is a little high or at a slant, check whether the surface that the water container sits on is dirty. If the water container is not sitting correctly, the drain valve will not be sealed.
Clean the surface if necessary.
16
Filling the coffee bean container
Fill the coffee bean container with roasted espresso or coffee beans if you want to use freshly ground coffee beans for each cup of espresso or coffee.
Alternatively, you can make coffee or espresso with ready ground coffee (see "Making coffee or espresso using ready ground coffee").
Warning! Damage to the grinder! Only put roasted coffee beans for espresso or coffee in the container. Anything else, including ground coffee, will damage the grinder.
Warning! Sugar will damage the coffee system.
Do not use coffee beans that have been treated with sugar, caramel, or other substances and do not put liquids containing sugar in the coffee bean container.
Take the lid off the coffee bean container.
Fill the container with roasted coffee beans.
Replace the lid.
Tip: Only add enough beans to last for a few days as contact with air causes coffee beans to lose their aroma.
17

Turning the machine On / Off
Turning on
Set the main switch on the left-hand side of the machine to the "I" position.
Touch the On/Off button .
The appliance will begin rinsing after the heating-up phase. Hot water will come out of the main dispenser.
If the coffee system still has an operating temperature higher than 140 °F (60°C), rinsing will not take place.
When "Select drink" appears in the display, drinks can be prepared.
If you do not touch any keys or run the maintenance program, the display will turn itself off after approx. 7 minutes to save energy. The right-hand LED will flash on and off as long as the machine is turned on.
Touch any one of the keys to wake the machine up again to make a drink.
Turning off
Touch the On/Off button .
After a coffee drink has been dispensed, the pipework will be rinsed before the machine turns off.
If a drink has been made using milk, the message "Place milk pipe in drip tray" will appear in the display.
Insert the end of the milk pipe into the aperture in the drip tray, then
Touch OK.
If the milk system is not rinsed out before turning off, it will have to be rinsed the next time the machine is turned on.
Turning off for longer periods of time
If the coffee system is not going to be used for a longer period of time:
Empty the drip tray, the waste container and the water container.
Clean all parts thoroughly, including the brew unit.
Turn the machine off using the main switch.
The time of day will not be saved. It will have to be reset next time the machine is turned on.
18
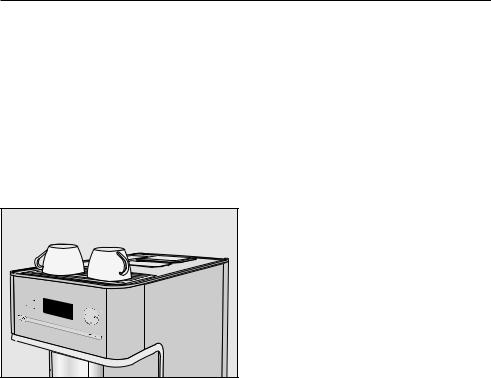
Cup heating
Cups should always be pre-heated to allow the flavor of the coffee to develop and be retained.
The smaller the volume of the coffee/espresso and the thicker the cup, the more important it is to pre-heat the cup.
You can use the cup heating surface on the top of the coffee system to pre-heat coffee cups and glasses. The cup heating function must be turned on.
Arrange the cups or glasses on the cup heating surface on the top of the coffee system.
The cup heating surface will be heated continually until the coffee system is turned off.
To turn cup heating on or off
Touch .
Select "Cup heating" and touch OK.
Select the desired option and touch OK.
The setting is now saved.
19
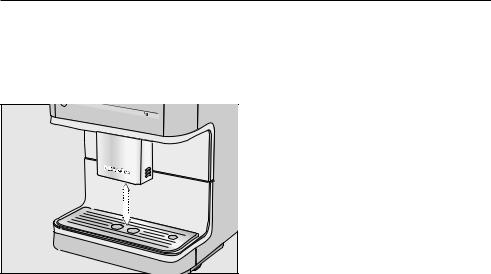
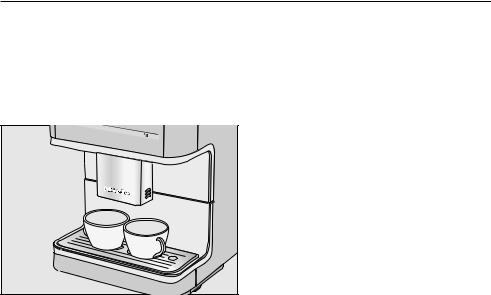
Adjusting the coffee dispensers to the cup height
You can adjust the main dispenser to suit the height of the cup you are using so that the coffee or espresso will not cool down as quickly and the crema will have a better consistency.
Pull the coffee dispenser down to the same level as the rim of the cup.
or
Push the dispenser up until there is enough room to fit a larger cup or mug underneath.
20
How to prepare beverages
You can choose from a variety of specialty coffees:
Ristretto is a concentrated, strong espresso. The same quantity of coffee powder as for an espresso is prepared with very little water.
Espresso is a strong, aromatic coffee with a thick hazelnut-brown cream layer
– the crema – on top.
Use espresso-roasted coffee beans for preparing espresso.
Coffee distinguishes itself from espresso due to the greater water quantity and the special roasting of the coffee beans.
Coffee Lungo is a coffee with significantly more water.
Coffee specialties
Place a cup under the main dispenser.
Touch the button for the drink you want:
Espresso
Coffee
in "Additional programs": Ristretto, Coffee Lungo
The coffee or espresso will be dispensed from the main dispenser.
To ensure that any residues from the factory testing process are removed from the brewing system, please discard the first two cups of coffee when using the machine for the first time.
21
How to prepare beverages
Double portion
You can dispense two portions into one cup or dispense two portions into two cups at the same time.
To fill two cups at the same time:
Place a cup under each coffee dispenser.
Touch .
The button will light up.
Touch the button for the desired drink.
Two portions of the desired drink will be dispensed from the main dispenser.
Tip: If, after a while, you have not touched one of the drink buttons, the "Double portion" option will revert back to single portions.
Canceling preparation
To cancel preparation:
Touch the drink button that is lit up, or for drinks from "Additional programs" again.
Tip: Drink preparation can be cancelled by pressing the OK button as soon as "Stop" appears in the display.
When making coffee with milk or two portions of a drink you can cancel each stage individually.
Touch OK.
Drink preparation will be canceled.
22

How to prepare beverages
Making coffee with ground coffee
To make espresso or coffee using ready ground coffee, add a portion of ground coffee to the ground coffee chute.
This allows you to prepare a decaffeinated coffee, if the bean container is already filled with regular coffee beans for example.
The coffee system will automatically recognize that ground coffee has been placed in the chute.
Only one portion of coffee or espresso can be prepared at a time when using ready ground coffee.
Adding ground coffee
Use the scoop supplied with the machine to ensure the correct amount of ground coffee is used.
Do not add more than one level scoop of ground coffee to the coffee chute. If too much is added, the brew unit will not be able to process the coffee.
The coffee system will use all the ground coffee that has been added to the chute to make the next coffee.
Open the ground coffee chute.
Add one level scoop of ready ground coffee to the chute.
Close the coffee chute.
"Use ground coffee?" appears in the display.
23
How to prepare beverages
Making coffee with ready ground coffee
If you want to make a drink with pre-ground coffee:
Select "Yes" and touch OK.
You can now select which type of drink you would like to make with ready ground coffee.
Place a cup under the main dispenser.
Select the desired drink.
The desired coffee drink is prepared.
If you do not want to make a drink with ready ground coffee:
Select "No" and touch OK.
The ground coffee will be directed into the waste container.
If you do not touch a drink button within approx. 15 seconds, the ground coffee will also be directed into the waste container.
Drinks with milk
Caution! Danger of burning and scalding from the main dispenser. Liquids and steam dispensed will be very hot.
Do not use milk with additives. Most additives contain sugar that will adhere to the milk pipework and damage the machine.
As soon as you select a drink containing milk, the machine will start to heat up. The milk will be drawn up into the main dispenser where it is heated by steam and also frothed for drinks requiring milk froth.
If you have not made any milk drinks for a while, rinse the milk system thoroughly before making the first drink to ensure any bacteria is flushed out.
24
How to prepare beverages
The following drinks with milk can be made:
Cappuccino consisting of approx. 2/3 milk froth and 1/3 espresso.
Latte macchiato consisting of 1/3 each of hot milk, milk froth and espresso.
Caffè latte consists of hot milk and coffee.
Hot milk or milk froth can also be made.
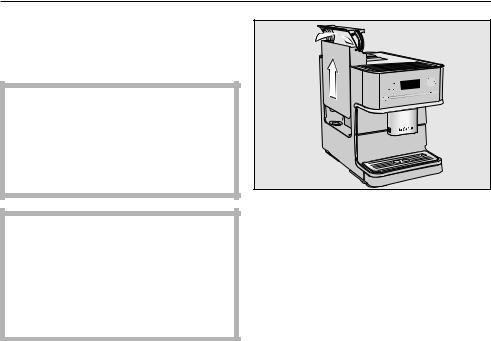
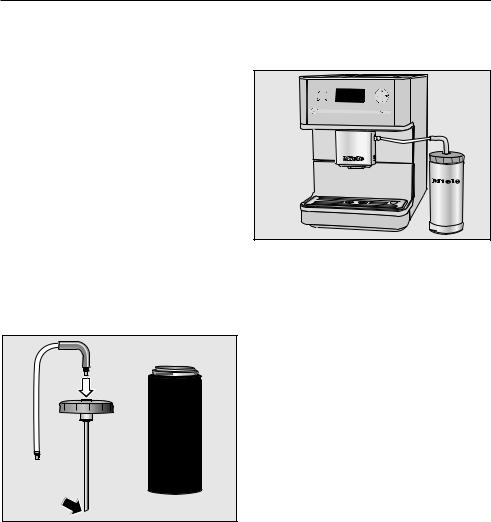
Notes about the stainless steel milk container
The stainless steel container keeps milk cool for longer. Good milk froth can only be made with cold milk
( 55°F/13 °C).
Connect the stainless steel suction tube to the inside of the lid. Make sure that the slanted end is pointing downwards as shown.
Fill the milk container up to max. 3/4" (2 cm) below the rim with milk. Seal the milk container with the lid.
Connect the stainless steel angled end of the milk tube to the top of the lid until it clicks into place.
Place the milk container on the right-hand side of the coffee system. Connect the other end of the milk tube to the main dispenser.
25
How to prepare beverages
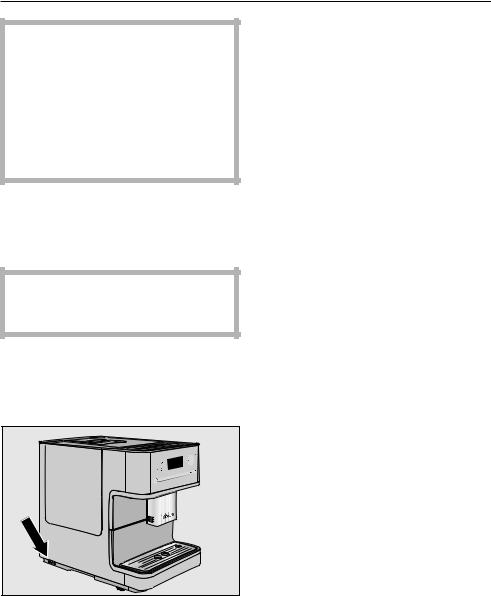
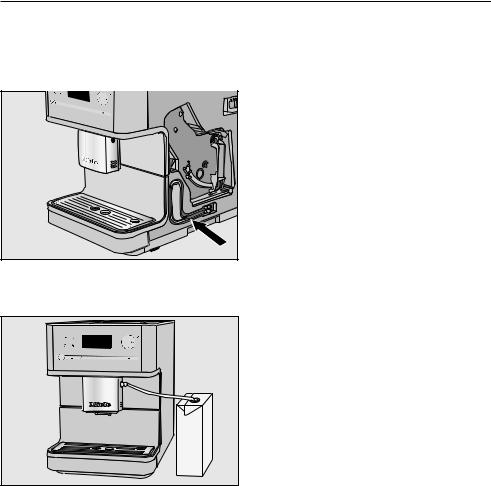
Using milk cartons or bottles
The milk tube for cartons and other suitable containers is located behind the machine front.
Connect the milk pipe to the aperture in the main dispenser.
Place a container with sufficient milk beside the coffee system on the right-hand side.
Place the end of the milk tube in the container making sure that it is sufficiently immersed in the milk.
Preparing drinks with milk
Place a suitable container under the main dispenser.
Touch the button for the drink you want:
Cappuccino
Latte macchiato
In "Additional programs": Caffè latte, hot milk, milk froth
The coffee system will now prepare the selected drink.
26
 Loading...