


 Loading...
Metrohm AG CH-9100 Herisau Switzerland
Phone +41 71 353 85 85 Fax +41 71 353 89 01 info@metrohm.com www.metrohm.com
MagIC Net 3.1
Installation
1 Minimum system requirements
Operating system |
32-bit version of: |
|
|
|
Windows 8 Professional/Enterprise |
|
|
Windows 7 Professional/Ultimate/Enterprise |
|
|
Windows Vista Business/Enterprise/Ultimate |
|
Windows XP Professional SP2 |
|
|
Windows Server 2008 R2 |
|
|
|
Windows Server 2008 |
|
|
Windows Server 2003 |
|
64-bit version of: |
|
|
|
Windows 8 Professional/Enterprise |
|
|
Windows 7 Professional/Ultimate/Enterprise |
|
|
Windows Server 2012 |
|
Windows Server 2008 R2 |
|
RAM |
Windows Vista and higher: 2 GB |
|
|
Windows XP: 1 GB |
|
Hard disk space |
Program: 1 GB |
|
|
Data: 2 GB |
|
Serial ports |
For devices with RS-232 interface |
|
USB ports |
For devices with USB interface |
|
Screen |
Resolution: 1,024 x 768 |
|
Network |
10 Mbit/s, stable and permanent |
|
|
Communication via TCP/IP |
|
The Windows user must have administrator rights in order to be able to install the MagIC Net software.
8.102.8061EN / 2014-05-23 |
1 |

CAUTION
Data loss may occur if the PC changes to sleep mode during a determination. The sleep mode should therefore be disabled in the energy settings of the operating system.
2 Single workplace installation
With the single workplace version MagIC Net Basic, MagIC Net Compact or MagIC Net Professional, you can install both the MagIC Net client and the server on the computer.
1The installation process starts automatically when you insert the CD into the drive. If this option is deactivated on your computer, double-click on the setup.exe file.
If the minimum system requirements are not met (see above) an appropriate message appears. Click on [Yes] if you would like to install the program nonetheless.
Afterwards, click on [Next >].
2During the installation process, the Welcome screen appears first. Click on [Next >] to install the software.
3After having read the license agreement for MagIC Net and accepted it with [Yes], a window will appear where you can enter the license code.
2 |
8.102.8061EN / 2014-05-23 |

4Enter the license code for MagIC Net Basic, MagIC Net Compact or MagIC Net Professional and then click on [Next >].
NOTE
If you have entered the license code of an update license, then the license code of the previous full version will additionally be requested.
5Now confirm the target folder for the MagIC Net installation with [Next >] or select a different target folder with [Browse…].
8.102.8061EN / 2014-05-23 |
3 |
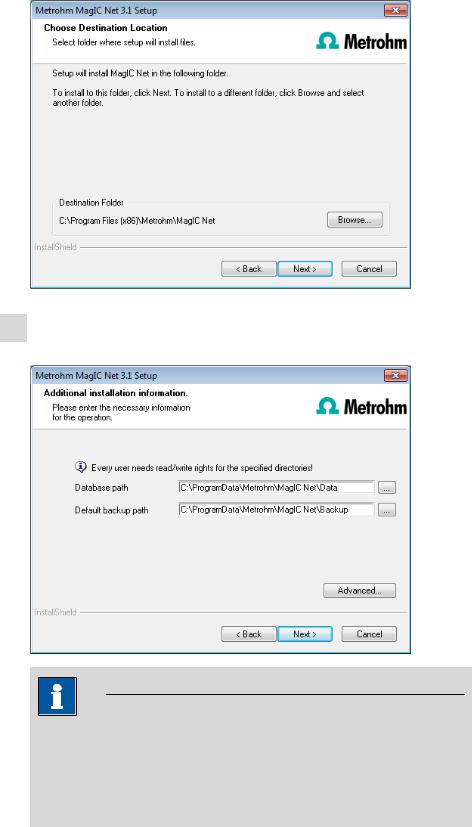
6You can define the paths for the database and default backup files in the
Additional installation information window:
NOTE
The default paths are different for Windows XP, Windows Vista, Windows 7 and Windows 8.
The database path must not be on a network drive.
The default backup path may be on a network drive.
You can change the ports MagIC Net uses to communicate with the database server and the administration server with the [Advanced…] button. If the ports are already used, an appropriate error message will appear. Ask your system administrator for more information about this. Continue with [Next >].
4 |
8.102.8061EN / 2014-05-23 |

7If you would like to create a shortcut on your desktop to start the MagIC Net software, activate [Yes] and then click on [Next >].
8In normal cases, you can confirm the selection of the program folder with
[Next >].
9The installation settings can now be checked. Start the copy process with
[Next >].
8.102.8061EN / 2014-05-23 |
5 |

10Follow the instructions of the program until the following message appears:
This message points out again which ports MagIC Net uses. Write down these ports and inform your system administrator in case MagIC Net is not able to connect to the database. Confirm the message with [OK].
MagIC Net will now be installed.
11Once the copying procedure has been completed you can make further workplace settings:
6 |
8.102.8061EN / 2014-05-23 |
Loading...