


 Loading...
CH-9101 Herisau/Switzerland
E-Mail info@metrohm.com
Internet www.metrohm.com
794 Basic Titrino
Program version 5.794.0010
Instructions for Use
8.794.1003 |
02.2002 / pkl |

|
|
|
Table of contens |
Table of contents |
|
||
1 |
Introduction........................................................................................................... |
1 |
|
|
1.1 |
Instrument description........................................................................................... |
1 |
|
1.2 |
Controls and parts................................................................................................. |
2 |
2 |
Manual operation.................................................................................................. |
6 |
|
|
2.1 |
Keypad .................................................................................................................. |
6 |
|
2.2 |
Principle of data input............................................................................................ |
7 |
|
2.3 |
Text input ............................................................................................................... |
8 |
|
2.4 |
Tutorial ................................................................................................................... |
9 |
2.4.1 |
Entering data, setting the dialog language.................................................... |
9 |
|
2.4.2 |
Development of a method, titration of an acid............................................. |
11 |
|
2.4.3 |
Storage and loading of methods ................................................................. |
16 |
|
2.4.4 |
pH calibration.............................................................................................. |
17 |
|
2.4.5 |
Statistics, acid capacity of drinking water.................................................... |
18 |
|
2.5 |
Configuration, key <CONFIG>........................................................................... |
22 |
|
2.6 |
Selection of the mode, key <MODE> ................................................................ |
24 |
|
2.7 |
Parameters, key <PARAM> ............................................................................... |
26 |
|
2.7.1 |
Parameters for DET and MET ...................................................................... |
26 |
|
2.7.2 |
Parameters for SET ...................................................................................... |
36 |
|
2.7.3 |
Parameters for MEAS................................................................................... |
45 |
|
2.7.4 |
Parameters for CAL...................................................................................... |
47 |
|
2.7.5 |
Parameters for TIP ....................................................................................... |
50 |
|
2.8 |
Result calculations............................................................................................... |
52 |
|
2.9 |
Statistics calculation ............................................................................................ |
55 |
|
2.10 |
Common variables .............................................................................................. |
57 |
|
2.11 |
Data output.......................................................................................................... |
58 |
|
2.12 |
TIP, Titration procedure ....................................................................................... |
62 |
|
2.13 |
Method memory, keys <USER METH> ............................................................. |
66 |
|
2.14 |
Calibration data, key <CAL.DATA> ................................................................... |
68 |
|
2.15 |
Current sample data, key <SMPL DATA> ......................................................... |
69 |
|
2.16 |
Silo memory for sample data .............................................................................. |
70 |
|
2.17 |
Storing determination results and silo calculations............................................. |
73 |
|
2.17.1 |
Storing determination results ....................................................................... |
73 |
|
2.17.2 |
Silo calculations ........................................................................................... |
74 |
|
3 Operation via RS232 Interface........................................................................... |
77 |
||
3.1 |
General rules ....................................................................................................... |
77 |
|
3.1.1 |
Call up of objects ......................................................................................... |
78 |
|
3.1.2 |
Triggers ........................................................................................................ |
79 |
|
3.1.3 |
Status messages ......................................................................................... |
80 |
|
3.1.4 |
Error messages............................................................................................ |
82 |
|
3.2 |
Remote control commands................................................................................. |
85 |
|
3.2.1 |
Overview....................................................................................................... |
85 |
|
3.2.2 |
Description of the remote control commands ........................................... |
102 |
|
3.3 |
Properties of the RS 232 Interface..................................................................... |
125 |
|
3.3.1 |
Handshake................................................................................................. |
125 |
|
3.3.2 |
Pin Assignment .......................................................................................... |
129 |
|
3.3.3 |
What can you do if the data transfer does not work? ................................ |
131 |
|
794 Basic Titrino

Table of contents
4 Error messages, Troubleshooting................................................................... |
133 |
||
4.1 |
Error and special messages ............................................................................. |
133 |
|
4.2 |
Diagnosis .......................................................................................................... |
137 |
|
4.2.1 |
General ...................................................................................................... |
137 |
|
4.2.2 |
Procedure .................................................................................................. |
137 |
|
4.2.3 |
Equipment required: .................................................................................. |
138 |
|
4.2.4 |
Diagnosis steps ......................................................................................... |
138 |
|
4.3 |
Initialise and test RAM....................................................................................... |
147 |
|
4.4 |
Releasing a locked spindle ............................................................................... |
148 |
|
5 Preparations ..................................................................................................... |
149 |
||
5.1 |
Setting up and connecting the instruments ...................................................... |
149 |
|
5.1.1 |
Titrino with Stirrer or Titration Stand........................................................... |
149 |
|
5.1.2 |
Connection of a printer .............................................................................. |
150 |
|
5.1.3 |
Connection of a balance............................................................................ |
151 |
|
5.1.4 |
Connection of a Sample Changer ............................................................. |
152 |
|
5.1.5 |
Connection of a recorder........................................................................... |
153 |
|
5.1.6 |
Connection of a computer......................................................................... |
154 |
|
5.2 |
Connection of electrodes, preparing titration vessel ........................................ |
155 |
|
6 Appendix ........................................................................................................... |
158 |
||
6.1 |
Technical specifications .................................................................................... |
158 |
|
6.2 |
Pin assignment of the "Remote" socket ............................................................ |
161 |
|
6.2.1 |
Lines of the "Remote" socket during the titration....................................... |
163 |
|
6.2.2 |
Possible configurations of the activate pulse in SET and CAL.................. |
164 |
|
6.3 |
User methods.................................................................................................... |
165 |
|
6.3.1 |
General ...................................................................................................... |
165 |
|
6.3.2 |
"Titer_pH" ................................................................................................... |
166 |
|
6.3.3 |
"Blank"........................................................................................................ |
167 |
|
6.3.4 |
"Chloride" ................................................................................................... |
168 |
|
6.3.5 |
"TAN-TBN".................................................................................................. |
169 |
|
6.3.6 |
"Diazo"........................................................................................................ |
170 |
|
6.3.7 |
"Br-Index" ................................................................................................... |
171 |
|
6.3.8 |
"Sapon.No"................................................................................................. |
172 |
|
6.3.9 |
"Ca-Mg"...................................................................................................... |
173 |
|
6.3.10 |
"EDTA-NTA"................................................................................................ |
174 |
|
6.3.11 |
"Metals" ...................................................................................................... |
175 |
|
6.3.12 |
"Perox.No" .................................................................................................. |
176 |
|
6.3.13 |
"FormolNo""................................................................................................ |
177 |
|
6.3.14 |
"P2O5Fert""................................................................................................. |
180 |
|
6.4 |
Validation / GLP................................................................................................. |
183 |
|
6.5 |
Warranty and conformity ................................................................................... |
184 |
|
6.5.1 |
Warranty..................................................................................................... |
184 |
|
6.5.2 |
EU Declaration of conformity..................................................................... |
185 |
|
6.5.3 |
Certificate of Conformity and System Validation ....................................... |
186 |
|
6.6 |
Scope of delivery and ordering designations ................................................... |
187 |
|
Index |
......................................................................................................................... |
|
190 |
794 Basic Titrino
1.1 Instrument description
1 Introduction
1.1 Instrument description
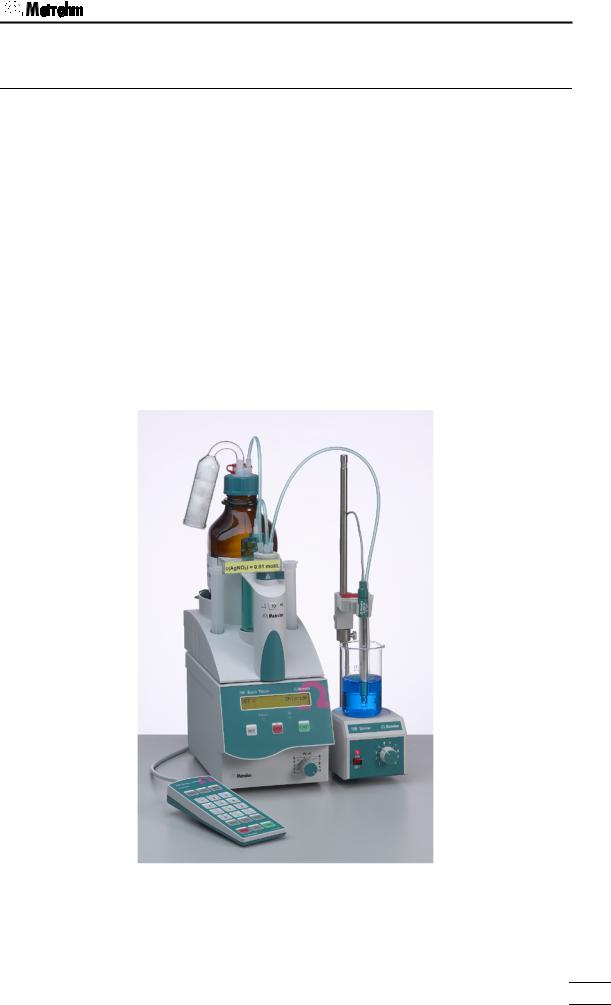
The 794 Basic Titrino is an all-purpose titrator. Titration modes of the 794 Basic Titrino are constant or – depending on the titration curve – variable dosing of the titration reagent and Endpoint-Titration.
All operating modes of the Titrino can be combined to perform extensive analytical sequences. Ready-to-start methods for the most common applications are stored in the internal method memory. The operator is free to modify and overwrite this methods or to create and store his own titration sequences.
Data exchange with a PC is possible with the Metrodata VESUV Software and with Metrodata TiNet Software complete remote control, data acquisition and evaluation via PC is enabled.
794 Basic Titrino |
1 |
|
1.2 Controls and parts
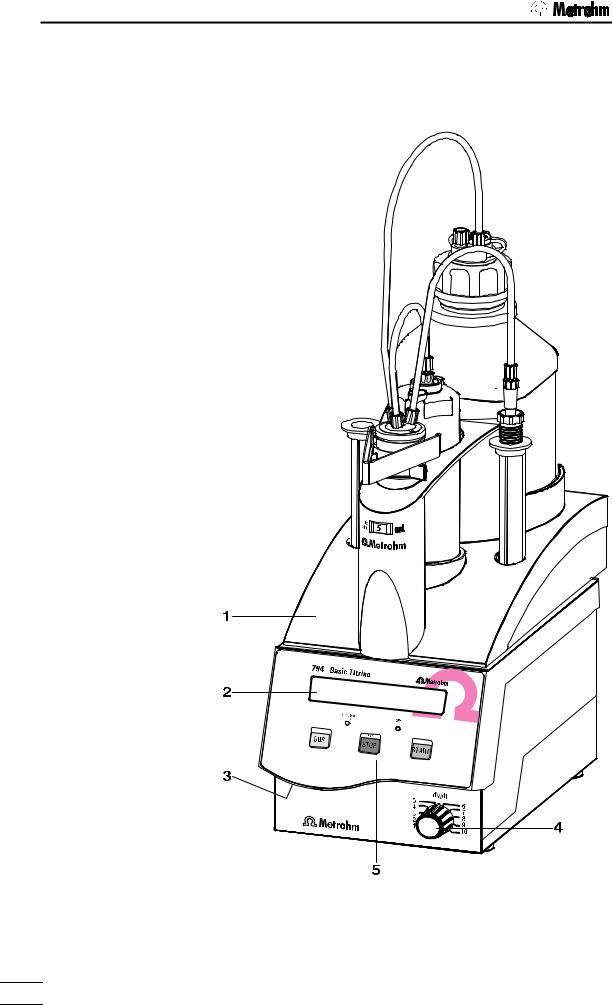
1.2 Controls and parts
Front view of instrument:
2
794 Basic Titrino

1.2 Controls and parts
1Exchange Unit
2Display
3Setting of display contrast
4Controls the dosing rate during manual dosing with <DOS> and subsequent filling
5Control keys and indicator lamps on the Titrino
Key <DOS> |
Dosing key. Dispensing is performed as long as <DOS> is being |
|
pressed. Used e.g. to prepare the Exchange Unit. The dispensing |
|
rate can be set with potentiometer (4). |
Key <STOP/FILL> |
- Stops procedures, e.g. titrations, conditioning. |
|
- Filling after manual dosing with <DOS>. |
Key <START> |
Starts procedures, e.g. titrations, conditioning. |
|
Identical with key <START> of the separate keypad. |
Indicator lamps: |
|
"Statistics" |
Lamp is on when the "statistics" function (calculation of mean and |
|
standard deviation) is on. |
"Silo" |
Lamp is on when silo memory (for sample data) is on. |
794 Basic Titrino |
3 |
|

1.2 Controls and parts
Rear view of instrument:
4
794 Basic Titrino

1.2 Controls and parts
6RS232 interface
for the connection of printer, balance or a computer
7Remote lines
(input/output)
for the connection of the Remote Box, Sample Changers, robots etc.
8Connection of electrodes and temperature sensor
•2 high-impedance measuring inputs for pH and U measurements (Ind I/ Ind II). They can either be used separately or for differential potentiometry, see page 155.
Important: If you work with both measuring inputs in the same vessel, the same reference electrode must be used.
•1 measuring input for polarized electrodes (Pol).
•1 measuring input for PT100 or Pt1000 temperature sensor.
9Connection for separate keypad
10Analog output for the connection of a recorder
11Connection for power cable
With power supplies where the voltage is subject to severe HF disturbances, the Titrino should be operated via an additional power filter, e.g. Metrohm 615 model.
12Mains switch
13Earthing socket
14Connection for stirrer
728 Magnetic Stirrer, 802 Rod Stirrer, 703 or 727 Ti Stand Supply voltage: 9 VDC (I ≤ 200 mA)
15Display of the set mains voltage
Before switching on for the first time, check that the set mains voltage matches the voltage of your power supply. If this is not the case, disconnect mains cable and change voltage.
16Rating plate
with fabrication, series and instrument number
794 Basic Titrino |
5 |
|

2.1. Keypad
2 Manual operation
2.1 Keypad
CONFIG Configuration.
PARAM Parameters. SMPL DATA Sample data.
STATISTICS ON/OFF switching of statistics calculations of consecutive determination, see page 55.
MEAS/HOLD ON/OFF switching of measurements between titrations and hold during titrations.
SILO |
ON/OFF switching of silo memory for |
|
sample data, see page 69. |
CAL.DATA |
Calibration data, see page 68. |
C-FMLA |
Calculation values, see page 54. |
DEF |
Formulas, data output, sequence for |
|
TIP, see page 52ff. |
USER METH Management of internal method |
|
|
memory, see page 66. |
Printing of reports, see page 60. |
|
REPORTS |
Result output. |
MODE |
Mode selection, see page 24. |
<,> |
Keys for text input. |
SELECT |
Selection of special values (dialog |
|
marked with ":") |
CLEAR |
Clears values, set special values. |
ENTER |
Stores values. |
STOP |
Stops methods. |
QUIT |
Quits inquiries, waiting times, printing. |
START |
Starts methods. |
The third functions (inscriptions in the triangle) on the keys of the keypad are used for formula entry, see page 52.
6 |
794 Basic Titrino |
|
2.2 Principle of data input
2.2Principle of data input
•If you press a key you will find the corresponding menu in the display.
Example key <CONFIG>:
configuration >peripheral units
>peripheral units |
|
send to: |
IBM |
configuration >auxiliaries
DET pH |
******** |
|
|
In the first line you see where you are: You pressed key <CONFIG> and you are now in the menu "configuration".
•In our example you are in the menu "configuration" on the title ">peripheral units". By pressing <CONFIG> you can move to the other titles of this menu.
•If a dialog text is marked with ">", it contains a group of inquiries. You branch into this group by pressing <ENTER>.
Example inquiries of "peripheral units": The first line indicates again where you are.
If a dialog text of an inquiry is marked with ":", you can select a value with the key <SELECT>.
•A value is stored with <ENTER> and the cursor moves to the next inquiry.
•Repeated pressing of <ENTER> moves you through the inquiries of the group ">peripheral units“, after the last inquiry of this group you leave this group and return to the level above.
The next group of the menu "configuration“ appears: ">auxiliaries“
•With key <QUIT> you leave an inquiry or a group of inquiries, it always moves you one level up.
•In this example you leave the menu "configuration" by pressing <QUIT> and return to the display of titration mode and the chosen method.
794 Basic Titrino |
7 |
|
2.3. Text input
2.3 Text input
|
Example storing a method: |
|
<USER METH> |
• Press key <USER METH>, the group ">recall |
|
|
method" appears. |
|
user methods |
||
|
||
>recall method |
|
|
|
|
<USER METH> <ENTER>
>store method method name:
<CLEAR>
<<>
>store method
method name:  ABCDEFG
<QUIT>
<ENTER>
>store |
method |
|
method |
name: |
text |
|
|
|
•Choose ">store method" by pressing <USER METH> and press <ENTER>.
The name of the method which is currently in the working memory is displayed.
•Delete this name with <CLEAR>.
•Open the "text writing mode" with key <<>.
•Select the character marked by the blinking cursor with the Keys <<> and <>>, confirm it with <ENTER>. Select the next character...
When you confirmed the last character, i.e. your name is complete, you quit the text writing mode with <QUIT>.
Confirm now the name with <ENTER>.
If your text fills the whole text field, just press <ENTER> to store the text.
•During text input you can correct typing errors with <CLEAR>:
<CLEAR> deletes the characters one by one.
•If you wish to modify an existing name (e.g. if you have names like Text 1, Text 2, Text 3), do not delete the existing name before you start the text input mode. Proceed then as follows:
1.Press <USER METH>, place the cursor to ">store method" and press <ENTER>.
2.Open the text writing mode directly: Press key <<>.
3.<CLEAR> now deletes the characters one by one or you can add additional characters.
8 |
794 Basic Titrino |
|
2.4 Tutorial
2.4 Tutorial
This short operating course teaches you to work quick and efficient with the 794 Basic Titrino, by means of the most important applications.
Set up your Titrino and connect the peripheral devices needed, see chapter 5.
2.4.1 Entering data, setting the dialog language
We can thus make a start and first take a look at the fundamentals of the entry of data. We change the dialog language.
DET pH |
******** |
|
|
<CONFIG>
configuration >peripheral units
<CONFIG>
configuration >auxilliaries
<ENTER>
•Switch on the Titrino. It is now in the standby state, it shows you the active mode and method name.
•Press the key <CONFIG>, the display shows:
This is the title of the group "peripheral units". This group contains various inquiries about peripheral units.
•Press again <CONFIG>. You see the title of a new group of inquiries.
This "auxiliaries" group contains the inquiry for the dialog language.
•Pressing the <ENTER> key takes you to the inquiries of the group "auxiliaries". Note the ">" sign. All titles of inquiry groups are prefixed by this sign.
>auxilliaries |
|
This is the first inquiry of the "auxiliaries" group: the |
|
selection of the dialog language. |
|
dialog: |
english |
|
|
|
|
<SELECT>
>auxilliaries
dialog: español
<ENTER>
>ajustes varios
fecha 2002-01-02
•You select the various dialog languages with the <SELECT> key. Press <SELECT> repeatedly until "español" appears in the display.
Note the sign ":". It appears if the values can be selected with the key <SELECT>.
•Accept the new "value" with <ENTER>.
The next inquiry "fecha" (date) of the group "ajustes varios" (auxiliaries) is shown.
You can open this inquiry by pressing <ENTER> too and go through all the inquiries of this group this way.
794 Basic Titrino |
9 |
|
2.4. Tutorial
<QUIT>
configuration >ajustes varios
Because this inquiry follows no colon ":" the value can't be selected by <SELECT>, the date "fecha" has to be entered with the numeric keys.
•Exit the inquiries with <QUIT>. You are one level higher in the "configuration" menu showing the title "ajustes varios" (auxiliaries).
<QUIT> |
|
• Press <QUIT> once again to exit the "configuration" |
|
|
menu and return to the standby state. |
|
|
All the dialog texts will now be displayed in Spanish. |
DET pH |
******** |
|
|
|
If you prefer English as the displayed dialog lan- |
|
|
guage, proceed as before and select "English". |
|
|
10 |
794 Basic Titrino |
|

2.4 Tutorial
2.4.2 Development of a method, titration of an acid
Selection of the mode
|
<MODE> |
|
|
mode |
|
mode |
DET |
|
|
|
<ENTER> |
|
|
DET pH |
******** |
DET: |
pH |
|
|
4 × <SELECT>
•Press <MODE> repeatedly until "DET" appears in the display. For a description of the DET mode see page 25.
•Confirm "DET" with <ENTER>
•Now select the measured quantity: Press <SELECT> repeatedly until "pH" appears again in the display.
Confirm the measured quantity "pH" with <ENTER>.
|
|
You are now ready to titrate. |
|
DET pH |
******** |
||
|
|||
|
|
|
For the titration put a Exchange Unit with c(NaOH) = 0.1 mol/L on the Titrino and rinse the tubing and the buret Tipp with <DOS>. Fill the buret again with <STOP/FILL>.
Plug a combined pH glass electrode into measuring input 1 (Ind I).
Pipette 2 mL c(HCl) = 0.1 mol/L into your titration vessel, dilute with ca. 20 mL dist. water. Put a magnetic stirrer in the titration vessel and place buret tip and electrode in the probe, see page 157 for their arrangement.
Start the stirrer and press <START>
During the titration the first line of the display shows the current measured value and the volume already dispensed:
pH 3.02 |
0.351 ml |
|
|
As soon as the instrument has found an equivalence point, this is shown on the second line:
pH 7.64 |
2.083 ml |
|
EP1 |
|
|
Let the titration continue for a short while, e.g. until ca. pH 11.50. Now stop it with <STOP>.
DET pH |
******** |
EP1 |
2.083 ml pH 7.64 |
|
|
The first line now shows the mode "DET pH" and the name of the chosen method (here "********" because this method has not been saved under a own name until now). Of interest is the second line, which shows the equivalence point found.
794 Basic Titrino |
11 |
|

2.4. Tutorial
If more than one equivalence point has been found, the others can be viewed with <ENTER>.
Calculation of the result: formula entry
<DEF>
def >formula
<ENTER>
RS?
<1>
RS1=
RS1=EP1*C01*C02/C00
<ENTER>
>formula |
|
RS1 text |
RS1 |
|
|
|
|
>formula |
|
RS1 decimal places |
2 |
|
|
|
|
>formula |
|
RS1 unit |
% |
|
|
<SELECT> |
|
<ENTER> |
|
|
|
RS? |
|
|
|
2 x <QUIT> |
|
With this equivalence point a result can be calculated.
•Press the <DEF> key.
•Press <ENTER> to move on to the formula entry. The display now shows "RS?".
•Press "1", i.e. the first formula.
You now can enter a formula. Note here the top inscription on the keys of the keypad and the numbers. The following symbols can be used:
EP# EP's with 1-digit number, e.g. EP1.
RS# Previously calculated results, e.g. RS1 in the second formula.
C## Calculation constant with 2-digit number, e.g. C01. C00 is reserved for the sample size. For the meaning of the calculation constants see page 53.
Calculate the content of your hydrochloric acid in g/L: RS1=EP1*C01*C02/C00
End point*conc.(titrant)*molecular weight/sample size To correct a formula, delete it with <CLEAR>.
•Confirm the formula with <ENTER>.
•You may enter a text for the result output, see page 8.
•Enter the desired number of decimal places for the result.
•Select the desired unit g/L with <SELECT>, or type a text as unit, see page 8.
The Titrino prompts for the calculation of the next result.
Quit the formula entry by pressing <QUIT> twice.
In order to be able to calculate the result, enter the calculation constants used in the formula.
12 |
794 Basic Titrino |
|

2.4 Tutorial
Entry of the calculation constants
<C-FMLA> |
|
• Press <C-FMLA>. |
|
|
The constants which have been used in the formula |
|
|
are requested: input with digit keys, confirm with |
C-fmla |
|
|
|
<ENTER>. |
|
>C01 |
0.0 |
|
|
|
C01: Concentration of your titrant= 0.1 mol/L. Enter |
|
|
|
|
0.1. |
|
|
|
C02: Molar mass of HCl = 36.47 g/mol |
Entry of the sample size
4 x <SMPL DATA>
smpl |
data |
|
smpl |
size |
1.0 g |
|
|
|
•Press <SMPL DATA> repeatedly until "sample size" appears in the display.
<2> |
|
• Enter 2. |
<ENTER> |
|
|
|
|
|
smpl data |
|
|
smpl unit: |
g |
|
|
|
|
<SELECT> |
|
• Use <SELECT> to select the unit "mL" and confirm |
<ENTER> |
|
the new value with <ENTER>. |
|
|
The result is now calculated and can be displayed in place of the equivalence point. If your method already includes a formula at the end of the titration, the calculated result is displayed directly after the titration. As we have entered the formula later, we now have to select the result display:
Display of the result |
|
|
<SELECT> |
|
|
DET pH |
******** |
>display results
•Press <SELECT> repeatedly until ">display results" appears in the display.
|
<ENTER> |
• Press <ENTER> to move to the result display. |
|
|
|
DET pH |
******** |
|
RS1 |
3.80 g/l |
|
|
|
|
794 Basic Titrino |
13 |
|

2.4. Tutorial
If you have a printer connected, you probably wish to have the curve and a result report printed out automatically at the end of a titration.
To install a printer, see page 150.
Print reports
4 x <DEF> |
• Press <DEF> repeatedly until the display shows: |
def >report
<ENTER>
report:
6 x <SELECT> <;>
9 x <SELECT>
report:curve;full
<ENTER>
<QUIT>
•Press <ENTER> to move to the definition of reports.
•With <SELECT> you select the individual repot blocks. Use a ";" as delimiter between the report blocks to print more than one block. If you wish to print out a curve and a full result report, enter "curve;full".
•Confirm the entry with <ENTER> and quit the inquiries with <QUIT>.
Now print your reports by pressing <PRINT><REPORTS><ENTER>. Your printout will look like the following:
'cu |
|
|
|
|
|
794 |
Titrino |
|
01102 |
794.0010 |
|
date 2002-01-03 |
|
time 17:34 |
1 |
||
start V |
0.000 ml |
DET pH |
******** |
||
1.0 |
ml/div |
|
dpH=2.0/div |
|
|
|
|
|
|||
|
−−−−−−−−−−−−−−−− |
|
|||
'fr |
|
|
|
|
|
794 |
Titrino |
|
01102 |
794.0010 |
|
date 2002-01-03 |
|
time 17:34 |
1 |
||
pH(init) |
|
2.88 |
DET pH |
******** |
|
smpl size |
|
2 |
ml |
|
|
EP1 |
|
|
2.083 |
ml |
7.64 |
RS1 |
|
|
3.80 |
g/l |
|
manual stop |
|
|
|
|
|
−−−−−−−−−−−−−−−−
Identification of the report type (cu=curve)
Start volume, mode and method name Scaling of curve axis
Identification of the report type (fr=full report) Device type with identification and program version
Initial pH, mode and method name
Volume and pH value of EP1
Calculated result
14 |
794 Basic Titrino |
|

2.4 Tutorial
So that you do not have to stop your titration manually each time, let us add a stop criterion for the titration.
Stop criterion
2 x <PARAM>
parameters >stop conditions
•Press <PARAM> twice to display the title ">stop conditions".
|
<ENTER> |
|
|
>stop conditions |
|
stop V: |
abs. |
|
|
|
<ENTER> |
>stop conditions |
|
stop V: |
99.99 ml |
|
|
|
<ENTER> |
|
|
>stop conditions |
|
stop pH |
OFF |
|
|
<ENTER>
2 x <QUIT>
•Open this group of inquiries with <ENTER>.
Absolute stop volume. This can be used as a safety measure to prevent overflow of the titration vessel.
The magnitude of the absolute stop volume. Set a value that appears suitable for your titration vessel.
Set the pH value, e.g. pH=11.5 as the expected stop criterion.
If several stop criteria have been set, the one that is reached first applies.
Confirm your entries with <ENTER> and quit the inquiry with <QUIT>.
The development of your method is now complete. Before we store it in the method memory, you should check it again. Prepare a fresh sample and restart the titration with <START>.
If everything appears to be all right, you can now store the method in the method memory.
794 Basic Titrino |
15 |
|
2.4. Tutorial
2.4.3 Storage and loading of methods
Now store the method you have just developed in the method memory.
Storage of a method
2 × <USER METH>
user methods >store method
•Press <USER METH> repeatedly until the title ">store method" appears in the display.
<ENTER>
>store method
method name: ********
<ENTER>
•Open the inquiry with <ENTER>.
•Enter an identifier, e.g. 1 or Acid. For text input see page 8.
|
|
The method now runs under the name "Acid". It is ready |
|
DET pH |
Acid |
||
to titrate. |
|||
|
|
||
|
|
|
If you have a printer connected, you can print out the contents of your method memory. Key sequence: <PRINT><USER METH><ENTER>
Stored methods can be loaded at any time.
Loading a method from the method memory
<USER METH> |
• Press <USER METH>. The display shows the title |
|
|
">recall method". |
|
user methods |
||
|
||
>recall method |
|
|
|
|
<ENTER>
>recall method
method name: ********
<SELECT> or
direct entry
<ENTER>
DET pH |
Acid |
|
|
•Open the inquiry <ENTER>
•You can select the desired method with <SELECT> (it shows all methods of the method memory one after the other) or by directly enter the method name.
•Load the method with <ENTER>
The method is ready to titrate.
16 |
794 Basic Titrino |
|
2.4 Tutorial
2.4.4 pH calibration
pH calibrations are not a requirement for pH titrations, when the equivalence point is determined from a curve. For end-point titrations, however, where titration is performed to a fixed, specified pH value, a calibration should be performed.
Selection of the calibration mode, CAL
<MODE> |
|
• Press <MODE> repeatedly until "CAL" appears in |
|
|
the display and confirm the mode with <ENTER>. |
mode |
|
|
|
|
|
mode |
CAL |
|
|
|
|
<ENTER>
CAL |
******** |
pH(as) 7.00 slope |
1.000 |
|
|
Calibration procedure
The instrument is ready for a 2-point calibration. The second display line shows the current calibration data for measuring input 1.
<START>
CAL |
|
cal.temp. |
25.0°C |
<ENTER>
|
|
25.0°C |
buffer 1 |
pH |
7.00 |
|
|
|
|
<ENTER> |
|
|
|
|
|
|
25.0°C |
buffer 2 |
pH |
4.00 |
|
|
|
<ENTER> oder <STOP>
•Immerse your electrode in the first buffer and start the calibration procedure.
Inquiry of calibration temperature.
•Enter the current temperature. If you have a temperature sensor connected, this inquiry is skipped.
pH value of the first buffer.
•Enter the pH value of the buffer at your calibration temperature.
The voltage of the first buffer is measured. When the measured value has met the set drift criterion, the measurement is stopped and the pH value of the second buffer is requested.
•Now enter the pH value of the second buffer. If you require a 1-point calibration, you can also terminate the calibration with <STOP>.
CAL |
******** |
At the end of the calibration, the calibration data ob- |
pH(as) 6.89 slope |
0.985 |
tained are displayed: asymmetry pH and slope. |
|
|
|
The calibration data can be viewed at any time under the <CAL.DATA> key. Our calibration data are stored under ">input 1".
The calibration report can be printed out at any time with the key sequence: <PRINT><CAL.DATA><ENTER>
794 Basic Titrino |
17 |
|

2.4. Tutorial
2.4.5 Statistics, acid capacity of drinking water
Let us now determine the acid capacity of drinking water. For this, the SET (set endpoint titration) mode is used to titrate to pH = 4.3.
First select the mode SET pH (keys <MODE> and <SELECT>).
Now set the end point.
Entry of the end point and the control parameters
<PARAM> |
|
• Press <PARAM>. The display shows: |
|
|
|
parameters |
|
Control parameters for EP1 |
>SET1 |
|
|
|
|
|
<ENTER> |
|
|
|
|
|
>SET1 |
|
|
EP at pH |
OFF |
|
|
|
• Set the end point to pH = 4.3. |
|
|
|
>SET1 |
|
|
EP at pH |
4.3 |
|
|
|
|
|
<ENTER> |
|
|
>SET1 |
|
dynamics |
OFF |
|
|
|
|
>SET1 |
|
dynamics |
3 |
|
|
|
<ENTER> |
|
|
>SET1 |
|
max.rate |
10.0 ml/min |
|
|
|
<ENTER> |
|
|
>SET1 |
|
min.rate |
25.0µl/min |
|
|
2 × <QUIT>
•Dynamics means the control range in which the adding of the titrant is controlled in dependence on the measured value (OFF: largest control range, i.e. slow titration).
With buffered systems such as drinking water, this value can be set lower, e.g. to 3. I.e. 3 pH units before the set EP controlled dosing starts.
Maximum possible titration rate inside the control range.
Minimum titration rate inside the control range.
• Quit the inquiry with <QUIT>.
Mount an Exchange Unit with c(HCl) = 0.1 mol/L as titrant. Add 25 mL drinking water as sample and start the titration with <START>. During the titration the first line of the display shows the measured value and dispensed volume. The "c" in pHc shows that the electrode assembly has been calibrated. The second line shows a "control bar", which indicates the control deviation of the current measured value from the set end point.
pHc 6.34 |
0.426 ml |
#====== |
|
|
|
18 |
794 Basic Titrino |
|

2.4 Tutorial
If the titration runs too slow or too fast, you can change the control parameters during the titration. If you wish to titrate faster, change the following parameters:
•dynamics: lower value, the control range becomes smaller (Attention: possibility of titrating over the set EP)
•max.rate: bigger value
•min.rate: bigger value
You will find further details of the control parameters on page 42.
After the titration, end point volume and pH value at the end point are displayed.
For the evaluation enter: |
|
|
|
|
the formula to calculate the m value |
|
|
|
|
(key <DEF>) |
RS1=EP1*C01*C02 |
|
||
with an accuracy of |
RS1 decimal places |
2 |
||
the unit |
RS1 unit: |
|
mmol/L |
|
and the calculation constants |
C01 |
1 |
(concentration of titrant ×10) |
|
(key <C-FMLA>) |
C02 |
4 |
(factor for the sample size 100 mL/25 mL) |
|
If you have a printer connected, select the automatic titration report (key <DEF>): "report:full". You can print out the results of the previous titration with keys
<PRINT><REPORTS><ENTER>.
If the previous titration has run to your satisfaction, you can start thinking about performing statistics calculations. Have you already added a new sample to the titration vessel? If you are no longer certain, you can find out immediately with <MEAS/HOLD>.
Rapid measurement between titrations
Press <MEAS/HOLD>. The pH value of your sample is displayed. You can stop the measurement with a second <MEAS/HOLD>.
Statistics calculations
Now switch on the statistics calculations. Press <STATISTICS>. The "Statistics" LED is on. Duplicate determinations are now performed.
• Perform 2 titrations.
794 Basic Titrino |
19 |
|
2.4. Tutorial
After the second titration you receive a printout with statistics calculations:
'fr |
|
|
|
794 Titrino |
01102 |
794.0010 |
|
date 2002-01-03 |
|
time 17:34 |
3 |
pHc(init) |
6.29 |
SET pH |
******** |
EP1 |
0.0628 ml |
4.26 |
|
m value |
5.02 |
mmol/l |
|
mean(2) |
+/s |
s/% |
|
m value |
5.04 |
0.028 mmol/l 0.56 |
|
============== |
|
||
|
|
|
|
If you have no printer connected, you can view the mean value and standard deviation:
•Press <SELECT> until "display mean" appears in the display.
•With <ENTER> you obtain the mean value.
•A second <ENTER> displays the number of single values which have been used for the mean calculation.
•If you press <SELECT> again, the display "display std.deviation" appears. Once again, you can view this value, by pressing <ENTER>.
Perhaps you have noticed that the two values differ too greatly? In any case, we shall perform a third determination with the same sample. The result of this determination will be another value which is incorporated in the statistics calculations.
Addition of more determinations for the statistics calculations
5 × <PARAM>
parameters >statistics
<ENTER>
>statistics
status: ON
<ENTER>
>statistics |
|
mean: |
n= 2 |
<3>
<ENTER>
•Press <PARAM> until the display shows:
•Statistics calculations can be switched on either with the <STATISTICS> key or in the inquiry "status:". We shall leave them switched on and proceed to the next inquiry.
Mean value of 2 single determinations.
• Enter "3" to include an additional determination.
2 × <QUIT> |
• Quit the inquiry. |
Perform another titration.
20 |
794 Basic Titrino |
|

2.4 Tutorial
You can now decide which of the results is an "outlier". You can delete it from the statistics calculation.
Deleting a result from the statistics calculation
5 × <PARAM> |
|
• Press <PARAM> until the display shows: |
|
|
|
|
|
parameters |
|
|
|
>statistics |
|
|
|
|
|
• Select with <ENTER> the inquiry of the result table |
|
3 × <ENTER> |
|
||
|
|
|
"res.tab:" |
|
|
|
|
>statistics |
|
|
|
res.tab: |
original |
|
|
|
|
• To delete a single result with index n from the result |
|
2 × <SELECT> |
|
||
|
|
|
table, press <SELECT> so that "delete n" appears. |
>statistics |
|
|
|
|
|
|
|
res.tab: |
delete n |
|
|
|
|
|
|
<ENTER> |
|
|
|
|
|
|
• Enter index n of the result you wish to delete; in our |
>statistics |
|
|
|
|
|
example the second: |
|
delete |
n= |
1 |
|
|
|
|
|
<2> |
|
|
|
<ENTER> |
|
|
|
2 × <QUIT> |
|
• Quit the inquiry by pressing <QUIT>. |
|
|
|
|
Mean value and standard deviation are recalculated |
|
|
|
and can be viewed in the display. |
With <PRINT><REPORTS><ENTER> you can print a fresh report.
With <PRINT> <STATISTICS><ENTER> you can print a statistics overview, in this report the deleted result is marked with a " " in the report.
794 Basic Titrino |
21 |
|

2.5. Configuration, key <CONFIG>
2.5 Configuration, key <CONFIG>
|
|
|
|
Key <CONFIG> serves to enter device specific data. |
|
|
CONFIG |
|
|
The set values apply to all modes. |
|
|
|
|
|
peripheral units: |
|
|
configuration |
|
|
||
|
|
|
Selection of printer, balance and the curve at the ana- |
||
|
>peripheral units |
|
|||
|
|
|
|
log output. |
|
|
|
|
|
|
|
|
|
|
|
auxiliaries: |
|
|
|
|
|
e.g. setting of dialog language, date, time, etc. |
|
|
|
|
|
RS232 settings: |
|
|
|
|
|
RS parameters for the COM interface. |
|
|
|
|
|
common variables: |
|
|
|
|
|
Values of common variables. |
|
|
|
|
|
The display texts of the Titrino are shown to the left. |
|
|
|
|
|
The values are the default values. |
|
|
|
|
|
|
|
|
>peripheral units |
|
|
Settings for peripheral units |
|
|
send to: |
IBM |
Selection of printer (Epson, Seiko, Citizen, HP, IBM) at |
||
|
|
|
|
the Titrino Rs232 interface. |
|
|
|
|
|
"Epson", for Epson |
|
|
|
|
|
"Seiko", e.g. for DPU-414 |
|
|
|
|
|
"Citizen", e.g. for iDP 562 RS, Custom DP40-S4N |
|
|
|
|
|
"HP" e.g. for Desk Jet types. Place curves always at the |
|
|
|
|
|
beginning of a page as you cannot have them over 2 |
|
|
|
|
|
pages. |
|
|
|
|
|
"IBM" for all printers with IBM character set Table 437 |
|
|
|
|
|
and IBM graphics, as well as for the data transmission |
|
|
|
|
|
to a computer with Metrodata software TiNET or |
|
|
|
|
|
VESUV. |
|
|
balance: |
Sartorius |
Selection of balance (Sartorius, Mettler, Mettler AT, |
||
|
|
|
|
AND, Precisa) |
|
|
|
|
|
Sartorius: |
Models MP8, MC1 |
|
|
|
|
Mettler: |
Models AM, PM, AX, MX, UMX and |
|
|
|
|
|
balances with 011, 012, or 016 interface |
|
|
|
|
Mettler AT: |
Model AT |
|
|
|
|
AND: |
Models ER-60, 120, 180, 182, FR-200, 300 |
|
|
|
|
|
and FX-200, 300, 320 |
|
|
|
|
Precisa: |
Models with RS232C interface |
|
record: |
U |
Selection of the curve for the output at the analog |
||
|
|
|
|
output (U, dU/dt, V, dV/dt, U(rel), T |
|
|
|
|
|
U:. |
Voltage |
|
|
|
|
dU/dt: |
Measured value drift |
|
|
|
|
V: |
Volume |
|
|
|
|
dV/dt |
Volume drift |
|
|
|
|
U(rel): |
Control deviation with SET |
|
|
|
|
T: |
Temperature with MEAS T |
22 |
794 Basic Titrino |
|

|
|
|
2.5 Configuration, key <CONFIG> |
||
|
|
|
|
|
|
|
|
|
|
|
|
|
>auxiliaries |
|
General settings |
||
|
dialog: |
english |
Selection of dialog language (english, deutsch, |
||
|
|
|
francais, español, italiano, portugese, svenska) |
||
|
date |
2001-01-03 |
Current date (YYYY-MM-DD) |
||
|
|
|
Format: Year-month-day, entry with leading zeros. |
||
|
time |
08:13 |
Current time (HH-MM) |
||
|
|
|
Format: Hours-minutes, entry with leading zeros. |
||
|
run number |
0 |
Current run number for result output (0...9999) |
||
|
|
|
The sample number is set to 0 when the instrument is |
||
|
|
|
switched on and incremented on every determination. |
||
|
auto start |
OFF |
Automatic starts of titrations. (1...9999, OFF) |
||
|
|
|
Number of automatic starts ("number of samples"). |
||
|
|
|
Used for instrument interconnections in which the |
||
|
|
|
external instrument does not initiate a start. Not |
||
|
|
|
advisable in connections with Sample Changers. |
||
|
start delay |
0 s |
Start delay (0...999999 s) |
||
|
|
|
Delay time after start of methods. Abort start delay time |
||
|
|
|
with <QUIT>. |
||
|
dev.label. |
|
Individual identification of devices (up to 8 ASCII |
||
|
|
|
characters) |
||
|
|
|
Will be printed in the result report, see page 59. |
||
|
program |
794.0010 |
Display of program version |
||
|
|
|
|
|
|
|
>RS232 settings |
|
Settings of RS232 interface |
||
|
|
|
see also page 125ff. |
||
|
baud rate: |
9600 |
Baud rate (300, 600, 1200, 2400, 4800, 9600) |
||
|
data bit: |
8 |
Data bit (7, 8) |
||
|
stop bit: |
1 |
Stop bit (1, 2) |
||
|
parity: |
none |
Parity (even, odd, none) |
||
|
handshake: |
HWs |
Handshake (HWs, HWf, SWline, SWchar, none) |
||
|
|
|
see page 125ff. |
||
|
RS control: |
ON |
Control via RS232 interface (ON, OFF) |
||
|
|
|
"OFF" means that the receipt of commands via the |
||
|
|
|
RS232 interface is blocked. Data output is possible. |
||
|
|
|
|
|
|
794 Basic Titrino |
23 |
|
2.6. Selection of the mode, key <MODE>
>common variables |
|
Values of the common variables |
C30 |
0.0 |
Common variables C30...C39 (0.. ± 999 999) |
etc. |
|
The values of all common variables are displayed. For |
|
|
creating of common variables see page 57. |
|
|
|
2.6 Selection of the mode, key <MODE>
MODE ;
–
>
Press key <MODE> until the desired mode is displayed and confirm with <ENTER>.
Select the measured quantity pH, U, Ipol, Upol, (T) with <SELECT> and confirm it also with <ENTER>.
The following modes can be selected:
•DET: Dynamic Equivalence-point Titration
•MET: Monotonic Equivalence-point Titration
•SET: Set Endpoint Titration.
•CAL: pH Calibration.
•MEAS: Measuring.
•TIP: Titration Procedure. Linking of various commands and methods to a titration procedure.
These standard modes are equipped with a set of standard parameters. They only need few settings in order to be ready to work.
TIP is an empty "shell". The TIP sequence has to be defined with <DEF>, see page 62.
24 |
794 Basic Titrino |
|
2.6 Selection of the mode, key <MODE>
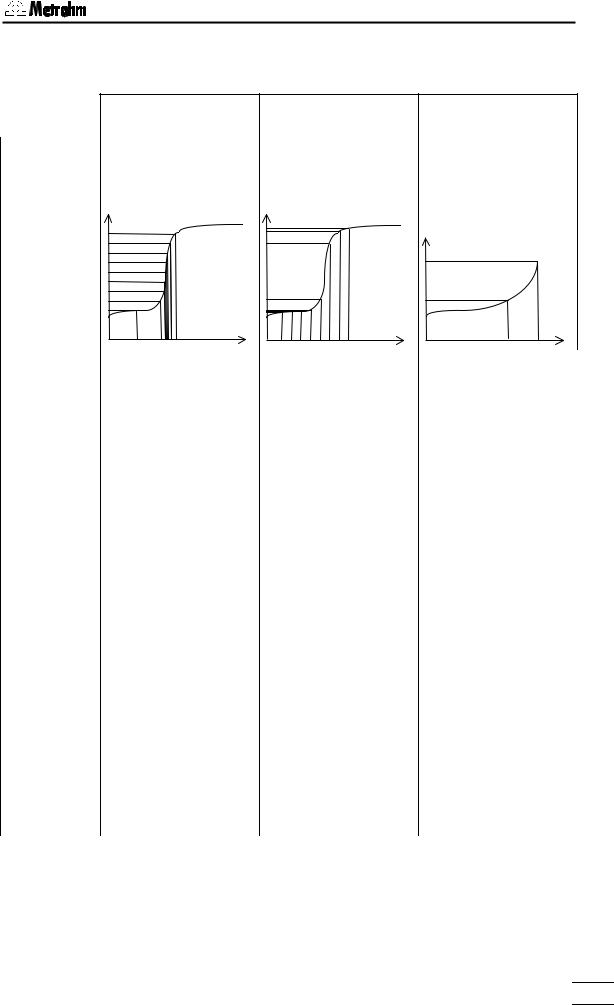
Overview of the titration modes
|
|
DET |
|
|
MET |
|
|
SET, KFT |
|||
|
Dynamic Equivalence |
Monotonic Equivalence |
|
Endpoint Titration |
|||||||
|
point Titration |
|
point Titration |
|
|
|
|
|
|
||
Reagent feeding: |
Reagent feeding: |
Titration to preset end-point. |
|||||||||
Variable volume increments, |
Constant volume incre- |
|
|
|
|
|
|
||||
depending on the slope of |
ments, independent of the |
|
|
|
|
|
|
||||
the curve. |
slope of the curve. |
|
|
|
|
|
|
||||
|
|
|
|
|
|
|
|
|
|
|
|
|
U/mV |
|
|
|
|
|
|
|
|
|
|
|
|
|
U/mV |
|
|
|
|
|
|
|
|
|
|
|
|
|
|
|
U/mV |
|
|
|
|
|
|
|
|
|
|
|
|
|
|
|
|
|
|
|
|
|
|
|
|
|
|
|
|
|
|
|
|
|
|
|
|
|
EP |
|
|
|
|
|
|
|
|
|
|
|
|
|
|
|
|
|
|
|
|
|
|
|
|
|
|
|
|
|
|
|
|
|
|
|
|
|
|
|
|
|
|
|
|
|
Control |
|
|
|
|
Titration |
|
|
|
|
range |
|
|
|
|
||
|
V/mL |
|
V/mL |
|
|
|
|
|
|
|
V/mL |
||
|
|
|
|
|
||
|
Acquisition of measured |
Acquisition of measured |
Acquisition of measured |
|||
|
values: |
values: |
values: |
|||
|
Drift controlled ("equilibrium |
Drift controlled ("equilibrium |
Continuously |
|||
|
titration") |
titration") |
|
|
|
|
|
and/or |
|
and/or |
|
|
|
|
after a fixed equilibration |
after a fixed equilibration |
|
|
|
|
|
time. |
time. |
|
|
|
|
|
|
|
|
|
||
|
The evaluation of EP' s is |
The evaluation of EP's is |
Volume that has been dis- |
|||
|
based on the zero crossing |
based on the Fortuin inter- |
pensed up to the endpoint |
|||
|
of the second derivative with |
polation. |
(EPX in mL). |
|||
|
a Metrohm correction for the |
Recognition criteria: |
|
|
|
|
|
distortion of the curve from |
|
|
|
||
Evaluation |
superimposed jumps. Can |
all EP's |
|
|
|
|
be combined with selectable |
only the last EP |
|
|
|
||
|
recognition criteria. |
only the greatest EP |
|
|
|
|
|
Recognition criteria: |
EP windows |
|
|
|
|
|
|
|
|
|
|
|
|
as for MET |
|
|
|
|
|
|
|
|
|
|
|
|
|
Suitable titration mode for |
For |
|
• |
For rapid, quantitative |
|
|
most problems. Specially |
• |
slow titration reactions |
|
determinations in ana- |
|
|
recommended if jumps lie |
|
(diazotations, coupling |
|
lytical chemistry. Re- |
|
|
very close together and for |
|
reactions) |
|
quirement: EP of the ti- |
|
|
very flat jumps. |
• |
sluggish electrode |
|
tration reaction is |
|
Applications |
Note: The reagent feeding |
|
response. |
|
known and does not |
|
|
|
|
change during a de- |
|||
|
algorithm is based on meas- |
|
|
|
termination series. |
|
|
ured data. The curve should |
|
|
• |
If an excess of titrant |
|
|
therefore not deviate |
|
|
|
must be avoided. |
|
|
markedly from S-shape. |
|
|
|
|
|
|
|
|
|
|
|
|
794 Basic Titrino |
25 |
|
2.7. Parameters, key <PARAM>
2.7 Parameters, key <PARAM>
|
The key <PARAM> is used for the entry of values that |
PARAM |
determine the modes. Values marked with "cond." are |
|
accessible during the conditioning in the SET mode. |
|
"**titr." means that these values can be changed dur- |
|
ing the titration. They influence the ongoing determina- |
|
tion. Other values can only be changed in the inactive |
|
state. |
|
The display texts of the Titrino are shown to the left. |
|
The values are the default values. |
|
|
2.7.1 Parameters for DET and MET
|
|
|
titration parameters |
|
parameters |
|
|
|
|
determine the course of the titration and measured |
|
|
>titration parameters |
||
|
|
|
value acquisition. |
|
|
|
|
|
|
|
stop conditions: |
|
|
|
Parameters for the automatic termination of the titra- |
|
|
|
tion. |
|
|
|
statistics: |
|
|
|
Calculation of mean values and standard deviation, |
|
|
|
see also page 55. |
|
|
|
evaluation: |
|
|
|
Parameters for the evaluation of EP's, fix EP's, and |
|
|
|
pK/HNP. |
|
|
|
preselections: |
|
|
|
ON/OFF of various auxiliary functions such as auto- |
|
|
|
matic requests after the start and activate pulse. |
|
|
|
|
|
>titration parameters |
General titration parameters |
|
|
meas.pt.density |
4 |
Measuring point density (0...9) |
|
DET |
|
0 means highest density, 9 lowest. Selection of the |
|
|
|
meas.pt.density, see page 32. |
|
min.incr. |
10.0 µl |
Minimum increment (0...999.9 µL) |
|
DET |
|
The increment is dispensed at the beginning of the |
|
|
|
titration and in the region of the equivalence point. |
|
V step |
0.10 ml |
Size of volume increment (0...9.999 mL) |
|
MET |
|
Dosing step. Small volume increments are needed to |
|
|
|
determine blank values or to assure accuracy with |
|
|
|
highly unsymmetrical curves. Selection of size of the |
|
|
|
increment, see page 33. |
|
|
|
|
26 |
794 Basic Titrino |
|
Loading...