


|
|
|
GB |
Resipro Saw |
Instruction manual |
|
|
|
F |
Scie recipro |
Manuel d’instructions |
|
|
|
D |
Reciprosäge |
Betriebsanleitung |
|
|
|
I |
Seghetto diritto |
Istruzioni per l’uso |
|
|
|
NL |
Reciprozaag |
Gebruiksaanwijzing |
|
|
|
E |
Sierra de sable |
Manual de instrucciones |
|
|
|
P |
Serra de sabre |
Manual de instruções |
|
|
|
DK |
Bajonet sav |
Brugsanvisning |
|
|
|
S |
Rak sticksåg |
Bruksanvisning |
|
|
|
N |
Bajonettsag |
Bruksanvisning |
|
|
|
SF |
Puukkosaha |
Käyttöohje |
|
|
|
GR |
Παλινδρ µικ πρι νι |
δηγίες ρήσης |
|
|
|
JR3060T
JR3070CT

|
A |
1 |
2 |
|
|
1 |
|
3 |
4 |
B |
|
2 |
1 |
2 |
|
5 |
6 |
3 |
4 |
7 |
5 |
11 |
7 |
2 |
9 |
8 |
10 |
|
||
6 |
|
|
|
12 |
|
8 |
|
|
13
9 |
10 |
14
15
11
Symbols
The following show the symbols used for the tool. Be sure that you understand their meaning before use.
Symboles
Nous donnons ci-dessous les symboles utilisés pour l’outil. Assurez-vous que vous en avez bien compris la signification avant d’utiliser l’outil.
Symbole
Die folgenden Symbole werden für die Maschine verwendet. Machen Sie sich vor der Benutzung unbedingt mit ihrer Bedeutung vertraut.
Symboli
Per questo utensile vengono usati i simboli seguenti. Bisogna capire il loro significato prima di usare l’utensile.
Symbolen
Voor dit gereedschap worden de volgende symbolen gebruikt. Zorg ervoor dat u de betekenis van deze symbolen begrijpt alvorens het gereedschap te gebruiken.
Símbolos
A continuación se muestran los símbolos utilizados con esta herramienta. Asegúrese de que entiende su significado antes de usarla.
Símbolos
O seguinte mostra os símbolos utilizados para a ferramenta. Certifique-se de que compreende o seu significado antes da utilização.
Symboler
Nedenstående symboler er anvendt i forbindelse med denne maskine. Vær sikker på, at De har forstået symbolernes betydning, før maskinen anvendes.
Symboler
Det följande visar de symboler som används för den här maskinen. Se noga till att du förstår deras innebörd innan maskinen används.
Symbolene
Følgende viser de symblene som brukes for maskinen. Det er viktig å forstå betydningen av disse før maskinen tas i bruk.
3

Symbolit
Alla on esitetty koneessa käytetyt symbolit. Opettele näiden merkitys, ennen kuin käytät konetta.
Σύµ λα
Τα ακ λ υθα δεί ν υν τα σύµ λα π υ ρησιµ π ι ύνται για τ µη άνηµα. Βε αιωθείτε τι καταλα αίνετε τη σηµασία τ υς πριν απ τη ρήση.
Read instruction manual.
Lire le mode d’emploi.
Bitte Betriebsanleitung lesen.
Leggete il manuale di istruzioni.
Lees de gebruiksaanwijzing.
Lea el manual de instrucciones.
DOUBLE INSULATION
DOUBLE ISOLATION
DOPPELT SCHUTZISOLIERT
DOPPIO ISOLAMENTO
DUBBELE ISOLATIE
DOBLE AISLAMIENTO
Leia o manual de instruções.
Læs brugsanvisningen.
Läs bruksanvisningen.
Les bruksanvisingen.
Katso käyttöohjeita.
∆ια άστε τις δηγίες ρήσης.
DUPLO ISOLAMENTO
DOBBELT ISOLERET
DUBBEL ISOLERING
DOBBEL ISOLERING
KAKSINKERTAINEN ERIST
∆ΙΠΛΗ Μ#ΝΩΣΗ
4

ENGLISH
Explanation of general view
1 |
Shoe |
6 |
Lock button |
11 |
Blade |
2 |
Shoe button |
7 |
Adjusting dial |
12 |
Blade clamp lever |
3 |
Lever |
8 |
Blade clamp lever |
13 |
Limit mark |
4 |
Stopper |
9 |
Released position |
14 |
Brush holder cap |
5 |
Switch trigger |
10 |
Fixed position |
15 |
Screwdriver |
|
|
|
|
|
|
SPECIFICATIONS
Model |
JR3060T/JR3070CT |
Length of stroke ...................................................... |
32 mm |
Max. cutting capacities |
|
Pipe ............................................................... |
130 mm |
Wood ............................................................. |
255 mm |
Strokes per minute (min-1) ................................... |
0 - 2,800 |
Overall length............................................................... |
485 |
Net weight.............................................. |
4.2 kg (JR3060T) |
...................................................... |
4.4 kg (JR3070CT) |
Safety class ................................................................ |
/II |
•Due to our continuing program of research and development, the specifications herein are subject to change without notice.
•Note: Specifications may differ from country to country.
Intended use
The tool is intended for sawing wood, plastic, metal and building materials with a strong impact. It is suitable for straight and curved cutting.
Power supply
The tool should be connected only to a power supply of the same voltage as indicated on the nameplate, and can only be operated on single-phase AC supply. They are double-insulated in accordance with European Standard and can, therefore, also be used from sockets without earth wire.
ADDITIONAL SAFETY RULES FOR TOOL
GEB008-1
DO NOT let comfort or familiarity with product (gained from repeated use) replace strict adherence to recipro saw safety rules. If you use this tool unsafely or incorrectly, you can suffer serious personal injury.
1.Hold power tool by insulated gripping surfaces when performing an operation where the cutting tool may contact hidden wiring or its own cord. Contact with a “live” wire will make exposed metal parts of the tool “live” and shock the operator.
2.Use clamps or another practical way to secure and support the workpiece to a stable platform. Holding the work by hand or against your body leaves it unstable and may lead to loss of control.
3.Always use safety glasses or goggles. Ordinary eye or sun glasses are NOT safety glasses.
4.Avoid cutting nails. Inspect workpiece for any nails and remove them before operation.
5.Do not cut oversize workpiece.
6.Check for the proper clearance beyond the workpiece before cutting so that the blade will not strike the floor, workbench, etc.
7.Hold the tool firmly.
8.Make sure the blade is not contacting the workpiece before the switch is turned on.
9.Keep hands away from moving parts.
10.Do not leave the tool running. Operate the tool only when hand-held.
11.Always switch off and wait for the blade to come to a complete stop before removing the blade from the workpiece.
12.Do not touch the blade or the workpiece immediately after operation; they may be extremely hot and could burn your skin.
13.Do not operate the tool at no-load unnecessarily.
14.Always use the correct dust mask/respirator for the material and application you are working with.
15.Some material contains chemicals which may be toxic. Take caution to prevent dust inhalation and skin contact. Follow material supplier safety data.
5
SAVE THESE INSTRUCTIONS.
WARNING:
MISUSE or failure to follow the safety rules stated in this instruction manual may cause serious personal injury.
FUNCTIONAL DESCRIPTION
CAUTION:
•Always be sure that the tool is switched off and unplugged before adjusting or checking function on the tool.
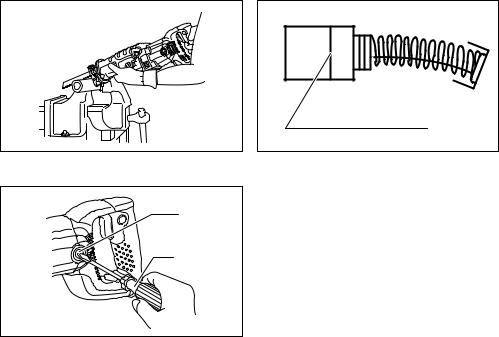
Adjusting the shoe (Fig. 1 & 2)
When the blade loses its cutting efficiency in one place along its cutting edge, reposition the shoe to utilize a sharp, unused portion of its cutting edge. This will help to lengthen the life of the blade. To reposition the shoe, push the shoe button in the “A” direction with a click and reposition as shown in the figure which allows you to make fiveway adjustment. To secure the shoe, push the shoe button in the “B” direction with a click.
Selecting the cutting action (Fig. 3)
This tool can be operated with an orbital or a straight line cutting action. The orbital cutting action thrusts the blade forward on the cutting stroke and greatly increases cutting speed.
To change the cutting action, press the stopper and turn the lever to the desired cutting action position. Then, release the stopper to lock the lever. Refer to the table to select the appropriate cutting action.
Note:
Orbital action means that the saw blade moves up and down, and back and forth at the same time. This increases the efficiency of cutting.
Position |
Cutting action |
Applications |
0 |
Straight line cutting |
For cutting mild steel, |
|
action |
stainless steel and |
|
|
plastics. |
|
|
For clean cuts in |
|
|
wood and plywood. |
I |
Small orbit cutting |
For cutting mild steel, |
|
action |
aluminum and hard |
|
|
wood. |
II |
Medium orbit cutting |
For cutting wood and |
|
action |
plywood. |
|
|
For fast cutting in alu- |
|
|
minum and mild steel |
III |
Large orbit cutting |
For fast cutting in |
|
action |
wood and plywood. |
Switch action (Fig. 4 & 5)
CAUTION:
•Before plugging in the tool, always check to see that the switch trigger actuates properly and returns to the “OFF” position when released.
To start the tool, simply pull the switch trigger. Tool speed is increased by increasing pressure on the switch trigger. Release the switch trigger to stop. For continuous operation, pull the switch trigger and then push in the lock button.
To stop the tool from the locked position, pull the switch trigger fully, then release it.
Speed adjusting dial (For JR3070CT)
The strokes per minute can be adjusted just by turning the adjusting dial. This can be done even while the tool is running. The dial is marked 1 (lowest speed) to 6 (full speed). Turn the adjusting dial without positive stops between 1 and 6 according to your work.
Refer to the table to select the proper speed for the workpiece to be cut. However, the appropriate speed may differ with the type or thickness of the workpiece. In general, higher speeds will allow you to cut workpieces faster but the service life of the blade will be reduced.
Number on adjusting dial |
Strokes per minute |
6 |
2,800 |
5 |
2,500 |
4 |
1,850 |
3 |
1,400 |
2 |
1,000 |
1 |
950 |
|
|
Workpiece to be cut |
Number on adjusting dial |
Wood |
6 |
Autoclaved lightweight |
5 - 6 |
concrete |
|
Mild steel |
3 - 4 |
Aluminum |
3 - 5 |
Plastics |
1 - 4 |
Stainless steel |
1 - 2 |
CAUTION:
•If the tool is operated continuously at low speeds for a long time, the motor will get overloaded and heated up.
•The speed adjusting dial can be turned only as far as 6 and back to 1. Do not force it past 6 or 1, or the speed
adjusting function may no longer work.
The tools equipped with electronic function are easy to operate because of the following features.
Constant speed control
Electronic speed control for obtaining constant speed. Possible to get fine finish, because the rotating speed is kept constant even under load condition.
Soft start feature
Safety and soft start because of suppressed starting shock.
6
 Loading...