


LD060P
Table of contents
 Loading...
D
GB
F
I
E
NL
P
N
FIN
DK
S
TR
CZ
SK
PL
ROM
H
GR
RUS
LV
EST
LT
ROK
CN
Bedienungsanleitung
User Manual
Manuel d'utilisation
Manuale d'uso
Manual de empleo
Gebruiksaanwijzing
Manual de Operação
Brukerhåndbok
Käyttäjän käsikirja
Brugervejledning
Bruksanvisning
Kullanma Kılavuzu
Uživatelská příručka
Návod na použitie
Instrukcja obsługi
Manualul utilizatorului
Használati útmutató
Οδηγίες χρήσης
Руководство пользователя
Lietotāja rokasgrāmata
Kasutusjuhend
Bendrosios instrukcijos
사용자 설명서
用户手册

1
Symbols used in this manual
Makita LD060P
D
GB
F
I
E
NL
P
N
FIN
DK
S
TR
CZ
SK
PL
SLO
HR
H
GR
RUS
LV
EST
LT
ROK
CN
User Manual
English
Congratulations on the purchase of your
Makita LD060P.
The safety instructions and the user
manual should be read through
carefully before you use the
product for the first time. The
person responsible for the product must ensure that
all users understand these directions and adhere to
them.
Symbols used in this manual
The symbols used have the following meaning:
WARNING
Indicates a potentially hazardous situation or
an unintended use which, if not avoided, could result
in death or serious injury.
CAUTION:
Indicates a potentially hazardous situation or
an unintended use which, if not avoided, may result
in minor injury and/or in appreciable material, finan-
cial and environmental damage.
)
Important paragraphs which must be adhered
to in practice, as they enable the product to be used
in a technically correct and efficient manner.
Intended Use
Permitted uses
• Measuring distances
• Computing functions, e.g. areas and volumes
Adverse uses
• Using the instrument without instructions
• Using outside the stated limits
• Deactivation of safety systems and removal of
explanatory and hazard labels
• Opening of the equipment by using tools
(screwdrivers etc.)
• Carrying out modification or conversion of the
product
• Use of accessories from other manufacturers
without the express approval of Makita.
• Deliberate or irresponsible behaviour on scaffol-
ding, when using ladders, when measuring near
machines which are running, or near parts of
machines or installations which are unprotected
• Aiming directly into the sun
• Deliberate dazzling of third parties; even in the
dark
• Inadequate safeguards at the surveying site (e.g
when measuring on roads, construction sites,
etc.)

2
Overview
Makita LD060P
D
GB
F
I
E
NL
P
N
FIN
DK
S
TR
CZ
SK
PL
SLO
HR
H
GR
RUS
LV
EST
LT
ROK
CN
Limits of use
)
Also see section "Technical data".
The Makita LD060P is designed for use in areas
permanently habitable by humans, do not use the
product in explosion hazardous areas or in aggressive
environments.
Responsibilities
Responsibilities of the manufacturer of the
original equipment Makita Corporation Anjo,
Aichi 446-8502, Japan:
Makita is responsible for supplying the product, inclu-
ding the User Manual and original accessories, in a
completely safe condition.
Responsibilities of the manufacturer of non-
Makita accessories:
The manufacturers of non-Makita accessories for the
Makita LD060P are responsible for developing, imple-
menting and communicating safety concepts for their
products. They are also responsible for the effecti-
veness of these safety concepts in combination with
the Makita equipment.
Responsibilities of the person in charge of the
instrument:
WARNING
The person responsible for the instrument
must ensure that the equipment is used in accor-
dance with the instructions. This person is also
accountable for the deployment of personnel and for
their training and for the safety of the equipment
when in use.The person in charge of the product has
the following duties:
• To understand the safety instructions on the
product and the instructions in the user manual.
• To be familiar with local safety regulations rela-
ting to accident prevention.
• To inform Makita immediately if the equipment
becomes unsafe.
Overview
Keyboard
See drawing {A}:
1 ON (ON/MEAS) - button
2 PLUS [+] - button
3 ILLUMINATION - button
4 MEASUREMENT - button
5 TIMER / UNIT - button
6 REFERENCE - button
7 CLEAR / OFF - button
8 HISTORICAL MEMORY - button
9 MINUS [-] - button

3
Start up
Makita LD060P
D
GB
F
I
E
NL
P
N
FIN
DK
S
TR
CZ
SK
PL
SLO
HR
H
GR
RUS
LV
EST
LT
ROK
CN
Display
See drawing {B}
1Laser "ON"
2 Reference (front/rear/end piece)
3Pythagoras
4 Timer (self-triggering)
5 Historical memory
6Area/volume
7 Battery status
8 Units with exponents (
2
/
3
)
9 Intermediate line 2
10 Intermediate line 1
11 Main line
12 min / max display
13 Info symbol
Start up
Inserting / Replacing Batteries
1 Remove battery compartment lid.
See drawing {C}.
2 Insert batteries, observing correct polarity.
3 Close the battery compartment.
• Replace the batteries when the symbol flashes
permanently in the display.
)
Only use alkaline batteries.
)
If the instrument will not be used for a long
time, remove the batteries as a protection against
corrosion.
Operation
Measuring Conditions
Range
Range is limited to 60 m.
At night or dusk and if the target is in shadow the
measuring range without target plate is increased.
Use a target plate to increase the measurement
range during daylight, or if the target has poor reflec-
tion properties!
Target Surfaces
CAUTION:
Measuring errors can occur when measuring
toward colourless liquids (e.g. water) or dust free
glass, Styrofoam or similar semi-permeable surfaces.
Aiming at high gloss surfaces may deflect the laser-
beam and lead to measurement errors.
Hazards of Use
CAUTION:
Watch out for erroneous distance measure-
ments if the instrument is defective or if it has been
dropped or has been misused or modified.
Precautions:
Carry out periodic test measurements.
Particularly after the instrument has been subject to
4
Operation
Makita LD060P
D
GB
F
I
E
NL
P
N
FIN
DK
S
TR
CZ
SK
PL
SLO
HR
H
GR
RUS
LV
EST
LT
ROK
CN
abnormal use, and before, during and after important
measurements.
Make sure the Makita LD060P optic is kept clean and
that there is no mechanical damage to the bumpers.
CAUTION:
In using the instrument for distance measure-
ments or for positioning moving objects (e.g. cranes,
building equipment, platforms, etc.) unforeseen
events may cause erroneous measurements.
Precautions:
Only use this product as a measuring sensor, not as
a control device. Your system must be configured and
operated in such a way, that in case of an erroneous
measurement, malfunction of the device or power
failure due to installed safety measures (e.g. safety
limit switch), it is assured that no damage will occur.
Switching on/off
1x briefly: the instrument and the laser are swit-
ched on.
The display shows the battery symbol until
the next button is pressed.
Pressing this button for longer switches the
instrument off.
The instrument switches off automatically after
three minutes of inactivity.
Setting the instrument
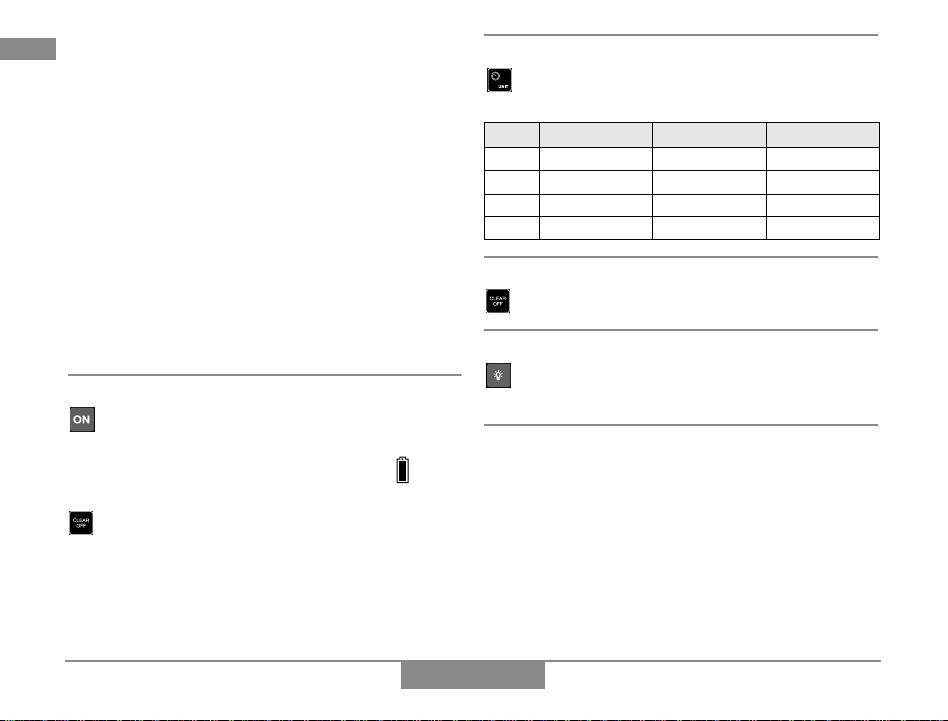
Press long until the desired unit is displayed.
Possible units:
CLEAR-Key
1x briefly: the last action is cancelled.
Illumination
1x briefly: the display illumination is switched on
or off.
Reference Setting
Default reference setting is from the rear of the
instrument.
The instrument can be set for the following measure-
ments:
• To measure from an edge (see drawing {D}), fold
out the stop bracket until it snaps in for the first
time. See drawing {E}.
• To measure out of a corner (see drawing {D}),
fold out the stop bracket until it snaps in, push
Distance Area Volume
1. 0.000 m
0.000 m² 0.000 m³
2. 0'0''
1
/
16
0.00 ft² 0.0 ft³
3. 0 in
1
/
16
0.00 ft² 0.0 ft³
4. 0.00 ft
0.00 ft² 0.0 ft³
5
Measuring
Makita LD060P
D
GB
F
I
E
NL
P
N
FIN
DK
S
TR
CZ
SK
PL
SLO
HR
H
GR
RUS
LV
EST
LT
ROK
CN
the stop bracket with a little force to the right
side; the stop bracket can now be completely
unfolded. See drawing {E}.
CAUTION:
Make sure that when measuring from the
unfolded endpiece, the measuring reference is set to
"End piece"!
1x briefly: the next measurement is taken from
the front edge.
2x briefly: the measurement is taken from the
unfolded end piece.
After one measurement, the reference returns auto-
matically to the default setting (rear reference).
1x long: the measurements are taken with the
front as reference until a new measuring refe-
rence is set
2x long: the measurements are taken from the
unfolded end piece until a new measuring refe-
rence is set.
See drawing {F}.
Measuring
Single Distance Measurement
1x briefly: the laser is activated.
1x briefly: a distance measurement is taken.
The result is displayed immediately.
Continuous measurement
Distances can be measured with this function
1x long: a "beep" is sounded.A continuous
measurement is started.
1x briefly: the continuous measurement is
stopped.
The last measured value is displayed in the summary
line.
Minimum-/Maximum-Measuring
This function enables determining the minimum or
maximum distance from a specific measuring point,
e.g. the determination of room diagonals (maximum
value) or horizontal distance (minimum value).
Switching on continuous measurement (see above).
The corresponding maximum and minimum values are
displayed.
Functions
Addition / Subtraction
Distance Measurement.
1x briefly: the next measurement is added to
the previous one.

6
Functions
Makita LD060P
D
GB
F
I
E
NL
P
N
FIN
DK
S
TR
CZ
SK
PL
SLO
HR
H
GR
RUS
LV
EST
LT
ROK
CN
1x briefly: the next measurement is subtracted
from the previous one.
Repeat this procedure for as many times as required.
The result is displayed in the summary row, the
previously measured value is displayed in interme-
diate line 2, the value to be added in intermediate line
1.
1x briefly: the last step is cancelled.
Area function
1x briefly: The symbol is displayed.
1x briefly: takes first distance measurement
(e.g. length)
1x briefly: takes second distance measurement
(e.g. width)
The result of the area measurement is displayed in
the summary row, the individually measured values
are displayed in intermediate lines 1 and 2.
Adding and subtracting areas
Calling up the area function and measuring areas.
Press or .
1x briefly: takes first distance measurement
(e.g. length)
1x briefly: takes second distance measurement
(e.g. width)
The result of the second area measurement, "+"
flashes.
1x briefly: confirms the addition; the added area
results are displayed in the summary row.
Volume function
2x briefly: the symbol is displayed.
1x briefly: takes first distance measurement
(e.g. length)
1x briefly: takes second distance measurement
(e.g. width)
The result of the area measurement from the values
already measured is displayed in the summary row.
1x briefly: takes the third distance measure-
ment (e.g. height). The value is displayed in
intermediate line 1.
The result of the area measurement is displayed in
the summary row, the two previously measured
values in intermediate lines 1 and 2.
Indirect Measurement
The instrument can measure distances with the
Pythagorean method. This procedure facilitates in
measuring distances that are difficult to access.
)
Adhere to the prescribed sequence of measu-
rements:

7
Functions
Makita LD060P
D
GB
F
I
E
NL
P
N
FIN
DK
S
TR
CZ
SK
PL
SLO
HR
H
GR
RUS
LV
EST
LT
ROK
CN
• All target points must be vertical or horizontal on
the surface of the wall.
• The best results are achieved when the intrument
is rotated around a fixed point (e.g. the stop
bracket is fully extended and the instrument is
placed against a wall).
• To take the measurement, the minimum/
maximum function can be called up. The minimum
value is used for measurements that must be at
right-angles to the target; the maximum distance
is used for all other measurements.
)
Make sure that the first measurement and the
distance to be measured are at right angles. Use the
minimum/maximum function.
Indirect measurement - determining a
distance using 2 auxilliary measurements
See drawing {G}
3x briefly: the symbol is displayed.
The distance to be measured flashes in the symbol.
1x briefly: takes a measurement of the distance
The second distance to be measured flashes in the
symbol
1x briefly: takes a measurement of the hori-
zontal distance
The result of the function is displayed in the summary
row.
If the button is pressed for along time while
measuring a distance, maximum or minimum conti-
nuous measuring is activated.
Indirect measurement - determining a
distance using 3 auxilliary measurements
See drawing {H}
4x briefly: the symbol is displayed.
The distance to be measured flashes in the symbol.
1x briefly: takes a distance measuement
The second distance to be measured flashes in the
symbol
1x briefly: takes a horizontal measurement.
The third dist ance to be measured flashes in the
symbol
1x briefly: takes a measurement of the distance
The result of the function is displayed in the summary
row.
If the button is pressed for along time while
measuring a distance, maximum or minimum conti-
nuous measuring is activated.
Stake out function
This function is helpful when staking out equal
distances, e.g in the erection of wooden substruc-
tures. See drawing {I}
5x briefly: the symbol is displayed.
A value is displayed in the summary row (default
Loading...