Makita LC1230 User Manual
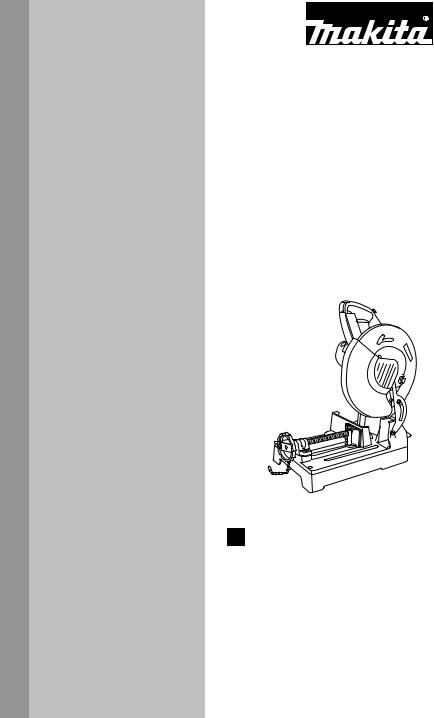
INSTRUCTION MANUAL MANUEL D'INSTRUCTION
MANUAL DE INSTRUCCIONES
Metal Cutting Saw Meule à couper le métal Sierra Tronzadora
LC1230
003770
DOUBLE INSULATION DOUBLE ISOLATION
DOBLE AISLAMIENTO
 WARNING:
For your personal safety, READ and UNDERSTAND before using. SAVE THESE INSTRUCTIONS FOR FUTURE REFERENCE.
 AVERTISSEMENT:
Pour votre propre sécurité, prière de lire attentivement avant l'utilisation. GARDER CES INSTRUCTIONS POUR RÉFÉRENCE ULTÉRIEURE.
 ADVERTENCIA:
Para su seguridad personal, LEA DETENIDAMENTE este manual antes de usar la herramienta.
GUARDE ESTAS INSTRUCCIONES PARA FUTURA REFERENCIA.
ENGLISH
SPECIFICATIONS
Model |
LC1230 |
Blade diameter |
305 mm (12") |
Hole (arbor) diameter |
25.4 mm (1") |
No load speed (RPM) |
1,300 /min. |
Dimensions (L x W x H) |
516 mm x 306 mm x 603 mm (20-1/3" x 12" x 23-5/8") |
Net weight |
19.0kg (41.8 lbs) |
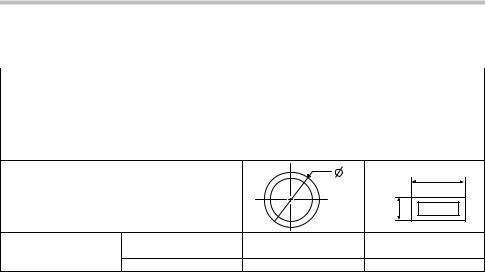
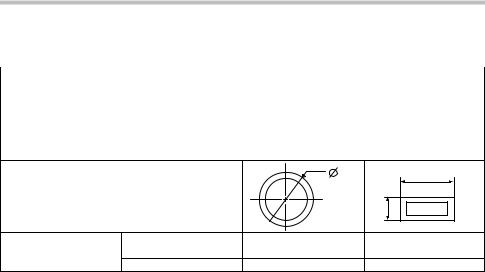
Cutting capacity
|
|
|
A |
A X B |
B |
|
|
|
|
||
|
Workpiece shape |
|
|
A |
|
|
|
|
|
|
|
|
90° |
115mm (4-1/2") |
|
75 mm x 150 mm (2-15/16" x 5-7/8") |
|
Cutting angle |
|
100 mm x 100 mm (3-15/16" x 3-15/16") |
|||
|
|
|
|||
|
45° |
90mm (3-1/2") |
|
85 mm x 85mm (3-5/16" x 3-5/16") |
|
•Due to our continuing programme of research and development, the specifications herein are subject to change without notice.
•Note: Specifications may differ from country to country.
USA007-2
For Your Own Safety Read
Instruction Manual
Before Operating Tool
Save it for future reference
GENERAL SAFETY
PRECAUTIONS
(For All Tools)
1.KNOW YOUR POWER TOOL. Read the owner's manual carefully. Learn the tool's applications and limitations, as well as the specific potential hazards peculiar to it.
2.KEEP GUARDS IN PLACE and in working order.
3.REMOVE ADJUSTING KEYS AND WRENCHES. Form habit of checking to see that keys and adjusting wrenches are removed from tool before turning it on.
4.KEEP WORK AREA CLEAN. Cluttered areas and benches invite accidents.
5.DO NOT USE IN DANGEROUS ENVIRONMENT. Do not use power tools in damp or wet locations, or expose them to rain. Keep work area well lighted. Do not use tool in presence of flammable liquids or gases.
6.KEEP CHILDREN AWAY. All visitors should be kept safe distance from work area.
7.MAKE WORKSHOP KID PROOF with padlocks, master switches, or by removing starter keys.
8.DO NOT FORCE TOOL. It will do the job better and safer at the rate for which it was designed.
9.USE RIGHT TOOL. Do not force tool or attachment to do a job for which it was not designed.
10.WEAR PROPER APPAREL. Do not wear loose clothing, gloves, neckties, rings, bracelets, or other jewelry which may get caught in moving parts. Nonslip footwear is recommended. Wear protective hair covering to contain long hair.
11.ALWAYS USE SAFETY GLASSES. Also use face or dust mask if cutting operation is dusty. Everyday eyeglasses only have impact resistant lenses, they are NOT safety glasses.
12.SECURE WORK. Use clamps or a vise to hold work when practical. It's safer than using your hand and it frees both hands to operate tool.
13.DO NOT OVERREACH. Keep proper footing and balance at all times.
2

14.MAINTAIN TOOLS WITH CARE. Keep tools sharp and clean for best and safest performance. Follow instructions for lubricating and changing accessories.
15.DISCONNECT TOOLS before servicing; when changing accessories such as blades, bits, cutters, and the like.
16.REDUCE THE RISK OF UNINTENTIONAL STARTING. Make sure switch is in off position before plugging in.
17.USE RECOMMENDED ACCESSORIES. Consult the owner's manual for recommended accessories. The use of improper accessories may cause risk of injury to persons.
18.NEVER STAND ON TOOL. Serious injury could occur if the tool is tipped or if the cutting tool is unintentionally contacted.
19.CHECK DAMAGED PARTS. Before further use of the tool, a guard or other part that is damaged should be carefully checked to determine that it will operate properly and perform its intended function - check for alignment of moving parts, binding of moving parts, breakage of parts, mounting, and any other conditions that may affect its operation. A guard or other part that is damaged should be properly repaired or replaced.
20.DIRECTION OF FEED. Feed work into a blade or cutter against the direction of rotation of the blade or cutter only.
21.NEVER LEAVE TOOL RUNNING UNATTENDED. TURN POWER OFF. Do not leave tool until it comes to a complete stop.
22.REPLACEMENT PARTS. When servicing, use only identical replacement parts.
23.POLARIZED PLUGS. To reduce the risk of electric shock, this appliance has a polarized plug (one blade is wider than the other). This
plug will fit in a polarized outlet only one way. If the plug does not fit fully in the outlet, reverse the plug. If it still does not fit, contact a qualified electrician to install the proper outlet. Do not change the plug in any way.
VOLTAGE WARNING: Before connecting the tool to a power source (receptacle, outlet, etc.) be sure the voltage supplied is the same as that specified on the nameplate of the tool. A power source with voltage greater than that specified for the tool can result in SERIOUS INJURY to the useras well as damage to the appliance. If in doubt, DO NOT PLUG IN THE APPLIANCE. Using a power source with voltage less than the nameplate rating is harmful to the motor.
USE PROPER EXTENSION CORD. Make sure your extension cord is in good condition. When using an extension cord, be sure to use one heavy enough to carry the current your product will draw. An undersized cord will cause a drop in line voltage resulting in loss of power and overheating. Table 1 shows the correct size to use depending on cord length and nameplate ampere rating. If in doubt, use the next heavier gage. The smaller the gage number, the heavier the cord.
Table 1: Minimum gage for cord
Ampere Rating |
Volts |
|
Total length of cord in feet |
|
||||
|
|
|
|
|
|
|
||
|
|
120 V |
25 ft. |
|
50 ft. |
100 ft. |
|
150 ft. |
More Than |
Not More Than |
|
|
|
AWG |
|
|
|
|
|
|
|
|
|
|
|
|
0 |
6 |
|
18 |
|
16 |
16 |
|
14 |
6 |
10 |
|
18 |
|
16 |
14 |
|
12 |
10 |
12 |
|
16 |
|
16 |
14 |
|
12 |
12 |
16 |
|
14 |
|
12 |
Not Recommended |
||
000173
USB079-2
ADDITIONAL SAFETY RULES
DO NOT let comfort or familiarity with product (gained from repeated use) replace strict adherence to metal cutting saw safety rules. If you use this tool unsafely or incorrectly, you can suffer serious personal injury.
1.Wear eye protection.
2.Keep hands out of path of saw blade. Avoid contact with any coasting blade. It can still cause severe injury.
3.Do not operate saw without guards in place. Check blade guard for proper closing before each use. Do not operate saw if blade guard does not move freely and close instantly. Never clamp or tie the blade guard into the open position.
3
4.Do not perform any operation freehand. The 24. Do not abuse cord. Never yank cord to
workpiece must be secured firmly against the base with a vise during all operations. Never use your hand to secure the workpiece.
5.Never reach around saw blade.
6.Turn off tool and wait for saw blade to stop before moving workpiece or changing settings.
7.Do not use the tool in the presence of flammable liquids or gases.
8.Check the blade carefully for cracks or damage before operation. Replace cracked or damaged blade immediately.
9.Use only flanges specified for this tool.
10.Be careful not to damage the arbor, flanges (especially the installing surface) or bolt. Damage to these parts could result in blade breakage.
11.Make sure that the base is properly secured so it will not move during operation. Use the holes in the base to fasten the saw to a stable work platform or bench. NEVER use tool where operator positioning would be awkward.
12.For your safety, remove the chips, small pieces, etc. from the table top before operation.
13.Make sure the shaft lock is released before the switch is turned on.
14.Be sure that the blade does not contact the base in the lowest position.
15.Hold the handle firmly. Be aware that the saw moves up or down slightly during start-up and stopping.
16.Make sure the blade is not contacting the workpiece before the switch is turned on.
17.Before using the tool on an actual workpiece, let it run for a while. Watch for vibration or wobbling that could indicate poor installation or a poorly balanced blade.
18.Wait until the blade attains full speed before cutting.
19.Stop operation immediately if you notice anything abnormal.
20.Do not attempt to lock the trigger in the "ON" position.
21.Shut off power and wait for saw blade to stop before moving workpiece or adjusting tool.
22.Be alert at all times, especially during repetitive, monotonous operations. Do not be lulled into a false sense of security. Blades are extremely unforgiving.
23.Always use accessories recommended in this manual. Use of improper accessories such as abrasive wheels may cause an injury.
disconnect it from the receptacle. Keep cord away from heat, oil, water and sharp edges.
25.Never attempt to cut workpiece less than 14 gauge (0.08") thick except pipe or workpiece which cannot be secured firmly with a vise. The piece cut off may be caught by the blade, causing dangerous scattering of chips and/or damage to the carbide-chips. Possible serious injury may result.
26.Unplug tool before changing blade or servicing.
SAVE THESE INSTRUCTIONS.
 WARNING:
MISUSE or failure to follow the safety rules stated in this instruction manual may cause serious personal injury.
INSTALLATION
Positioning the tool
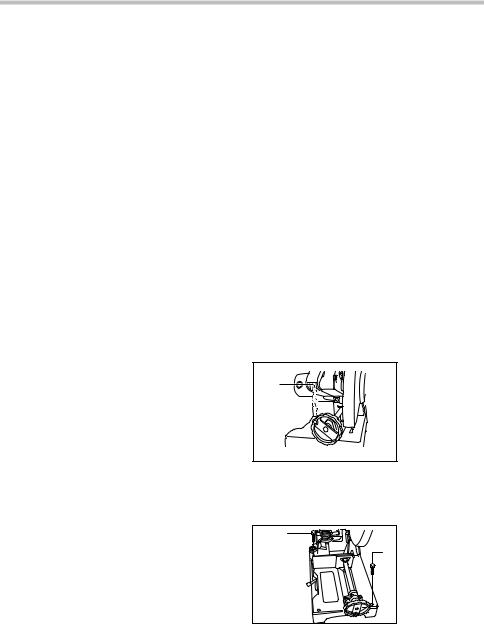
When the tool is shipped from the factory, the handle is locked in the lowered position. Release the handle from the lowered position by lowering it slightly and removing the chain from the hook on the handle.
1. Hook
1
003771
Bolt the tool with two bolts to a level and stable surface using the bolt holes provided in the tool base. This will help prevent tipping and possible injury.
1 |
1. Bolt |
1
003772
4
FUNCTIONAL DESCRIPTION
 CAUTION:
•Always be sure that the tool is switched off and unplugged before adjusting or checking function on the tool.
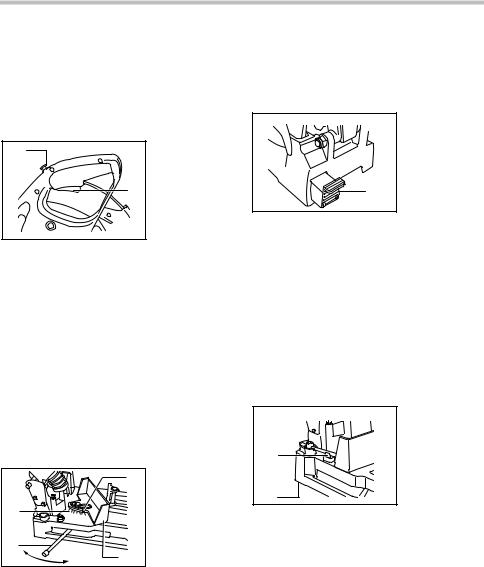
Switch action
1 |
1. |
Lock-off button |
|
2. |
Switch trigger |
||
|
|||
|
2 |
|
003773
 CAUTION:
•Before plugging in the tool, always check to see that the switch trigger actuates properly and returns to the "OFF" position when released.
•When not using the tool, remove the lock-off button
and store it in a secure place. This prevents unauthorized operation.
To prevent the switch trigger from being accidentally pulled, a lock-off button is provided.
To start the tool, depress the lock-off button and pull the switch trigger. Release the switch trigger to stop.
Setting for desired cutting angle
 CAUTION:
•Always tighten the hex bolt securely after changing the cutting angle.
3 |
1. Graduation |
|
2. Lever |
|
3. indicator |
1 |
4. Vise stop |
|
|
2 |
|
4 |
|
003774 |
|
To change the cutting angle, loosen the lever. Move the vise stop so that the indicator will point to the desired graduation. Then tighten the lever to secure the vise stop.
Dust collection
 CAUTION:
•Do not touch any part of the dust box except its handle immediately after operation; it may be extremely hot and could burn your skin.
1.Dust box
1
003775
This tool is equipped with the dust box to collect dust and cut chips. When the dust box is full, hold the handle of the dust box and raise it slightly. Then pull the dust box out of the tool base. Empty the dust box of its contents.
ASSEMBLY
 CAUTION:
•Always be sure that the tool is switched off and unplugged before carrying out any work on the tool.
Socket wrench storage
1. Wrench holder
2. Base
1
2
003776
The socket wrench is stored as shown in the figure. When using the socket wrench, pull it out of the wrench holder. After using the socket wrench, return it to the wrench holder.
Installing or removing saw blade
 CAUTION:
•When mounting the blade, make sure that the direction of the arrow on the surface of the blade matches the direction of the arrow on the blade case.
5
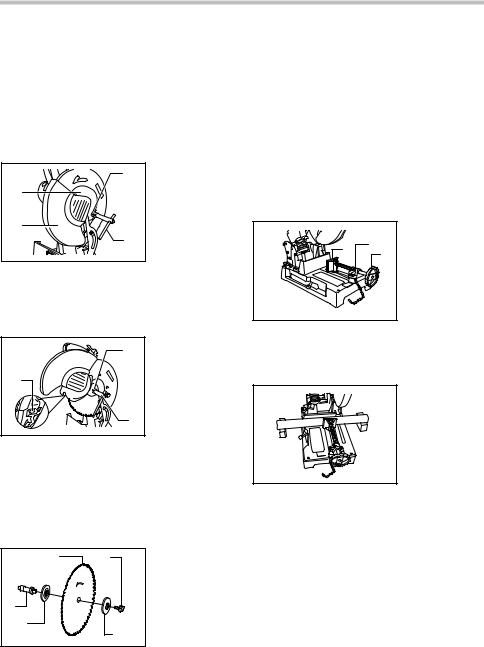
•Use only the Makita socket wrench provided to install or remove the blade. Failure to do so may result in overtightening or insufficient tightening of the hex bolt. This could cause a personal injury.
•Do not touch the blade immediately after operation; it may be extremely hot and could burn your skin.
To remove the blade, use the socket wrench to loosen the hex bolt holding the center cover by turning it counterclockwise. Raise the blade guard and center cover.
|
2 |
1. |
Center cover |
|
2. |
Hex bolt |
|
|
|
||
1 |
|
3. |
Socket wrench |
|
|
4. |
Blade guard |
4 |
|
|
|
|
3 |
|
|
003777
Press the shaft lock to lock the spindle and use the socket wrench to loosen the hex bolt by turning counterclockwise. Then remove the hex bolt, outer flange and blade.
1 |
1. |
Hex bolt |
|
2. |
Shaft lock |
||
|
|||
|
3. |
Socket wrench |
|
2 |
|
|
|
|
3 |
|
003778
To install the blade, mount the inner flange, saw blade, outer flange and hex bolt onto the spindle in that order. Tighten the hex bolt by turning clockwise while pressing the shaft lock. Return the blade guard and center cover to the original position. Then tighten the hex bolt clockwise to secure the center cover. Lower the handle to make sure that the blade guard moves properly.
1 |
2 |
1. |
Carbide-tipped |
|
|
|
saw blade |
|
|
2. |
Hex bolt |
|
|
3. |
Spindle |
3 |
|
4. |
Inner flange |
|
5. |
Outer flange |
|
4 |
|
5 |
|
|
|
|
|
003801 |
|
|
|
Securing workpiece
 CAUTION:
•Always set the vise nut to the right fully when securing the workpiece. Failure to do so may result in insufficient securing of the workpiece. This could cause the workpiece to be ejected or cause
damage to the blade.
By turning the vise handle counterclockwise and then flipping the vise nut to the left, the vise is released from the shaft threads and can be moved rapidly in and out. To grip workpieces, push the vise handle until the vise plate contacts the workpiece. Flip the vise nut to the right and then turn the vise handle clockwise to securely retain the workpiece.
|
|
|
1. |
Vise plate |
|
1 |
2 |
|
2. |
Vise nut |
|
3 |
3. |
Vise handle |
|||
|
|||||
|
|
|
|
003780
Long workpieces must be supported by blocks of non-flammable material on either side so that it will be level with the base top.
003781
OPERATION
Cutting operation
 CAUTION:
•Never attempt to cut workpieces less than 14 gauge (0.08") thick except pipe or workpieces which cannot be secured firmly with the vise. The piece cut off may be caught by the blade, causing dangerous scattering of chips and/or damage to the carbide-tips. Possible serious injury may result.
•Do not apply excessive pressure on the handle when cutting. Too much pressure may result in overload of the motor, decreased cutting efficiency and/or damage to the carbide-tips or blade itself.
6
•Too little pressure on the handle may result in more sparks and premature blade wear.
•Do not touch the blade, workpiece or cutting chips immediately after operation; they may be extremely hot and could burn your skin.
•If the blade stops during operation, makes an odd noise or begins to vibrate, switch off the tool immediately. Replace cracked or damaged blade
with a new one.
Hold the handle firmly. Switch on the tool and wait until the blade attains full speed. Then lower the handle gently to bring the blade close to the workpiece. When the blade makes contact, ease into the cut gently at first, then gradually add pressure as the cutting position steadies. Your pressure on the handle should be adjusted to produce the minimum amount of sparks.
When the cut is completed, switch off the tool and WAIT UNTIL THE BLADE HAS COME TO A COMPLETE STOP before returning the handle to the fully elevated position. If the handle is raised while the blade is still rotating, the piece cut off may be caught by the blade, causing dangerous scattering of chips. When cutting only part of the way into a workpiece, raise the handle while the blade is rotating. Switching off during the cut may cause damage to the carbide-tips as they contact the workpiece.
Cutting angles
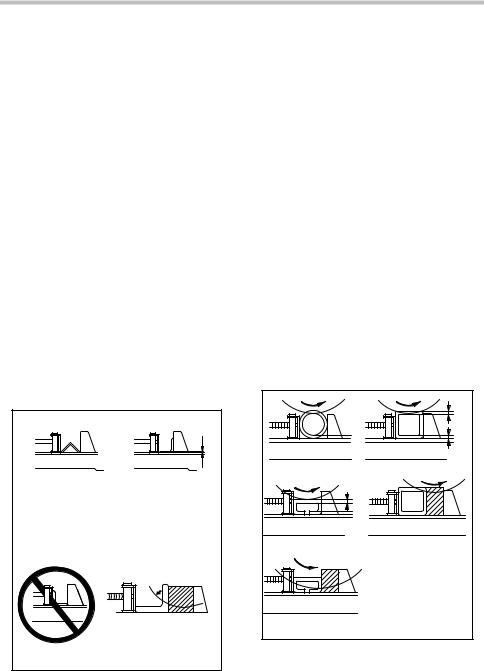
Secure the workpiece in the vise as shown in the Figure A and proceed to cut it. The saw blade life will be shortened if the workpiece is cut as shown in the Fig B.
|
A |
Fig. A |
Fig. B |
Fig. C |
Fig. D |
|
|
003782 |
|
 CAUTION:
•Do NOT cut the workpiece as shown in the Fig. C
since this may cause it to be ejected from the vise, possibly resulting in injury.
The saw blade is subjected to greater wear when the area A in the Fig. B is cut. Place a wooden block up against the workpiece as shown in the Fig. D so that the saw blade will enter area A at an angle. This will help to extend the saw blade life.
The allowable cutting dimensions are reduced when a wooden block is used. Use a wooden block whose dimensions are equivalent to the maximum allowable cutting dimensions minus the dimensions of the workpiece to be cut. This will further minimize the shortening of the saw blade life.
Cutting pipes, squares and channels
The saw blade is subjected to greater wear when the areas A and B in figure F and figure G are cut. Place a wooden block up against the workpiece as shown in figure H and figure I so that the saw blade will enter areas A and B at an angle. This will help to minimize the shortening of the saw blade life.
The allowable cutting dimensions are reduced when a wooden block is used. Use a wooden block whose dimensions are equivalent to the maximum allowable cutting dimensions minus the dimensions of the workpiece to be cut. This will further minimize the shortening of the saw blade life.
|
A |
|
B |
Fig. E |
Fig. F |
|
A |
Fig. G |
Fig. H |
Fig. I |
|
003783 |
|
7
Cutting rectangles
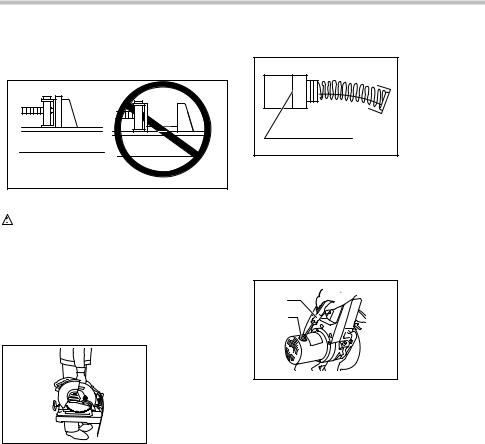
Secure the workpiece in the vise as shown in figure J, and proceed to cut it.
Fig. J |
Fig. K |
003784 |
|
CAUTION: |
|
•Do NOT cut the workpiece as shown in figure K since this may cause it to be ejected from the vise, possibly resulting in injury.
Carrying tool
 CAUTION:
•The chain for transportation shall be adjusted to minimize the accessible zone of the saw blade before transporting the tool.
003785
Fold down the tool head to the position where you can attach the chain to the hook on the handle. Grasp the carrying grip when carrying the tool.
MAINTENANCE
 CAUTION:
•Always be sure that the tool is switched off and unplugged before attempting to perform inspection or maintenance.
Replacing saw blade
Continuing to use a dull and worn blade may cause motor overload and decreased cutting efficiency. Replace with a new blade as soon as it is no longer effective.
Replacing carbon brushes
1. Limit mark
1
001145
Remove and check the carbon brushes regularly. Replace when they wear down to the limit mark. Keep the carbon brushes clean and free to slip in the holders. Both carbon brushes should be replaced at the same time. Use only identical carbon brushes.
Use a screwdriver to remove the brush holder caps. Take out the worn carbon brushes, insert the new ones and secure the brush holder caps.
|
1. |
Screwdriver |
1 |
2. |
Brush holder |
2 |
|
cap |
|
|
003786
To maintain product SAFETY and RELIABILITY, repairs, any other maintenance or adjustment should be performed by Makita Authorized or Factory Service Centers, always using Makita replacement parts.
ACCESSORIES
 CAUTION:
•These accessories or attachments are recommended for use with your Makita tool specified in this manual. The use of any other accessories or attachments might present a risk of
injury to persons. Only use accessory or attachment for its stated purpose.
If you need any assistance for more details regarding these accessories, ask your local Makita Service Center.
•Socket wrench 17
•Safety goggle
•Lock-off button (Switch button)
•Carbide-tipped saw blade
•305 mm (12") Carbide-tipped saw blade & workpiece ranges
8

|
Number |
|
|
Applicable workpiece & thickness range |
|
|||
Part No. |
application |
|
|
|
|
|
||
of teeth |
Angles |
Pipes |
Channels |
Stainless |
Stainless |
|||
|
|
|||||||
|
|
|
Pipes |
Angles |
||||
|
|
|
|
|
|
|||
A-90532 |
60 |
Mild Steel |
5/32" or more |
1/8"-13/64" |
5/32" or more |
NA |
NA |
|
A-90722 |
|
Mild Steel |
|
|
|
|
|
|
60 |
(Lessened |
5/32" or more |
1/8"-13/64" |
5/32" or more |
NA |
NA |
||
|
|
Noise Type) |
|
|
|
|
|
|
A-90875 |
78 |
Thin Mild |
1/8"-15/64" |
3/64"-13/64" |
5/64" or more |
NA |
NA |
|
Steel |
||||||||
|
|
|
|
|
|
|
||
A-90847 |
78 |
Stainless |
1/8"-15/64" |
3/64"-13/64" |
5/32" or more |
3/64"-13/64" |
1/8"-5/32" |
|
Steel |
||||||||
|
|
|
|
|
|
|
||
006943 |
|
|
|
|
|
(NA.......Not applicable) |
||
|
|
|
|
|
|
|
||
 CAUTION:
•Always use carbide-tipped saw blades appropriate for your job. Do not cut aluminum, wood, plastics, concrete, tiles, etc.
•Carbide-tipped saw blades for metal cutting saw are not to be re-sharpened.
MAKITA LIMITED ONE YEAR WARRANTY
Warranty Policy
Every Makita tool is thoroughly inspected and tested before leaving the factory. It is warranted to be free of defects from workmanship and materials for the period of ONE YEAR from the date of original purchase. Should any trouble develop during this one year period, return the COMPLETE tool, freight prepaid, to one of Makita’s Factory or Authorized Service Centers. If inspection shows the trouble is caused by defective workmanship or material, Makita will repair (or at our option, replace) without charge.
This Warranty does not apply where:
repairs have been made or attempted by others:
repairs are required because of normal wear and tear:
the tool has been abused, misused or improperly maintained:
alterations have been made to the tool.
IN NO EVENT SHALL MAKITA BE LIABLE FOR ANY INDIRECT, INCIDENTAL OR CONSEQUENTIAL DAMAGES FROM THE SALE OR USE OF THE PRODUCT. THIS DISCLAIMER APPLIES BOTH DURING AND AFTER THE TERM OF THIS WARRANTY.
MAKITA DISCLAIMS LIABILITY FOR ANY IMPLIED WARRANTIES, INCLUDING IMPLIED WARRANTIES OF "MERCHANTABILITY" AND "FITNESS FOR A SPECIFIC PURPOSE," AFTER THE ONE YEAR TERM OF THIS WARRANTY.
This Warranty gives you specific legal rights, and you may also have other rights which vary from state to state. Some states do not allow the exclusion or limitation of incidental or consequential damages, so the above limitation or exclusion may not apply to you. Some states do not allow limitation on how long an implied warranty lasts, so the above limitation may not apply to you.
EN0006-1
9
FRANÇAIS
SPÉCIFICATIONS
Modèle |
LC1230 |
Diamètre de la lame |
305 mm (12") |
Diamètre de l'orifice (alésage) |
25.4 mm (1") |
Vitesse à vide (T/MIN) |
1,300 /min. |
Dimensions (L x L x H) |
516 mm x 306 mm x 603 mm (20-1/3" x 12" x 23-5/8") |
Poids net |
19.0kg (41.8 lbs) |
Capacité de coupe
|
|
|
A |
A X B |
B |
|
|
|
|
||
|
Forme de la pièce |
|
|
A |
|
|
|
|
|
|
|
|
90° |
115mm (4-1/2") |
|
75 mm x 150 mm (2-15/16" x 5-7/8") |
|
Angle de coupe |
|
100 mm x 100 mm (3-15/16" x 3-15/16") |
|||
|
|
|
|||
|
45° |
90mm (3-1/2") |
|
85 mm x 85mm (3-5/16" x 3-5/16") |
|
•Étant donné l'évolution constante de notre programme de recherche et de développement, les spécifications contenues dans ce manuel sont sujettes à modification sans préavis.
•Note : Les spécifications peuvent varier suivant les pays.
USA007-2
Pour votre propre sécurité, veuillez lire le manuel d'instructions
Avant d'utiliser l'outil
Conservez-le pour référence ultérieure
PRÉCAUTIONS GÉNÉRALES
(POUR TOUS LES OUTILS)
1.VOUS DEVEZ CONNAÎTRE VOTRE OUTIL ÉLECTRIQUE. Lisez attentivement le manuel d'instructions. Familiarisez-vous avec les applications et limites de l'outil, ainsi qu'avec les risques potentiels qui lui sont spécifiques.
2.MAINTENEZ LES PROTECTEURS EN PLACE et en bon état de fonctionnement.
3.RETIREZ LES CLÉS DE RÉGLAGE ET DE SERRAGE. Prenez l'habitude de vous assurer que les clés de réglage et de serrage ont été retirées de l'outil avant de le mettre sous tension.
4.MAINTENEZ LA ZONE DE TRAVAIL PROPRE. Les zones de travail et les établis encombrés ouvrent grande la porte aux accidents.
5.ÉVITEZ L'UTILISATION DANS UN ENVIRONNEMENT DANGEREUX. N'utilisez pas les outils électriques dans les endroits humides ou mouillés, et ne les exposez pas à la pluie. Maintenez un éclairage adéquat dans la zone de travail. Ne vous servez pas de votre outil en présence de liquides ou gaz inflammables.
6.MAINTENEZ LES ENFANTS À L'ÉCART. Toute autre personne que l'utilisateur de l'outil doit se tenir à une distance sûre de l'aire de travail.
7.FAITES EN SORTE QUE L'ATELIER SOIT SANS DANGER POUR LES ENFANTS, en y posant des cadenas, un interrupteur principal, ou en retirant des équipements leurs clés de démarrage.
8.NE FORCEZ PAS L'OUTIL. Il effectuera un travail de meilleure qualité et plus sécuritaire s'il est utilisé au régime pour lequel il a été conçu.
9.UTILISEZ LE BON OUTIL. Ne forcez pas un outil ou accessoire à effectuer un travail pour lequel il n'a pas été conçu.
10.PORTEZ DES VÊTEMENTS ADÉQUATS. Ne portez ni vêtements ni gants amples, ni cravate, anneaux/bagues, bracelets ou autres bijoux susceptibles d'être happés par les pièces mobiles de l'outil. Le port de
10
 Loading...