


English / Français / Español /
Português do Brasil
Petrol Earth Auger
Tarière Thermique
Barrenadora a Gasolina
Perfurador de solo a gasolina
PE3450H
PE3450HG
INSTRUCTION MANUAL
MANUEL D’INSTRUCTIONS
MANUAL DE INSTRUCCIONES
MANUAL DE INSTRUÇÕES
Important:
Read this instruction manual carefully before putting the Petrol Earth Auger into operation and strictly observe the safety regulations! Preserve instruction manual carefully!
Importante :
Lisez attentivement ce manuel avant d'utiliser la tarière thermique et suivez scrupuleusement les consignes de sécurité ! Conservez avec soin le manuel !
Importante:
¡Lea este manual de instrucciones cuidadosamente antes de poner la barrenadora a gasolina en funcionamiento y observe estrictamente las normativas de seguridad!
¡Guarde el manual de instrucciones con cuidado!
Importante:
Leia cuidadosamente este manual de instruções antes de colocar o perfurador de solo a gasolina em funcionamento e observe estritamente as normas de segurança.
Guarde o manual de instruções cuidadosamente.

English |
(Original instructions) |
|
|
Thank you very much for purchasing the MAKITA Outdoor Power Equipment. We are pleased to recommend to you the MAKITA product which is the result of a long development program and many years of knowledge and experience.
Please read this booklet which refers in detail to the various points that will demonstrate its outstanding performance. This will assist you to obtain the best possible result from your MAKITA product.
Table of Contents |
|
|
Page |
SYMBOLS............................................................................................ |
2 |
SAFETY INSTRUCTIONS ................................................................... |
3 |
TECHNICAL DATA............................................................................... |
6 |
DESIGNATION OF PARTS.................................................................. |
7 |
ASSEMBLY .......................................................................................... |
7 |
BEFORE START OF OPERATION...................................................... |
8 |
CORRECT HANDLING OF MACHINE .............................................. |
10 |
POINTS IN OPERATION AND HOW TO STOP ................................ |
12 |
OPERATION ...................................................................................... |
13 |
SERVICING INSTRUCTIONS ........................................................... |
15 |
STORAGE.......................................................................................... |
22 |
TROUBLESHOOTING....................................................................... |
24 |
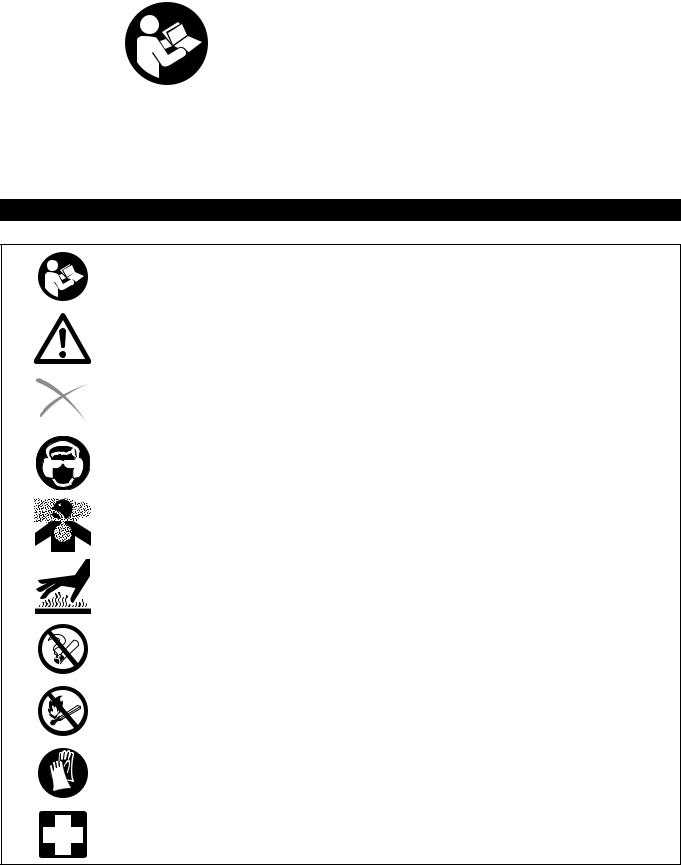
SYMBOLS
You will note the following symbols when reading the instructions manual.
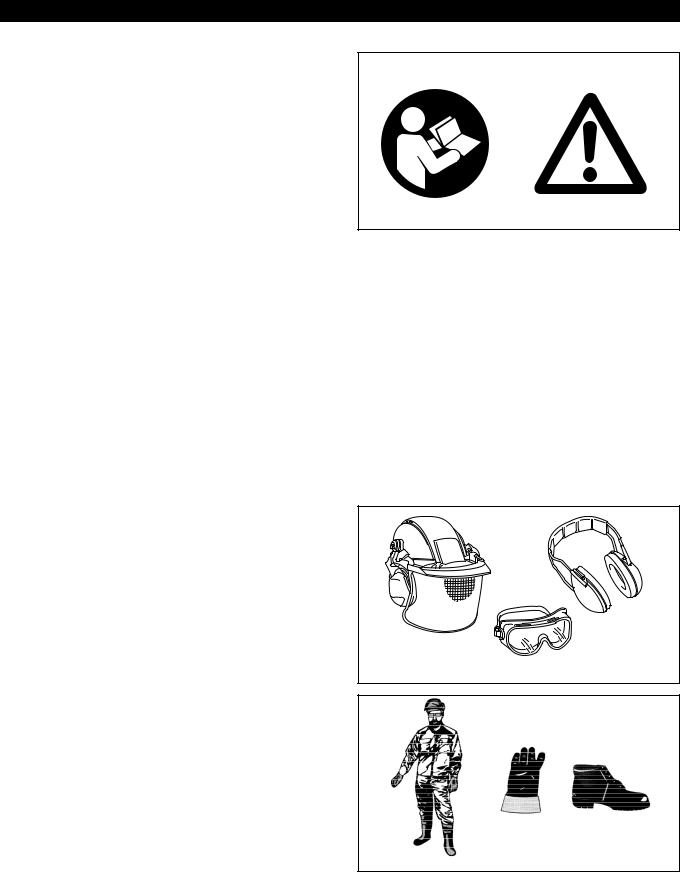
Read instruction manual and follow the warnings and safety precautions!
Take Particular care and attention!
Forbidden
Wear eye and ear Protection.
Exhaust gas is poisonous. Do not operate in an unventilated area.
Stay clear of the hot surface.
No Smoking!
No open flame!
Protective gloves must be worn
First Aid
2
SAFETY INSTRUCTIONS
General Instructions
–Read this instruction manual to become familiar with handling of the equipment. Users insufficiently informed will risk danger to themselves as well as others due to improper handling. If you can not read or do not fully understand the contents of this manual, please contact the service center before trying to operate this equipment.
–Lend the equipment to only people who have proven to be experienced. Always hand over the instruction manual and other informative materials with the equipment.
–It is recommended that first users ask the service center for basic instructions to familiarize oneself with the handling of an engine powered tool.
–Do not make modifications or alterations to the equipment.
–The earth auger is permitted to be operated only by operators who are adequate physical size and stature with mental awareness and in good condition.
–Children and young persons aged less than 18 years must not be allowed to operate this equipment. Persons over the age of 16 years may however use the equipment for the purpose of being trained while under supervision of a qualified trainer.
–The operator must be of proper height, weight and strength for operating the earth auger to minimize the risk of personal injury.
–An operator with a chronic back related problem or a history of back or other medically related problems must not try to use the earth auger. The hole digging process may produce excessive stress and strain directly to the back muscles, spinal vertebrae and many other body parts. Back related pain can be a side effect of the hole digging process.
–Use with the utmost care and attention.
–Operate only when you are in good physical condition. Perform all work calmly and carefully. The user has to accept liability for others.
–Never use this equipment after consumption of alcohol or drugs, or if feeling tired or ill.
–Do not touch a hot engine muffler. An engine muffler can become hot. A hot muffler may result in personal injury.
–National regulation can restrict the use of the equipment.
Intended use of the machine
This equipment is intended for drilling the ground. It should not be used for any other purpose such as drilling through ice or drilling walls as it may cause injury.
Personal protective equipment
– The clothing worn must be functional and appropriate, i.e. it is tightfitting but does not cause hindrance. Do not wear either jewelry or clothing which could become caught on controls or moving parts.
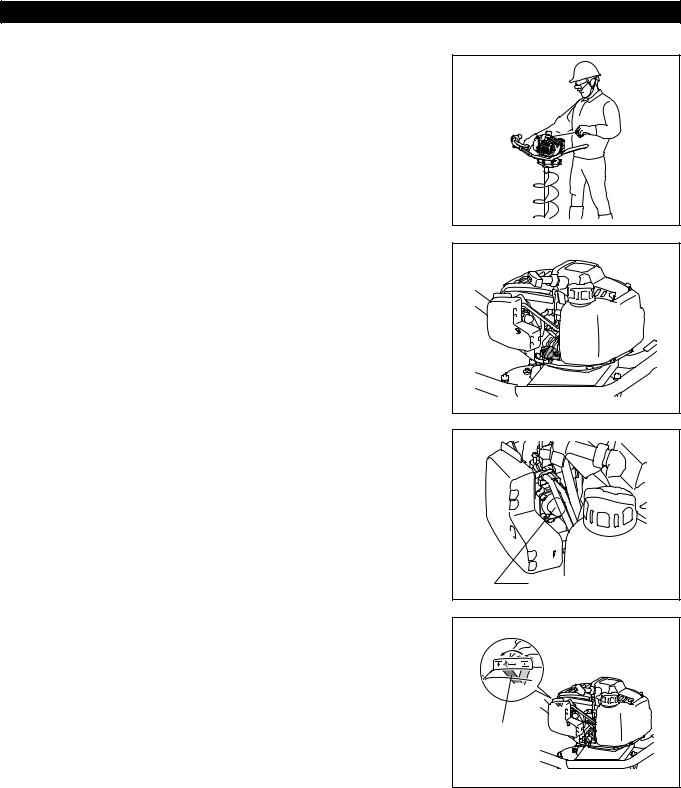
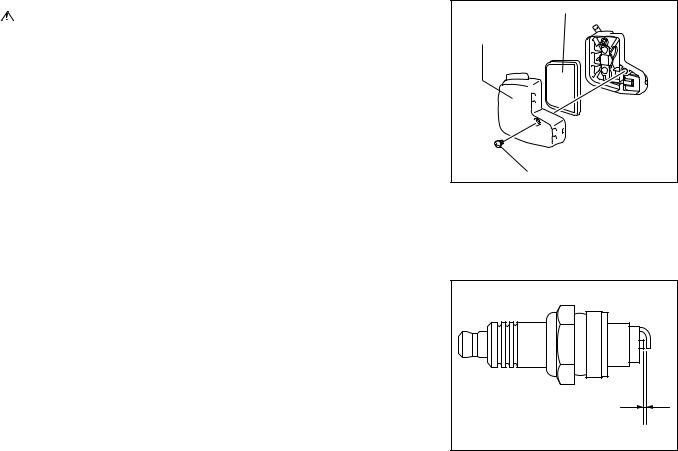
– In order to avoid either head-, eye-, hand-or foot injuries as well as to protect your hearing the following protective equipment and protective clothing must be used during operation.
– Always wear a helmet where there is a risk of falling objects. The |
|
|
protective helmet (1) is to be checked at regular intervals for damage |
|
|
and is to be replaced at the latest after 5 years. Use only approved |
(3) |
|
protective helmets. |
||
|
||
– The goggles (2) (or alternatively helmet’s visor) protect the face from |
(1) |
|
flying debris and stones. During operation always wear goggles, or a |
||
(2) |
||
visor to prevent eye injuries. |
||
|
–Wear adequate noise protection equipment to avoid hearing impairment (ear muffs (3), ear plugs etc.).
–The work overalls (4) protect against flying stones and debris. We strongly recommend that the user wears work overalls.
–Gloves (5) are part of the prescribed equipment and must always be worn during operation.
–When using the equipment, always wear sturdy shoes (6) with a nonslip sole. This protects against injuries and ensures a good footing.
(4) |
(5) |
(6) |
Starting up
–Because of the size, power, complexity and operating characteristics of the equipment, each operator must receive adequate, professional instruction regarding this earth auger before operation.
–Contact appropriate representatives to confirm whether electrical cables, gas lines or other hazardous items are not buried under the work surface BEFORE use. The earth auger and related accessories are not insulated. If the auger bit touches with buried electrical cables, gas lines or other hazardous items, it may result in electrocution or an explosion.
3

–Do not let bystanders, especially children and animals, go near operating site. The hole digging process may cause flying particles being emitted at high velocity and striking the operator and onlookers. This may result in property damage and/or personal injury.
–Minors should never be allowed to operate the earth auger. There is potential risk of explosion or carbon monoxide poisoning, and it may result in serious personal injury or death.
–Operators must be of adequate height so that for any given operating configuration, the operator handle remain below their shoulder sockets.
–Continuous and regular users must closely monitor the condition of their hands and fingers. After each period of use, perform exercise to restore normal blood circulation. Prolonged use of the earth auger exposes the operator to vibrations which may produce Whitefinger Disease (Raynaud’s Phenomenon) and may result in serious personal injury.
–Guard against the possibility of back related injuries. Always lift the earth auger with leg muscles and not with the back.
–Before use always check the equipment is safe for operation:
Check the security of the auger bit and proper functioning of the throttle control.
Rotation of the auger bit during idling speed is not permitted. Check with your service center for adjustment if in doubt.
–Start the engine only in accordance with the instructions. Do not use any other methods for starting the engine!
–Use the tools only for such applications as specified.
–Do not start the engine before the entire assembly is done. Operation of the device is only permitted after all the appropriate accessories are attached!
–Know how the controls operate. Know how to stop the engine quickly in an emergency.
–The engine is to be switched off immediately in case of any engine problems.
–Never hold the equipment with one hand during use. During operation always hold the equipment with both hands.
–Always ensure a safe footing.
–Do not operate near a vertical wall, foundation or other structures where kickback forces let your body parts hit those structures. Always maintain a safe distance from those types of structures. Otherwise it may result in property damage and/or personal injury.
–Avoid inhalation of the exhaust gases. Never run the engine in enclosed rooms (risk of gas poisoning). Carbon monoxide is an odorless gas.
–Switch off the engine when resting or leaving the equipment unattended, and place it in a safe location to prevent danger to others or damage to the machine.
–Never put the hot equipment onto dry grass or any combustible materials.
–Never operate the engine with faulty exhaust muffler.
–Shut off the engine during transport.
–Ensure safe position of the equipment during car transportation to avoid fuel leakage.
–When transporting, always disconnect the auger bit, and the fuel tank must be completely empty.
–When unloading the equipment from the truck, never drop the engine to the ground or this may severely damage the fuel tank.
–Except in case of emergency, never drop or throw the equipment to the ground or this may severely damage the equipment.
–Remember to lift the entire equipment from the ground when moving the equipment. Dragging the fuel tank is highly dangerous and may cause damage and leakage of fuel, possibly causing fire.
Refuelling
–Shut off the engine during refueling, keep away from open flames and do not smoke.
–Never refuel in closed rooms. Fuel vapors accumulate at ground lever (risk of explosions).
–Avoid skin contact with mineral oil products. Do not inhale fuel vapor. Always wear protective gloves during refueling. Change and clean protective clothing at regular intervals.
–Take care not to spill either fuel or oil in order to prevent soil contamination (environmental protection). Clean the earth auger immediately after fuel has been spilt.
–Avoid any fuel contact with your clothing. Change your clothing immediately if fuel has been spilt on it (to prevent clothing catching fire).
–Carefully tighten the fuel tank cap. Change location to start the engine (at least 3 meters (10 feet) away from the place of refueling).
–Inspect the fuel tank cap at regular intervals making sure that it can be securely fastened and does not leak.
–Transport and store fuel in approved containers only. Make sure the stored fuel is not accessible to children.
–Gasoline is an extremely flammable fuel. Use extreme caution when handling gasoline.
–Always shut off the engine and allow it to cool before refueling. Do not remove the fuel tank cap while the engine is running. Do not operate an engine without a fuel tank cap.
Method of operation
–Give complete attention to the job. Do not chew gum, smoke or use smokeless tobacco while operating the earth auger. Do not eat nor drink while operating the earth auger.
–Plan to take work breaks, it helps you to maintain proper mental and physical alertness.
–Do not operate the earth auger in an explosive atmosphere or near combustible materials.
–Only one operator operates the earth auger. Use of an earth auger by more than one operator may lead to confusion and loss of control, resulting in damage and/or personal injury. Do not operate the earth auger with an improper number of operators.
–Do not use a shovel or foreign object to remove the loose soil from a hole area while the earth auger is in use. Otherwise the shovel or foreign object may become entrapped by the rotating auger bit, and it may result in property damage and/or personal injury.
–Always stand opposite side of hot engine muffler. Hold the handle by left hand. Hold the throttle by right hand. Reversed hand positioning causes the hot engine muffler closer to the operator’s body, and it may result in injury from the hot muffler or breathing Carbon Monoxide fumes during operation.
–Pay attention to the environment. Avoid unnecessary throttle operation for less pollution and noise emissions. Adjust the carburetor correctly.
4
–Operate the earth auger only when visibility and light are adequate for the job at hand.
–Do not come in contact with a rotating part of the earth auger. The earth auger is not shielded. Body contact with a rotating auger bit may result in personal injury.
–Always hold the earth auger firmly with both hands. Wrap your fingers around the handle gripping areas, keeping the gripping areas cradled between your thumbs and forefingers.
–Always check that the operator handle and gripping areas are in good condition and free of moisture, pitch, oil or grease. Wear gloves to improve your grip.
–Stop the engine between each hole. Allowing the engine to remain operating between each hole substantially increases the risk for property damage and/or personal injury.
–Special care must be exercised in slippery conditions and on difficult, uneven surfaces. Watch for cracks, high spots and other surface irregularities. Keep proper footing and balance at all times. The normal use of the earth auger is on level ground. Other digging terrains can be dangerous and not recommended. Only properly trained operators are permitted to try these techniques.
–Remain clear of a hot, engine muffler at all times. Contact with a hot engine muffler may cause property damage and/or personal injury.
–Do not allow the earth auger to drop and impact against the ground. Such action may result in damage to the throttle control and engine. A throttle control that does not operate properly may result in property damage and/or personal injury.
Kickback
Striking buried obstructions such as tree roots, rocks or other debris at any engine operating speed may cause the earth auger to transmit reactionary type of “impact” loads to the operator. This impact may be felt as a sharp, pulsating movement of the earth auger in a counterclockwise direction (as viewed by the operator). Such loads may lead to the loss of operator control and result in personal injury. The related phenomenon is termed as kickback.
Kickback forces may inflict damage to hands, arms and other upper body parts. Always think the proper operating position when digging to maximize control and minimize the effects of kickback.
Maintenance instructions
–Use only genuine, approved replacement parts for maintenance and repair. Inappropriate parts may result in property damage and/or personal injury.
–Always stop the engine and disconnect the spark plug wire BEFORE checking or working on the earth auger.
–Always properly maintain the earth auger. Frequently check all fasteners and individual parts.
–Built in safety features are effective only if they are maintained in good working condition. If there are any questionable parts, consult authorized service center.
–Do not attempt any maintenance or repair work not described in the instruction manual. Have such work performed at your authorized service center.
–Check whether the throttle control and other parts around are not damaged and allow for complete freedom of movement. Do not operate the earth auger with a damaged or worn throttle or throttle cable.
–A worn or damaged engine muffler is a fire hazard and may cause loss of hearing. Check to see that the muffler is in good condition. Replace the spark arresting device with an approved replacement if there is any question of its integrity. Do not operate the earth auger if the muffler is faulty or has been removed. Contact with a hot muffler may cause property damage and/or personal injury. Remain clear of a hot engine muffler.
–Maintain all safety and operation markings in proper condition. If any markings become damaged or unreadable, replace with a genuine replacement part.
–Replace the auger blade, screw bit and auger bit when signs of excessive wear are seen. When such parts are not replaced at proper intervals, undo wear will occur at auger bit. The end result is an inverted cone configuration for the auger bit, which usually requires complete replacement.
–Digging with equipment that is past its useful service life or that have not been properly maintained may result in substandard productivity, excessive property damage and/or personal injury. Auger service life can be greatly extended with constant auger wear part maintenance.
–Never service or store the equipment in the vicinity of naked flames.
–Always store the equipment in locked rooms and with its fuel tank emptied.
–At the conclusion of the useful service life of the earth auger, drain and properly dispose of all fluids per local requirements. Dispose the earth auger properly according to local requirements.
5

First Aid
In case of accident, make sure that a first-aid box is available in the vicinity of the operation site. Immediately replace any item taken from the first aid box.
When asking for help, please give the following information:
–Place of accident
–What happened
–Number of injured persons
–Kind of injuries
–Your name
TECHNICAL DATA
Model |
|
PE3450H |
|
PE3450HG |
|
|
|
|
|
Dimensions: length x width x height |
mm(") |
374(14-3/4) x 695(27-3/8) x 370(14-19/32) |
||
|
|
|
|
|
Mass |
kg(lbs) |
11.7(25.8) |
|
|
|
|
|
|
|
Volume (fuel tank) |
L |
0.75 |
|
|
|
|
|
|
|
Volume (oil tank) |
L |
0.1 |
|
|
|
|
|
|
|
Engine displacement |
cm3 |
33.5 |
|
|
Maximum engine performance |
kW |
1.07 at 7000 min–1 |
|
|
Maximum shaft speed (corresponding) |
min–1 |
166 |
|
|
Maximum specific fuel consumption |
g/kWh |
340 |
|
|
|
|
|
|
|
Idling speed |
min–1 |
2900 – 3100 |
|
|
Clutch engagement speed |
min–1 |
3200 ± 100 |
|
|
Carburetor |
type |
Diaphragm |
|
|
|
|
|
|
|
Ignition system |
type |
Solid state ignition |
|
|
|
|
|
|
|
Spark plug |
type |
NGK CMR6A |
|
|
|
|
|
|
|
Electrode gap |
mm |
0.7 – 0.8 |
|
|
|
|
|
|
|
Fuel |
|
Automobile gasoline |
|
E25 gasoline |
|
|
|
|
|
Engine Oil |
|
SAE 10W-30 oil of API Ciassification, |
||
|
Class SF or higher (4-stroke engine for automobile) |
|||
|
|
|||
|
|
|
|
|
Gear ratio |
|
42.5:1 |
|
|
|
|
|
|
|
Note: |
|
|
|
|
• PE3450HG: This model adapts for use with Brazilian gasoline (E20 and E25). |
|
|||
6
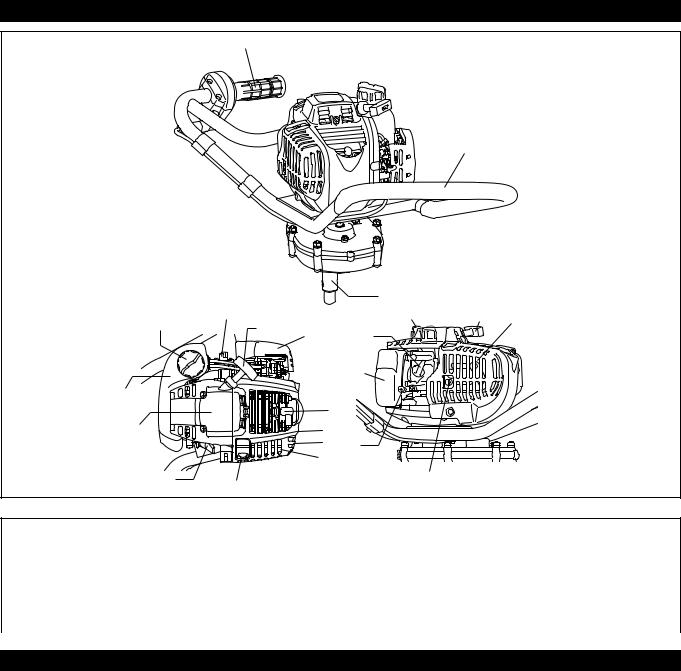
DESIGNATION OF PARTS
2
1
|
|
|
3 |
|
|
11 |
7 |
|
11 |
12 |
9 |
12 |
6 |
13 |
|
|
|
|
|
|
|
||
|
|
|
4 |
|
|
4 |
|
|
|
|
|
|
|
|
8 |
|
|
5 |
|
|
|
|
|
|
|
|
14 |
|
|
|
|
|
9 |
|
|
13 |
10 |
|
|
10 |
|
|
|
|
|
||
|
|
|
|
|
DESIGNATION OF PARTS
1. |
Handle |
5. |
Recoil starter |
9. Exhaust muffler |
13.Oil gauge |
|
|
|
|
|
|
2. |
Throttle control |
6. |
Air cleaner |
10.Exhaust pipe |
14.Drain screw |
|
|
|
|
|
|
3. |
Drive shaft |
7. |
I-O switch (on/off) |
11.Fuel tank cap |
|
|
|
|
|
|
|
4. |
Fuel tank |
8. |
Spark plug |
12.Starter knob |
|
|
|
|
|
|
|
ASSEMBLY
 WARNING:
•Before doing any work on the equipment, always stop the engine and pull the spark plug connector off the spark plug. A sudden change in the engine speed will result in the earth auger damage or personal injury.
•Always wear protective gloves and eye protection!
•Start the engine only after having assembled it completely.
 CAUTION:
•Use only auger bits designed for use with the product. Do not use incorrect auger bits.
•Use only approved auger pin and safety pin.
The auger pin supplied with the earth auger is designed to withstand the high stress encountered while digging. Use of any other connecting device, including cap screws, bolts, pins, etc., may result in damage to the earth auger drive shaft. Improper connecting devices can cause property damage and/or personal injury.
7
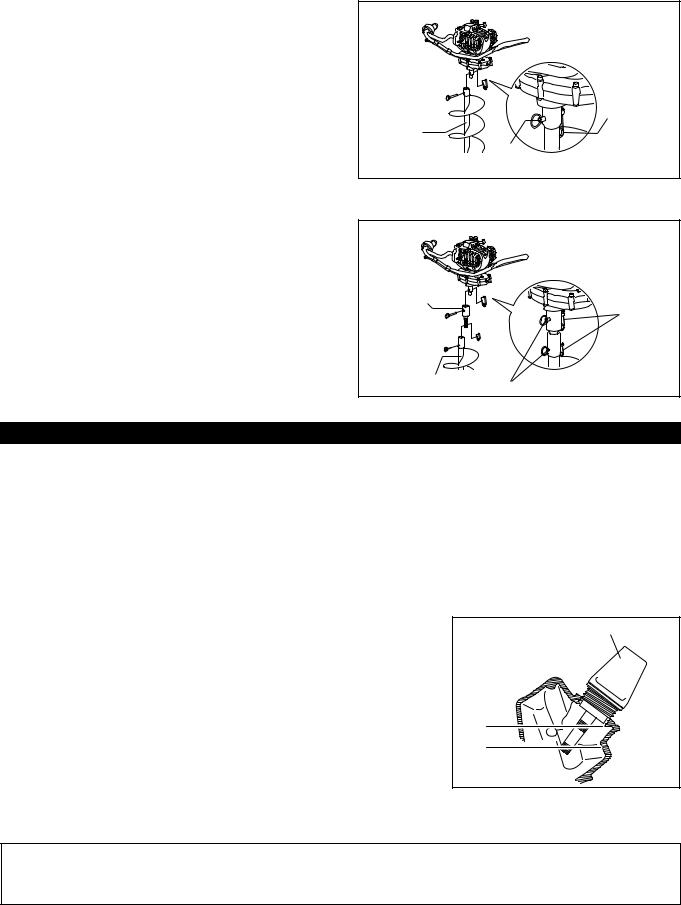
MOUNTING OF AUGER BIT (optional accessory)
Align the hole on the drive shaft of the earth auger and the hole on the auger bit. Fix them with auger pin and safety pin. Check that the safety pin is securely attached.
Safety pin
Auger bit
Auger pin
MOUNTING OF AUGER BIT WITH THE ADAPTER (optional accessory)
Align the hole on the drive shaft of the earth auger and the hole on the
adapter. Fix them with auger pin and safety pin. Then attach the auger
bit to the adapter with aligning the hole on the adapter and the hole on
the auger bit. Then fix them with adapter’s auger pin and safety pin. Check that both of the safety pins are securely attached.
Adaptor
Safety pin
Auger bit |
Auger pin |
|
BEFORE START OF OPERATION
INSPECTION AND REFILL OF ENGINE OIL
Filling the engine crankcase with oil requires a level working platform of sufficient size and appropriate height. As an alternative, the transmission drive shaft can be securely mounted in a suitable bench vice.
–Perform the following procedure, with the engine cooled down.
–Assure that the engine is horizontal position.
–Do not thread the oil gauge into oil filler to check oil level.
–Check if the oil level is between the lower or upper limit on the oil gauge.
–If the oil level is below the lower limit, add oil.
–Before filling oil, make sure that the oil drain screw is secured thoroughly.
–You may need to refill oil approximately every 10 operating hours (every 10 refueling).
–If the oil changes in color or mixes with dirt, replace it with new one.
Recommended oil: |
SAE 10W-30 oil of API Classification, Class SF or |
|
higher (4-stroke engine for automobile) |
Oil volume: |
Approx. 0.10L |
Oil gauge
Upper level
Lower level
NOTE:
•If the engine is not positioned horizontal, an inaccurate indication of oil level may occur and oil may be overfilled. Filling oil above the upper limit may cause oil contamination or white smoke.
Replacement of oil: “Oil gauge”
–Remove dust or dirt near the oil refill port.
–Keep the detached oil gauge free from sand or dust. Otherwise, any sand or dust adhering to the oil cap may result in problems with irregular oil circulation or wear on the engine parts.
8

1) Keep the engine in horizontal position, and detach the oil gauge.
2) Fill with oil to upper limit mark. Use oil bottle when filling.
3) Securely tighten the oil gauge. Insufficient tightening may cause oil leakage.
After refilling oil
– Wipe with a rag any spilled oil immediately.
REFUELING
 WARNING:
• Shut off the engine before refueling, keep away from open flames and do not smoke.
Handling of fuel
It is necessary to handle fuel with utmost care. Fuel may contain substances similar to solvents. Refueling must be performed in a sufficiently ventilated room or in the open air. Never inhale fuel vapor, and keep fuel away from you. If you touch fuel repeatedly or for a long time, the skin becomes dry, which may cause skin disease or allergy. If fuel enters into the eye, clean the eye with fresh water. If your eye remains still irritated, consult your doctor.
Storage period of fuel
Fuel should be used within a period of 4 weeks, even if it is kept in a special container in a well-ventilated and shaded area. Otherwise, fuel may deteriorate in one day.
Storage of machine and refill tank
–Keep the machine and tank at a cool place free from direct sunshine.
–Never keep the fuel in a car.
Fuel:
–The engine is a four-stroke engine. Be sure to use an unleaded automobile gasoline 87 or higher octane ((R+M)/2). It may contain no more than 10% alcohol (E-10).
–PE3450HG: This model adapts for use with Brazilian gasoline (E20 and E25).
Points for fuel:
–Never use a gasoline mixture which contains engine oil. Otherwise, it will cause excessive carbon accumulation or mechanical troubles.
–Use of deteriorated oil may cause irregular start-up.
9
Refueling
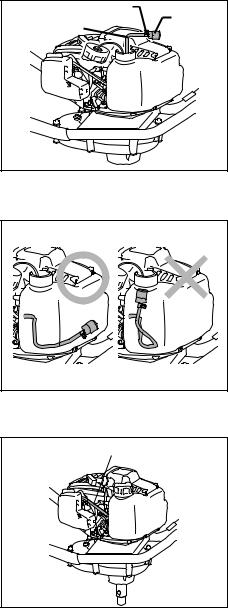
1)Keep the engine in horizontal position.
2)Loosen the fuel tank cap a little to release the tank pressure.
3)Detach the fuel tank cap, and refuel. DO NOT fill fuel up to the top of the tank.
4)After refueling, securely tighten the fuel tank cap.
Fuel tank cap |
Fuel |
upper level |
–Wipe the outside of the fuel tank cap to prevent debris from entering into the fuel tank.
–If there is any flaw or damage on the fuel tank cap, replace it.
–The fuel tank cap wears out in course of time. Replace it every two to three years.
–DO NOT put fuel in the oil fill port.
CORRECT HANDLING OF MACHINE
UNDERSTANDING KICKBACK
The operation of the earth auger involves engine torque being transmitted and multiplied by the transmission to the auger bit. The energy is then used to dig holes. But to every force, there is always a reaction force in the opposite direction. Thus, if the auger bit contacts a buried obstruction, the operator feels the left side of the handle of the earth auger being “thrusted” toward him. This “thrusting” force experienced by the operator is called kickback. The speed that the handle moves (and magnitude of the resulting impact force) is directly proportional to the amount and speed of the kickback force experienced by the operator.
Under certain operating conditions, striking a buried obstruction may produce a sudden kickback force to the hip or leg areas. It is possible that this kickback force may have the magnitude to “throw” the operator from the earth auger. The operator must maintain physical and mental alertness and be prepared to deal with this phenomenon.
BACK CARE / PROPER LIFTING INFORMATION
During the hole digging process, the operator is required to lift the earth auger and auger bit with numerous repetitions. Applying proper lifting techniques minimizes fatigue and back-related injuries.
Keep the following instructions in mind to reduce the risk of back-related injuries.
1)Maintain proper body weight.
2)Maintain good posture while walking or sitting.
3)Be conscious of how you twist and bend your body while digging. Twisting and bending the wrong way may exert too much pressure on one side of your vertebrae.
4)Always use proper lifting techniques as described below.
5)Develop a consistent exercise routine.
6)Quit or reduce your use of tobacco. Smoking reduces the supply of oxygen and nutrients to the discs that cushion the vertebrae.
10
PROPER LIFTING PROCEDURES
The following are guidelines for properly lifting the earth auger and auger bit from the hole. These guidelines are not intended to be all inclusive. Plan your path and make sure there are no obstructions or tripping hazards. Consider how you set the load. The spinal column is a very sensitive mechanism. At any given time, improper lifting procedures may cause damage that may lead to injury.
1)Position your feet at a comfortable distance (shoulder width) to help provide the necessary balance.
2)Tighten your stomach muscles by pulling in your stomach. Keep your back as straight as possible to keep the spine, back muscles and ligaments in correct alignment.
3)Remember to bend at the hips and knees as much as possible.
4)Start lifting the earth auger with a thrust of your feet while lifting as much as possible with your leg muscles. Use smooth movements.
5)Once you lift the earth auger, keep it close as possible to the body. Avoid turning at the waist. To turn, pivot your entire body.
6)Keep your shoulders, hips and feet pointed in the same direction.
7)Keep your footing firm and make sure that your intended path is clear before attempting to carry the earth auger.
MINIMIZING KICKBACK FROM AN OPERATIONAL STANDPOINT
Proper operator positioning enhances the control of the earth auger, reduces operator fatigue, and increase over all productivity.
1) Keep the left side of the handle as close to your body (left hip and leg areas) as possible to
minimize machine “kickback” when auger bit touches a buried obstruction. 2) Always keep in mind that the operating positions should allow your involuntary body reac-
tion against the torque sensation created by the digging process. 3) Keep upper arms as close to the upper body as possible to maximize mechanical lever-
age.
4) Keep your back as vertical as possible by bending the legs as required during the digging process.
5) Positioning the left foot ahead of the right foot at a comfortable distance enhances proper
body position.
Maintaining proper operating position is one of the most IMPORTANT and EFFECTIVE procedures for controlling kickback. Improper operating positions only increase the effects of kickback upon the operator.
Do not lean too far over the earth auger. Proper reaction and control may not be achieved in the event of kickback.
 CAUTION:
•Maintain the operator handle and throttle control handle grip areas in good condition and free of moisture, pitch, oil or grease.
•Wear gloves to improve your grip.
•Bent or damaged handles, a throttle control with a damaged/no grip or handles without the gripping area material (PVC coating) increase the effects of kickback. Do not operate the earth auger until such damage has been repaired or replaced. Damage to property and/or personal injury can result.
11
POINTS IN OPERATION AND HOW TO STOP
STARTING
 CAUTION:
• Move at least 3 m (10 feet) away from the place of refueling.
• Do not start the earth auger with the exhaust muffler facing toward the operator. Wrong standing position may result in injury from the hot muffler or breathing carbon monoxide fumes during operation. Always stand opposite side of engine muffler.
• The operator should position himself on firm footing.
1) Turn the engine I-O switch to the “I” (ON) position.
2) Continue to push the primer pump until fuel comes into the primer pump. (In general, 7 to 10 pushes.)
Primer pump
3)
–If the engine is cold or the ambient temperature is low, close the choke lever fully.
–If the engine is warm or the ambient temperature is high, open the choke lever half-way, or keep it fully open.
close
Choke lever
12
It is not necessary to open the throttle to start the engine.
4) Stand opposite side of the muffler, and hold the equipment firmly. And pull the starter knob gently until a certain resistance is felt. Then, return the starter knob, and pull it strongly. Never pull the rope to the full extension. Once the starter knob is pulled, never release your hand immediately. Hold the starter knob until it returns to its original point.
5)Once engine starts, set choke lever to the OPEN position if you have closed the choke lever.
6)Allow the engine to properly “warm up”. Continue warm-up operation for 2 to 3 minutes.
STOPPING
1) Releasing the throttle control to its closed (engine idle speed) position. 2) Turn the engine I-O switch to the OFF position.


 OFF
OFF
ADJUSTMENT OF IDLE SPEED
Carburetor adjusting screw
 WARNING:
• Make sure the auger bit does NOT rotate at the idle speed.
When it is necessary to adjust the idle speed, perform it by the carburetor adjusting screw.
CHECKUP OF IDLE SPEED
– Set the idle speed between 2900 – 3100 min–1.
If it is necessary to change the idle speed, use a phillips head screw driver on the screw as illustrated.
–To increase the idle speed, turn the adjusting screw clockwise. To reduce the idle speed, turn the adjusting screw counterclockwise.
–The carburetor is factory adjusted. However, after several use the idle speed may need to be re-adjusted.
OPERATION
 WARNING:
•It is a misconception that a larger diameter hole can be obtained by first digging an initial hole with a smaller “pilot” auger bit, and then second larger diameter auger bit is used to “ream” the hole. Do NOT apply this method. The auger bit may become unstable and lose control, and this may result in property damage or personal injury.
 CAUTION:
•Do not attempt to begin digging with the earth auger until the operator is ready to begin the process and is in full control of the machine.
•When digging in areas filled with known buried obstructions such as tree roots, rocks and other debris, operate the earth auger at less than full (an intermediate) speed to make sure a more rapid release of the centrifugal clutch when the auger bit touches an obstruction.
•An improper operating procedure may let the auger bit to “bind” or “bury” itself in the hole, and the earth auger is not capable of transmitting ample power to “free” the auger. This is usually the result of letting the auger to feed at an excessive rate. Smaller 5 to 10cm (2 to 4") diameter augers tend to cause this phenomenon more often. Do not continue to overload and slip the centrifugal clutch assembly. STOP the earth auger and remove it from the buried auger bit. Place an appropriate long bar through the hole of the auger bit, turn it counterclockwise with applying the principal of leverage until buried auger bit is retrieved.
13
•Some job applications may encounter buried obstructions on the job site that are too large in size to allow the usage or operation for the earth auger. Also, some job applications may encounter soil that is too compacted to operate the earth auger. Utilization of the earth auger on those job sites may cause property damage and/or personal injury. Exercise proper common sense by selecting the proper size and type of equipment.
•The throttle control regulates the engine speed. Keep a firm grip on it at all times. As with any safety device, it requires constant and proper maintenance to function as intended.
•Do not use an earth auger with the auger bit and blade worn past their service limits. Both the auger bit and auger blade must be replaced when signs of excessive wear are visible. A regularly scheduled maintenance program increases the service life and increase overall productivity by substantially reducing operator fatigue.
•Avoid placing serious stress to the back and lower body members. Always lift in a straight line with your legs. Maintain the back in a vertical position as much as possible. Proper wrist position during the digging process can reduce stress and strain related damage potential to this body area. Keep wrists as perpendicular to the operator handle as possible during the digging process to enhance operator control and reduce fatigue.
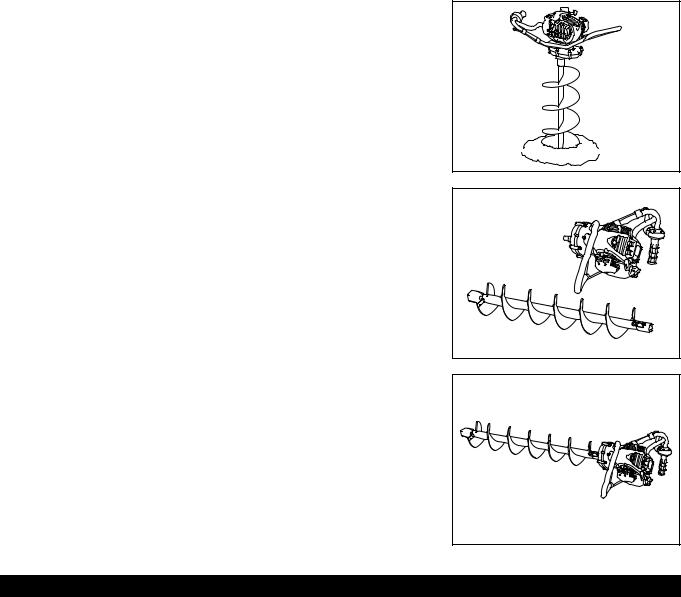
HOLE DIGGING OPERATION
1)Rotate the throttle control counterclockwise to increase the engine speed. The auger bit begins to rotate when the engine speed reaches the centrifugal clutch initial engagement speed.
2)Normal operating procedure for the earth auger is to dig with the engine operating at full speed. This allows the centrifugal clutch to become more firmly engaged, and transmits more usable power to the auger bit, resulting in greater productivity and less component wear.
 CAUTION:
•The earth auger’s centrifugal clutch slips when it is overloaded or if the auger bit comes in contact with a buried object. This slippage does not mean that the centrifugal clutch becomes fully disengaged with no horse power and torque being transmitted to the auger bit. Also, always keep in mind that the earth auger does not become slipping mode immediately after the throttle is released.
3)As a general rule, pressing down on the operator handle is not required to initiate or sustain the digging process. In most soils of moderate solidity, the auger bit digs at rates that do not cause the centrifugal clutch to overload and slip. In most soft soils (sandy, etc.), it may be necessary to hold up on the operator handle to reduce the digging rate of the auger. In most hard soils (hard clay, etc.), it may be necessary to press down on the operator handle to establish and maintain acceptable digging rates. Proper digging procedure for any given soil condition requires actual experience, skill and common sense. For any given soil condition, let the earth auger to dig at the rate most comfortable to the operator, but not causing the centrifugal clutch to overload and slip.
4)Some soil conditions may require more power to dig the hole than the earth auger is capable of. This problem is more noticeable in areas of semiconsolidated soils or solid compacted soils. Examples of such soil types include: soft shale, hard pan and cliche. The power required to dig a hole is directly proportional to the soil resistance encountered by the auger bit and the square of the auger bit diameter.
5)When digging in areas filled with tree roots, small rocks or other, buried obstructions, let the auger blade to “chip away” at the obstruction until the auger bit can pass by (by working the object loose) or go through it (as in the case of penetrating tree roots).
This technique usually involves holding up on the operator handle and establishing a minimal feed rate for the auger bit. Proper operator position minimizes the effects of kickback. This technique requires a lot of actual experience and common sense. Many times the size and nature of the buried object may simply prevent the auger from passing by or going through it. Continued use of the earth auger only causes equipment damage or personal injury. Instead, remove the buried object with a shovel or other suitable tool and then continue to dig the hole with the earth auger to the desired depth.
6)The auger retracts with less effort if it is allowed to rotate at a slow speed. This procedure, however, leaves more loose soil at the bottom of the hole. To minimize the amount of loose soil in the hole, stop the rotation before retracting the auger. Proper procedure for obtaining the cleanest, most usable hole for any given soil condition requires actual skill, experience and common sense.
7)Stop the engine between each hole to minimize the possibility of personal injury. Special care must be taken to slippery conditions and to difficult, overgrown terrain.
NOTE:
•Grass and other overgrowth conditions may become “clogged” around the auger blade and auger bit. Removal of such obstructions from the hole location may increase digging efficiency and overall productivity.
IN CASE YOU LOSE CONTROL OF THE EARTH AUGER
As a general rule, as soon as you realize you are in the process of loosing full control of the earth auger, “push” yourself free and clear from operator handle. The operator must fully comprehend that he is loosing control of the earth auger and to react accordingly with the appropriate body movement.
Improperly maintained engine throttle may cause the earth auger “spin” about its axis when the earth auger is out of control. In this case, do not try to stop the engine by grasping the rotating operator handle nor by using foreign object. Instead, leave the engine to exhaust its fuel supply. Check all components of the engine throttle control assembly allow for proper function before attempting to further use of the earth auger.
14
TEMPORARY STORAGE FOR THE EARTH AUGER WHILE ON THE JOB SITE
The earth auger can be temporarily stored on the job site by one of the following acceptable methods.
a) Digging a shallow hole and leaving the earth auger connected to the auger with the engine not running.
b)Disconnecting the earth auger from the auger bit, and storing it in a level configuration with its muffler and engine spark plug upward.
c)Storing the earth auger while connected to the auger bit with the muffler and the engine spark plug facing upward.
Pay attention that the hot muffler and muffler heat shield do not ignite grass or other combustible materials.
SERVICING INSTRUCTIONS
 CAUTION:
•Before doing any work on the equipment, always stop the engine and pull the plug cap off the spark plug (see “checking the spark plug”).
•Always wear protective gloves!
To ensure a long service life and to prevent any damage to the equipment, the following servicing operations should be performed at regular intervals.
Daily checkup and maintenance
–Before operation, check the machine for loose screws or missing parts. Pay particular attention to stability of the auger pin and safety pin.
–Before operation, always check for clogging of the cooling air passage and the cylinder fins.
Clean them if necessary.
– Perform the following work daily after use:
• Clean the equipment externally and inspect for damage.
• Clean the air filter. When working under extremely dusty conditions, clean the filter the several times a day.
• Check that there is no deformation or cracks on the auger bit and make sure they are firmly mounted by the auger pin and safety pin.
• Check that there is sufficient difference between idling and engagement speed to ensure that the auger bit is at a standstill while the engine is idling (if necessary reduce the idle speed). If under idling conditions the tool still continues to run, consult your nearest service center.
– Check the functioning of I-O switch and throttle control.
15
REPLACEMENT OF ENGINE OIL
 WARNING:
•The engine and engine oil is still hot just after stopping engine. Allow sufficient time for the engine and engine oil to cool down. Otherwise a skin burn may result.
 CAUTION:
•Before changing oil, check for a suitable way to dispose of old oil. Do not pour it down into sewage drains, onto garden soil or into open streams. Your local zoning or environmental regulations will give you more detailed instructions on proper disposal.
Oil gauge |
Deteriorated engine oil shortens the life of the engine. Be sure to check the oil and level regularly.
NOTE:
•If the oil filled above the limit, it may be contaminated or may catch fire with white smoke. Allow sufficient time after stopping engine for the engine oil to return to the oil tank to ensure accurate reading of the oil level.
Interval of replacement: |
After first 20 operating hours, followed by every 50 operating hours. |
Recommended oil: |
SAE 10W-30 oil of API Classification SF Class or higher (4-stroke engine oil for automobile) |
In replacement, perform the following procedure.
1)Place a cloth or paper towel to the area around the drain screw and oil refill port.
2)Place large container (pan, etc.) under drain hole.
3)Turn the oil gauge a little so that air can pass through oil refill port.
4)Remove the oil drain screw. Be sure to place the oil drain screw where it does not gather dirt, dust or other foreign matter.
5)Tilt the earth auger and drain the oil into a pan or other container.
* Use cloth to fully wipe off any oil attached to bolt and equipment. Alternative draining method
Remove the oil gauge, tilt the equipment toward oil refill port, and drain out oil. Collect oil in container.
6)Once all the oil is drained, tightly secure the drain screw.
7)Remove the oil gauge. Be sure to place the oil gauge where it does not gather dirt, dust or other foreign matter.
8)Keep the engine in horizontal position, and then fill with the oil up to the point of overflowing the filler neck.
9)After filling the engine with oil, tightly secure the oil gauge. Ensure that the oil gauge and the drain screw are tight. If it is not tightly secured, it may leak.
Drain hole |
16
CLEANING OF AIR CLEANER
|
WARNING: |
|
• Shut off the engine. Keep away from open flames. Do not smoke. |
Cover |
|
|
|
|
Dirty air cleaner element causes starting difficulty, power loss, engine malfunctions, and short- |
|
|
ens engine life extremely. Keep the air cleaner element clean. |
|
|
Interval of Cleaning and Inspection: Daily (every 10 operating hours) |
|
|
1) |
Place the choke lever to the fully closed position so that dust and dirt are not allowed to |
|
|
enter the carburetor. |
|
2) |
Remove the fixing bolt of air cleaner cover. |
|
Element
3)Pull out the lower edge of the cover to remove the air cleaner cover. Bolt
4)Remove the element, then clean it with a solution of warm water and a mild detergent, thoroughly drying it afterward.
5)Install it in alignment with the lines as shown in illustration.
6)Wipe off any oil adhering to the area around the air cleaner cover and breather with a cloth.
7)After cleaning, reassemble the cleaner cover (insert the tab at the top first, then insert the bottom tab) and tighten the fixing bolt.
CHECKING THE SPARK PLUG
 CAUTION:
•Never touch the spark plug connector while the engine is running (danger of high voltage electric shock).
Interval of Cleaning and Inspection: Daily (every 10 operating hours)
–Only use the supplied universal wrench to remove or to install the spark plug.
–The gap between the two electrodes of the spark plug should be 0.7 – 0.8 mm (0.028" – 0.032"). If the gap is too wide or too narrow, adjust it. If the spark plug is clogged or contaminated, clean it thoroughly or replace it.
0.7 mm – 0.8 mm |
(0.028" – 0.032") |
17
CLEANING OF FUEL FILTER
 WARNING:
• Shut off the engine. Keep away from open flames. Do not smoke.
Interval of Cleaning and Inspection: Monthly (every 50 operating hours)
The fuel filter is used to filter the fuel required by the carburetor. A periodical visual inspection of the fuel filter is to be conducted.
1)Open the fuel tank cap, use a wire hook and pull out the suction head through the tank opening.
2)Remove the hose clamp and pull out the fuel filter from fuel pipe.
3)Wash the fuel filter with kerosene.
4)After washing, reassemble it.
5)If the filter is hard or clogged up, replace it with new one.
Replace the fuel filter at least quarterly to ensure an enough fuel supply to the carburetor. Otherwise an insufficient fuel supply may cause the engine start failure and limited maximum speed.
After checking, cleaning or replacing, fix the fuel filter onto the fuel pipe with the hose clamp. Push the fuel filter in all the way to the bottom of the fuel tank.
Hose clamp
Fuel filter
Fuel pipe
REPLACEMENT OF FUEL PIPE
 WARNING:
• Shut off the engine. Keep away from open flames. Do not smoke.
Interval of Cleaning and Inspection: Daily (every 10 operating hours)
Replacement: Annually (every 200 operating hours)
Replace the fuel pipe every year, regardless of operating frequency. Fuel leakage may lead to fire.
If any leakage is detected during inspection, replace the fuel pipe immediately.
Fuel pipe
INSPECTION OF BOLTS, NUTS AND SCREWS
–Retighten loose bolts, nuts, etc.
–Check the fuel cap and oil cap for tightness. Check for fuel and oil leakage.
–Replace damaged parts with new ones for safety operation.
CLEANING OF PARTS
–Always keep the engine clean by wiping down with a cloth rag.
–Keep the cylinder fins free of dust or dirt. Dust or dirt adhering to the fins may cause piston seizure.
18
THROTTLE CONTROL MAINTENANCE
 CAUTION:
•Do not operate the earth auger without a rubber boot assembly in proper condition mounted in posit ion on the throttle control. Without the use of a proper rubber boot assembly, foreign materials may be gathered and restrict the movement of the internal components, reduce operator control of the earth auger and result in property damage and/or personal injury.
Interval of Inspection: Daily (every 8 operating hours)
Every 8 hours of actual operation and whenever the throttle cable is replaced, the following maintenance program is to be followed.
1)Remove the plastic cover to properly inspect the internal components. Any worn or damaged component must be replaced with an approved replacement part only.
2)Normal use produces a wear pattern by the braided inner cable into the idler pulley. Maximum allowable groove depth wear created by the throttle cable is 1 mm (0.045"). Replace the idler pulley when it becomes worn more than this limit.
3)Inspect the braided inner cable on a regular basis for excessive wear in the area of direct contact with the idler pulley. Replace the throttle cable if it is abnormally worn.
4)Inspect the barrel end of the braided inner cable for proper retention on a regular basis. A properly retained barrel end has no relative movement between the barrel end itself and the inner cable. If there is any relative movement between them, replace the throttle cable.
5)Inspect the receptacle area of the throttle control which retains the barrel end of the braided inner cable on a regular basis. A properly fitted barrel fitting must have complete freedom of movement with no binding restrictions or excessive play due to wear. A barrel fitting which is binding within the receptacle must be discarded in case of a replacement of throttle cable.
If receptacle is worn excessively, replace the specific component assembly.
6)The rubber boot assembly protects the internal components of the throttle control from foreign material. The service life of the boot assembly may be extended by an appropriate inspection and maintenance on a regular basis.
7)Inspect the handle grip on a regular basis to check if it is properly secured to the throttle control.
Replace the throttle control if it fits loose or becomes worn or torn by usage.
Idler pulley |
Barrel end |
AUGER BIT MAINTENANCE
 WARNING:
•Do not operate the auger bit which has a bent or damaged axle with a total indicated runout exceeding the maximum allowable limit. Excessive auger wobble may reduce operator control, resulting in property damage and/or personal injury.
•Use safety eye protection and any other appropriate safety apparel. The bit replacement process may create flying steel chips or other debris. Pay attention to all onlookers to remain clear of flying debris. Improper safety procedures may result in property damage and/or personal injury.
The service life of the auger bits are affected by soil classification, soil moisture content and general operating procedures. A consistent auger maintenance program provides maximum digging performance.
The replacement of the auger screw bit or blade requires a level working platform of sufficient size and appropriate height.
19
REPLACING A WORN SCREW BIT
Inspect the auger bit for worn or broken components. Check if the auger does not have a bent or damaged axle. A bent or damaged axle causes the auger bit to “wobble” during use. Maximum allowable auger wobble is 7 mm (0.25") total indicated runout (TIR). An auger bit with a total indicated runout wobble in excess of this value must be removed from service and scrapped.
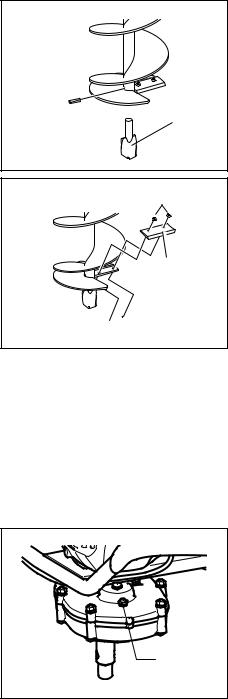
1)Using the hammer and drift-type punch, remove the roll pin from the auger bit.
2)Remove the worn screw bit from the auger bit. Align the hole of the replacement screw bit with the hole drilled in the auger bit.
3)Install the roll pin with the hammer and drift-type punch.
REPLACING A WORN AUGER BLADE
All blades utilize 1/4 inch diameter capscrews, lock washers and standard nuts to retain the blade to the auger bit.
Each blade incorporates a minimum of two capscrews. A worn auger that has only one capscrew is worn beyond its useful service life and must be discarded.
1)Using the 7/16 inch wrenches, loosen the capscrews to remove the worn blade from the auger bit.
2)Remove any accumulated dirt.
3)Install the replacement blade with the capscrew threads facing up toward the hub. The replacement blade extends past the outside diameter of the auger bit so that the blade provides added component protection.
Tighten firmly with the wrenches.
CHANGING THE EARTH AUGER TRANSMISSION LUBRICANT
 CAUTION:

 Screw bit Roll pin
Hex nut
Blade

 Screw
Screw
•Observe all applicable safety precautions for the solvent. Dispose of the used transmission lubricant according to all applicable laws and regulations.
Earth auger uses a fully enclosed, double reduction transmission for multiplying and transmitting engine torque to the auger bit. The principle involves engine horsepower and torque being transmitted through a centrifugal clutch and two sets of gear reductions into a final drive shaft. Grease is provided for lubrication and heat dissipation for the bearings, gears and clutch assembly.
The transmission is originally filled with approximately 8 ounces (224 g) of high temperature lubricant. This lubricant contains an extreme pressure additive which enables the gear teeth to cling at high rotational speeds.
Pressure relief valve
A pressure relief valve is located on the top surface of the transmission cover to relieve any excess pressure created in the transmission due to heat rise. If this valve becomes clogged, the following problems may occur:
a) Lubrication grease is forced out between the bearings and the final driveshaft.
b) The gasket that separates the two halves of the transmission pushes out, causing a loss of lubrication grease.
To prevent these problems, clean the pressure relief valve at regular intervals with an approved safety solvent.
Pressure relief valve
Transmission lubricant
 CAUTION:
•Before changing the transmission lubricant, drain the fuel from the fuel tank into an approved container. Wipe any excess spilled fuel and discard them properly.
Interval of replacement: every 50 hours of operation
Change the transmission lubricant every 50 hours of operation, or more often as necessary, if the earth auger is operated in extremely dusty or dirty conditions.
20
1)Position the earth auger on a suitable work bench with the operator handle level with the ground. As an alternative, the transmission drive shaft can be securely mounted in a suitable bench vice. Wipe any dust or dirt from the area where the transmission separates.
2) Loosen and remove the six capscrews that fasten the transmission together. Using the |
Drive shaft |
Panhead screw |
|
||
rubber hammer, split and separate the transmission cover and case. |
|
|
Exercise caution not to damage the dowel pins located on opposite end of the transmis- |
|
Capscrew |
sion. |
|
|
3) If the bearing journals of the secondary gear are difficult to remove from the ball bearings, it may be much difficult to separate the transmission cover and case. It may be necessary to provide a supplemental force to the pinion journals to assist the removal process.
Remove the panhead screw from both bearing housings.
Insert a 1/4-20 UNC capscrew of one inch minimum length into the housing. Turn the capscrew in a clockwise direction. This provides thrust against the pinion bearing journal until it clears the pinion gear support bearing.
Repeat the process with the remaining pinion gear bearing journal if necessary.
NOTE:
•This process is only necessary if the fit between the pinion gear journals and the ball bearings do not allow disassembly of the transmission cover and case.
4)Remove the gasket.
5)Remove the primary gear and pinion assembly.
6)Clean the interior surfaces of the transmission cover and case with an approved safety solvent.
7)Clean each gear with an approved safety solvent. Inspect the teeth for excess wear, cracks or fatigue.
Replace each component as necessary.
8) If necessary, reinstall panhead screw into the bearing housings. Properly secure it.
9)Fill the transmission cover and case with 8 ounces (224 g) of high temperature transmission grease containing an extreme pressure additive. Fisk Brothers GR-132 or equivalent lubrication grease is an approved lubricant.
If the Fisk Brothers lubricant is not available, an acceptable alternative is a marine-grade wheel bearing grease that contains an EP (denoting extreme pressure) additive. Distribute the grease equally around all gear teeth.
Secondary gear |
Primary gear |
Drive shaft |
DO NOT USE STANDARD LITHIUM BASED GREASES INTENDED FOR COMMON LUBRICATION PURPOSES. These types of grease are not formulated to operate at the higher operating temperatures encountered during the hole digging process. Such greases also do not contain an extreme pressure additive for use with gears.
10) Reinstall the primary gear and pinion assembly. Distribute the grease equally around all gear teeth.
Replace the old transmission gasket with a new gasket.
Align the transmission dowel pins when reinstalling the cover. Reinstall the fasteners with the hexagon nuts on the cover side of the transmission. Torque all fasteners to 96 in lbs (12 N.m.) The second fastener should be diagonally opposite from the first fastener, i.e. torque fasteners in an “X” sequence.
11)Rotate the final driveshaft and check for excessive noise or binding. If excessive noise or binding is evident, disassemble the transmission and investigate for probable causes. Reassemble and retorque to the specified amount. Recheck for excessive noise or binding.
12)Inspect the earth auger for loose, worn or damaged parts. Replace any questionable part or assembly with a genuine, approved replacement part.
21

STORAGE
 DANGER:
•When the earth auger is kept out of operation for a long time, drain all fuel from the fuel tank and carburetor, and keep it at a dry and clean place.
 WARNING:
•The engine is still hot just after stopping engine. When draining the fuel, allow sufficient time for the engine to cool down after stopping it. Otherwise a skin burn and/or fire may result.
Drain fuel from the fuel tank and carburetor according to the following procedure: 1) Remove the fuel tank cap, and drain fuel completely.
If there is any foreign matter remaining in the fuel tank, remove it completely.
2)Pull out the fuel filter from the refill port using a wire.
3)Push the primer pump until fuel is drained from there, and drain fuel coming into the fuel tank.
4)Put the filter to the fuel tank, and securely tighten the fuel tank cap.
5)Then, start the engine and make it keep running until it stops so that all the fuel in carburetor runs out.
After the engine stops and cools down, perform the following steps.
–Remove the spark plug, and drip several drops of engine oil through the spark plug hole.
–Gently pull the starter knob so that engine oil will spread over the engine, and attach the spark plug.
–Keep the drained fuel in a special container in a well-ventilated shade.
–Check all visible parts for wear, breakage or damage. Order any part required if necessary.
–Apply a light coat of protective grease to the transmission final driveshaft to prevent the formation of rust.
–Do not store the earth auger connected to an auger bit.
–Always store the earth auger with the muffler and the spark plug facing upwards.
–Store the earth auger inside. If the earth auger must be stored outside, apply suitable protective means and put each auger bit with a suitable covering.
Attention after long-time storage
Before startup after long-time shutdown, be sure to replace oil. Oil will deteriorate while the machine is kept out of operation.
Fault |
System |
Observation |
Cause |
|
|
|
|
Engine not starting or |
Ignition system |
Ignition spark O.K. |
Fault in fuel supply or compression system, mechanical defect |
with difficulty |
|
|
|
|
|
No ignition spark |
I-O switch is OFF position, wiring fault or short circuit, spark plug or |
|
|
|
connector defective, ignition module faulty |
|
Fuel supply |
Fuel tank filled |
Incorrect choke position, carburetor defective, fuel supply line bent or |
|
|
|
blocked, fuel dirty |
|
Compression |
No compression when |
Cylinder bottom gasket defective, crankshaft seals damaged, cylinder |
|
|
pulled over |
or piston rings defective or improper sealing of spark plug |
|
Mechanical fault |
Starter not engaging |
Broken starter spring, broken parts inside of the engine |
Warm start problems |
|
Tank filled ignition |
Carburetor contaminated, have it cleaned |
|
|
spark existing |
|
Engine starts but dies |
Fuel supply |
Tank filled |
Incorrect idling adjustment, carburetor contaminated |
|
|
|
Fuel tank vent defective, fuel supply line interrupted, cable or |
|
|
|
I-O switch faulty |
Insufficient |
Several systems may |
Engine idling poor |
Air filter contaminated, carburetor contaminated, muffler clogged, |
performance |
simultaneously be |
|
exhaust duct in the cylinder clogged |
|
affected |
|
|
|
|
|
|
22

Operating time |
Before |
After |
Daily |
30h |
50h |
200h |
Shutdown |
Corres- |
|
Item |
operation |
lubrication |
(10h) |
/rest |
ponding P |
||||
|
|
|
|||||||
Engine oil |
Inspect/clean |
|
|
|
|
|
|
8 |
|
|
Replace |
|
|
|
*1 |
|
|
16 |
|
Tightening parts |
Inspect |
|
|
|
|
|
|
18 |
|
(bolt, nut) |
|
|
|
|
|
|
|
||
|
|
|
|
|
|
|
|
||
Fuel tank |
Clean/inspect |
|
|
|
|
|
*3 |
– |
|
|
Drain fuel |
|
|
|
|
|
|
22 |
|
Throttle control |
Check |
|
|
|
|
|
|
– |
|
|
function |
|
|
|
|
|
|
||
|
|
|
|
|
|
|
|
||
I-O switch |
Check |
|
|
|
|
|
|
15 |
|
|
function |
|
|
|
|
|
|
||
|
|
|
|
|
|
|
|
||
Idle speed |
Inspect/adjust |
|
|
|
|
|
|
13 |
|
Air cleaner |
Clean |
|
|
|
|
|
|
17 |
|
Spark plug |
Inspect |
|
|
|
|
|
|
17 |
|
Cooling air passage and |
Clean/inspect |
|
|
|
|
|
|
18 |
|
cylinder fins |
|
|
|
|
|
|
|
||
|
|
|
|
|
|
|
|
||
Fuel pipe |
Inspect |
|
|
|
|
|
|
18 |
|
|
Replace |
|
|
|
|
*2 |
|
– |
|
Fuel filter |
Clean/replace |
|
|
|
|
|
|
18 |
|
Valve clearance (intake |
Inspect/adjust |
|
|
|
|
*2 |
|
– |
|
valve and exhaust valve) |
|
|
|
|
|
|
|||
|
|
|
|
|
|
|
|
||
Carburetor |
Drain fuel |
|
|
|
|
|
*3 |
22 |
|
Auger bit |
Inspect |
|
|
|
|
|
|
19 |
|
Throttle control cable wire |
Inspect |
|
|
|
|
|
|
19 |
|
Transmission |
Inspect/clean |
|
|
|
|
|
|
20 |
|
|
Lubrication |
|
|
|
|
|
|
20 |
*1 Perform initial replacement after 20h operation.
*2 For the 200 operating hour inspection, request authorized service center.
*3 After emptying the fuel tank, continue to run the engine and drain fuel in the carburetor.
23

TROUBLESHOOTING
Before making a request for repairs, check for trouble by yourself. If any abnormality is found, control your machine according to the description of this manual. Never tamper or dismount any part contrary to the description. For repairs, contact service center.
|
|
State of abnormality |
Probable cause (malfunction) |
Remedy |
|||
|
|
|
|
|
|
|
|
|
|
|
|
|
Failure to operate primer pump |
Push 7 to 10 times |
|
|
|
|
|
|
|
|
|
|
|
|
|
|
Low pulling speed of starter rope |
Pull strongly |
|
|
|
|
|
|
|
|
|
|
|
|
|
|
Lack of fuel |
Feed fuel |
|
|
|
|
|
|
|
|
|
|
|
|
|
|
Clogged fuel filter |
Clean it |
|
|
|
|
|
|
|
|
|
|
|
|
|
|
Disconnected fuel tube |
Connect fuel tube properly |
|
|
|
|
|
|
|
|
|
|
|
|
|
|
Bented fuel tube |
Straighten fuel tube |
|
|
|
|
|
|
|
|
|
|
|
|
|
|
|
Deteriorated fuel makes starting more difficult. |
|
|
|
|
|
|
Deteriorated fuel |
Replace with new fuel. (Recommended |
|
|
|
|
|
|
|
replacement: 1 month) |
|
|
|
|
|
|
|
|
|
|
|
|
|
|
|
Set throttle control to medium or high speed, |
|
|
|
|
|
|
|
and pull starter handle until engine starts. |
|
Engine does not start |
|
Once engine starts, auger bit starts rotating. |
|||||
Excessive suction of fuel |
Pay full attention to auger bit. |
||||||
|
|
|
|
|
|||
|
|
|
|
|
If engine still does not start, remove spark |
||
|
|
|
|
|
|
||
|
|
|
|
|
|
plug, dry the electrode, and reassemble them |
|
|
|
|
|
|
|
as they originally were. Then, start as |
|
|
|
|
|
|
|
specified. |
|
|
|
|
|
|
|
|
|
|
|
|
|
|
Detached plug cap |
Attach securely |
|
|
|
|
|
|
|
|
|
|
|
|
|
|
Contaminated spark plug |
Clean it |
|
|
|
|
|
|
|
|
|
|
|
|
|
|
Abnormal clearance of spark plug |
Adjust clearance |
|
|
|
|
|
|
|
|
|
|
|
|
|
|
Other abnormality of spark plug |
Replace it |
|
|
|
|
|
|
|
|
|
|
|
|
|
|
Abnormal carburetor |
Make request for inspection and maintenance. |
|
|
|
|
|
|
|
|
|
|
|
|
|
|
Starter rope cannot be pulled |
Make request for inspection and maintenance. |
|
|
|
|
|
|
|
|
|
|
|
|
|
|
Abnormal drive system |
Make request for inspection and maintenance. |
|
|
|
|
|
|
|
|
|
|
|
|
|
|
Insufficient warm-up |
Perform warm-up operation |
|
|
|
|
|
|
|
|
|
|
|
|
|
|
Choke lever is set to “CLOSE” although |
Set to “OPEN” |
|
|
|
|
|
|
engine is warmed up. |
||
|
|
|
|
|
|
||
Engine stops soon |
|
|
|||||
Clogged fuel filter |
Clean it |
||||||
Engine speed does not increase |
|||||||
|
|
||||||
Contaminated or clogged air cleaner |
Clean it |
||||||
|
|
|
|
|
|||
|
|
|
|
|
|
|
|
|
|
|
|
|
Abnormal carburetor |
Make request for inspection and maintenance. |
|
|
|
|
|
|
|
|
|
|
|
|
|
|
Abnormal drive system |
Make request for inspection and maintenance. |
|
|
|
|
|
|
|
|
|
|
|
|
|
|
|
Stop the engine. Remove the earth auger from |
|
Auger bit gets stucked in the ground |
Auger bit is bound in difficult terrian |
auger bit. Apply appropriate strong bar to |
|||||
|
|
|
|
|
|
reliese the auger bit. |
|
|
|
|
|
|
|
|
|
|
|
Auger bit does not rotate |
Loosened auger bit pin or safety pin |
Tighten them securely |
|||
|
|
|
|
||||
|
|
|
|
|
Foreign matter caught by auger bit |
Remove foreign matter while the engine |
|
|
|
Stop engine immediately |
|
|
stopped. |
||
|
|
|
|
||||
|
|
|
|
|
Abnormal drive system |
Make request for inspection and maintenance. |
|
|
|
|
|
|
|
|
|
|
Main unit vibrates abnormally |
Broken, bent or worn auger bit |
Replace auger bit |
||||
|
|
|
|
|
|
|
|
|
|
|
|
|
Loosened auger bit pin or safety pin |
Tighten them securely |
|
|
|
Stop engine immediately |
|
|
|||
|
|
|
|
|
|||
|
|
|
|
|
Abnormal drive system |
Make request for inspection and maintenance. |
|
|
|
|
|
|
|||
|
|
|
|
|
|
|
|
|
|
Auger bit does not stop |
High idling rotation |
Adjust idle speed |
|||
|
|
|
|
|
|
|
|
|
|
|
Throttle control wire problem |
Ask service center to replace it. |
|||
|
|
Stop engine immediately |
|
||||
|
|
|
|
|
Abnormal drive system |
Make request for inspection and maintenance. |
|
|
|
|
|
|
|||
|
|
|
|
|
|
|
|
|
|
Engine does not stop |
Detached connector to the I-O switch |
Attach securely |
|||
|
|
|
|
|
|
|
|
|
Run engine at idling, and set |
|
Abnormal electric system |
Make request for inspection and maintenance. |
|||
|
|
choke lever to CLOSE |
|
||||
|
|
|
|
|
|
|
|
|
|
|
|
|
|
|
|
When the engine does not start after warm-up operation:
If there is no abnormality found for the checked items, open the throttle by about 1/3 and start the engine.
24
Français |
(Instructions originales) |
|
|
Vous avez fait l’achat d’un équipement électrique pour usage extérieur MAKITA et nous vous en remercions. Nous avons le plaisir de vous recommander ce produit MAKITA, fruit d’importants programmes de développement et de nombreuses années d’études et d’expérience.
Veuillez lire soigneusement ce manuel, qui traite en détail des différents points des performances de la machine et vous aidera à en tirer le meilleur parti possible.
Table des matières |
|
|
Page |
SYMBOLES ....................................................................................... |
25 |
CONSIGNES DE SÉCURITÉ ............................................................ |
26 |
CARACTÉRISTIQUES TECHNIQUES.............................................. |
29 |
NOMENCLATURE DES PIÈCES....................................................... |
30 |
MONTAGE ......................................................................................... |
30 |
AVANT LE DÉMARRAGE .................................................................. |
31 |
MANIPULATION CORRECTE DE LA MACHINE .............................. |
33 |
POINTS DE FONCTIONNEMENT ET MÉTHODE D’ARRÊT............ |
35 |
FONCTIONNEMENT ......................................................................... |
36 |
INSTRUCTIONS POUR LE DÉPANNAGE ........................................ |
38 |
RANGEMENT .................................................................................... |
45 |
DÉPANNAGE..................................................................................... |
47 |
SYMBOLES
Vous remarquerez les symboles suivants lors de la lecture de ce manuel.
Lire le manuel et suivre les mises en garde et les consignes de sécurité !
Redoubler de précaution !
Interdit
Porter des lunettes de protection et un serre-tête antibruit.
Le gaz d’échappement est toxique. Ne pas utiliser dans un endroit non aéré.
Rester à l’écart de la surface encore chaude.
Interdiction de fumer !
Pas de flamme nue !
Port de gants de protection obligatoire
Premiers secours
25

CONSIGNES DE SÉCURITÉ
Généralités
–Lisez ce manuel pour vous familiariser avec le maniement de l’équipement. Les utilisateurs mal informés risquent, par des manipulations inappropriées, de se blesser ou de blesser leur entourage. Si vous ne pouvez pas lire ou ne comprenez pas parfaitement le contenu de ce manuel, veuillez vous adresser au SAV avant d’essayer de faire fonctionner cet équipement.
–Ne le prêtez qu’aux personnes ayant déjà une certaine expérience de ce type d’équipement. Remettez toujours le manuel d’instructions et les autres documents d’information avec l’équipement.
–Il est conseillé aux utilisateurs novices de solliciter auprès du SAV des instructions de base afin de se familiariser avec le maniement d’un engin à moteur.
–N’apportez aucune modification à l’équipement.
–Seuls les opérateurs ayant toutes leurs capacités physiques et mentales, et la taille et la stature adéquates sont autorisés à utiliser la tarière.
–Les enfants et les adolescents âgés moins de 18 ans ne doivent pas être autorisés à utiliser cet équipement. Au-delà de 16 ans, ils peuvent cependant apprendre à s’en servir, mais uniquement sous le contrôle direct d’une personne qualifiée.
–L’opérateur doit avoir une taille, un poids et une force appropriés pour utiliser la tarière en vue de minimiser les risques de blessures corporelles.
–Un opérateur souffrant de maux de dos chroniques ou présentant des antécédents de mal de dos ou d’autres problèmes médicaux ne doit pas essayer d’utiliser la tarière. Le processus d’excavation de trous peut engendrer un stress excessif et exercer une tension directe sur les muscles dorsaux, la colonne vertébrale et d’autres parties du corps. Les problèmes de dos peuvent être un effet secondaire du processus d’excavation de trous.
–Soyez toujours très prudent.
–N’utilisez l’équipement que si vous êtes en bonne condition physique. Travaillez toujours en faisant preuve de calme et de prudence. N’oubliez pas que vous êtes responsable des autres.
–N’utilisez jamais cet équipement sous l’emprise de l’alcool ou de médicaments, ou si vous êtes fatigué ou malade.
–Ne touchez pas le silencieux chaud du moteur. Un silencieux peut chauffer et provoquer des blessures corporelles.
–Les réglementations nationales peuvent limiter l’utilisation de l’équipement.
Utilisation prévue de la machine
Cet équipement est prévu pour percer le sol. Il ne doit pas être utilisé à d’autres fins, par exemple : percer la glace ou dans un mur sous peine de provoquer des blessures.
Équipement de protection individuel
–Les vêtements doivent être fonctionnels et pratiques, à savoir résistants et moulants, sans toutefois entraver la liberté de mouvement. Évitez les bijoux ou vêtements qui pourraient être happés par les commandes ou les pièces en mouvement.
–Afin d’éviter les blessures à la tête, aux yeux, aux mains ou aux pieds, ainsi que pour protéger votre ouïe, portez toujours les équipements et vêtements de protection suivants lorsque vous utilisez la machine.
–Portez toujours un casque en présence d’un risque de chute d’objets. Le casque de sécurité (1) doit être inspecté régulièrement pour vérifier qu’il n’est pas endommagé et doit être remplacé au moins tous les 5 ans. N’utilisez que les casques de sécurité homologués.
–Les lunettes de sécurité (2) (ou encore la visière du casque) protègent le visage des projections de débris et de pierres. Pendant le fonctionnement, portez toujours les lunettes de sécurité ou une visière pour éviter les blessures oculaires.
–Portez un équipement anti-bruit adéquat afin d’éviter une déficience auditive (cache-oreilles (3), bouchons d’oreille, etc.).
–Une combinaison de travail (4) vous protègera contre les projections de pierres et de débris. Il est vivement recommandé de porter une combinaison de travail.
–Les gants (5) font partie de l’équipement réglementé et leur port est obligatoire pendant le fonctionnement.
–Lorsque vous utilisez l’équipement, portez toujours des chaussures robustes (6) à semelle anti-dérapante, afin de vous protéger des blessures et de garantir un bon appui.
(3)
(1)
(2)
(4) |
(5) |
(6) |
|
|
|
26
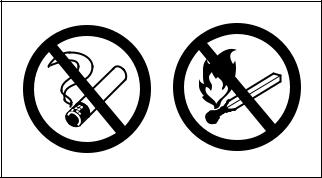
Mise en route
–En raison de la dimension, de la puissance, de la complexité et des caractéristiques de fonctionnement de l’équipement, chaque opérateur doit recevoir une formation professionnelle adéquate sur cette tarière avant de l’utiliser.
–Prenez contact avec les représentants pertinents pour confirmer l’absence de câbles électriques, de conduites de gaz ou d’autres matériels dangereux enfouis sous la surface de travail AVANT d’utiliser la tarière. La tarière et ses accessoires ne sont pas isolés. Si la mèche hélicoïdale entre en contact avec des câbles électriques, des conduites de gaz ou d’autres matériels dangereux enfouis, une électrocution ou une explosion peut se produire.
–Tenez les passants, particulièrement les enfants et les animaux, à l’écart du site de travail. Le processus d’excavation de trous peut entraîner la projection à grande vitesse de particules frappant l’opérateur et les passants. Ce qui peut entraîner des dommages matériels et/ou corporels.
–Les mineurs ne doivent jamais être autorisés à utiliser la tarière. Il existe un risque potentiel d’explosion ou d’empoisonnement au monoxyde de carbone, susceptible de provoquer des blessures graves, voire mortelles.
–Les opérateurs doivent avoir une taille adéquate de sorte que dans n’importe quelle configuration d’utilisation, la poignée demeure en dessous de leur épaule.
–Lorsque vous utilisez continuellement et régulièrement la tarière, surveillez étroitement l’état de vos mains et doigts. Après chaque période d’utilisation, faites des exercices pour rétablir une circulation sanguine normale. L’utilisation prolongée de la tarière expose l’opérateur à des vibrations susceptibles de produire le phénomène des doigts blancs (syndrome de Raynaud) et pouvant entraîner de graves blessures corporelles.
–Protégez-vous contre les risques de lésions au niveau du dos. Soulevez toujours la tarière avec le muscle de la jambe, pas du dos.
–Avant de l’utiliser, vérifiez toujours la sécurité de l’équipement :
Vérifiez la sécurité de la mèche hélicoïdale et le bon fonctionnement de la commande des gaz.
La rotation de la mèche hélicoïdale pendant la vitesse au ralenti est interdite. Vérifiez auprès de votre SAV pour un ajustement en cas de doute.
–Ne démarrez le moteur que conformément aux instructions. N’utilisez pas d’autres méthodes pour démarrer le moteur !
–N’utilisez les outils que pour les tâches pour lesquelles ils sont spécifiés.
–Ne démarrez le moteur qu’après avoir assemblé toutes les pièces. Vous ne devez utiliser l’appareil qu’après avoir fixé en place tous les accessoires appropriés.
–Vous devez connaître le fonctionnement des commandes. Vous devez savoir comment arrêter rapidement le moteur en cas d’urgence.
–En cas de problème mécanique, vous devez immédiatement couper le moteur.
–Ne tenez jamais l’équipement d’une seule main pendant l’utilisation. Pendant le fonctionnement, tenez toujours l’équipement à deux mains.
–Assurez-vous toujours d’avoir une bonne assise.
–Ne l’utilisez pas à proximité d’un mur vertical, de fondations ou d’autres structures où les forces de recul pousseraient votre corps contre ces structures. Tenez-vous toujours à bonne distance de ce type de structure, sous peine d’entraîner des dommages matériels et/ou corporels.
–Évitez de respirer les gaz d’échappement. Ne faites jamais tourner le moteur dans une pièce fermée (risque d’empoisonnement au gaz). Le monoxyde de carbone est un gaz inodore.
–Coupez le moteur lorsque vous faites une pause ou laissez l’équipement sans surveillance, et rangez-le dans un endroit où il ne représentera un danger pour personne et ne risquera pas d’être endommagé.
–Ne posez jamais l’équipement encore chaud sur de l’herbe sèche ou tout matériau combustible.
–Ne faites jamais fonctionner le moteur si son silencieux d’échappement est défectueux.
–Coupez le moteur pendant le transport.
–Pendant le transport dans un véhicule, assurez-vous que l’équipement est placé de façon à éviter toute fuite de carburant.
–Lors du transport, assurez-vous que la mèche hélicoïdale est retirée et que le réservoir de carburant est complètement vide.
–Lorsque vous déchargez l’équipement du véhicule, ne laissez pas tomber le moteur sous peine de gravement endommager le réservoir de carburant.
–Sauf en cas d’urgence, ne laissez jamais tomber l’équipement, ni ne le lancez au sol sous peine de gravement l’endommager.
–Pour déplacer l’équipement, soulevez-le toujours complètement. Le déplacement de l’équipement en laissant traîner au sol son réservoir de carburant est extrêmement dangereux et peut causer des dommages au réservoir et une fuite de carburant pouvant entraîner un incendie.
Plein de carburant
–Coupez le moteur pendant que vous faites le plein, tenez-vous à l’écart des flammes nues et ne fumez pas.
–Ne faites pas le plein dans une pièce fermée. Les vapeurs d’essence s’accumulent au niveau du sol (risque d’explosion).
–Évitez tout contact de la peau avec les produits à base d’huile minérale. Ne respirez pas les vapeurs d’essence. Portez toujours des gants de protection pendant que vous faites le plein. Changez et nettoyez régulièrement les vêtements de protection.
–Veillez à ne pas renverser de carburant ou d’huile, pour éviter de polluer le sol (protection de l’environnement). Nettoyez immédiatement la tarière si vous renversez du carburant.
–Évitez tout contact du carburant avec les vêtements. Changez immédiatement de vêtement si vous renversez du carburant dessus (afin d’éviter qu’ils ne prennent feu).
–Serrez fermement le bouchon du réservoir de carburant. Avant de démarrer le moteur, éloignez-vous de l’endroit où vous avez fait le plein (d’au moins 3 mètres).
–Vérifiez régulièrement le bouchon du réservoir de carburant, pour vous assurer qu’il est bien serré et ne fuit pas.
–Ne transportez et ne stockez le carburant que dans des conteneurs homologués. Veillez à ce que les enfants n’y aient pas accès.
–L’essence est un combustible très inflammable. Faites preuve d’une extrême prudence lorsque vous manipulez de l’essence.
–Éteignez toujours le moteur et laissez le refroidir avant de faire le plein. Ne retirez pas le bouchon du réservoir de carburant pendant que le moteur tourne. Ne faites pas fonctionner le moteur si le bouchon du réservoir de carburant n’est pas en place.
27
Utilisation
–Concentrez-vous sur la tâche. Ne mastiquez pas de chewing-gum, ne fumez pas ni ne consommez de tabac sans fumée pendant que vous utilisez la tarière. Abstenez-vous de manger ou de boire pendant que vous utilisez la tarière.
–Prévoyez des pauses pour vous aider à maintenir une bonne vivacité intellectuelle et physique.
–N’utilisez pas la tarière dans une atmosphère explosible ou à proximité de matériaux combustibles.
–Un seul opérateur doit utiliser la tarière. Si la tarière est utilisée par plus d’un opérateur, cela présente un risque de confusion et de perte de contrôle susceptible de provoquer des dommages matériels et/ou corporels. N’utilisez pas la tarière avec un nombre inapproprié d’opérateurs.
–N’employez pas une pelle ou un corps étranger pour retirer la terre meuble d’un trou alors que la tarière est utilisée. Sinon, la pelle ou le corps étranger pourrait être happé par la mèche hélicoïdale en rotation, ce qui peut provoquer des dommages matériels et/ou corporels.
–Tenez-vous toujours de l’autre côté du silencieux chaud du moteur. Tenez la poignée de la main gauche. Tenez la commande des gaz de la main droite. Si vous inversez le positionnement des mains, le silencieux chaud du moteur est plus proche du corps de l’opérateur, ce qui présente un risque de brûlure ou d’inhalation des vapeurs de monoxyde de carbone pendant l’utilisation.
–Portez attention au cadre dans lequel vous évoluez. Évitez de mettre les gaz inutilement afin de réduire la pollution et les émissions de bruit. Réglez correctement le carburateur.
–N’utilisez la tarière que lorsque les conditions de visibilité et d’éclairage conviennent à la tâche à accomplir.
–Ne touchez pas la partie en rotation de la tarière. La tarière n’a pas de protection. Un contact corporel avec une mèche hélicoïdale en rotation présente un risque de blessure corporelle.
–Tenez toujours fermement la tarière des deux mains. Placez vos doigts autour des zones de prise de la poignée en les serrant entre votre pouce et votre index.
–Vérifiez toujours que la poignée de l’opérateur et les zones de prise sont en bon état et exemptes d’humidité, de colle, d’huile ou de graisse. Portez des gants pour améliorer votre prise.
–Coupez le moteur entre chaque trou. Si vous laissez le moteur tourné entre chaque trou, vous augmentez considérablement le risque de dommages matériels et/ou blessures corporelles.
–Redoublez de précaution sur les surfaces glissantes et sur les surfaces inégales et difficiles. Vérifiez qu’il n’y a pas de fissures, de bosses et d’autres irrégularités de la surface. Maintenez constamment votre équilibre. La tarière doit normalement être utilisée sur un terrain plat. D’autres terrains d’excavation peuvent se révéler dangereux et sont déconseillés. Seuls les opérateurs correctement formés sont autorisés à essayer ces techniques.
–Restez toujours à l’écart du silencieux chaud du moteur. Des dommages matériels et/ou corporels peuvent être occasionnés par le contact avec un silencieux chaud de moteur.
–Ne laissez pas la tarière tomber et percuter le sol, sous peine d’endommager la commande des gaz et le moteur. Une commande des gaz fonctionnant mal peut entraîner des dommages matériels et/ou corporels.
Recul
Percuter des obstacles enfouis (par exemple, des racines d’arbre, des rochers ou d’autres débris) à n’importe quel régime moteur peut faire que la tarière transmette en réaction une charge “d’impact” à l’opérateur. Cet impact peut être ressenti comme un mouvement pulsé aigu de la tarière dans le sens inverse des aiguilles d’une montre (tel que perçu par l’opérateur). De telles charges peuvent provoquer la perte de contrôle de l’opérateur et entraîner des blessures corporelles. Le phénomène lié est appelé recul.
Les forces de recul peuvent infliger des blessures aux mains, aux bras et autres membres supérieurs du corps. Pensez toujours à avoir une bonne position lorsque vous creusez afin de maximiser le contrôle et minimiser les effets du recul.
Instructions d’entretien
–Veillez à n’utiliser que des pièces de rechange homologuées et d’origine pour l’entretien et la réparation. Des pièces inadéquates peuvent entraîner des dommages matériels et/ou corporels.
–Coupez toujours le moteur et débranchez le fil de la bougie AVANT de vérifier ou de travailler sur la tarière.
–Procédez toujours à un entretien rigoureux de la tarière. Inspectez fréquemment tous les éléments de fixation et les différentes pièces.
–Les dispositifs de sécurité intégrés ne sont efficaces que s’ils sont toujours dans un bon état de fonctionnement. En présence de pièces suspectes, consultez le SAV agréé.
–N’essayez pas de procéder à des tâches d’entretien ou de réparation qui ne sont pas décrites dans ce manuel. Confiez ces tâches à votre SAV agréé.
–Vérifiez si la commande des gaz et les autres pièces autour ne sont pas abîmées et permettent une liberté totale de mouvement. N’utilisez pas la tarière si le papillon des gaz ou le câble de commande des gaz est endommagé ou usé.
–Un silencieux de moteur usé ou endommagé présente un risque d’incendie et peut provoquer une perte auditive. Vérifiez que le silencieux est en bon état. Remplacez le pare-étincelles par une pièce de rechange homologuée si son intégrité est compromise. N’utilisez pas la tarière si le silencieux est défectueux ou a été retiré. Des dommages matériels et/ou corporels peuvent être occasionnés par le contact avec un silencieux chaud. Restez à l’écart du silencieux chaud du moteur.
–Conservez en bon état tous les marquages de sécurité et de fonctionnement. Si un marquage est abîmé ou illisible, remplacez-le par une pièce de rechange d’origine.
–Remplacez la lame de la tarière, la mèche de vissage et la mèche hélicoïdale en présence de signes visibles d’usure excessive. Si ces pièces ne sont pas remplacées à des intervalles appropriés, une usure irrémédiable affectera la mèche hélicoïdale. Au bout du compte, la mèche hélicoïdale aura un cône inversé, ce qui nécessite un remplacement complet.
–Creuser avec un équipement dont la durée de vie utile est dépassée ou n’ayant pas fait l’objet d’un entretien correct peut entraîner une productivité médiocre, des dommages matériels et/ou corporels excessifs. La durée de vie d’une tarière peut être considérablement allongée grâce à un entretien continu des pièces d’usure de la tarière.
–Ne dépannez ni ne rangez l’équipement à proximité de flammes nues.
–Rangez toujours l’équipement dans une pièce fermée à clé en ayant pris soin de vider son réservoir de carburant.
–À la fin de la durée de vie utile de la tarière, vidangez tous les liquides et éliminez-les conformément aux exigences locales. Mettez correctement au rebut la tarière conformément aux exigences locales.
28

Premiers secours
En cas d’accident, assurez-vous qu’une trousse de premiers secours est disponible à proximité du site de travail. Faites en sorte que la trousse soit toujours complète.
Lorsque vous appelez les secours, fournissez les informations suivantes :
–Le lieu de l’accident
–Les circonstances de l’accident
–Le nombre de personnes blessées
–Le type de blessures
–Votre nom
CARACTÉRISTIQUES TECHNIQUES
Modèle |
|
PE3450H |
|
PE3450HG |
|
|
|
|
|
Dimensions : longueur x profondeur x hauteur |
mm |
|
374 x 695 x 370 |
|
|
|
|
|
|
Poids |
kg |
|
11,7 |
|
|
|
|
|
|
Volume (réservoir de carburant) |
l |
|
0,75 |
|
|
|
|
|
|
Volume (réservoir d’huile) |
l |
|
0,1 |
|
|
|
|
|
|
Cylindrée |
cm3 |
|
33,5 |
|
Performance maximale du moteur |
kW |
|
1,07 à 7 000 min–1 |
|
Vitesse de l’arbre maximale (correspondante) |
min–1 |
|
166 |
|
Consommation maximale spécifique de carburant |
g/kWh |
|
340 |
|
|
|
|
|
|
Vitesse au ralenti |
min–1 |
|
2900 – 3100 |
|
Vitesse d’engagement de l’embrayage |
min–1 |
|
3200 ± 100 |
|
Carburateur |
type |
|
Diaphragme |
|
|
|
|
|
|
Système d’allumage |
type |
|
Allumage électronique |
|
|
|
|
|
|
Bougie d’allumage |
type |
|
NGK CMR6A |
|
|
|
|
|
|
Distance entre électrodes |
mm |
|
0,7 – 0,8 |
|
|
|
|
|
|
Carburant |
|
Essence auto |
|
Essence E25 |
|
|
|
|
|
Huile moteur |
|
Huile SAE 10W-30 selon la classification API |
||
|
Catégorie SF ou supérieure (moteur à 4 temps pour voiture) |
|||
|
|
|||
|
|
|
|
|
Rapport d’engrenage |
|
|
42,5:1 |
|
|
|
|
|
|
Remarque : |
|
|
|
|
• PE3450HG : ce modèle fonctionne avec l’essence brésilienne (E20 et E25). |
|
|
||
29
 Loading...