


KDC-BT268U
CD-RECEIVER
INSTRUCTION MANUAL
AMPLI-TUNER LECTEUR DE CD
MODE D’EMPLOI
REPRODUCTOR DE DISCOS COMPACTOS RECEPTOR DE FM/AM
MANUAL DE INSTRUCCIONES
For your records
Record the serial number, found on the back of the unit, in the spaces designated on the warranty card, and in the space provided below. Refer to the model and serial numbers whenever you call upon your Kenwood dealer for information or service on the product.
Model KDC-BT268U Serial number
US Residents Only
Register Online
Register your Kenwood product at http://www.kenwood.com/usa/
© 2016 JVC KENWOOD Corporation |
B5A-1860-00 (KN) |
CAUTION
Use of controls or adjustments or performance of procedures other than those specified herein may result in hazardous radiation exposure.
In compliance with Federal Regulations, following are reproductions of labels on, or inside the product relating to laser product safety.
JVC KENWOOD Corporation
2967-3, ISHIKAWA-MACHI,
HACHIOJI-SHI, TOKYO, JAPAN
THIS PRODUCT COMPLIES WITH DHHS RULES 21CFR SUBCHAPTER J IN EFFECT AT DATE OF MANUFACTURE.
Location : Top Plate
FCC WARNING
This equipment may generate or use radio frequency energy. Changes or modifications to this equipment may cause harmful interference unless the modifications are expressly approved in the instruction manual. The user could lose the authority to operate this equipment if an unauthorized change or modification is made.
FCC NOTE
This equipment has been tested and found to comply with the limits for a Class B digital device, pursuant to Part 15 of the FCC Rules. These limits are designed to provide reasonable protection against harmful interference in a residential installation. This equipment may cause harmful interference to radio communications, if it is not installed and used in accordance with the instructions. However, there is no guarantee that interference will
not occur in a particular installation. If this equipment does cause harmful interference to radio or television reception, which can be determined by turning the equipment off and on, the user is encouraged to try to correct the interference by one or more of the following measures:
•Reorient or relocate the receiving antenna.
•Increase the separation between the equipment and receiver.
•Connect the equipment into an outlet on a circuit different from that to which the receiver is connected.
•Consult the dealer or an experienced radio/TV technician for help.
Información acerca de la eliminación de equipos eléctricos y electrónicos al final de la vida útil (aplicable a los países que hayan adoptado sistemas independientes de recogida de residuos)
Los productos con el símbolo de un contenedor con ruedas tachado no podrán ser desechados como residuos domésticos. Los equipos eléctricos y electrónicos al final de la vida útil, deberán ser reciclados en instalaciones que puedan dar el tratamiento adecuado a estos productos y a sus subproductos residuales correspondientes. Póngase en contacto con su administración local para obtener información sobre el punto de recogida más cercano. Un tratamiento correcto del reciclaje y la eliminación de residuos ayuda a conservar los recursos y evita al mismo tiempo efectos perjudiciales en la salud y el medio ambiente.
Informação sobre a eliminação de pilhas
Este produto não deve ser eliminado como lixo doméstico geral. Devolva a pilha usada ao revendedor ou entidade autorizada para que a mesma seja devolvida ao fabricante ou importador.
A reciclagem e a eliminação de lixo de maneira apropriada ajudarão a conservar os recursos naturais ao mesmo tempo que prevenirão os efeitos prejudicais à nossa saúde e ao meio ambiente.
CALIFORNIA, USA ONLY
This product contains a CR Coin Cell Lithium Battery which contains Perchlorate Material— special handling may apply. See www.dtsc.ca.gov/hazardouswaste/perchlorate
i

IC (Industry Canada) Notice
This device complies with Industry Canada’s licence-exempt RSSs.
Operation is subject to the following two conditions:
(1)This device may not cause interference; and
(2)This device must accept any interference, including interference that may cause undesired operation of the device.
Note de IC (Industrie Canada)
Le présent appareil est conforme aux CNR d’Industrie Canada applicables aux appareils radio exempts de licence.
L’exploitation est autorisée aux deux conditions suivantes:
(1)l’appareil ne doit pas produire de brouillage;
(2)l’utilisateur de l’appareil doit accepter tout brouillage radioélectrique subi, même si le brouillage est susceptible d’en compromettre le fonctionnement.
Contains Bluetooth Module |
FCC ID: |
ZWY8811X |
|
IC ID: |
12033A-8811X |
|
|
|
This transmitter must not be co-located or operated in conjunction with any other antenna or transmitter.
CAUTION
This equipment complies with FCC/IC radiation exposure limits set forth for an uncontrolled environment and meets the FCC radio frequency (RF) Exposure Guidelines and RSS-102 of the IC radio frequency (RF) Exposure rules. This equipment has very low levels of RF energy that is deemed to comply without maximum permissive exposure evaluation (MPE). But it is desirable that it should be installed and operated keeping the radiator at least 20 cm or more away from person’s body.
ATTENTION
Cet équipement est conforme aux limites d’exposition aux rayonnements énoncées pour un environnement non contrôlé et respecte les règles les radioélectriques (RF) de la FCC lignes directrices d’exposition et d’exposition aux fréquences radioélectriques (RF) CNR-102 de l’IC. Cet équipement émet une énergie RF très faible qui est considérée comme conforme sans évaluation de l’exposition maximale autorisée (MPE). Cependant, il est souhaitable qu’il devrait être installé et utilisé en gardant une distance de 20 cm ou plus entre le radiateur et le corps humain.
Para cumplimiento de la IFT:
“La operación de este equipo está sujeta a las siguientes dos condiciones:
(1)es posible que este equipo o dispositivo no cause interferencia perjudicial y
(2)este equipo o dispositivo debe aceptar cualquier interferencia, incluyendo la que pueda causar su operación no deseada”
ii

SOFTWARE LICENSE AGREEMENT
The software embedded in the Product (hereinafter the "Licensed Software") provided by Licensor is copyrighted to or sublicensable by the Licensor, and this Agreement provides for the terms and conditions which Users shall follow in order to use the Licensed Software.
The User shall use the Licensed Software by agreeing with the terms of this Software License Agreement. This Agreement shall be deemed completed at the time the User (hereinafter the "User") initially used the Product in which the "Licensed Software" is embedded.
The Licensed Software may include the software which has been licensed to the Licensor directly or indirectly from any third party. In such case, some third parties require the Users to follow their conditions for use separately from this Software License Agreement. Such software shall not be subject to this Agreement, and the Users are urged to read the "Important Notice concerning the Software" to be provided separately below.
Article 1 General Provision
The Licensor shall grant to the User a non-exclusive and non-transferable (other than the exceptional case referred to in Article 3, Paragraph 1) licensed to use the Licensed Software within the country of the User. (the country where the User bought the Product(hereinafter the "Country")
Article 2 |
License |
1.The license granted under this Agreement shall be the right to use the Licensed Software in the Product.
2.The User shall not duplicate, copy, modify, add, translate or otherwise alter, or lease the Licensed Software and any related documents, whether in whole or in part.
3.The use of the Licensed Software shall be limited to personal purpose, and the Licensed Software shall not be distributed, licensed or sub-licensed whether it is for commercial purpose or not.
4.The User shall use the Licensed Software according to the directions described in the operation manual or help file, and is prohibited to use or duplicate any data in a manner violating the Copyright Law or any other laws and regulations by applying whole or a part of the Licensed Software.
Article 3 Conditions for Grant of License
1.When the User transfers the Product, it may also transfer the license to use the Licensed Software embedded in the Product (including any related materials, updates and upgrades) on condition that no original, copies or related materials continue in the possession of the User, and that the User shall cause the transferee to comply with this Software License Agreement.
2.The User shall not carry out reverse engineering, disassembling, decompiling or any other code analysis works in connection with the Licensed Software.
Article 4 Right pertaining to the Licensed Software
Any and all copyrights and other rights pertaining to the Licensed Software and related documents shall belong to the Licensor or the original holder of the right who granted to the Licensor the license or sublicense for the Licensed Software (hereinafter the "Original Rightholder"), and the User shall not be entitled to any right other than the license granted hereunder, in respect of the Licensed Software and any related documents.
Article 5 Indemnification of Licensor
1.Neither the Licensor nor the Original Rightholder shall be liable for any damage incurred by the User or any third party due to the exercise of the license granted to the User under this Agreement, unless otherwise restricted by law.
2.The Licensor will offer no guarantee for the merchantability, convertibility and consistency with certain objective of the Licensed Software.
Article 6 Liability to Third Party
If any dispute has arisen with any third party due to an infringement upon a copyright, patent or any other intellectual property right that was caused by the User's use of the Licensed Software, the User shall settle such dispute at its own cost and hold the Licensor and the Original Rightholder harmless from any inconvenience it may cause.
Article 7 Confidentiality
The User shall keep the confidentiality of such portion of the Licensed Software, related documents thereof or any other information to be granted under this Agreement, as well as the conditions of this Agreement as has not yet entered the public domain, and shall not disclose or divulge the same to any third party without approval of the Licensor.
iii

Article 8 |
Termination |
|
|
In case the User falls under any of the events described in the following items, the Licensor may immediately terminate this Agreement or claim that the User compensates for the damage incurred by the Licensor due to such event:
(1)when the User violated any provision of this Agreement; or
(2)when a petition has been filed against the User for an attachment,
provisional attachment, provisional disposition or any other compulsory execution.
Article 9 Destruction of the Licensed Software
If this Agreement is terminated pursuant to the provision of Article 8, the User shall destroy the Licensed Software, any related documents and copies thereof within two (2) weeks from such date of termination.
Article 10 Protection of Copyright
1.The copyright and all the other intellectual property rights relating to the Licensed Software shall belong to the Licensor and the Original Rightholder, and in no event shall they be under the ownership of the User.
2.The User shall, whenever it uses the Licensed Software, comply with any laws relating to the copyright and other intellectual property rights.
Article 11 Export Restriction
1.It is prohibited to export the Licensed Software and any related documents outside the country of the User (including transmission thereof outside the country of the User via Internet of other communication tools).
2.The User shall understand that the Licensed Software shall be subject to the export restrictions adopted by the country of User and any other countries.
3.The User shall agree that the software will be subject to any and all applicable international and domestic laws (including the export control regulation of the country of User and any other countries, and any restrictions concerning the end-users, the use by end-users and importing countries to be provided by the country of User and any other countries, and any other governmental authorities).
Article 12 Miscellaneous
1.In the event any part of this Agreement is invalidated by operation of law, the residual provisions shall continue in force.
2.Matters not stipulated in this Agreement or any ambiguity or question raised in the construction of this Agreement shall be provided or settled upon good-faith consultation between the Licensor and the User.
3.The Licensor and the User hereby agree that this Agreement is governed by the laws of Japan, and any dispute arising from, and relating to the rights and obligations under, this Agreement shall be submitted to the exclusive jurisdiction of the Tokyo District Court for its first instance.
Important Notice concerning the Software
-jansson
Copyright (c) 2009-2012 Petri Lehtinen <petri@digip.org>
Permission is hereby granted, free of charge, to any person obtaining a copy of this software and associated documentation files (the "Software"), to deal in the Software without restriction, including without limitation the rights to use, copy, modify, merge, publish, distribute, sublicense, and/or sell copies of the Software, and to permit persons to whom the Software is furnished to do so, subject to the following conditions:
The above copyright notice and this permission notice shall be included in all copies or substantial portions of the Software.
THE SOFTWARE IS PROVIDED "AS IS", WITHOUT WARRANTY OF ANY KIND, EXPRESS OR IMPLIED, INCLUDING BUT NOT LIMITED TO THE WARRANTIES OF MERCHANTABILITY, FITNESS FOR A PARTICULAR PURPOSE AND NONINFRINGEMENT. IN NO EVENT SHALL THE AUTHORS OR COPYRIGHT HOLDERS BE LIABLE FOR ANY CLAIM, DAMAGES OR OTHER LIABILITY, WHETHER IN AN ACTION OF CONTRACT, TORT OR OTHERWISE, ARISING FROM, OUT OF OR IN CONNECTION WITH THE SOFTWARE OR THE USE OR OTHER DEALINGS IN THE SOFTWARE.
iv

CONTENTS |
|
BEFORE USE ............................... |
2 |
BASICS ........................................ |
3 |
GETTING STARTED.................... |
4 |
1 Select the display language and cancel the demonstration
2 Set the clock and date
3 Set the initial settings
RADIO ......................................... |
5 |
CD/USB/iPod/ANDROID .......... |
7 |
AUX.............................................. |
9 |
Pandora® .................................. |
10 |
iHeartRadio®............................ |
11 |
BLUETOOTH®........................... |
12 |
AUDIO SETTINGS .................... |
19 |
DISPLAY SETTINGS ................. |
22 |
TROUBLESHOOTING .............. |
23 |
REFERENCES ............................ |
25 |
Maintenance |
|
More information |
|
INSTALLATION/ |
|
CONNECTION .......................... |
27 |
SPECIFICATIONS ..................... |
30 |
BEFORE USE
IMPORTANT
•To ensure proper use, please read through this manual before using this product. It is especially important that you read and observe Warning and Caution in this manual.
•Please keep the manual in a safe and accessible place for future reference.
 WARNING
•Do not operate any function that takes your attention away from safe driving.
•Do not ingest the battery, Chemical Burn Hazard
The remote control supplied with this product contains a coin/button cell battery.
If the coin/button cell battery is swallowed, it can cause severe internal burns in just 2 hours and can lead to death. Keep new and used batteries away from children.
If the battery compartment does not close securely, stop using the product and keep it away from children.
If you think batteries might have been swallowed or placed inside any part of the body, seek immediate medical attention.
 Caution
Volume setting:
•Adjust the volume so that you can hear sounds outside the car to prevent accidents.
•Lower the volume before playing digital sources to avoid damaging the speakers by the sudden increase of the output level.
General:
•Avoid using the external device if it might hinder safe driving.
•Make sure all important data has been backed up. We shall bear no responsibility for any loss of recorded data.
•Never put or leave any metallic objects (such as coins or metal tools) inside the unit to prevent a short circuit.
•If a disc error occurs due to condensation on the laser lens, eject the disc and wait for the moisture to evaporate.
•USB rating is indicated on the main unit. To view, detach the faceplate. ( 3)
3)
•Depending on the types of cars, the antenna will automatically extend when you turn on the unit with the antenna control wire connected ( 29). Turn off the unit or change the source to STANDBY when parking at a low ceiling area.
Remote control (RC-406):
•Do not leave the remote control in hot places such as on the dashboard.
•The Lithium battery is in danger of explosion if replaced incorrectly. Replace it only with the same or equivalent type.
•The battery pack or batteries shall not be exposed to excessive heat such as sunshine, fire or the like.
How to read this manual
•Operations are explained mainly using buttons on the faceplate.
•English indications are used for the purpose of explanation. You can select the display language from the [FUNCTION] menu. ( 5)
5)
•[XX] indicates the selected items.
•( XX) indicates references are available on the stated page.
2ENGLISH

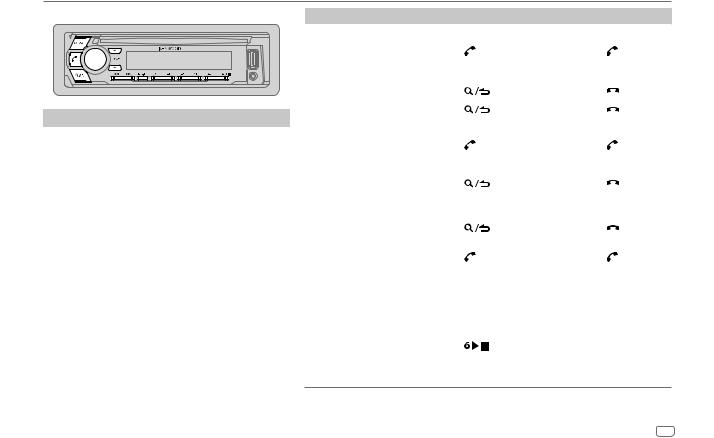
BASICS
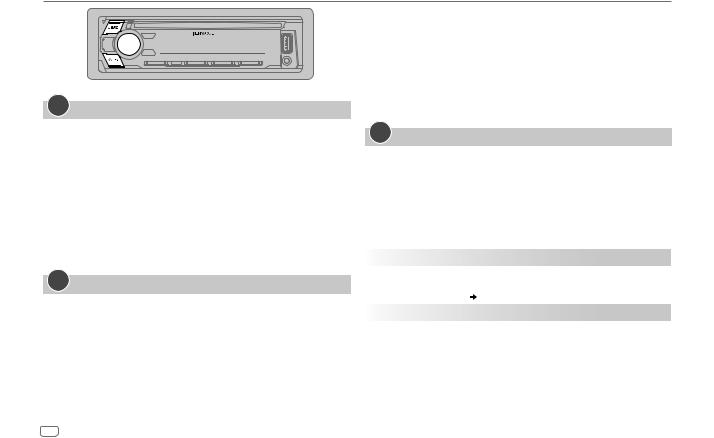
Faceplate
Volume knob |
|
Loading slot |
|
|
|
Display window |
||||||||||||||||
|
|
|
|
|
|
|
|
|
|
|
|
|
|
|
|
|
|
|
|
|
|
|
|
|
|
|
|
|
|
|
|
|
|
|
|
|
|
|
|
|
|
|
|
|
|
|
|
|
|
|
|
|
|
|
|
|
|
|
|
|
|
|
|
|
|
|
|
|
|
|
|
|
|
|
|
|
|
|
|
|
|
|
|
|
|
|
|
|
|
|
|
|
|
|
|
|
|
|
|
|
|
|
|
|
|
|
|
|
|
|
|
|
|
|
|
|
|
|
|
|
|
|
|
|
|
|
|
|
|
|
|
|
|
|
|
|
|
|
|
|
|
|
|
|
|
|
|
|
|
|
|
|
|
|
|
|
|
|
|
|
|
|
|
|
|
|
|
|
|
|
|
|
|
|
|
|
|
|
|
|
|
|
|
Detach button
Attach |
Detach |
|
How to reset |
||||||
|
|
|
|
|
|
|
|
|
|
|
|
|
|
|
|
|
|
|
|
|
|
|
|
|
|
|
|
|
|
|
|
|
|
|
|
|
|
|
|
|
|
|
|
|
|
|
|
|
|
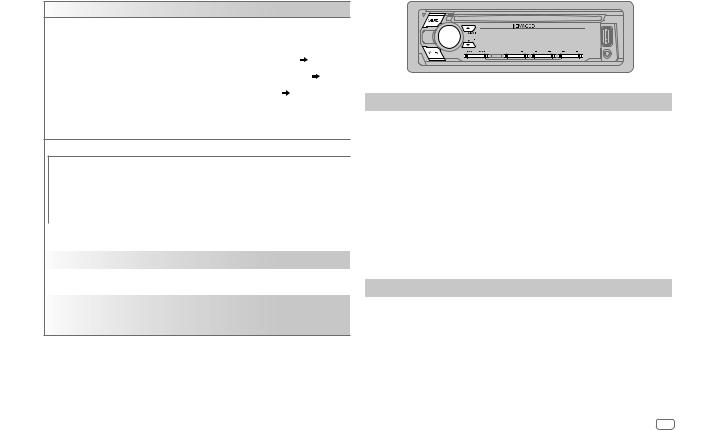
Remote control (RC-406)
This unit can be remotely controlled with an optionally purchased remote control.
Remote sensor (Do not expose to bright sunlight.)
 Pull out the insulation
 sheet when using for the

 first time.
How to replace the battery
|
|
|
|
|
|
|
|
|
|
|
|
|
|
|
|
|
|
|
|
|
|
|
|
|
|
|
|
|
|
To |
On the faceplate |
On the remote control |
|
|
|
|
|||
Turn on the power |
Press |
. |
Press and hold SRC to turn off the power. |
||||||
|
• Press and hold to turn off the power. |
( Pressing SRC does not turn on the power. ) |
|||||||
|
|
|
|
|
|
|
|
|
|
Adjust the volume |
Turn the volume knob. |
Press |
or |
. |
|
|
|
||
|
|
|
• Press and hold |
to continuously increase the |
|||||
|
|
|
volume to 15. |
|
|
|
|
||
|
|
|
Press ATT during playback to attenuate the sound. |
||||||
|
|
|
• Press again to cancel. |
|
|
|
|
||
Select a source |
Press |
repeatedly. |
Press SRC repeatedly. |
|
|
|
|
||
|
|
|
|
|
|
|
|
||
Change the display information |
Press DISP repeatedly. ( 27) |
( Not available ) |
|
|
|
|
|||
|
|
|
|
|
|
|
|
|
|
ENGLISH 3
GETTING STARTED
1Select the display language and cancel the demonstration
When you turn on the power for the first time (or [FACTORY RESET] is set to [YES],  5), the display shows: “SEL LANGUAGE”
  “PRESS”
  “VOLUME KNOB”
1Turn the volume knob to select [ENG] (English) or [SPA] (Spanish), then press the knob.
[ENG] is selected for the initial setup.
Then, the display shows: “CANCEL DEMO”  “PRESS”
  “VOLUME KNOB”.
2Press the volume knob.
[YES] is selected for the initial setup.
3Press the volume knob again.
“DEMO OFF” appears.
2Set the clock and date
1 Press the volume knob to enter [FUNCTION].
2 Turn the volume knob to select [CLOCK], then press the knob.
To adjust the clock
3 Turn the volume knob to select [CLOCK ADJUST], then press the knob.
4Turn the volume knob to make the settings, then press the knob.
Hour  Minute
5 Turn the volume knob to select [CLOCK FORMAT], then press the knob. 6 Turn the volume knob to select [12H] or [24H], then press the knob.
To set the date
7 Turn the volume knob to select [DATE FORMAT], then press the knob.
8Turn the volume knob to select [DD/MM/YY] or [MM/DD/YY], then press the knob.
9 Turn the volume knob to select [DATE SET], then press the knob.
10Turn the volume knob to make the settings, then press the knob.
Day  Month
Month  Year or Month
  Day
Day  Year
Year
11Press and hold 
 to exit.
To return to the previous setting item, press 
 .
.
3Set the initial settings
1 Press  repeatedly to enter STANDBY.
2 Press the volume knob to enter [FUNCTION].
3Turn the volume knob to select an item (see the following table), then press the knob.
4 Repeat step 3 until the desired item is selected or activated. 5 Press and hold 
 to exit.
To return to the previous setting item, press 
 .
.
|
Default: XX |
AUDIO CONTROL |
|
|
|
SWITCH |
REAR/SUB-W: Selects whether rear speakers or a subwoofer are |
PREOUT |
connected to the line out terminals on the rear (through an external |
|
amplifier). ( 29) |
TUNER SETTING |
|
|
|
PRESET TYPE |
NORMAL: Memorizes one station for each preset button in each band |
|
(FM1/FM2/FM3/AM). ; MIX: Memorizes one station for each preset |
|
button, regardless of the selected band. |
|
|
4ENGLISH
GETTING STARTED |
|
RADIO |
SYSTEM
KEY BEEP |
ON: Activates the keypress tone. ; OFF: Deactivates. |
|
SOURCE SELECT |
|
|
|
PANDORA SRC |
ON: Enables PANDORA in source selection. ; OFF: Disables. ( 10) |
|
|
|
|
IHEART SRC |
ON: Enables IHEARTRADIO in source selection. ; OFF: Disables. ( 11) |
|
|
|
|
BUILT-IN AUX |
ON: Enables AUX in source selection. ; OFF: Disables. ( 9) |
|
|
|
CD READ |
1: Automatically distinguishes between audio file disc and music CD. ; |
|
|
|
2: Forces to play as a music CD. No sound can be heard if an audio file disc |
|
|
is played. |
F/W UPDATE
UPDATE SYSTEM
|
F/W UP xxxx |
YES: Starts upgrading the firmware. ; NO: Cancels (upgrading is not |
|
|
|
activated). |
|
|
|
For details on how to update the firmware, visit |
|
|
|
<www.kenwood.com/cs/ce/>. |
|
|
|
|
|
FACTORY RESET |
YES: Resets the settings to default (except the stored station). ; |
||
|
|
NO: Cancels. |
|
|
|
|
|
CLOCK |
|
||
|
|
|
|
CLOCK DISPLAY |
ON: The clock time is shown on the display even when the unit is turned |
||
|
|
off. ; OFF: Cancels. |
|
|
|
|
|
ENGLISH |
Select the display language for [FUNCTION] menu and music information |
||
|
|
if applicable. |
|
ESPANOL |
|||
By default, [ENGLISH] is selected. |
|||
|
|
||
Search for a station
1 Press  repeatedly to select TUNER.
2Press  repeatedly (or press
  /
/  on the remote control) to select FM1/FM2/FM3/AM.
3Press S / T (or press S /  on the remote control) to search for a station.
•To change the searching method for S / T: Press  repeatedly.
AUTO1 : Automatically search for a station. AUTO2 : Search for a preset station. MANUAL : Manually search for a station.
•To store a station: Press and hold one of the number buttons (1 to 6).
•To select a stored station: Press one of the number buttons (1 to 6) (or press one of the number buttons (1 to 6) on the remote control).
Direct Access Tuning (using the remote control)
1 Press DIRECT to enter Direct Access Tuning.
2 Press the number buttons to enter a frequency.
3Press  to search for a station.
•To cancel, press  or DIRECT.
•If no operation is done for 10 seconds after step 2, Direct Access Tuning is automatically canceled.
ENGLISH 5

RADIO
Other settings
1 Press the volume knob to enter [FUNCTION].
2Turn the volume knob to select an item (see the following table), then press the knob.
3Repeat step 2 until the desired item is selected/activated or follow the instructions stated on the selected item.
4 Press and hold |
to exit. |
To return to the previous setting item, press 
 .
.
|
Default: XX |
TUNER SETTING |
|
|
|
AUTO |
YES: Automatically starts memorizing 6 stations with good reception. ; |
MEMORY |
NO: Cancels. |
|
• Selectable only if [NORMAL] is selected for [PRESET TYPE]. ( 4) |
|
|
MONO SET |
ON: Improves the FM reception, but the stereo effect may be lost. ; |
|
OFF: Cancels. |
|
|
TI |
ON: Allows the unit to temporarily switch to Traffic Information if available |
|
(“TI” lights up). ; OFF: Cancels. |
|
|
PTY SEARCH |
Select the available Program Type, then press S / T to start. |
|
|
CLOCK |
|
|
|
TIME SYNC |
ON: Synchronizes the unit’s time to the Radio Broadcast Data System station |
|
time. ; OFF: Cancels. |
|
|
Available Program Type for [PTY SEARCH]
SPEECH : NEWS, INFORM (information), SPORTS, TALK, LANGUAGE, REL TALK
(religious talk), PERSNLTY (personality), PUBLIC, COLLEGE, HABL ESP (spanish talk), WEATHER
MUSIC : ROCK, CLS ROCK (classic rock), ADLT HIT (adult hits), SOFT RCK (softrock), TOP 40, COUNTRY, OLDIES, SOFT, NOSTALGA (nostalgia),
JAZZ, CLASSICL (classical), R & B (rhythm and blues), SOFT R&B (soft rhythm and blues), REL MUSC (religious music), MUSC ESP (spanish music), HIP HOP
The unit will search for the Program Type categorized under [SPEECH] or [MUSIC] if selected.
•[MONO SET]/[TI]/[PTY SEARCH] is selectable only when the band is FM1/ FM2/FM3.
•If the volume is adjusted during reception of traffic information or news bulletin, the adjusted volume is memorized automatically. It will be applied the next time traffic information or news bulletin is turned on.
6ENGLISH
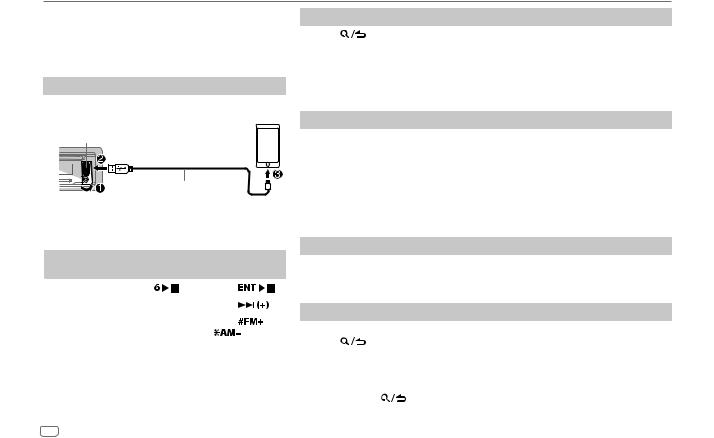
CD/USB/iPod/ANDROID
Start playback
The source changes automatically and playback starts.
CD
M Eject disc |
|
|
|
Label side |
||||||||||
|
|
|
|
|
|
|
|
|
|
|
|
|
|
|
|
|
|
|
|
|
|
|
|
|
|
|
|
|
|
|
|
|
|
|
|
|
|
|
|
|
|
|
|
|
|
|
|
|
|
|
|
|
|
|
|
|
|
|
|
|
|
|
|
|
|
|
|
|
|
|
|
|
|
|
USB input terminal
USB
CA-U1EX (max.: 500 mA) (optional accessory)
iPod/iPhone
KCA-iP102/KCA-iP103 (optional accessory)*1 or accessory of the  iPod/iPhone*2
ANDROID*3
Micro USB 2.0 cable*2 (commercially available)
*1 |
|
|
|
|
|
|
|
|
|
KCA-iP102 : 30-pin type, KCA-iP103 : Lightning type |
||||
*2 |
Do not leave the cable inside the car when not using. |
|||
To |
|
On the faceplate |
|
|
|
On the remote control |
|
|||
Playback/pause |
Press |
. |
|
|
|
Press |
|
. |
|
|
|
|
|
|
|
|
|||||
Reverse/Fast-forward*4 |
Press and hold S / T. |
|
|
Press and hold S / |
. |
|||||
Select a track/file |
Press S / T. |
|
|
|
Press S / |
. |
|
|||
|
|
|
|
|
|
|
|
|
||
Select a folder*5 |
Press J / K. |
|
|
|
Press |
/ |
|
. |
||
Repeat play*6 |
Press |
repeatedly. |
|
|
|
|
|
|
||
|
|
TRACK REPEAT/ALL REPEAT |
|
|
: Audio CD |
|
|
|||
|
|
FILE REPEAT/FOLDER REPEAT/ALL REPEAT |
: MP3/WMA/AAC/WAV/FLAC file |
|||||||
|
|
FILE REPEAT/FOLDER REPEAT/REPEAT OFF |
: iPod or ANDROID |
|
||||||
|
|
|
|
|
|
|
|
|
||
Random play*6 |
Press |
repeatedly. |
|
|
|
|
|
|
||
|
|
DISC RANDOM/RANDOM OFF |
: Audio CD |
|
|
|
||||
|
|
FOLDER RANDOM/RANDOM OFF : MP3/WMA/AAC/WAV/FLAC file, iPod or |
||||||||
|
|
|
|
|
ANDROID |
|
|
|
||
|
|
|
|
|
|
|||||
|
|
Press and hold |
to select ALL RANDOM.*7 |
|
|
|||||
*3 |
When connecting an Android device, “Press [VIEW] to install KENWOOD MUSIC PLAY APP” is shown. Follow the instructions |
|||||||||
|
to install the application. You can also install the latest version of KENWOOD MUSIC PLAY application on your Android device |
|||||||||
*4 |
before connecting. For more information, visit <www.kenwood.com/cs/ce/>. |
|
|
|
|
|||||
For ANDROID: Applicable only when [BROWSE MODE] is selected. ( |
8) |
|
|
|
|
|
||||
*5 |
For CD: Only for MP3/WMA/AAC files. This does not work for iPod/ANDROID. |
|
|
|
|
|||||
*6 |
For iPod/ANDROID: Applicable only when [MODE OFF]/[BROWSE MODE] is selected. ( |
8) |
|
|
||||||
*7 |
For CD: Only for MP3/WMA/AAC files. |
|
|
|
|
|
|
|
|
|
ENGLISH 7
CD/USB/iPod/ANDROID
Select control mode
While in iPod USB source, press 5 repeatedly.
MODE ON : Control iPod using the iPod itself. However, you can still play/ pause, file skip, fast-forward or reverse from this unit.
MODE OFF : Control iPod from this unit.
While in ANDROID source, press 5 repeatedly.
BROWSE MODE : Control Android device from this unit via KENWOOD MUSIC PLAY application installed in the Android device.
HAND MODE : Control Android device using the Android device itself via other media player applications installed in the Android device. However, you can still play/pause and file skip from this unit.
Select music drive
While in USB source, press 5 repeatedly.
Stored songs in the following drive will be played back.
•Selected internal or external memory of a smartphone (Mass Storage Class).
•Selected drive of a multiple drives device.
Listen to TuneIn Radio/TuneIn Radio Pro/Aupeo
While listening to TuneIn Radio, TuneIn Radio Pro or Aupeo, connect the iPod/iPhone to the USB input terminal of the unit.
• The unit will output the sound from these applications.
Select a file from a folder/list
For iPod/ANDROID, applicable only when [MODE OFF]/[BROWSE MODE] is selected.
1 |
Press |
. |
2 |
Turn the volume knob to select a folder/list, then press the knob. |
|
3 Turn the volume knob to select a file, then press the knob.
Quick Search (applicable only for CD, USB and ANDROID source)
If you have many files, you can search through them quickly.
Turn the volume knob quickly to browse through the list quickly.
Skip Search (applicable only for iPod USB and ANDROID source)
Press S / T to search at a preset skip search ratio. ( 9, [SKIP
SEARCH])
• Pressing and holding S / T searches at a 10% ratio.
Alphabet search (applicable only for iPod USB and ANDROID source)
You can search for a file according to the first character.
For iPod USB source
1 Turn the volume knob quickly to enter character search.
2Turn the volume knob to select the character.
•Select “*” to search for a character other than A to Z, 0 to 9.
3 Press S / T to move to the entry position.
•You can enter up to 3 characters.
4 Press the volume knob to start searching.
For ANDROID source
1 Press J / K to enter character search.
2Turn the volume knob to select the character. ^A^: Upper case letters (A to Z)
_A_: Lower case letters (a to z) -0-: Numbers (0 to 9)
***: Character other than A to Z, 0 to 9
3Press the volume knob to start searching.
•To return to the root folder/first file/top menu, press 5. (Not applicable for
BT AUDIO source.)
•To return to the previous setting item, press 
 .
.
•To cancel, press and hold 
 .
.
8ENGLISH
CD/USB/iPod/ANDROID
Direct Music Search (using the remote control)
1 Press DIRECT.
2 Press the number buttons to enter a track/file number. 3 Press  to search for music.
•To cancel, press  or DIRECT.
•Not available if Random Play is selected.
•Not applicable for iPod USB and ANDROID source.
Settings to use KENWOOD Remote application
KENWOOD Remote application is designed to control the KENWOOD car receiver’s operations from the iPhone/iPod (via USB input terminal).
Preparation:
Install the latest version of KENWOOD Remote application on your device before connecting. For more information, visit <www.kenwood.com/cs/ce/>.
You can make the settings in the same way as connection via Bluetooth. ( 17)
17)
Other settings
1 Press the volume knob to enter [FUNCTION].
2Turn the volume knob to select an item (see the following table), then press the knob.
3 Repeat step 2 until the desired item is selected or activated. 4 Press and hold 
 to exit.
To return to the previous setting item, press 
 .
.
|
Default: XX |
USB |
|
|
|
MUSIC DRIVE |
DRIVE CHANGE: The next drive ([DRIVE 1] to [DRIVE 4]) is selected automatically and |
|
playback starts. |
|
Repeat steps 1 to 3 to select the following drives. |
SKIP SEARCH |
0.5%/1%/5%/10%: While listening to iPod USB or ANDROID source, selects the skip search |
|
ratio over the total files. |
|
|
AUX
Preparation:
Select [ON] for [BUILT-IN AUX] for [SOURCE SELECT]. ( 5)
5)
Start listening
1Connect a portable audio player (commercially available).
Auxiliary input jack
Portable audio player
3.5 mm (1/8") stereo mini plug with “L” shaped connector (commercially available)
2 Press  repeatedly to select AUX.
3 Turn on the portable audio player and start playback.
Set the AUX name
While listening to a portable audio player connected to the unit...
1 Press the volume knob to enter [FUNCTION].
2Turn the volume knob to select [SYSTEM], then press the knob.
3Turn the volume knob to select [AUX NAME SET], then press the knob.
4Turn the volume knob to select an item, then press the knob.
AUX (default)/DVD/PORTABLE/GAME/VIDEO/TV
5 Press and hold 
 to exit.
To return to the previous setting item, press 
 .
.
ENGLISH 9
Pandora®
Preparation:
Install the latest version of the Pandora application on your device (iPhone/iPod touch), then create an account and log in to Pandora.
• Select [ON] for [PANDORA SRC] in [SOURCE SELECT]. ( 5)
5)
Start listening
1 Open the Pandora application on your device.
2Connect your device to the USB input terminal.
USB input terminal
KCA-iP102/KCA-iP103 (optional accessory)*1 or accessory of the iPod/iPhone*2
3Press  repeatedly to select PANDORA.
Broadcast starts automatically.
To |
|
On the faceplate |
On the remote |
||
|
control |
|
|||
|
|
|
|
|
|
Playback/pause |
Press |
. |
Press |
. |
|
Skip a track |
Press T. |
|
Press |
. |
|
|
|
|
|
||
Thumbs up or |
Press J / K. |
Press |
/ |
||
thumbs down*3 |
|
|
|
. |
|
*1 |
KCA-iP102 : 30-pin type, KCA-iP103 : Lightning type |
|
|||
*2 |
Do not leave the cable inside the car when not using. |
|
|||
*3 |
If thumbs down is selected, the current track is skipped. |
|
|||
Create and save a new station
1 |
Press |
. |
2 |
Turn the volume knob to select [NEW STATION], then press the knob. |
|
3Turn the volume knob to select [FROM ARTIST] or [FROM TRACK], then press the knob.
A new station is created based on the artist or current song.
4 Press and hold one of the number buttons (1 to 5) to store. To select a stored station: Press one of the number buttons (1 to 5).
Search for a registered station
1 Press 
 .
.
2Turn the volume knob to select an item, then press the knob.
[SORT BY DATE]: According to the registered date [SORT BY A-Z]: By alphabetical order
3Turn the volume knob (or press J/ K on the remote control) to select the desired station.
4 Press the volume knob (or press  on the remote control) to confirm.
To cancel, press and hold 
 .
.
Bookmark current song information
Press and hold the volume knob.
“BOOKMARKED” appears and the information is stored to your device.
• The bookmark is available on your Pandora account but not on this unit.
Delete a station
While listening to PANDORA...
1 |
Press |
. |
|
2 |
Turn the volume knob to select [STATION DEL], then press the knob. |
||
3 |
Turn the volume knob to select [SORT BY DATE] or [SORT BY A-Z], then press the knob. |
||
4 |
Turn the volume knob to select the desired station to delete, then press the knob. |
||
5 |
Turn the volume knob to select [YES], then press the knob. |
||
6 |
Press and hold |
to exit. |
|
To return to the previous setting item, press 
 .
.
10 ENGLISH

iHeartRadio®
Preparation:
Install the latest version of iHeartAuto application on your device (iPhone/iPod touch), then create an account and log in to iHeartRadio.
• Select [ON] for [IHEART SRC] in [SOURCE SELECT]. ( 5)
5)
Start listening
1 Open the iHeartAuto application on your device.
2Connect your device to the USB input terminal.
USB input terminal
KCA-iP102/KCA-iP103 (optional accessory)*1 or accessory of the iPod/iPhone*2
3Press  repeatedly to select IHEARTRADIO.
Broadcast starts automatically.
*1 |
KCA-iP102 : 30-pin type, KCA-iP103 : Lightning type |
*2 |
Do not leave the cable inside the car when not using. |
To |
|
On the faceplate |
On the remote control |
||
Playback/pause |
Press |
. |
Press |
. |
|
Skip a track for custom |
Press T. |
|
Press |
. |
|
station |
|
|
|
|
|
Thumbs up or thumbs |
Press J / K. |
( Not available ) |
|||
down |
|
|
|
||
|
|
|
|
|
|
Create a new/custom |
Press 1. |
|
( Not available ) |
||
station |
|
|
|
||
|
|
|
|
|
|
Scan for live station |
1 Press 2 to start |
|
|
||
|
|
scanning. |
( Not available ) |
||
|
|
2 Press 2 again to listen |
|||
|
|
|
|
||
|
|
to the station. |
|
|
|
|
|
|
|
||
|
|
|
|
||
Search and store a station |
|
|
|
||
1 Press |
. |
|
|
|
|
2 Turn the volume knob to select a category, then press the knob. |
|
||||
3Turn the volume knob (or press J/ K on the remote control) to select the desired station.
4Press the volume knob (or press  on the remote control) to confirm.
When a city list appears, you can search cities in alphabetical order by turning the volume knob quickly.
To cancel, press and hold 
 .
.
To store a station: Press and hold one of the number buttons (3, 4 or 5). To select a stored station: Press one of the number buttons (3, 4 or 5).
ENGLISH 11

BLUETOOTH®
BLUETOOTH — Connection
Supported Bluetooth profiles |
Supported Bluetooth codecs |
– Hands-Free Profile (HFP) |
– Sub Band Codec (SBC) |
– Advanced Audio Distribution Profile (A2DP) |
– Advanced Audio Coding (AAC) |
–Audio/Video Remote Control Profile (AVRCP)
–Serial Port Profile (SPP)
–Phonebook Access Profile (PBAP)
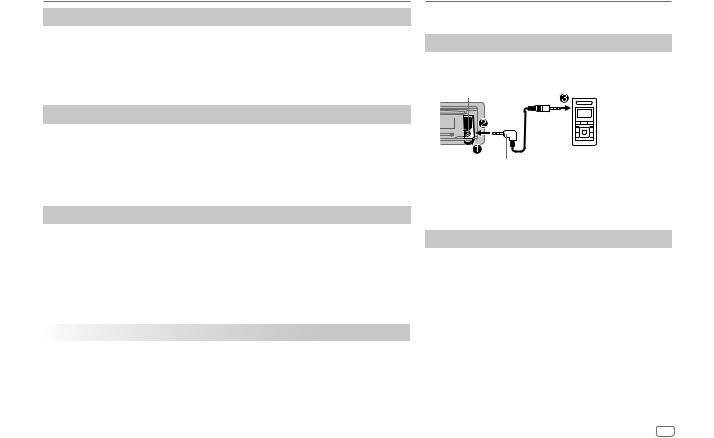
Connect the microphone
Rear panel |
|
Microphone |
|
(supplied) |
|
Microphone input jack |
Adjust the |
( 29) |
|
Secure using cord clamps |
microphone angle |
(not supplied) if necessary. |
|
Pair and connect a Bluetooth device for the first time
1 Press  to turn on the unit.
2Search and select this unit model name (KDC-BT2*) on the Bluetooth device.
“PAIRING”  “PASS XXXXXX”
  Device name
  “PRESS”
  “VOLUME KNOB” appears on the display.
•For some Bluetooth devices, you may need to enter the Personal Identification Number (PIN) code immediately after searching.
3Press the volume knob to start pairing.
“PAIRING OK” appears when pairing is completed.
Once pairing is completed, Bluetooth connection is established automatically. “BT1” and/or “BT2” on the display window lights up.
•This unit supports Secure Simple Pairing (SSP).
•Up to five devices can be registered (paired) in total.
•Once the pairing is completed, the Bluetooth device will remain registered in the unit even if you reset the unit. To delete the paired device,  16, [DEVICE DELETE].
•A maximum of two Bluetooth phones and one Bluetooth audio device can be connected at any time.
However, while in BT AUDIO source, you can connect to five Bluetooth audio devices and switch between these five devices. ( 17)
17)
•Some Bluetooth devices may not automatically connect to the unit after pairing. Connect the device to the unit manually.
•Refer to the instruction manual of the Bluetooth device for more information.
Auto Pairing
When you connect iPhone/iPod touch/Android device to the USB input terminal, pairing request (via Bluetooth) is automatically activated.
Press the volume knob to pair once you have confirmed the device name.
Automatic pairing request is activated only if:
–Bluetooth function of the connected device is turned on.
–[AUTO PAIRING] is set to [ON]. ( 16)
16)
–KENWOOD MUSIC PLAY application is installed on the Android device ( 7) and [BROWSE MODE] is selected (
 8).
8).
12 ENGLISH
BLUETOOTH®
BLUETOOTH — Mobile phone
Receive a call
When there is an incoming call:
•The unit answers the call automatically if [AUTO ANSWER] is set to a selected time. ( 14)
14)
During a call:
•If you turn off the unit or detach the faceplate, the Bluetooth connection is disconnected.
The following operations may differ or not available depending on the connected phone.
|
To |
On the faceplate |
On the remote control |
||
First incoming call... |
|
|
|
|
|
|
Answer a call |
Press |
or the volume knob |
Press . |
|
|
|
or one of the number buttons |
|
|
|
|
|
(1 to 6). |
|
|
|
|
|
|
|
|
|
|
Reject a call |
Press |
. |
Press |
. |
|
|
|
|
|
|
|
End a call |
Press |
. |
Press |
. |
|
|
|
|
|
|
While talking on the first incoming call...
|
Answer another incoming |
Press . |
|
Press . |
|
|
call and hold the current |
|
|
|
|
|
call |
|
|
|
|
|
|
|
|
|
|
|
Reject another incoming |
Press |
. |
Press |
. |
|
call |
|
|
|
|
While having two active calls... |
|
|
|
|
|
|
|
|
|
|
|
|
End current call and |
Press |
. |
Press |
. |
|
activate held call |
|
|
|
|
|
Swap between the |
Press . |
|
Press . |
|
|
current call and held call |
|
|
|
|
Adjust the phone volume |
Turn the volume knob during |
|
|
||
[00] to [35] (Default: [15]) |
a call. |
|
( Not available ) |
||
|
|
• This adjustment will not |
|||
|
|
affect the volume of the |
|
|
|
|
|
other sources. |
|
|
|
|
|
|
|
|
|
Switch between hands-free |
Press |
during a call. |
|
|
|
and private talk modes |
• Operations may vary |
( Not available ) |
|||
|
|
according to the connected |
|||
|
|
|
|
||
Bluetooth device.
ENGLISH 13

BLUETOOTH®
 Improve the voice quality
While talking on the phone...
1 Press the volume knob to enter [FUNCTION].
2Turn the volume knob to select an item (see the following table), then press the knob.
3 Repeat step 2 until the desired item is selected or activated. 4 Press and hold 
 to exit.
To return to the previous setting item, press 
 .
.
MIC GAIN |
–10 to +10 (–4): The sensitivity of the microphone increases as the |
|
number increased. |
|
|
NR LEVEL |
–5 to +5 (0): Adjust the noise reduction level until the least noise is |
|
being heard during a phone conversation. |
ECHO CANCEL |
–5 to +5 (0): Adjust the echo cancellation delay time until the least |
|
echo is being heard during a phone conversation. |
 Answer incoming call automatically
1 Press  to enter Bluetooth mode.
2 Turn the volume knob to select [SETTINGS], then press the knob.
3 Turn the volume knob to select [AUTO ANSWER], then press the knob.
4Turn the volume knob to select an item, then press the knob.
1 to 30 (in seconds)/ OFF (default)
5 Press and hold 
 to exit.
To return to the previous setting item, press 
 .
.
Make a call
You can make a call from the call history, phonebook, or dialing the number. Call by voice is also possible if your mobile phone has the feature.
1Press  to enter Bluetooth mode.
“(First device name)” appears.
•If two Bluetooth phones are connected, press  again to switch to another phone.
“(Second device name)” appears.
2Turn the volume knob to select an item (see the following table), then press the knob.
3Repeat step 2 until the desired item is selected/activated or follow the instructions stated on the selected item.
4 Press and hold 
 to exit.
To return to the previous setting item, press 
 .
.
CALL HISTORY (Applicable only if the phone supports PBAP.)
1Press the volume knob to select a name or a phone number.
•“I” indicates call received, “O” indicates call made, “M” indicates call missed.
•Press DISP to change the display category (NUMBER or NAME).
•“NO DATA” appears if there is no recorded call history.
2 Press the volume knob to call.
14 ENGLISH
BLUETOOTH®
PHONE BOOK |
(Applicable only if the phone supports PBAP.) |
|
1 Turn the volume knob quickly to enter alphabet search mode (if the |
|
phonebook contains many contacts). |
|
The first menu (ABCDEFGHIJK) appears. |
|
• To go to the other menu (LMNOPQRSTUV or WXYZ1*), press J/ K. |
|
• To select the desired first letter, turn the volume knob or press |
|
S / T, then press the knob. |
|
Select “1” to search with numbers and select “*” to search with symbols. |
|
2 Turn the volume knob to select a name, then press the knob. |
|
3 Turn the volume knob to select a phone number, then press the knob to call. |
|
• The phonebook of the connected phone is automatically transferred to the |
|
unit when pairing. |
|
• Contacts are categorized as: HM (home), OF (office), MO (mobile), OT (other), |
|
GE (general) |
|
• This unit can display only non-accent letters. (Accent letters such as “Ú” is |
|
showns as “U”.) |
NUMBER DIAL |
1 Turn the volume knob to select a number (0 to 9) or character ( , #, +). |
2Press S / T to move the entry position.
Repeat steps 1 and 2 until you finish entering the phone number.
3 Press the volume knob to call.
|
1 |
(or using the remote control) |
|
|
Press the number buttons (0 to 9) to enter the phone number. |
||
|
2 |
Press |
to call. |
VOICE |
Speak the name of the contact you want to call or the voice command to control |
||
|
the phone functions. ( Make a call using voice recognition) |
||
BATT LOW/MID/FULL*: Shows the strength of the battery.
NO SIGNAL/LOW/MID/MAX*: Shows the strength of the current received signal.
* Functionality depends on the type of the phone used.
 Make a call using voice recognition
1Press and hold  to activate the voice recognition of the connected phone.
2Speak the name of the contact you want to call or the voice command to control the phone functions.
•Supported Voice Recognition features vary for each phone. Refer to the instruction manual of the connected phone for details.
•This unit also supports the intelligent personal assistant function of iPhone.
Settings in memory
 Store a contact in memory
You can store up to 6 contacts into the number buttons (1 to 6).
1 Press  to enter Bluetooth mode.
2Turn the volume knob to select [CALL HISTORY], [PHONE BOOK], or [NUMBER DIAL], then press the knob.
3Turn the volume knob to select a contact or enter a phone number.
If a contact is selected, press the volume knob to show the phone number.
4Press and hold one of the number buttons (1 to 6).
“STORED” appears when the contact is stored.
To erase a contact from the preset memory, select [NUMBER DIAL] in step 2 and store a blank number.
 Make a call from memory
1 Press  to enter Bluetooth mode.
2 Press one of the number buttons (1 to 6).
3Press the volume knob to call.
“NO MEMORY” appears if there is no contacts stored.
ENGLISH 15
BLUETOOTH®
Other settings
1 Press the volume knob to enter [FUNCTION].
2Turn the volume knob to select an item (see the following table), then press the knob.
3Repeat step 2 until the desired item is selected/activated or follow the instructions stated on the selected item.
4 Press and hold |
to exit. |
To return to the previous setting item, press 
 .
.
Default: XX
BT MODE
PHONE SELECT
AUDIO SELECT
Selects the phone or audio device to connect or disconnect. “*” appears in front of the device name when connected. “ ” appears in front of the current playback audio device.
•You can only connect a maximum of two Bluetooth phones and one Bluetooth audio device at any time.
DEVICE DELETE |
1 |
Turn the volume knob to select a device to delete, then press the knob. |
|
2 |
Turn the volume knob to select [YES] or [NO], then press the knob. |
PIN CODE EDIT |
Changes the PIN code (up to 6 digits). |
|
(0000) |
1 |
Turn the volume knob to select a number. |
|
2 |
Press S / T to move the entry position. |
|
3 |
Repeat steps 1 and 2 until you finish entering the PIN code. |
|
Press the volume knob to confirm. |
|
RECONNECT |
ON: The unit automatically reconnect when the last connected Bluetooth device is within |
|
|
range. ; OFF: Cancels. |
|
AUTO PAIRING |
ON: The unit automatically pair supported Bluetooth device (iPhone/iPod touch/Android |
|
|
device) when it is connected through USB input terminal. Depending on the operating |
|
|
system of the connected device, this function may not work. ; OFF: Cancels. |
|
|
|
|
INITIALIZE |
YES: Initializes all the Bluetooth settings (including stored pairing, phonebook, and |
|
|
etc.). ; NO: Cancels. |
|
Bluetooth test mode
You can check the connectivity of the supported profile between the Bluetooth device and the unit.
• Make sure there is no Bluetooth device paired.
1Press and hold  .
.
“PLEASE PAIR YOUR PHONE PIN 0000” appears.
2Search and select this unit model name (KDC-BT2*) on the Bluetooth device.
3Operate the Bluetooth device to confirm pairing.
“TESTING” flashes on the display.
The connectivity result (OK or NG) appears after the test.
PAIRING: |
Pairing status |
HF CNT: |
Hands-Free Profile (HFP) compatibility |
AUD CNT: Advanced Audio Distribution Profile (A2DP) |
|
|
compatibility |
PB DL: |
Phonebook Access profile (PBAP) compatibility |
To cancel test mode, press and hold  to turn off the unit.
16 ENGLISH
BLUETOOTH®
BLUETOOTH — Audio
While in BT AUDIO source, you can connect to five Bluetooth audio devices and switch between these five devices.
Audio player via Bluetooth
1Press 
 repeatedly (or press SRC on the remote control) to select BT AUDIO.
2 Operate the Bluetooth audio player to start playback.
To |
On the faceplate |
|
On the remote control |
|
||
Playback/pause |
Press |
. |
|
Press |
. |
|
|
|
|
|
|
|
|
Select group or |
Press J/ K. |
|
Press |
/ |
. |
|
folder |
|
|
|
|
|
|
Reverse/ |
Press S / T. |
|
Press S / |
. |
|
|
Forward skip |
|
|
|
|
|
|
Reverse/Fast- |
Press and hold S / T. |
Press and hold S / |
|
|||
forward |
|
|
|
. |
|
|
|
|
|
|
|
|
|
Repeat play |
Press |
repeatedly. |
|
|
|
|
|
ALL REPEAT, FILE REPEAT, |
( Not available ) |
|
|||
|
REPEAT OFF |
|
|
|
|
|
|
|
|
|
|
|
|
Random play |
Press and hold |
to |
|
|
|
|
|
select ALL RANDOM. |
|
( Not available ) |
|
||
|
• Press |
to select |
|
|||
|
|
|
|
|||
RANDOM OFF.
To |
On the faceplate |
On the remote control |
Select a file from a |
Refer to “Select a |
|
folder/list |
file from a folder/ |
( Not available ) |
|
list” on page 8. |
|
Switch between |
Press 5.* |
|
connected Bluetooth |
|
( Not available ) |
audio device |
|
|
|
|
|
*Pressing the “Play” key on the connected device itself also causes switching of sound output from the device.
Operations and display indications may differ according to their availability on the connected device.
Settings to use KENWOOD Remote application
KENWOOD Remote application is designed to control the KENWOOD car receiver’s operations from the iPhone/iPod (via Bluetooth or via USB input terminal) or Android smartphone (via Bluetooth).
Preparation:
Install the latest version of KENWOOD Remote application on your device before connecting. For more information, visit <www.kenwood.com/cs/ce/>.
1 Press the volume knob to enter [FUNCTION].
2 Turn the volume knob to select an item ( 18), then press the knob. 3 Repeat step 2 until the desired item is selected or activated.
4 Press and hold 
 to exit.
To return to the previous setting item, press 
 .
.
ENGLISH 17

BLUETOOTH®
|
|
Default: XX |
REMOTE APP |
|
|
|
|
|
SELECT |
Select the device (IOS or ANDROID) to use the application. |
|
|
IOS |
YES: Selects iPhone/iPod to use the application via Bluetooth or connected via USB input |
|
|
terminal. ; NO: Cancels. |
|
|
If IOS is selected, select iPod BT source (or iPod USB if your iPhone/iPod is connected via |
|
|
USB input terminal) to activate the application. |
|
|
• The connectivity of the application will be interrupted or disconnected if: |
|
|
– You change from iPod BT source to any playback source connected via the USB |
|
|
input terminal. |
|
|
– You change from iPod USB source to iPod BT source. |
|
|
|
|
ANDROID |
YES: Selects Android smartphone to use the application via Bluetooth. ; |
|
|
NO: Cancels. |
ANDROID LIST*: Selects the Android smartphone to use from the list.
STATUS Shows the status of the selected device.
IOS CONNECTED: You are able to use the application using the iPhone/iPod connected via Bluetooth or USB input terminal.
IOS NOT CONNECTED: No IOS device is connected to use the application.
ANDROID CONNECTED: You are able to use the application using the Android smartphone connected via Bluetooth.
ANDROID NOT CONNECTED: No Android device is connected to use the application.
* Displayed only when [ANDROID] of [SELECT] is set to [YES].
 Listen to iPhone/iPod via Bluetooth
You can listen to the songs on the iPhone/iPod via Bluetooth on this unit.
Press  repeatedly to select iPod BT.
•You can operate the iPod/iPhone in the same way as iPod/iPhone via USB input terminal ( 7).
7).
•If you plug in an iPhone/iPod to the USB input terminal while listening to iPod BT source, the source automatically change to iPod USB. Press  to select iPod BT if the device is still connected via Bluetooth.
Internet radio via Bluetooth
You can listen to internet radio (Pandora and iHeartRadio) on the iPhone/iPod/Android device via Bluetooth on this unit.
• Make sure the USB input terminal is not connected to any device.
 Listen to Pandora
Preparation:
Select [ON] for [PANDORA SRC] in [SOURCE SELECT]. ( 5)
5)
1 Open the Pandora application on your device.
2 Connect your device via Bluetooth connection. ( 12)
12)
3Press  repeatedly to select PANDORA (for iPhone/iPod) or PANDORA BT (for Android device).
The source switches and broadcast starts automatically.
•You can operate Pandora in the same way as Pandora via USB input terminal. ( 10)
10)
 Listen to iHeartRadio
Preparation:
Select [ON] for [IHEART SRC] in [SOURCE SELECT]. ( 5)
5)
1 Open the iHeartAuto application on your device.
2 Connect your device via Bluetooth connection. ( 12)
12)
3Press  repeatedly to select IHEARTRADIO.
The source switches and broadcast starts automatically.
•You can operate iHeartRadio in the same way as iHeartRadio via USB input terminal. ( 11)
11)
18 ENGLISH

AUDIO SETTINGS
While listening to any source... |
|
|
|
BASS BOOST |
LV1/LV2/LV3/LV4/LV5: Selects your preferred bass boost level. ; |
|||||||
1 Press the volume knob to enter [FUNCTION]. |
|
|
|
|||||||||
|
|
|
|
|
OFF: Cancels. |
|||||||
2 Turn the volume knob to select an item (see the following table), |
|
|
|
|
||||||||
|
LOUDNESS |
LV1/LV2: Selects your preferred low and high frequencies boost to |
||||||||||
|
|
then press the knob. |
|
|
|
|
|
|||||
|
|
|
|
|
|
|
|
|
produce a well-balanced sound at a low volume level. ; OFF: Cancels. |
|||
3 Repeat step 2 until the desired item is selected or activated. |
|
|
|
|||||||||
4 Press and hold |
to exit. |
|
|
|
SUBWOOFER SET |
ON: Turns on the subwoofer output. ; OFF: Cancels. |
||||||
|
|
(or using the remote control) |
|
|
|
|
|
|
|
|||
|
|
|
|
|
|
FADER |
R15 to F15 (0): Adjusts the rear and front speaker output balance. |
|||||
|
|
|
|
|
|
|||||||
1 Press AUD to enter [AUDIO CONTROL]. |
|
|
|
|||||||||
|
|
|
|
|
|
|||||||
|
|
|
BALANCE |
L15 to R15 (0): Adjusts the left and right speaker output balance. |
||||||||
2 Press J/ K to select an item, then press |
. |
|
|
|||||||||
|
|
|
|
|
||||||||
|
|
|
|
|
|
|
|
|
VOLUME OFFSET |
–15 to +6 (0): Preset the initial volume level of each source. (Before |
||
|
|
|
|
|
|
|
|
|||||
To return to the previous setting item, press |
. |
|
|
|
|
adjustment, select the source you want to adjust.) |
||||||
|
|
|
|
|
|
|
Default: XX |
|
SOUND EFFECT |
|
||
AUDIO CONTROL |
|
|
|
|
|
|
|
SOUND RECNSTR |
(Not applicable for TUNER source and AUX source.) |
|||
|
|
|
|
|
|
|
|
|
|
(Sound |
ON: Creates realistic sound by compensating the high-frequency |
|
SUB-W LEVEL |
LEVEL –50 to LEVEL +10 (LEVEL 0): Adjusts the subwoofer output level. |
|||||||||||
|
|
reconstruction) |
components and restoring the rise-time of the waveform that are lost |
|||||||||
|
|
|
|
|
|
|
|
|
|
|||
MANUAL EQ |
The sound elements (frequency level, tone level, Q factor) are preset into |
|
|
|
in audio data compression. ; OFF: Cancels. |
|||||||
|
|
|
each selection (BAND1 LEVEL to BAND13 LEVEL). |
|
|
SPACE ENHANCE |
(Not applicable for TUNER source.) |
|||||
|
|
|
|
|
|
|
|
|
|
|||
|
BAND1 LEVEL |
|
|
|
|
|
|
|
|
SML/MED/LRG: Virtually enhances the sound space. ; OFF: Cancels. |
||
|
|
LEVEL |
LEVEL–9 to LEVEL +9 (LEVEL 0): Adjusts the level to memorize for |
|
|
SND REALIZER |
LV1/LV2/LV3: Virtually makes the sound more realistic. ; |
|||||
|
|
|
each source. (Before making an adjustment, select the source you want |
|
|
|
OFF: Cancels. |
|||||
|
|
|
to adjust.) |
|
|
|
|
|
|
|
|
|
|
|
|
|
|
|
|
|
|
STAGE EQ |
LOW/MID/HI: Virtually adjust the sound position heard from the |
||
|
|
|
|
|
|
|
|
|
|
|||
|
|
BASS EXTEND |
ON: Turns on the extended bass. ; OFF: Cancels. |
|
|
|
speakers. ; OFF: Cancels. |
|||||
|
BAND2 LEVEL to |
LEVEL–9 to LEVEL +9 (LEVEL 0): Adjusts the level to memorize for |
|
|
DRIVE EQ |
ON: Boosts the frequency to reduce the noise heard from outside the |
||||||
|
BAND13 LEVEL |
each source. (Before making an adjustment, select the source you want |
|
|
|
car or running noise of the tyres. ; OFF: Cancels. |
||||||
|
|
|
to adjust.) |
|
|
|
|
|
|
|
|
|
|
|
|
|
|
|
|
|
|
|
|
||
|
|
|
|
|
|
|
|
|
|
|
||
|
Q FACTOR |
1.35/1.50/2.00: Adjust the quality factor. |
|
|
|
|
|
|
||||
|
|
|
|
|
|
|
|
|
|
|||
PRESET EQ |
NATURAL/ROCK/POPS/EASY/TOP40/JAZZ/POWERFUL/USER: Selects |
|
|
|
|
|||||||
|
|
|
a preset equalizer suitable to the music genre. (Select [USER] to use the |
|
|
|
|
|||||
|
|
|
settings made in [MANUAL EQ].) |
|
|
|
|
|
|
|||
|
|
|
|
|
|
|
|
|
|
|
|
|
ENGLISH 19

AUDIO SETTINGS
SPEAKER SIZE |
The frequency and slope settings are automatically set for the crossover of |
||
|
|
the selected speaker. |
|
|
FRONT |
SIZE |
3.5"/4"/4.75"/5"/6.5"/6.75"/7"/4×6/5×7/6×8/ |
|
|
|
6×9/7×10: Selects according to the connected |
|
|
|
speaker size for optimum performance. |
|
|
|
|
|
|
TWEETER |
SMALL/MIDDLE/LARGE: Selects according to the |
|
|
|
size range of the connected tweeter for optimum |
|
|
|
performance. ; NONE: Not connected. |
|
|
|
|
|
REAR |
3.5"/4"/4.75"/5"/6.5"/6.75"/7"/4×6/5×7/6×8/6×9/7×10: Selects |
|
|
|
according to the connected speaker size for optimum performance. ; |
|
|
|
NONE: Not connected. |
|
|
SUBWOOFER |
6.5"/8"/10"/12"/15" OVER: Selects according to the connected speaker |
|
|
|
size for optimum performance. ; NONE: Not connected. |
|
X ' OVER |
|
|
|
|
|
|
|
|
TWEETER |
FRQ |
1KHZ/1.6KHZ/2.5KHZ/4KHZ/5KHZ/6.3KHZ/8KHZ/ |
|
|
|
10KHZ/12.5KHZ: Adjusts the crossover frequency for |
|
|
|
the tweeter speaker. |
|
|
|
|
|
|
GAIN LEFT |
–8 to 0: Adjusts the output volume of the left tweeter. |
|
|
|
|
|
|
GAIN RIGHT |
–8 to 0: Adjusts the output volume of the right |
|
|
|
tweeter. |
|
|
|
|
|
FRONT HPF |
F - HPF FRQ |
30HZ/40HZ/50HZ/60HZ/70HZ/80HZ/90HZ/100HZ/ |
|
|
|
120HZ/150HZ/180HZ/220HZ/250HZ: Adjusts the |
|
|
|
crossover frequency for the selected speakers (high |
|
|
|
pass filter). ; THROUGH: All signals are sent to the |
|
|
|
selected speakers. |
|
|
F - HPF SLOPE |
–6DB/–12DB/–18DB/–24DB: Adjusts the crossover |
|
|
|
slope. |
|
|
|
(Selectable only if a setting other than [THROUGH] is |
|
|
|
selected for [F - HPF FRQ].) |
|
|
|
|
|
|
F - HPF GAIN |
–8 to 0: Adjusts the output volume of the selected |
|
|
|
speaker. |
|
|
|
|
|
REAR HPF |
R - HPF FRQ |
|
|
|
|
|
(Refer FRONT HPF settings above.) |
|
|
|
R - HPF SLOPE |
||
|
|
|
|
|
|
|
R - HPF GAIN |
|
|
|
SUBWOOFER |
SW LPF FRQ |
30HZ/40HZ/50HZ/60HZ/70HZ/80HZ/90HZ/ |
|
|
LPF |
|
100HZ/120HZ/150HZ/180HZ/220HZ/250HZ: Adjusts |
|
|
|
|
the crossover frequency for the subwoofer (low pass |
|
|
|
|
filter). ; THROUGH: All signals are sent to the subwoofer. |
|
|
|
|
|
|
|
|
SW LPF SLOPE |
–6DB/–12DB/–18DB/–24DB: Adjusts the crossover |
|
|
|
|
slope. |
|
|
|
|
(Selectable only if a setting other than [THROUGH] is |
|
|
|
|
selected for [SW LPF FRQ].) |
|
|
|
|
|
|
|
|
SW LPF PHASE |
REVERSE (180°)/NORMAL (0°): Selects the phase of the |
|
|
|
|
subwoofer output to be in line with the speaker output |
|
|
|
|
for optimum performance. |
|
|
|
|
|
|
|
|
SW LPF GAIN |
–8 to 0: Adjusts the output volume of the subwoofer. |
|
DTA SETTINGS |
For settings, 21, Digital Time Alignment settings. |
|||
|
|
|||
CAR SETTINGS |
||||
|
|
|||
|
|
|
|
|
•The following item is selectable only if [SWITCH PREOUT] is set to [SUB-W] ( 4):
4):
–[SUB-W LEVEL], [SUBWOOFER SET]
–[SUBWOOFER] of [SPEAKER SIZE]
–[SUBWOOFER LPF] of [X ‘ OVER]
–[SUBWOOFER] of [DISTANCE] and [GAIN] in [DTA SETTINGS]
•The following item is selectable only if [SUBWOOFER SET] is set to [ON] ( 19):
19):
–[SUB-W LEVEL]
–[SUBWOOFER] of [SPEAKER SIZE]
–[SUBWOOFER LPF] of [X ‘ OVER]
–[SUBWOOFER] of [DISTANCE] and [GAIN] in [DTA SETTINGS]
•The following item is selectable only if a setting other than [NONE] is selected for
[TWEETER], [REAR] and [SUBWOOFER] of [SPEAKER SIZE]:
–[TWEETER], [REAR HPF], [SUBWOOFER LPF] of [X ‘ OVER]
20 ENGLISH
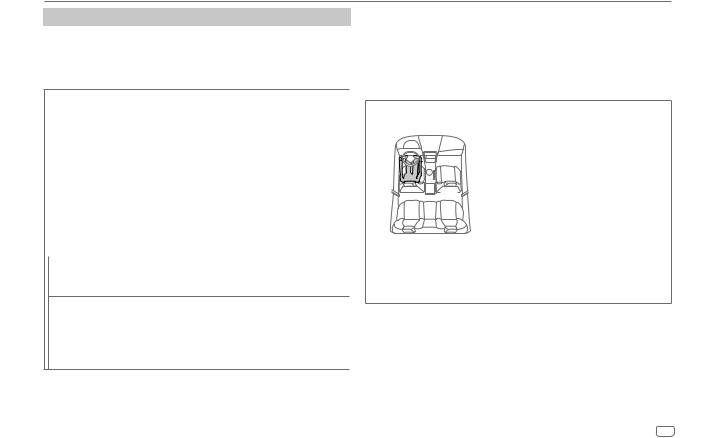
AUDIO SETTINGS
Digital Time Alignment settings
Digital Time Alignment sets the delay time of the speaker output to create a more suitable environment for your vehicle.
•For more information,  Determining the value for [DISTANCE] and [GAIN] of
[DTA SETTINGS].
DTA SETTINGS
|
POSITION |
Selects your listening position (reference point). |
|
|
ALL: Not compensating ; FRONT RIGHT: Front right seat ; |
|
|
FRONT LEFT: Front left seat ; FRONT ALL: Front seat |
|
|
|
|
DISTANCE |
0FT to 20.01FT: Fine adjust the distance to compensate. (Before |
|
|
making an adjustment, select the speaker you want to adjust.) |
|
|
|
|
GAIN |
–8DB to 0DB: Fine adjust the output volume of the selected speaker. |
|
|
(Before making an adjustment, select the speaker you want to adjust.) |
|
|
|
|
DTA RESET |
YES: Resets the settings ([DISTANCE] and [GAIN]) of the selected |
|
|
[POSITION] to default. ; NO: Cancels. |
|
|
|
CAR SETTINGS |
Identify your car type and rear speaker location in order to make the |
|
|
|
adjustment for [DTA SETTINGS]. |
|
CAR TYPE |
COMPACT/FULL SIZE CAR/WAGON/MINIVAN/SUV/ |
|
|
MINIVAN(LONG): Selects the type of vehicle. ; OFF: Not |
|
|
compensating. |
R-SP LOCATION Selects the location of the rear speakers in your vehicle to calculate the furthest distance from the listening position selected (reference point).
•DOOR/REAR DECK: Selectable only when [CAR TYPE] is selected as
[OFF], [COMPACT], [FULL SIZE CAR], [WAGON] or [SUV].
•2ND ROW/3RD ROW: Selectable only when [CAR TYPE] is selected as [MINIVAN] or [MINIVAN(LONG)].
•Before making an adjustment for [DISTANCE] and [GAIN] of [DTA SETTINGS], select the speaker you want to adjust:
FRONT LEFT/FRONT RIGHT/REAR LEFT/REAR RIGHT/SUBWOOFER:
You can only select [REAR LEFT], [REAR RIGHT] and [SUBWOOFER] if a setting other than
[NONE] is selected for [REAR] and [SUBWOOFER] of [SPEAKER SIZE].
•[R-SP LOCATION] of [CAR SETTING] is selectable only if a setting other than [NONE] is selected for [REAR] of [SPEAKER SIZE].
Determining the value for [DISTANCE] and [GAIN] of [DTA SETTINGS]
If you specify the distance from the center of the currently set listening position to every speaker, the delay time will be automatically computed and set.
1 Determine the center of the currently set listening position as the reference point.
2 Measure the distances from the reference point to the speakers.
3 Calculate the differences between the distance of the furthest speaker (rear speaker) and other speakers.
4 Set the [DISTANCE] calculated in step 3 for individual speakers.
5 Adjust [GAIN] for individual speakers.
Example: When [FRONT ALL] is selected as the listening position
ENGLISH 21
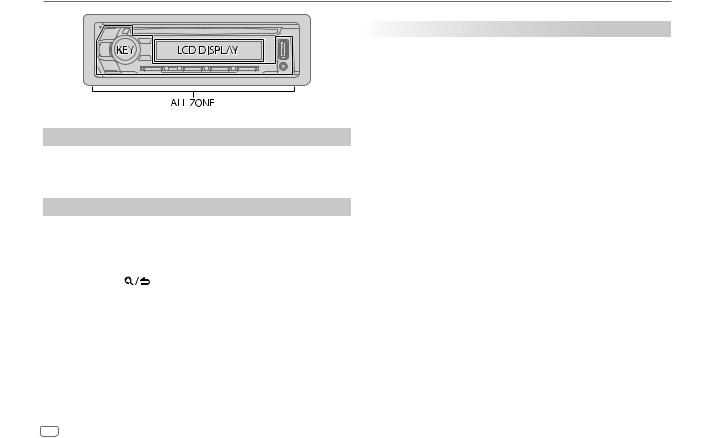
DISPLAY SETTINGS
Set the dimmer
Press and hold DISP (DIMMER) to turn on or off the dimmer.
•If you have set [DIMMER TIME], it will be canceled once you press and hold this button.
Other settings
1 Press the volume knob to enter [FUNCTION].
2Turn the volume knob to select an item (see the following table), then press the knob.
3Repeat step 2 until the desired item is selected/activated or follow the instructions stated on the selected item.
4 Press and hold |
to exit. |
To return to the previous setting item, press
 .
.
|
|
Default: XX |
DISPLAY |
|
|
|
|
|
DIMMER |
Dim the illumination. |
|
|
ON: Dimmer is turned on. ; OFF: Cancels. |
|
|
DIMMER TIME: Set the dimmer on and off time. |
|
|
1 |
Turn the volume knob to adjust the [ON] time, then press the knob. |
|
2 |
Turn the volume knob to adjust the [OFF] time, then press the knob. |
|
(Default: [ON]: 6:00PM; [OFF]: 6:00 AM) |
|
BRIGHTNESS |
1 |
Select a zone. (See the illustration on the left column.) |
|
2 |
0 to 31: Select your preferred brightness level for the selected zone. |
TEXT SCROLL |
AUTO/ONCE: Select whether to scroll the display information automatically, |
|
|
or scroll only once. ; OFF: Cancels. |
|
|
|
|
22 ENGLISH
TROUBLESHOOTING
Symptom |
Remedy |
||
|
Sound cannot be heard. |
• Adjust the volume to the optimum level. |
|
|
|
• Check the cords and connections. |
|
|
|
|
|
|
“MISWIRING CHECK WIRING |
Turn the power off, then check to be sure the |
|
|
THEN PWR ON” appears. |
terminals of the speaker wires are insulated |
|
|
|
properly. Turn the power on again. |
|
General |
|
|
|
appears. |
Send the unit to the nearest service center. |
||
|
“PROTECTING SEND SERVICE” |
||
|
|
|
|
|
• Sound cannot be heard. |
Clean the connectors. ( 25) |
|
|
• The unit does not turn on. |
|
|
|
• Information shown on the |
|
|
|
display is incorrect. |
|
|
|
The unit does not work at all. |
Reset the unit. ( 3) |
|
|
|
|
|
Radio |
• Radio reception is poor. |
Connect the antenna firmly. |
|
• Static noise while listening |
|
||
|
|
||
|
to the radio. |
|
|
|
|
|
|
|
Disc cannot be ejected. |
Press and hold M to forcibly eject the disc. Be |
|
|
|
careful not to drop the disc when it is ejected. If this |
|
|
|
does not solve the problem, reset the unit. ( 3) |
|
|
|
|
|
|
Noise is generated. |
Skip to another track or change the disc. |
|
|
|
|
|
/iPod |
Tracks do not play back as you |
Playback order is determined when files are |
|
intended them to play. |
recorded. |
||
CD/USB |
|
|
|
“READING” keeps flashing. |
Do not use too many hierarchical levels or folders. |
||
|
|||
|
|
|
|
|
Elapsed playing time is not |
This is caused by how the tracks are recorded. |
|
|
correct. |
|
|
|
|
|
|
|
“LOADING” appears when you |
This unit is still preparing the iPod/iPhone music |
|
|
enter search mode by pressing |
list. It may take some time to load, try again later. |
|
|
. |
|
|
|
|
|
|
Symptom |
Remedy |
||
|
Correct characters are not |
• This unit can only display uppercase letters, numbers, and |
|
|
displayed (e.g. album |
|
a limited number of symbols. |
|
name). |
• Depending on the display language you have selected |
|
|
|
|
( 5), some characters may not be displayed correctly. |
|
“NA FILE” |
Make sure the disc contains supported audio files. ( 26) |
|
|
|
|
|
|
“NO DISC” |
Insert a playable disc into the loading slot. |
|
|
|
|
|
|
“TOC ERROR” |
Make sure the disc is clean and inserted properly. |
|
|
|
|
|
|
“PLEASE EJECT” |
Reset the unit. If this does not solve the problem, consult |
|
|
|
your nearest service center. |
|
|
|
|
|
|
“READ ERROR” |
Copy the files and folders onto the USB device again. If this |
|
/iPod |
|
does not solve the problem, reset the USB device or use |
|
|
another USB device. |
||
|
|
||
CD/USB |
“NO DEVICE” |
Connect a USB device, and change the source to USB again. |
|
|
|||
|
|
|
|
|
“COPY PRO” |
A copy-protected file is played. |
|
|
|
|
|
|
“UNSUPPORTED DEVICE” |
• Check whether the connected device is compatible with this |
|
|
appears. |
|
unit and ensure the file systems are in supported formats. |
|
|
• |
( 26) |
|
|
Reattach the device. |
|
|
“UNRESPONSIVE DEVICE” |
Make sure the device is not malfunction and reattach the |
|
|
appears. |
device. |
|
|
“USB HUB IS NOT |
This unit cannot support a USB device connected via a USB |
|
|
SUPPORTED” appears. |
hub. |
|
|
“NO MUSIC” |
Connect a USB device that contains playable audio files. |
|
|
|
|
|
|
“iPod ERROR” |
• |
Reconnect the iPod. |
|
|
• |
Reset the iPod. |
|
|
|
|
ENGLISH 23

TROUBLESHOOTING
Symptom |
Remedy |
|
||
|
• |
Sound cannot |
• Reconnect the Android device. |
|
|
|
be heard during |
• If in [HAND MODE], launch any media player application |
|
|
|
playback. |
on the Android device and start playback. |
|
|
• |
Sound output only |
• If in [HAND MODE], relaunch the current media player |
|
|
|
from the Android |
application or use another media player application. |
|
|
|
device. |
• Restart the Android device. |
|
|
|
|
• If this does not solve the problem, the connected Android |
|
|
|
|
device is unable to route the audio signal to unit. ( 26) |
|
|
|
|
||
|
Cannot playback at |
• Make sure KENWOOD MUSIC PLAY APP is installed on the |
||
ANDROID |
[BROWSE MODE]. |
Android device. ( 7) |
|
|
|
|
• Reconnect the Android device and select the appropriate |
||
|
|
|
||
|
|
|
control mode. |
|
|
|
|
• If this does not solve the problem, the connected Android |
|
|
|
|
device does not support [BROWSE MODE]. ( |
26) |
|
|
|
||
|
“NO DEVICE” or |
• Switch off the developer options on the Android device. |
||
|
“READING” keeps |
• Reconnect the Android device. |
|
|
|
flashing. |
• If this does not solve the problem, the connected Android |
||
|
|
|
device does not support [BROWSE MODE]. ( |
26) |
|
|
|
||
|
Playback is intermittent |
Turn off the power saving mode on the Android device. |
||
|
or sound skips. |
|
|
|
|
“ANDROID ERROR”/ |
• Reconnect the Android device. |
|
|
|
“NA DEVICE” |
• Restart the Android device. |
|
|
|
“ADD ERROR” |
New station creation is unsuccessful. |
|
|
Pandora |
|
|
|
|
“NO SKIPS” |
The skip limit has been reached. |
|
||
|
“CHECK DEVICE” |
Check the Pandora application on your device. |
|
|
|
|
|
|
|
|
“NO STATIONS” |
No stations are found. |
|
|
|
|
|
|
|
Symptom |
Remedy |
|||
|
“STATION LIMIT” |
The number of registered stations has reached its limit. |
||
|
|
Retry after deleting unnecessary stations from your device. |
||
|
|
|
||
|
“CONNECT ERROR” |
Communication is unstable. |
||
Pandora |
|
|
|
|
“RATING ERROR” |
Registration of thumbs up/thumbs down has failed due |
|||
|
||||
|
|
to insufficient network connectivity. |
||
|
|
|
||
|
“THUMBS N/A” |
Registration of thumbs up/thumbs down is not allowed. |
||
|
|
|
||
|
“LICENSE ERROR” |
You try to access from a country which Pandora is not |
||
|
|
deliverable. |
||
|
|
|
||
iHeartRadio |
iHeartRadio station cannot |
If “Explicit Content” in [Account Settings] is checked in |
||
be selected. |
the web version of iHeartRADIO, custom stations become |
|||
|
||||
|
|
unavailable. |
||
|
|
|
||
|
“NOT CONNECTED” |
Link to the application is impossible. |
||
|
|
|
||
|
No Bluetooth device is |
• Search from the Bluetooth device again. |
||
|
detected. |
• |
Reset the unit. ( 3) |
|
|
Bluetooth pairing cannot |
• Make sure you have entered the same PIN code to both |
||
|
be made. |
|
the unit and Bluetooth device. |
|
Bluetooth® |
during a phone |
• Delete pairing information from both the unit and the |
||
• |
Check the [ECHO CANCEL] setting. ( 14) |
|||
|
|
|
Bluetooth device, then perform pairing again. ( 12) |
|
|
Echo or noise is heard |
• |
Adjust the microphone unit’s position. ( 12) |
|
|
conversation. |
|
|
|
|
|
|
||
|
Phone sound quality is |
• Reduce the distance between the unit and the |
||
|
poor. |
|
Bluetooth device. |
|
|
|
• Move the car to a place where you can get a better |
||
|
|
|
signal reception. |
|
|
|
|
|
|
24 ENGLISH
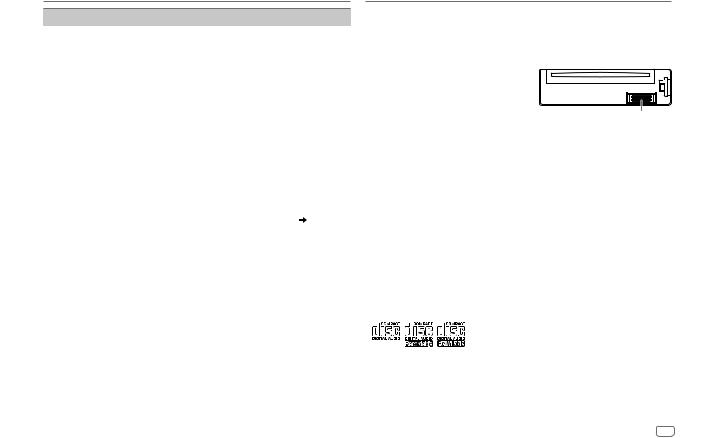
TROUBLESHOOTING
Symptom |
Remedy |
||
|
Voice calling method is |
• Use voice calling method in a more quiet environment. |
|
|
not successful. |
• Reduce the distance from the microphone when you |
|
|
|
speak the name. |
|
|
|
• Make sure the same voice as the registered voice tag is |
|
|
|
used. |
|
|
|
|
|
|
Sound is being |
• Reduce the distance between the unit and the Bluetooth |
|
|
interrupted or skipped |
audio player. |
|
|
during playback of a |
• Turn off, then turn on the unit and try to connect again. |
|
|
Bluetooth audio player. |
• Other Bluetooth devices might be trying to connect to the |
|
|
|
unit. |
|
|
|
|
|
|
The connected Bluetooth |
• Check whether the connected Bluetooth audio player |
|
|
audio player cannot be |
supports Audio/Video Remote Control Profile (AVRCP). |
|
|
controlled. |
(Refer to the instructions of your audio player.) |
|
Bluetooth® |
|
• Disconnect and connect the Bluetooth player again. |
|
“DEVICE FULL” |
The number of registered devices has reached its limit. |
||
|
|||
|
|
Retry after deleting an unnecessary device. ( 16, DEVICE |
|
|
|
DELETE) |
|
|
“N/A VOICE TAG” |
Make sure the same voice as the registered voice tag is |
|
|
|
used. |
|
|
“NOT SUPPORT” |
The connected phone does not support Voice Recognition |
|
|
|
feature or phonebook transfer. |
|
|
“NO ENTRY”/“NO PAIR” |
There is no registered device connected/found via |
|
|
|
Bluetooth. |
|
|
|
|
|
|
“ERROR” |
Try the operation again. If “ERROR” appears again, check if |
|
|
|
the device supports the function you have tried. |
|
|
|
|
|
|
“NO INFO”/“NO DATA” |
Bluetooth device cannot get the contact information. |
|
|
|
|
|
|
“HF ERROR XX”/ |
Reset the unit and try the operation again. If this does not |
|
|
“BT ERROR” |
solve the problem, consult your nearest service center. |
|
|
|
|
|
REFERENCES
 Maintenance
Cleaning the unit
Wipe off dirt on the faceplate with a dry silicone or soft cloth.
Cleaning the connector
Detach the faceplate and clean the connector gently with a cotton swab, being careful not to damage the connector.
Handling discs
•Do not touch the recording surface of the disc.
•Do not stick tape etc. on the disc, or use a disc with tape stuck on it.
•Do not use any accessories for the disc.
•Clean from the center of the disc and move outward.
•Clean the disc with a dry silicone or soft cloth. Do not use any solvents.
•When removing discs from this unit, pull them out horizontally.
•Remove burrs from the center hole and disc edge before inserting a disc.
 More information
For: – Latest firmware updates and latest compatible item list
–KENWOOD original application
–Any other latest information Visit <www.kenwood.com/cs/ce/>.
General
•This unit can only play the following CDs:
•For detailed information and notes about the playable audio files, visit <www.kenwood.com/cs/ce/audiofile/>.
ENGLISH 25
 Loading...