


KDC-HD548U
CD-RECEIVER
INSTRUCTION MANUAL
AMPLI-TUNER LECTEUR DE CD
MODE D’EMPLOI
REPRODUCTOR DE DISCOS COMPACTOS RECEPTOR DE FM/AM
MANUAL DE INSTRUCCIONES
Take the time to read through this instruction manual.
Familiarity with installation and operation procedures will help you obtain the best performance from your new CD-receiver.
For your records
Record the serial number, found on the back of the unit, in the spaces designated on the warranty card, and in the space provided below. Refer to the model and serial numbers whenever you call upon your Kenwood dealer for information or service on the product.
Model KDC-HD548U Serial number
US Residents Only
Register Online
Register your Kenwood product at www.Kenwoodusa.com
© 2010 Kenwood Corporation All Rights Reserved. |
GET0696-001A (KW/KN) |
CONTENTS
Safety |
2 |
Preparation |
3 |
How to attach/detach the faceplate How to reset your unit
How to prepare the remote controller (RC-405)
Basic operations |
4 |
Getting started |
6 |
Canceling the display demonstration Setting the demonstration mode Adjusting the clock
Initial settings before operations
Listening to HD Radio™ |
|
Broadcasts |
7 |
Direct Access Tuning using the remote controller (RC-405)
iTunes Tagging
Adjust [SETTINGS] mode settings
Listening to a disc/ |
|
USB device/ iPod |
9 |
Start playing a disc Connecting a USB device Connecting an iPod Selecting Repeat Play Selecting Random Play Selecting Scan Play Selecting a folder/track/file
Direct Music Search using the remote controller (RC-405)
Alphabet Search and My Playlist for iPod iPod control by Hand Mode
Adjust [SETTINGS] mode settings
Listening to the other |
|
external components |
12 |
Function settings |
12 |
Troubleshooting |
14 |
Specifications |
17 |
Safety
WARNING
Stop the car before operating the unit.
Important to know...
 To prevent a short circuit, never put or leave any metallic objects (such as coins or metal tools) inside the unit.
 Caution: Adjust the volume so that you can hear sounds outside the car. Driving with the volume too high may cause an accident.
 Condensation: When the car is airconditioned, moisture may collect on the laser lens. This may cause disc read errors. In this case, remove the disc and wait for the moisture to evaporate.
 This unit can only play the CDs with:
 The illustrations in this manual are examples used to explain more clearly how the controls are used. Therefore, what appears on the illustrations may differ from what appears on the actual equipment.
 A USB connection cable, CA-U1EX (optional accessory) is required for connecting a USB device.
 You can connect an Apple iPod/iPhone with this unit.
The word “iPod” appearing in this manual indicates the iPod or iPhone connected to this unit with a connection cable, KCA-iP102 (optional accessory).
 If you experience problems during installation, consult your Kenwood dealer.
 When you purchase external components, check with your Kenwood dealer to make sure that they work with your model and in your area.
 Detailed information and notes about the playable audio files are stated in an online manual on the following site: www.kenwood.com/cs/ce/audiofile/
2
Preparation
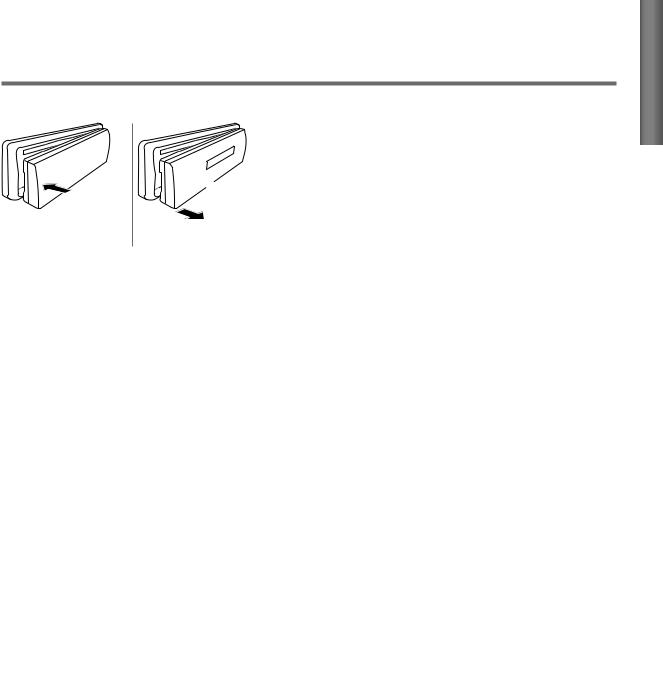
How to attach/detach the faceplate
 1
1
1
2
2 
 Do not expose the faceplate to direct sunlight, excessive heat, or humidity. Also avoid places with too much dust or the possibility of water splashing.
 Keep the faceplate in its casing while detached.
 The faceplate is a precision piece of equipment and can be damaged by shocks or jolts.
 To prevent deterioration, do not touch the terminals of the unit and faceplate with your fingers.
How to reset your unit
If this unit fails to operate properly, press the reset button.
The unit returns to factory settings when the reset button is pressed.
Reset button
How to prepare the remote controller (RC-405)
When you use the remote controller for the first time, pull out the insulation sheet.
Insulation sheet
If the effectiveness of the remote controller decreases, replace the battery.
2 |
3 |
|
|
|
4 |
1 |
|
CALIFORNIA, USA ONLY
This perchlorate WARNING applies only to the product sold or distributed in
California USA “Perchlorate Material–special handling may apply, See www.dtsc.ca.gov/ hazardouswaste/perchlorate.”
Caution:
 Do not set the remote control in hot places such as on the dashboard.
 Lithium battery.
Danger of explosion if the battery is incorrectly replaced. Replace only with the same or equivalent type.
 The battery pack or batteries shall not be exposed to excessive heat such sunshine, fire or the like.
 Keep battery out of reach of children and in original package until ready to use. Dispose of used batteries promptly. If swallowed contact physician immediately.
ENGLISH
3

Basic operations
|
|
|
|
|
|
|
|
|
|
|
Loading slot |
|||||||||||
Remote sensor |
|
|
|
|
|
|
|
Ejects the disc |
||||||||||||||
|
|
Do not expose to bright sunlight. |
|
|
|
|
|
|
|
|||||||||||||
|
|
|
|
|
|
|
|
|
||||||||||||||
|
|
|
|
|
|
|
|
|
||||||||||||||
|
|
|
|
|
|
|
|
|
|
|
|
|
|
|
|
|
|
|
|
|
|
|
|
|
|
|
|
|
|
|
|
|
|
|
|
|
|
|
|
|
|
|
|
|
|
|
|
|
|
|
|
|
|
|
|
|
|
|
|
|
|
|
|
|
|
|
|
|
|
|
|
|
|
|
|
|
|
|
|
|
|
|
|
|
|
|
|
|
|
|
|
|
|
|
|
|
|
|
|
|
|
|
|
|
|
|
|
|
|
|
|
|
|
|
|
|
|
|
|
|
|
|
|
|
|
|
|
|
|
|
|
|
|
|
|
|
|
|
|
|
|
|
|
|
|
|
|
|
|
|
|
|
|
|
|
|
|
|
|
|
|
|
|
|
|
|
|
|
|
|
|
|
|
|
|
|
|
|
|
|
|
|
|
|
|
|
|
|
|
|
|
|
|
|
|
|
|
|
|
|
|
|
|
|
|
|
|
|
|
|
|
|
|
|
|
|
|
|
|
|
|
|
|
|
|
|
|
|
|
|
|
|
|
|
|
|
|
|
|
|
|
|
|
|
|
|
|
|
|
|
|
|
|
|
|
|
|
|
|
|
|
|
|
|
|
|
|
|
|
|
|
|
|
|
|
|
|
|
|
|
|
|
|
|
|
|
|
|
|
|
|
|
|
|
|
|
|
|
|
|
|
|
|
|
|
|
|
|
|
|
|
|
|
|
|
|
|
|
|
|
|
|
|
|
|
|
|
|
|
|
|
|
|
|
|
|
|
|
|
|
|
|
|
|
|
|
|
|
|
|
|
|
|
|
|
|
|
|
|
|
|
|
|
|
|
|
|
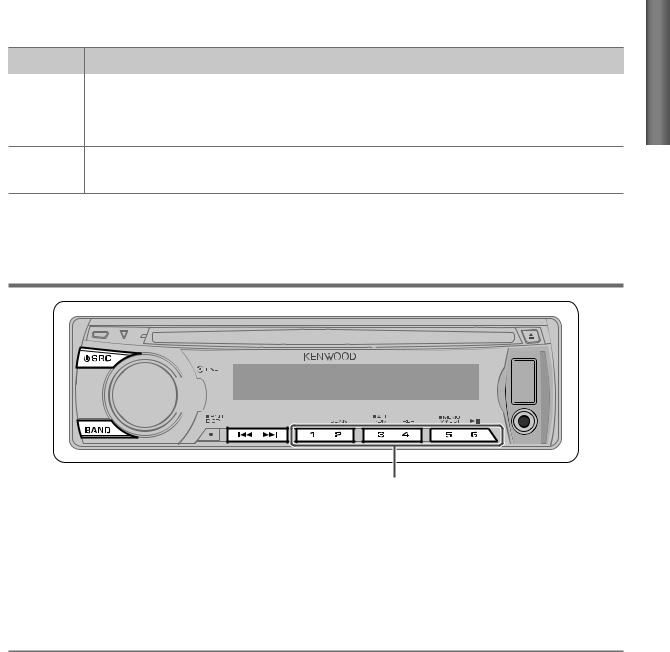
Volume knob |
Display window |
Detaches the faceplate
USB terminal 

Auxiliary input jack 

The following indicator lights up when...
ATT (blink) : The sound attenuates. (Applicable only when using the remote controller,
|
RC-405). |
ST |
: A stereo broadcast is received. |
HD |
: HD Radio™ broadcast is tuned in. |
D |
: HD Radio digital broadcast is tuned in. |
MC |
: HD Radio multicast broadcast is tuned in. |
EQ |
: [SYSTEM Q] is set to an EQ mode other than [NATURAL]. (page 12) |
B.BOOST : |
[BASS BOOST] is set to [B.BOOST LV1] or [B.BOOST LV2]. (page 12) |
|
TAG |
: |
The song information can be registered. |
|
: |
In Search Mode or when a Playlist is displayed. |
IN |
: |
A disc is in the unit. |
4

When you press or hold the following button(s)...
Main unit |
Remote |
|
General operation |
||||||||||
controller |
|
||||||||||||
|
|
|
|
|
|
|
|
|
|||||
|
|
|
|
|
|
|
— |
|
Turns on. |
||||
|
|
|
|
|
|
|
|
||||||
|
|
|
|
|
|
|
|
||||||
|
|
|
|
|
|
|
|
Turns off if pressed and held. |
|||||
|
|
|
|
|
|
|
|
|
|
|
|
|
|
|
|
|
|
|
|
|
|
|
|
|
|
|
|
|
|
|
|
|
|
|
|
|
|
|
|
|
|
|
|
SRC |
|
|
|
|
|
Selects the available sources (HD RADIO, USB or iPod, CD, AUX, |
|||||
|
|
|
|
|
|
|
|||||||
|
|
|
|
|
|
|
|||||||
|
|
|
|
|
|
|
SRC |
STANDBY), if the power is turned on. |
|||||
|
|
|
|
|
|
|
• If the source is ready, playback also starts. “iPod” or “CD” is |
||||||
|
|
|
|
|
|
|
|
|
|
|
|
||
|
|
|
|
|
|
|
|
|
|
|
|
|
selectable only when an iPod is connected or a disc is loaded. |
|
|
|
|
|
|
|
|
|
|
|
|
|
|
Volume knob |
VOL |
Adjusts the volume level. |
|||||||||||
(turn) |
5 / ∞ |
Selects items. |
|||||||||||
|
|
|
|
|
|
|
|||||||
|
|
|
|
|
|
|
|
|
|
|
|
|
|
Volume knob |
ENT |
|
|
|
|
Confirms selection. |
|||||||
|
|
||||||||||||
|
|
||||||||||||
|
|
|
|
|
|
|
|||||||
(press) |
— |
Enters [FUNCTION] settings. |
|||||||||||
|
|
|
|
|
|
|
|
|
|
|
|
|
|
|
|
|
|
|
|
|
*AM– / |
|
Selects the FM bands (FM1/ FM2/ FM3) or AM. |
||||
|
|
|
|
|
|
|
|
||||||
|
|
|
|
|
|
|
|
||||||
BAND |
|
Selects the next/previous folder. (Pressing BAND on the main |
|||||||||||
|
|||||||||||||
|
|||||||||||||
|
|
|
|
|
|
|
#FM+ |
|
unit can only select the next folders.) |
||||
|
|
|
|
|
|
|
|
|
|
|
|
|
|
|
|
|
|
|
|
|
|
|
|
|
|
|
|
6 ( |
|
|
|
|
) |
ENT |
|
|
|
|
Pauses/resumes playback of a disc/ USB device/ iPod. |
||
|
|
|
|
||||||||||
|
|
|
|
||||||||||
|
|
|
|
|
|
|
|
|
|
|
|
|
|
|
|
|
|
|
|
|
+ |
|
Searches for radio station. |
||||
|
|
|
|
|
|
|
|
||||||
|
|
|
|
|
|
|
|
||||||
|
|
|
|
|
|
|
|
Selects track/file. |
|||||
4 / ¢ |
4 / ¢ |
|
|||||||||||
|
|||||||||||||
|
|||||||||||||
|
|
|
|
|
|
|
|
|
|
|
|
|
Fast-forwards/reverses tracks if pressed and held. |
|
|
|
|
|
|
|
|
|
|
|
|
|
|
|
|
|
|
|
|
|
|
|
|
|
|
|
|
|
|
|
|
|
|
|
|
|
|
|
|
|
|
|
|
|
|
|
|
|
|
|
|
|
|
|
Changes the display information. |
|
|
|
|
|
|
|
|
|
|
|
|
|
|
|
|
|
|
|
|
|
|
|
|
|
|
|
|
SCRL DISP |
— |
|
Scrolls the display information if pressed and held. |
||||||||||
|
|||||||||||||
|
|||||||||||||
|
Enters clock adjustment mode directly (page 6) if pressed and |
||||||||||||
|
|
|
|
|
|
|
|
|
|
|
|
|
|
|
|
|
|
|
|
|
|
|
|
|
|
|
|
|
|
|
|
|
|
|
|
|
|
|
|
|
held while in clock display screen. |
|
|
|
|
|
|
|
|
|
|
|
|
|
|
|
|
|
|
|
|
|
— |
|
Selects “HD RADIO” source. |
||||
|
|
|
|
|
|
|
|
||||||
|
|
|
|
|
|
|
|
||||||
|
|
|
|
|
|
|
|
Enters HD Radio tagging mode if pressed and held. (page 8) |
|||||
|
|
|
|
|
|
|
|
|
|
|
|
|
|
|
|
|
|
|
|
|
|
|
|
|
|
|
|
—AUD Enters [AUDIO CTRL] settings directly.
— |
ATT |
Attenuates the sound. |
|
• To return to the previous level, press the button again. |
|||
|
|
||
|
|
|
|
|
|
Returns to the previous item. |
|
|
|
|
|
|
|
Exit from setting mode. |
|
|
EXIT |
• Press and hold on the main unit will also exit from the setting |
|
|
|
mode. |
ENGLISH
5

Getting started
Canceling the display |
Adjusting the clock |
|||
demonstration |
1 |
Press the volume knob to enter |
||
The display demonstration is always turned |
|
[FUNCTION] mode. |
||
on unless you cancel it. |
2 |
Turn the volume knob to select |
||
When you turn on the power (or after you |
|
[SETTINGS], then press to enter. |
||
3 |
Turn the volume knob to select [CLOCK], |
|||
reset the unit), the display shows: |
||||
|
then press to enter. |
|||
|
[CANCEL DEMO] \ [PRESS] \ |
|
||
|
4 |
Turn the volume knob to select |
||
|
[VOLUME KNOB] |
|||
|
|
[CLOCK ADJUST], then press to enter. |
||
1 Press the volume knob. |
|
|||
|
Clock hour flashes on the display. |
|||
|
[YES] is selected as the initial setup. |
5 |
Turn the volume knob to adjust the |
|
2 Press the volume knob again to confirm. |
|
hour, then press to enter minute |
||
|
[DEMO OFF] appears. |
|
adjustment. |
|
|
If no operation is done for about |
|
Clock minutes flashes on the display. |
|
|
|
|||
|
|
|||
|
15 seconds or if you turn the volume knob |
6 |
Turn the volume knob to adjust the |
|
|
to select [NO] in step 2, [DEMO MODE] |
|
minute, then press to confirm. |
|
|
appears and the display demonstration |
|
Press 4 / ¢ to move between the |
|
|
starts. |
|
hour and minute adjustment. |
|
|
|
7 |
Hold to finish the procedure. |
|
Setting the demonstration mode
1Press the volume knob to enter
[FUNCTION].
2 Turn the volume knob to select [DEMO MODE], then press to enter.
3Turn the volume knob to select [ON] or
[OFF].
If [ON] is selected, display demonstration starts if no operation is done for about 20 seconds.
4 Hold |
to finish the procedure. |
Initial settings before operations
1 Press SRC to enter [STANDBY] mode.
2 Press the volume knob to enter
[FUNCTION] mode.
3Turn the volume knob to select [INITIAL SET], then press to enter.
4Turn the volume knob to make a selection, then press to confirm.
See table below for selection.
5 Hold |
to finish the procedure. |
Item |
Selectable setting (Preset: *) |
|
|
PRESET TYPE |
NORMAL*: Memorizes one station for each preset button in each band (FM1/ FM2/ FM3/ AM). ; |
|
MIX: Memorizes one station for each preset button regardless of the selected band (FM1/ FM2/ FM3/ AM). |
|
|
KEY BEEP |
ON*/ OFF: Activates/deactivates the keypress tone. |
|
|
BUILT-IN AUX |
ON1*: Outputs sound of the connected external component through the car speakers when “AUX” is selected |
|
as the source. ; ON2: Outputs sound from the connected external component when “AUX” is selected as the |
|
source. When you turn on the power, the sound attenuates (to prevent noise when no external component is |
|
connected). Turn the volume knob clockwise to return to the previous volume level. ; OFF: Disables “AUX” in |
|
source selection. |
|
|
6
Item |
Selectable setting (Preset: *) |
CD READ |
1*: Automatically distinguishes between audio file disc and music CD. ; 2: Forces to play as a music CD. No |
|
sound can be heard if an audio file disc is played. |
|
|
SP SELECT |
OFF*/ 5/4/ 6 × 9/6/ OEM: Selects the speaker size for optimum performance. |
F/W UP xx.xx YES: Starts upgrading the firmware. ; NO*: Cancels (upgrading is not activated). For details on how to update the firmware, see: www.kenwood.com/cs/ce/
ENGLISH
Listening to HD Radio™ Broadcasts
Hold for about 2 seconds to memorize the current station.
 Press briefly to recall memorized station or channel.
1 Press  SRC to select “HD RADIO.”
Press  to select “HD RADIO” source directly.
2 Press BAND repeatedly to select a band (FM1/ FM2/ FM3/ AM).
3Press 4 / ¢ to search for a station or channel.
“LINKING” appears while linking to a multicast channel.
Direct Access Tuning using the remote controller (RC-405)
1 Press DIRECT to enter Direct Access Tuning Mode.
“– – – –” appears.
2 Press DIRECT repeatedly to select the tuning item.
Tuning item: Frequency “– – – –”, Channel “HD –”, or Cancelling Direct Access Tuning
3Press the number buttons to enter the frequency or channel.
You can enter the FM band frequency in steps of a minimum of 0.1 MHz.
4 Press 4 / ¢ to tune in to the entered frequency or channel.
Using the remote controller (RC-405)
FM+ / AM– |
: Selects band. |
4 / ¢ (+) : Selects station. |
|
1 – 6 |
: Selects preset station. |
Continued...
7
 Loading...