Kenwood KDC-BT955HD, KDC-X997, KDC-655U, KDC-X697, KMR-555U Manual
...
KDC-X997/KDC-BT955HD/KDC-X897/KDC-BT855U/KDC-X697/KDC-655U/KMR-555U |
1. Before use |
1-1. Safety precaution |
|
|
|
|
|
1-1. Safety precaution
# WARNING
To prevent injuries or a fire, take the following precautions:
Stop the car before operating the unit.
To prevent a short circuit, never put or leave any metallic objects (such as coins or metal tools) inside the unit.
! CAUTION
Adjust the volume so that you can hear the sound outside the car. Driving with the volume too high may cause an accident.
Wipe off the dirt on the panel with a dry silicon or soft cloth.
Failure to observe this precaution may result in damage to the monitor or unit. If you experience problems during installation, consult your Kenwood dealer.
KDC-X997/KDC-BT955HD/KDC-X897/KDC-BT855U/KDC-X697/KDC-655U/KMR-555U |
1. Before use |
1-2. Important information |
|
|
|
|
|
1-2. Important information
Before using the this unit for the first time
KDC-X997, KDC-BT955HD, KDC-X897, KDC-BT855U, KDC-X697, and KDC-655U are factory-set to operate in the Demonstration mode initially.
When using this unit for the first time, cancel the Demonstration mode. Refer to <Cancel the Demonstration mode>.
Cleaning the connector
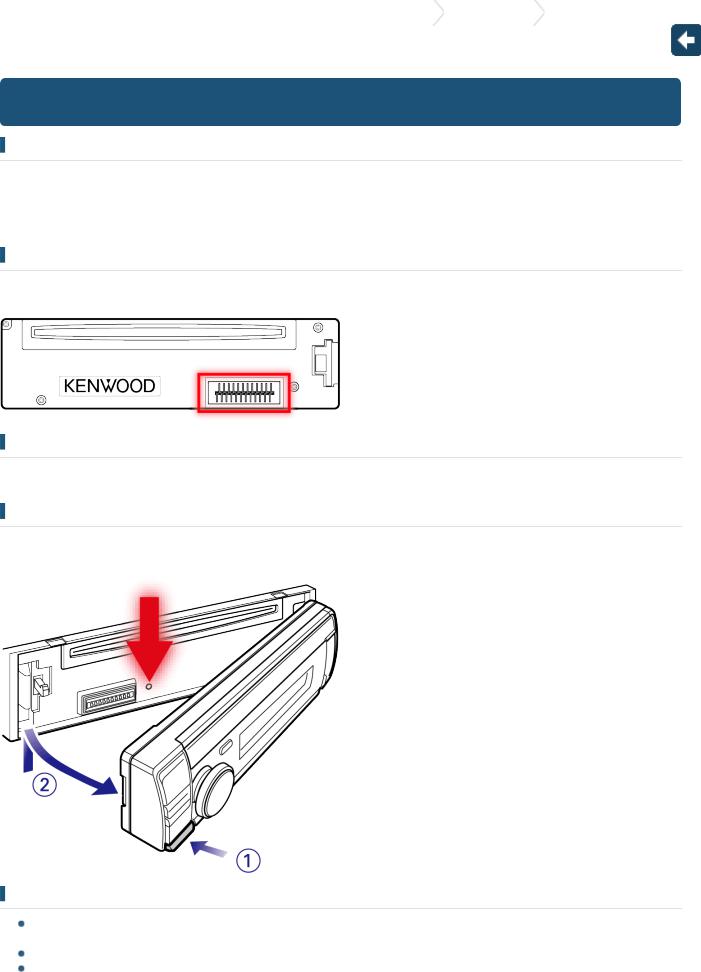
The unit may not function properly if the connectors between the unit and faceplate are dirty. Detach the faceplate and clean the connector with a cotton swab gently, being careful not to damage the connector.
Condensation
When the car is air-conditioned, moisture may collect on the laser lens. This may cause disc read errors. In this case, remove the disc and wait for the moisture to evaporate.
How to reset your unit
If the unit fails to operate properly, press the Reset button. The unit returns to the factory settings when the Reset button is pressed.
Notes
When you purchase optional accessories, check with your Kenwood dealer to make sure that they can work with your model and in your area.
Characters that conform to ISO 8859-1 can be displayed.
The illustrations of the display and panel appearing in this manual are examples used to explain more clearly how the controls are used. Therefore, what appears on the display in the illustrations may differ from what appears on the display on the actual equipment, and some of the images on the display may be inapplicable.

About the remote controls of KMR-555U
A maximum of 3 remote controls (KCA-RC107MR or KCA-RC55MR; optional accessory) can be used with the KMR-555U. For details on how to use the remote control, refer to the operation manual attached to it.
When using the remote control with this unit, you should register the remote control ID. For details, refer to <20-1. Registering a remote control ID>.
KDC-X997/KDC-BT955HD/KDC-X897/KDC-BT855U/KDC-X697/KDC-655U/KMR-555U |
1. Before use |
1-3. Regulatory Compliance |
|
|
|
1-3. Regulatory Compliance
#CAUTION
Use of controls or adjustments or performance of procedures other than those specified herein may result in hazardous radiation exposure.
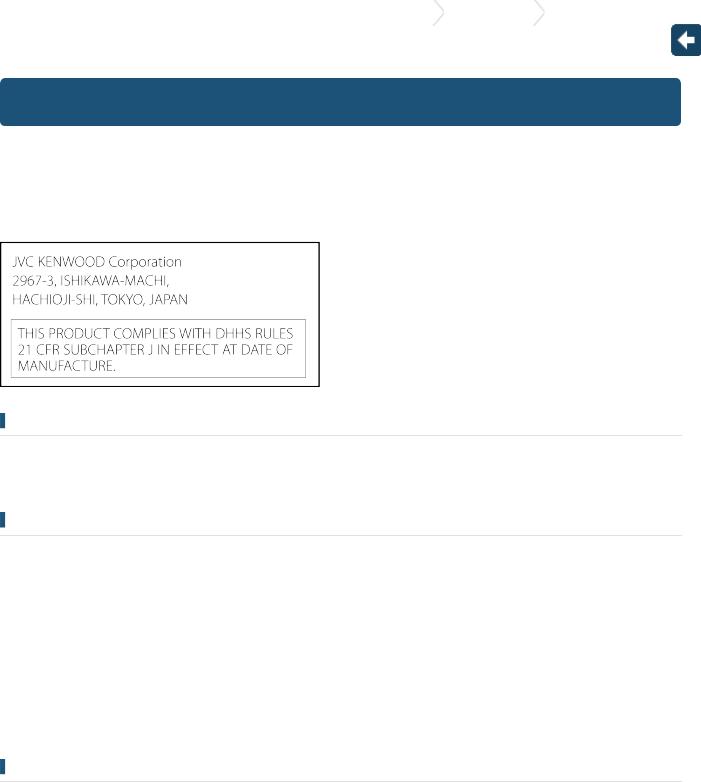
In compliance with Federal Regulations, following are reproductions of labels on, or inside the product relating to laser product safety.
Location : Top plate
FCC WARNING
This equipment may generate or use radio frequency energy. Changes or modifications to this equipment may cause harmful interference unless the modifications are expressly approved in the instruction manual. The user could lose the authority to operate this equipment if an unauthorized change or modification is made.
FCC NOTE
This equipment has been tested and found to comply with the limits for a Class B digital device, pursuant to Part 15 of the FCC Rules. These limits are designed to provide reasonable protection against harmful interference in a residential installation. This equipment may cause harmful interference to radio communications, if it is not installed and used in accordance with the instructions. However, there is no guarantee that interference will not occur in a particular installation. If this equipment does cause harmful interference to radio or television reception, which can be determined by turning the equipment off and on, the user is encouraged to try to correct the interference by one or more of the following measures:
Reorient or relocate the receiving antenna.
Increase the separation between the equipment and receiver.
Connect the equipment into an outlet on a circuit different from that to which the receiver is connected.
Consult the dealer or an experienced radio/TV technician for help.
IC (Industry Canada) Notice
Operation is subject to the following two conditions:
(1)This device may not cause interference, and
(2)this device must accept any interference, including interference that may cause undesired operation of the device.
The term "IC: " before the certification/ registration number only signifies that the Industry Canada technical specification were met.
#CAUTION
This equipment complies with FCC/IC radiation exposure limits set forth for an uncontrolled environment and meets the FCC radio frequency (RF) Exposure Guidelines in Supplement C to OET65 and RSS-102 of the IC radio frequency (RF) Exposure rules. This equipment has very low levels of RF energy that it deemed to comply without maximum permissive exposure evaluation (MPE). But it is desirable that it should be installed and operated keeping the radiator at least 20cm or more away from person's body (excluding extremities: hands, wrists, feet and ankles).

Under Industry Canada regulations, this radio transmitter may only operate using an antenna of a type and maximum (or lesser) gain approved for the transmitter by Industry Canada. To reduce potential radio interference to other users, the antenna type and its gain should be so chosen that the equivalent isotropically radiated power (e.i.r.p.) is not more than that necessary for successful communication.
-------------------------------------------------------
Contains Transmitter Module FCC ID : XQN-BTR60X
Contains Transmitter Module IC: 9688A-BTR601
-------------------------------------------------------
CALIFORNIA, USA
This product contains a CR Coin Cell Lithium Battery which contains
Perchlorate Material – special handling may apply.
See www.dtsc.ca.gov/hazardouswaste/perchlorate
Información acerca de la eliminación de equipos eléctricos y electrónicos al final de la vida útil (aplicable a los países que hayan adoptado sistemas independientes de recogida de residuos)
Los productos con el símbolo de un contenedor con ruedas tachado no podrán ser desechados como residuos domésticos.
Los equipos eléctricos y electrónicos al final de la vida útil, deberán ser reciclados en instalaciones que puedan dar el tratamiento adecuado a estos productos y a sus subproductos residuales correspondientes. Póngase en contacto con su administración local para obtener información sobre el punto de recogida más cercano. Un tratamiento correcto del reciclaje y la eliminación de residuos ayuda a conservar los recursos y evita al mismo tiempo efectos perjudiciales en la salud y el medio ambiente.
Para cumplimiento de la COFETEL:
"La operacion de este equipo esta sujeta a las siguientes dos condiciones:
(1)es posible que este equipo o dispositivo no cause interferencia perjudicial y
(2)este equipo o dispositivo debe aceptar cualquier interferencia,
incluyendo la que pueda causar su operacion no deseada."
KDC-X997/KDC-BT955HD/KDC-X897/KDC-BT855U/KDC-X697/KDC-655U/KMR-555U |
2. Appendix |
2-1. Specifications |
|
|
|
|
|
2-1. Specifications
FM tuner section
Frequency range (200 kHz step)
:87.9 MHz – 107.9 MHz Usable sensitivity (S/N = 30dB)
:9.3dBf (0.8 μV/75 Ω) Quieting Sensitivity (S/N = 46dB)
:10.2 dBf (1.13 μV/75 Ω) Frequency response (±3 dB)
:30 Hz – 15 kHz
Signal to Noise ratio
:75 dB (MONO) Stereo separation
:45 dB (1 kHz)
Digital FM tuner section (KDC-X997/ KDC-BT955HD)
Frequency range (200 kHz step)
:87.9 MHz – 107.9 MHz Frequency response (±3 dB)
:20 Hz – 20 kHz
Signal to Noise ratio (STEREO) : 75 dB
AM tuner section
Frequency range (10 kHz step)
:530 kHz – 1700 kHz Usable sensitivity (S/N = 20dB)
:28 dBµ (25 µV)
Digital AM tuner section (KDC-X997/ KDC-BT955HD)
Frequency range (10 kHz step)
:530 kHz – 1700 kHz Frequency response (±3 dB)
:40 Hz – 15 kHz
Signal to Noise ratio (STEREO) : 70 dB
CD player section
Laser diode
:GaAlAs Digital filter (D/A)
:8 Times Over Sampling D/A Converter
:24 Bit
Spindle speed (Audio files)
:500 – 200 rpm (CLV) Wow & Flutter
:Below Measurable Limit Frequency response (±1 dB)
:10 Hz – 20 kHz
Total harmonic distortion (1 kHz)
KDC-X997 KDC-X897 KDC-X697
: 0.008 %
KDC-BT955HD KDC-BT855U KDC-655U KMR-555U
: 0.010 %
Signal to Noise ratio (1 kHz)
KDC-X997 KDC-X897 KDC-X697
: 110 dB
KDC-BT955HD KDC-BT855U KDC-655U KMR-555U
:105 dB Dynamic range
:93 dB
MP3 decode
: Compliant with MPEG-1/2 Audio Layer-3 WMA decode
:Compliant with Windows Media Audio AAC decode
:AAC-LC ".m4a" files
USB interface
USB Standard
:USB1.1/ 2.0 (Full speed) File System
:FAT12/16/ 32 Maximum Supply current
:DC 5 V = 1 A
Decode
: MP3, WMA, AAC, WAV
Audio section
Maximum output power : 50 W x 4
Full Bandwidth Power (at less than 1% THD) : 22 W x 4
Preout level/ Load (CD)
KDC-X997 KDC-BT955HD KDC-X897 KDC-BT855U
KDC-X697
: 4000 mV/10 kΩ
KDC-655U KMR-555U
:2500 mV/10 kΩ Preout impedance
:≤ 600 Ω Speaker Impedance
:4 – 8 Ω
Tone
KDC-X997
Band1 : 62.5 Hz ±9 dB
Band2 : 100 Hz ±9 dB
Band3 : 160 Hz ±9 dB
Band4 : 250 Hz ±9 dB
Band5 : 400 Hz ±9 dB
Band6 : 630 Hz ±9 dB
Band7 : 1 kHz ±9 dB
Band8 : 1.6 kHz ±9 dB
Band9 : 2.5 kHz ±9 dB
Band10 : 4 kHz ±9 dB
Band11 : 6.3 kHz ±9 dB
Band12 : 10 kHz ±9 dB
Band13 : 16 kHz ±9 dB
KDC-BT955HD
Band1 : 62.5 Hz ±9 dB
Band2 : 160 Hz ±9 dB
Band3 : 400 Hz ±9 dB
Band4 : 1 kHz ±9 dB
Band5 : 2.5 kHz ±9 dB
Band6 : 6.3 kHz ±9 dB
Band7 : 16 kHz ±9 dB
KDC-X897 KDC-BT855U KDC-X697 KDC-655U
KMR-555U
Bass : 100 Hz ±8 dB
Middle : 1 kHz ±8 dB Treble : 12.5 kHz ±8 dB
Bluetooth section (KDC-X997/ KDC-BT955HD/ KDC-X897/ KDC-BT855U)
Version
:Bluetooth Ver. 2.1+EDR Certified Frequency range
:2.402 – 2.480 GHz
Output Power
:+4dBm (MAX), 0dBm (AVE) Power Class 2 Maximum Communication range
:Line of sight approx.10m (32.8 ft) Profiles
:HFP (Hands Free Profile)
:SPP (Serial Port Profile)
:PBAP (Phonebook Access Profile)
:OPP (Object Push Profile)

:A2DP (Advanced Audio Distribution Profile)
:AVRCP (Audio/Video Remote Control Profile)
Auxiliary input
Frequency response (±3 dB)
:20 Hz – 20 kHz Input Maximum Voltage
:1200 mV
Input Impedance
: 10 kΩ
General
Operating voltage
KDC-X997 KDC-BT955HD KDC-X897 KDC-BT855U
: 14.4 V (10.5 – 16V allowable)
KDC-X697 KDC-655U KMR-555U
:14.4 V (11 – 16V allowable) Maximum Current consumption
:10 A
Installation Size (W x H x D)
: 182 x 53 x 159 mm
7-3/16 x 2-1/16 x 6-1/4 inch
Weight
KDC-X997 KDC-BT955HD KDC-X897 KDC-BT855U
: 2.9 lbs (1.3 kg)
KDC-X697 KDC-655U KMR-555U
: 2.7 lbs (1.2 kg)
Specifications subject to change without notice.
KDC-X997/KDC-BT955HD/KDC-X897/KDC-BT855U/KDC-X697/KDC-655U/KMR-555U |
2. Appendix |
2-2. Trademarks |
|
|
|
|
|
2-2. Trademarks
 The Bluetooth word mark and logos are owned by the Bluetooth SIG, Inc. and any use of such marks by JVC KENWOOD Corporation is under license. Other trademarks and trade names are those of their respective owners.
 "Made for iPod" and "Made for iPhone" mean that an electronic accessory has been designed to connect specifically to iPod or iPhone, respectively, and has been certified by the developer to meet Apple performance standards. Apple is not responsible for the operation of this device or its compliance with safety and regulatory standards. Please note that the use of this accessory with iPod or iPhone may affect wireless performance.
 iPhone, iPod, iPod classic, iPod nano, and iPod touch are trademarks of Apple Inc., registered in the U.S. and other countries.
 iTunes and Safari are trademark of Apple Inc.
 Sirius, XM and all related marks and logos are trademarks of Sirius XM Radio Inc. All rights reserved.
 HD Radio Technology manufactured under license from iBiquity Digital Corporation. U.S. and Foreign Patents. HD Radio™ and the HD, HD Radio, and "Arc" logos are proprietary trademarks of
iBiquity Digital Corp.
 PANDORA, the PANDORA logo, and the Pandora trade dress are trademarks or registered trademarks of Pandora Media, Inc., used with permission.
 aha, the Aha logo, and the Aha trade dress are trademarks or registered trademarks of HARMAN International Industries, used with permission.
 Android and Chrome are trademark of Google Inc.
 BlackBerry®, RIM®, Research In Motion® and related trademarks, names and logos are the property of Research In Motion Limited and are registered and/or used in the U.S. and countries around the world. Used under license from Research In Motion Limited.

 Internet Explorer and Windows Media are registered trademark of Microsoft Corporation in the United States and other countries.
 The "AAC" logo is a trademark of Dolby Laboratories.
KDC-X997/KDC-BT955HD/KDC-X897/KDC-BT855U/KDC-X697/KDC-655U/KMR-555U |
3. Basic operations |
3-1. Component names
3-1. Component names
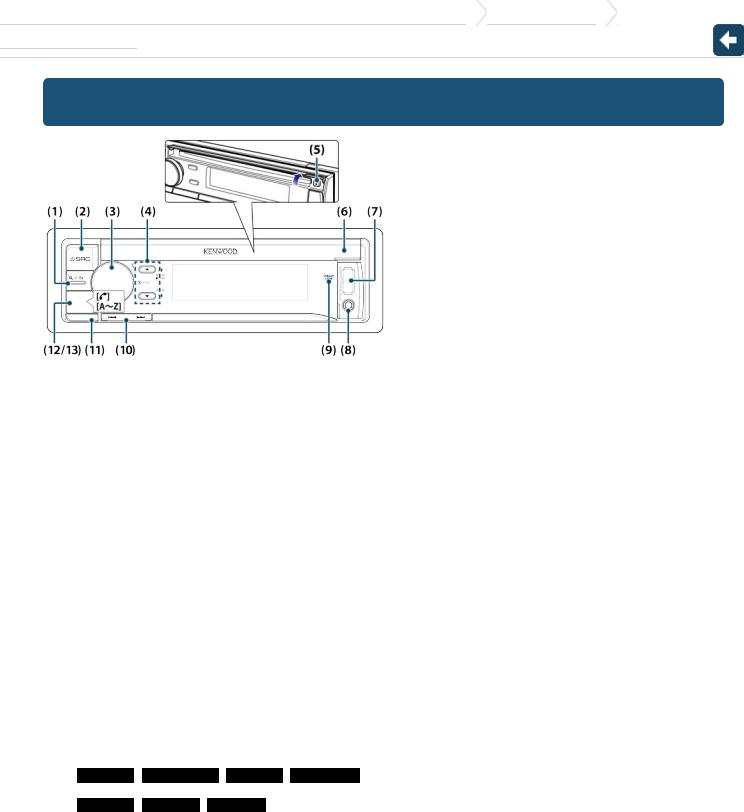
1.[1/6] button
When listening to the iPod, audio file, CD, or radio, press this button to enter the search mode. In each of the selected modes, press the button to return to the previous item.
2.[SRC] button
Press this button to enter source select mode. Refer to <Source selection>.
3.[Control] knob (Volume knob)
In the normal mode, turn the knob to adjust the volume or press the knob to enter the Function setting mode.
In the Function mode, turn the knob to select an item or press the knob to determine the selection.
4.[R]/ [S] button
Press the button to select an audio file folder or use it as a Likes/ Dislikes button on Aha etc. The [R] button can be used to select broadcast band as well.
5.[G] button
Press the button to eject the disc.
6.Disc slot cover
When this cover opens upward, the disc insertion slot appears.
7.USB terminal (inside of the cover) Connect an iPod or USB device.
8.Auxiliary input (inside of the cover)
Connect the output of an external device using a stereo mini-jack.
9.REAR USB indicator
When a USB device or iPod is connected to the USB terminal of the rear, this indicator stays lit. During playback of the connected device, this indicator blinks.
10.[E]/ [F] button
Press the button to select a song or station.
11.Release button
Press the button to detach the faceplate.
12. KDC-X997 KDC-BT955HD KDC-X897 KDC-BT855U [Ú] button
Press the button to make, answer, or disconnect a hands-free call.
13.KDC-X697 KDC-655U KMR-555U [A~Z] button
Press any of (A to Z) button during the Music search mode to enter the alphabet search mode.
KDC-X997/KDC-BT955HD/KDC-X897/KDC-BT855U/KDC-X697/KDC-655U/KMR-555U |
3. Basic operations |
3-2. Preparations |
|
|
|
|
|
3-2. Preparations
Cancel the Demonstration mode
KDC-X997 KDC-BT955HD KDC-X897 KDC-BT855U KDC-X697
KDC-655U
Cancel the Demonstration mode when you use the unit for the first time after installation.
1.Press [Control] knob to cancel the Demonstration mode when the message "To cancel DEMO Press the volume knob" appears (approx. 15 seconds).
2.Turn [Control] knob to select the "YES", and then press [Control] knob.
The Demonstration mode can also be canceled in the Function Setting mode. Refer to <14-5. Demonstr ation mode setting>.
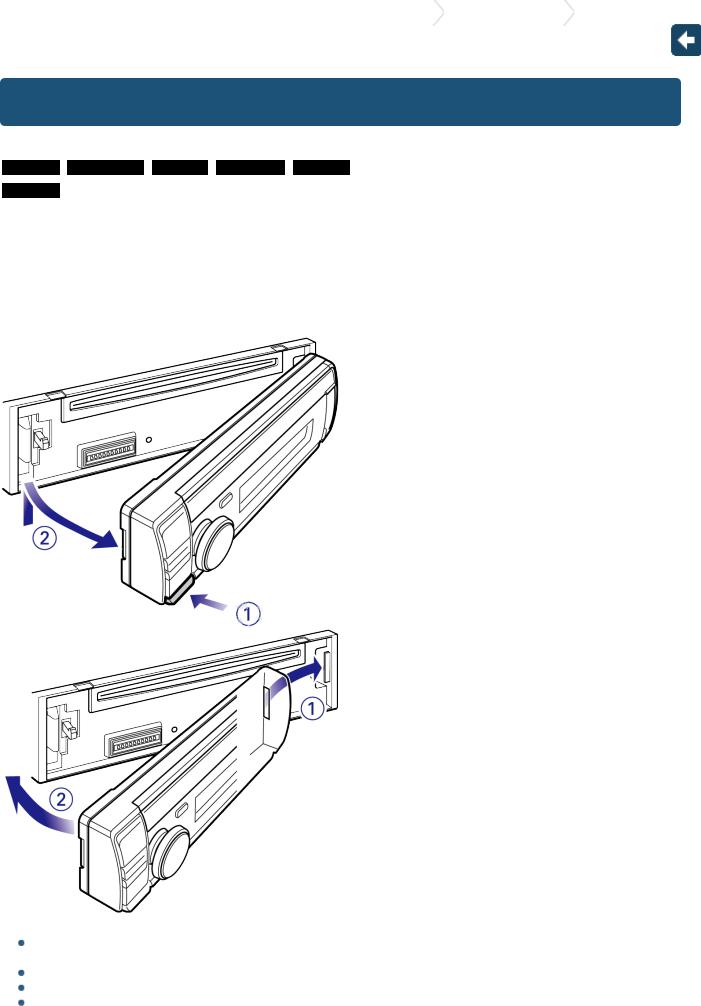
Detaching/ Attaching the faceplate
!
Remove the faceplate at once after pressing the Release button; otherwise it can fall down due to vibration.
The faceplate is a precision component of the unit and can be damaged by shocks or jolts.
Keep the faceplate in its case while detached.
Do not place the faceplate (and case) in areas exposed to direct sunlight, excessive heat or humidity. Also avoid places with too much dust or the possibility of water splashing.
KDC-X997/KDC-BT955HD/KDC-X897/KDC-BT855U/KDC-X697/KDC-655U/KMR-555U |
3. Basic operations |
3-3. How to select the item
3-3. How to select the item
For how to select setting items such as a function setting item, see the following example:
Example: Setting the Date format of the display
1.Press [Control] knob.
"Function" appears and enters the Function setting mode.
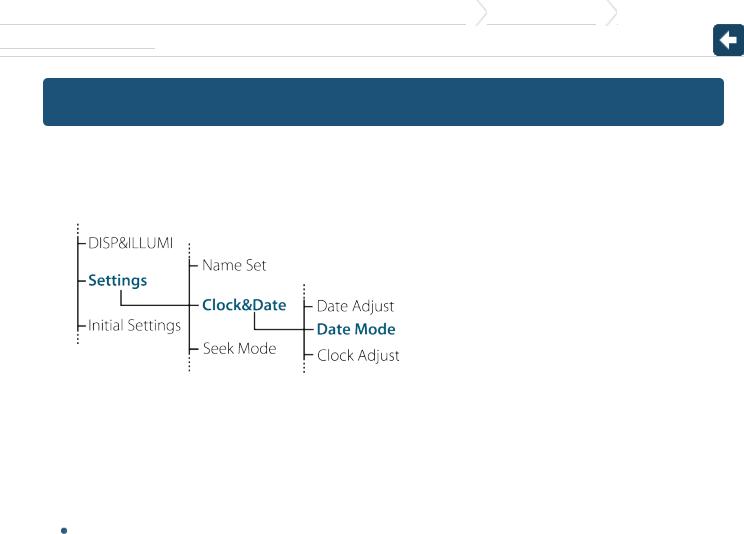
2.Select the Date Mode function item
Turn [Control] knob to select "Settings", and then press [Control] knob.
Next, turn [Control] knob to select "Clock&Date", and then press [Control] knob. Finally, turn [Control] knob to select "Date Mode", and then press [Control] knob.
To cancel and return to the previous item, press [1/6].
3.Turn [Control] knob to select a format (7 types), and then press [Control] knob.
Returns to the previous item.
4.Press and hold [1/6].
Exits the Function setting mode.
 About the description in this manual
In this manual, operations performed in steps 2 and 3 are described as follows:
2.Select "Settings" > "Clock&Date" > "Date Mode" using [Control] knob.
3.Select a format (7 types) using [Control] knob.

KDC-X997/KDC-BT955HD/KDC-X897/KDC-BT855U/KDC-X697/KDC-655U/KMR-555U |
3. Basic operations |
3-4. Adjusting the clock
3-4. Adjusting the clock
1.Press [Control] knob.
Enters the Function setting mode.
2.Select "Settings" > "Clock&Date" > "Clock Adjust" using [Control] knob.
For how to use [Control] knob, refer to <3-3. How to select the item>.
3.Set the hour using [Control] knob.
4.Set the minute using [Control] knob.
Exiting from the Function setting mode
Press and hold [1/6].

KDC-X997/KDC-BT955HD/KDC-X897/KDC-BT855U/KDC-X697/KDC-655U/KMR-555U |
3. Basic operations |
3-5. General operations
3-5. General operations
Power
Press [SRC] to turn the power ON.
Press and hold [SRC] to turn the power OFF.
Source selection
1.Press [SRC].
The currently selected source is displayed and enters the Source selection mode.
2.Select a source using [Control] knob.
Source |
Display |
Standby |
"STANDBY" |
SiriusXM (optional accessory)[1] |
"SiriusXM" |
HD Radio[2] |
"HD RADIO" |
Tuner[4] |
"TUNER" |
USB device connected to front USB terminal |
"USB(FRONT)" |
USB device connected to rear USB terminal |
"USB(REAR)" |
iPod connected to front USB terminal[1] |
"iPod(FRONT)" |
iPod connected to rear USB terminal[1] |
"iPod(REAR)" |
Pandora® of iPod connected to front USB terminal[1] |
"Pandora(FRONT)" |
Pandora® of iPod connected to rear USB terminal[1] |
"Pandora(REAR)" |
Pandora® of device connected via Bluetooth[1][3] |
"Pandora" |
iHeartRADIO of iPod connected to front USB terminal [1] |
"iHeartRADIO (FRONT)" |
iHeartRADIO of iPod connected to rear USB terminal [1] |
"iHeartRADIO (REAR)" |
iHeartRADIO of device connected via Bluetooth[1][3] |
"iHeartRADIO" |
aha™ of iPod connected to front USB terminal[1][3] |
"aha(FRONT)" |
aha™ of iPod connected to rear USB terminal[1][3] |
"aha(REAR)" |
aha™ of device connected via Bluetooth[1][3] |
"aha" |
Bluetooth audio[3] |
"BT AUDIO" |
CD[1] |
"CD" |
Auxiliary Input |
"AUX" |
[1]This source can be selected only when it can be played.
[2]Function of KDC-X997/ KDC-BT955HD.
[3]Function of KDC-X997/ KDC-BT955HD/ KDC-X897/ KDC-BT855U.
[4]Function of KDC-X897/ KDC-BT855U/ KDC-X697/ KDC-655U/ KMR-555U.
 Setting the source switching
Source switching can be set so that pressing [SRC] switches among sources. For more details, refer to <14-6. Initial settings>.
Source switching can be set so that "Pandora", "iHeartRADIO", "aha", and "AUX" sources can not be selected when not in use. For more details, refer to <14-6. Initial settings>.
Volume
Turn [Control] knob.
USB terminal
A USB device or iPod can be connected.
The CA-U1EX (Max. 500mA) or KCA-iP102 (optional accessories) is recommended to connect a USB device or iPod.
Auxiliary input
A portable audio device can be connected with a stereo mini-plug (3.5 mm ø).

KDC-X997/KDC-BT955HD/KDC-X897/KDC-BT855U/KDC-X697/KDC-655U/KMR-555U
4. Audio adjustments (KDC-X897, KDC-BT855U, KDC-X697, KDC-655U, KMR-555U) |
4-1. Audio control |
|
|
|
|
4-1. Audio control
You can adjust the audio control items.
1.Press [SRC] and select a source other than Standby ("STANDBY") using [Control] knob.
Refer to <Source selection>.
2.Press [Control] knob.
Enters the Function setting mode.
3.Select "Audio Control" using [Control] knob.
For how to use [Control] knob, refer to <3-3. How to select the item>.
4.Select a audio control item using [Control] knob.
Display |
Audio control item |
Range |
|||
"SubWoofer Level" |
Subwoofer level |
–15 — +15 (dB) |
|||
"Bass Level" |
Bass level |
–8 — +8 (dB) |
|||
"Middle Level" |
Middle level |
–8 — +8 (dB) |
|||
"Treble Level" |
Treble level |
–8 — +8 (dB) |
|||
"Equalizer PRO"[1] |
|
|
|||
|
"Bass Adjust" |
|
|
||
|
|
"Bass Center FRQ" |
Bass Center Frequency |
60/ 80/ 100/ 200 (Hz) |
|
|
|
"Bass Level" |
Bass level |
–8 — +8 (dB) |
|
|
|
"Bass Q Factor" |
Bass Q Factor |
1.00/ 1.25/ 1.50/ 2.00 |
|
|
|
"Bass EXT" |
Bass Extend |
OFF/ ON |
|
|
"Middle Adjust" |
|
|
||
|
|
"Middle Center FRQ" |
Middle Center |
0.5/ 1.0/ 1.5/ 2.5 (kHz) |
|
|
|
Frequency |
|||
|
|
|
|
||
|
|
"Middle Level" |
Middle level |
–8 — +8 (dB) |
|
|
|
"Middle Q Factor" |
Middle Q Factor |
0.75/ 1.00/ 1.25 |
|
|
"Treble Adjust" |
|
|
||
|
|
"Treble Center FRQ" |
Treble Center Frequency |
10.0/ 12.5/ 15.0/ 17.5 kHz |
|
|
|
"Treble Level" |
Treble level |
–8 — +8 (dB) |
|
"Preset Equalizer" |
Preset Equalizer curve |
"Rock"/ "Pops"/ "Easy"/ "Top40"/ "Jazz"/ "Powerful"/ "Natural"/ |
|||
"User"[3] |
|||||
|
|
|
|
||
"Bass Boost" |
Bass Boost |
"OFF"/ "Level1"/ "Level2"/ "Level3" |
|||
"Loudness" |
Loudness |
"OFF"/ "Level1"/ "Level2" |
|||
"Balance" |
Balance |
Left 15 — Right 15 |
|||
"Fader" |
Fader |
Rear 15 — Front 15 |
|||
"SubWoofer" |
Subwoofer output |
ON/ OFF |
|||
"Detailed Settings" |
|
|
|||
|
|
"HPF" |
High Pass Filter |
Through/ 100/ 120/ 150 (Hz) |
|
|
|
"LPF SubWoofer" |
Low Pass Filter |
85/ 120/ 160/ Through (Hz) |
|
|
|
"SubWoofer |
Subwoofer Phase |
Reverse (180°)/ |
|
|
|
Phase"[4] |
Normal (0°) |
||
|
|
|
|||
|
|
"Supreme"[5] |
Supreme setting |
OFF/ ON |
|
|
|
"Audio Preset" |
Audio Preset memory[2] |
Recall/ Memory |
|
|
|
"Volume Offset" |
Volume offset |
–8 — ±0 (dB) |
|
|
|
(AUX: -8 — +8) |
|||
|
|
|
|
||
[1]Function of KDC-X897/ KDC-X697.
[2]Refer to <4-2. Audio preset>, <4-3. Audio preset recall>.
[3]"User": The customized Bass, Middle, and Treble settings are effective.
[4]Displayed only when "LPF SubWoofer" is set to "85"/ "120"/ "160".
[5]Audio file source only
5.Select a value using [Control] knob.

Exiting from the Function setting mode
Press and hold [1/6].
 Adjusting Bass, Middle, and Treble levels
You can set Bass, Middle, and Treble levels for each source.
KDC-X997/KDC-BT955HD/KDC-X897/KDC-BT855U/KDC-X697/KDC-655U/KMR-555U
4. Audio adjustments (KDC-X897, KDC-BT855U, KDC-X697, KDC-655U, KMR-555U) |
4-2. Audio preset |
|
|
|
|
4-2. Audio preset
You can register the values set the Audio control items.
1.Set the audio control items
Refer to <4-1. Audio control>.
2.Select "Audio Control" > "Detailed Settings" > "Audio Preset" > "Memory" using [Control] knob.
For how to use [Control] knob, refer to <3-3. How to select the item>.
3.Select "YES" using [Control] knob.
"Memory Completed" appears.
Exiting from the Function setting mode
Press and hold [1/6].
 Number of Audio preset memories that can be stored
Register a pair of Audio preset memories. You cannot register them by source.
 When reset
When you press the Reset button, audio control values of all sources will be set to the values registered here.
 Audio control items that can be registered
The following Audio control items can be registered.
"Bass Center FRQ"*, "Bass Level", "Bass Q Factor"*, "Bass EXT"*, "Middle Center FRQ"*, "Middle Level", "Middle Q Factor"*, "Treble Center FRQ"*, "Treble Level", "SubWoofer Level", "HPF", "LPF SubWoofer", "SubWoofer Phase"
*KDC-X897, KDC-X697 only

KDC-X997/KDC-BT955HD/KDC-X897/KDC-BT855U/KDC-X697/KDC-655U/KMR-555U
4. Audio adjustments (KDC-X897, KDC-BT855U, KDC-X697, KDC-655U, KMR-555U) |
4-3. Audio preset recall |
|
|
|
|
4-3. Audio preset recall
You can recall the Audio control items registered to the <4-2. Audio preset>.
1.Press [SRC] and select a recall source using [Control] knob.
Refer to <Source selection>.
2.Press [Control] knob.
Enters the Function setting mode.
3.Select "Audio Control" > "Detailed Settings" > "Audio Preset" > "Recall" using [Control] knob.
For how to use [Control] knob, refer to <3-3. How to select the item>.
4.Select "YES" using [Control] knob.
"Recall Completed" appears.
Exiting from the Function setting mode
Press and hold [1/6].

KDC-X997/KDC-BT955HD/KDC-X897/KDC-BT855U/KDC-X697/KDC-655U/KMR-555U |
5. DSP settings (KDC-X997, KDC-BT955HD) |
5-1. Audio control
5-1. Audio control
You can adjust the audio control items.
1.Press [SRC] and select a source other than Standby ("STANDBY") using [Control] knob.
Refer to <Source selection>.
2.Press [Control] knob.
Enters the Function setting mode.
3.Select "Audio Control" using [Control] knob.
For how to use [Control] knob, refer to <3-3. How to select the item>.
4.Select a audio control item using [Control] knob.
Display |
Overview |
|
"SubWoofer Level" |
You can set subwoofer level. |
|
"–15" — "0" — "+15" |
||
"Preset |
Select from among preset equalizer curves to set the sound quality. |
|
"User"[2]/ "Natural"/ "Rock"/ "Pops"/ "Easy"/ "Top 40"/ "Jazz"/ "Powerful"/ "iPod"(During iPod |
||
Equalizer"[1][5] |
source only) |
|
"Manual |
Set the equalizer curve manually. |
|
Equalizer""[1][5] |
Refer to <5-2. Manual equalizer control>. |
|
"Pro Setup" |
|
|
|
"DSP Set" |
Turn on/off the DSP function. |
|
"Bypass": Disables the DSP function. |
|
|
|
"Through": Enables the DSP function. |
|
"Car Type"[5] |
To get clear sound, set the sound environment according to the location and size of physically |
|
"Speaker |
installed speakers with reference to the followings: |
|
<5-3. Car type selection> |
|
|
Setting"[5] |
|
|
<5-4. Speaker setting> |
|
|
"X'Over"[5] |
<5-5. X'Over setting> |
|
|
<5-6. Listening position setting> |
|
"DTA Settings"[5] |
<5-7. Delay time control> |
|
|
<5-8. Channel level fine adjustments> |
"Sound Enhancements"[5]
|
|
"Supreme"[6] |
Turns ON/OFF the Supreme function. |
|
|
Can be set while Audio file source of USB/CD and iPod source. |
|
|
|
|
"ON"/ "OFF" |
|
|
"HIGHWAY- |
Compensates the low volume or bass sound being lost by road noises to make vocal sound clearer. |
|
|
SOUND" [3] |
"OFF"/ "Low"/ "Middle"/ "High" |
|
|
"Space |
Virtually enhances the sound space using the DSP. |
|
|
Enhancer"[3] |
|
|
|
"OFF"/ "Small"/ "Medium"/ "Large" |
|
|
|
[4] |
|
|
|
"Sound |
Virtually makes the sound more realistic using the DSP. |
|
|
Realizer"[4] |
"OFF"/ "Level1"/ "Level2"/ "Level3" |
|
|
"Sound |
Virtually raises the sound field using the DSP. |
|
|
Elevation"[4] |
"OFF"/ "Low"/ "Middle"/ "High" |
|
"Volume offset" |
Sets each source's volume as a difference from the basic volume. |
|
|
"–8" — "0" (AUX: "–8"— "+8") |
||
|
"SubWoofer |
Sets the Subwoofer Mute. |
|
|
Mute" |
"ON"/ "OFF" |
|
|
"Audio Preset" |
You can register the values set the Audio control items. |
|
|
Refer to <5-10. DSP preset>, <5-11. DSP preset recall>. |
||
|
|
|
|
"Bass Boost"[5] |
Sets the Bass Boost level in 3 steps. |
||
"OFF"/ "Level1"/ "Level2"/ "Level3" |
|||
"Loudness"[5] |
Makes the sounds at high and low frequencies louder. |
||
"OFF"/ "Low"/ "High" |
|||
"Balance" |
Adjusts left/right speaker balance. |
||
"Left15" — "0" — "Right15" |
|||
"Fader" |
Adjusts front/rear speaker balance. |
||
"Rear15" — "0" — "Front15" |
|||
(Colored text: Factory setting)

[1]You can select for each source.
[2]"User": The Equalizer curve set in the section <5-2. Manual equalizer control> is recalled.
[3]This function is not effective for the HD Radio source.
[4]Function of KDC-X997.
[5]Displayed only when "DSP Set" is set to "Through".
[6]Audio file source only
5.Select a value using [Control] knob.
Exiting from the Function setting mode
Press and hold [1/6].
 When you selected "iPod" for "Preset Equalizer"
When you selected "iPod" for "Preset Equalizer", next select an equalizer curve. Select a desired equalizer curve using [Control] knob from among 22 equalizer curves displayed after you selected "iPod".

KDC-X997/KDC-BT955HD/KDC-X897/KDC-BT855U/KDC-X697/KDC-655U/KMR-555U |
5. DSP settings (KDC-X997, KDC-BT955HD) |
5-2. Manual equalizer control
5-2. Manual equalizer control
You can adjust the equalizer curve manually.
1.Press [SRC] and select a source other than Standby ("STANDBY") using [Control] knob.
Refer to <Source selection>.
2.Press [Control] knob.
Enters the Function setting mode.
3.Select "Audio Control" > "Manual Equalizer" using [Control] knob.
For how to use [Control] knob, refer to <3-3. How to select the item>.
4.Select a equalizer control item using [Control] knob.
Display |
Description |
Range |
"Gain" |
Adjust the gain of each band. |
-9 – 0 – +9 dB |
"Q Factor"[1] |
Adjust Q of each band. |
1.35/ 1.50/ 2.00 |
"Bass EXT" |
– |
"OFF"/ "ON" |
(Colored text: Factory setting) [1] Function of KDC-X997.
When "Bass EXT" and "Q Factor" are selected, skip step 5.
5. Select a Band using [Control] knob.
KDC-X997
"BAND1"; 62.5 Hz, "BAND2"; 100 Hz, "BAND3"; 160 Hz, "BAND4"; 250 Hz, "BAND5"; 400 Hz, "BAND6"; 630 Hz, "BAND7"; 1 kHz, "BAND8"; 1.6 kHz, "BAND9"; 2.5 kHz, "BAND10"; 4 kHz, "BAND11"; 6.3 kHz, "BAND12"; 10 kHz, "BAND13"; 16 kHz
KDC-BT955HD
"BAND1"; 62.5 Hz, "BAND2"; 160 Hz, "BAND3"; 400 Hz, "BAND4"; 1 kHz, "BAND5"; 2.5 kHz, "BAND6"; 6.3 kHz, "BAND7"; 16 kHz
6. Select a value using [Control] knob.
Exiting from the Function setting mode
Press and hold [1/6].
 When the "Manual Equalizer" item is not displayed
This function is not available when "iPod" is selected for "Preset Equalizer".
KDC-X997/KDC-BT955HD/KDC-X897/KDC-BT855U/KDC-X697/KDC-655U/KMR-555U |
5. DSP settings (KDC-X997, KDC-BT955HD) |
5-3. Car type selection
5-3. Car type selection
You can compensate the delay of the sound arrival time by selecting your environment from the car types.
1.Press [SRC] and select a source other than Standby ("STANDBY") using [Control] knob.
Refer to <Source selection>.
2.Press [Control] knob.
Enters the Function setting mode.
3.Select "Audio Control" > "Pro Setup" > "Car Type" using [Control] knob.
For how to use [Control] knob, refer to <3-3. How to select the item>.
4.Select a car type using [Control] knob.
Display |
Car type |
"OFF" |
Not compensating. |
"Compact" |
Compact car |
"Full Size Car" |
Full size car |
"Wagon" |
Station wagon |
"Minivan" |
Minivan |
"SUV" |
Sport-utility vehicle |
"Minivan (Long)" |
Long Minivan |
Exiting from the Function setting mode
Press and hold [1/6].
 To set the delay time finely
You can compensate the distances in more details by using <5-7. Delay time control> function.

KDC-X997/KDC-BT955HD/KDC-X897/KDC-BT855U/KDC-X697/KDC-655U/KMR-555U |
5. DSP settings (KDC-X997, KDC-BT955HD) |
5-4. Speaker setting
5-4. Speaker setting
The speaker X'Over is automatically set when the position and size of each speaker are selected from the following items.
1.Press [SRC] and select a source other than Standby ("STANDBY") using [Control] knob.
Refer to <Source selection>.
2.Press [Control] knob.
Enters the Function setting mode.
3.Select "Audio Control" > "Pro Setup" > "Speaker Setting" using [Control] knob.
For how to use [Control] knob, refer to <3-3. How to select the item>.
4.Select a speaker type using [Control] knob.
Speaker |
Setting item |
Setting value |
||||
type |
||||||
|
|
|
|
|
||
|
Front speaker |
"Door", "On Dash", "Under Dash" |
||||
|
location |
|
|
|
|
|
|
|
Front speaker size |
||||
|
|
|
KDC-X997 |
1/2in", "4in", "4 3/4in", "5in", "6 1/2in", "6 3/4in", "7in", "4x6", "5x7", |
||
"Front" |
"SIZE" |
|
"O.E.M.", "3 |
|||
"6x8", "6x9", "7x10" |
||||||
|
|
|
KDC-BT955HD |
|
||
|
|
|
"Small", "Medium", "Large" |
|||
|
"TW" |
Tweeter size |
||||
|
"None", "Small", "Medium", "Large" |
|||||
|
Rear speaker |
"Door", "Rear Deck" |
||||
|
location |
("2nd Row", "3rd Row"[1]) |
||||
"Rear" |
|
Rear speaker size |
||||
|
|
KDC-X997 |
|
|||
|
"SIZE" |
|
"None", "O.E.M.", "3 1/2in", "4in", "4 3/4in", "5in", "6 1/2in", "6 3/4in", "7in", "4x6", |
|||
|
"5x7", "6x8", "6x9", "7x10" |
|||||
|
|
|
KDC-BT955HD |
"Medium", "Large" |
||
|
|
|
"None", "Small", |
|||
|
|
Speaker Size Subwoofer |
||||
"SubWoofer" |
"SIZE" |
|
KDC-X997 |
1/2inch", "8inch", "10inch", "12inch", "15inch Over" |
||
|
"None", "6 |
|||||
|
|
|
KDC-BT955HD |
"Large" |
||
|
|
|
"None", "Small", |
|||
(Colored text: Factory setting)
[1] Value set when "Minivan" or "Minivan (Long)" is selected as described in <5-3. Car type selection>.
5.Select a setting item using [Control] knob.
6.Select a setting value using [Control] knob.
Exiting from the Function setting mode
Press and hold [1/6].

KDC-X997/KDC-BT955HD/KDC-X897/KDC-BT855U/KDC-X697/KDC-655U/KMR-555U |
5. DSP settings (KDC-X997, KDC-BT955HD) |
5-5. X'Over setting
5-5. X'Over setting
Fine adjusting the following setting values corresponding to the X'Over values set in the section <5-4. Speak er setting>.
1.Press [SRC] and select a source other than Standby ("STANDBY") using [Control] knob.
Refer to <Source selection>.
2.Press [Control] knob.
Enters the Function setting mode.
3.Select "Audio Control" > "Pro Setup" > "X'Over" using [Control] knob.
For how to use [Control] knob, refer to <3-3. How to select the item>.
4.Select a speaker type using [Control] knob.
Speaker type |
Setting item |
Setting value |
||||
|
|
Front high pass filter |
||||
|
"FC" |
|
KDC-X997 |
|
|
|
|
|
Through, 30, 40, 50, 60, 70, 80, 90, 100, 120, 150, 180, 220, 250 Hz |
||||
|
|
|
KDC-BT955HD |
|
||
"Front" |
|
|
Through, 40, 60, 70, 80, 100, 120, 150, 180, 220 Hz |
|||
"SLOPE"[1][2] |
Front high pass slope |
|||||
|
||||||
|
-6, -12, -18, -24 dB/Oct |
|||||
|
"GAIN" |
Front gain |
||||
|
-8 ,-7, -6, -5, -4, -3, -2, -1, 0 dB |
|||||
|
|
Rear high pass filter |
||||
|
"FC" |
|
KDC-X997 |
|
||
|
|
Through, 30, 40, 50, 60, 70, 80, 90, 100, 120, 150, 180, 220, 250 Hz |
||||
|
|
|
KDC-BT955HD |
|
||
"Rear" |
|
|
Through, 40, 60, 70, 80, 100, 120, 150, 180, 220 Hz |
|||
"SLOPE"[1][2] |
Rear high pass slope |
|||||
|
||||||
|
-6, -12, -18, -24 dB/Oct |
|||||
|
"GAIN" |
Rear Gain |
||||
|
-8, -7, -6, -5, -4, -3, -2, -1, 0 dB |
|||||
|
|
Subwoofer low pass filter |
||||
|
"FC" |
|
KDC-X997 |
60, 70, 80, 90, 100, 120, 150, 180, 220, 250, Through Hz |
||
|
|
30, 40, 50, |
||||
|
|
|
KDC-BT955HD |
100, 120, 150, 180, 220, Through Hz |
||
|
|
|
40, 60, 70, 80, |
|||
"SubWoofer" |
"SLOPE"[1][2] |
Subwoofer slope |
||||
-6, -12, -18, -24 dB/Oct |
||||||
|
"GAIN" |
Subwoofer gain |
||||
|
-8 ,-7, -6, -5, -4, -3, -2, -1, 0 dB |
|||||
|
"PHASE" |
Subwoofer phase |
||||
|
"REV" (180°)/ "NML" (0°) |
|||||
|
"FC" |
Shelving filter |
||||
"Tweeter"[2] |
1, 1.6, 2.5, 4, 5, 6.3, 8, 10, 12.5 kHz |
|||||
"Volume" |
Tweete volume |
|||||
|
||||||
|
-8 ,-7, -6, -5, -4, -3, -2, -1, 0 dB |
|||||
(Colored text: Factory setting)
[1]Displayed only when "FC" is set to a value other than "Through".
[2]Function of KDC-X997.
5.Select a setting item using [Control] knob.
6.Select a setting value using [Control] knob.
Exiting from the Function setting mode
Press and hold [1/6].

KDC-X997/KDC-BT955HD/KDC-X897/KDC-BT855U/KDC-X697/KDC-655U/KMR-555U |
5. DSP settings (KDC-X997, KDC-BT955HD) |
5-6. Listening position setting
5-6. Listening position setting
You can adjust sound localization according to the listening position.
1.Press [SRC] and select a source other than Standby ("STANDBY") using [Control] knob.
Refer to <Source selection>.
2.Press [Control] knob.
Enters the Function setting mode.
3.Select "Audio Control" > "Pro Setup" > "DTA Settings" > "Preset Position" using [Control] knob.
For how to use [Control] knob, refer to <3-3. How to select the item>.
4.Select a listening position using [Control] knob.
Display |
Compensation seat |
"ALL" |
Not compensating. |
"Front R" |
Front Right seat |
"Front L" |
Front Left seat |
"Front All" |
Front seat |
Exiting from the Function setting mode
Press and hold [1/6].
KDC-X997/KDC-BT955HD/KDC-X897/KDC-BT855U/KDC-X697/KDC-655U/KMR-555U |
5. DSP settings (KDC-X997, KDC-BT955HD) |
5-7. Delay time control
5-7. Delay time control
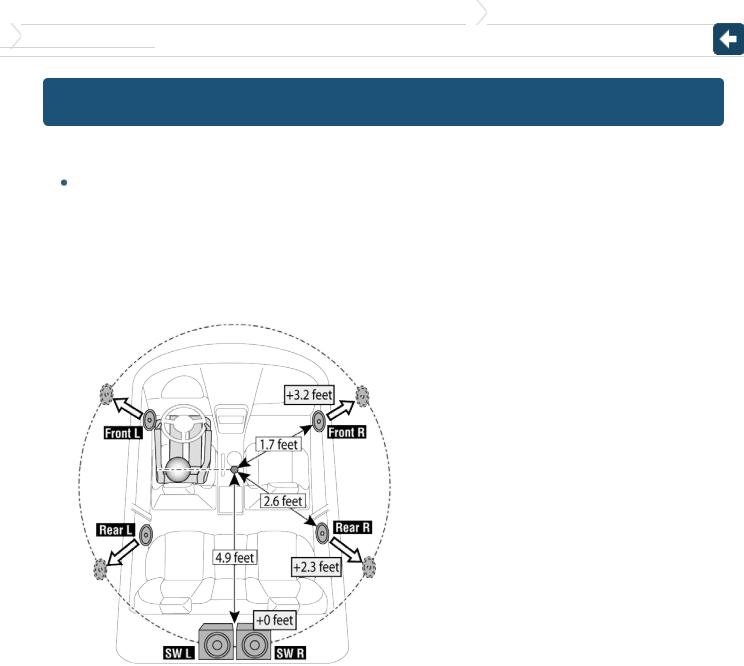
Adjusting fine tuning of the speaker position compensation value specified at <5-3. Car type selection>.
 Preparation for setting
If you specify the distance from the center of the currently set listening position to every speaker, the delay time will be automatically computed and set.
1.Determine the center of the currently set listening position as the reference point (• in the illustration shown below).
2.Measure the distances from the reference point to the speakers.
3.Calculate the differences between the distance of the furthest speaker and other speakers.
4.Input the differences calculated in step 3 for individual speakers.
5.Adjust gain for individual speakers. A sound image will be shifted to the speaker with increased gain.
Example: When "Front" is selected as the listening position (<5-6. Listening position setting>).
1.Press [SRC] and select a source other than Standby ("STANDBY") using [Control] knob.
Refer to <Source selection>.
2.Press [Control] knob.
Enters the Function setting mode.
3.Select "Audio Control" > "Pro Setup" > "DTA Settings" > "DTA" using [Control] knob.
For how to use [Control] knob, refer to <3-3. How to select the item>.
4.Select a speaker using [Control] knob.
Speaker |
Display |
Range |
Front Left speaker |
"FrontL" |
0 – 20.01 feet |
Front Right speaker |
"FrontR" |
0 – 20.01 feet |
Rear Left speaker |
"RearL" |
0 – 20.01 feet |
Rear Right speaker |
"RearR" |
0 – 20.01 feet |
Subwoofer Left |
"SW L" |
0 – 20.01 feet |
Subwoofer Right |
"SW R" |
0 – 20.01 feet |
(Colored text: Factory setting)
5. Select a value using [Control] knob.
Exiting from the Function setting mode
Press and hold [1/6].

KDC-X997/KDC-BT955HD/KDC-X897/KDC-BT855U/KDC-X697/KDC-655U/KMR-555U |
5. DSP settings (KDC-X997, KDC-BT955HD) |
5-8. Channel level fine adjustments
5-8. Channel level fine adjustments
After DTA compensation, you can finely adjust the unsatisfactory speaker volume of respective speaker.
1.Press [SRC] and select a source other than Standby ("STANDBY") using [Control] knob.
Refer to <Source selection>.
2.Press [Control] knob.
Enters the Function setting mode.
3.Select "Audio Control" > "Pro Setup" > "DTA Settings" > "Channel Level" using [Control] knob.
For how to use [Control] knob, refer to <3-3. How to select the item>.
4.Select a speaker using [Control] knob.
Speaker |
Display |
Range |
Front Left speaker |
"Front" "L" |
-8 – 0 dB |
Front Right speaker |
"Front" "R" |
-8 – 0 dB |
Rear Left speaker |
"Rear" "L" |
-8 – 0 dB |
Rear Right speaker |
"Rear" "R" |
-8 – 0 dB |
Subwoofer Left |
"SW" "L" |
-8 – 0 dB |
Subwoofer Right |
"SW" "R" |
-8 – 0 dB |
(Colored text: Factory setting)
5. Select a value using [Control] knob.
Exiting from the Function setting mode
Press and hold [1/6].

KDC-X997/KDC-BT955HD/KDC-X897/KDC-BT855U/KDC-X697/KDC-655U/KMR-555U |
5. DSP settings (KDC-X997, KDC-BT955HD) |
5-9. Resetting of DTA Settings
5-9. Resetting of DTA Settings
You can reset the DTA-compensated values to the factory settings.
1.Press [SRC] and select a source other than Standby ("STANDBY") using [Control] knob.
Refer to <Source selection>.
2.Press [Control] knob.
Enters the Function setting mode.
3.Select "Audio Control" > "Pro Setup" > "DTA Settings" > "Reset DTA Setting" using [Control] knob.
For how to use [Control] knob, refer to <3-3. How to select the item>.
4.Select "YES" using [Control] knob.
Exiting from the Function setting mode
Press and hold [1/6].
KDC-X997/KDC-BT955HD/KDC-X897/KDC-BT855U/KDC-X697/KDC-655U/KMR-555U |
5. DSP settings (KDC-X997, KDC-BT955HD) |
5-10. DSP preset
5-10. DSP preset
You can register the values set the DSP control items.
1.Set the DSP control items
Refer to the following operations to setup the Sound Control.
"SubWoofer Level" of <5-1. Audio control> <5-2. Manual equalizer control>
<5-3. Car type selection> <5-4. Speaker setting> <5-5. X'Over setting>
<5-6. Listening position setting> <5-7. Delay time control>
<5-8. Channel level fine adjustments>
2.Press [Control] knob.
Enters the Function setting mode.
3.Select "Audio Control" > "Pro Setup" > "Audio Preset" > "Memory" using [Control] knob.
For how to use [Control] knob, refer to <3-3. How to select the item>.
4.Select a memory number ("Memory 1" or "Memory 2") using [Control] knob.
5.Select "YES" using [Control] knob.
"Memory Completed" appears.
Exiting from the Function setting mode
Press and hold [1/6].
 When reset
When this unit is reset, all setting values stored in "Memory 1" are applied to the source.
 Loading...