


(044)361-05-06 ICQ:495-089-192 (067)469-02-12 ICQ:613-211-859 (099)048-99-03 (093)672-77-76
User's Manual
CD receiver Kenwood KDC-314A
In the online store Winauto you also can buy car receiver Kenwood KDC-314A . Delivery in Kiev and throughout Ukraine with payment upon receipt!
http://winauto.ua
Car Receivers - Facia Plates - Head Units - TV and Monitors - Car Antennas - Car Audio - Car DVRs - GPS Navigation - Trip Computers - Security Systems - Mechanical Locking - Car Park Systems - Cameras - Optic and Light - Car Tuning - Car Heating - Marine Audio and Electronics - Car Accessories - Car Isolation - Car Installation Components - Car Batteries - Liquid and Oil -

Car audio and car goods internet store Winauto
CD-RECEIVER
KDC-3047 KDC-3047GY KDC-3047M KDC-3247.ua
winautoKDC-3347
KDC-314
INSTRUCTION MANUAL
© B64-4591-00/00 (EW/E2W/E0/E20/M20/M20)

Car audio and car goods internet store Winauto
Contents
Before Use |
3 |
Basic Operations |
4 |
Before Using |
|
Common Operation |
|
Playing Music |
|
Listening Radio |
|
General |
6 |
Removing the Faceplate |
|
Muting Volume upon Reception of Phone Call |
|
Display Indicator
Text Display Selection
Declaration of Conformity with regard to the EMC Directive 2004/108/EC
Manufacturer:
Kenwood Corporation
2967-3 Ishikawa-machi, Hachioji-shi, Tokyo, 192-8525 Japan
EU Representative’s:
Kenwood Electronics Europe BV
Amsterdamseweg 37, 1422 AC UITHOORN, The Netherlands
For Turkey
|
|
|
|
.ua |
|
Function Setting |
8 |
|
Bu ürün 26891sayılı Resmi Gazete’de yayımlanan |
||
<SETTINGS> |
|
|
|
Elektrikli ve Elektronik Eşyalarda Bazı Zararlı Maddelerin |
|
|
|
|
Kullanımının Sınırl ndırılmasına Dair Yönetmeliğe |
||
<INITIAL SET> |
|
|
|
uyg n ol |
r k üretilmiştir. |
<DEMO MODE> |
|
|
|
This prod |
ct complies with Directive, Number 26891 |
<AUDIO CONTROL> |
|
|
|||
|
|
regarding “REGULATION ON THE RESTRICTION OF |
|||
|
|
|
|
||
|
winauto |
|
|||
Music Disc/Audio File Operation |
12 |
|
THE USE OF CERTAIN HAZARDOUS SUBSTANCES IN |
||
Play Function |
|
|
|
LECTRICAL AND ELECTRONIC EQUIPMENT”. |
|
Music Search |
|
|
|
|
|
Direct Music Search |
|
|
|
|
|
Tuner Operation |
13 |
|
|
|
|
PTY (Program Type) |
|
|
|
|
|
Program Type preset |
|
|
|
|
|
Changing Language for PTY Fu ction |
|
|
|
|
|
Basic Operations of Remote Co trol 14 |
|
|
|||
Appendix |
|
15 |
|
|
|
Accessories/Installation Procedure |
16 |
|
|
||
Connecting Wires to Terminals |
17 |
|
|
||
Installation/Removing the Unit |
19 |
|
|
|
|
Troubleshooting Guide |
20 |
|
|
|
|
Specifications |
|
22 |
|
|
|
2 | KDC-3047/ KDC-3047GY/ KDC-3047M/ KDC-3247/ KDC-3347/ KDC-314

Car audio and car goods internet store Winauto
condensation on the lens may not allow CDs to play. In such a situation, remove the disc and wait for the condensation to evaporate. If the unit still does not operate normally after a while, consult your Kenwood dealer.
Notes
Before using this unit for the first time |
• |
If you experience problems during installation, |
|||||||||||||||||||||||||||||||||
|
consult your Kenwood dealer. |
||||||||||||||||||||||||||||||||||
This unit is initially set on the Demonstration mode. |
|
||||||||||||||||||||||||||||||||||
• When you purchase optional accessories, check with |
|||||||||||||||||||||||||||||||||||
When using this unit for the first time, cancel |
|||||||||||||||||||||||||||||||||||
|
your Kenwood dealer to make sure that they work |
||||||||||||||||||||||||||||||||||
the Demonstration mode. Refer to <Exit of the |
|
||||||||||||||||||||||||||||||||||
|
with your model and in your area. |
||||||||||||||||||||||||||||||||||
Demonstration Mode> (page 4). |
|
||||||||||||||||||||||||||||||||||
• The characters which can be displayed by this unit |
|||||||||||||||||||||||||||||||||||
|
|
|
|
|
|
|
|
|
|
|
|
|
|
|
|
|
|
|
|
|
|
|
|
|
|
|
|
|
|
|
|
|
|||
How to reset your unit |
|
are A-Z 0-9 @ “ ‘ ` % & * + – = , . / \ < > [ ] ( ) : ; ^ - { } | |
|||||||||||||||||||||||||||||||||
|
~ . |
||||||||||||||||||||||||||||||||||
• If the unit fails to operate properly, press the Reset |
|
||||||||||||||||||||||||||||||||||
• The RDS fe ture won’t work where the service is not |
|||||||||||||||||||||||||||||||||||
|
|
button. The unit returns to factory settings when the |
|||||||||||||||||||||||||||||||||
|
|
|
s pported by ny bro dcasting station. |
||||||||||||||||||||||||||||||||
|
|
Reset button is pressed. |
|
||||||||||||||||||||||||||||||||
|
|
• |
The ill strations of the display and the panel |
||||||||||||||||||||||||||||||||
|
|
1. Release the faceplate lock so that it can be |
|||||||||||||||||||||||||||||||||
|
|
|
appearing in this manual are examples used to |
||||||||||||||||||||||||||||||||
|
|
|
|
|
|
removed. Refer to <Removing the Faceplate> |
|
||||||||||||||||||||||||||||
|
|
|
|
|
|
|
explain more clearly how the controls are used. |
||||||||||||||||||||||||||||
|
|
|
|
|
|
(page 6) |
|
|
|
|
|
|
|
|
|
|
|
|
|
|
|
|
|
|
|
|
|
||||||||
|
|
|
|
|
|
|
|
|
|
|
|
|
|
|
|
|
|
|
|
|
|
|
|
|
|
|
Therefore, what appears on the display in the |
||||||||
|
|
|
|
|
|
|
|
|
|
|
|
|
|
|
|
|
|
|
|
|
|
|
|
|
|
|
|
|
|
|
|
|
|
||
|
|
2. Press the Reset button and reattaching the |
.ua |
||||||||||||||||||||||||||||||||
|
|
|
|
|
|
faceplate. |
|
|
|
|
|
|
|
|
|
|
|
|
|
|
|
|
|
|
|
|
|
illustrations may differ from what appears on the |
|||||||
|
|
|
|
|
|
|
|
|
|
|
|
|
|
|
|
|
|
|
|
|
|
|
|
|
|
|
display on the actual equipment, and some of the |
||||||||
|
|
|
|
|
|
|
|
|
|
|
|
|
|
|
|
|
|
|
|
|
|
|
|
|
|
|
|
|
|
|
|
|
|
illustrations on the display may be inapplicable. |
|
|
|
|
|
|
|
|
|
|
|
|
|
|
|
|
|
|
|
|
|
|
|
|
|
|
|
|
|
|
|
|
|
|
|
||
|
|
|
|
|
|
|
|
|
|
|
|
|
|
|
|
|
|
|
|
|
|
|
|
|
|
|
|
|
|
|
|
|
Handling CDs |
||
|
|
|
|
|
|
|
|
|
|
|
|
|
|
|
|
|
|
|
|
|
|
|
|
|
|
|
|
|
|
|
|
|
• Do not touch the recording surface of the CD. |
||
|
|
|
|
|
|
|
|
|
|
|
|
|
|
|
|
|
|
|
|
|
|
|
|
|
|
|
|
|
|
|
|
|
|||
|
|
|
|
|
|
|
|
|
|
|
|
|
|
|
|
|
|
|
|
|
|
|
|
|
|
|
|
|
|
|
|
|
• Do not stick tape etc. on the CD, or use a CD with |
||
|
|
|
|
|
|
|
|
|
|
|
|
|
|
|
|
|
|
|
|
|
|
|
|
|
|
|
|
|
|
|
|
|
|
tape stuck on it. |
|
|
|
|
|
|
|
|
|
|
|
|
|
|
|
|
|
|
Reset button |
|
|
|
|
|
|
||||||||||||
|
|
|
|
|
|
|
|
|
|
|
|
|
|
|
|
|
|
• Do not use disc type accessories. |
|||||||||||||||||
Cleaning the Unit |
|||||||||||||||||||||||||||||||||||
• Clean from the center of the disc and move |
|||||||||||||||||||||||||||||||||||
If the faceplate of this un t s sta ned, wipe it with a |
|||||||||||||||||||||||||||||||||||
|
outward. |
||||||||||||||||||||||||||||||||||
dry soft cloth such as a silicon cloth. |
|
||||||||||||||||||||||||||||||||||
• When removing CDs from this unit, pull them out |
|||||||||||||||||||||||||||||||||||
If the faceplate is stained badly, ipe the stain off with |
|||||||||||||||||||||||||||||||||||
|
horizontally. |
||||||||||||||||||||||||||||||||||
a cloth moistened ith neutral cleaner, then wipe it |
|
||||||||||||||||||||||||||||||||||
• |
If the CD center hole or outside rim has burrs, |
||||||||||||||||||||||||||||||||||
again with a clean soft dry cloth. |
|||||||||||||||||||||||||||||||||||
|
use the CD only after removing the burrs with a |
||||||||||||||||||||||||||||||||||
|
|
|
|
|
|
|
|
|
|
|
|
|
|
|
|
|
|
|
|
|
|
|
|
|
|
|
|
|
|
|
|
|
|
||
¤ |
|
|
|
|
|
|
|
|
winauto |
||||||||||||||||||||||||||
|
|
|
|
|
|
|
|
|
|
|
|
|
|
|
|
|
|
|
|
|
|
|
|
|
|
ballpoint pen etc. |
|||||||||
•Applying spray cleaner directly to the unit may affect its mechanical parts. Wiping the faceplate with a hard cloth or using a volatile liquid such as thinner or alcohol may scratch the surface or erases characters.
About the Terminals of the Unit and
Faceplate
•To prevent deterioration, do not touch the terminals of the unit and faceplate with your fingers.
•If the terminals on the unit or faceplate get dirty, wipe them with a clean soft dry cloth.
Lens Fogging
When you turn on the car heater in cold weather, dew or condensation may form on the lens in the CD player of the unit. Called lens fogging, this
CDs that cannot be used
•CDs that are not round cannot be used.
•CDs with coloring on the recording surface or CDs that are dirty cannot be used.
•This unit can only play the CDs with 

 . This unit may not correctly play discs which do not have the mark.
•You cannot play a CD-R or CD-RW that has not been finalized. (For the finalization process refer to your CD-R/CD-RW writing software, and your CD-R/ CD-RW recorder instruction manual.)
•3 inch CD cannot be used. Attempt to insert using an adapter can cause malfunction.
English | 3

Car audio and car goods internet store Winauto
Basic Operations
[ ] Release [SRC] |
[DISP] |
Disc slot |
[ ] |
|
|
|
|
|
|
|
|
|
|
|
|
|
|
|
|
|
|
|
|
|
|
|
|
|
|
|
|
|
|
|
|
|
|
|
|
|
|
|
|
|
|
|
|
|
|
|
|
|
|
|
|
|
|
|
|
|
|
|
|
] [BAND] [VOL] [ ] [D] [1][2] [3][4] [5][6] |
Auxiliary input |
|||||||||||||
Before Using |
|
.ua |
||
|
Common Oper tion |
|||
Exit of the Demonstration Mode |
Power and so rce select |
|||
|
winautoTurning the [VOL] knob adjusts the sound |
|||
Turn off the demonstration mode when you use it |
|
Turns the power ON by pressing the [SRC] |
||
for the first time after installation. |
|
butt n. |
||
1 Press the [VOL] knob to quit the demonstra ion |
|
When power is ON, pressing the [SRC] button |
||
mode when the messages “CANCEL DEMO”, |
|
switches among playable sources in the following |
||
“PRESS”, “VOLUME KNOB” are displayed (approx. |
|
order: |
||
15 seconds). |
|
|
Tuner (“TUNER”) CD (“CD”) Auxiliary |
|
2 Select “YES” and press the [VOL] knob. |
|
Input (“AUX”) Standby (“STANDBY”) Tuner |
||
When “NO” is selected, turn the [VOL] k ob. |
|
(“TUNER”) |
||
⁄ |
|
|
Keeping pressing the [SRC] button for at least 1 |
|
|
|
second turns the power OFF. |
||
• Demonstration mode can also be ca celled in “DEMO |
⁄ |
|||
|
|
|||
MODE” of <Function Setting> (page 8). |
• The source “CD” can be selected when each source is ready |
|||
|
|
|||
|
|
|
to play. |
|
Adjusting the Clock |
|
|
||
1 Press the [DISP] button several times until clock |
Volume |
|||
display (“CLOCK”) appears. |
||||
|
|
|||
2 Keep pressing the [DISP] button until the hour |
|
volume. |
||
display blinks. |
|
|
|
|
3Turn the [VOL] knob to adjust the hour.
4Press the [VOL] knob to finish the hour adjusting. The minute display blinks.
5Turn the [VOL] knob to adjust the minute.
6Press the [VOL] knob to finish the minute adjusting.
⁄
•You can do this adjustment when “TIME SYNC” in <Function Setting> (page 8) is set to “OFF”.
Clock display and Display scroll
Pressing the [DISP] button selects the display mode.
Refer to <Text Display Selection> (page 7). Keeping pressing the [DISP] button scrolls the display.
Auxiliary input
Portable audio device can be connected with the stereo mini-plug (3.5 mm ø).
4 | KDC-3047/ KDC-3047GY/ KDC-3047M/ KDC-3247/ KDC-3347/ KDC-314

Car audio and car goods internet store Winauto
Playing Music |
Listening Radio |
|
|
|
|
Playing Disc |
Select Tuner source |
|
Insert a disc into the disc slot.
When inserted, the source is switched automatically and a song starts playing.
Pressing the [SRC] button several times switches the source to “TUNER”.
|
|
Band select |
||
Folder select |
|
|
Pressing the [BAND] button switches the |
|
Pressing the [BAND] button switches a folder. |
|
receiving band (FM1, FM2, FM3, AM). |
||
Song select |
|
Station select |
||
Pressing the [4] or [¢] button selects a song |
|
Pressing the [4] or [¢] button selects the |
||
(track or file). |
|
|
station. |
|
Fast reverses or forwards the music while |
|
|
||
pressing the [4] or [¢] button. |
Station memory |
|||
(No sound is output while playing audio file.) |
||||
|
Pressing the [1] – [6] button recalls the |
|||
|
|
|
||
|
|
|
memorized station. |
|
Pause and play |
|
|
Keeping pressing the [1] – [6] button for at |
|
Pressing the [6] button pauses or resumes |
|
least 2 seconds memorizes the station currently |
||
playing a song (track or file). |
|
selected. |
||
|
|
.ua |
||
Removing Disc |
|
Traffic information |
||
Pressing the [0] button ejects a disc. |
|
Press the [ ] button for at least 1 second. |
||
|
|
|
Turns ON or OFF the Traffic Information function. |
|
⁄ |
|
|
When the function is turned ON, “TI” indicator is |
|
• For the playable audio files, see <About Audio file> (p ge |
|
ON. |
||
|
|
|||
15). |
|
|
If traffic bulletin starts when the function is ON, |
|
|
|
|
“TRAFFIC” is displayed and traffic information is |
|
|
|
|
received. |
|
|
|
⁄ |
||
|
|
• Details of the station selecting in operation are set in the |
||
|
|
|
“SEEK MODE” of <Function Setting> (page 8). |
|
|
|
• |
Receivable stations can be automatically memorized. See |
|
|
winauto |
|||
|
|
|
“AUTO MEMORY” of <Function Setting> (page 8). |
|
|
|
• |
Up to 6 each stations can be memorized to the [1] – [6] |
|
|
|
|
button in each band (FM1, FM2, FM3, AM). |
|
|
|
• |
Up to 6 stations with a different band (FM/AM) can be |
|
|
|
|
memorized to the [1] – [6] button according to the setting |
|
|
|
|
of “PRESET TYPE” of <Function Setting> (page 8). |
|
• If the volume is adjusted during reception of traffic information, the adjusted volume is memorized automatically. The memorized volume will be applied next time the Traffic Information function is turned ON..
English | 5
Car audio and car goods internet store Winauto
General
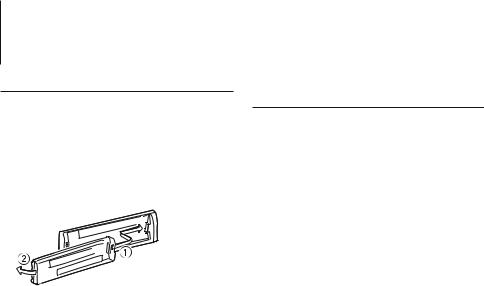
Removing the Faceplate
The faceplate of the unit can be detached and taken with you, helping to deter theft.
Detach the faceplate
Muting Volume upon Reception of Phone Call
The audio system automatically mutes when a call comes in.
Press the Release button. |
When a call comes in |
|
|
|
|
Reattaching the Faceplate |
“CALL” is displayed. |
|
|
||
Refer to the following diagram when |
The audio system pauses. |
|
|
||
reattaching the faceplate. |
Listening to the audio during a call |
|
|
|
|
|
|
Press the [SRC] button. |
|
|
The “CALL” display disappears and the audio system |
|
|
comes back ON. |
|
|
When the c ll ends |
|
|
Hang up the phone. |
|
|
The “CALL” displ y dis ppears and the audio system |
¤ |
. |
|
comes back ON. |
||
|
winauto |
|
• |
After pressing the Release button, detach the faceplate |
⁄ |
|
immediately. If the faceplate is left attached, it can fall |
• To use the TEL Mute feature, you need to hook up the MUTE |
|
due to vibration and so on. |
wireuato your telephone using a commercial telephone |
• |
The faceplate is a precision piece of equipment and can |
access ry. Refer to <Connecting Wires to Terminals> (page |
|
be damaged by shocks or jolts. |
17). |
• |
Keep the faceplate in its faceplate case while de ached. |
|
• |
Do not place the faceplate (and the faceplate case) |
|
|
in areas exposed to direct sunlight, excessive heat or |
|
|
humidity. Also avoid places with too much d st or the |
|
|
possibility of water splashing. |
|
6 | KDC-3047/ KDC-3047GY/ KDC-3047M/ KDC-3247/ KDC-3347/ KDC-314

Car audio and car goods internet store Winauto
Display Indicator |
|
Text Display Selection |
|
|
|||||||||
|
|
s t |
|
Changes displayed information on each source |
|||||||||
|
|
|
|
|
|
|
|
following; |
|
|
|||
|
|
|
|
|
|
|
|
|
|
||||
|
|
|
|
|
|
|
|
|
|
||||
|
|
|
|
|
|
|
|
In Tuner source |
|
|
|||
|
|
|
|
|
|
|
|
|
|
||||
|
|
|
|
|
|
|
|
|
|
|
|
|
|
|
|
|
r |
|
|
Information |
|
Display |
|||||
1 “ST“ indicator: Lights when a stereo broadcast is |
|
|
Program Service name (FM) |
|
“FREQ/PS” |
||||||||
|
|
Radio text (FM) |
|
“RADIO TEXT” |
|||||||||
|
received. |
|
|
|
|
|
|
|
|
||||
|
|
|
|
|
|
|
|
Frequency (MW, LW) |
|
“FREQUENCY” |
|||
|
|
|
|
|
|
|
|
|
|
||||
2 “RDS“ indicator: Lights when the RDS service is |
|
|
Clock |
|
“CLOCK” |
||||||||
|
available. |
|
|
|
|
|
|
In CD source |
|
|
|||
3 “TI“ indicator: Lights when the Traffic Information |
|
|
|
||||||||||
|
|
|
|
|
|
|
|||||||
|
|
Information |
|
Display |
|||||||||
|
function is on. |
|
|
|
|
|
|
|
|
||||
|
|
|
|
|
|
.ua |
|
“DISC TITLE” |
|||||
|
|
|
|
|
|
|
|
|
Disc title |
|
|||
4 “IN“ indicator: Lights when a disc is in the unit. |
|
|
Track title |
|
“TRACK TITLE” |
||||||||
5 “ “ indicator: Shows the image indicating the |
|
|
Play time & Tr ck number |
|
“P-TIME” |
||||||||
|
operating state of each source or the setting of |
|
|
Clock |
|
“CLOCK” |
|||||||
|
Audio Control. |
winauto |
dio file so rce |
|
|
||||||||
|
|
|
|
|
|
|
|
In A |
|
|
|||
|
|
|
|
|
|
|
|
|
Inf |
rmation |
|
Display |
|
|
|
|
|
|
|
|
|
|
Music title & Artist name |
|
“TITLE” |
||
|
|
|
|
|
|
|
|
|
Album name & Artist name |
|
“ALBUM” |
||
|
|
|
|
|
|
|
|
|
F lder name |
|
“FOLDER NAME” |
||
|
|
|
|
|
|
|
|
|
File name |
|
“FILE NAME” |
||
|
|
|
|
|
|
|
|
|
Play time & Music number |
|
“P-TIME” |
||
|
|
|
|
|
|
|
|
|
Clock |
|
“CLOCK” |
||
|
|
|
|
|
|
|
|
In Standby/ Auxiliary input source |
|||||
|
|
|
|
|
|
|
|
|
Information |
|
Display |
||
|
|
|
|
|
|
|
|
|
Source name |
|
“SOURCE NAME” |
||
|
|
|
|
|
|
|
|
|
Clock |
|
“CLOCK” |
||
|
|
|
|
|
|
|
|
|
Select the text |
|
|
||
|
|
|
|
|
|
|
|
|
Press the [DISP] button. |
|
|
||
|
|
|
|
|
|
|
|
|
⁄ |
|
|
||
|
|
|
|
|
|
|
|
|
• |
When you select the clock display, the display setting of |
|||
|
|
|
|
|
|
|
|
|
|
each source will be changed to the clock display. |
|||
|
|
|
|
|
|
|
|
|
• |
If the selected display item does not have any |
|||
|
|
|
|
|
|
|
|
|
|
information, alternative information is displayed. |
|||
English | 7
 Loading...