Kenwood KDC-HD552U User Manual
KDC-X596
KDC-HD552U
CD-RECEIVER
INSTRUCTION MANUAL
AMPLI-TUNER LECTEUR DE CD
MODE D’EMPLOI
REPRODUCTOR DE DISCOS COMPACTOS RECEPTOR DE FM/AM
MANUAL DE INSTRUCCIONES
Take the time to read through this instruction manual.
Familiarity with installation and operation procedures will help you obtain the best performance from your new CD-receiver.
For your records
Record the serial number, found on the back of the unit, in the spaces designated on the warranty card, and in the space provided below. Refer to the model and serial numbers whenever you call upon your Kenwood dealer for information or service on the product.
Model KDC-X596/ KDC-HD552U Serial number
US Residents Only
Register Online
Register your Kenwood product at www.Kenwoodusa.com
© 2011 JVC KENWOOD Corporation |
GET0752-001A (KW) |

CONTENTS
Safety
Preparation
How to attach/detach the faceplate How to reset your unit
Basic operations
Getting started
Canceling the display demonstration Setting the demonstration mode Adjusting the clock
Initial settings before operations
3Listening to Pandora® internet
4 |
radio |
13 |
Station Search mode |
|
|
|
|
|
|
Listening to the other external |
|
5 |
components |
14 |
|
|
7Using the remote controller
(RC-405) |
14 |
Basic operations
Direct Access Tuning
Direct Music Search
Listening to HD Radio™ Broadcasts |
8 |
|
Function settings |
16 |
|
|
|
||
iTunes Tagging |
|
|
Troubleshooting |
18 |
Adjust [SETTINGS] mode settings |
|
|
|
|
|
|
Installation/connection |
20 |
|
Listening to a disc/ USB device/ |
|
|
||
|
|
Basic procedure |
|
|
iPod |
10 |
|
|
|
|
|
|
Warning |
|
Start playing a disc |
|
|
||
|
|
Caution |
|
|
Connecting a USB device |
|
|
|
|
|
|
Wiring connection |
|
|
Connecting an iPod |
|
|
|
|
|
|
Installing the unit |
|
|
Selecting Repeat Play |
|
|
|
|
|
|
Removing the unit |
|
|
Selecting Random Play |
|
|
|
|
|
|
Specifications |
23 |
|
Selecting a folder/track/file |
|
|
Functions of this unit with iPod
Selecting a song by alphabet
Selecting App & iPod Control Mode
Adjust [SETTINGS] mode settings
2
Safety
WARNING
Stop the car before operating the unit.
Important to know...
 To prevent a short circuit, never put or leave any metallic objects (such as coins or metal tools) inside the unit.
 Caution: Adjust the volume so that you can hear sounds outside the car. Driving with the volume too high may cause an accident.
 Condensation: When the car is airconditioned, moisture may collect on the laser lens. This may cause disc read errors. In this case, remove the disc and wait for the moisture to evaporate.
 This unit can only play the CDs with:
 The illustrations in this manual are examples used to explain more clearly how the controls are used. Therefore, what appears on the illustrations may differ from what appears on the actual equipment.
 A USB connection cable, CA-U1EX (max.: 500 mA) (optional accessory) is required for connecting a USB device.
 You can connect an Apple iPod/iPhone with this unit.
The word “iPod” appearing in this manual indicates the iPod or iPhone connected to this unit with a connection cable, KCA-iP102 (optional accessory).
 If you experience problems during installation, consult your Kenwood dealer.
 When you purchase external components, check with your Kenwood dealer to make sure that they work with your model and in your area.
 Detailed information and notes about the playable audio files are stated in an online manual on the following site: www.kenwood.com/cs/ce/audiofile/
ENGLISH
Muting upon the reception of a phone call
To use this feature, connect the MUTE lead to your telephone using a commercial telephone accessory. (page 21)
When a call comes in, “CALL” appears.  The audio system pauses.
 To continue listen to the audio system during a call, press
  SRC. “CALL” disappear and the audio system resumes.
When a call ends, “CALL” disappear.
 The audio system resumes.
3

Preparation
How to attach/detach the faceplate How to reset your unit
 1
1
1
2
2 
 Do not expose the faceplate to direct sunlight, excessive heat, or humidity. Also avoid places with too much dust or the possibility of water splashing.
 Keep the faceplate in its casing while detached.
 The faceplate is a precision piece of equipment and can be damaged by shocks or jolts.
 To prevent deterioration, do not touch the terminals of the unit and faceplate with your fingers.
1

2 
3
Reset button
If this unit fails to operate properly, press the reset button.
The unit returns to factory settings when the reset button is pressed.
Maintenance
Cleaning the unit: Wipe off the dirt on the panel with a dry silicon or soft cloth. Failure to observe this precaution may result in damage to the monitor or unit.
Cleaning the connector: The unit may not function properly if the connectors between the unit and faceplate are dirty. Detach the faceplate and clean the connector with a cotton swab gently, being careful not to damage the connector.
Handling discs
Connector (on the reverse side of the faceplate)
 Do not touch the recording surface of the disc.
 Do not stick tape etc. on the disc, or use a disc with tape stuck on it.
 Do not use any accessories for the disc.
 Clean from the center of the disc and move outward.
 Clean the disc with a dry silicon or soft cloth. Do not use any solvents.
 When removing discs from this unit, pull them out horizontally.
 Remove the rims from the center hole and disc edge before inserting a disc.
4
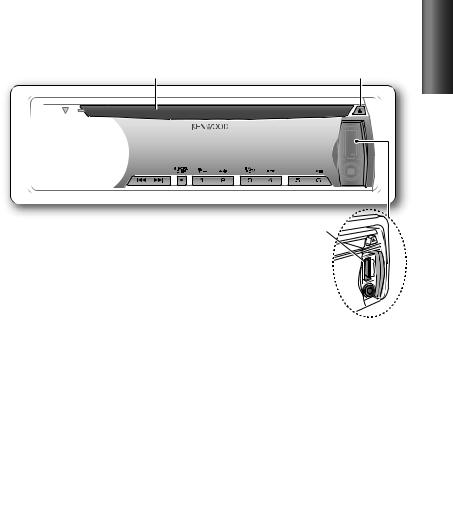
Basic operations
Loading slot |
Display window |
Ejects the disc |
Volume knob |
USB terminal |
Detaches the faceplate
Auxiliary input jack 
ENGLISH
The following indicator lights up when...
ATT (blink) : The sound attenuates. (Applicable only when using the remote controller,
|
|
RC-405). (page 14 — 16) |
ST |
: A stereo broadcast is received. |
|
HD |
: HD Radio™ broadcast is tuned in. |
|
D |
: HD Radio digital broadcast is tuned in. |
|
MC |
: HD Radio multicast broadcast is tuned in. |
|
EQ |
: [PRESET EQ] is set to an EQ mode other than [NATURAL]. (page 17) |
|
B.BOOST : |
[BASS BOOST] is set to [B.BOOST LV1], [B.BOOST LV2] or [B.BOOST LV3]. |
|
|
|
(page 17) |
TAG |
: The song information can be registered. |
|
|
: In Search Mode or when a Playlist is displayed. |
|
IN |
: A disc is in the unit. |
|
Continued...
5

When you press or hold the following button(s)...
Button |
General operation |
 Turns on.
 Turns off if pressed and held.
 Selects the available sources (HD RADIO, USB/ iPod, PANDORA, CD, AUX, STANDBY), if the power is turned on.
 SRC • If the source is ready, playback also starts.
•“PANDORA” is selectable only when an iPhone or iPod touch (with the Pandora® internet radio application) is connected and [ON] is selected for [PANDORA SRC]. (page 7, 8)
•“iPod” or “CD” is selectable only when an iPod is connected or a disc is loaded.
Volume knob |
|
|
Adjusts the volume level. |
|
|
||
|
|
||
(turn) |
|
|
Selects items. |
|
|
||
|
|
||
Volume knob |
|
|
Confirms selection. |
|
|
||
|
|
||
(press) |
|
|
Enters [FUNCTION] settings. |
|
|
||
|
|
||
|
|
|
|
|
|
|
Enters Music Search mode or Station Search mode (for Pandora). |
|
|
|
|
|
|
|
|
|
|
|
Selects the FM bands (FM1/ FM2/ FM3) or AM when “HD RADIO” is selected |
|
|
|
|
|
|
|
|
|
|
|
as the source. |
|
|
|
|
|
|
|
Selects “HD RADIO” source. |
|
|
|
|
|
|
|
|
|
|
|
Enters HD Radio tagging mode if pressed and held. (page 8) |
|
|
|
|
|
|
|
|
|
|
|
|
1 ( –) / 2 (+ |
) |
|
Selects the previous/next folder. |
|
|||
|
|||
|
Selects thumbs down/up (for Pandora). |
||
|
|
|
|
|
|
|
6 ( 

 ) Pauses/resumes playback of a disc/ USB device/ iPod/ Pandora.
 Searches for radio station. 4 / ¢
  Selects track/file.
 Fast-forwards/reverses tracks if pressed and held.
¢Skips a song (for Pandora).
 Changes the display information.
SCRL DISP
 Scrolls the display information if pressed and held.
 Enters clock adjustment mode directly (page 7) if pressed and held while in clock display screen.
5 (iPod)
Switches the controlling mode (MODE ON/ MODE OFF) for iPod playback. (page 12)
 Returns to the previous item.
 Exit from setting mode if pressed and held.
6

Getting started
Canceling the display demonstration
The display demonstration is always turned on unless you cancel it.
When you turn on the power (or after you reset the unit), the display shows:
[CANCEL DEMO] \ [PRESS] \ [VOLUME KNOB]
1Press the volume knob.
[YES] is selected as the initial setup.
2Press the volume knob again to confirm.
[DEMO OFF] appears.
 If no operation is done for about 15 seconds or if you turn the volume knob to select [NO] in step 2, [DEMO MODE] appears and the display demonstration starts.
Setting the demonstration mode
1 Press the volume knob to enter [FUNCTION].
2 Turn the volume knob to select [DEMO MODE], then press to enter.
3Turn the volume knob to select [ON] or [OFF].
If [ON] is selected, display demonstration starts if no operation is done for about 20 seconds.
4 Hold  to finish the procedure.
Adjusting the clock
1 Press the volume knob to enter [FUNCTION] mode.
2 Turn the volume knob to select [SETTINGS], then press to enter. 3 Turn the volume knob to select [CLOCK], then press to enter.
4Press the volume knob to select [CLOCK ADJUST].
Clock hour flashes on the display.
5Turn the volume knob to adjust the hour, then press to enter minute adjustment.
Clock minutes flashes on the display.
6Turn the volume knob to adjust the minute, then press to confirm.
Press 4 / ¢ to move between the hour and minute adjustment.
7 Hold  to finish the procedure.
Initial settings before operations
1 Press  SRC to enter [STANDBY] mode.
2 Press the volume knob to enter [FUNCTION] mode.
3 Turn the volume knob to select [INITIAL SET], then press to enter.
4Turn the volume knob to make a selection, then press to confirm.
See table on page 8 for selection.
5 Hold  to finish the procedure.
ENGLISH
Continued...
7
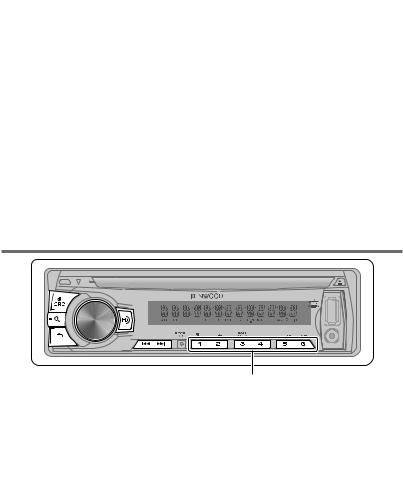
Item |
Selectable setting (Preset: *) |
PRESET TYPE |
NORMAL*: Memorizes one station for each preset button in each band (FM1/ FM2/ FM3/ AM). ; |
|
MIX: Memorizes one station for each preset button regardless of the selected band (FM1/ FM2/ FM3/ AM). |
KEY BEEP |
ON*/ OFF: Activates/deactivates the keypress tone. |
PANDORA SRC |
ON*: Allows you to select “PANDORA” source by connecting an iPhone or iPod touch (with the Pandora® |
|
internet radio application). ; OFF: Disables “PANDORA” in source selection. |
BUILT-IN AUX |
ON*: Enables “AUX” in source selection. Sound of the connected external component is produce through the |
|
car speakers. ; OFF: Disables “AUX” in source selection. |
CD READ |
1*: Automatically distinguishes between audio file disc and music CD. ; 2: Forces to play as a music CD. No |
|
sound can be heard if an audio file disc is played. |
SP SELECT |
OFF*/ 5/4/ 6 × 9/6/ OEM: Selects the speaker size for optimum performance. |
F/W UP xx.xx |
YES*: Starts upgrading the firmware. ; NO: Cancels (upgrading is not activated). |
|
For details on how to update the firmware, see: www.kenwood.com/cs/ce/ |
Listening to HD Radio™ Broadcasts
Hold for about 2 seconds to memorize the current station.
 Press briefly to recall memorized station or channel.
1Press  SRC to select “HD RADIO.”
Press to select “HD RADIO” source directly.
2 Press  repeatedly to select a band (FM1/ FM2/ FM3/ AM).
3Press 4 / ¢ to search for a station or channel.
“LINKING” appears while linking to a multicast channel.
iTunes Tagging
When you hear a song you enjoy on your local HD Radio station, you can tag the song and save the song’s information on this unit. Up to 50 TAGs (song’s information) can be registered to this unit.
By using this tagging function, you can easily purchase the songs from Apple iTunes Store.
Hold to enter HD Radio tagging mode and tag the song.
“TAG” will be indicated on the display when the song information can be registered.
8
To transfer the tagged songs to your iPod and purchase the songs from iTunes Store
1Connect an iPod to this unit. (page 10)
The tagged information registered to this unit is automatically transferred to the connected iPod.
2 Connect the iPod to your computer.
3Synchronize the iPod to the iTunes.
The saved songs will be shown in a playlist called “Tagged.” You can now purchase and download the songs easily from the iTunes Store.
Adjust [SETTINGS] mode settings
While listening to the radio...
1 Press the volume knob to enter [FUNCTION] mode.
2 Turn the volume knob to select [SETTINGS], then press to enter.
3Turn the volume knob to make a selection, then press to confirm.
See table below for selection.
4 Hold  to finish the procedure.
Item |
Selectable setting (Preset: *) |
SEEK MODE Selects the tuning mode for 4 / ¢ buttons.
AUTO1*: Automatically search for a station. ; AUTO2: Search in the order of the stations in the preset memory. ; MANUAL: Manually search for a station.
AUTO MEMORY |
YES*: Automatically starts memorizing 6 stations with good reception. ; NO: Cancels (automatic |
|
memorizing is not activated). (Selectable only if [NORMAL] is selected for [PRESET TYPE].) (page 7, 8) |
RECEIVE MODE |
Sets the receive mode of the HD Radio receiver. |
|
AUTO*: Automatically tunes to analog broadcast when there is no digital broadcast. ; DIGITAL: Tunes in to |
|
digital broadcast only. ; ANALOG: Tunes in to analog broadcast only. |
|
|
TAG MEMORY |
Displays the tag memory usage of the HD Radio receiver. |
|
00 — 50 (Preset: 00): Up to 50 tags can be registered to this unit. |
|
|
|
HD Radio Technology manufactured under license from iBiquity |
|
Digital Corporation. U.S. and Foreign Patents. HD Radio™ and the |
|
HD, HD Radio, and “Arc” logos are proprietary trademarks of iBiquity |
|
Digital Corp. |
Program Service Data: Contributes to the superior user experience of HD Radio Technology. Presents song name, artist, station IDs, HD2/HD3 Channel Guide, and other relevant data streams.
Adjacent to traditional main stations are extra local FM channels. These HD2/HD3 Channels provide new, original music as well as deep cuts into traditional genre.
Digital, CD-quality sound. HD Radio Technology enables local radio stations to broadcast a clean digital signal. AM sounds like today’s FM and FM sounds like a CD.
iTunes® Tagging provides you the opportunity to discover a wide range of content and the means to “tag” that content for later review and purchase from the iTunes® Store.
ENGLISH
9
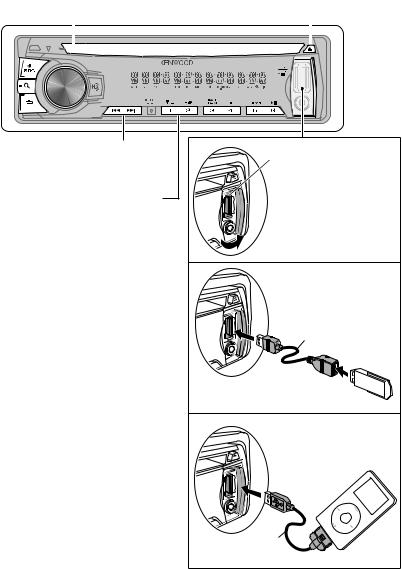
Listening to a disc/ USB device/ iPod
Loading slot |
Ejects the disc. (“NO DISC” appears and “IN” indicator goes off.) |
|||||||
|
|
|
|
|
|
|
|
|
|
|
|
|
|
|
|
|
|
|
|
|
|
|
|
|
|
|
|
|
|
|
|
|
|
|
|
|
|
|
|
|
|
|
|
|
|
|
|
|
|
|
|
|
|
 Press to select track/file.
 Hold to fast-forwards/reverses.
Press to select previous/next folder.
•Not available if “ALL RANDOM” is selected.
Start playing a disc
1 Press  SRC to turn on the power.
2Insert a disc into the loading slot.
Playback starts automatically.
3Press number button 6 ( 

 ) to resume/pause playback (if necessary).
Discs that cannot be used
 Discs that are not round.
 Discs with coloring on the recording surface or discs that are dirty.
 You cannot play a Recordable/ReWritable disc that has not been finalized. (For the finalization process refer to your disc writing software, and your disc recorder instruction manual.)
 3-inch CD cannot be used. Attempt to insert using an adapter can cause malfunction.
USB terminal
Slide open the cover, then make the following connection.
The source automatically switches, and playback starts.
Connecting a USB device
CA-U1EX (Max.: 500 mA) (optional accessory)
USB device (commercially available)

Connecting an iPod
Apple iPod (commercially available)
KCA-iP102 (optional accessory)
10

Selecting Repeat Play
Press number button 4 (REP) repeatedly to make a selection.
Audio CD : TRACK REPEAT, REPEAT OFF
AAC/MP3/WMA : FILE REPEAT, FOLDER
REPEAT, REPEAT OFF
iPod : FILE REPEAT, REPEAT OFF
Selecting Random Play
Press number button 3 (RDM) repeatedly to make a selection.
Audio CD : DISC RANDOM, RANDOM OFF
AAC/MP3/WMA/iPod : FOLDER RANDOM,
RANDOM OFF
 For AAC/MP3/WMA/iPod : Press and hold number button 3 (RDM) to select “ALL RANDOM.”
–Applicable only if “RANDOM OFF” is selected initially.
–Changes the iPod browsing item to “songs.”
Selecting a folder/track/file
1Press  to enter Music Search mode.
“SEARCH” appears, then the current file name appears on the display.
2Turn the volume knob to select a folder/ track/file, then press to confirm.
 To return to the root folder (or first track for audio CD), press number button 5 (iPod).
 To return to the previous folder, press
  .
.
 To cancel the Music Search mode, press and hold
  .
.
 < or > on the display indicates that preceded/next item is available.
 For USB device* and iPod: To skip search, press 4 / ¢.
*This operation is effective only for the files registered in the database created with Kenwood Music Editor. (See below.)
About Audio file
 Playable Audio file: AAC-LC (.m4a), MP3 (.mp3), WMA (.wma)
 Playable disc media: CD-R/RW/ROM
 Playable disc file format: ISO 9660 Level 1/2, Joliet, Romeo, Long file name.
 Playable USB device file system: FAT16, FAT32 Although the audio files are complied with the standards listed above, the playback maybe impossible depending on the types or conditions of media or device.
About USB device
 This unit can play AAC/MP3/WMA files stored on a USB mass storage class device.
 Install the USB device in the place where it will not prevent you from driving your vehicle properly.
 You cannot connect a USB device via a USB hub and Multi Card Reader.
 Make sure all important data has been backed up to avoid losing the data.
 Connecting a cable whose total length is longer than 5 m can result in abnormal playback.
About “KENWOOD Music Editor”
 This unit supports the PC application “KENWOOD Music Editor Light ver1.1” or later.
 When you use the audio file with database information added by the “KENWOOD Music Editor Light ver1.1,” you can search a file by title, album or artist name using Music Search.
 In the Instruction manual, the term “USB device” is used to mean the device that contains audio files with database information added with KENWOOD Music Editor.
 “KENWOOD Music Editor Light ver1.1” is available from the following web site: www.kenwood.com/cs/ce/
 For further information on “KENWOOD Music Editor Light ver1.1,” refer to the site above or the application help.
ENGLISH
11

Functions of this unit with iPod
Selecting a song by alphabet
1Press  to enter Music Search mode.
“SEARCH” appears.
2Turn the volume knob to select a category, then press to confirm.
3Press  again to enter alphabet search mode.
“SEARCH <– – –>” appears.
4Turn the volume knob to select the character to be searched for.
5Press 4 / ¢ to move to the entry position.
You can enter up to three characters.
6 Press the volume knob to start searching.
7Turn the volume knob to select a folder/ track/file, then press to confirm.
 To return to the previous folder, press
  .
.
 To return to the top menu, press number button 5 (iPod).
 To cancel the Alphabet Search mode, press and hold
  .
.
 A longer searching time is required if there are many songs or playlists in the iPod.
 To search for a character other than A to Z and 0 to 9, enter only “*”.
 The article (a, an, the) of songs name will be skipped during search.
Selecting App & iPod Control Mode
Press and hold 5 (iPod) to make a selection.
MODE ON: Control iPod from the iPod*. “APP&iPod MODE” appears on the display.
MODE OFF: Control iPod from the unit.
*You can still control play/pause, select files, fast-forward/reverse files from the unit.
Adjust [SETTINGS] mode settings
While listening to an iPod...
1Press the volume knob to enter
[FUNCTION] mode.
2Turn the volume knob to select [SETTINGS], then press to enter.
3Turn the volume knob to select [SKIP SEARCH], then press to enter.
4Turn the volume knob to make a selection, then press to confirm.
0.5% (initial)/ 1%/ 5%/ 10% : Sets the ratio of skip when searching for a song in Music Search mode.
(Holding 4 / ¢ skips songs at 10% regardless of the setting made.)
5 Hold  to finish the procedure.
About compatible iPod/iPhone |
|
|
Made for |
|
For the latest compatible list and software version of |
|
||
|
||
– iPod touch (1st, 2nd, 3rd, and 4th generation) |
|
iPod/iPhone, see: www.kenwood.com/cs/ce/ipod |
– iPod classic |
|
If you start playback after connecting the iPod, the music |
|
||
|
||
– iPod with video |
|
that has been played by the iPod is played first. |
– iPod nano (1st, 2nd, 3rd, 4th, 5th, and 6th generation) |
|
In this case, “RESUMING” is displayed without displaying |
– iPhone 4S |
|
a folder name, etc. Changing the browse item will |
– iPhone 4 |
|
display a correct title, etc. |
– iPhone 3GS |
|
You cannot operate iPod if “KENWOOD” or “ ” |
|
||
|
||
– iPhone 3G |
|
displayed on iPod. |
– iPhone |
|
|
|
|
|
12
Listening to Pandora® internet radio
Preparation : Make sure [ON] is selected for [PANDORA SRC]. (page 7, 8)
ENGLISH
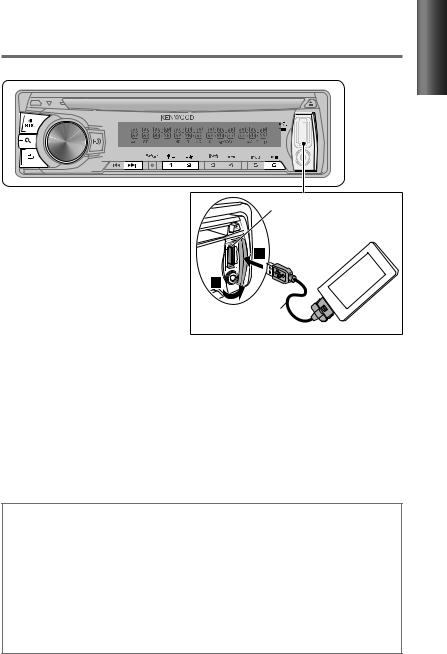
1Open the Pandora® application on your device.
2Connect the device to the USB terminal.
The source switches, and broadcasting starts automatically from your current station.
 If no station has been selected, broadcasting does not start.
 To select thumbs down/up, press number button 1 (
  – )/ 2 ( +
  ).
).
 To skip a song, press ¢.
 To pause or resume playback, press number button 6 (

 ).
).
USB terminal
Apple iPhone/ iPod touch (commercially available)
KCA-iP102 (optional accessory)
Station Search mode
While listening to “PANDORA” source...
1 Press  to enter Station Search mode.
2Turn the volume knob to select [A–Z] (stations are displayed in alphabetical order) or [BY DATE] (stations are displayed in date order), then press to enter.
3 Turn the volume knob to select a desired station, then press to confirm.
About Pandora® internet radio |
|
|
|
The requirements for listening to Pandora® are as follows: |
|
Internet connection by 3G, EDGE, or WiFi. |
|
|
|||
|
|||
|
Use an Apple iPhone or iPod touch running under iOS3 |
|
iPhone connected to this unit with a KCA-iP102. |
|
|
||
|
|
||
|
or later. |
|
Pandora® is available only in the U.S. |
|
|
||
|
|
||
|
Search for “Pandora” in the Apple iTunes App Store |
|
Because Pandora® is a third-party service, the specifications |
|
|
||
|
|
||
|
to find and install the most current version of the |
|
are subject to change without prior notice. Accordingly, |
|
Pandora® application on your device. |
|
compatibility may be impaired or some or all of the services |
|
In the application on your device, log in and create an |
|
may become unavailable. |
|
|||
|
|||
|
account with Pandora®. |
|
Some functions of Pandora® cannot be operated from this unit. |
|
|
||
|
|
||
|
(If you are not already a registered user, an account can |
|
For issues using the application, please contact Pandora® at |
|
|
||
|
|
||
|
also be created at www.pandora.com.) |
|
pandora-support@pandora.com |
13
Listening to the other external components
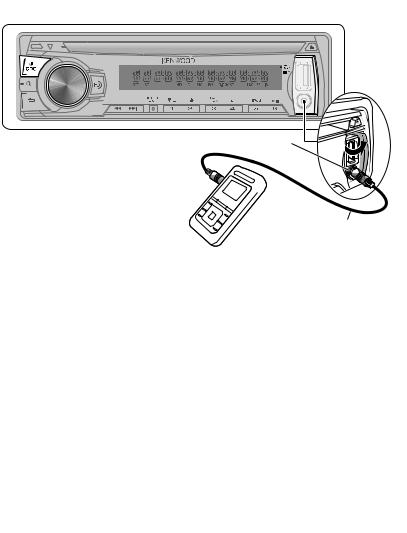
Preparation : Make sure [ON] is selected for [BUILT-IN AUX]. (page 7, 8)
1 Press  SRC to select “AUX.”
2Turn on the external component and start playing.
3Turn the volume knob to adjust the volume.
Portable audio device (commercially available)
Auxiliary input jack
3.5 mm (1/8") stereo mini plug (commercially available)
Using the remote controller (RC-405)
Remote sensor
 Do not expose to bright sunlight.
CALIFORNIA, USA ONLY
This perchlorate WARNING applies only to the product sold or distributed in
California USA “Perchlorate Material–special handling may apply, See www.dtsc.ca.gov/ hazardouswaste/perchlorate.”
Preparation:
When you use the remote controller for the first time, pull out the insulation sheet.
Insulation sheet
If the effectiveness of the remote controller decreases, replace the battery.
2 |
3 |
|
|
|
4 |
1 |
|
14
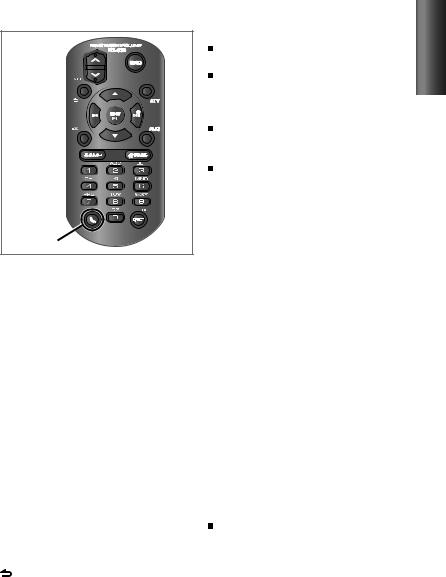
RC-405 |
Caution: |
|
Do not set the remote control in hot places |
||
|
||
|
such as on the dashboard. |
|
|
Lithium battery. |
|
|
Danger of explosion if the battery is |
|
|
incorrectly replaced. Replace only with the |
|
|
same or equivalent type. |
|
|
The battery pack or batteries shall not |
|
|
be exposed to excessive heat such as |
|
|
sunshine, fire or the like. |
|
|
Keep battery out of reach of children and in |
|
|
original package until ready to use. Dispose |
|
|
of used batteries promptly. If swallowed |
|
|
contact physician immediately. |
|
(Not used.) |
|
Basic operations
SRC : Selects the available sources. VOL  : Adjusts the volume level.
5 / ∞ : Enters Music Search mode or Station Search mode (for Pandora).
ENT 

 :
:  Pauses/resumes playback.
 Confirms selection (in Music Search mode).
*AM– / #FM+:  Selects bands.
 Selects folders.
4 / ¢ (+):  Fast-forward/reverses track if pressed and held.
 Searches for radio station.
 Selects track/file.
¢ (+) : Skips a song (while listening to Pandora).
1 – 6 : Selects preset station.
AUD : Enters [AUDIO CONTROL] settings directly.
ATT : Attenuates the sound. (To return to the previous level, press the button again.)
: Returns to the previous item (in Music Search mode).
EXIT : Exit from setting mode.
Direct Access Tuning
1 Press #FM+ / *AM– to select a band.
2Press DIRECT to enter Direct Access Tuning mode.
“– – – –” appears on the display.
3Press DIRECT repeatedly to select the tuning item.
Tuning item: Frequency “– – – –”, Channel “HD –”, or Cancelling Direct Access Tuning
4Press the number buttons to enter the frequency or channel.
You can enter the FM band frequency in steps of a minimum of 0.1 MHz.
5Press 4 / ¢ (+) to tune in to the entered frequency or channel.
 To cancel Direct Access Tuning mode, press
 or EXIT.
If no operations is done for 10 seconds after step 3, Direct Access Tuning is automatically canceled.
Continued...
ENGLISH
15

Direct Music Search
•Not available if Random Play is selected.
•Not applicable for iPod and Kenwood Music Editor.
1Press DIRECT to enter Direct Music Search Mode.
“– – –” appears.
2Press the number buttons to enter the track number.
3Press 4 / ¢ (+) to search for the music.
 To cancel the Direct Music Search Mode, press
  or EXIT.
In Station Search Mode (while listening to “PANDORA” source...)
5 / ∞ |
|
: • |
Selects [A–Z] or [BY DATE]. |
||
|
|
|
|
• |
Selects item. |
ENT |
|
|
|
: Confirms selection. |
|
|
|
||||
|
|
||||
EXIT |
|
: Cancels Station Search mode. |
|||
Function settings
1 Press the volume knob to enter [FUNCTION] mode.
2 Turn the volume knob to select [AUDIO CONTROL] or [SETTINGS], then press to enter.
3Turn the volume knob to make a selection, then press to confirm.
 See the following table for selection.
 Repeat step 3 until the desired item is selected/activated.
 Press
Press  to return to the previous item.
4 Hold  to finish the procedure.
[AUDIO CONTROL] : While listening to any source except in STANDBY state...
Item |
Selectable setting (Preset: *) |
SUB-W LEVEL |
–15 — +15 (Preset: 0): Adjusts the subwoofer output level. |
BASS LEVEL |
–8 — +8 (Preset: 0): Source tone memory: Adjusts the level to memorize in each source. (Before |
MID LEVEL |
making an adjustment, select the source you want to adjust.) |
|
|
TRE LEVEL |
|
|
|
16

|
Item |
|
Selectable setting (Preset: *) |
EQ PRO (for |
) |
|
|
|
BASS ADJUST |
BASS CTR FRQ |
60/ 80/ 100 */ 200: Selects the center frequency. |
|
|
BASS LEVEL |
–8 — +8 (Preset: 0): Adjusts the level. |
|
|
BASS Q FACTOR |
1.00 */ 1.25/ 1.50/ 2.00: Adjusts the quality factor. |
|
|
BASS EXTEND |
ON: Turns on the extended bass. ; OFF *: Cancels. |
|
|
|
|
|
MID ADJUST |
MID CTR FRQ |
0.5K/ 1.0K */ 1.5K/ 2.5K: Selects the center frequency. |
|
|
|
|
|
|
MID LEVEL |
–8 — +8 (Preset: 0): Adjusts the level. |
|
|
|
|
|
|
MID Q FACTOR |
0.75/ 1.00 */ 1.25: Adjusts the quality factor. |
|
|
|
|
|
TRE ADJUST |
TRE CTR FRQ |
10.0K/ 12.5K */ 15.0K/ 17.5K: Selects the center frequency. |
|
|
|
|
|
|
TRE LEVEL |
–8 — +8 (Preset: 0): Adjusts the level. |
|
|
|
|
PRESET EQ |
NATURAL*/ USER/ ROCK/ POPS/ EASY/ TOP40/ JAZZ/ POWERFUL: Selects a preset sound mode |
||
|
|
suitable to the music genre. (Selects [USER] to use the customized bass, middle, and treble settings.) |
|
BASS BOOST |
B.BOOST LV1/ B.BOOST LV2/ B.BOOST LV3: Selects your preferred bass boost level. ; OFF*: Cancels. |
||
LOUDNESS |
LOUDNESS LV1*/ LOUDNESS LV2: Selects your preferred low and high frequencies boost to produce |
||
|
|
a well-balanced sound at a low volume level. ; OFF: Cancels. |
|
|
|
|
|
BALANCE |
L15 — R15 (Preset: 0): Adjusts the left and right speaker output balance. |
||
|
|
|
|
FADER |
R15 — F15 (Preset: 0): Adjusts the rear and front speaker output balance. |
||
|
|
|
|
SUBWOOFER SET |
ON*: Turns on the subwoofer output. ; OFF: Cancels. |
||
|
|
|
|
DETAILED SET |
|
|
|
|
HPF |
THROUGH*: All signals are sent to the speaker. ; 100HZ/ 120HZ/ 150HZ: Frequencies lower than the |
|
|
|
specified value are cut off. |
|
|
LPF SUBWOOFER |
THROUGH*: All signals are sent to the subwoofer. ; 85HZ/ 120HZ/ 160HZ: Frequencies higher than |
|
|
|
85 Hz/ 120 Hz/ 160 Hz are cut off. |
|
|
|
|
|
|
SUB-W PHASE |
REVERSE (180°)/ NORMAL (0°)*: Selects the phase angle of the subwoofer output to be in line with |
|
|
|
the speaker output for optimum performance. (Selectable only if a setting other than [THROUGH] is |
|
|
|
selected for [LPF SUBWOOFER].) |
|
|
|
|
|
|
SUPREME SET |
ON*: Creates realistic sound by interpolating the high-frequency components that are lost in AAC/ |
|
|
|
MP3/WMA audio compression. ; OFF: Cancels. (Selectable only when playback an AAC/MP3/WMA |
|
|
|
disc or a USB device, except iPod.) |
|
|
VOLUME OFFSET |
–8 — +8 (for AUX) ; –8 — 0 (for other sources): Presets the volume adjustment level of each |
|
|
(Preset: 0) |
source. The volume level will automatically increase or decrease when you change the source. (Before |
|
|
|
making an adjustment, select the source you want to adjust.) |
|
[SUB-W LEVEL/ LPF SUBWOOFER/ SUB-W PHASE] is selectable only if [SUBWOOFER SET] is set to [ON].
ENGLISH
Continued...
17
[SETTINGS]
|
Item |
Selectable setting (Preset: *) |
AUX NAME SET |
AUX*/ DVD/ PORTABLE/ GAME/ VIDEO/ TV: Selects the desired name for the connected component. |
|
|
|
(Selectable only if “AUX” is selected as the source.) |
CLOCK |
CLOCK ADJUST: (For details, see page 7.) |
|
DISP & KEY (for |
) |
|
|
COLOR SELECT |
VARIABLE SCAN*/ COLOR 01 – COLOR 24/ USER: Selects your preferred key illumination color. |
|
|
You can create your own color (when [COLOR 01] — [COLOR 24] or [USER] is selected). The color you |
|
|
created can be selected when you select [USER]. |
|
|
1. Hold the volume knob to enter the detail color adjustment mode. |
|
|
2. Press 4 / ¢ to select the color (R/ G/ B) to adjust. Turn the volume knob to adjust the level |
|
|
(0 — 9). |
|
|
3. Press the volume knob to confirm and exit. |
|
DISP DIMMER |
ON: Dims the display illumination. ; OFF*: Cancels. |
|
TEXT SCROLL |
AUTO*/ ONCE: Selects to scroll the display information automatically, or scroll only once. ; OFF: Cancels. |
|
KEY DIMMER |
DIMMER LV1: Dims the key illumination constantly. ; DIMMER LV2: Dims the key illumination darker |
|
|
than DIMMER LV1. ; DIMMER OFF*: Cancels. |
DISPLAY (for |
) |
|
|
DISP DIMMER |
ON: Dims the display illumination. ; OFF*: Cancels. |
|
TEXT SCROLL |
AUTO*/ ONCE: Selects to scroll the display information automatically, or scroll only once. ; OFF: Cancels. |
Troubleshooting
Symptom |
Remedy/Cause |
Sound cannot be heard. |
Adjust the volume to the optimum level. / Check the cords and connections. |
“PROTECT” appears and no operations |
Check to be sure the terminals of the speaker leads are covered with insulating |
can be done. |
tape properly, then reset the unit. If “PROTECT” does not disappear, consult your |
|
nearest service center. |
|
|
Sound cannot be heard. / The unit does |
The connectors are dirty. Clean the connectors. (page 4) |
not turn on. / Information shown on the |
|
display is incorrect. |
|
|
|
The unit does not work at all. |
Reset the unit. (page 4) |
|
|
Radio reception is poor. / Static noise |
Connect the antenna firmly. / Pull the antenna out all the way. |
while listening to the radio. |
|
“MEMORY FULL” appears. |
The tag memory of HD Radio receiver is full. |
“NO TAG FNC” appears. |
The connected iPod does not support iTunes tagging function. |
“TAG ERROR” appears. |
The unit is unable to complete transferring the tagged information to the iPod. |
18

|
Symptom |
Remedy/Cause |
|
“IN” flashes. |
The CD player is not operating properly. Reinsert the disc properly. If the |
||
|
|
condition did not improve, turn off the unit and consult your nearest service |
|
|
|
center. |
|
|
|
|
|
CD-R/CD-RW cannot be played back and |
Insert a finalized CD-R/CD-RW (finalize with the component which you used |
||
tracks cannot be skipped. |
for recording). |
||
Disc sound is sometimes interrupted. |
Stop playback while driving on rough roads. / Change the disc. / Check the cords |
||
|
|
and connections. |
|
|
|
|
|
“NA FILE” appears. |
The unit is playing an unsupported audio file. |
||
|
|
|
|
“NO DISC” appears. |
Insert a playable disc into the loading slot. |
||
|
|
|
|
“TOC ERROR” appears. |
The CD is quite dirty. / The CD is upside-down. / The CD is scratched a lot. Try |
||
|
|
another disc instead. |
|
“ERROR 99” appears. |
The unit is malfunctioning for some reason. Press the reset button on the unit. If |
||
|
|
the “ERROR 99” code does not disappear, consult your nearest service center. |
|
|
|
|
|
“READ ERROR” appears. |
Copy the files and folders for the USB device again. If the error message is still |
||
|
|
displayed, initialize the USB device or use other USB devices. |
|
|
|
|
|
“NO DEVICE” appears. |
No USB device is connected. Connect an USB device, and change the source to |
||
|
|
USB again. |
|
“COPY PRO” appears. |
A copy-protected file is played. |
||
“NO MUSIC” appears. |
The connected USB device contains no playable audio file. |
||
“NA DEVICE” appears. |
Connect a supported USB device, and check the connections. |
||
|
|
|
|
“USB ERROR” appears. |
Remove the USB device, turn the unit off, then turn it on again. If the unit still |
||
|
|
showing the same display, try to connect another USB device. |
|
|
|
|
|
“iPod ERROR” appears. |
Reconnect the iPod. / Reset the iPod. |
||
|
|
|
|
Noise is generated. |
Skip to another track or change the disc. |
||
|
|
|
|
Tracks cannot play back as you have |
Playback order is determined when files are recorded. |
||
intended them to play. |
|
||
“READING” keeps flashing. |
Longer readout time is required. Do not use too many hierarchies and folders. |
||
|
|
|
|
Elapsed playing time is not correct. |
This is caused by how the tracks are recorded. |
||
|
|
|
|
The number of songs contained in “SONGS” |
Podcast files are not counted in this unit as this unit does not support the |
||
category of this unit is different from that |
playback of podcast files. |
||
contained in “SONGS” category of iPod. |
|
||
Correct characters are not displayed (e.g. |
This unit can only display letters (upper case), numbers, and a limited number |
||
album name). |
of symbols. |
||
|
|
|
|
Pandora |
“PANDORA ERR 5” appears. |
Thumb up/down operation has failed. |
|
|
|
||
“NO STATIONS” appears. |
No station is found. |
||
|
|||
|
|
|
|
|
“NO SKIPS” appears. |
The skip count limit has been exceeded. |
|
|
|
|
|
|
“CHK DEVICE” appears. |
Check the Pandora® application on the iPhone/iPod touch. |
|
|
|
|
|
ENGLISH
19

Installation/connection
Part list: |
|
A Faceplate.............................................................. |
(×1) |
B Escutcheon......................................................... |
(×1) |
C Mounting sleeve............................................. |
(×1) |
D Wiring harness.................................................. |
(×1) |
E Removal tool ..................................................... |
(×2) |
F Flat head screw (for Nissan cars)........... |
(×4) |
G Round head screw (for Toyota cars).... |
(×4) |
H Casing for faceplate ...................................... |
(×1) |
Basic procedure
1Remove the key from the ignition switch, then disconnect the · terminal of the car battery.
2Make proper input and output wire connections.
\“Wiring connection” (page 21) 3 Install the unit to your car.
\“Installing the unit” (page 22)
4Reconnect the · terminal of the car battery.
5 Reset the unit. (page 4)
Warning
 The unit can only be installed in a car with a 12 V DC power supply, negative ground.
 If you connect the ignition wire (red) and the battery wire (yellow) to the car chassis (ground), you may cause a short circuit, that in turn may start a fire. Always connect those wires to the power source running through the fuse box.
 Disconnect the battery's negative terminal and make all electrical connections before installing the unit.
 Insulate unconnected wires with vinyl tape or other similar material. To prevent a short circuit, do not remove the caps on the ends of the unconnected wires or the terminals.
  Be sure to ground this unit to the car's chassis again after installation.
Caution
 If your car's ignition does not have an ACC position, connect the ignition wires to a power source that can be turned on and off with the ignition key. If you connect the ignition wire to a power source with a constant voltage supply, as with battery wires, the battery may die.
 Do not use your own screws. Use only the screws provided.
 Install this unit in the console of your vehicle. Make sure the faceplate will not hit the lid of the console (if any) when closing and opening.
 After the unit is installed, check whether the brake lamps, blinkers, wipers, etc. on the car are working properly.
 Mount the unit so that the mounting angle is 30° or less.
 If the fuse blows, first make sure the wires aren't touching to cause a short circuit, then replace the old fuse with one with the same rating.
 Connect the speaker wires correctly to the terminals to which they correspond. The unit may be damaged or fail to work if you share the · wires or ground them to any metal part in the car.
 When only two speakers are being connected to the system, connect the connectors either to both the front output terminals or to both the rear output terminals (do not mix front and rear).
 Do not touch the metal part of this unit during and shortly after the use of the unit. Metal part such as the heat sink and enclosure become hot.
 Mounting and wiring this product requires skills and experience. For safety‘s sake, leave this work to professionals.
If you experience problems during installation, consult your Kenwood dealer.
20
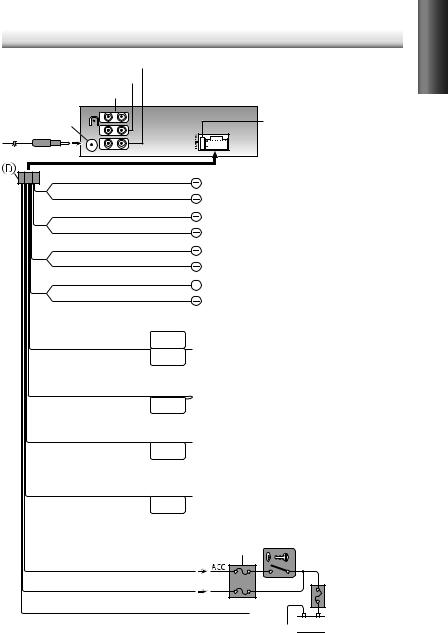
Wiring connection
Rear output terminals |
|
|
|||
Front output terminals |
|
|
|||
Subwoofer output terminals |
|
|
|||
Antenna terminal |
SW |
|
|
Fuse (10 A) |
|
FRONT |
|
|
|||
|
|
|
|
||
|
R |
L |
|
|
|
|
REAR |
|
|
|
|
White |
|
|
|
|
|
White/Black |
|
|
|
To front speaker (left) |
|
Gray |
|
|
|
|
|
Gray/Black |
|
|
|
To front speaker (right) |
|
Green |
|
|
|
|
|
Green/Black |
|
|
|
To rear speaker (left) |
|
Purple |
|
|
|
|
|
Purple/Black |
|
|
|
To rear speaker (right) |
|
Light blue/yellow |
|
|
STEERING WHEEL |
|
|
|
|
REMOTE INPUT |
To the steering wheel remote control adapter |
||
(Steering remote control wire) |
REMOTE CONT |
||||
|
|||||
Blue |
|
|
|
(Not used) |
|
(Antenna control wire) |
|
ANT CONT |
|||
|
|
||||
Blue/White |
|
|
|
To the power control terminal when using the optional power |
|
(Power control wire) |
|
P. CONT |
amplifier, or to the antenna control terminal in the vehicle. |
||
Brown |
|
|
|
To the terminal that is grounded when either the telephone rings |
|
|
|
|
or during conversation. (To connect the Kenwood navigation |
||
(Mute control wire) |
|
|
MUTE |
||
|
|
system, consult your navigation manual.) |
|||
|
|
|
|
||
|
|
|
|
Car fuse box |
|
Red (Ignition wire) |
|
|
|
Ignition key switch |
|
|
|
|
|
||
Yellow (Battery wire) |
|
|
|
||
|
|
|
|
Car fuse box |
|
Black (Ground wire)
To the metallic body or chassis of the car


 Battery
ENGLISH
21
 Loading...