


DVD/CD RECEIVER
RÉCEPTEUR DVD/CD
ПРИЕМНИК ДЛЯ ВОСПРОИЗВЕДЕНИЯ ДИСКОВ DVD И КОМПАКТ-ДИСКОВ
KD-DV9402/KD-DV9401
РУCCKИЙ FRANÇAIS ENGLISH
For canceling the display demonstration, see page 7.
Pour annuler la démonstration des affichages, référez-vous à la page 7. Информацию об отмене демонстрации функций дисплея см. на стр. 7.
For installation and connections, refer to the separate manual.
Pour l’installation et les raccordements, se référer au manuel séparé.
Указания по установке и выполнению соединений приводятся в отдельной инструкции.
INSTRUCTIONS
MANUEL D’INSTRUCTIONS
ИНСТРУКЦИИ ПО ЭКСПЛУАТАЦИИ
GET0542-001A
[EU]

Declaration of Conformity with regard to the R&TTE Directive 1999/5/EC

 0984
0984
English:
Hereby, JVC, declares that this KD-DV9402/KD-DV9401 is in compliance with the essential requirements and other relevant provisions of Directive 1999/5/EC.
Deutsch:
Hiermit erklärt JVC, dass sich das Gerät KD-DV9402/KD-DV9401 in Übereinstimmung mit den grundlegenden Anforderungen und den übrigen einschlägigen
Bestimmungen der Richtlinie 1999/5/ EG befindet.
Hiermit erklärt JVC die Übereinstimmung des Gerätes KD-DV9402/KD-DV9401 mit den grundlegenden
Anforderungen und den anderen relevanten Festlegungen der Richtlinie 1999/5/EG befindet. (Wien)
Français:
Par la présente JVC déclare que l’appareil KD-DV9402/KD-DV9401 est conforme aux exigences essentielles et aux autres dispositions pertinentes de la directive 1999/5/CE.
Nederlands:
.Hierbij verklaart JVC dat het toestel KD-DV9402/KD-DV9401 in
overeenstemming is met de essentiële eisen en de andere relevante bepalingen van richtlijn 1999/5/EG.
Dansk:
Undertegnede JVC erklærer herved, at følgende udstyr KD-DV9402/ KD-DV9401 overholder de væsentlige krav og øvrige relevante krav i direktiv 1999/5/EF
Español:
Por medio de la presente JVC declara que el KD-DV9402/KD-DV9401 cumple con los requisitos esenciales y cualesquiera otras disposiciones aplicables o exigibles de la Directiva 1999/5/CE
Ελληνική:
ΜΕ ΤΗΝ ΠΑΡΟΥΣΑ JVC ∆ΗΛΩΝΕΙ ΟΤΙ KD-DV9402/KD-DV9401 ΣΥΜΜΟΡΦΩΝΕΤΑΙ ΠΡΟΣ ΤΙΣ ΟΥΣΙΩ∆ΕΙΣ ΑΠΑΙΤΗΣΕΙΣ ΚΑΙ ΤΙΣ ΛΟΙΠΕΣ ΣΧΕΤΙΚΕΣ ∆ΙΑΤΑΞΕΙΣ ΤΗΣ Ο∆ΗΓΙΑΣ 1999/5/ΕΚ.
Italiano:
Con la presente JVC dichiara che questo KD-DV9402/KD-DV9401 è conforme ai requisiti essenziali ed alle altre disposizioni pertinenti stabilite dalla direttiva 1999/5/CE.
Malti:
Hawnhekk, JVC, jiddikjara li dan KD-DV9402/KD-DV9401 jikkonforma mal-ħtiġijiet essenzjali u ma provvedimenti oħrajn relevanti li hemm fid-Dirrettiva 1999/5/EC.
Português:
JVC declara que este KD-DV9402/ KD-DV9401 está conforme com os requisitos essenciais e outras
disposições da Directiva 1999/5/CE.
Suomi:
JVC vakuuttaa täten että KD-DV9402/ KD-DV9401 tyyppinen laite on direktiivin 1999/5/EY oleellisten vaatimusten ja sitä koskevien direktiivin muiden ehtojen mukainen.
G-1

Svenska:
Härmed intygar JVC att denna KD-DV9402/KD-DV9401 står I överensstämmelse med de väsentliga egenskapskrav och övriga relevanta bestämmelser som framgår av direktiv 1999/5/EG.
Lietuviu:
Šiuo JVC deklaruoja, kad šis KD-DV9402/KD-DV9401 atitinka esminius reikalavimus ir kitas 1999/5/ EB Direktyvos nuostatas.
Íslenska:
Hér með lýsir JVC yfir því að KD-DV9402/KD-DV9401 er í samræmi við grunnkröfur og aðrar kröfur, sem gerðar eru í tilskipun 1999/5/EC.
Norsk:
JVC erklærer herved at utstyret KD-DV9402/KD-DV9401 er i samsvar med de grunnleggende krav og øvrige relevante krav i direktiv 1999/5/EF.
Cesky:
JVC tímto prohlašuje, že tento KD-DV9402/KD-DV9401 je ve shode se základními požadavky a dalšími príslušnými ustanoveními smernice 1999/5/ES.
Eesti:
Käesolevaga kinnitab JVC seadme KD-DV9402/KD-DV9401 vastavust direktiivi 1999/5/EÜ põhinõuetele ja nimetatud direktiivist tulenevatele teistele asjakohastele sätetele.
Latviski:
Ar šo JVC deklare, ka KD-DV9402/ KD-DV9401 atbilst Direktivas 1999/5/EK butiskajam prasibam un citiem ar to saistitajiem noteikumiem.
Magyar:
Alulírott, JVC nyilatkozom, hogy a KD-DV9402/KD-DV9401 megfelel a vonatkozó alapvetõ követelményeknek és az 1999/5/EC irányelv egyéb elõírásainak.
Polski:
Niniejszym JVC oświadcza, że KD-DV9402/KD-DV9401 jest zgodny z zasadniczymi wymogami oraz pozostałymi stosownymi
postanowieniami Dyrektywy 1999/5/ EC.
Slovensko:
JVC izjavlja, da je ta KD-DV9402/ KD-DV9401 v skladu z bistvenimi zahtevami in ostalimi relevantnimi dolocili direktive 1999/5/ES.
Slovensky:
JVC týmto vyhlasuje, že KD-DV9402/ KD-DV9401 splna základné požiadavky a všetky príslušné ustanovenia Smernice 1999/5/ES.
G-2
ENGLISH
Thank you for purchasing a JVC product.
Please read all instructions carefully before operation, to ensure your complete understanding and to obtain the best possible performance from the unit.
IMPORTANT FOR LASER PRODUCTS
1.CLASS 1 LASER PRODUCT
2.CAUTION: Do not open the top cover. There are no user serviceable parts inside the unit; leave all servicing to
qualified service personnel.
3.CAUTION: Visible and/or invisible class 1M laser radiation when open. Do not view directly with optical instruments.
4.REPRODUCTION OF LABEL: CAUTION LABEL, PLACED OUTSIDE THE UNIT.
Caution on volume setting:
Digital devices (CD/USB) produce very little noise [European Union only] compared with other sources. Lower the volume before
playing these digital sources to avoid damaging the speakers by sudden increase of the output level.
For safety...
•Do not raise the volume level too much, as this will block outside sounds, making driving dangerous.
•Stop the car before performing any complicated operations.
Temperature inside the car...
If you have parked the car for a long time in hot or cold weather, wait until the temperature in the car becomes normal before operating the unit.
Caution for DualDisc playback
The Non-DVD side of a “DualDisc” does not comply with the “Compact Disc Digital Audio” standard. Therefore, the use of Non-DVD side of a DualDisc on this product may not be recommended.
2
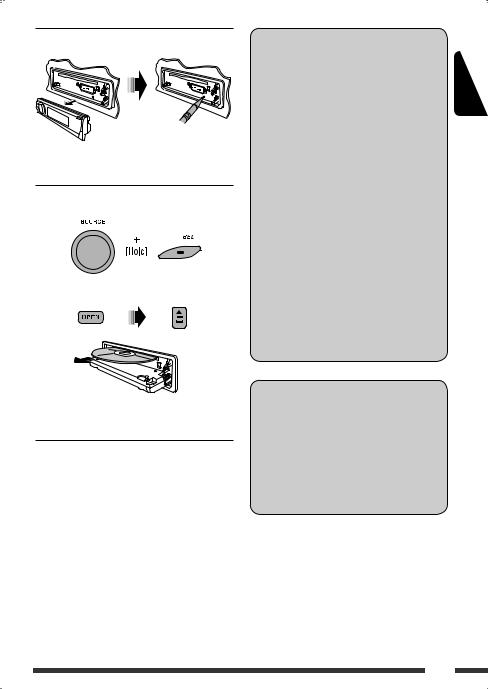
 How to reset your unit
•Your preset adjustments will also be erased (except the registered Bluetooth device, see pages 26 and 27).
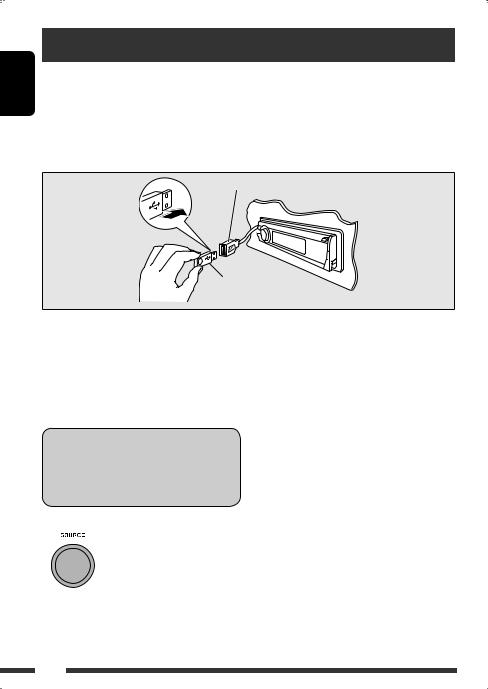
 How to forcibly eject a disc
“Please Eject” appears on the display.
•Be careful not to drop the disc when it ejects.
•If this does not work, reset your unit.
WARNINGS:
(To prevent accidents and damage)
•DO NOT install any unit or wire any cable in a location where;
–it may obstruct the steering wheel and gearshift lever operations.
–it may obstruct the operation of safety devices such as air bags.
–it may obstruct visibility.
•DO NOT operate the unit while driving.
•If you need to operate the unit while driving, be sure to look around carefully.
•The driver must not watch the monitor while driving.
If the parking brake is not engaged, “DRIVER MUST NOT WATCH THE MONITOR WHILE DRIVING.” appears on the monitor, and no playback picture will be shown.
–This warning appears only when the parking brake lead is connected to the parking brake system built in the car (refer to the Installation/Connection Manual).
Indication language:
In this manual, English indications are used for purposes of explanation. You can select the indication language on the monitor on the “LANGUAGE” setting (see page 44).
•You can also select the indication language on the display while playing a CD Text, MP3, WMA, AAC, or WAV file. See “Language” on page 40 for setting.
ENGLISH
3
|
|
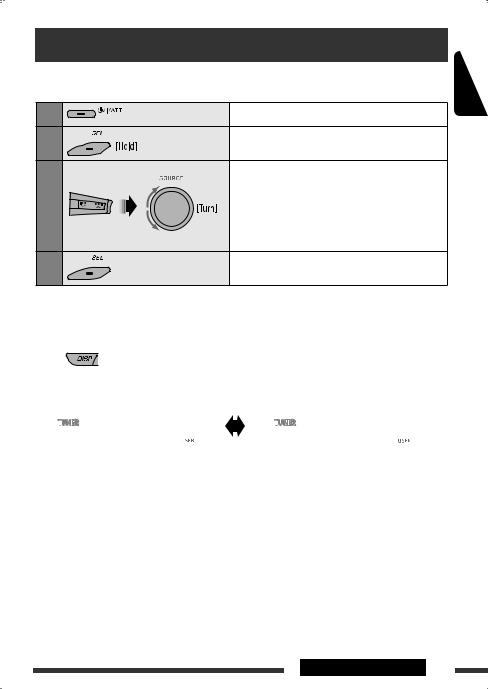
How to use the M MODE and SEL |
||||
ENGLISH |
|
buttons |
||||
4 /¢ buttons, 5/∞buttons, and the |
||||||
|
If you use M MODE or SEL (select), the display and some |
|||||
|
controls (such as the number buttons, |
|||||
|
control dial) enter the corresponding control mode. |
|||||
|
Ex.: When you press number button 1 after pressing |
|||||
|
|
M MODE, to operate the FM tuner. |
||||
|
|
|
|
|
|
|
|
|
|
|
|
|
|
|
|
|
|
|
|
|
Works as time countdown indicator.
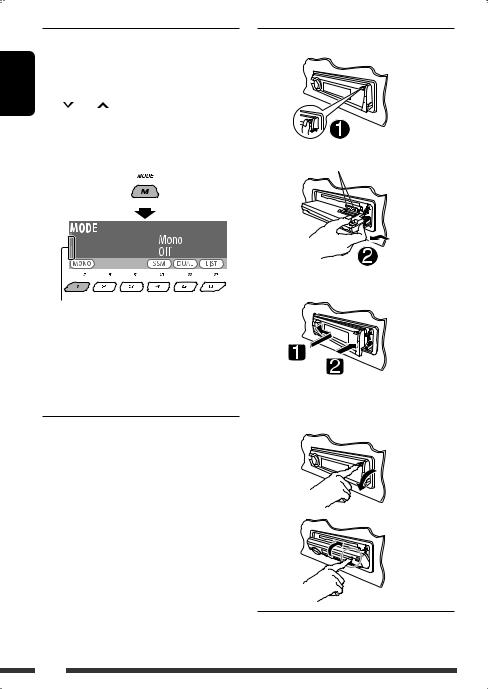
To use these controls for original functions, press M MODE again.
•However, pressing SEL makes the unit enters a different mode.
•Waiting for about 15 seconds without pressing any of these buttons will automatically cancels the control.
Caution:
If the temperature inside the car is below 0°C, the movement of animation and text scroll will be halted on the display to prevent the display from being blurred.  appears on the display.
When the temperature increases, and the operating temperature is resumed, these functions will start working again.
 Detaching the control panel
Avoid touching the connectors.
 Attaching the control panel
 Opening and closing the control panel
Open...
Close...
4

CONTENTS |
|
INTRODUCTIONS |
|
Playable disc type ........................................................................................................................... |
6 |
Preparation..................................................................................................................................... |
7 |
OPERATIONS |
|
Basic operations.............................................................................................................................. |
8 |
• Using the control panel............................................................................................................................ |
8 |
• Using the remote controller (RM-RK252)................................................................................................. |
9 |
Listening to the radio...................................................................................................................... |
12 |
Disc operations................................................................................................................................ |
14 |
• Operations using the control panel.......................................................................................................... |
15 |
• Operations using the remote controller (RM-RK252)............................................................................... |
18 |
Listening to the USB device............................................................................................................. |
24 |
Dual Zone operations ...................................................................................................................... |
25 |
Listening to the Bluetooth® devices................................................................................................ |
26 |
• Using the Bluetooth cellular phone ......................................................................................................... |
28 |
• Using the Bluetooth audio player ............................................................................................................ |
31 |
EXTERNAL DEVICES |
|
Listening to the CD changer ............................................................................................................ |
32 |
Listening to the iPod....................................................................................................................... |
33 |
Listening to the other external components ................................................................................... |
35 |
SETTINGS |
|
Selecting a preset sound mode ....................................................................................................... |
36 |
General settings — PSM ................................................................................................................ |
39 |
Disc setup menu.............................................................................................................................. |
44 |
Bluetooth settings .......................................................................................................................... |
46 |
Title assignment ............................................................................................................................. |
47 |
REFERENCES |
|
Maintenance................................................................................................................................... |
48 |
More about this unit ....................................................................................................................... |
49 |
Troubleshooting.............................................................................................................................. |
57 |
Specifications.................................................................................................................................. |
62 |
ENGLISH
5
ENGLISH
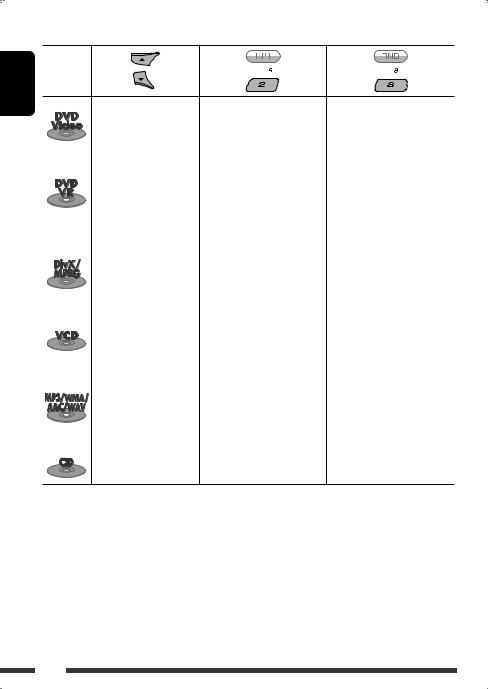
Playable disc type |
|
|
Disc type |
Recording format, file type, etc |
Playable |
DVD |
DVD Video (Region Code: 2) *1 |
|
|
DVD Audio |
|
|
DVD-ROM |
|
DVD Recordable/Rewritable |
DVD Video |
|
(DVD-R/-RW *2, +R/+RW *3) |
DVD-VR |
|
• DVD Video: UDF bridge |
|
|
DivX/MPEG1/MPEG2 |
|
|
• DVD-VR |
|
|
|
|
|
• DivX/MPEG-1/MPEG-2/MP3/ |
MP3/WMA/AAC *4/WAV |
|
WMA/WAV: ISO 9660 level 1, |
JPEG/MPEG4 |
|
level 2, Joliet |
|
|
DVD+VR |
|
|
|
|
|
|
DVD-RAM |
|
Dual Disc |
DVD side |
|
|
Non-DVD side |
|
CD/VCD |
Audio CD/CD Text (CD-DA)/DTS-CD *5 |
|
|
VCD (Video CD) |
|
|
SVCD (Super Video CD) |
|
|
CD-ROM |
|
|
CD-I (CD-I Ready) |
|
CD Recordable/Rewritable |
CD-DA |
|
(CD-R/-RW) |
DivX/MPEG1/MPEG2 |
|
• ISO 9660 level 1, level 2, Joliet |
|
|
MP3/WMA/AAC *4/WAV |
|
|
|
|
|
|
JPEG/MPEG4 |
|
*1 If you insert a DVD Video disc of an incorrect Region Code, “REGION CODE ERROR” appears on the monitor.
*2 DVD-R recorded in multi-border format is also playable (except for dual layer discs). DVD-RW dual layer discs are not playable.
*3 It is possible to play back finalized +R/+RW (Video format only) discs. +RW double layer discs are not playable. *4 This unit can play back AAC files encoded using iTunes. This unit cannot play back AAC files purchased from iTunes
Store.
*5 To reproduce DTS sound, use the DIGITAL OUT terminal (see also pages 45 and 55).
6
Preparation
 Cancel the display demonstration and set the clock
• See also pages 39 and 40.
1 |
Turn on the power. |
2 |
Enter the PSM settings. |
3 |
Cancel the display demonstrations |
|
Select “Demo,” then “Off.” |
|
Set the clock |
|
Select “Clock Hr” (hour), then adjust the hour. |
|
Select “Clock Min” (minute), then adjust the minute. |
|
Select “24H/12H,” then “24Hours” or “12Hours.” |
4 |
Finish the procedure. |
Changing the display information and pattern
• When the power is turned off: Check the current clock time
Ex.: When tuner is selected as the source
|
|
|
|
|
|
|
|
|
|
|
|
|
|
|
|
|
|
|
|
|
|
|
|
|
|
|
|
|
|
|
|
|
|
|
|
|
|
|
|
|
|
|
|
|
|
|
|
|
|
|
|
|
|
|
|
|
|
|
|
|
|
|
|
|
|
|
|
|
|
|
|
|
|
|
|
|
|
|
|
|
|
|
|
|
|
|
|
|
|
|
|
|
|
|
|
|
|
|
|
|
Source operation display |
|
Audio level meter display |
||||||||||||||||
• To assign a title to a station, see page 47. |
|
(see “LevelMeter” on page 39) |
|||||||||||||||||
ENGLISH
INTRODUCTIONS 7
ENGLISH
Basic operations
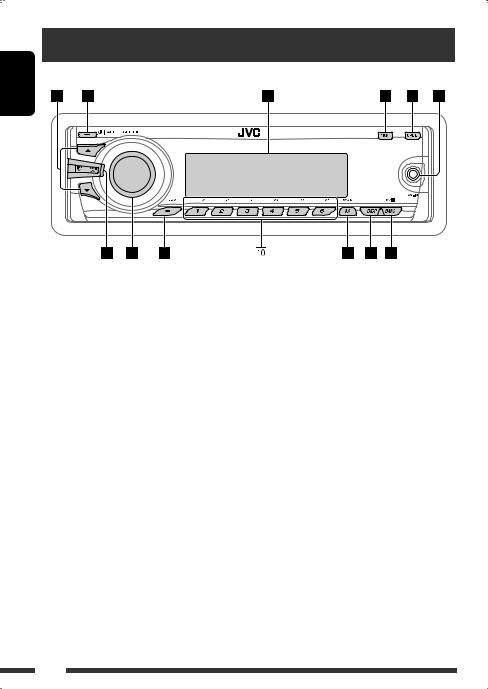
Using the control panel 
1• TUNER: Select preset station.
•DISC/USB/CD-CH: Select title/program/ playlist/folder.
•iPod: Enter the main menu/Pause playback/ Confirm selection.
2• Turn on the power.
•Turn off the power [Hold].
•Attenuate the sound (if the power is on).
•Bluetooth: Switch the conversation media
during a phone call conversation. 3 Display window
4• Enter/exit Bluetooth menu.
•Display the dialed list [Hold]. 5 Flip down the control panel.
•To eject the disc, flip down the control panel
then press 0on the unit. 6 AV-IN (video) input jack
7• TUNER: Search for station.
•DISC/USB/CD-CH/iPod: Select chapter/track.
•BT Audio: Reverse skip/forward skip.
8 • Volume control [Turn].
•Select the source [Press].
TUNER =DISC*1 =USB*1 =CD-CH*1/ iPod*1 (or EXT IN) =BT Audio =LINE IN
=AV IN =(back to the beginning)
9• Select/adjust the sound mode.
•Enter the PSM settings [Hold]. p • TUNER: Select preset station.
•DISC/USB/CD-CH: Select chapter/title/ program/folder/track/disc (for CD changer).
•Bluetooth: Dial preset phone number*2. q • Enter functions mode.
•Bluetooth: Activate Voice Dialing [Hold]. w Change the display information and pattern. e • TUNER: Select the bands.
•DISC/USB: Start/pause playback.
•BT Audio: Start/pause playback.
*1 You cannot select these sources if they are not ready or not connected.
*2 For storing preset phone number, see page 30.
8
Using the remote controller (RM-RK252) 
Installing the batteries
R03/LR03/AAA
Insert the batteries into the remote controller by matching the polarity (+ and –) correctly.
Caution:
Battery shall not be exposed to excessive heat such as sunshine, fire, or the like.
If the effectiveness of the remote controller decreases, replace both batteries.
Before using the remote controller:
• Aim the remote controller directly at the remote sensor on the unit.
• DO NOT expose the remote sensor to bright light (direct sunlight or artificial lighting).
ENGLISH
IMPORTANT:
If Dual Zone is activated (see page 25), the remote controller only functions for operating the DVD/CD player.
1*1 |
|
button |
|
|
|||
|
|||
Remote sensor |
• Turns the power on if pressed briefly or |
||
attenuates the sound when the power is on. |
|||
|
|||
•Turns the power off if pressed and held.
•Switches the conversation media during a phone call conversation.
Continued on the next page
OPERATIONS 9

ENGLISH
25/∞buttons
•TUNER: Selects the preset stations.
•DISC:
–DVD-Video: Selects the title.
–DVD-VR: Selects the program/playlist.
–DivX/MPEG Video/MP3/WMA/AAC/WAV: Selects the folders if included.
•USB:
–DivX/MPEG Video/MP3/WMA/AAC/WAV: Selects the folders if included.
•CD-CH: Selects the folders if included.
•BT Audio: Selects the folders if included.
•iPOD:
–5:Enters the main menu (then 5/∞/ 4 /¢
/¢ work as menu selecting buttons.)
5: Returns to the previous menu.
∞: Confirms the selection.
–∞:Pauses or resumes playback.
4 / ¢
/ ¢ buttons
•TUNER:
–Searches for stations automatically if pressed briefly.
–Searches for stations manually if pressed and held.
•DISC/USB/CD-CH:
–Reverse skip/forward skip if pressed briefly.
–Reverse search/forward search if pressed and held.
•BT Audio:
–Reverse skip/forward skip if pressed briefly.
–Reverse search/forward search if pressed and held.
•iPOD:
–Reverse skip/forward skip if pressed briefly.
–Reverse search/forward search if pressed and held.
In menu selecting mode:
–Selects an item if pressed briefly. (Then, press ∞to confirm the selection.)
–Skips 10 items at a time if pressed and held.
3VOL (volume) + / – buttons
• Adjusts the volume level.
2nd VOL (volume) buttons
•Adjust the volume level through the 2nd AUDIO OUT plug while holding SHIFT button (see page 25).
4*2 ASPECT button
• Not applicable for this unit.
5*1  PHONE button
•Answer incoming calls.
•Enters “Redial” menu when a Bluetooth phone is connected [Hold].
6*2 SETUP button
• Enters disc setup menu (during stop).
7*2 TOP M (menu) button
•DVD-Video/DivX: Shows the disc menu.
•DVD-VR: Shows the Original Program screen.
•VCD: Resumes PBC playback.
8*2 OSD (on-screen display) button
• Shows the on-screen bar.
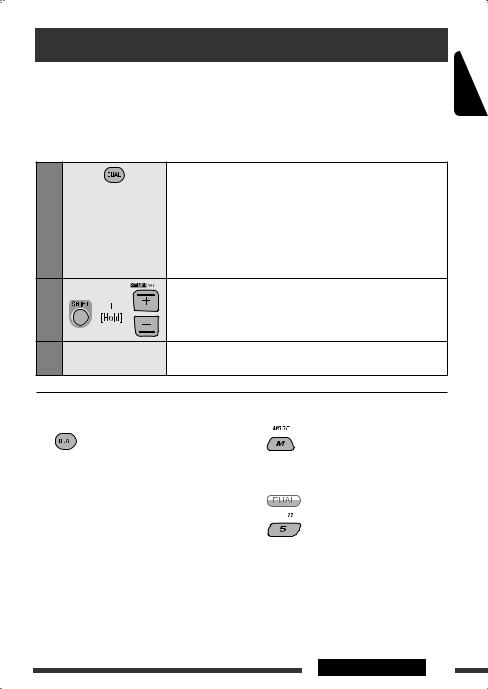
9SHIFT button
• Functions with other buttons.
p*1 DISP (display) button
• Changes the display information.
10
q1/¡buttons
•DVD-Video: Slow motion playback (during pause).
•DVD-VR/VCD: Forward slow motion playback (during pause).
•DISC/USB: Reverse search/forward search.
w*1 SOURCE button
• Selects the source.
e3(play) / 8(pause) button
• DISC/USB/BT Audio: Starts/pauses playback.
r (end call) button
• Ends the call.
BAND/7(stop) buttons
•TUNER: Selects the bands.
•DISC/USB/BT Audio: Stops playback.
t*2 RETURN button
• VCD: Returns to the PBC menu.
y*2 MENU button
•DVD-Video/DivX: Shows the disc menu.
•DVD-VR: Shows the Playlist screen.
•VCD: Resumes PBC playback.
u*2 %/fibuttons
•DVD-Video: Makes selection/settings.
•CD-CH: Changes discs in the magazine.
@/#buttons
•DVD-Video: Makes selection/settings.
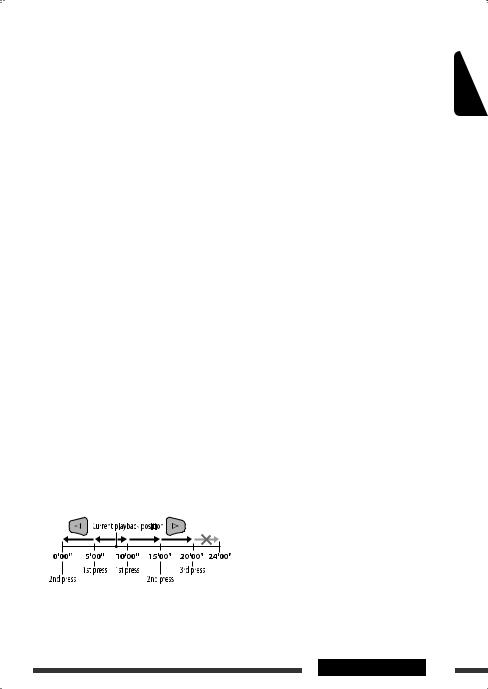
•DivX/MPEG Video: Skips back or forward by about five minutes.
ENT (enter) button
• Confirms selection.
i*2 DUAL button
• Activates or deactivates Dual Zone.
oSURROUND button
• Not applicable for this unit.
DIRECT button
•DISC/USB: Enters direct search mode for chapter/title/program/playlist/folder/track while holding SHIFT button (see page 18 for details).
CLR (clear) button
•DISC/USB/Bluetooth: Erases the misentry while holding SHIFT button.
*1 When Dual Zone is activated, these buttons cannot be used.
*2 Functions as number buttons/* (asterisk)/# (hash) while holding SHIFT button.
–TUNER: Selects the preset stations (1 – 6).
–DISC: Enters chapter/title/program/playlist/folder/ track number after entering search mode by pressing SHIFT and DIRECT (see page 18 for details).
ENGLISH
OPERATIONS 11

ENGLISH
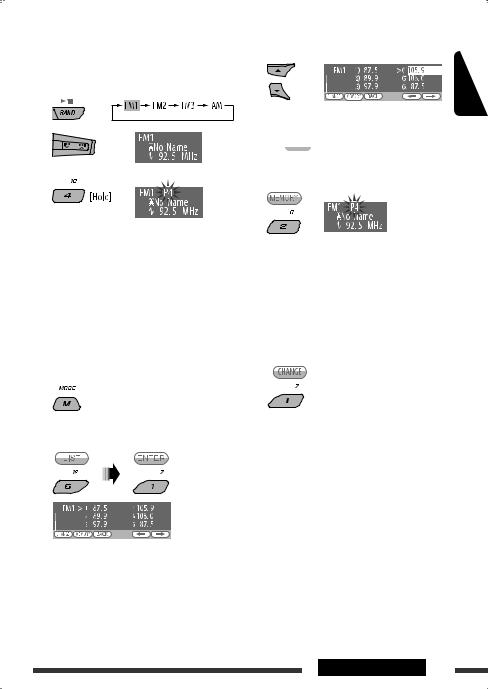
Listening to the radio
1 |
Select “TUNER.” |
|
2 |
Select the bands. |
|
3 |
Search for a station to listen—Auto Search. |
|
|
Manual Search: Hold either one of the buttons until “Manual Search” lights up on the |
|
|
display, then press it repeatedly. |
|
|
• When receiving an FM stereo broadcast with sufficient signal strength, |
lights up |
|
on the display. |
|
 When an FM stereo broadcast is hard to receive
1
2
Reception improves, but stereo effect will be lost.
•  lights up on the display.
3 Exit from the setting.
 FM station automatic presetting —SSM (Strong-station Sequential Memory)
You can preset up to six stations for each band.
1 While listening to a station...
2 
3 
Local FM stations with the strongest signals are searched and stored automatically in the selected FM band.
12
|
|
Manual presetting |
4 |
|
|
Ex.: Storing FM station of 92.5 MHz into preset number 4 of the FM1 band.
Using the number buttons
1
2 |
|
3 |
5 |
Preset number flashes for a while.
Select the preset number you want to store into.
•You can move to the lists of the other FM bands
by pressing number button 5 ( ) or 6 (
 ) repeatedly.
Store the station.
ENGLISH
Using the Preset Station list
•When  is shown on the display, you can move back to the previous screen by pressing number button 3.
1Follow steps 1 and 2 of “Using the number buttons” above.
•By holding 5/ ∞, the Preset Station List will also appear (go to step 4).
2
3 Display the Preset Station List.
 Listening to the preset station on the Preset Station List
1Display the Preset Station List, then select the preset station you want to listen to.
2 Change to the selected station.
OPERATIONS 13

ENGLISH
Disc operations
Before performing any operations...
Turn on the monitor to watch the playback picture. If you turn on the monitor, you can also control playback of other discs by referring to the monitor screen. (See pages 20 – 23.)
The disc type is automatically detected, and playback starts automatically (for DVD: automatic start depends on its internal program).
If the current disc does not have any disc menu, all tracks will be played repeatedly until you change the source or eject the disc.
If “ ” appears on the monitor when pressing a button, the unit cannot accept the operation you have tried to do.
• In some cases, without showing “ ,” operations will not be accepted.
1
2
3
Open the control panel.
Insert the disc.
Playback starts automatically.
Start playback if necessary.
To stop play and eject the disc |
Prohibiting disc ejection |
|||
|
|
|
|
|
|
|
|
|
|
• Press SOURCE to listen to another playback source.
To cancel the prohibition, repeat the same procedure.
14

Operations using the control panel 
Pressing (or holding) the following buttons allows you to...
Disc type |
|
(Number buttons)*3 |
|
|
|
|
|
|
[Press] Select chapter |
Select title |
During stop: Locate title |
|
[Hold] Reverse/fast-forward |
|
During play/pause: Locate |
|
chapter*1 |
|
chapter |
|
[Press] Select chapter |
Select program number/ |
During stop: Locate program |
|
[Hold] Reverse/fast-forward |
playlist number |
During play/pause: Locate |
|
chapter*1 |
|
chapter |
|
[Press] Select track |
Select folder |
Locate particular folder directly |
|
[Hold] Reverse/fast-forward track*2 |
|
|
|
[Press] Select track |
— |
Locate particular track directly |
|
[Hold] Reverse/fast-forward track*1 |
(PBC not in use) |
|
|
|
||
|
[Press] Select track |
Select folder |
Locate particular folder directly |
|
[Hold] Reverse/fast-forward track*1 |
|
|
|
[Press] Select track |
— |
Locate particular track directly |
|
[Hold] Reverse/fast-forward track*1 |
|
|
|
|
|
|
*1 |
Search speed: |
|
|
*2 |
Search speed: |
|
|
*3 |
Press to select number 1 to 6; hold to select number 7 to 12. |
|
|
Continued on the next page
ENGLISH
OPERATIONS 15
ENGLISH
After pressing M MODE, press the following buttons to...
Disc type
|
|
|
Skip 10 chapters (during |
Repeat Chapter: |
|
|
|
|
play or pause) |
Repeat current chapter |
— |
|
|
|
|
Repeat Title: |
|
|
|
|
|
|
|
|
|
|
|
Repeat current title |
|
|
|
|
|
|
|
|
|
|
Skip 10 chapters (during |
Repeat Chapter: |
|
|
|
|
play or pause) |
Repeat current chapter |
|
|
|
|
|
Repeat Program: |
— |
|
|
|
|
Repeat current program (not |
|
|
|
|
|
available for Playlist Playback) |
|
|
|
|
|
|
|
|
|
|
Skip 10 tracks (within the |
Repeat Track: |
Random Folder: |
|
|
|
same folder) |
Repeat current track |
Randomly play all tracks of |
|
|
|
|
Repeat Folder: |
current folder, then tracks of |
|
|
|
|
Repeat current folder |
next folders |
|
|
|
|
|
Random All: |
|
|
|
|
|
Randomly play all tracks |
|
|
|
Skip 10 tracks (PBC not in |
Repeat Track: |
Random Disc: |
|
|
|
use) |
Repeat current track (PBC not in |
Randomly play all tracks (PBC |
|
|
|
|
use) |
not in use) |
|
|
|
|
|
|
|
|
|
Skip 10 tracks (within the |
Repeat Track: |
Random Folder: |
|
|
|
same folder) |
Repeat current track |
Randomly play all tracks of |
|
|
|
|
Repeat Folder: |
current folder, then tracks of |
|
|
|
|
Repeat current folder |
next folders |
|
|
|
|
|
Random All: |
|
|
|
|
|
Randomly play all tracks |
|
|
|
|
|
|
|
|
|
Skip 10 tracks |
Repeat Track: |
Random All: |
|
|
|
|
Repeat current track |
Randomly play all tracks |
• You can also cancel the playback mode by selecting “Off” or press number button 4 (  ).
).
16
|
|
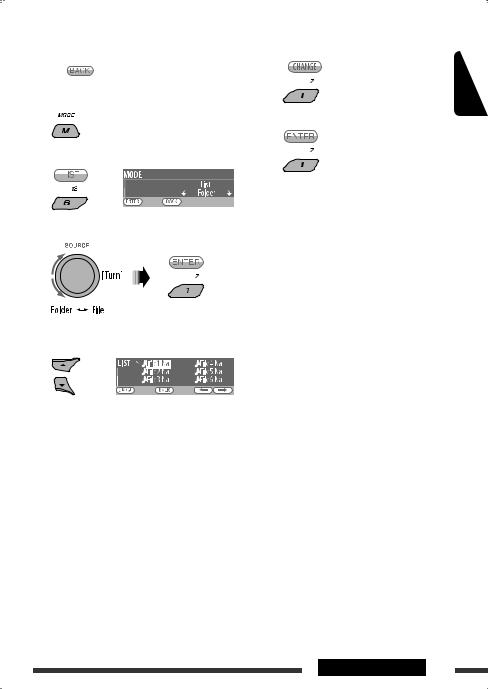
Selecting a folder/track on the list |
5 Change to the selected item. |
||
|
|
||||
|
|
(only for MP3/WMA/AAC/WAV file) |
A If File List is selected |
||
• When |
is shown on the display, you can move |
The list disappears and playback |
|||
starts. |
|||||
|
back to the previous screen by pressing number |
||||
|
|
||||
button 3.
1
2 Select “LIST.”
3 Select the list type.
4 Select an item.
Ex.: When “File” is selected in step 3
•You can move to the other lists by pressing
number button 5 (  ) or 6 (
 ) repeatedly.
BIf Folder List is selected
•If the current folder is selected, File List appears, then repeat steps 4 and 5 Ato start playback.
•If another folder is selected, playback starts from the 1st file of the selected folder.
ENGLISH
OPERATIONS 17

ENGLISH
Operations using the remote controller (RM-RK252) 
|
Disc |
/ |
|
Button |
|
|
|
|
|
Stop play |
Stop play |
|
|
Start play/Pause (if pressed during play) |
Start play/Pause (if pressed during play) |
|
|
• Reverse/forward chapter search*1 (No |
Reverse/forward track search*4 (No sound can |
|
|
sound can be heard.) |
be heard.) |
•Slow motion*2 during pause (No sound can be heard.)
* DVD-VR: Reverse slow motion does not work.
[Press] Select chapter (during play or pause) |
[Press] Select track (during play or pause) |
[Hold] Reverse/fast-forward chapter search*3 |
[Hold] Reverse/fast-forward track search*5 |
|
(No sound can be heard.) |
|
|
• DVD-Video: Select title (during play or |
Select folder |
pause) |
|
• DVD-VR: Select program/playlist (during |
|
play or pause) |
|
|
|
|
• Skip back or forward the scenes by about |
— |
five minutes |
|
• Select chapter |
To search for chapter/title/program/playlist/folder/track directly (DVD/DivX/MPEG Video/VCD/ MP3/WMA/AAC/WAV/CD)
1 While holding SHIFT, press DIRECT repeatedly to select the desired search mode.
DVD-Video |
: |
|
|
|
|
|
|
|
|
|
|
|
|
|
|
VCD : |
|
|
|
|
|
|
|
|
|
|
|
|
|
|
|
|
|
|
|
|
|
|
|
|
|
|
|
|
|
|
|
|
|
|
|
|
|||
|
|
|
|
|
|
|
|
|
|
|
|
|
|
|
|
|
|
|
|
|
|
|
|
|
|
|
|
DVD-VR |
: |
|
|
|
|
|
|
|
|
|
|
|
|
|
|
CD : |
|
|
|
|
|
|
|
|
|
|
|
|
|
|
|
|
|
|
|
|
|
|
|
|
|
|
|
|
|
|
|
|
|
|
|||||
DivX/MPEG Video |
: |
|
|
|
|
|
|
|
|
|
|
|
|
|
|
|
|
|
|
|
|
|
|
|
|
|
|
|
|
|
|
|
|
|
|
|
|
|
|
|
|
|
|
|
|
|
|
|
|
|
|
|
|
||
|
|
|
|
|
|
|
|
|
|
|
|
|
|
|
|
|
|
|
|
|
|
|
|
|
|
||
|
|
|
|
|
|
|
|
|
|
|
|
|
|
|
|
|
|
|
|
|
|
|
|
|
|
||
MP3/WMA/AAC/WAV :
2 While holding SHIFT, press the number buttons (0 – 9) to enter the desired number. 3 Press ENT (enter) to confirm.
18
|
|
|
Stop play |
Stop play |
Stop play |
|
|
|
Start play/Pause (if pressed during |
Start play/Pause (if pressed during |
Start play/Pause (if pressed during |
play) |
play) |
play) |
|
|
|
Reverse/forward track search*1 |
Reverse/forward track search*1 |
Reverse/forward track search*1 |
• Forward slow motion*2 during |
|
|
pause. (No sound can be heard.) |
|
|
* Reverse slow motion does not work. |
|
|
|
|
|
[Press] Select track (during play or |
[Press] Select track (during play or |
[Press] Select track (during play or |
pause) |
pause) |
pause) |
[Hold] Reverse/fast-forward track |
[Hold] Reverse/fast-forward track |
[Hold] Reverse/fast-forward track |
search*3 (No sound can be |
search*3 |
search*3 |
heard.) |
|
|
|
|
|
|
Select folder |
|
— |
|
— |
|
|
|
— |
— |
— |
|
|
|
ENGLISH
•For DivX/MPEG Video/MP3/WMA/AAC/WAV, track is searched within the same folder.
•To erase a misentry, press CLR (clear) while holding SHIFT.
•To return to the previous screen, press RETURN.
*1 |
Search speed: |
*2 |
Slow motion speed: |
*3 |
Search speed: |
*4 |
Search speed: |
*5 |
Search speed: |
Continued on the next page
OPERATIONS 19
ENGLISH
Using menu driven features... (DVD-Video/ DVD-VR)
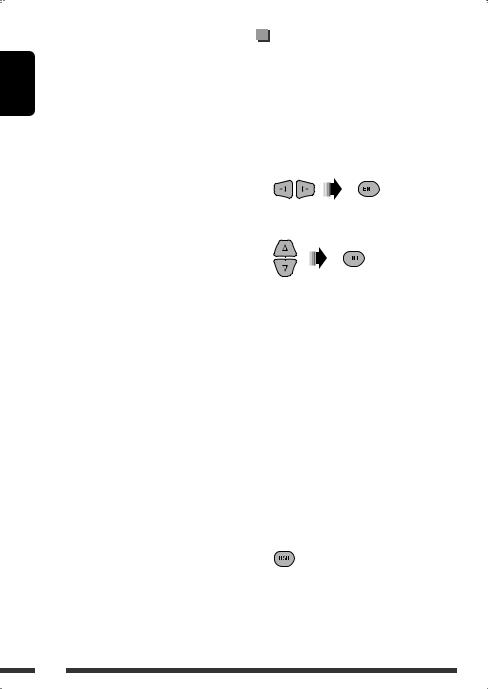
1 Press TOP M/MENU to enter the menu screen.
2Press %/fi/@*/#* to select an item you want to start play.
3 Press ENT (enter) to confirm.
* Not applicable for DVD-VR.
Canceling the PBC playback... (VCD)
1 During stop, press DIRECT while holding SHIFT.
2Hold SHIFT, then press the number buttons (0 – 9) to enter the desired number.
3 Press ENT (enter) to confirm.
• To resume PBC, press TOP M/MENU.
Operations using the on-screen bar
(DVD/DVD-VR/DivX/MPEG Video/VCD)
These operations are possible on the monitor using the remote controller.
1Show the on-screen bar (see page 21).
 (twice)
2 Select an item.
3Make a selection.
If pop-up menu appears...
•To cancel pop-up menu, press RETURN.
•For entering time/numbers, see the following.
Entering time/numbers
Press %/fito change the number, then press @/#to move to the next entry.
•Each time you press %/fi, the number increases/ decreases by one value.
•After entering the numbers, press ENT (enter).
•It is not required to enter the zero and tailing zeros (the last two digits in the example below).
Ex.: Time search
DVD: _:_ _:_ _ (Ex.: 1:02:00)
Press %once, then #twice to go to the third entry, % twice, then press ENT (enter).
To remove the on-screen bar
20

On-screen bar
Ex.: DVD-Video
Information
Operation
1 Disc type
2 • DVD-Video/DTS-CD: Audio signal format type and channel
• VCD:PBC
3Playback mode*1
DVD-Video: T. RPT: Title repeat
C. RPT: Chapter repeat
DVD-VR: C. RPT: Chapter repeat PG. RPT: Program repeat
DivX/MPEG Video: T. RPT: Track repeat F. RPT: Folder repeat F. RND: Folder random A. RND: All random
VCD*2: T. RPT: Track repeat A. RND: All random
4 Playback information
Current title/chapter Current program/chapter
Current playlist/chapter
Current track
 Current folder/track 5 Time indication
Elapsed playing time of the disc (For DVD-Video/DVD-VR, elapsed playing time of the current title/ program/playlist.)
DVD-Video/DVD-VR: Remaining title/program/playlist time VCD: Remaining disc time
Elapsed playing time of the current chapter/track*3
Remaining time of the current chapter/track*3
6 Playback status
Play
Forward/reverse search
Forward/reverse slow-motion
Pause
 Stop 7 Operation icons
Change time indication (see 5)
Time Search (Enter the elapsed playing time of the current title/program/ playlist or of the disc.)
Title Search (by its number)
Chapter Search (by its number)
 Track Search (by its number)
Change the audio language or audio channel
Change or turn off the subtitle language
Change the view angle
Repeat play*1 Random play*1
*1 For repeat play/random play, see also page 16. *2 While PBC is not in use.
*3 Not applicable for DVD-VR.
ENGLISH
OPERATIONS 21

ENGLISH
Operations using the control screen
(DivX/MPEG Video/MP3/WMA/AAC/WAV/CD)
These operations are possible on the monitor using the remote controller.
1Show the control screen.
DivX/MPEG Video: Press 7during play. MP3/WMA/AAC/WAV/CD: Automatically appear during play.
2Select “Folder” column or “Track” column (except for CD).
3 Select a folder or track.
4Start playback.
DivX/MPEG Video: Press ENT (enter) or 3/8. MP3/WMA/AAC/WAV/CD: Playback starts automatically.
Control screen
Ex.: MP3/WMA/AAC/WAV disc
1 Current folder number/total folder number
2 Folder list with the current folder selected
3 Selected playback mode
4 Elapsed playing time of the current track
5 Operation mode icon ( 3, 7, 8, ¡, 1)
6Current track number/total number of tracks in the current folder (total number of tracks on the disc)
7 Track information
8 Track list with the current track selected
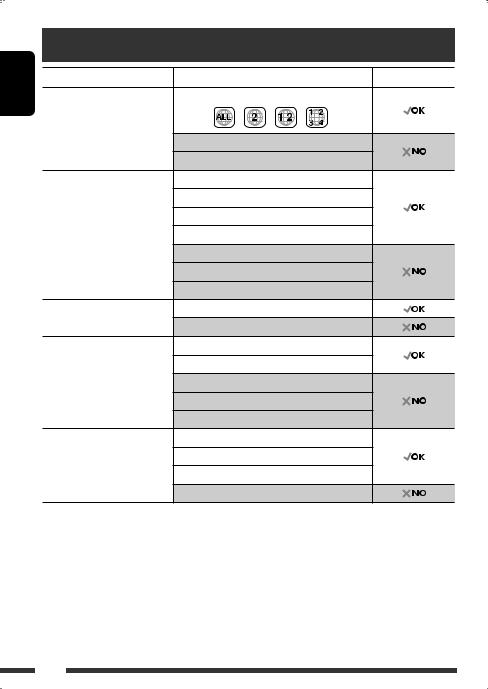
To select a playback mode
1 While control screen is displayed...
Playback mode selection screen appears on the folder list section of the control screen.
2 Select a playback mode.
3 Select an item.
REPEAT: |
||||||||||
|
|
|
|
|
|
|
|
|
|
|
|
|
|
|
|
|
|
|
|
||
RANDOM: |
||||||||||
|
|
|
|
|
|
|
|
|
|
|
|
|
|
|
|
|
|
|
|
|
|
|
|
|
|
|
|
|
|
|
|
|
Mode |
Playback functions |
|||||||||
|
|
|
|
|
|
|
|
|
|
|
F. RPT |
Repeat current folder |
|||||||||
(folder repeat): |
|
|
|
|
|
|
|
|
|
|
|
|
|
|
|
|
|
|
|
|
|
T. RPT |
Repeat current track |
|||||||||
(track repeat): |
|
|
|
|
|
|
|
|
|
|
|
|
|
|
|
|
|
|
|
|
|
A. RND |
Randomly play all tracks |
|||||||||
(all random): |
|
|
|
|
|
|
|
|
|
|
|
|
|
|
|
|
|
|
|
|
|
F. RND |
Randomly play all tracks of |
|||||||||
(folder random): |
current folder, then tracks of |
|||||||||
|
next folders |
|||||||||
|
|
|
|
|
|
|
|
|
|
|
4 Confirm the selection.
* Not selectable for CD.
22
Operations using the list screen
(DVD-VR/DivX/MPEG Video/MP3/WMA/AAC/ WAV)
These operations are possible on the monitor using the remote controller.
List screen (DivX/MPEG Video/MP3/WMA/ AAC/WAV)
Before playing, you can display the folder list/track list to confirm the contents and start playing a track.
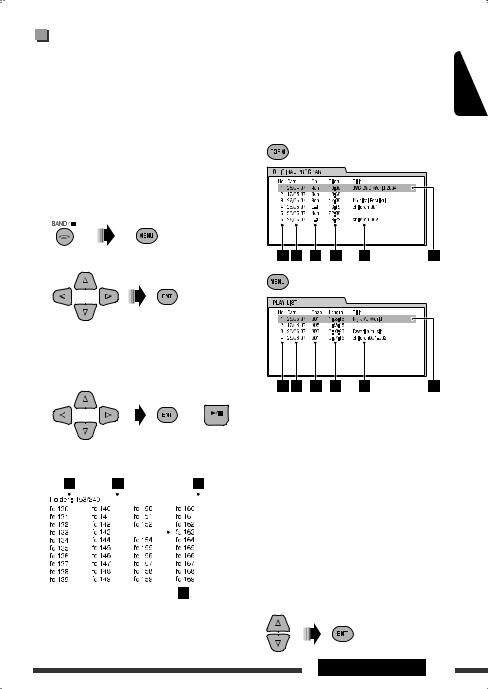
1 Display the folder list while stop.
2 Select an item from the folder list.
3Current page/total number of the pages included in the list
4 Current folder/track (highlighted bar)
List screen (DVD-VR)
You can use ORIGINAL PROGRAM or PLAY LIST screen anytime while playing DVD-VR with its data recorded. 1 Select a list screen.
ENGLISH
• Track list of the selected folder appears.
• To go back to the folder list, press RETURN.
3 Select a track to start playing.
|
|
|
|
|
|
|
|
|
or |
1 Program/playlist number |
|||
|
|
|
|
|
|
|
|
|
|||||
|
|
|
|
|
|
|
|
|
|
|
|
2 |
Recording date |
|
|
|
|
|
|
|
|
|
|
|
|
3 |
Recording source (TV station, the input |
• MP3/WMA/AAC/WAV: Control screen appears |
|
terminal of the recording equipment, etc.) |
|||||||||||
|
(see page 22). |
4 Start time of recording |
|||||||||||
|
|
|
|
|
|
|
|
|
|
|
|
5 |
Title of the program/playlist* |
|
|
|
|
|
|
|
|
|
|
|
|
6 |
Current selection (highlighted bar) |
|
|
|
|
|
|
|
|
|
|
|
|
||
|
|
|
|
|
|
|
|
|
|
|
|
7 |
Creating date of playlist |
|
|
|
|
|
|
|
|
|
|
|
|
8 |
Number of chapters |
|
|
|
|
|
|
|
|
|
|
|
|
||
|
|
|
|
|
|
|
|
|
|
|
|
9 |
Playback time |
|
|
|
|
|
|
|
|
|
|
|
|
||
|
|
|
|
|
|
|
|
|
|
|
|
* The title of the original program or playlist may |
|
|
|
|
|
|
|
|
|
|
|
|
|
not be displayed depending on the recording |
|
|
|
|
|
|
|
|
|
|
|
|
|
||
|
|
|
|
|
|
|
|
|
|
|
|
equipment. |
|
|
|
|
|
|
|
|
|
|
|
|
|
||
|
|
|
|
|
|
|
|
|
|
|
|
||
|
|
|
|
Ex.: Folder list |
2 Select an item from the list. |
||||||||
1 Current folder number/total folder number
2 Current track number/total number of tracks in the current folder
OPERATIONS 23
ENGLISH
Listening to the USB device
You can connect a USB mass storage class device such as a USB memory, Digital Audio Player, portable HDD, etc. to the unit.
This unit can play DivX/MPEG Video/MP3/WMA/AAC */WAV tracks stored in a USB device.
*This unit can play back AAC files encoded using iTunes. This unit cannot play back AAC files purchased from iTunes Store.
All tracks will be played repeatedly until you change the source or detach the USB device.
USB cable from the rear of the unit.
USB memory
Turn on the monitor to watch the playback picture if you play back a DivX/MPEG file. You can also control playback by referring to the monitor screen. (See also pages 20 – 23.)
•See pages 18 – 23 for operation using the remote controller.
•See pages 44 and 45 for more settings.
If “ ” appears on the monitor when pressing a button, the unit cannot accept the operation you have tried to do.
•In some cases, without showing “ ,” operations will not be accepted.
If a USB device has been attached...
Playback starts from where it has been stopped previously.
•If a different USB device is currently attached, playback starts from the beginning.
To stop play and detach the USB device
Straightly pull it out from the unit.
• Press SOURCE to listen to another playback source.
You can operate the USB device in the same way you operate the files on a disc. (See pages 15 – 23.)
•You cannot select “USB” when Dual Zone is in use (see page 25).
Cautions:
•Avoid using the USB device if it might hinder your safety driving.
•Do not pull out and attach the USB device repeatedly while “Reading” is shown on the display.
•Do not start the car engine if a USB device is connected.
•This unit may not be able to play the files depending on the type of USB device.
•Operation and power supply may not work as intended for some USB devices.
•You cannot connect a computer to the USB input terminal of the unit.
•Make sure all important data has been backed up to avoid losing the data.
•Do not leave a USB device in the car, expose to direct sunlight, or high temperature to avoid deformation or cause damages to the device.
•Some USB devices may not work immediately after you turn on the power.
•For more details about USB operations, see page 51.
24
Dual Zone operations
You can enjoy disc playback on the external monitor connected to the VIDEO output terminal and 2nd AUDIO OUT plugs while listening to any source (other than “AM” and “USB”) through the speakers.
•You cannot select “AM” or “USB” as the source when Dual Zone is activated.
•When Dual Zone is in use, you can only operate the DVD/CD player using the remote controller. For operations, see pages 18 – 23.
These operations are possible on the monitor using the remote controller.
1 |
Activate Dual Zone. |
• DUAL indicator lights up on the display.
The main source automatically changes to “DISC.”
To select a different source (main source) to listen through the speakers, press SOURCE on the control panel.
•By using the buttons on the control panel, you can operate the newly selected source without affecting Dual Zone operations.
2 |
|
Adjust the volume through the 2nd AUDIO OUT plug. |
3 |
— |
Operate the DVD/CD player using the remote controller by |
|
|
referring to the monitor screen. |
ENGLISH
To cancel Dual Zone operations
• DUAL indicator goes off.
On the control panel:
1
2Enter Dual Zone settings. Activate or deactivate Dual Zone.
•The source automatically changes to “DISC” when Dual Zone is activated.
OPERATIONS 25
ENGLISH
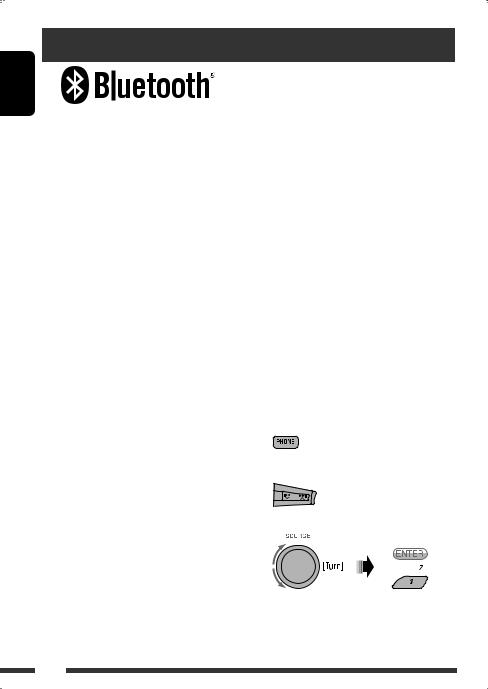
Listening to the Bluetooth® devices
Bluetooth is a short-range wireless radio communication technology for the mobile device such as mobile phones, portable PCs, and other devices. The Bluetooth devices can be connected without cables and communicate with each other.
•Refer to the list (included in the box) to see the countries where you may use the Bluetooth® function.
Bluetooth profile
This unit supports the following Bluetooth profiles; HFP (Hands-Free Profile) 1.5
OPP (Object Push Profile) 1.1
A2DP (Advanced Audio Distribution Profile) 1.2 AVRCP (Audio/Video Remote Control Profile) 1.3
Features
You can operate Bluetooth devices through the unit as follows:
•Receiving a call
•Making a call—from phone book, from call history (dialed number/received call), by dialing number, by preset numbers, by voice command
•Informing you of the arrival of a text message
•Play back a Bluetooth audio player
Refer also to the instructions supplied with the Bluetooth device.
 Connecting a Bluetooth device for the first time
Pairing and PIN code
When you connect a Bluetooth device to the unit for the first time, make pairing between the unit and the device. Pairing allows Bluetooth devices to communicate with each other.
To make pairing, you may need to enter the PIN (Personal Identification Number) code of your Bluetooth device you want to connect.
•Once the connection is established, it is registered in the unit even if you reset the unit. Up to five devices can be registered in total.
•Only one device for Bluetooth phone and one for Bluetooth audio can be connected at a time.
•To use the Bluetooth function, you need to turn on Bluetooth function of the device.
Preparation: Operate the device to turn on its Bluetooth function.
•When  is shown on the display, you can move back to the previous screen by pressing number button 3.
1 While listening to a source...
2 Select “Device.”
3 Select “New Pairing.”
26
4Enter a PIN (Personal Identification Number) code to the unit.
•You can enter any number you like (1-digit to 16-digit number). [Initial: 0000]
•To enter a PIN code less than 4-digit, firstly delete the initial PIN code (0000) by pressing
number button 5 ( ).
).
*Some devices have their own PIN code. Enter the specified PIN code to the unit.
1Move to the next (or previous) number position.
2 Select a number.
3Repeat steps 1and 2until you finish entering a PIN code.
4 Confirm the entry.
5Operate the target Bluetooth device, (while “Open...” is flashing on the display).
On the device to be connected, enter the same PIN code you have just entered for this unit. “Connecting...” flashes, then “Pairing Ok” or “Connected [Device Name]” appears on the display when the connection is established. Now you can use the device through the unit.
 appears when the connection is established.
The device remains registered even after you disconnect the device. Use “Cnnct Phone“ or “Cnnct Audio” (or activate “Auto Cnnct”) to connect the same device from next time on. (See the following and page 46.)
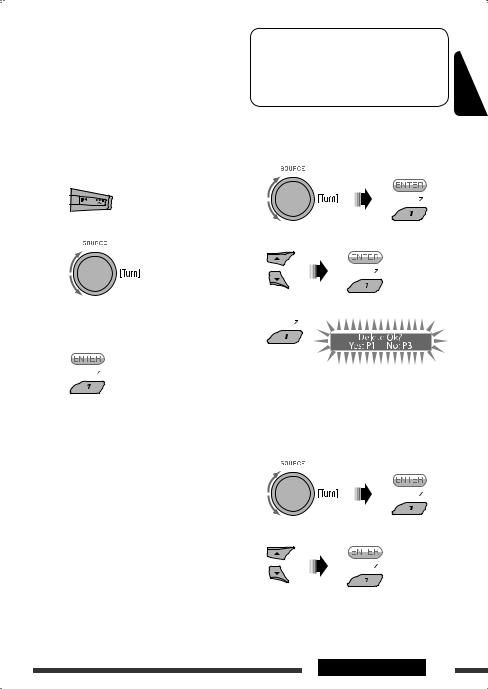
Deleting a registered device
Perform steps 1 and 2 on page 26, then...
1 Select “Del Pairing.”
2 Select a device you want to delete.
3 Delete the selection.
•Press number button 3 to select “No” or return to step 1.
Connecting a registered device
Perform steps 1 and 2 on page 26, then...
1 Select “Cnnct Phone” or “Cnnct Audio.”
2Select a device you want.
“Connecting...” flashes, then “Connected (and device name)” appears on the display when the device is connected.
Continued on the next page
ENGLISH
OPERATIONS 27

ENGLISH
You can set the unit to connect the Bluetooth device automatically when the unit is turned on. (See “Auto Cnnct” on page 46.)
Disconnecting a device
Perform steps 1 and 2 on page 26, then...
Select “Discn Phone” or “Discn Audio.”
“Disconnecting...” flashes, then “Disconnected (and device name)” appears on the display when the device is disconnected.
Using the Bluetooth cellular phone 
 Making a call
You can make hands-free calls using the unit.
The built-in microphone is behind this corner of the unit.
3Select the method to make a call.
•Dialed*: Shows the list of the phone numbers you have dialed. Go to the following step.
•Received*: Shows the list of the received calls. Go to the following step.
•Phonebook: Shows the name/phone number of the phone book of the unit. Go to the following step. To copy the phone book memory, see
page 30.
•Preset: Shows the list of preset numbers. Go to the following step. To preset numbers, see page 30.
•Dial Number: Shows the phone number entry screen. See “How to enter phone number” on page 29.
•Voice Dial (Only accessible when the connected cellular phone has the voice recognition system): Speak the name (registered words) you want to call.
*Displays only when the dialed or received number is made through the unit.
4Select the name/phone number/preset number you want to call.
The sounds comes out from the connected speakers.
•When  appears on the display, you can move back to the previous display by pressing number button 3.
1 
2 Select “Call.”
•When the sound is stopped or interrupted during the use of a Bluetooth device, turn off, then turn on the unit.
–If the sound is not yet restored, connect the device again. (See “Connecting a registered device” on page 27.)
28
 Loading...