


 Loading...
DVD/CD RECEIVER
KD-DV6108
KD-DV6108
ENGLISH
For canceling the display demonstration, see page 11.
INSTRUCTIONS
GET0380-001A
[UL]
ENGLISH
Thank you for purchasing a JVC product.
Please read all instructions carefully before operation, to ensure your complete understanding and to obtain the best possible performance from the unit.
IMPORTANT FOR LASER PRODUCTS
1.CLASS 1 LASER PRODUCT
2.CAUTION: Do not open the top cover. There are no user serviceable parts inside the unit; leave all servicing to qualified service personnel.
3.CAUTION: Visible and invisible laser radiation when open and interlock failed or defeated. Avoid direct exposure to beam.
4.REPRODUCTION OF LABEL: CAUTION LABEL, PLACED OUTSIDE THE UNIT.
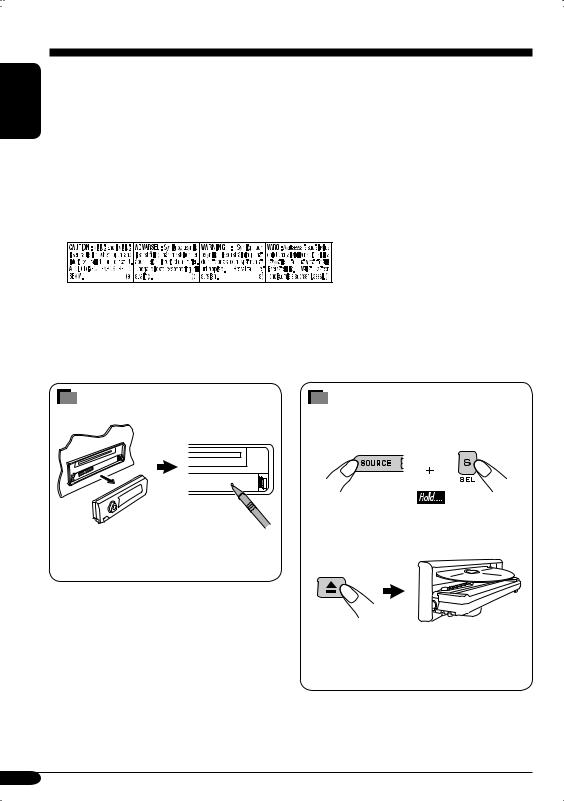
How to reset your unit
This will reset the microcomputer. Your preset adjustments will also be erased.
How to forcibly eject a disc
If a disc cannot be recognized by the unit or cannot be ejected, ejects the disc as follows.
“PLEASE” and “EJECT” appear alternately on the display.
•If this does not work, reset your unit.
•Be careful not to drop the disc when it ejects.
2

WARNINGS:
•DO NOT install any unit in locations where;
–it may obstruct the steering wheel and gearshift lever operations, as this may result in a traffic accident.
–it may obstruct the operation of safety devices such as air bags, as this may result in a fatal accident.
–it may obstruct visibility.
•DO NOT operate any unit while manipulating the steering wheel, as this may result in a traffic accident.
•The driver must not watch the monitor while driving.
If the driver watches the monitor while driving, it may lead to carelessness and cause an accident.
•The driver must not put on the headphones while driving. It is dangerous to shut off the outside sounds while driving.
•If you need to operate the unit while driving, be sure to look ahead carefully or you may be involved in a traffic accident.
•If the parking brake is not engaged, “DRIVER MUST NOT WATCH THE MONITOR WHILE DRIVING.” appears on the monitor, and no playback picture will be shown.
–This warning appears only when the parking brake wire is connected to the parking brake system built in the car (refer to the Installation/Connection Manual).
This product incorporates copyright protection technology that is protected by U.S. patents and other intellectual property rights. Use of this copyright protection technology must be authorized by Macrovision, and is intended for home
and other limited viewing uses only unless otherwise authorized by Macrovision. Reverse engineering or disassembly is prohibited.
Caution on volume setting:
Discs produce very little noise compared with other sources. Lower the volume before playing a disc to avoid damaging the speakers by the sudden increase of the output level.
ENGLISH
For safety....
•Do not raise the volume level too much, as this will block outside sounds, making driving dangerous.
•Stop the car before performing any complicated operations.
Temperature inside the car....
If you have parked the car for a long time in hot or cold weather, wait until the temperature in the car becomes normal before operating the unit.
3
ENGLISH
How to read this manual
The following methods are used to make the explanations simple and easy-to-understand:
•Some related tips and notes are explained in “More about this unit” (see pages 46 – 49).
•Button operations are mainly explained with the illustrations as follows:
Press briefly.
Press repeatedly.
Press either one.
Press and hold until your desired response begins.
Press and hold both buttons at the same time.
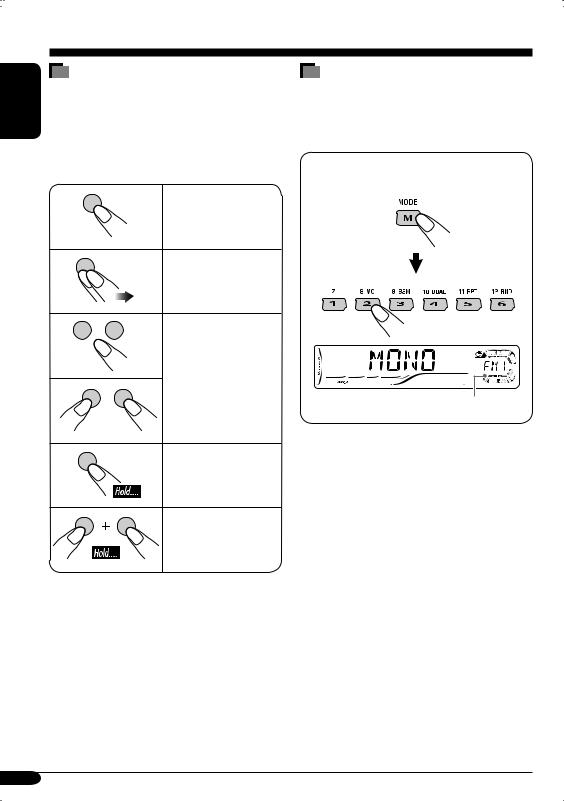
How to use the M MODE button
If you press M MODE, the unit goes into functions mode, then the number buttons and
5/∞ buttons work as different function buttons.
Ex.: When number button 2 works as MO (monaural) button.
Time countdown indicator
To use these buttons for original functions again after pressing M MODE, wait for
5 seconds without pressing any of these buttons until the functions mode is cleared.
•Pressing M MODE again also clears the functions mode.
4

Contents
How to reset your unit ........................... |
2 |
How to forcibly eject a disc................... |
2 |
How to read this manual........................ |
4 |
How to use the M MODE button........... |
4 |
Introduction — Playable discs ............ |
6 |
Control panel ................................ |
7 |
Parts identification................................. |
7 |
Remote controller — RM-RK230 ....... |
8 |
Main elements and features ................... |
8 |
Other disc operations ..................... |
29 |
Basic operations..................................... |
29 |
Changing the display information ......... |
30 |
Selecting the playback modes................ |
31 |
Dual Zone operations ..................... |
32 |
Listening with headphones .................... |
32 |
Sound adjustments ......................... |
33 |
Selecting preset sound modes ...... |
33 |
Storing your own sound adjustments..... |
33 |
Adjusting the sound ............................... |
34 |
Getting started .............................. |
10 |
Basic operations............................. |
10 |
Canceling the display demonstrations ... 11
Setting the clock .................................... |
11 |
Radio operations............................ |
12 |
Listening to the radio .................... |
12 |
Storing stations in memory.................... |
13 |
Listening to a preset station ................... |
14 |
Disc operations .............................. |
15 |
Playing a disc in the unit .............. |
15 |
Basic operations .................................... |
17 |
DVD/VCD special functions ............ |
19 |
Selecting subtitles .................................. |
19 |
Selecting audio languages ..................... |
19 |
Selecting multi-angle views................... |
19 |
Disc menu operations ............................ |
20 |
Zoom in.................................................. |
20 |
On-Screen disc operations............... |
21 |
Basic on-screen bar operations .............. |
22 |
Basic control screen operations ............. |
24 |
List screen operations ............................ |
25 |
DVD setup menu ............................ |
26 |
Basic setting procedure.......................... |
26 |
General settings — PSM................ |
35 |
Basic procedure ..................................... |
35 |
Other main functions ...................... |
37 |
Assigning titles to the sources ............... |
37 |
Detaching the control panel................... |
38 |
CD changer operations.................... |
39 |
Playing discs in the CD changer.... |
39 |
Changing the display information ......... |
41 |
Selecting the playback modes................ |
42 |
External component operations............ |
43 |
Playing an external component.... |
43 |
Maintenance .................................. |
44 |
Language codes.............................. |
45 |
More about this unit....................... |
46 |
Troubleshooting ............................. |
50 |
Specifications................................. |
53 |
ENGLISH
5

ENGLISH
Introduction — Playable discs
Discs you can play
You can play back the following discs (12 cm and 8 cm) on this unit:
•DVD Video: Recorded in either PAL or NTSC color system with Region Code “3” (see below).
–DVD-R/DVD-RW recorded in the DVDVideo format can also be played (see page 46).
•Video CD (VCD)/audio CD
•MP3/WMA: Recorded either in CD-R/ CD-RW or DVD-R/DVD-RW/DVD-ROM.
–CD-R/CD-RW: Compliant with ISO 9660 Level 1, ISO 9660 Level 2, Romeo, and Joliet.
–DVD-R/DVD-RW/DVD-ROM: Compliant with UDF-Bridge Format*1.
On some discs, the actual operations may be different from what is explained in this manual.
Discs cannot be played back
DVD-Audio, DVD-ROM (data), DVD-RAM, DVD-R/DVD-RW recorded in the DVD-VR format, CD-ROM, CD-I (CD-I Ready), Photo CD, etc.
•Playing back these discs will generate noise and damage the speakers.
Note on Region Code:
DVD players and DVD Video discs have their own Region Code numbers. This unit can only playback DVD discs whose Region Code numbers include “3.”
Examples:
If you insert a DVD Video disc of an incorrect Region Code
“REGION CODE ERROR!” appears on the monitor.
Caution for DualDisc playback
•The Non-DVD side of a “DualDisc” does not comply with the “Compact Disc Digital Audio” standard. Therefore, the use of NonDVD side of a DualDisc on this product may not be recommended.
Digital audio formats
The System can play back the following digital audio formats.
Linear PCM: Uncompressed digital audio, the same format used for CDs and most studio masters.
Dolby Digital *2: Compressed digital audio, developed by Dolby Laboratories, which enables multi-channel encode to create the realistic surround sound.
DTS *3 (Digital Theater Systems):
Compressed digital audio, developed by Digital Theater Systems, Inc., which enables multichannel like Dolby Digital. As the compression ratio is lower than for Dolby Digital, it provides wider dynamic range and better separation.
MPEG Audio: Another compressed digital audio which also enables multi-channel encode to create the realistic surround sound. However, this System downmix the multi-channel signals into 2 channels (decoded PCM) and play it back.
*1 A hybrid file system used to provide compatibility with ISO 9660 for accessing any type of files on the disc. (UDF stands for Universal Disk Format.)
*2 Manufactured under license from Dolby Laboratories. “Dolby” and the
double-D symbol are trademarks of Dolby Laboratories.
*3 “DTS” and “DTS 2.0 + Digital Out” are trademarks of Digital Theater Systems, Inc.
“DVD Logo” is a trademark of DVD Format/ Logo Licensing Corporation registered in the US, Japan and other countries.
6

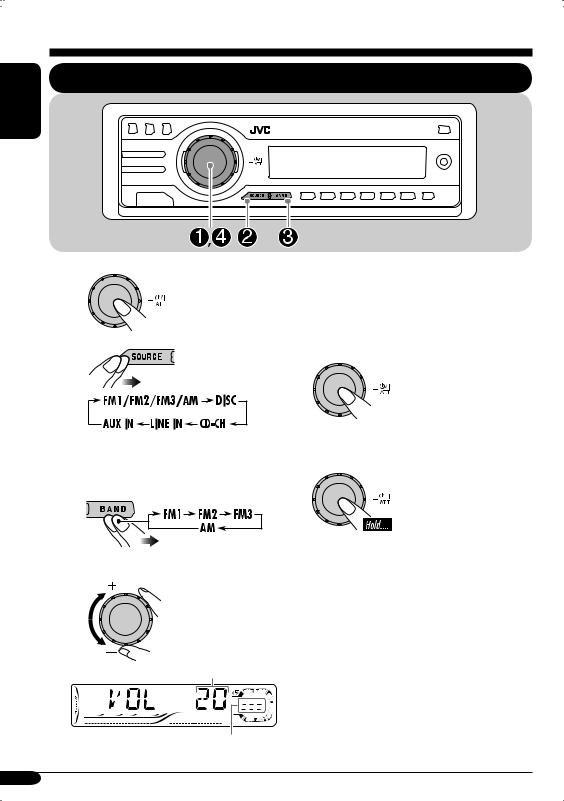
Control panel
Parts identification
Display window
ENGLISH
15(up) / ∞(down) buttons
• Function as Play / Stop buttons for DVD
|
|
and VCDs. |
|
2 |
E EQ (equalizer) button |
||
3 |
D DISP (display) button |
||
4 |
S SEL (select) button |
||
5 |
• |
Control dial |
|
|
• |
|
(standby/on attenuator) button |
|
|
||
|
|
||
6 |
Display window |
||
7 |
Remote sensor |
||
8 |
0(eject) button |
||
9 |
|
4/¢ buttons |
|
p |
|
(control panel release) button |
|
q SOURCE button w BAND button e Number buttons
r MO (monaural) button
t SSM (Strong-station Sequential Memory) button
y DUAL (dual zone) button u RPT (repeat) button
i RND (random) button o M MODE button
; AUX (auxiliary) input jack
Display window
a Disc information indicators—
TAG (ID3 Tag), (folder), (track/file) s Main display
d Source display / Volume level indicator f EQ (equalizer) indicator
g Sound mode indicators—ROCK, CLASSIC, POPS, HIP HOP, JAZZ, USER
• also works as the time countdown indicator and level meter during play (see page 35).
h Disc type indicators—WMA, MP3
jTuner reception indicators— ST (stereo), MO (monaural)
k Playback source indicators—
CH: Lights up for the CD changer. DISC: Lights up for the built-in DVD/CD player.
l Playback mode / item indicators— RND (random), (disc), (folder), RPT (repeat)
/ LOUD (loudness) indicator z Tr (track) indicator
7

ENGLISH
Remote controller — RM-RK230
Installing the lithium coin battery |
Main elements and features |
(CR2025) |
Before using the remote controller:
•Aim the remote controller directly at the remote sensor on the unit. Make sure there is
no obstacle in between.
Remote sensor
MONITOR CONTROL
MODE ASPECT MENU
DVD / RECEIVER CONTROL
ATT |
ZOOM |
+10
SOURCE |
–100  PRESET
BAND 

 / TITLE
|
|
–10 |
|
DUAL |
|
|
|
VOL |
1 |
DISC+ |
2 |
|
TOP M |
|
|
2nd VOL |
4 |
|
5 |
|
|
ENTER |
|
|
7 |
DISC– |
8 |
|
SETUP |
|
|
|
|
|
0 |
+100 
 / TITLE OSD
3 MENU
6
9 |
RETURN |
 SHIFT
SHIFT
RM-RK230
•Do not expose the remote sensor to strong light (direct sunlight or artificial lighting).
Warning:
•Do not install any battery other than CR2025 or its equivalent; otherwise, it may explode.
•Store the battery in a place where children cannot reach to avoid risk of accident.
•To prevent the battery from over-heating, cracking, or starting a fire:
–Do not recharge, short, disassemble, or heat the battery, or dispose of it in a fire.
–Do not leave the battery with other metallic materials.
–Do not poke the battery with tweezers or similar tools.
–Wrap the battery with tape and insulate when throwing away or saving it.
IMPORTANT:
If Dual Zone is activated (see page 32), the remote controller only functions for operating the DVD/CD player.
MONITOR CONTROL
1Monitor control buttons*1
•
 (standby/on), MODE, ASPECT, MENU,
  and
and  .
.
DVD/RECEIVER CONTROL
2 
 (standby/on attenuator) button
•Turns on and off the power and also attenuates the sound.
3SOURCE button
• Selects the source.
8

4BAND button
•Selects the FM/AM bands. 5 TOP M (menu) button*2
•Display the DVD and VCD*3 disc menu. 6 DUAL button
•Activate and deactivate Dual Zone.
7VOL + / – buttons
•Adjusts the volume level.
•Also function as 2nd VOL +/– buttons
when pressed with SHIFT button. 8 SETUP button*2
9 SHIFT button
pBasic disc operation buttons*4 7 (stop), 3 (play), 8 (pause)
•3 (play) also function as ZOOM button when pressed with SHIFT button.
qAdvanced disc operation/tuner operation buttons*5
For advanced disc operations:
• /TITLE 5 / ∞ — Select the titles (for DVD) or folders (for MP3/WMA).
•4 / ¢ (reverse skip/forward skip)
•1 / ¡ (reverse search/forward search)*4
For tuner operations:
•PRESET 5 / ∞ — Changes the preset stations.
•4 / ¢ — Functions to search for stations.
wOSD button
•Display the on-screen bar.
•Also function as the  /TITLE button when pressed with SHIFT button.
– You can directly select titles (for DVD)
or folders (for MP3/WMA) using the number buttons (see page 18).
eMENU button*2
•Display the DVD and VCD*3 disc menu. r Menu operation buttons*2
•Cursor (% , fi , @ , #), and ENTER
•% / fi : Also function as DISC + / – buttons when the source is “CD-CH.”
t RETURN button*2 |
|
|
ENGLISH |
|||
y |
Special function buttons |
|
||||
|
|
|||||
|
• |
DVD/VCD: |
(audio) |
|
|
|
|
• |
DVD: |
(subtitle), |
(angle) |
|
|
*1 |
Controllable only if your monitor is one of |
|
||||
|
the JVC monitors — KV-MR9010 or |
|
||||
|
KV-MH6510. |
|
|
|
|
|
*2 |
These buttons function as the number |
|
||||
|
buttons when pressed with SHIFT button. |
|
||||
*3 |
Only when PBC is not in use. |
|
||||
*4 |
Not used for CD changer operations. |
|
||||
*5 |
These buttons function as the +10/–10 |
|
||||
|
and +100/–100 buttons when pressed with |
|
||||
|
SHIFT button. |
|
|
|
||
How to select a number
To select a number from 0 – 9:
To select a number greater than 9:
•+100/–100 buttons used only for searching MP3/WMA tracks number greater than 99.
9
ENGLISH
Getting started
Basic operations
~ |
@ Adjust the sound as you want. |
|
|
(See pages 33 and 34.) |
|
Ÿ |
To drop the volume in a moment (ATT) |
|
To restore the sound, |
||
|
||
|
press it again. |
!
⁄
You cannot select some sources if they |
To turn off the power |
|
are not ready. |
||
|
For FM/AM tuner only
Adjust the volume.
Volume level appears.
Volume level indicator
10
Canceling the display demonstrations
If no operations are done for about 20 seconds, display demonstration starts.
[Initial: DEMO ON]—see page 35.
1
2
3
4 Finish the procedure.
To activate the display demonstration
In step 3 above...
Setting the clock
1
2Set the hour and minute.
1Select “CLOCK H” (hour), then adjust the hour.
2Select “CLOCK M” (minute), then adjust the minute.
3 Finish the procedure.
To check the current clock time when the power is turned off
ENGLISH
11

ENGLISH
Radio operations
Listening to the radio
~ |
To tune in to a station manually |
|
In step ! on the left column... |
||
|
||
|
1 |
Ÿ
Selected band appears. |
2 Select the desired station frequencies. |
||||
|
|
|
|
|
|
|
|
|
|
|
|
|
|
|
|
|
|
Lights up when receiving an FM stereo broadcast with sufficient signal strength.
!Start searching for a station.
When a station is received, searching stops.
To stop searching, press the same button again.
12

When an FM stereo broadcast is hard to receive
1 

2
Lights up when monaural mode is activated.
Reception improves, but stereo effect will be lost.
To restore the stereo effect, repeat the same procedure. “MONO OFF” appears and the MO indicator goes off.
Storing stations in memory
You can preset six stations for each band.
 FM station automatic presetting— SSM (Strong-station Sequential Memory)
1 |
2 Select the FM band (FM1 – FM3) |
you want to store into.
3
4
ENGLISH
“SSM” flashes, then disappears when automatic presetting is over.
Local FM stations with the strongest signals are searched and stored automatically in the FM band.
To be continued....
13

ENGLISH
Manual presetting |
Listening to a preset station |
|
Ex.: Storing FM station of 92.5 MHz into the |
||
|
||
preset number 1 of the FM1 band. |
1 |
|
|
||
1 |
|
2 
2 
3 Select the preset station (1 – 6) you
want.
3 


or
4
When using the remote controller....
|
|
|
|
|
|
|
|
|
|
|
or |
Preset number flashes for a while. |
|||
To check the current clock time while listening to an FM or AM station
*If no title is assigned to a station, “NO NAME” appears. To assign a title to a station, see page 37.
14

Disc operations
Playing a disc in the unit
ENGLISH
The disc type is automatically detected, and playback starts automatically (for DVD: automatic start depends on its internal program).
If the current disc is an audio CD, CD Text, MP3/WMA, or VCD without PBC, all tracks will be played repeatedly until you change the source or eject the disc.
•If a title list or disc menu appears while playing a DVD or VCD with PBC, see “Disc menu operations” on page 20.
The following marks are used to indicate
the playable discs....
DVD Video |
Video CD with PBC |
|
only |
Video CD with/without |
Audio CD/ |
PBC |
CD Text |
MP3/WMA disc |
All discs listed here |
Before performing any operations, make
sure the following....
•To watch the playback pictures, select the an appropriate video system (NTSC or PAL) to match it to the connected monitor. (See page 36.)
•Turn on the monitor for playing a DVD or VCD. If you turn on the monitor, you can also control the audio CD, CD Text, and MP3/ WMA playback by referring to the monitor screen. (See pages 24 and 25.)
•For DVD playback, you can change the Setup Menu setting to your preference. (See pages 26 – 28.)
•The operations explained on pages 17 – 28 are using the remote controller.
•When you want to operate the DVD/CD player using the buttons on the control panel, see “Other disc operations” on pages 29 – 31.
If “ ” appears on the monitor when pressing a button, the unit cannot accept an operation you have tried to do.
•In some cases, without showing “ ,” operations will not be accepted.
To be continued....
15

ENGLISH
• When inserting a DVD disc:
Total title number
Elapsed playing time
Current chapter number
• When inserting a VCD:
Total playing time |
Total track number |
of the inserted disc |
of the inserted disc |
Elapsed playing time
• When inserting an MP3/WMA disc:
Total folder number
Total track number
Ex.: When an MP3 file is detected
Disc information appears automatically (see page 30).
Elapsed playing |
Current track |
time |
number |
Current folder number
*1 Either the MP3 or WMA indicator lights up depending on the detected file.
*2 Does not light up for DVD-R/DVD-RW.
• When inserting a CD Text/audio CD:
Total playing time |
Total track number |
of the inserted disc |
of the inserted disc |
CD Text: Disc title/performer =
Track title appears automatically (see page 30).
Elapsed playing |
Current track |
time |
number |
To eject the disc
16

Basic operations
Operations |
Display indication and/or next operation |
To stop play temporarily “PAUSE” illuminates on the display.
A still picture appears.
A Frame by frame playback
B Slow motion playback
•No sound comes out during Slow Motion Playback.
•When playing a VCD, Reverse Slow Motion Playback is prohibited.
To resume normal play:
To replay the previous |
The playback position moves back about 10 seconds before |
scenes—One Touch Replay |
the current position. |
•This function works only within the same title.
•For some DVDs, this function does not work.
To stop playback |
When you start playback again, playback |
||
|
|
|
starts from where it has been stopped |
|
|
|
|
|
|
|
(Resume play). |
|
|
|
|
|
|
|
When you start playback again, playback starts from |
|
|
|
the beginning of the last playing track. |
* During play, on-screen guide icons appear on the monitor for a while (see page 48).
To be continued....
ENGLISH
17
Loading...