


KD-AVX44
Table of contents
 Loading...
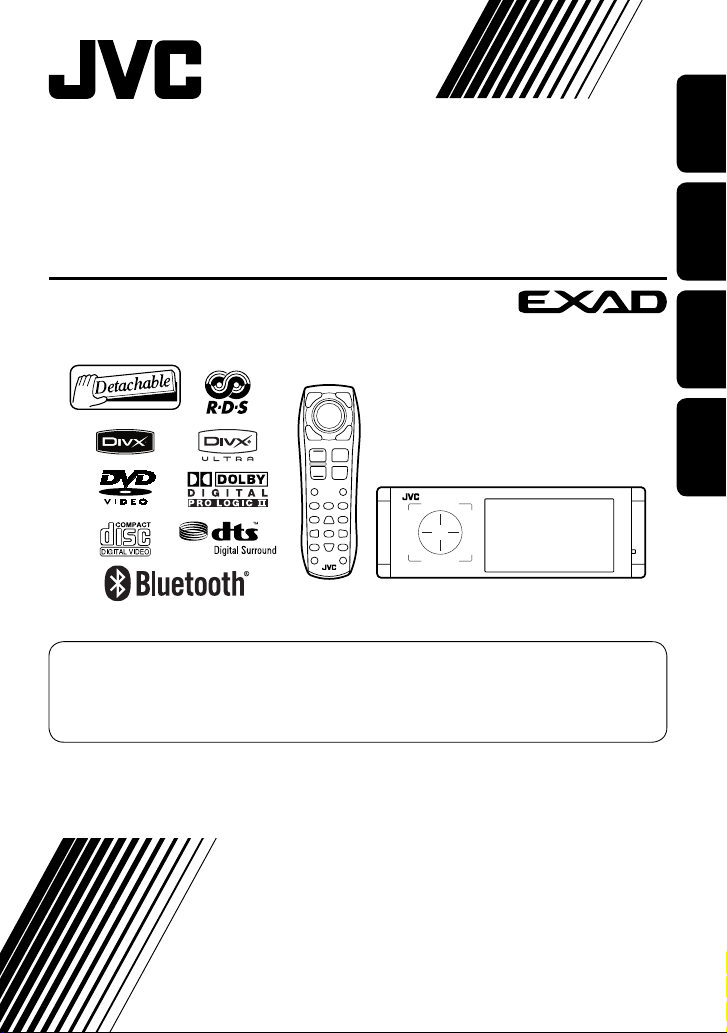
DVD/CD RECEIVER
DVD-/CD-RECEIVER
RÉCEPTEUR DVD/CD
DVD/CD-RECEIVER
KD-AVX44
For canceling the display demonstration, see page 7.
Zum Abbrechen der Displaydemonstration siehe Seite 7.
Pour annuler la démonstration des affichages, référez-vous à la page 7.
Zie bladzijde 7 voor het annuleren van de displaydemonstratie.
ENGLISH
DEUTSCHFRANÇAIS
NEDERLANDS
For installation and connections, refer to the separate manual.
Für den Einbau und die Anschlüsse siehe das eigenständige Handbuch.
Pour l’installation et les raccordements, se référer au manuel séparé.
Bijzonderheden over de installatie en aansluiting van het apparaat vindt u in de desbetreffende handleiding.
INSTRUCTIONS
BEDIENUNGSANLEITUNG
MANUEL D’INSTRUCTIONS
GEBRUIKSAANWIJZING
LVT1797-003A
[E]

Declaration of Conformity with regard to the R&TTE Directive 1999/5/EC
0984
English: Español:
Hereby, JVC, declares that this
KD-AVX44 is in compliance with the
essential requirements and other
relevant provisions of Directive 1999/5/
EC.
Deutsch: Ελληνική:
Hiermit erklärt JVC, dass sich das Gerät
KD-AVX44 in Übereinstimmung mit
den grundlegenden Anforderungen
und den übrigen einschlägigen
Bestimmungen der Richtlinie 1999/5/
EG befindet. (BMWi)
Hiermit erklärt JVC die Italiano:
Übereinstimmung des Gerätes
KD-AVX44 mit den grundlegenden
Anforderungen und den anderen
relevanten Festlegungen der Richtlinie
1999/5/EG befindet. (Wien)
Français: Malti:
Par la présente JVC déclare que
l’appareil KD-AVX44 est conforme aux
exigences essentielles et aux autres
dispositions pertinentes de la directive
1999/5/CE.
Nederlands: Português:
Hierbij verklaart JVC dat het toestel
KD-AVX44 in overeenstemming is
met de essentiële eisen en de andere
relevante bepalingen van richtlijn
1999/5/EG.
Dansk: Suomi:
Undertegnede JVC erklærer herved, at
følgende udstyr KD-AVX44 overholder
de væsentlige krav og øvrige relevante
krav i direktiv 1999/5/EF.
Por medio de la presente JVC declara
que el KD-AVX44 cumple con los
requisitos esenciales y cualesquiera
otras disposiciones aplicables o
exigibles de la Directiva 1999/5/CE.
ΜΕ ΤΗΝ ΠΑΡΟΥΣΑ JVC ΔΗΛΩΝΕΙ ΟΤΙ
KD-AVX44 ΣΥΜΜΟΡΦΩΝΕΤΑΙ ΠΡΟΣ
ΤΙΣ ΟΥΣΙΩΔΕΙΣ ΑΠΑΙΤΗΣΕΙΣ ΚΑΙ ΤΙΣ
ΛΟΙΠΕΣ ΣΧΕΤΙΚΕΣ ΔΙΑΤΑΞΕΙΣ ΤΗΣ
ΟΔΗΓΙΑΣ 1999/5/ΕΚ.
Con la presente JVC dichiara che
questo KD-AVX44 è conforme ai
requisiti essenziali ed alle altre
disposizioni pertinenti stabilite dalla
direttiva 1999/5/CE.
Hawnhekk, JVC, jiddikjara li dan
KD-AVX44 jikkonforma mal-ħtiġijiet
essenzjali u ma provvedimenti oħrajn
relevanti li hemm fid-Dirrettiva 1999/5/
EC.
JVC declara que este KD-AVX44 está
conforme com os requisitos essenciais
e outras disposições da Directiva
1999/5/CE.
JVC vakuuttaa täten että KD-AVX44
tyyppinen laite on direktiivin 1999/5/
EY oleellisten vaatimusten ja sitä
koskevien direktiivin muiden ehtojen
mukainen.
G1

Svenska: Lietuviu:
Härmed intygar JVC att denna
KD-AVX44 står I överensstämmelse
med de väsentliga egenskapskrav och
övriga relevanta bestämmelser som
framgår av direktiv 1999/5/EG.
Íslenska: Magyar:
Hér með lýsir JVC yfir því að KD-AVX44
er í samræmi við grunnkröfur og aðrar
kröfur, sem gerðar eru í tilskipun
1999/5/EC.
Norsk: Polski:
JVC erklærer herved at utstyret
KD-AVX44 er i samsvar med de
grunnleggende krav og øvrige
relevante krav i direktiv 1999/5/EF.
Cesky: Slovensko:
JVC tímto prohlašuje, že tento
KD-AVX44 je ve shodě se základními
požadavky a dalšími príslušnými
ustanoveními směrnice 1999/5/ES.
Eesti: Slovensky:
Käesolevaga kinnitab JVC seadme
KD-AVX44 vastavust direktiivi
1999/5/EÜ põhinõuetele ja nimetatud
direktiivist tulenevatele teistele
asjakohastele sätetele.
Latviski:
Ar šo JVC deklarē, ka KD-AVX44 atbilst
Direktīvas 1999/5/EK būtiskājam
prasībām un citiem ar to saistītajiem
noteikumiem.
Šiuo JVC deklaruoja, kad šis KD-AVX44
atitinka esminius reikalavimus ir kitas
1999/5/EB Direktyvos nuostatas.
Alulírott, JVC nyilatkozom, hogy a
KD-AVX44 megfelel a vonatkozó
alapvetõ követelményeknek és az
1999/5/EC irányelv egyéb elõírásainak.
Niniejszym JVC oświadcza, że
KD-AVX44 jest zgodny z zasadniczymi
wymogami oraz pozostałymi
stosownymi postanowieniami
Dyrektywy 1999/5/EC.
JVC izjavlja, da je ta KD-AVX44 v skladu
z bistvenimi zahtevami in ostalimi
relevantnimi določili direktive 1999/5/
ES.
JVC týmto vyhlasuje, že KD-AVX44
spĺňa základné požiadavky a všetky
príslušné ustanovenia Smernice
1999/5/ES.
G2
Thank you for purchasing a JVC product.
Please read all instructions carefully before operation, to ensure your complete understanding and to obtain the best
possible performance from the unit.
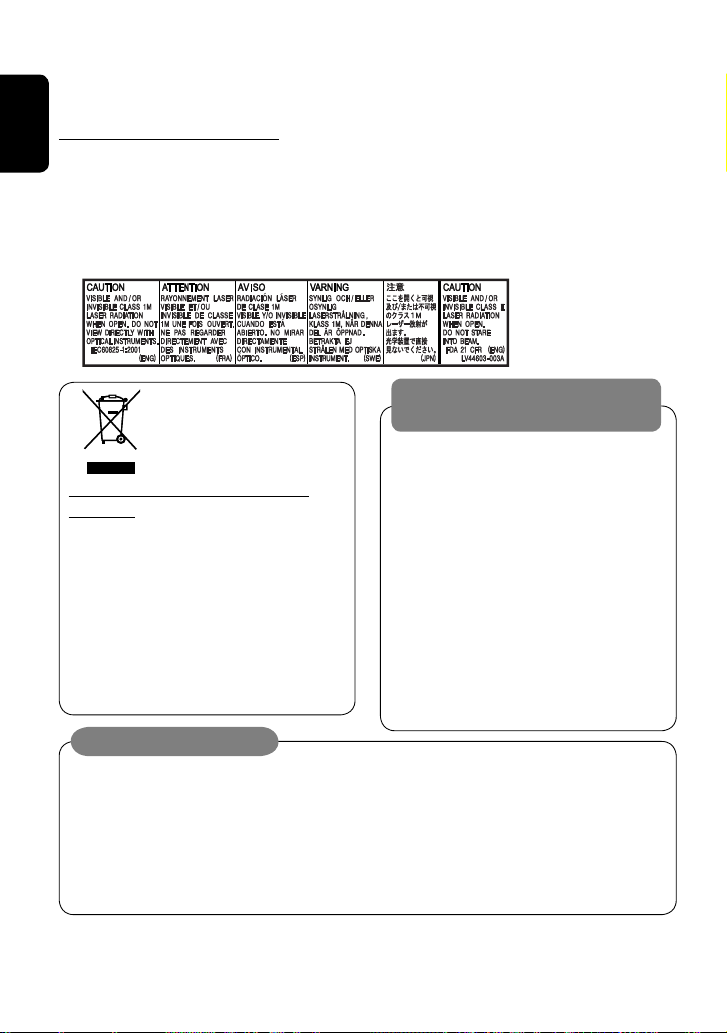
IMPORTANT FOR LASER PRODUCTS
ENGLISH
1. CLASS 1 LASER PRODUCT
2. CAUTION: Do not open the top cover. There are no user serviceable parts inside the unit; leave all servicing to
qualified service personnel.
3. CAUTION: Visible and/or invisible class 1M laser radiation when open. Do not view directly with optical
instruments.
4. REPRODUCTION OF LABEL: CAUTION LABEL, PLACED OUTSIDE THE UNIT.
WARNINGS:
This symbol is only valid
in the European Union.
Information for Users on Disposal of Old
Equipment
This symbol indicates that the product with
this symbol should not be disposed as general
household waste at its end-of-life. If you wish to
dispose of this product, please do so in accordance
with applicable national legislation or other rules in
your country and municipality. By disposing of this
product correctly, you will help to conserve natural
resources and will help prevent potential negative
effects on the environment and human health.
To prevent accidents and damage
• DO NOT install any unit or wire any cable in a
location where;
– it may obstruct the steering wheel and
gearshift lever operations.
– it may obstruct the operation of safety devices
such as air bags.
– it may obstruct visibility.
• DO NOT operate the unit while driving.
If you need to operate the unit while driving, be
sure to look around carefully.
• The driver must not watch the monitor while
driving.
• The driver must not put on the headphones while
driving.
Cautions on the monitor:
• The monitor built in this unit has been produced
with high precision, but it may have some
ineffective dots. This is inevitable and is not
malfunction.
• Do not expose the monitor to direct sunlight.
• When the temperature is very cold or very hot...
– Chemical changes occur inside, causing
malfunction.
– Pictures may not appear clearly or may move
slowly. Pictures may not be synchronized
with the sound or picture quality may
decline in such environments.
For security reasons, a numbered ID card is provided with this unit, and the same ID number is imprinted on the
unit’s chassis. Keep the card in a safe place, as it will help the authorities to identify your unit if stolen.
2
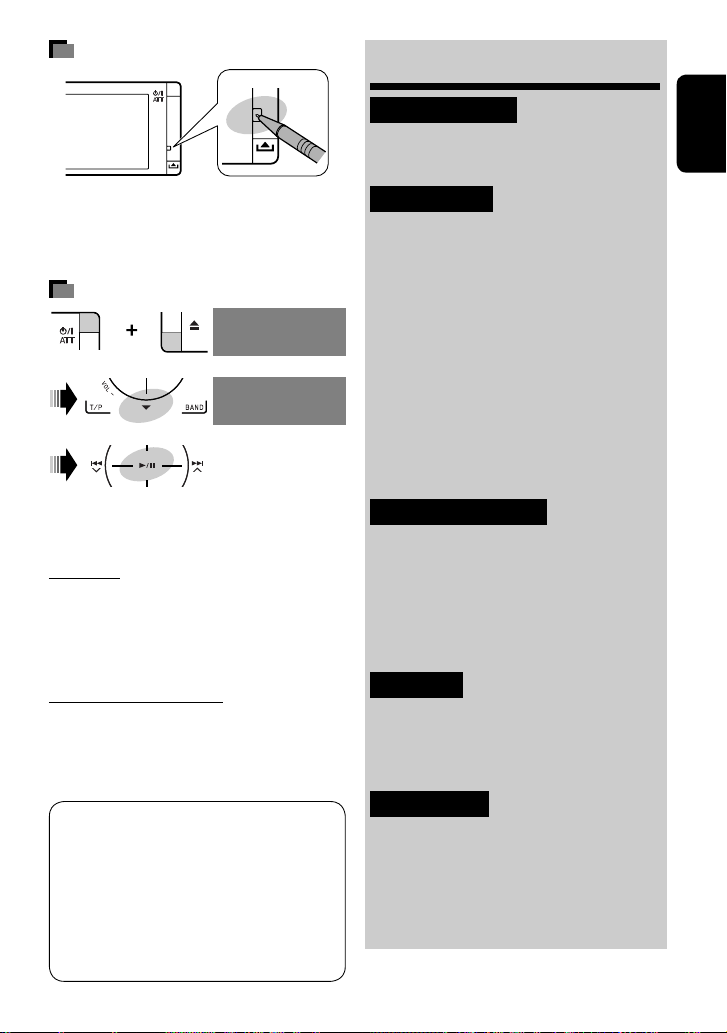
How to reset your unit
Contents
INTRODUCTION
Playable disc type ............................ 4
Before operations ............................ 5
ENGLISH
• Your preset adjustments (except for the registered
Bluetooth devices) will also be erased.
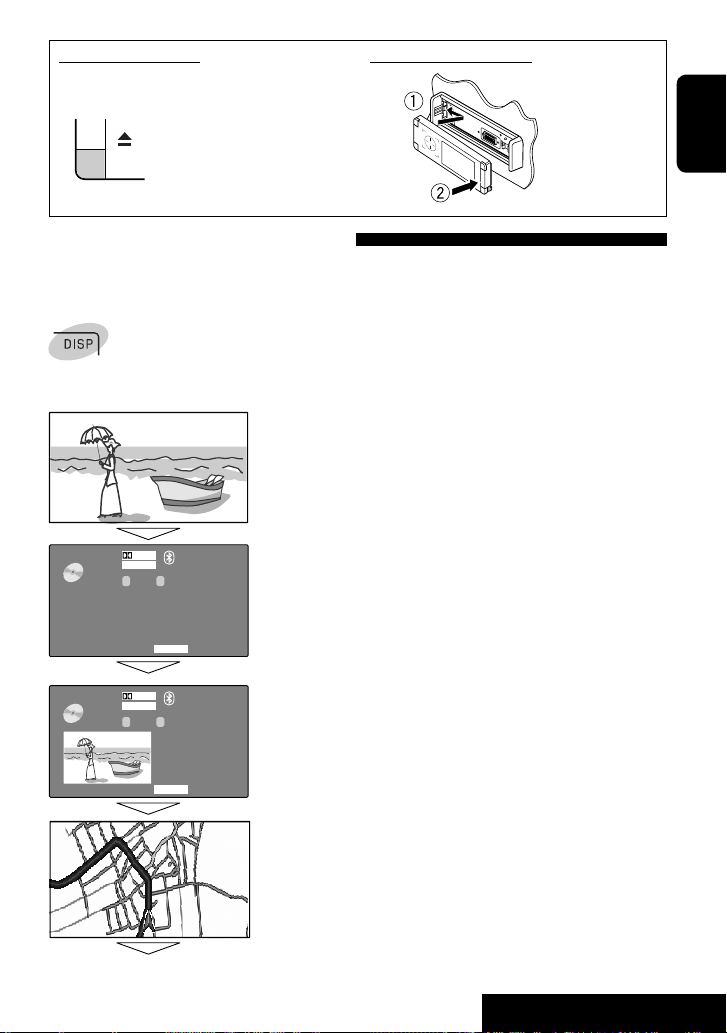
How to forcibly eject a disc
NO EJECT?
[Hold]
• If this does not work, reset the unit.
For safety...
• Do not raise the volume level too much, as this will
block outside sounds, making driving dangerous.
• Stop the car before performing any complicated
operations.
Temperature inside the car...
If you have parked the car for a long time in hot or cold
weather, wait until the temperature in the car becomes
normal before operating the unit.
EMERGENCY EJECT?
NO EJECT?
EMERGENCY EJECT?
OPERATIONS
Basic operations—AV menu ............. 6
Basic operations—Control panel ...... 8
Basic operations—
Remote controller (RM-RK252) ...... 10
Listening to the radio ...................... 12
Disc operations ................................ 18
Dual Zone operations ....................... 30
USB operations ................................ 33
Bluetooth® operations—
Cellular phone/audio player .......... 35
EXTERNAL DEVICES
Listening to the iPod ........................ 42
Listening to the CD changer .............. 45
Listening to the DAB tuner ............... 47
Listening to other external
components ................................. 50
SETTINGS
Sound equalization .......................... 52
Assigning titles to the sources .......... 53
Menu items ..................................... 54
This product incorporates copyright protection
technology that is protected by U.S. patents and
other intellectual property rights. Use of this
copyright protection technology must be authorized
by Macrovision, and is intended for home and
other limited viewing uses only unless otherwise
authorized by Macrovision. Reverse engineering or
disassembly is prohibited.
REFERENCES
Maintenance ................................... 63
More about this unit ........................ 64
Troubleshooting .............................. 70
Specifications .................................. 74
3
Playable disc type
Disc type Recording format, file type, etc. Playable
DVD DVD Video (Region Code: 2)*
ENGLISH
DVD Audio
DVD-ROM
DVD Recordable/Rewritable
(DVD-R/-RW*
2
, +R/+RW*3)
• DVD Video: UDF bridge
• DVD-VR
• DivX/MPEG1/MPEG2/JPEG/MP3/WMA/WAV/
AAC: Compliant to ISO 9660 level 1, level 2,
Romeo, Joliet
DVD Video
DVD-VR
DivX/MPEG1/MPEG2
JPEG
MP3/WMA/WAV/AAC*
MPEG4
DVD+VR
DVD-RAM
DualDisc DVD side
Non-DVD side
CD/VCD Audio CD/CD Text (CD-DA)/DTS-CD
VCD (Video CD)
SVCD (Super Video CD)
CD-ROM
CD-I (CD-I Ready)
CD Recordable/Rewritable
(CD-R/-RW)
• Compliant to ISO 9660 level 1, level 2, Romeo,
Joliet
CD-DA
MP3/WMA/WAV/AAC*
JPEG
DivX/MPEG1/MPEG2
MPEG4
1
4
4
1
If you insert a DVD Video disc of an incorrect Region Code, “Region code error” appears on the monitor.
*
2
*
DVD-R recorded in multi-border format is also playable (except for dual layer discs).
DVD-RW dual layer discs are not playable.
3
It is possible to play back finalized +R/+RW (Video format only) discs.
*
+RW double layer discs are not playable.
4
*
This unit can play back AAC files encoded using iTunes.
Caution for DualDisc playback
The Non-DVD side of a “DualDisc” does not comply with the “Compact Disc Digital Audio” standard. Therefore,
the use of Non-DVD side of a DualDisc on this product may not be recommended.
4
Before operations
ENGLISH
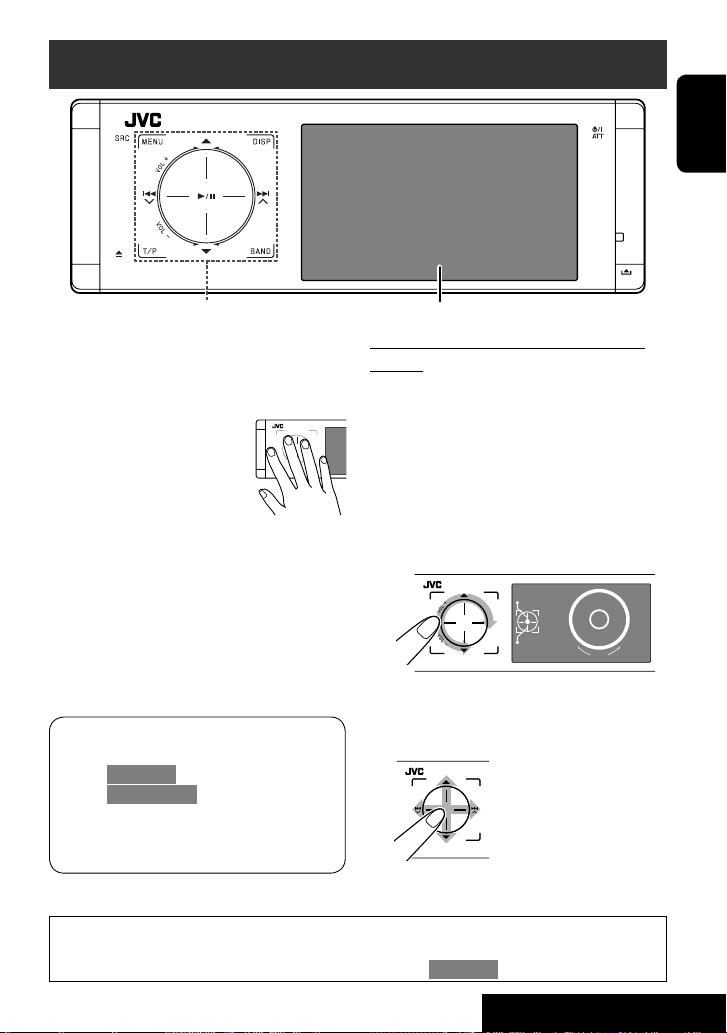
Touch pad controls
The lights of the touch pad controls and monitor are
turned off when no operation is done for about 10
seconds.
The lights are turned on in the following cases:
– When you move your hand close
to the touch pad controls.*
– When your finger touches the
touch pad controls.*
– When you use the remote
controller.
– When a call/SMS comes in.
– When the source is automatically changed by
receiving the Traffic Announcement or a programme
searched by PTY search.
– When the signal from the rear view camera comes in.
* Depending on the setting. To change the setting, ☞
page 59.
The lights are always turned on in the following
cases:
– While <AV Menu> is displayed.
– While <Source Menu> is displayed.
– While the control panel is open.
– When <Illumination> is set to <Normal>. (☞
page 59)
Monitor
How to operate the unit by the touch pad
controls
You can operate the unit by touching the appropriate
part of the touch pad controls.
• To adjust the volume, move your finger on the
touch pad knob as illustrated below to display the
animation on the monitor, then press 5 or ∞
repeatedly.
– You can also adjust the volume by just continuing
to move your finger on the touch pad knobs as
illustrated below.
Vol+
Vol-
• When you slide your finger on the touch pad knob
as illustrated below, it functions in the same way as
touching 5 / ∞ / 4 / ¢.
15
VOL
• Operations are explained mainly using the touch pad controls and buttons of the unit; however, the buttons
on the remote controller can work in the same way if they have the same names or marks.
• In the explanation, the screen names are highlighted. For example, <AV Menu>.
5
INTRODUCTION
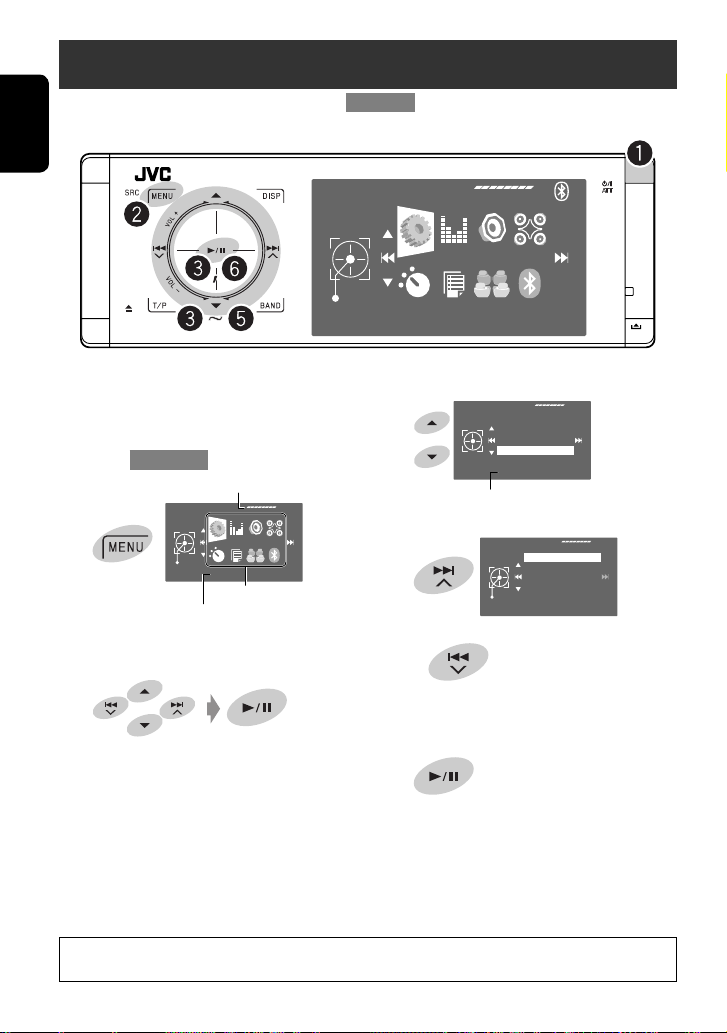
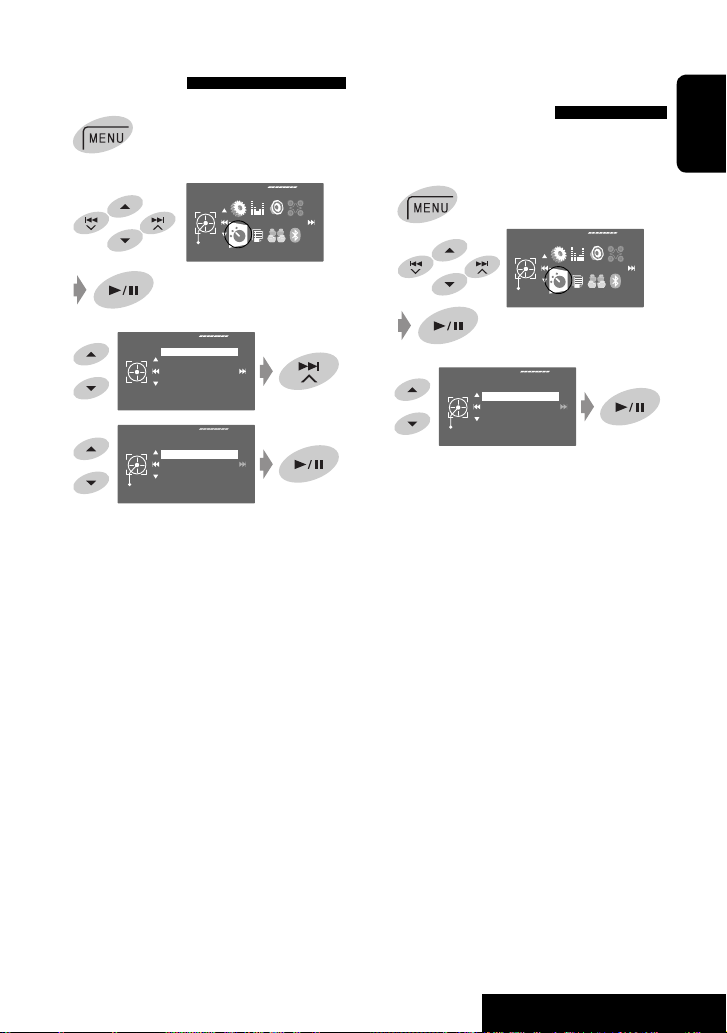
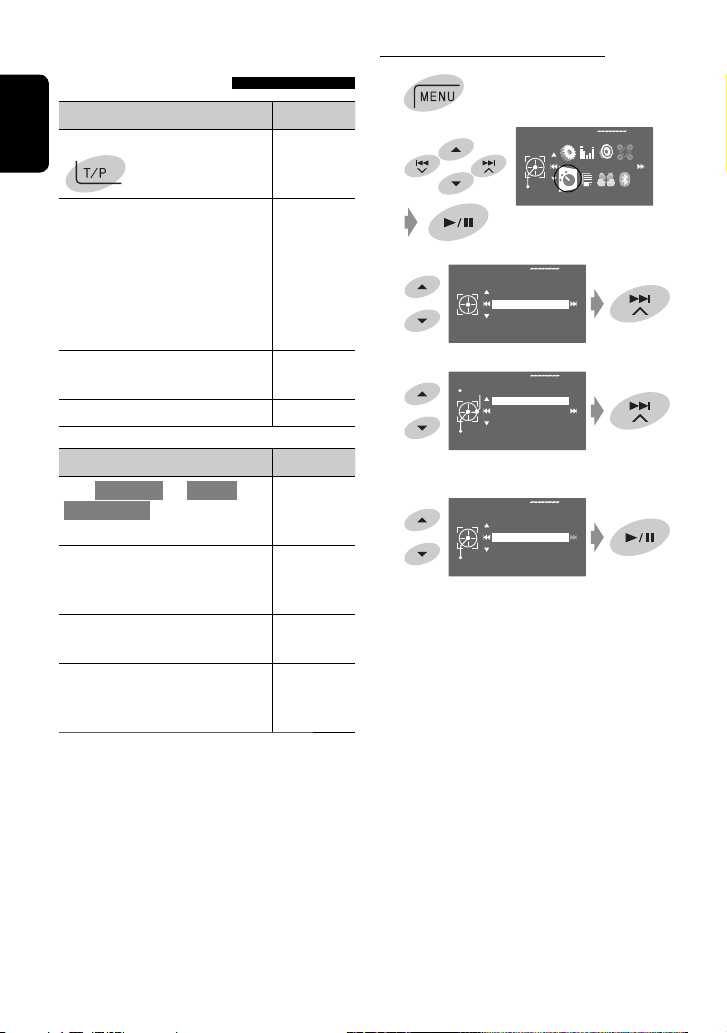
Basic operations— AV menu
You can use the menus to set up various settings from <AV Menu>. For details of each menu and setting, see “Menu
items.” (☞ pages 54 to 62)
ENGLISH
AV Menu
Enter
Setup
~ Turn on the power.
The lights of the touch pad controls and monitor
are turned on.
Ÿ Enter <AV Menu>.
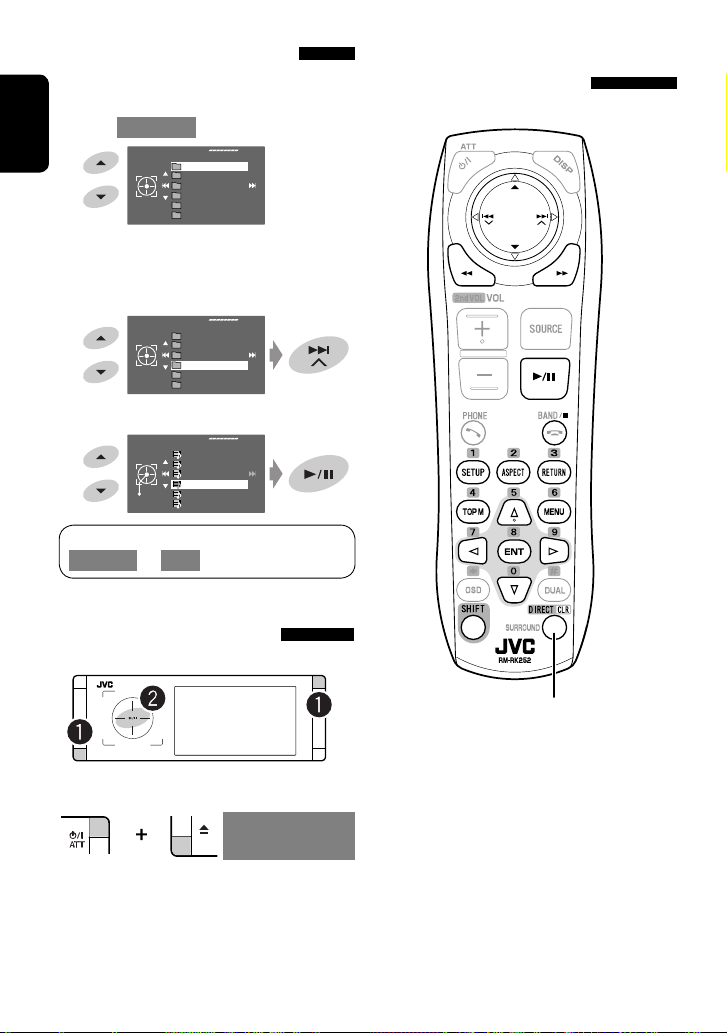
Time countdown indicator
AV Menu
Enter
Setup
Current selected icon name
• Non-available items will be shaded.
Setup icons
⁄ Select an item.
Sound
Fader/Balance
Volume Adjust
Subwoofer Level
High Pass Filter
Crossover
Through
Current setting of the selected item
@ Enter the next screen.
High Pass Filter
Through
On
Exit
• To return to the previous screen:
! Select an icon to enter the setup screen.
• Repeat steps ⁄ and @ to set the sub-item if
needed.
¤ Finish the procedure.
In this manual, English indications are used for purpose of explanation. You can select the indication
language on the monitor. (☞ page 55)
6
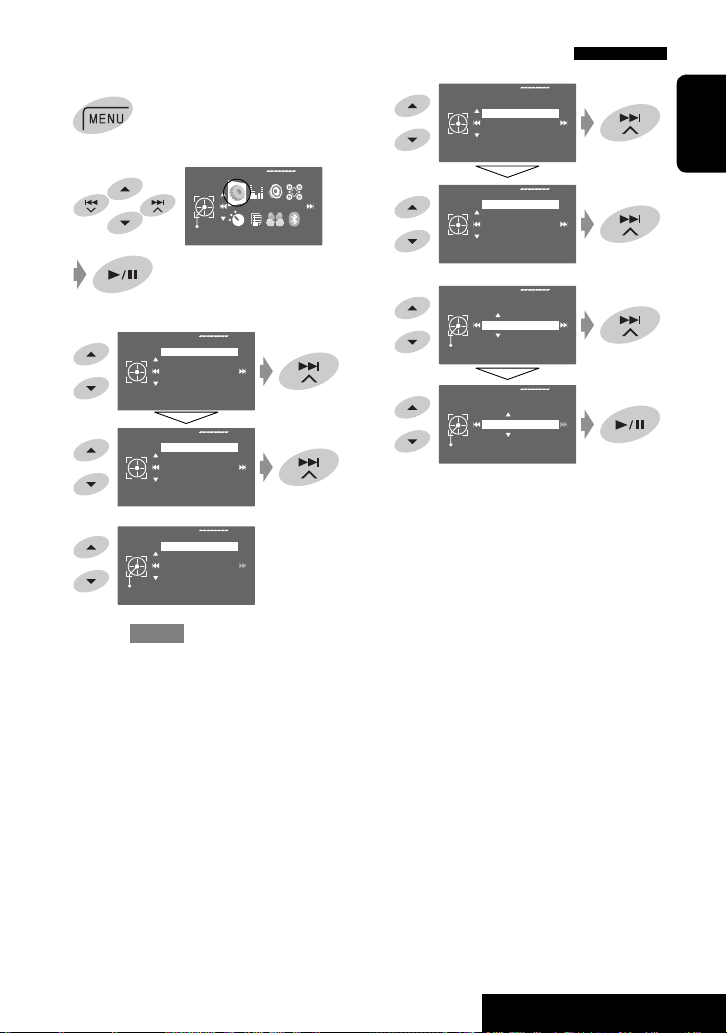
Canceling the display demonstration and setting the clock
1
2
3
4
5
Return to <Setup> by touching 4
Setup
Display
Demonstration
repeatedly.
AV Menu
Enter
Setup
Display
Clock
Disc Setup 1
Disc Setup 2
Tuner
Demonstration
Wall Paper
Color
Scroll
Tag Display
On
Off
On
Exit
6
7
Setup
Clock
Time Set
Exit
Time Set
Exit
Display
Clock
Disc Setup 1
Disc Setup 2
Tuner
Time Set
Time Format
OSD Clock
Clock Adjust
0:00
Hours
18:00
Minutes
18:35
ENGLISH
7
OPERATIONS
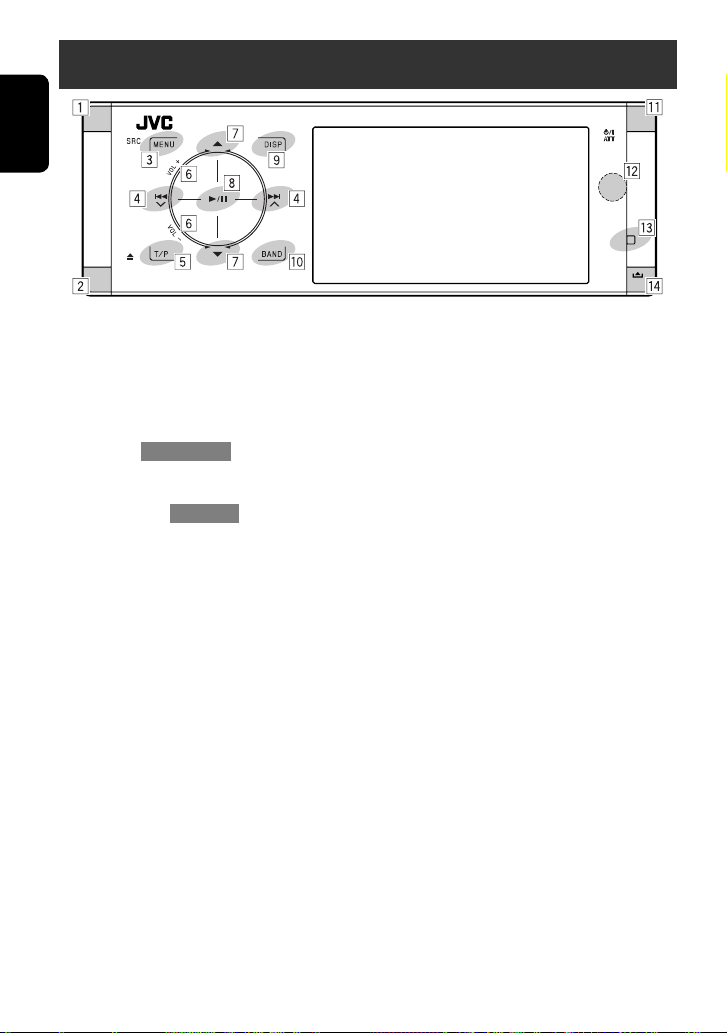
Basic operations — Control panel
ENGLISH
1 Selects sources.
“Tuner” = “DAB” = “Disc” = “USB”
or ”USB iPod” = “Changer,” ”iPod,” or
”External Input” = “Bluetooth” = “AV Input”
• You can also select sources by touching
5 / ∞ / 4 / ¢ after holding SRC for
entering <Source Menu>.
2 • Ejects the disc.
• Tilts the control panel (☞ page 9).
3 • Enters or exits <AV Menu>.
• Activates Voice Dialling [Hold].
• While talking: Adjusts the built-in microphone
volume.
4 • “Tuner” and “DAB”: Searches for stations/
ensembles.
• “Disc,” “USB,” “USB iPod,” “Changer,” “iPod,” and
“Bluetooth”: Reverse skip/forward skip
• On menus:
– Enters the previous/next screen.
– Selects items.
5 • Activates TA Standby Reception.
• Displays PTY preset list [Hold].
6 Adjusts the volume level. (☞ page 5)
*1
7*2 • “Tuner”: Selects preset stations.
• “DAB”: Selects services.
• “Disc,” “USB,” and “Changer”: Selects titles/
folders.
• “USB iPod”: Selects the next/previous items.
• “iPod”: Enters the player’s menu and pauses
playback.
• “Bluetooth”: Selects group/folder.
• On menus: Selects items.
8 • “Disc,” “USB,” “USB iPod,” and “Changer”: Starts
and pauses playback.
• “Bluetooth”: Starts playback.
• On menus: Enters the next screen or exits the
displayed screen.
9 Changes the display information. (☞ page 9)
p • “Tuner” and “DAB”: Selects the bands.
• “Disc” and “USB”: Stops playback.
• “Bluetooth”: Pauses playback.
q • Turns on the power.
• Turns off the power [Hold].
• Attenuates the sound (when the power is on).
w Remote sensor
e Resets the unit.
• Use only when the internal system malfunctions.
r Detaches the control panel (☞ page 9).
*1 You cannot select these sources if they are not ready.
*2 By holding 5 / ∞, you can display the list accessible
for the selected source.
8
To attach the control panelTo tilt the control panel
Hold 0 until “Tilt” appears on the monitor then press
the button repeatedly.
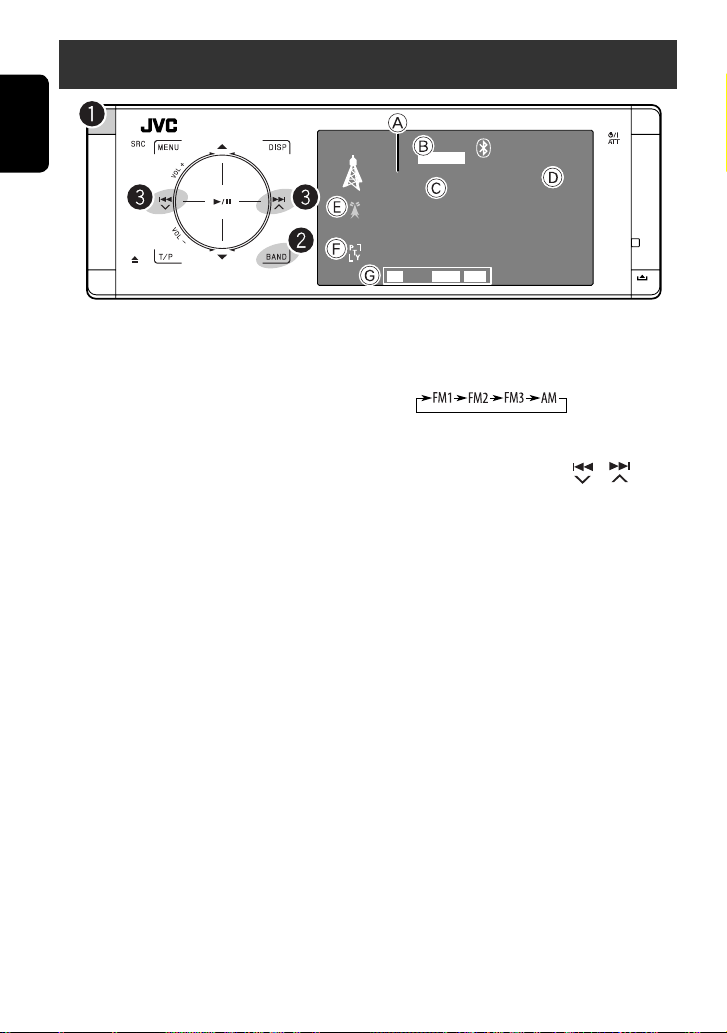
Changing the display information
Available display information varies among the playback sources.
Each time you touch DISP, the display changes to show the various information.
Ex.: When the playback source is a DVD video disc.
Playback picture screen (only for video sources)
ENGLISH
DVD
DVD
DIGITAL
MULTI
VIDEO
01 02 0:01:20
VIDEO
01 02 0:01:20
DIGITAL
MULTI
CT
CHAP.RPT
CT
15:45
CHAP.RPT
Back to the beginning
Source information screen
15:45
Playback picture and the source information screen
Navigation screen
• This screen is displayed when <Navigation> is selected for <AV Input>.
(☞ page 58)
9
OPERATIONS

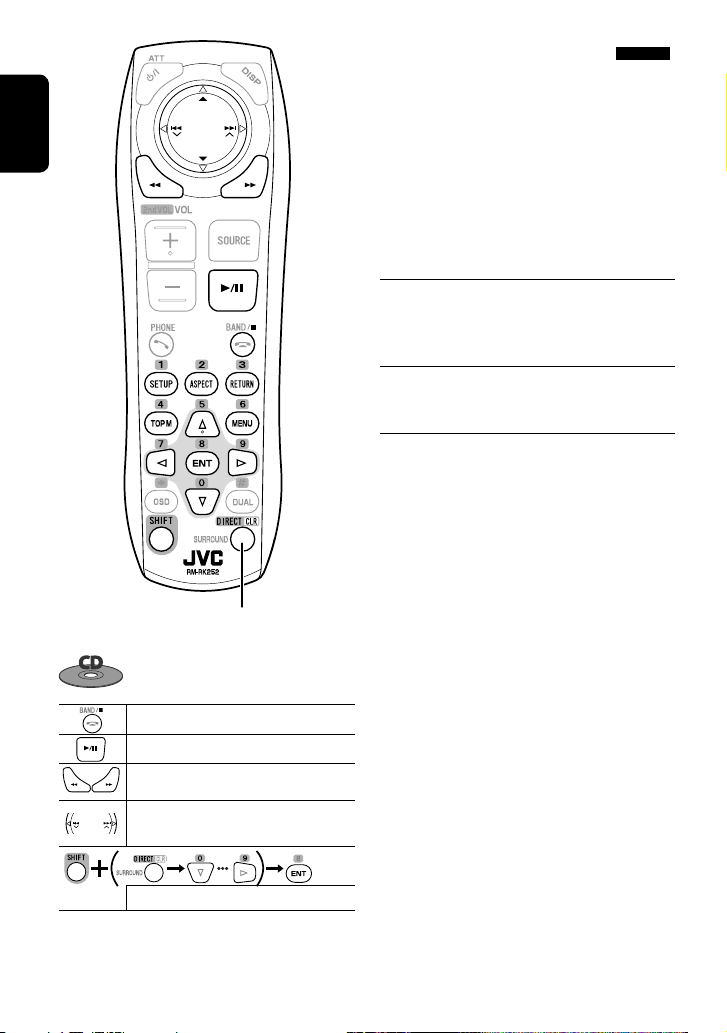
Basic operations — Remote controller (RM-RK252)
Installing the battery
ENGLISH
Insert the batteries into the remote controller by
matching the polarity (+ and –) correctly.
R03/LR03/AAA
Caution:
Battery shall not be exposed to excessive heat
such as sunshine, fire or the like.
If the range or effectiveness of the remote
controller decreases, replace both batteries.
Before using the remote controller:
• Aim the remote controller directly at the remote
sensor on the unit.
• DO NOT expose the remote sensor to bright light
(direct sunlight or artificial lighting).
The unit is equipped with the steering wheel
remote control function.
• See the Installation/Connection Manual (separate
volume) for connection.
IMPORTANT:
When Dual Zone is activated (☞ page 30), the
remote controller functions only for operating the
DVD/CD player.
Main elements and features
1 • Turns on the power.
• Turns off the power [Hold].
• Attenuates the sound (when the power is on).
2 “Disc,” “USB,” and “USB iPod”: Reverse search
3 • Adjusts the volume level.
• Adjusts the volume level through the 2nd AUDIO
OUT plug (while holding SHIFT). (☞ page 30)
4 • Answers incoming calls.
• Enters <Redial> [Hold].
• You can enter
button then touching 6 on the unit.
5 • DVD/DivX 6: Displays the disc menu.
• VCD: Resumes PBC playback (☞ page 25).
• DVD-VR: Displays the Original Program screen.
10
<Dial Menu> by pressing the

6 • Enters numbers (while holding SHIFT). (☞ pages
14, 23 to 26, 40, and 48)
• Selects the preset phone number.
• “Tuner” and “DAB”: Selects the preset stations.
7 Displays the on-screen bar.
8 Functions with other buttons (see 3, 6, and ;)
9 Displays the display information.
p “Tuner”:
• 5 / ∞: Selects preset stations.
• 4 / ¢: Searches for stations.
– Auto Search
– Manual Search [Hold]
“DAB”:
• 5 / ∞: Selects services.
• 4 / ¢: Searches for ensembles.
– Auto Search
– Manual Search [Hold]
“Disc” and “Changer”:
• 5 / ∞:
– DVD: Selects the title.
– DVD-VR: Selects the program/play list.
– Other discs (except VCD/CD): Selects the
folders.
• 4 / ¢:
– Reverse skip/forward skip
– Reverse search/forward search [Hold]
“USB”:
• 5 / ∞: Selects the folders.
• 4 / ¢:
– Reverse skip/forward skip
– Reverse search/forward search [Hold]
“USB iPod”:
• 5 / ∞: Selects previous/next item.
• 4 / ¢:
– Reverse skip/forward skip
– Reverse search/forward search [Hold]
“iPod”:
• ∞: Pauses or resumes playback.
• 5: Enters the main menu (then 5 / ∞
¢ work as the menu selecting buttons).
/ 4 /
*3
• 4 / ¢:
– Reverse skip/forward skip
– Reverse search/forward search [Hold]
In menu selecting mode:
– Selects an item. (Then, press ∞ to confirm the
selection.)
– Skips 10 items at a time [Hold].
“Bluetooth”:
• 5 / ∞: Selects group/folder.
• 4 / ¢:
– Reverse skip/forward skip
– Reverse search/forward search [Hold]
q “Disc,” “USB,” and “USB iPod”: Forward search
w Selects the source.
e • “Disc,” “USB,” and “USB iPod”: Starts and pauses
playback.
• “Bluetooth”: Starts playback.
• Answers incoming calls.
r Changes the aspect ratio of the playback pictures.
t • “Tuner” and “DAB”: Selects the bands.
• “Disc” and “USB”: Stops playback.
• “Bluetooth”: Pauses playback.
• Ends the call.
y VCD: Returns to the PBC menu.
u • DVD Video/DivX 6: Displays the disc menu.
• VCD: Resumes PBC playback. (☞ page 25)
• DVD-VR: Displays the Play List screen.
i • Makes selection/settings.
• @ / #: Skips back or forward by 5 minutes for
DivX/MPEG1/MPEG2.
• % / fi: Changes discs for “Changer.”
o Activates or deactivates Dual Zone.
; • Changes the surround mode.*1 (☞ page 27)
• “Disc” and “USB”: Switches the number entry
mode (while holding SHIFT).
• Erases the misentry after entering a wrong
number (while holding SHIFT).
1
When Dual Zone is activated, these buttons cannot be
*
used.
*2 Functions as a number button only (see 6 ).
*3 5 : Returns to the previous menu.
∞ : Confirms the selection.
ENGLISH
11
OPERATIONS
Listening to the radio
ENGLISH
A Band
B Sound mode (
C Preset no.
D Frequency
E PS (station name) for FM RDS. If no signal is coming in,
“No Name” appears.
F PTY code for FM RDS
G Tuner-related function indicators
☞ page 52)
TUNER
Bayern Radio
Pop Music
FLAT
FM1 P1 87.5 MHz
AFTP
MO
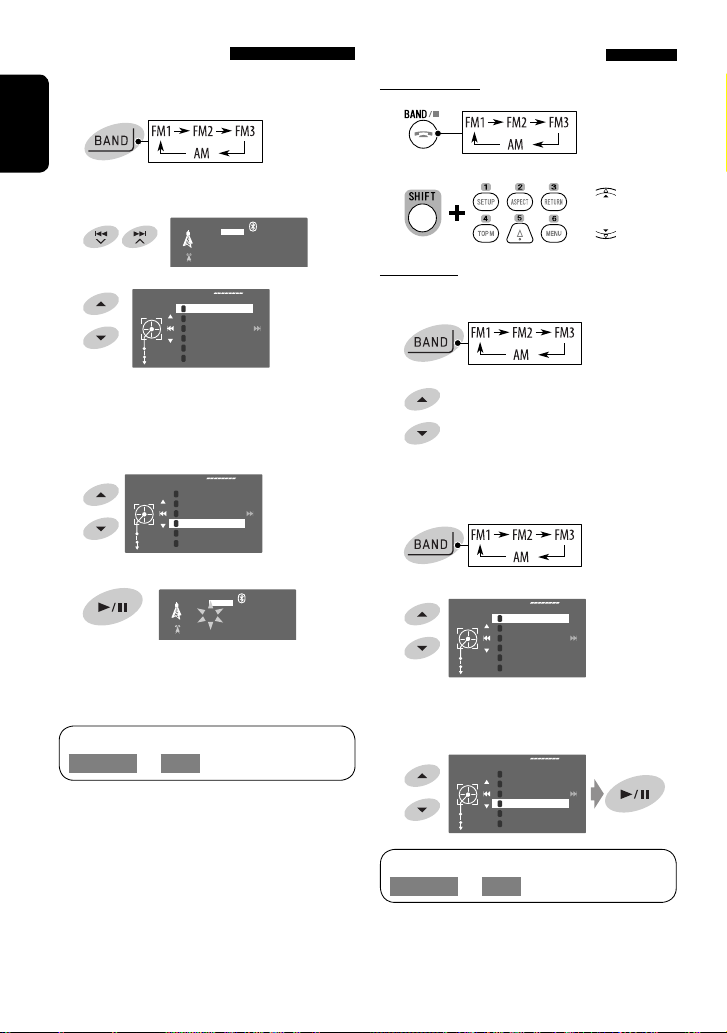
~ Select “Tuner.”
Ÿ Select the band.
! Search for a station—Auto Search.
• Manual Search: Hold either or until
“Manual Search” appears on the monitor, then
touch it repeatedly.
• The ST indicator lights up when receiving an
FM stereo broadcast with sufficient signal
strength.
15:45
12
When an FM stereo broadcast is
hard to receive
1
2
AV Menu
FM station automatic presetting
—SSM (Strong-station
Sequential Memory)
This function works only for FM bands.
You can preset six stations for each band.
1
ENGLISH
Enter
Mode
3
4
Mode
Mono
Mono
SSM
PTy Standby
Off
Off
On
Exit
Reception improves, but the stereo effect will be
lost.
• The MO indicator lights up.
To restore the stereo effect, select <Off> in step 4.
Start
AV Menu
Mono
SSM
PTy Standby
Enter
Mode
2
3
Mode
Local FM stations with the strongest signals are
searched and stored automatically in the FM band.
13
OPERATIONS
Manual presetting
Ex.: Storing the FM station of 92.5 MHz into preset
number 4 of the FM1 band.
1
ENGLISH
Tune in to a station you want to preset.
2
TUNER
FLAT
FM1 92.5 MHz
No Name
3
4 Select a preset number.
5 Store the station.
The Preset List can also be accessed through
<AV Menu> = <List>.
FM1
1
87.5
2
89.9
3
97.9
4
105.9
5
Enter
108.0
6
87.5
[Hold]
Store
The Preset List appears
• For FM: Each time you hold 5 / ∞ , you can
change the bands.
FM1
1
87.5
2
89.9
3
97.9
4
105.9
5
Enter
108.0
6
87.5
Store
15:45
FLAT
[Hold]
TUNER
FM1 P4 92.5 MHz
No Name
The station selected in step 2 is now stored in
preset number 4.
15:45
Selecting preset stations
On the remote:
1
2
or
On the unit:
To select directly
1
2
To select from the Preset List
1
2
3 Select the preset number.
FM1
1
87.5
2
89.9
3
97.9
4
105.9
5
Enter
108.0
6
87.5
Store
[Hold]
• For FM: Each time you hold 5 / ∞ , you can
change the bands.
FM1
1
87.5
2
89.9
3
97.9
4
105.9
5
Enter
108.0
6
87.5
Store
The Preset List can also be accessed through
<AV Menu> = <List>.
14

The following features are available only for FM RDS
stations.
Searching for FM RDS
programme—PTY Search
You can search for your favorite programmes being
broadcast by selecting the PTY code for your favorite
programmes.
1
[Hold]
The available PTY codes appear (including six
preset PTY codes).
2 Select a PTY code.
3
If there is a station broadcasting a programme
of the same PTY code as you have selected, that
station is tuned in.
PTy Search
Memory
1
Pop Music
2
Rock Music
3
Easy Listening
4
Serious Classics
5
Start
Current Affairs
6
Varied Speech
PTy Search
Memory
Cultures
Science
Varied Speech
Pop Music
Start
Rock Music
Eash Listening
FLAT
PTy Search
15:45
TUNER
FM1 XX.X MHz
Science
The frequency changes as search goes on.
Storing your favorite programme types
You can store your favorite PTY codes into the PTY
Preset List.
1 Follow steps 1 and 2 in the left column to select
a PTY code you want to store.
PTy Search
Memory
Cultures
Science
Varied Speech
Pop Music
Start
Rock Music
Eash Listening
2 Enter <PTy Memory>.
PTy Memory
1
Pop Music
2
Rock Music
3
Easy Listening
4
Serious Classics
5
Store
Current Affairs
6
Varied Speech
The current PTY Preset List appears.
3 Select a listed code to be replaced with the one
newly selected.
PTy Memory
1
Pop Music
2
Rock Music
3
Easy Listening
4
Serious Classics
5
Store
Current Affairs
6
Varied Speech
4 Store the code.
Now the selected PTY code is replaced with the
new one.
PTy Memory
Store
1
Pop Music
2
Rock Music
3
Easy Listening
4
Serious Classics
5
Science
6
Varied Speech
ENGLISH
Available PTY codes:
News, Current Affairs, Information, Sport, Education,
Drama, Cultures, Science, Varied Speech, Pop Music,
Rock Music, Easy Listening, Light Classics M,
Serious Classics, Other Music, Weather & Metr,
Finance, Children’s Progs, Social Affairs, Religion,
Phone In, Travel & Touring, Leisure & Hobby,
Jazz Music, Country Music, National Music,
Oldies Music, Folk Music, Documentary
15
OPERATIONS
Activating/deactivating TA/PTY
Standby Reception
TA Standby Reception Indicator
Touch T/P to activate.
ENGLISH
The unit will temporarily switch
to Traffic Announcement (TA), if
available, from any source other than
AM. The volume changes to the preset
TA volume level if the current level is
lower than the preset level (☞ page
58).
Not yet activated. Tune in to another
station providing the RDS signals.
Touch T/P to deactivate. Goes off
TP
Lights up
Flashes
Activating PTY Standby Reception
1
2
3
4
Mode
PTy Standby
Select
AV Menu
Enter
Mode
Mono
SSM
PTy Standby
Off
Off
News
Exit
PTY Standby Reception Indicator
Enter <AV Menu> = <Mode> =
<PTy Standby> (☞ right column and
PTY
page 61).
The unit will temporarily switch to
Lights up
your favorite PTY programme from
any source other than AM.
Not yet activated. Tune in to another
Flashes
station providing the RDS signals.
To deactivate, select <Off> in step
Goes off
4, then touch 6 once (☞ right
column).
• When a DAB tuner is connected, TA Standby/PTY
Standby Reception also works for the DAB tuner.
5
Select a PTY code for PTY Standby Reception.
PTy Standby
Drama
Cultures
Science
Varied Speech
Exit
Pop Music
16
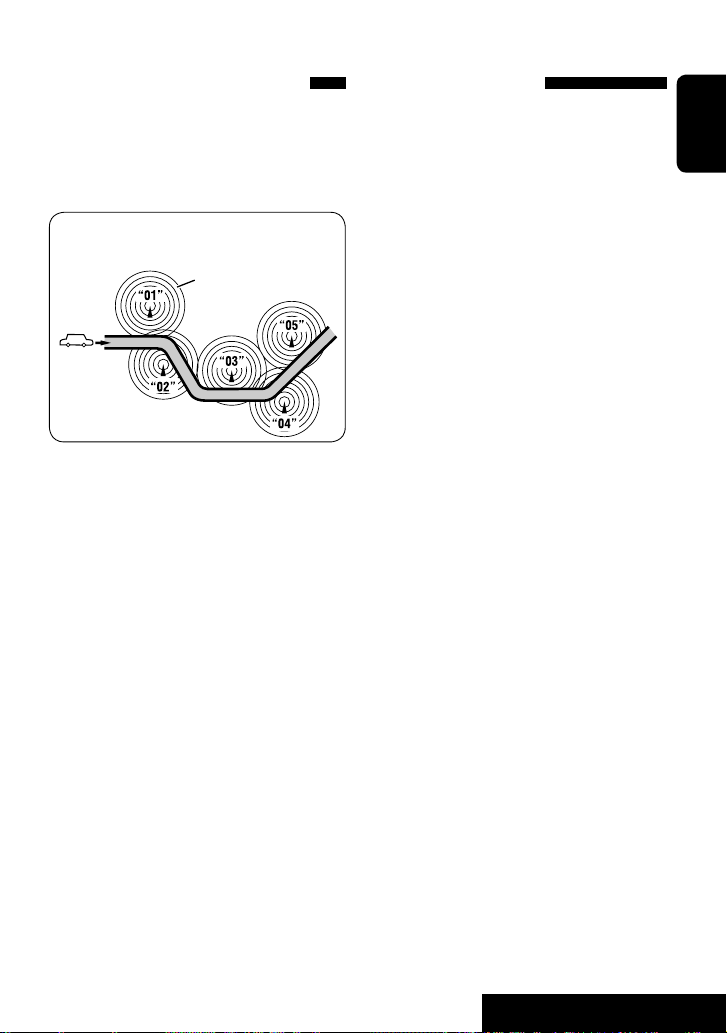
Tracing the same programme—
Network-Tracking Reception
When driving in an area where FM reception is not
sufficient enough, this unit automatically tunes in to
another FM RDS station of the same network, possibly
broadcasting the same programme with stronger
signals.
Programme A broadcasting on different frequency
areas (01 – 05)
A
When shipped from the factory, Network-Tracking
Reception is activated.
You can change the Network-Tracking Reception
setting. ☞ <AF Regional> on page 58.
• When the DAB tuner is connected, refer also to
“Tracing the same programme—Alternative
Frequency Reception (DAB AF).” (☞ page 49)
Automatic station selection—
Programme Search
Usually when you select preset stations, the preset
station is tuned in.
If the signals from the FM RDS preset station are not
sufficient for good reception, this unit, using the AF
data, tunes in to another frequency broadcasting the
same programme as the original preset station is
broadcasting. (☞ page 58)
• The unit takes some time to tune in to another
station using Programme Search.
ENGLISH
17
OPERATIONS
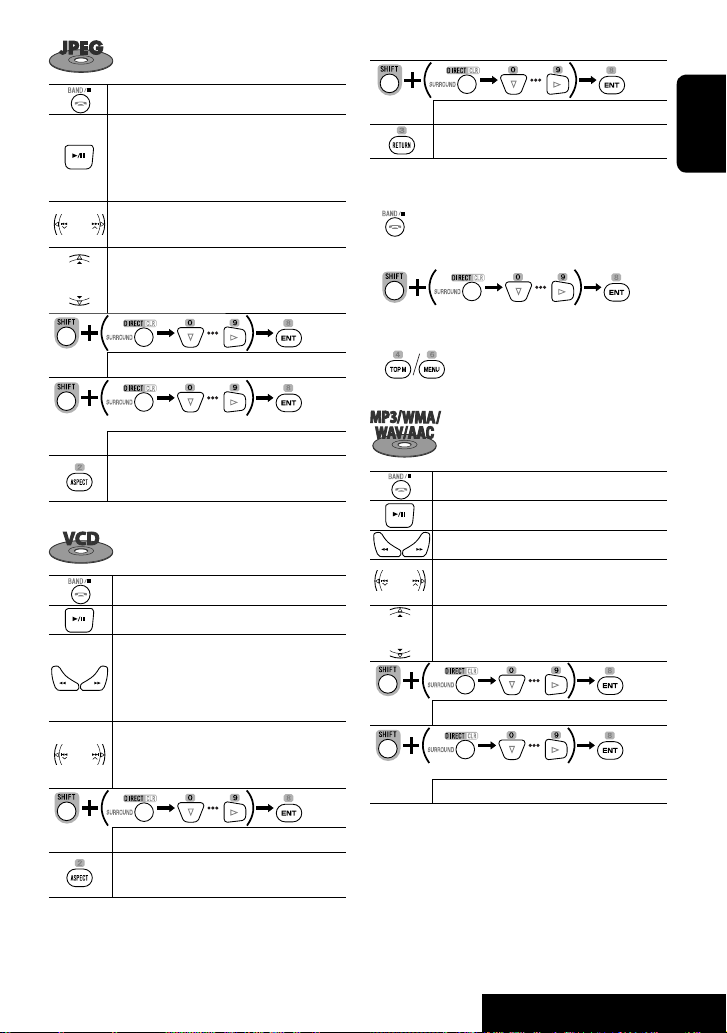
Disc operations
The disc type is automatically detected, and playback starts automatically (for some discs: automatic start depends
on its internal program).
ENGLISH
If a disc does not have any disc menu, all tracks in it will be played repeatedly until you change the source or eject the
disc.
” appears on the monitor, the unit cannot accept the operation you have tried to do.
If “
• In some cases, without showing “ ,” operations will not be accepted.
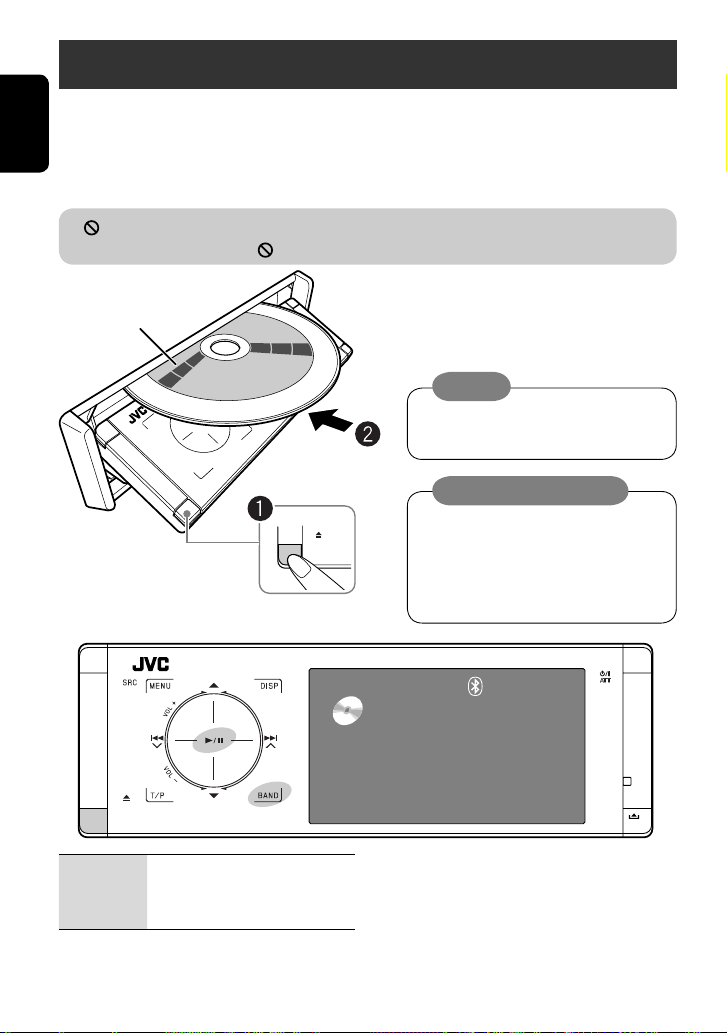
~ Open the front panel.
Label side
Ÿ Insert the disc.
Playback starts automatically.
Caution:
Do not place your finger behind the control
panel.
Caution on volume setting:
Discs and connected USB devices produce
very little noise compared with other sources.
Lower the volume before playing a disc to
avoid damaging the speakers by the sudden
increase of the output level.
0: Ejects the disc.
3/8: Starts and pauses playback.
BAND: Stops playback.
DISC
15:45
Now Reading...
18
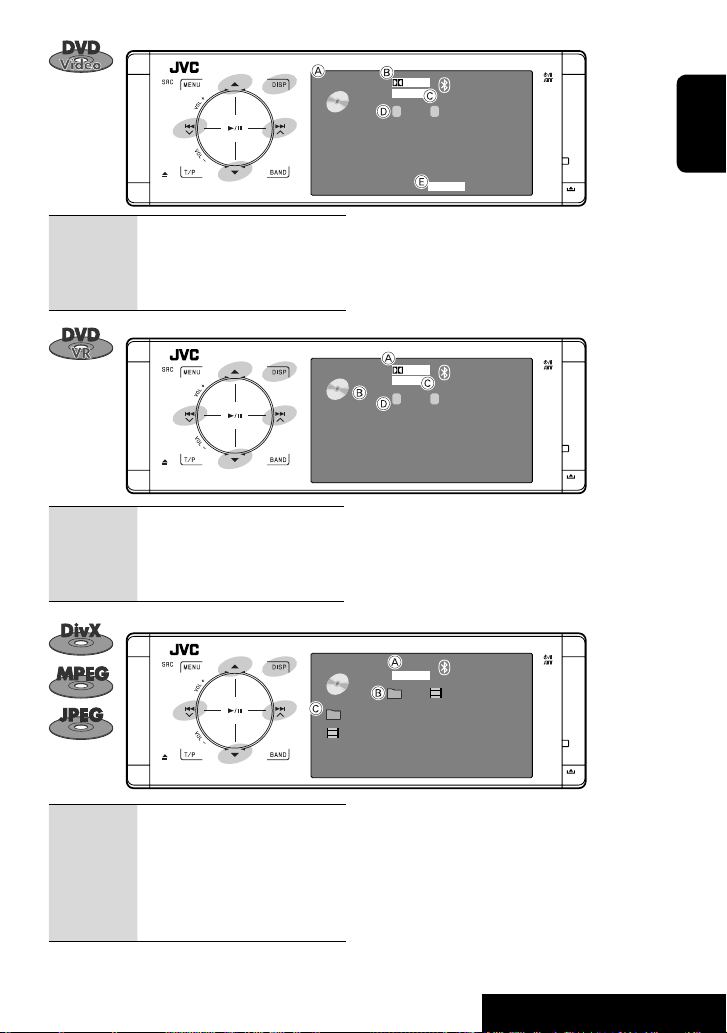
DVD
DIGITAL
MULTI
VIDEO
01 02 0:01:20
CT
CHAP.RPT
15:45
ENGLISH
4 ¢: Touch: Selects chapter.
Hold: Reverse/forward search
*1
5 ∞: Selects title.
DISP:
4 ¢: Touch: Selects chapter.
Touch if necessary (☞ page 9).
Hold: Reverse/forward search
*1
5 ∞: Selects program no./Play List no.
DISP:
Touch if necessary (☞ page 9).
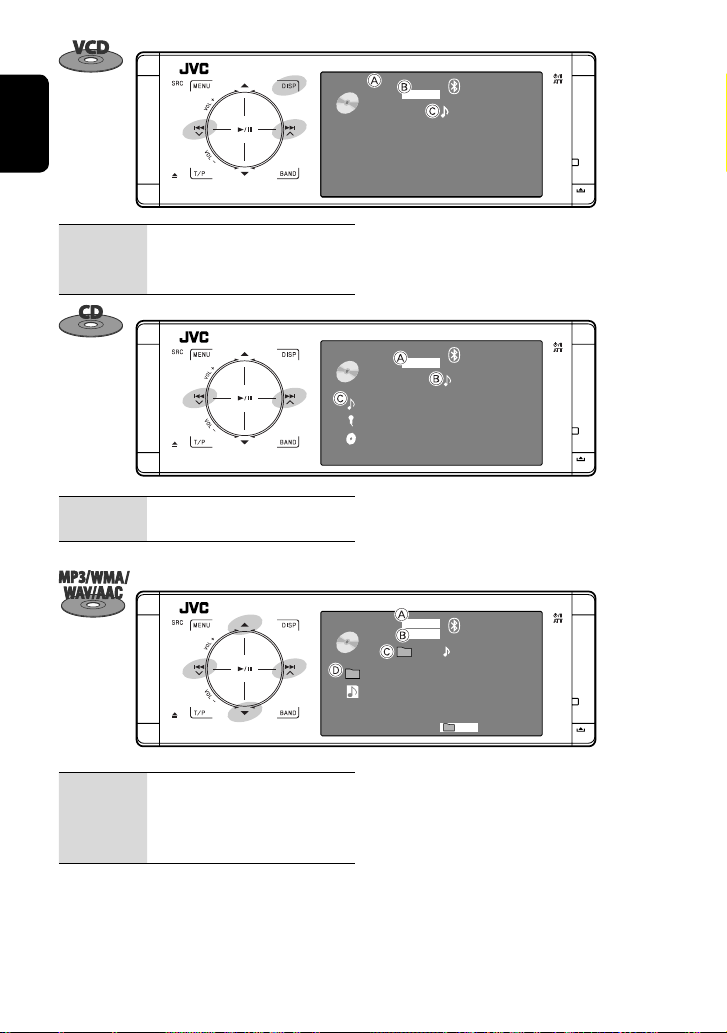
A Disc type
B Audio format
C Sound/surround mode (
☞ pages 26 and 52)
D Title no./Chapter no./Playing time
E Playback mode
DVD
DIGITAL
FLAT
VR-PRG
01 02 0:01:20
15:45
CP
A Audio format
B VR-PRG: Original program
VR-PL: Play List
C Sound/surround mode (
☞ pages 26 and 52)
D Program no. (or Play List no.)/Chapter no./Playing time
DVD
FRONT 2CH
DivX
01 02 0:01:20
Current Folder Name
Current File Name.avi
15:45
4 ¢: Touch: Selects track.
Hold: Reverse/forward search for
*2
DivX/MPEG
5 ∞: Touch: Selects folder.
Hold: Displays Folder List.
DISP:
Touch if necessary (☞ page 9).
A Sound/surround mode (☞ pages 26 and 52)
B For DivX/MPEG: Folder no./Track no./Playing time
For JPEG: Folder no./File no.
C Current folder name/current file name
*1 Search speed: x2 ] x10
*2 Search speed: ¡1 ] ¡2
19
OPERATIONS
ENGLISH
VCD
VCD
02 0: 45: 38
PBC
PBC
FLAT
FLAT
15:45
15: 45
02 0:01:20
4 ¢: Touch: Selects track.
Hold: Reverse/forward search
DISP:
Touch if necessary (☞ page 9)
4 ¢: Touch: Selects track.
Hold: Reverse/forward search
4 ¢: Touch: Selects track.
Hold: Reverse/forward search
5 ∞: Touch: Selects folder.
Hold: Displays Folder List.
A PBC indicator lights up when PBC is in use.
*1
B Sound/surround mode (
C Track no./Playing time
CD
Current Track Title
Artist Name
Disc Title
A Sound/surround mode (☞ pages 26 and 52)
*1
B Track no./Playing time
C Track title (only for CD Text)/Artist Name/Disc title
CD
01 02 0:01:20
Current Folder Name
Current File Name.mp3
A Audio format (MP3/WMA/WAV/AAC)
*1
B Sound/surround mode (
C Folder no./Track no./Playing time
D Current folder name/current file name
FLAT
MP3
FLAT
☞ pages 26 and 52)
15:45
02 0:01:20
*2
15:45
RPT
☞ pages 26 and 52)
*3
*1 Search speed: x2 ] x10
*2 “No Name” appears for conventional CDs.
*3 Tag data will be shown instead of folder/file names
when they are recorded and <Tag Display> is set to
<On>. (☞ page 54)
20

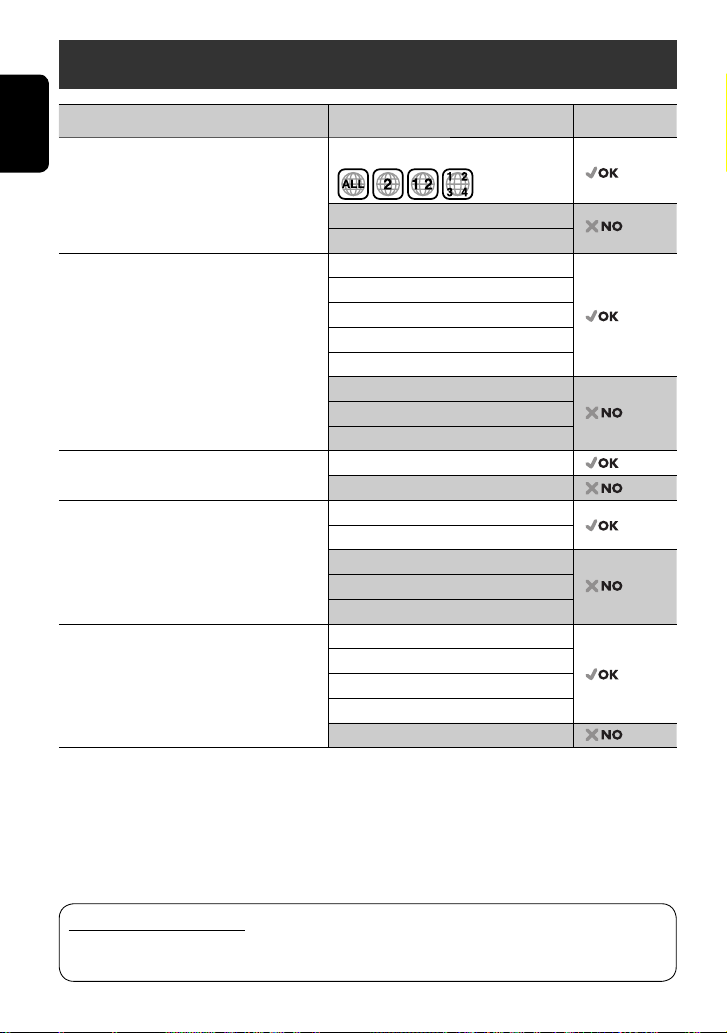
Selecting playback modes
You can use Repeat or Random playback mode.
3
Mode
Repeat
Random
Repeat
Set
Off
Off
Track
Folder
Ex.: To select Track Repeat
1
2
AV Menu
Enter
Mode
4
When one of the playback modes is selected, the
corresponding indicator lights up on the source
information screen.
To cancel, select <Off> in step 4.
Disc type Repeat Random
Chapter: Repeats current chapter.
Title: Repeats current title.
Chapter: Repeats current chapter.
Program: Repeats current program (not available
for Playlist playback).
Track: Repeats current track (for VCD: PBC not
in use).
Disc (All): Randomly plays all tracks (for
VCD: PBC not in use).
Track: Repeats current track. Folder: Randomly plays all tracks of
current folder, then tracks of
next folders.
Folder: Repeats all tracks of the current folder. Disc (All): Randomly plays all tracks.
Track: Repeats current track. Folder: Randomly plays all tracks of
current folder, then tracks of
next folders.
Folder: Repeats all tracks of the current folder. Disc (All): Randomly plays all tracks.
Folder: Repeats all tracks of the current folder.
ENGLISH
—
—
—
21
OPERATIONS
Selecting tracks on the list
If a disc includes folders, you can display the Folder/
Track (File) Lists, then start playback.
1 Enter <Folder List>.
ENGLISH
2 Select a folder.
3 Select a file.
The Folder List can also be accessed through
<AV Menu> = <List>.
Folder List
My Best
Cinema
Pops
My Best2
Favorite Song
[Hold]
Cinema2
• Hold the button to display the next/previous
folders.
Folder List
My Best
Cinema
Pops
My Best2
Favorite Song
Cinema2
File List
Song011.mp3
Song012.mp3
Song013.mp3
Song014.mp3
Enter
Song015.mp3
Song016.mp3
Operations using the remote
controller—RM-RK252
Prohibiting disc ejection
You can lock a disc in the loading slot.
~ Hold the buttons at the same time.
NO EJECT?
[Hold]
EMERGENCY EJECT?
Ÿ Activate the prohibition.
“No Eject” appears.
To cancel the prohibition, repeat the same procedure
to select <EJECT OK?>.
Also functions as CLR (clear):
Erases a misentry if pressed while
holding SHIFT.
22
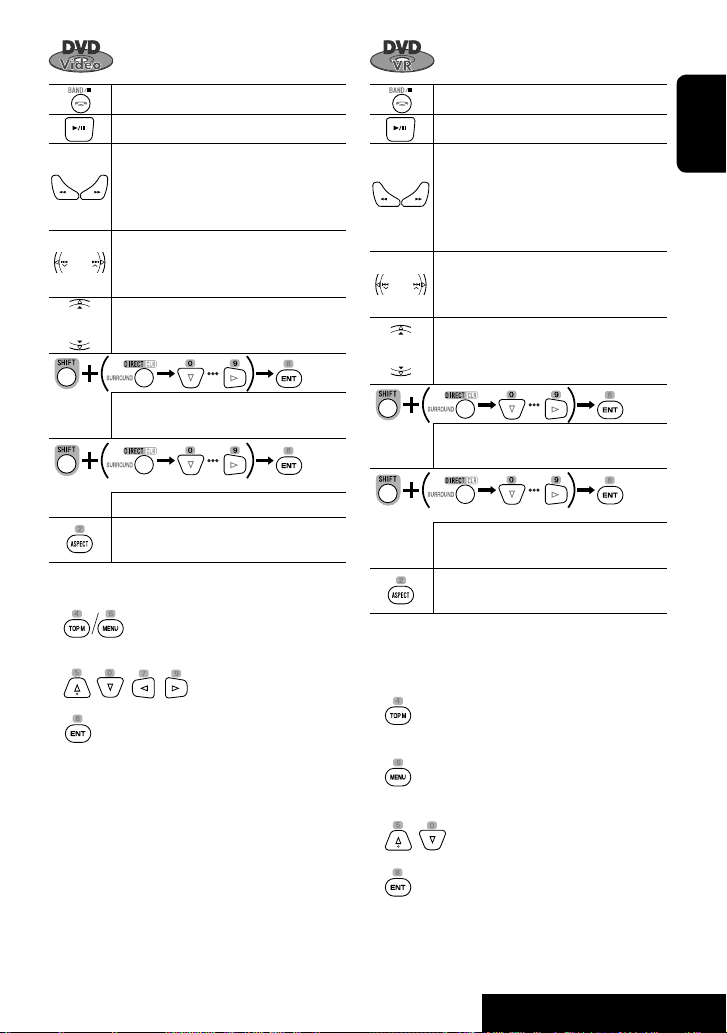
Stops playback.
Starts or pauses playback.
*1
• Reverse/forward search
can be heard.)
• Slow motion
*2
(No sound
during pause. (No sound
can be heard.)
• Selects chapter (during playback or
pause).
• Reverse/forward search
*3
[Hold]
Selects title (during playback or pause).
• Selects chapter.
• Selects title (when not playing).
[Twice]
Selects title (during playback or pause).
Changes the aspect ratio of the playback
pictures.
Using menu driven features
1.
2. Select an item you want to start playback.
3.
Stops playback.
Starts or pauses playback.
*1
• Reverse/forward search
can be heard.)
• Forward slow motion
(No sound
*2
during pause.
(No sound can be heard.)
• Reverse slow motion does not work.
• Select chapter (during playback or
pause).
• Reverse/forward search
*3
[Hold]
• Selects program.
• Selects Play List (during playback or
pause).
• Selects chapter.
• Selects program (when not playing).
[Twice]
Selects program/Play List (during
playback or pause).
Changes the aspect ratio of the playback
pictures.
Using Original Program/Play List screens (☞ page
32)
1. For Original Programs:
For Play List:
ENGLISH
2. Select the item you want to start playback.
3.
*1 Search speed: x2 ] x5 ] x10 ] x20 ] x60
*2 Slow motion speed: 1/32 ] 1/16 ] 1/8 ] 1/4
] 1/2
*3 Search speed: x2 ] x10
23
OPERATIONS
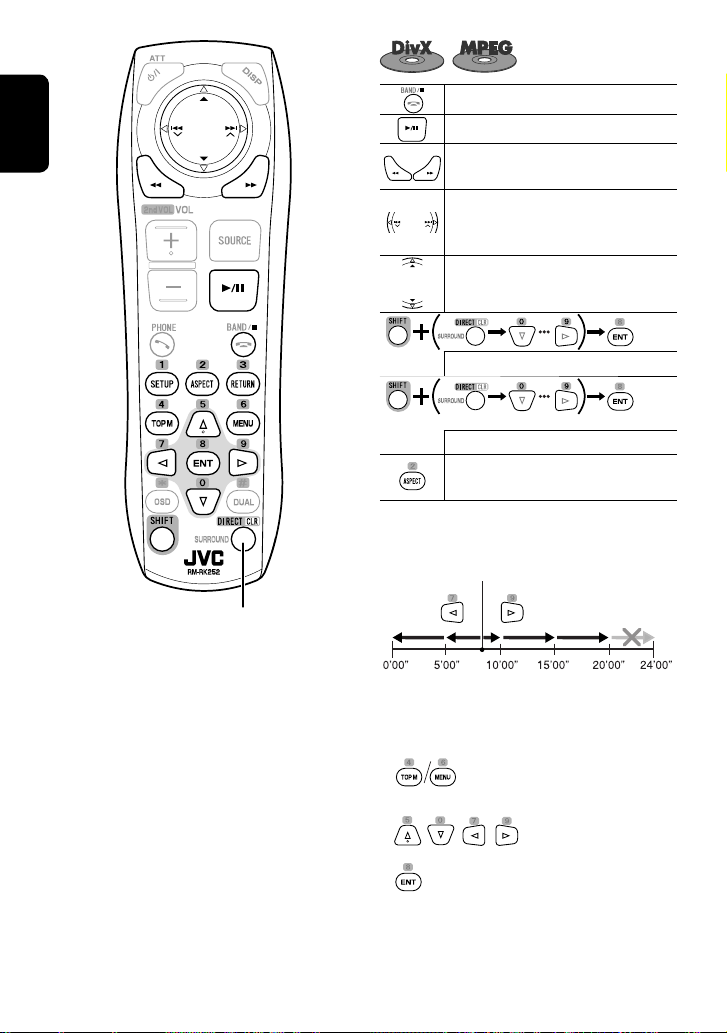
ENGLISH
Also functions as CLR (clear):
Erases a misentry if pressed while
holding SHIFT.
Stops playback.
Starts or pauses playback.
Reverse/forward search
be heard.)
• Selects track.
• Reverse/forward search
sound can be heard.)
Selects folder.
Selects track (within the same folder).
[Twice]
Selects folder.
Changes the aspect ratio of the playback
pictures.
While playing...
Back/advance the scenes by 5 minutes.
Current playback position
1st press
1st press 2nd press
*1
(No sound can
*2
[Hold] (No
3rd press2nd press
For DivX6: Using menu driven features
1.
2. Select the item you want to start playback.
3.
24
During PBC playback...
Stops playback.
Starts or pauses playback. (Slide show:
each file is shown for a few seconds.)
Shows the current file until you change it if
pressed during Slide show.
Selects track.
Selects folder.
Selects track (within the same folder).
[Twice]
Selects folder.
Changes the aspect ratio of the playback
pictures.
Stops playback.
Starts or pauses playback.
• Reverse/forward search*
3
• Forward slow motion*4 during pause.
(No sound can be heard.)
• Reverse slow motion does not work.
• Selects track.
• Reverse/forward search
*5
[Hold] (No
sound can be heard.)
Selects an item on the menu.
Returns to the previous menu.
To cancel PBC playback
1
2 Start the desired track.
• To resume PBC:
Stops playback.
Starts or pauses playback.
Reverse/forward search
• Selects track.
• Reverse/forward search*5 [Hold]
Selects folder.
Selects track (within the same folder).
[Twice]
Selects folder.
ENGLISH
*3
Selects track.
Changes the aspect ratio of the playback
pictures.
*1 Search speed: ¡1 ] ¡2 ] ¡3
*2 Search speed: ¡1 ] ¡2
*3 Search speed: x2 ] x5 ] x10 ] x20 ] x60
*4 Slow motion speed: 1/32 ] 1/16 ] 1/8 ] 1/4
] 1/2
*5 Search speed: x2 ] x10
25
OPERATIONS
ENGLISH
Also functions as CLR (clear):
Erases a misentry if pressed while
holding SHIFT.
Enjoying surround sounds
You can enjoy multi-channel surround playback
through the front, center, surround speakers.
• After connecting the center speaker, make sure to
activate the center speaker; otherwise, no sound
comes out of the center speaker (☞ page 57).
• You cannot activate this function in the following
cases:
– When “USB iPod” is selected as the source.
– When Dual Zone is in use.
MULTI:
For multi-channel encoded sources such as Dolby
*3
Digital
and DTS*4. (When activated, “MULTI” is shown
on the source information screen.)
Dolby Pro Logic II (Movie/Music):
For 2 channel sources except for DivX/MPEG1/MPEG2
discs.
*3 Manufactured under license from Dolby Laboratories.
Dolby, Pro Logic, and the double-D symbol are
trademarks of Dolby Laboratories.
*4 “DTS” and “DTS Digital Surround” are registered
trademarks of DTS, Inc.
Stops playback.
Starts or pauses playback.
Reverse/forward search
*1
• Selects track.
• Reverse/forward search*2 [Hold]
Selects track.
*1 Search speed: x2 ] x5 ] x10 ] x20 ] x60
*2 Search speed: x2 ] x10
26
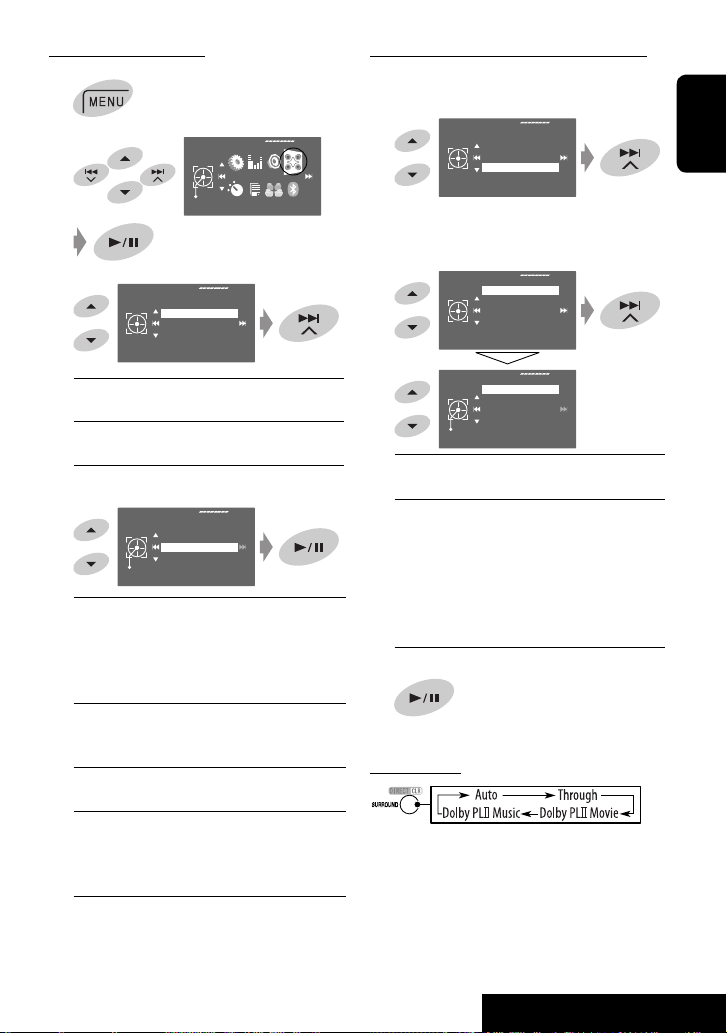
To turn on the surround
1
2
3
4
Disc Surround
Surround Off:
Deactivates surround.
Surround On:
Activates surround. = Go to the following step.
Surround On
Auto:
• When multi-channel digital signals come in,
“MULTI” surround is activated.
• When 2-channel or 2.1-channel signals
in, “4CH STEREO” is activated.
Through:
All incoming channel signals are sent to the
corresponding speakers.
Dolby PLII Movie:
Activates Dolby Pro Logic II Movie.
Dolby PLII Music:
Activates Dolby Pro Logic II Music. You can adjust
<Panorama> and <Center Width> settings. (☞
right column)
Exit
AV Menu
Surround Off
Surround On
Auto
Auto
Through
Dolby PLII Movie
Dolby PLII Music
Enter
Disc Surround
*5
come
To change the <Dolby PLII Music> setting
In step 4 in the left column...
1 Select <Dolby PLII Music>.
Surround On
Auto
Through
Dolby PLII Movie
Dolby PLII Music
2 Enter each sub-screen then select the desired
setting.
EX.: When <Panorama> is selected in step 1.
Dolby PLII Music
Panorama
Center Width
Off
Panorama
Off
On
Exit
Panorama:
Select <On> to add wraparound sound effect.
Center Width:
Adjust the center image so it may be heard only
from the center speaker, only from the left/right
front speaker as a “phantom” center image, or
various combination of these speakers.
As the number increases, the “phantom” effect
becomes stronger (normally select <04>).
3
On the remote:
• You cannot change the <Dolby PL II Music> settings
using the remote controller.
ENGLISH
5
*
Except signals of DivX/MPEG1/MPEG2 discs.
27
OPERATIONS
Operations using the on-screen bar (DVD/VCD/DivX/MPEG1/MPEG2/
JPEG)
These operations are possible on the monitor using the remote controller.
ENGLISH
~ Display the on-screen bar. (☞ page 29)
Ÿ Select an item.
! Make a selection.
• When a pop-up menu appears...
• For entering time/numbers...
To move the entry position:
To select a number:
⁄
Repeat steps Ÿ and ! to set other items if
needed.
To remove the on-screen bar
28
Loading...