


DVD/CD RECEIVER
RECEPTOR CON DVD/CD
RÉCEPTEUR DVD/CD
KD-AVX2
KD-AVX2
KD-AVX2
FRANÇAIS ESPAÑOL ENGLISH
EXTRA MONITOR CONTROL
MODE ASPECT MENU
DVD / RECEIVER CONTROL |
|
|
|
|
KD-AVX2 |
ASPECT |
||
ATT |
|
ZOOM |
|
|
|
MENU |
A |
|
|
|
+10 |
|
|
|
|
|
|
SOURCE |
|
|
|
|
|
|
|
|
|
–100 |
|
|
+100 |
|
|
|
|
BAND |
|
|
|
|
|
|
|
|
|
|
–10 |
|
DIRECT |
SRC |
D |
DISP |
|
DUAL |
ASPECT |
|
|
OSD |
|
|||
VOL |
1 |
DISC+ 2 |
3 |
|
|
|
|
|
|
TOP M |
|
|
MENU |
|
|
|
|
2nd VOL |
4 |
|
5 |
6 |
|
|
|
|
|
|
ENTER |
|
|
|
|
|
|
|
7 |
DISC– |
8 |
9 |
|
|
7 / BACK |
|
|
|
|
|
|
|
|
||
|
SETUP |
|
|
RETURN |
|
|
BAND |
ENT |
|
|
|
0 |
SURROUND |
|
|
||
|
|
|
|
|
|
|
||
SHIFT
RM-RK240
For canceling the display demonstration, see page 10.
Para cancelar la demonstración en pantalla, consulte la página 10. Pour annuler la démonstration des affichages, référez-vous à la page 10.
For installation and connections, refer to the separate manual. Para la instalación y las conexiones, refiérase al manual separado.
Pour l’installation et les raccordements, se référer au manuel séparé.
INSTRUCTIONS
MANUAL DE INSTRUCCIONES
MANUEL D’INSTRUCTIONS
For customer Use:
Enter below the Model No. and Serial No. which are located on the top or bottom of the cabinet. Retain this information for future reference.
Model No.
Serial No.
LVT1454-001B [J]
ENGLISH
Thank you for purchasing a JVC product. Please read all instructions carefully before operation, to ensure your complete understanding and to obtain the best possible performance from the unit.
INFORMATION (For U.S.A.)
This equipment has been tested and found to comply with the limits for a Class B digital device, pursuant to Part 15 of the FCC Rules. These limits are designed to provide reasonable protection against harmful interference in a residential installation. This equipment generates, uses, and can radiate radio frequency energy and, if not installed and used in accordance with the instructions, may cause harmful interference to radio communications. However, there
is no guarantee that interference will not occur in a particular installation. If this equipment does cause harmful interference to radio or television reception, which can be determined by turning the equipment off and on, the user is encouraged to try to correct the interference by one or more of the following measures:
–Reorient or relocate the receiving antenna.
–Increase the separation between the equipment and receiver.
–Connect the equipment into an outlet on a circuit different from that to which the receiver is connected.
–Consult the dealer or an experienced radio/TV technician for help.
Caution:
Changes or modifications not approved by JVC could void the user’s authority to operate the equipment.
IMPORTANT FOR LASER PRODUCTS
1.CLASS 1 LASER PRODUCT
2.CAUTION: Do not open the top cover. There are no user serviceable parts inside the unit; leave all servicing to qualified service personnel.
3.CAUTION: Visible and invisible laser radiation when open and interlock failed or defeated. Avoid direct exposure to beam.
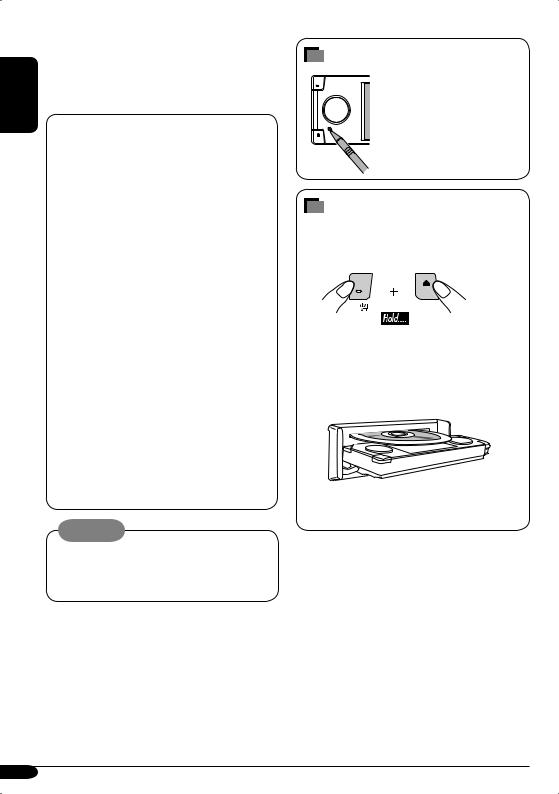
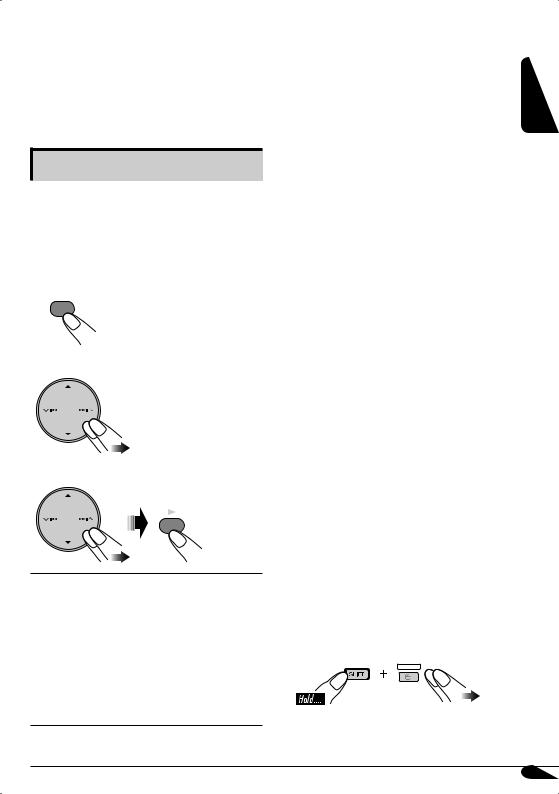
How to reset your unit
This will reset the microcomputer. Your preset adjustments will also be erased.
How to forcibly eject a disc
If a disc cannot be recognized by the receiver or cannot be ejected, ejects the disc as follows.
“NO EJECT?” (or “EJECT OK?”) and “EMERGENCY EJECT?” appear on the monitor.
Press 5 / ∞ repeatedly to select “EMERGENCY EJECT?”, then press ENT.
•If this does not work, reset your receiver.
•Be careful not to drop the disc when it ejects.
For safety....
•Do not raise the volume level too much, as this will block outside sounds, making driving dangerous.
•Stop the car before performing any complicated operations.
Temperature inside the car....
If you have parked the car for a long time in hot or cold weather, wait until the temperature in the car becomes normal before operating the unit.
2
WARNINGS:
•DO NOT install any receiver in locations where;
–it may obstruct the steering wheel and gearshift lever operations, as this may result in a traffic accident.
–it may obstruct the operation of safety devices such as air bags, as this may result in a fatal accident.
–it may obstruct visibility.
•DO NOT operate any receiver while manipulating the steering wheel, as this may result in a traffic accident.
•The driver must not watch the monitor while driving.
If the driver watches the monitor while driving, it may lead to carelessness and cause an accident.
•The driver must not put on the headphones while driving. It is dangerous to shut off the outside sounds while driving.
•If you need to operate the receiver while driving, be sure to look ahead carefully or you may be involved in a traffic accident.
•If the parking brake is not engaged, “Parking Brake” flashes on the monitor, and no playback picture will be shown.
–This warning appears only when the parking brake wire is connected to the parking brake system built in the car (refer to the Installation/Connection Manual).
This product incorporates copyright protection technology that is protected by U.S. patents and other intellectual property rights. Use of this copyright protection technology must be authorized by Macrovision, and is intended for home and other limited viewing uses only unless otherwise authorized by Macrovision. Reverse engineering or disassembly is prohibited.
Caution on volume setting:
Discs produce very little noise compared |
ENGLISH |
output level. |
|
with other sources. Lower the volume |
|
before playing a disc to avoid damaging |
|
the speakers by the sudden increase of the |
|
Cautions on the monitor:
•The monitor built in this receiver has been produced with high precision, but it may have some ineffective dots. This is inevitable and is not malfunction.
•Do not expose the monitor to direct sunlight.
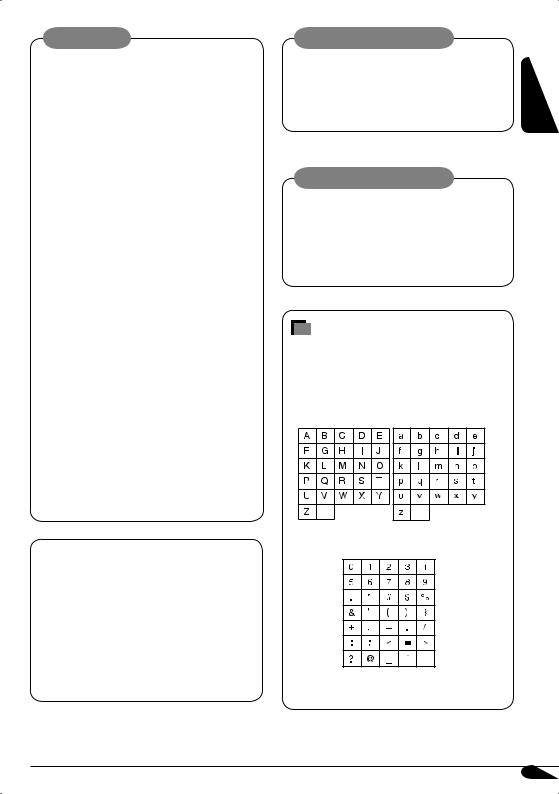
Characters shown on the monitor
The following characters will be used to show the various information on the monitor.
•You can also use the following characters to assign titles (see page 41).
space |
space |
Upper and lower cases
space
Numbers and symbols
3
ENGLISH
Introduction—Playable discs
Discs you can play
You can play back the following discs—12 cm (4-3/4") and 8 cm (3-3/16")—on this receiver:
•DVD Video: Recorded in NTSC color system with Region Code “1” (see below).
–DVD-R/DVD-RW recorded in the DVDVideo format can also be played.
•DVD Audio
•Video CD (VCD)/audio CD
•MP3/WMA/WAV/JPEG/MPEG1,2: Recorded either in CD-R/CD-RW or DVD-R/DVD- RW/+R/+RW/DVD-ROM.
–CD-R/CD-RW: Compliant with ISO 9660 Level 1, ISO 9660 Level 2, Romeo, and Joliet.
–DVD-R/DVD-RW/+R/+RW/DVD-ROM: Compliant with UDF-Bridge Format*1.
•It is possible to play back finalized +R/+RW (DVD Video format only) discs. However the use of +R double layer disc on this unit is not recommended.
•DVD-R recorded in multi-border format is also playable (except for dual layer discs).
On some discs, the actual operations may be different from what is explained in this manual.
Discs cannot be played back
DVD-ROM (data), DVD-RAM, DVD-R/DVD- RW recorded in the DVD-VR format, CDROM, CD-I (CD-I Ready), Photo CD, etc.
•Playing back these discs will generate noise and damage the speakers.
Caution for DualDisc playback
•The Non-DVD side of a “DualDisc” does not comply with the “Compact Disc Digital Audio” standard. Therefore, the use of NonDVD side of a DualDisc on this product may not be recommended.
*1 A hybrid file system used to provide compatibility with ISO 9660 for accessing any type of files on the disc. (UDF stands for Universal Disk Format.)
“DVD Logo” is a trademark of DVD Format/ Logo Licensing Corporation registered in the US, Japan and other countries.
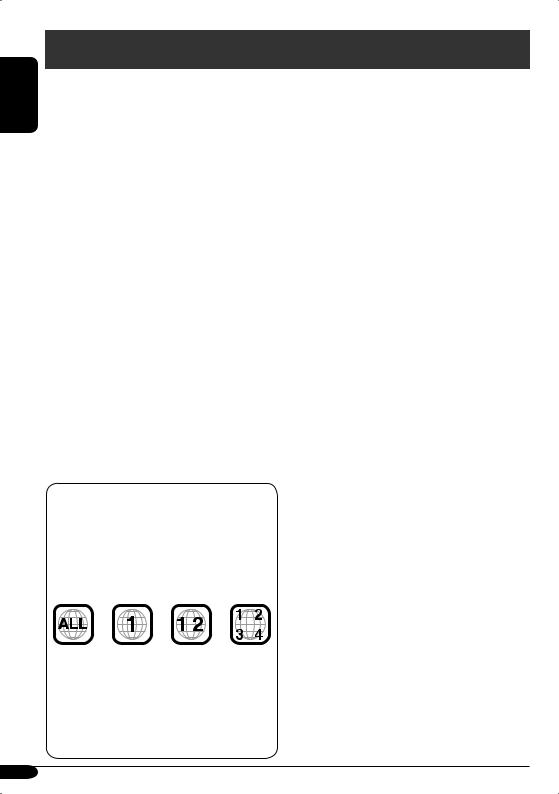
Note on Region Code:
DVD players and DVD Video discs have their own Region Code numbers. This receiver can only play back DVD discs whose Region Code numbers include “1”.
Examples:
If you insert a DVD Video disc of an incorrect Region Code
“Region Error” appears on the monitor on the unit and the disc ejects.
“REGION CODE ERROR” also appears on the external monitor.
4
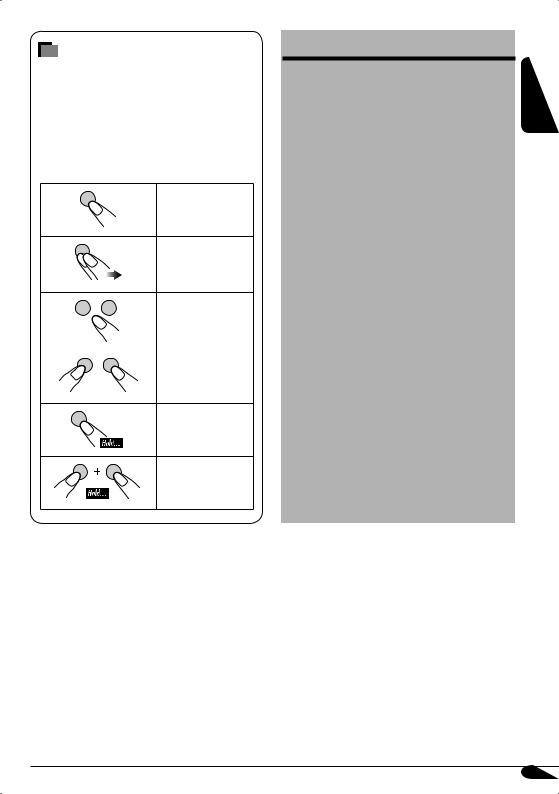
How to read this manual
The following methods are used to make the explanations simple and easy-to-understand:
•Some related tips and notes are explained in “More about this receiver” (see pages 54
– 58).
•Button operations are mainly explained with the illustrations as follows:
Press briefly.
Press repeatedly.
Press either one.
Press and hold until your desired response begins.
Press and hold both buttons at the same time.
Contents |
|
Control panel ............................... |
6 |
Remote controller — RM-RK240 ....... |
7 |
Getting started............................. |
10 |
Radio operations .......................... |
12 |
Disc operations............................. |
15 |
Unique disc functions.................... |
20 |
Disc surround playback ................. |
22 |
On-Screen disc operations ............. |
24 |
Other disc operations.................... |
28 |
Dual Zone operations.................... |
30 |
AV Menu settings.......................... |
31 |
Other main functions .................... |
41 |
CD changer operations .................. |
42 |
Satellite radio operations ................. |
44 |
External component operations ......... |
49 |
iPod®/D. player operations................ |
50 |
Maintenance ................................ |
52 |
Language codes............................ |
53 |
More about this receiver ............... |
54 |
Troubleshooting........................... |
59 |
Specifications............................... |
63 |
ENGLISH
5
ENGLISH
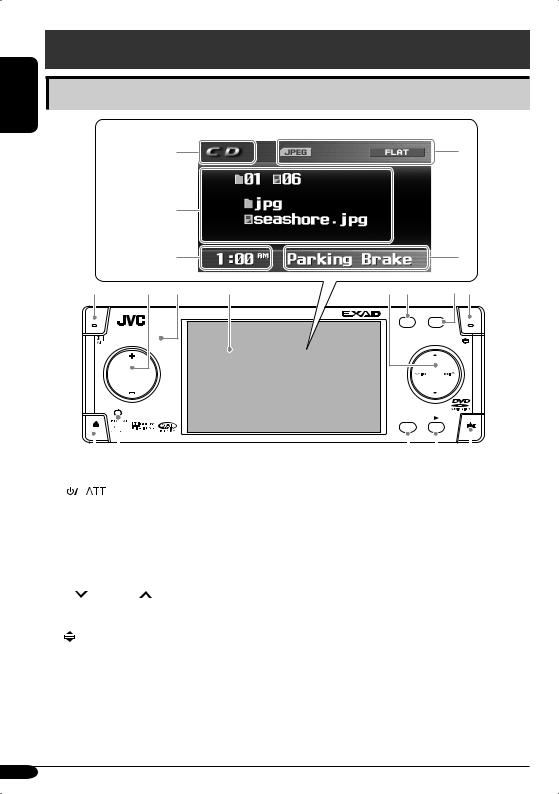
Control panel
|
Parts identification |
Monitor |
|
indications r |
u |
Ex.: |
|
t |
|
|
|
|
|
|
|
|
|
Source screen on |
|
|
|
|
|
JPEG playback |
|
|
|
|
|
|
|
y |
|
|
i |
1 |
2 |
3 |
4 |
5 6 |
7 8 |
|
|
|
KD-AVX2 |
|
ASPECT |
|
|
|
|
|
|
|
|
|
|
MENU |
A |
SRC |
D |
DISP |
|
|
|
|
|
|
|
|
|
|
|
|
|
|
|
|
|
|
7 / BACK |
|
|
|
|
||
|
|
|
|
|
|
|
|
|
|
|
|
|
|
|
BAND |
ENT |
|
|
|||
|
|
|
|
|
|
|
|
|
|
|
|
|
|
|
|
|
|
|
|
|
|
|
|
|
|
|
|
|
|
|
|
|
|
|
|
|
|||||||
|
|
|
|
|
|
9 p |
q |
w |
e |
||||||||||||
1 |
|
|
|
|
|
|
|
|
(standby/on attenuator) button |
Monitor indications |
|
|
|
|
|||||||
|
|
|
|
|
|
|
|
|
|
|
|
||||||||||
|
|
|
|
|
|
|
|
|
|
|
|
||||||||||
2 |
• +/– (volume +/–) button |
r Source indicator |
|
|
|
|
|||||||||||||||
|
• SRC (source) button |
|
|
|
|
||||||||||||||||
|
t Main display |
|
|
|
|
||||||||||||||||
|
• DISP (D: display) button |
|
|
|
|
||||||||||||||||
|
y Clock display |
|
|
|
|
||||||||||||||||
3 |
Remote Sensor |
|
|
|
|
||||||||||||||||
Also indicates volume level when adjusting |
|||||||||||||||||||||
4 |
Monitor |
||||||||||||||||||||
volume. |
|
|
|
|
|||||||||||||||||
5 |
• 5 (up) / ∞ (down) buttons |
|
|
|
|
||||||||||||||||
u Status indicators |
|
|
|
|
|||||||||||||||||
|
• |
|
4/¢ buttons |
|
|
|
|
||||||||||||||
|
|
i Alert information area |
|
|
|
|
|||||||||||||||
6 |
MENU button |
|
|
|
|
||||||||||||||||
Also indicates volume level bar when |
|||||||||||||||||||||
7 |
ASPECT (A) button |
||||||||||||||||||||
adjusting volume. |
|
|
|
|
|||||||||||||||||
8 |
|
|
|
|
(angle) button |
|
|
|
|
||||||||||||
|
|
|
|
|
|
|
|
|
|
||||||||||||
|
|
|
|
|
|
|
|
|
|
||||||||||||
9 |
0 (eject) button |
|
|
|
|
|
|
||||||||||||||
p Reset button |
|
|
|
|
|
|
|||||||||||||||
q• BAND button
•BACK button
•7 (stop) button
w• ENT (enter) button
• 3 (play) button
e  (control panel release) button
6

 How to detach/attach the control panel
Detaching...
Attaching...
 How to change the control panel angle
ENGLISH
Angle 1 |
Angle 2 |
Angle 3 |
Angle 4 |
Caution: Do not insert your finger behind the control panel.
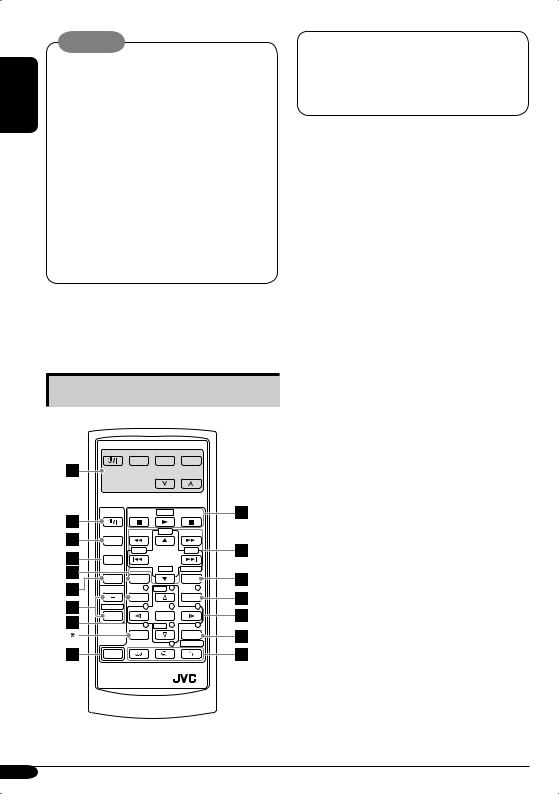
Remote controller — RM-RK240
 Installing the lithium coin battery (CR2025)
Before using the remote controller:
•Aim the remote controller directly at the remote sensor on the receiver. Make sure there is no obstacle in between.
Remote sensor
•Do not expose the remote sensor to strong light (direct sunlight or artificial lighting).
7
Warning:
ENGLISH |
• Do not install any battery other than |
|
CR2025 or its equivalent; otherwise, it may |
||
|
||
|
explode. |
|
|
• Store the battery in a place where children |
|
|
cannot reach to avoid risk of accidents. |
|
|
• To prevent the battery from over-heating, |
|
|
cracking, or starting a fire: |
|
|
– Do not recharge, short, disassemble, or |
|
|
heat the battery or dispose of it in a fire. |
|
|
– Do not leave the battery with other |
|
|
metallic materials. |
|
|
– Do not poke the battery with tweezers or |
|
|
similar tools. |
|
|
– Wrap the battery with tape and insulate |
|
|
when throwing away or saving it. |
The receiver is equipped with the steering wheel remote control function.
•See the Installation/Connection Manual (separate volume) for connection.
Main elements and features
EXTRA MONITOR CONTROL
MODE ASPECT MENU
DVD / RECEIVER CONTROL
ATT |
ZOOM |
+10
SOURCE |
–100 |
+100 |
 BAND
BAND
|
|
–10 |
|
DIRECT |
DUAL |
ASPECT |
|
|
OSD |
VOL |
1 |
DISC+ |
2 |
3 |
|
TOP M |
|
|
MENU |
2nd VOL |
4 |
|
5 |
6 |
|
|
ENTER |
|
|
|
7 |
DISC– |
8 |
9 |
|
SETUP |
|
|
RETURN |
|
|
|
0 |
SURROUND |
 SHIFT
SHIFT
RM-RK240
* Not used as the SETUP button for this model.
IMPORTANT:
If Dual Zone is activated (see page 30), the remote controller only functions for operating the DVD/CD player.
MONITOR CONTROL
1Monitor control buttons*1
•
 (standby/on), MODE, ASPECT, MENU,
  and
and  .
.
DVD/RECEIVER CONTROL
2

 (standby/on attenuator) button
•Turns on and off the power and also attenuates the sound.
3SOURCE button
•Selects the source. 4 BAND button
•Selects the FM/AM/Satellite radio bands. 5 ASPECT button
•Change the aspect of the monitor on the unit when playing back DVD, VCD, etc.
6DUAL button
•Activate and deactivate Dual Zone. 7 VOL + / – buttons
•Adjusts the volume level.
•Also function as 2nd VOL +/– buttons when pressed with SHIFT button.
8TOP M (menu) button*2
• Display the DVD, DVD Audio, and
VCD*3 disc menu. 9 SHIFT button
pBasic disc operation buttons*4: 7 (stop), 3 (play), 8 (pause)
• 3 (play) also function as ZOOM button
when pressed with SHIFT button.
qAdvanced disc operation/tuner operation buttons*5
For advanced disc operations:
•5 / ∞
–Select the titles (for DVD), groups (for DVD Audio), or folders (for MP3/ WMA/WAV/JPEG/MPEG).
•4 / ¢ (reverse skip/forward skip)
•1 / ¡ (reverse search/forward search)*6
8
For FM/AM tuner operations:
•5 / ∞
–Changes the preset stations.
•4 / ¢
–Functions to search for stations. Press briefly: auto search
Press and hold: manual search
For Satellite radio operations:
•5 / ∞
–Changes the categories.
•4 / ¢
–Changes the channels if pressed briefly.
–Changes the channels rapidly if pressed and held.
For iPod/D. player operations:
•5 / ∞
∞: Pauses/stops or resumes playback. 5: Enters the main menu of iPod/D. player. (Now 5 / ∞/4 / ¢ work as the menu selection buttons)*7
•4 / ¢ (in menu selecting mode)
–Selects an item if pressed briefly. (Then, press ∞ to confirm the selection.)
–Skips 10 items at a time if pressed and held.
wOSD button
•Display the on-screen bar.
•Also function as the DIRECT button when pressed with SHIFT button.
–You can directly select titles (for DVD), groups (for DVD Audio) or folders (for MP3/WMA/WAV/MPEG) using the
number buttons (see the right column and page 19).
eMENU button*2
• Display the DVD and VCD*2 disc menu.
(Not functions for the DVD Audio disc.)
rMenu operation buttons*2
•Cursor (% , fi , @ , #) and ENTER
•% / fi : Also function as DISC+/– buttons when the source is “CD-CH”.
t RETURN button*2
y Special function buttons |
|
|
||||
|
• DVD/VCD: |
(audio) |
|
|
||
|
• DVD: |
(subtitle), |
(angle) |
ENGLISH |
||
|
• |
Also function as the SURROUND |
||||
|
|
|||||
|
|
button when pressed with SHIFT button. |
|
|||
|
|
–You can change the surround mode (see |
|
|||
|
|
page 23). |
|
|
|
|
*1 |
Controllable only if your monitor is one of the |
|
||||
|
JVC monitors — KV-MR9010 or |
|
||||
|
KV-MH6510. |
|
|
|
||
*2 |
These buttons function as the number buttons |
|
||||
|
when pressed with SHIFT button. |
|
||||
*3 |
Only when PBC is not in use. |
|
||||
*4 |
Not used for CD changer operations. |
|
||||
*5 |
These buttons function as the +10/–10 and |
|
||||
|
+100/–100 buttons when pressed with SHIFT |
|
||||
|
button. |
|
|
|
|
|
*6 |
Not used for JPEG operations. No sound can |
|
||||
|
be heard (DVD/VCD/MPEG). |
|
||||
*7 |
5: Returns to the previous menu. |
|
||||
|
∞: Confirms the selection. |
|
|
|||
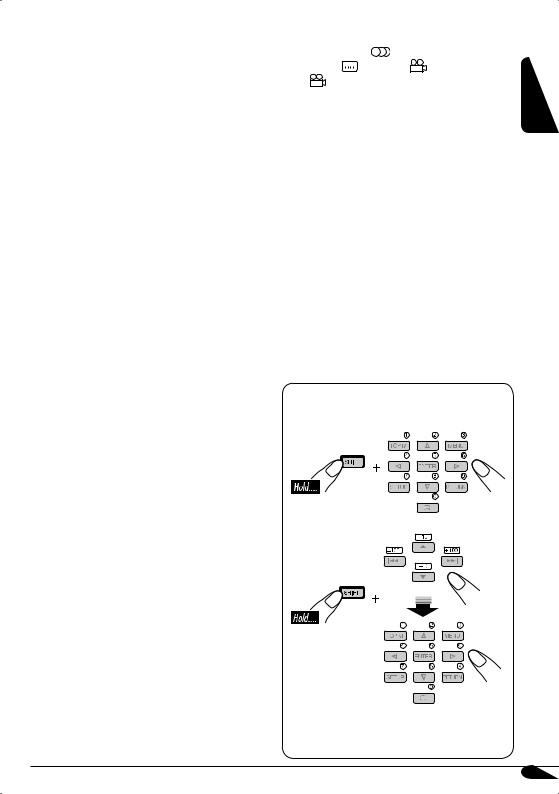
How to select a number
To select a number from 0 – 9:
To select a number greater than 9:
•+100/–100 buttons used for searching track number greater than 99 (not available for CD/VCD/DVD/DVD audio).
9
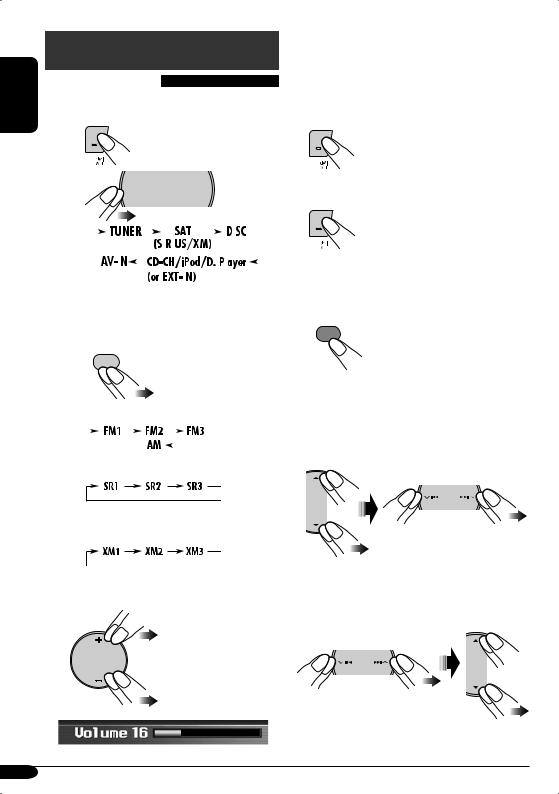
Getting started
ENGLISH |
~ Turn on the power. |
|
|
|
Basic operations |
|
|
|
Ÿ |
SRC |
D DISP |
@Adjust the equalizer as you want. (See pages 38.)
To drop the volume in a moment (ATT)
To restore the sound, press it again.
To turn off the power
|
|
|
|
|
|
|
|
|
|
|
|
|
|
|
|
|
|
|
|
|
|
|
|
|
|
|
|
|
|
|
|
|
|
|
|
|
|
|
|
|
|
|
|
|
|
|
|
|
|
|
|
|
|
|
|
|
|
|
|
|
|
|
|
|
|
|
|
|
|
|
|
|
|
|
|
|
|
|
|
|
|
|
|
|
|
|
|
|
|
|
|
|
|
|
|
|
|
|
|
|
|
|
|
|
|
|
|
|
|
|
Canceling demonstration and setting |
|||
|
|
|
|
|
|
|
|
|
|
|
|
|
|
|
|
|
|
|
||||
You cannot select some sources if they |
||||||||||||||||||||||
the clock |
||||||||||||||||||||||
are not ready. |
||||||||||||||||||||||
|
|
|
||||||||||||||||||||
! |
1 |
MENU |
||||||||||
|
7 / BACK |
|
||||||||||
|
|
|
BAND |
|
||||||||
|
2 |
Select “Setup”, then, |
||||||||||
|
For FM/AM tuner |
1 Select “Display”, “Demonstration”, then |
||||||||||
|
|
|
|
|
|
|
|
|
|
|
|
“Off” to cancel demonstration. |
|
|
|
|
|
|
|
|
|
|
|
|
2 Select “Clock”, “Time Set”, and go to the |
|
|
|
|
|
|
|
|
|
|
|
|
next step to set the clock. |
For SIRIUS radio
For XM radio
⁄ Adjust the volume.
SRC |
D |
Volume level indicator
3Set the hour and minute.
1 Select “Hour”, then adjust the hour.
2 Select “Minute”, then adjust the minute.
10
4 Finish the procedure. |
• See the example on “Basic procedure of AV |
|
Menu operation” below to change the clock |
ENT |
from 12 hours to 24 hours. |
|
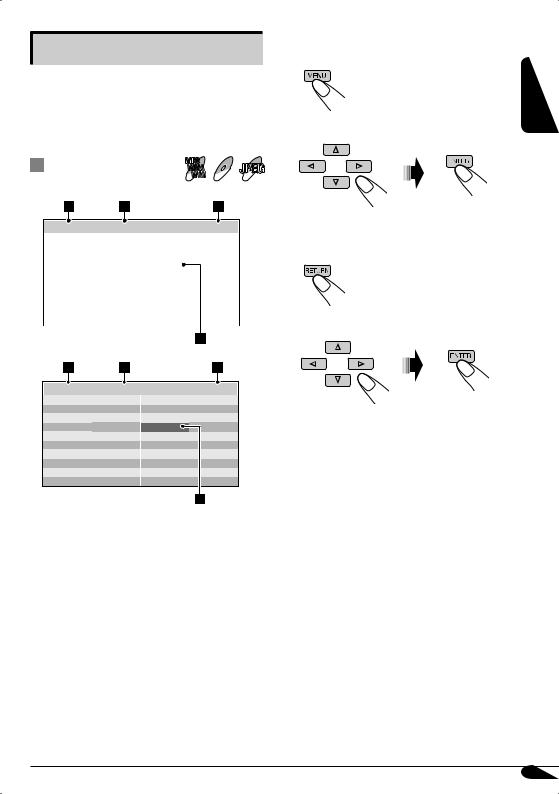
Basic procedure of AV Menu operation
You can adjust various settings of the unit from AV Menu.
• To call up AV Menu...
Displays remaining time to continue the menu
operation
Current menu
Selected item of the sub menu currently selected
MENU
Selected sub menu
Sub menus
•To select an menu item and proceed to the sub menu...
Selects a sub menu or a menu item


 Proceeds to the selected sub menu
Ex.: To change the clock from 12 hours to 24
hours, after pressing MENU...
Select “Setup”,
“Clock”,
“12Hours / 24Hours”,
then “24Hours”.
Back to previous menu |
|
|
ENT |
|
|
|
|
|
|
|
|
• To go back to the previous screen and |
• |
To cancel menu operations and return to |
|
adjust other items... |
• |
the source screen, press DISP (D). |
|
7 / BACK |
See pages 31 – 40 for information of the |
||
|
sub menus and menu items. |
||
BAND |
|
||
|
|
|
|
ENGLISH
11
Radio operations
ENGLISH |
~ |
SRC |
D DISP |
|

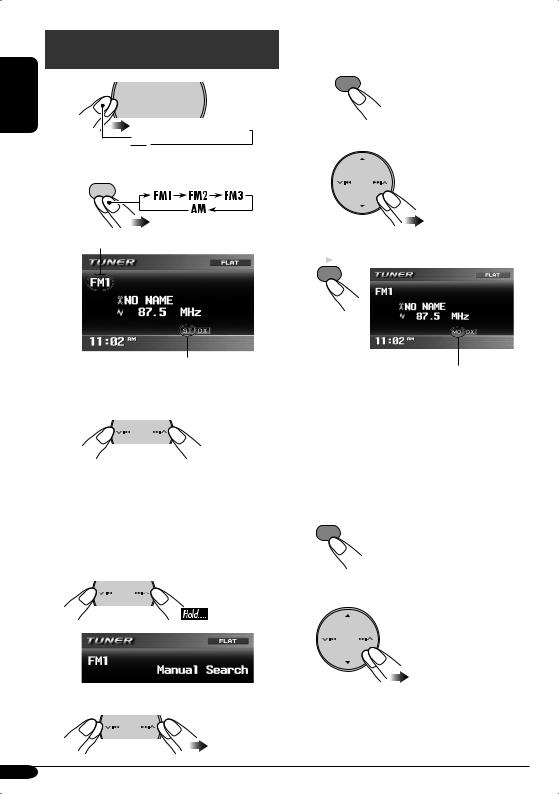
 TUNER (FM1/2/3,AM)
Ÿ7 / BACK
BAND
Selected band appears.
Lights up when receiving an FM stereo broadcast with sufficient signal strength.
!Start searching for a station.
When a station is received, searching stops.
To stop searching, press the same button again.
To tune in to a station manually
In step ! above....
1
2 Select the desired station frequencies.
When an FM stereo broadcast is hard to receive
1
MENU
2 Select “Mode”, “Mono”, then “On”.
3 Finish the procedure.
ENT
Lights up when monaural mode is activated.
Reception improves, but stereo effect will be lost.
To restore the stereo effect, repeat the same procedure to set “Mono” to “Off”. The MO indicator goes off.
To tune in strong-signal FM station only
1
MENU
2 Select “Mode”, “DX / Local”, then “Local”.
12
3 Finish the procedure.
ENT
Lights up when “Local” mode is activated.
Only stations with sufficient signal strength will be detected.
To tune in to all receivable stations, repeat the same procedure to set “DX / Local” to “DX”. The LO indicator goes off and the DX indicator lights up.
Storing stations in memory
You can preset six stations for each band.
 FM station automatic presetting— SSM (Strong-station Sequential Memory)
After selecting the FM band (FM1 – FM3) you
want...
1MENU
2 Select “Mode”, then “SSM”.
3
ENT
“SSM” is shown until automatic presetting is over.
Local FM stations with the strongest signals are searched and stored automatically in the FM band.
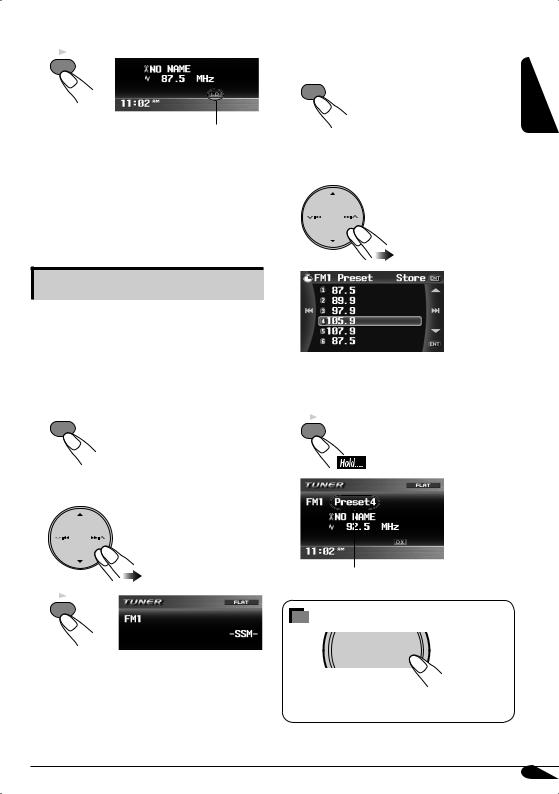
 Manual presetting
After tuning in the station you want to preset...
1 |
MENU |
ENGLISH |
|
2Select “List”, then a preset number (1–6) you want to store the station into.
EX.: Storing 92.5 MHz into preset number 4 of FM1
•You can also display the list by pressing and holding 5/∞ buttons.
3ENT
Stored preset number flashes for a while.
How to exit from menus or lists
SRC |
D |
DISP |
Menu or list operations are canceled and the screen returns to the source screen.
13

Listening to a preset station
ENGLISH |
1 |
|
|
|
|
|
SRC |
D DISP |

 TUNER (FM1/2/3,AM)
27 / BACK
BAND
3Select a preset station (1 – 6) you want.
When using the list screen...
After step 2 above...
1
MENU
2Select “List”, then a preset number (1–6) you want.
•You can change the preset list between FM1/2/3 by pressing and holding 5/∞ buttons (or by pressing 5/∞ buttons repeatedly) when selecting any of the FM bands.
3
ENT
When using the remote controller...
or
14
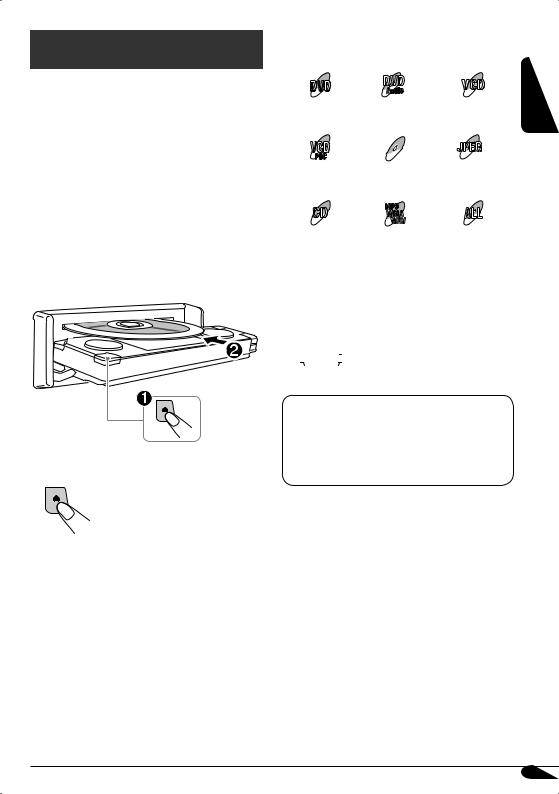
Disc operations
Playing a disc in the receiver 
The disc type is automatically detected, and playback starts automatically (for DVD Video/ Audio: automatic start depends on its internal program).
If the current disc is an audio CD, CD Text, MP3/WMA/WAV, JPEG, MPEG, or VCD without PBC, all tracks will be played repeatedly until you change the source or eject the disc.
•If a title list or disc menu appears while playing a DVD Video/Audio or VCD with PBC, see “Disc menu operations” on page 21.
To eject a disc
The following marks are used to indicate
the playable discs...
DVD
|
Audio |
|
DVD Video |
DVD Audio |
Video CD with/without |
|
|
PBC |
|
MPEG |
JPEG |
Video CD with PBC |
MPEG disc |
JPEG disc |
only |
|
|
|
MP3 |
|
|
WMA |
|
|
WAV |
|
Audio CD/ |
MP3/WMA/WAV |
All discs listed here |
CD Text |
disc |
|
Before performing any operations, make sure
the following...
•The operations explained on pages 17 – 22 are mainly of the remote controller.
–  shows functions which you can also use on the unit.
If “ ” appears on the monitor when pressing a button, the receiver cannot accept an operation you have tried to do.
•In some cases, without showing “ ”, operations will not be accepted.
ENGLISH
15
ENGLISH
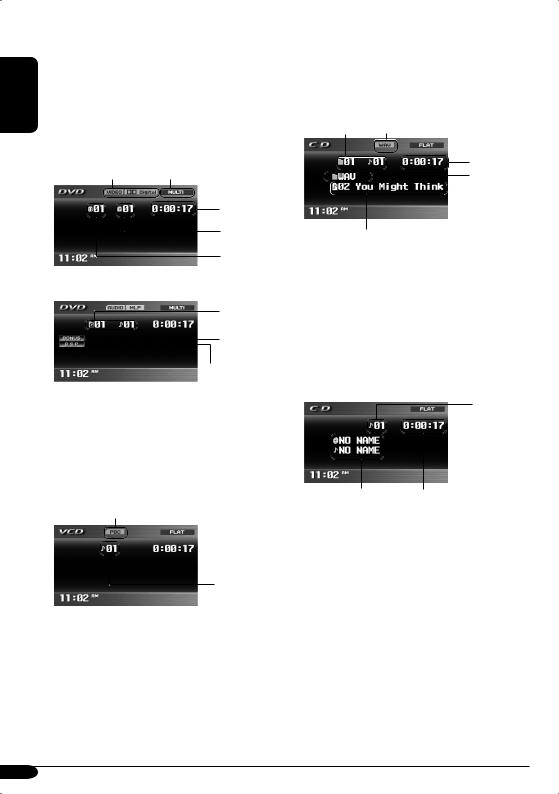
•When inserting a DVD video/DVD Audio disc:
Video/picture playback starts automatically on the monitor when the parking brake is applied.
•The screen such as below appears when pressing DISP (D).
When an DVD is playing back
Format indication |
Surround/Sound indication |
Elapsed playing time
Current chapter number Current title number
When a DVD Audio disc is playing back
Current group/ track numbers
Bonus group indicator
B.S.P. (browsable still pictures) indicator
•To return to playback, press DISP (D) again.
•When inserting a VCD:
VCD playback starts automatically on the monitor when the parking brake is applied.
•The screen such as below appears when pressing DISP (D).
 PBC indicator*1
 Elapsed playing time
Current track number
*1 Appears when the PBC function is in use.
• To return to playback , press DISP (D) again.
•When inserting an MP3/WMA/WAV/JPEG/ MPEG disc*2:
After showing the total folder and file number...
Ex.: When an WAV file is detected
Current folder/track |
Format indication |
number |
Elapsed playing time*3
Current folder name
Current track name
*2 When playing back a JPEG/MPEG disc, press DISP (D) to display the screen. (Picture/video playback is automatically starts when the parking brake is applied.)
*3 Does not appear for JPEG disc.
•When inserting a CD Text/audio CD:
After showing the total track number and total playing time...
Current track number
*4 Elapsed playing time
*4 Disc title/performer and track title are displayed when playing a CD Text.
16
Basic operations
Operations |
Monitor indication and/or next operation |
|
To stop playback |
When you start playback again, playback |
|
7 / BACK |
starts from where it has been stopped |
|
BAND |
(Resume play). |
ENT |
To stop play temporarily |
Playback is paused. |
|
|
A still picture appears. |
MPEG |
|
A Frame by frame playback |
|
|
|
B Slow motion playback
•No sound comes out during Slow Motion Playback.
•When playing a VCD, Reverse Slow Motion Playback is prohibited.
To resume normal play:
To replay the previous |
The playback position moves back about 10 seconds |
|
scenes—One Touch Replay |
before the current position. |
|
ENT |
• This function works only within the same title. |
|
• For some DVDs, this function does not work. |
||
|
ENGLISH
• During play, on-screen guide icons appear on the monitor for a while (see page 58).
17
ENGLISH
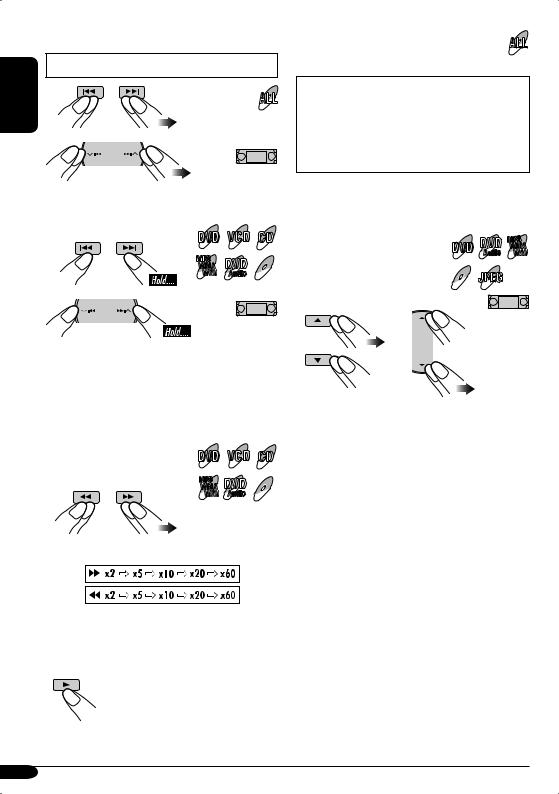
To go to the next or previous chapters/tracks |
To locate a particular title/chapter/track |
• For DVD: During play or pause |
directly |
|
|
|
• For DVD Video/DVD Audio: |
|
During play or pause—select a chapter/ |
|
track. |
|
During stop—select a title/track. |
|
• For MP3/WMA/WAV/JPEG/MPEG: |
|
Select a track within the same folder. |
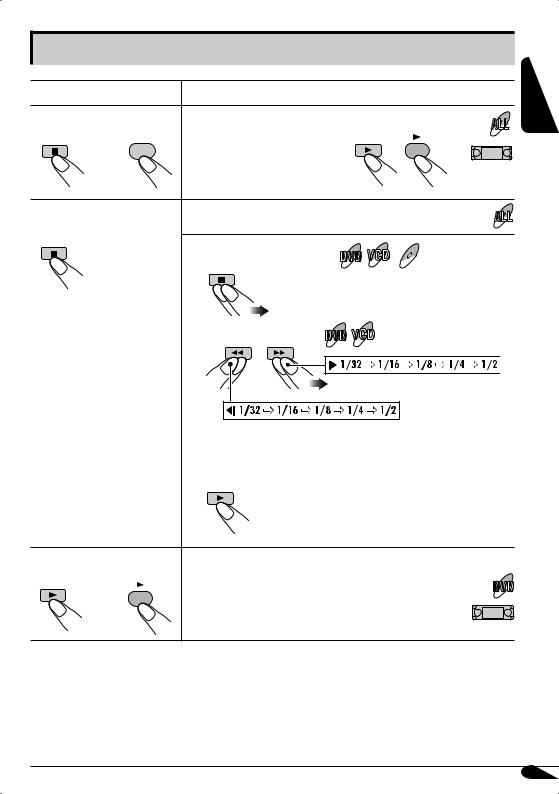
To fast-forward or reverse the chapter/track
While playing back...
MP3
WMA DVD MPEG
WAV Audio
*The search speed changes to x2 ] x10 (¡ (1) 1/2 for MPEG), but the information shown on the monitor is only for DVD/VCD/ MPEG.
To forward or reverse search the chapter/track
While playing back... |
MP3 |
DVD MPEG |
|
WMA |
|
|
WAV |
Audio |
The information shown is only for DVD/VCD:
*The search speed of an MPEG file is 3 steps
– ¡ (1) 1/2/3.
• To resume normal speed
Select the number corresponding to the item you want (see page 9).
To locate a title/group/folder |
DVD WMA |
|
MP3 |
|
Audio WAV |
|
MPEG JPEG |
18

To locate a particular title/ |
DVD |
MP3 |
group/folder |
WMA |
|
Audio |
WAV |
|
|
|
|
|
MPEG JPEG |
|
Within 10 seconds, press the number buttons (see page 9).
IMPORTANT:
•For MP3/WMA/WAV discs: It is required that folders are assigned with 2-digit number at the beginning of their folder names—01, 02, 03, and so on.
To adjust the screen shape on the unit
ASPECT
|
DVD |
|
Audio |
ASPECT |
MPEG JPEG |
A |
|
• See “Aspect” on page 33 for the detail.
To skip to the next or previous scene |
MPEG |
|
You can skip the scene back and forward by 5 minutes.
Ex.: when you are playing a 24-minute MPEG
file and the elapsed playing time is 8’24”...
Current playback position
•The first pressing of the buttons skips the scene to the nearest multiple-of-5 playing time (except current playing time).
•This function does not work when remaining time to skip forward or back is under 5 minutes.
ENGLISH
19
Unique disc functions
ENGLISH |
|
|
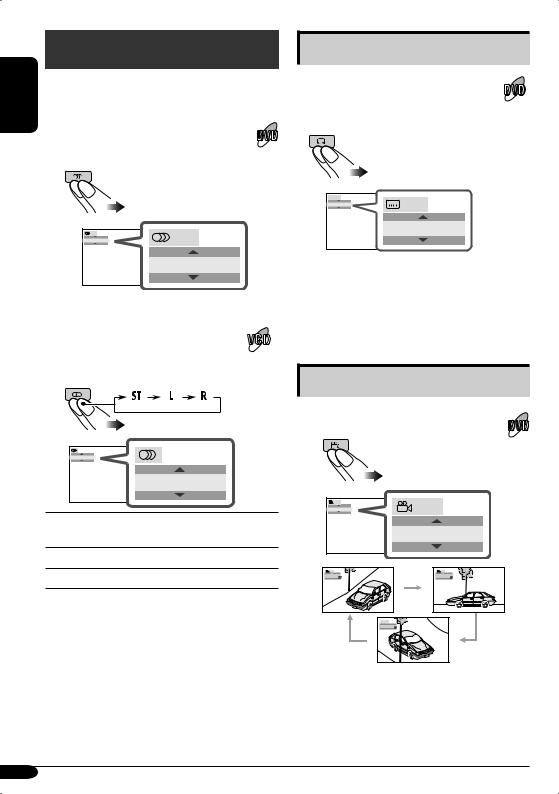
Selecting audio languages |
||
|
||
|
|
|
|
For DVD: |
|
|
You can select the language to listen to if |
|
|
the disc has multiple audio languages. |
1/3 |
1/3 |
ENGLISH |
ENGLISH
Ex.: When the disc has 3 options
For VCD:
You can select the audio channel to play. (This is convenient when playing a Karaoke VCD.)
ST
ST
ST: To listen to normal stereo (left/right) playback.
L:To listen to the L (left) audio channel.
R:To listen to the R (right) audio channel.
Selecting subtitles
You can select the language of the subtitle to be shown on the monitor.
•You can set the initial subtitle language using the AV Menu (see page 34).
 1/3
1/3
ENGLISH |
1/3 |
ENGLISH
Ex.: When the disc has 3 options
•For some DVDs and VCDs, changing the subtitle language, audio language (or audio channel) without using the disc menu is prohibited.
Selecting multi-angle views
You can view the same scene at different angles if the disc has multi-angle views.
1/3 |
1/3 |
1 |
|
|
1 |
1/3 |
1/3 |
1 |
2 |
 1/3
1/3
3 |
Ex.: When the disc has 3 multi-angle views
20
Disc menu operations
Menu-driven playback is possible while playing back a DVD with menu-driven features or a VCD with the PBC (PlayBack Control).
While playing a DVD |
DVD |
1 |
Audio |
|
|
DVD |
DVD Audio |
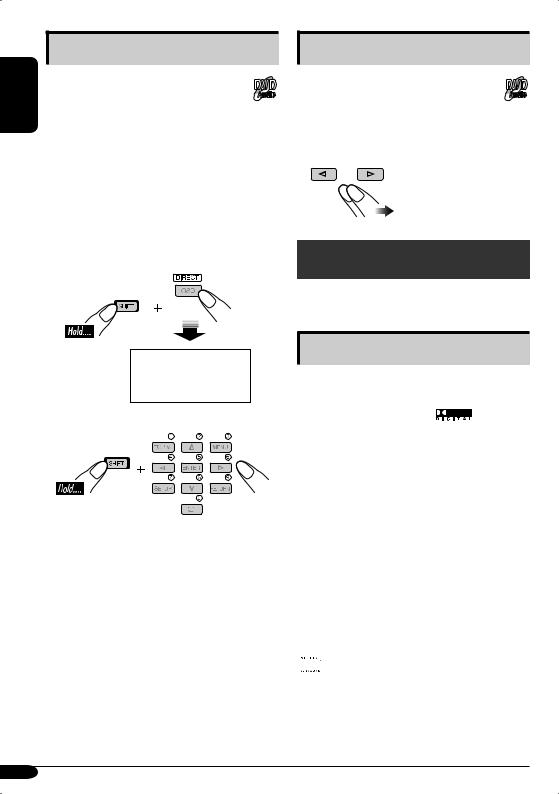
Canceling the PBC playback
1
2Select a track to start normal playback using the number buttons (see page 9).
To resume the PBC function
ENGLISH
A title list or disc menu will appear on the monitor.
2 Select the item you want on the menu.
Selected item starts playback.
•On some discs, you can also select items by their numbers.
 While playing a VCD
•When a list of items is displayed on the monitor.
•To select a number greater than 9, see “How to select a number” on page 9.
To return to the previous menus
|
Zoom in |
|
DVD |
|
Audio |
1 |
JPEG MPEG |
|
|
|
|
|
|
|
|
|
|
|
|
|
|
|
|
|
|
|
|
|
|
|
|
|
|
|
|
|
|
|
|
|
|
|
|
|
|
|
|
|
|
ZOOM 1 |
|
|
ZOOM 2 |
|
|
ZOOM 3 |
|
|
ZOOM 4 |
|
|
||||||
|
|
|
|
|
|
|
|
|
|||||||||||
|
|
|
ZOOM OFF |
|
|
ZOOM 6 |
|
|
|
ZOOM 5 |
|
|
|
||||||
|
|
|
|
|
|
|
|
|
|
||||||||||
|
|
|
|
|
|
|
|
|
|
|
|
|
|
|
|
|
|
|
|
For JPEG disc (effective only when pausing):
ZOOM 1 |
|
ZOOM 2 |
|
ZOOM OFF 
2 Move the zoomed-in position.
•For JPEG files:
You cannot move the zoomed-in position when the entire picture is still displayed on the monitor.
To cancel zoom, select “ZOOM OFF” in step 1.
21
Playing back a bonus group
ENGLISH |
Some DVD Audio discs have a special |
DVD |
|
||
|
group called “bonus group” whose |
|
|
Audio |
|
|
contents are not open to the public. |
|
|
• To play back a bonus group, you have to |
|
enter the specific “key number” (a kind of password) for the bonus group. The way of getting the key number depends on the disc.
1Select the bonus group.
•The bonus group is usually recorded as the last group (for example, if a disc contains four groups including a bonus group, “group 4” is the bonus group.
Within 10 seconds, press the number buttons (see page 9).
2 Enter the key number.
3Follow the interactive instructions shown on the monitor.
•The entered key number is cleared when the disc is ejected. Repeat steps 1 to 3 above to play back the bonus group again.
Selecting Browsable still pictures
While playing back a track linked to
browsable still pictures (B.S.P.), you can DVD
Audio
select (turn the page) the still picture to be shown on the monitor.
•If a track is linked to B.S.P., they are usually shown in turn automatically during playback.
Disc surround playback
You can enjoy multichannel surround playback of the disc on the unit.
Available surround format
Dolby Digital*1: used to reproduce multichannel soundtracks of the software encoded with Dolby Digital ).
Dolby Pro Logic II: Dolby Pro Logic II is a multichannel playback format to decode all 2 channel sources—stereo source and Dolby Surround encoded source—into 5.1 channels. Dolby Pro Logic II has two modes—Movie mode and Music mode:
•Pro Logic II Movie
Suitable for playing any Dolby Surround encoded software.
•Pro Logic II Music
Suitable for playing any 2-channel stereo software.
DTS (Digital Theater Systems)*2: used to reproduce multichannel soundtracks of the software encoded with DTS Digital Surround  ).
).
22
*1: Manufactured under license from Dolby Laboratories. Dolby, Pro Logic, MLP Lossless, and the double-D symbol are the trademarks of Dolby Laboratories.
*2: “DTS” and “DTS Digital Surround” are registered trademarks of Digital Theater Systems, Inc.
Selecting the surround mode
The unit is set up, by default, to select the optimal surround mode for the digital multichannel disc in the initial setting. You can also choose the surround mode for the 2 channel disc.
When DISC is selected as the source...
1
MENU
2 Select “Disc Surround”.
3 Select the surround setting you want.
ENT
Surround O :
Deactivate the surround function.
Surround On*1*2:
•Auto*3: the optimum surround mode is selected automatically when multichannel digital signals are detected.
•Dolby PLII Movie*4*5: Activate Dolby Pro Logic II Movie.
•Dolby PLII Music*4*5*6: Activate Dolby Pro Logic II Music.
*1 No sound comes out of the rear speakers and the subwoofer when the FRONT 2CH indicator appears on the monitor.
*2 No sound comes out of the subwoofer when the FIX indicator appears on the monitor.
*3 Activates no surround function when the source is a CD (except for DTS CD)/VCD / MP3/WMA/WAV. Select “Dolby PLII Movie” or “Dolby PLII Music” manually to activate the surround function.
*4 Not selectable in the cases below:
–the disc has 2.1 or more channels of sound tracks (except for MPEG-encoded tracks).
–the disc is an MPEG disc.
*5 No sound comes out of the subwoofer when the front speaker size is set to “Large” (see page 35).
*6 When you select “Dolby PLII Music”, you can adjust the following items: “Panorama” and “Center Width” . Adjusting “Panorama” to “On” adds “wraparound” sound effect; Activating “Center Width” adjusts the center image so it may be heard only from the center speaker, only from the left/right front speakers as a “phantom” center image, or various combinations of these speakers. As the number increases, the “phantom” effect becomes stronger (normally select “4”).
•No sound comes out of the center speaker when the surround function is not activated.
•Equalizer settings (page 38) become ineffective and unadjustable while the surround function is activated.
•No sound may come out of some speakers depending on the Speaker Size settings (page 35) or the type of the disc played back.
•When Dual Zone is activated, the surround settings become ineffective and unadjustable. No sound comes from the center speaker.
On the remote controller:
SURROUND
ENGLISH
23
ENGLISH
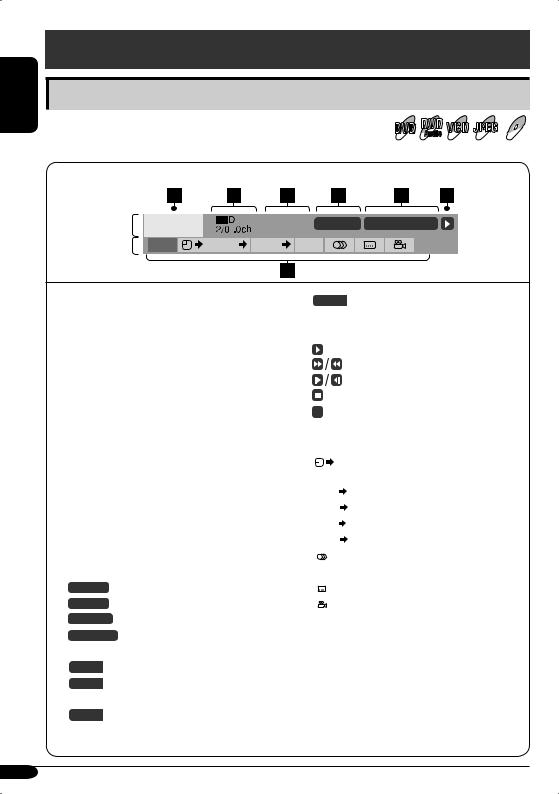
On-Screen disc operations
Operations using the on-screen bar
You can check the disc information and use some functions through |
DVD |
JPEG MPEG |
the on-screen bar. |
Audio |
|
On-screen bar
Information |
DVD-V |
C. RPT T02-C03 TOTAL 1:25:58 |
Operation |
TIME |
TITLE CHAP RPT |
1 Disc type
2• DVD Video/DVD Audio: Audio signal format type
• VCD: PBC
3Playback mode
DVD: T. RPT: Title repeat
C.RPT: Chapter repeat DVD Audio:
T.RPT: Track repeat VCD: T. RPT: Track repeat
D.RND: Disc random
T.INT: Track intro
Plays the beginning 15 seconds of the current track
JPEG:T. RPT: |
Track repeat |
MPEG: |
|
T. RPT: |
Track repeat |
F. RPT: |
Folder repeat |
4 Playback information |
|
T02-C03 |
Current title/chapter |
G02-T03 |
Current group/track |
TRACK 01 |
Current track |
F001-T001 |
Current folder/track |
5 Time indication |
|
TOTAL |
Elapsed playing time of the disc |
T. REM |
Remaining disc time (for VCD)/ |
|
remaining title time (for DVD) |
TIME |
Elapsed playing time of the current |
|
chapter/track |
|
REM |
|
Remaining time of the current |
|||
|
|
|
|
|
|
chapter/track |
6 Playback status |
||||||
|
|
|
|
|
|
Play |
|
|
|
|
|
|
Forward/reverse search |
|
|
|
|
|
|
Forward/reverse slow-motion |
|
|
|
|
|
|
Pause |
|
|
|
|
|
|
Stop |
|
|
|
|
|
||
|
|
|
|
|
||
7 Operation icons |
||||||
|
|
|
|
|
Change time indication (see 5) |
|
|
TIME |
|
||||
|
|
|
|
|
|
Time Search (Enter the elapsed playing |
|
|
|
|
|
||
|
|
|
|
|
|
time of the current title or of the disc.) |
|
TITLE |
|
Title Search (by its number) |
|||
|
|
|
|
Group Search (by its number) |
||
|
GROUP |
|
||||
|
|
|
|
Chapter Search (by its number) |
||
|
CHAP |
|
||||
|
|
|
|
Track Search (by its number) |
||
|
TRACK |
|
||||
|
|
|
|
|
|
Change the audio language or audio |
|
|
|
|
|
|
|
|
|
|
|
|
|
channel |
|
|
|
|
|
|
Change the subtitle language |
|
|
|
|
|
|
|
|
|
|
|
|
|
Change the view angle |
|
|
|
|
|
|
|
|
|
|
Repeat play* |
|||
|
RPT |
|
|
|||
|
|
|
|
Intro play* |
||
|
INT |
|
||||
|
|
|
||||
|
|
|
|
Random play* |
||
|
RND |
|
||||
* See also page 28.
24
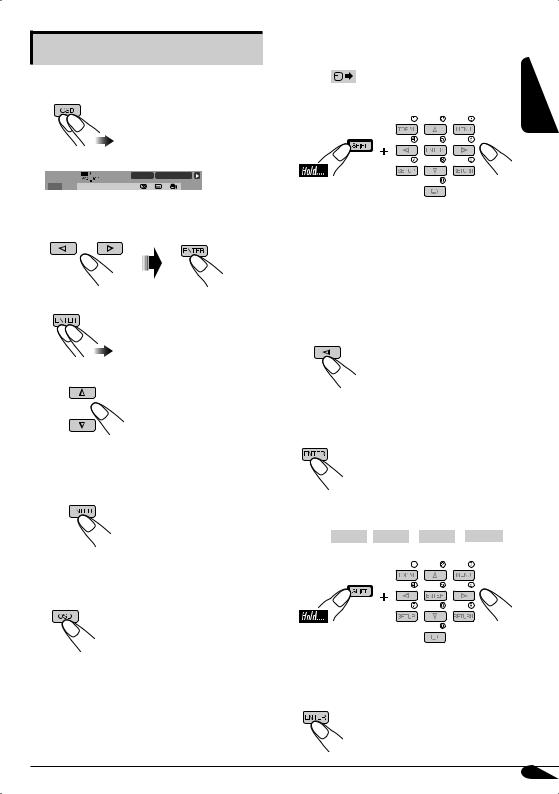
Basic on-screen bar operations
1 Display the on-screen bar.
(twice)
DVD-V |
C. RPT T02-C03 TOTAL 1:25:58 |
TIME  TITLE
TITLE CHAP
CHAP RPT
RPT
2 Select an item.
3 Make a selection.
• If pop-up menu appears....
1
or press the number buttons (see page 9).
2
To erase the on-screen bar
To search for a particular point by playing time
1 |
Select |
. |
ENGLISH |
|
|||
2 |
Enter the elapsed playing time of the |
|
|
|
current title or of the disc. |
|
|
Ex.: • To enter 1 (hours): 02 (minutes): 00 (seconds), press 1, 0, 2, 0, then 0.
•To enter 54 (minutes): 00 (seconds), press 0, 5, 4, 0, then 0.
•It is always required to enter the hour digit (even “0” hour), but it is not required to enter trailing zeros (the last two digits in the examples above).
•To correct a misentry, press....
•You can also specify the elapsed playing time by using % / fi / @ / #.
3 Finish the procedure.
To search for a particular title/group/chapter/ track
1 Select TITLE ( GROUP
 / CHAP
 / TRACK
 ).
).
2Enter the number.
•To correct a misentry, press the number button until the correct number is entered.
3 Finish the procedure.
25
ENGLISH
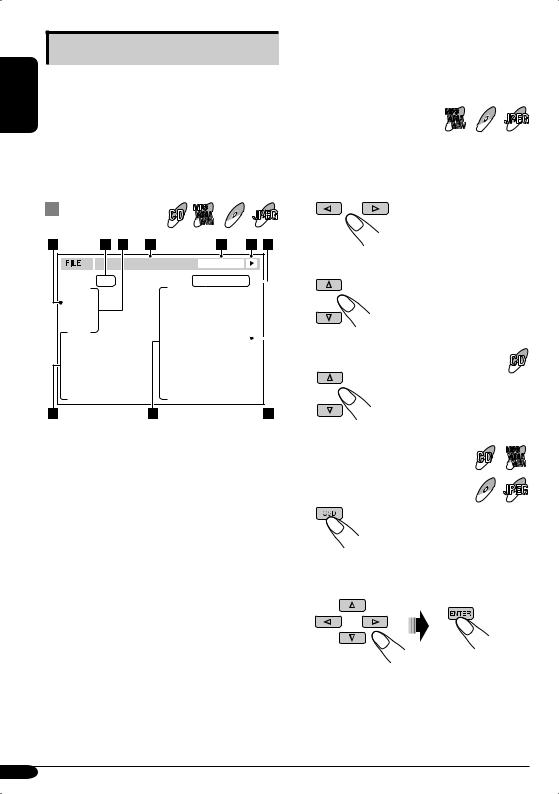
Basic control screen operations
You can search for and play the desired items through the control screen when using the external monitor.
•The control screen automatically appears on the monitor when you insert a disc (external monitor only).
•JPEG/MPEG control screen appears only when playback stops.
Control screen |
WMA |
MPEG JPEG |
|
MP3 |
|
|
WAV |
|
8Track information (Not appears on JPEG/ MPEG playback)
9 Track (file) list
p Current track (file) (highlighted bar)
To select a folder or track |
MP3 |
MPEG JPEG |
|
WMA |
|
|
WAV |
|
While Dual Zone (see page 30) is on....
1Select “Folder” column or “Track” column on the control screen.
T. RPT |
TIME |
00:00:14 |
Folder : 2 / 3 |
|
Track : 5 / 14 (Total 41) |
|
|
|
|
|
|
|
||
|
|
|
|
|
|
01 Music |
Cloudy.mp3 |
|
|
||
02 Music |
|
Fair.mp3 |
|
|
|
03 Music |
|
Fog.mp3 |
|
|
|
|
|
Hail.wma |
|
|
|
|
|
Indian summer.mp3 |
|
|
|
Track Information |
|
Rain.mp3 |
|
|
|
|
|
|
|
|
|
Album |
|
Shower.mp3 |
|
|
|
Weather |
|
Snow.mp3 |
|
|
|
Artist |
|
Thunder.wma |
|
|
|
Robert M. Smith |
|
Typhoon.mp3 |
|
|
|
Title |
|
Wind.mp3 |
|
|
|
Rain |
|
Winter sky.mp3 |
|
|
|
|
|
|
|
|
|
|
|
|
|
|
|
2 Select a folder or track.
To select a track
Ex.: MP3 playback
1 Current folder (Not appears on CD playback)
2 Current folder number/total folder number (Not appears on CD playback)
3 Folder list (Not appears on CD playback)
4 Selected playback mode
5 Elapsed playing time of the current track (Not appears on JPEG playback)
6Operation mode icon
‰ (play), 7 (stop), 8 (pause), ¡ (fast-
forward), 1 (reverse)
7CD: Current track number/total number of tracks on the disc
Others: Current track (file) number/total number of tracks (files) in the current folder (total number of tracks/files on the disc)
To change the playback mode |
MP3 |
|
WMA |
While Dual Zone (see page 30) is |
WAV |
|
|
on.... |
MPEG JPEG |
|
|
1 |
|
2Select a playback mode (see page 28) you want.
26
List screen operations
You can display the folder list/track list before starting play when using the external monitor and Dual Zone function (see page 30). On this list, you can confirm the contents and start playing a disc.
MP3
Folder/track list screens WMAWAV MPEG JPEG
Folder list
While Dual Zone is on and the disc play stops...
1 Display the folder list.
Each time you press the button, the list screen comes on and goes off.
2 Select a folder on the list.
Folder : 153/240 Track 154/198 |
Page : 4/6 |
The track list of the selected folder appears. |
|
fol130 |
|
fol140 |
|
fol150 |
|
fol160 |
|
To go back to the folder list |
|
fol131 |
|
fol141 |
|
fol151 |
|
fol161 |
|
|
|
fol132 |
|
fol142 |
|
fol152 |
|
fol162 |
|
|
|
fol133 |
|
fol143 |
|
fol153 |
|
fol163 |
|
|
|
fol134 |
|
fol144 |
|
fol154 |
|
fol164 |
|
|
|
fol135 |
|
fol145 |
|
fol155 |
|
fol165 |
|
|
|
fol136 |
|
fol146 |
|
fol156 |
|
fol166 |
|
|
|
fol137 |
|
fol147 |
|
fol157 |
|
fol167 |
|
|
|
fol138 |
|
fol148 |
|
fol158 |
|
fol168 |
|
3 Select a track on the list. |
|
fol139 |
|
fol149 |
|
fol159 |
|
fol169 |
|
|
|
|
|
|
|
|
|
|
|
|
|
|
|
|
|
|
|
|
|
Track list
Folder : 153/240 Track 154/198 |
Page : 4/6 |
file0131.mp3 file0141.mp3 file0151.wma file0161.wma file0132.mp3 file0142.mp3 file0152.mp3 file0162.mp3 file0133.wma file0143.mp3 file0153.wma file0163.wma file0134.mp3 file0144.mp3 file0154.mp3 file0164.mp3 file0135.mp3 file0145.wma file0155.mp3 file0165.wma file0136.wma file0146.mp3 file0156.mp3 file0166.wma file0137.wma file0147.wma file0157.mp3 file0167.wma file0138.mp3 file0148.mp3 file0158.wma file0168.wma file0139.mp3 file0149.wma file0159.wma file0169.mp3 file0140.wma file0150.wma file0160.wma file0170.wma
Ex.: Track list for MP3/WMA
1 Current folder number/total folder number
2Current track number/total number of tracks in the current folder.
3Current page/total number of the pages included in the list
4 Current folder/track (highlighted bar)
ENGLISH
27
ENGLISH
Other disc operations
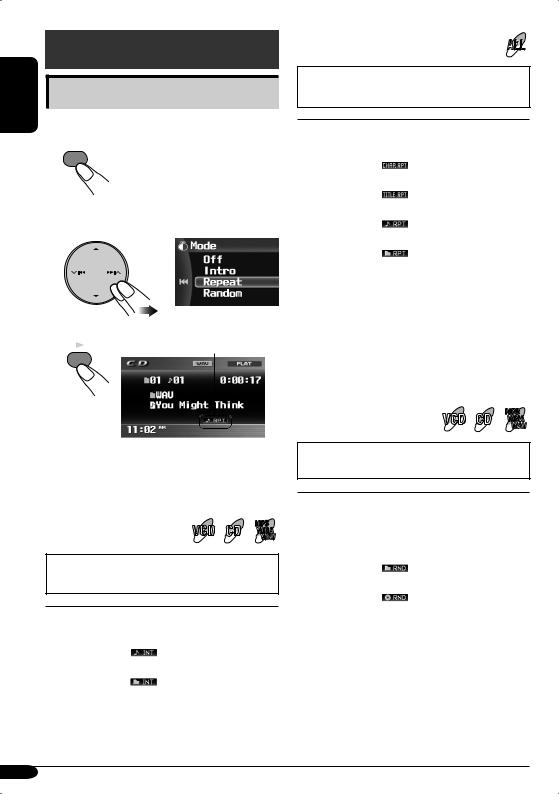
Selecting the playback modes
You can use only one of the following playback modes at a time.
1MENU
(On the unit)
2Select “Mode”, then your desired playback mode.
Repeat
• For VCD: While PBC (see page 21) is not in use.
Mode |
Plays repeatedly |
|
Chapter*2: |
The current chapter. |
|
Title*2: |
• |
lights up. |
The current title. |
||
Track*3: |
• |
lights up. |
The current track. |
||
Folder*1: |
• |
lights up. |
All tracks of the current folder. |
||
|
• |
lights up. |
O : |
For DVD: Cancels Repeat play. |
|
|
For other discs: All tracks of the |
|
|
disc. |
|
3 Finish the procedure.
Playback mode indicator appears.
ENT
Selectable modes
O
Deactivates Intro/Repeat/Random playback.
Intro |
MP3 |
|
WMA |
|
WAV |
• For VCD: While PBC (see page 21) is not in use.
Mode |
Plays the first 15 seconds of |
|
Track: |
All tracks of the disc. |
|
Folder*1: |
• |
lights up. |
First tracks of all folders. |
||
|
• |
lights up. |
O : |
Cancels. |
|
*1 Only while playing a disc containing folders.
*2 |
Only while playing a DVD disc. |
*3 |
Except for DVD and JPEG discs. |
Random |
MP3 |
|
WMA |
|
WAV |
• For VCD: While PBC (see page 21) is not in use.
Mode |
Plays at random |
|
Folder*1: |
All tracks of the current folder, |
|
|
then tracks of the next folder |
|
|
and so on. |
|
|
• |
lights up. |
Disc: |
All tracks of the disc. |
|
|
• |
lights up. |
O : |
Cancels. |
|
28
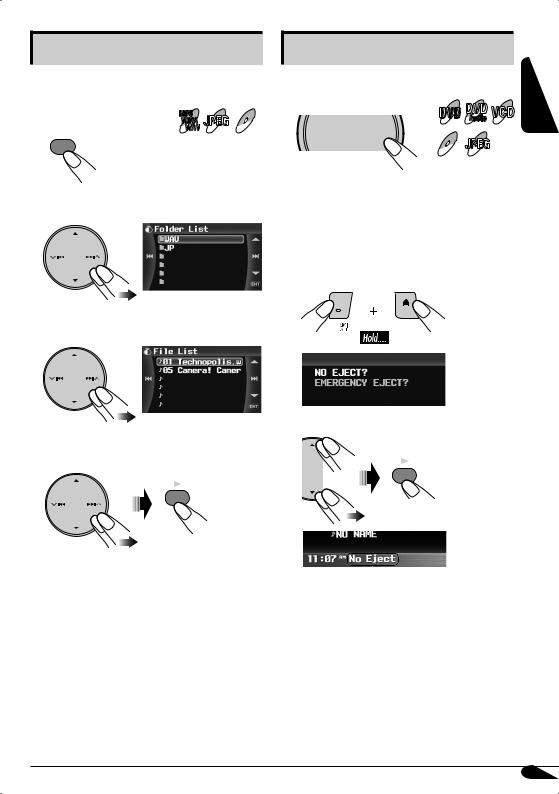
List screen operations
You can display the folder list/file list and select a file directly while playing.
|
MP3 |
JPEG MPEG |
While playing.... |
WMAWAV |
1MENU
(On the unit)
2 Select “Mode”, then “List”.
3 Select a folder you want.
Other operations
 Monitor indication control
To change monitor indication
DVD
Audio
SRC |
D |
DISP |
MPEG JPEG
•Each time you press DISP (D), the display changes between the source screen and picture playback.
 Prohibiting disc ejection
You can lock a disc in the loading slot.
1
ENGLISH
2 Select “NO EJECT?”.
4 Select a file you want to play.
ENT
ENT
• You can also access the folder list by pressing |
|
|
|
|
|
and holding 5 / ∞ on the unit. |
“No Eject” flashes. |
|
|
To cancel the prohibition, repeat the same |
|
|
procedure to select “EJECT OK?”. |
|
29
|
|
Dual Zone operations |
ENGLISH |
|
|
|
||
|
at a time |
|
|
|
Playing back two sources |
|
|
|
You can connect external audio equipment
to the 2nd AUDIO OUT plug on the rear, and play back a disc separately from the
source selected on the unit.
You can activate Dual Zone while listening to any source.
•When Dual Zone is in use, you can only operate the DVD/CD player using the remote controller.
•When Dual Zone is in use, the surround settings (page 23) become ineffective and unadjustable. No sound comes from the center speaker.
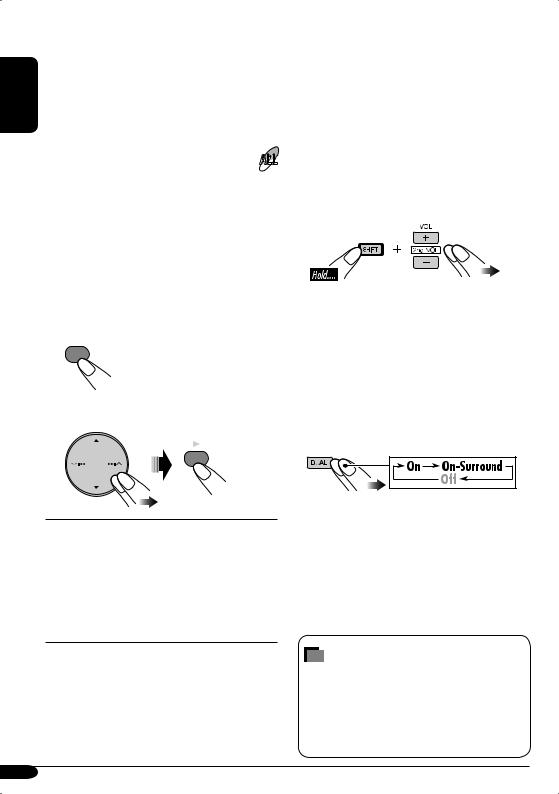
1MENU
2Select “Dual Zone”, then “On” or “On-Surround”.
ENT
O : Deactivate Dual Zone.
On: Activate Dual Zone.
On-Surround*1*2:
Activate Dual Zone and add the headphone Surround*3 effect to the disc playback sound. Select this when listening the disc playback sound with headphones.
*1 Not effective when playing back an MPEG disc.
*2 The surround effect is also added to the sound from the speakers when you select “DISC” as the source.
*3 JVC original headphone virtual surround system.
The source automatically changes to “DISC” and  appears on the monitor.
To select a different source to listen through the speakers, press SRC on the control panel.
•By using the buttons on the control panel, you can operate the newly selected source without affecting Dual Zone operations.
3Adjust the volume through the 2nd AUDIO OUT plug using the remote controller.
4Operate the DVD/CD player using the remote controller by referring to the monitor screen.
To cancel Dual Zone operations, select “Off” on step 2 on the left column. (  /
/
 disappears.)
On the remote controller:
You can also activate and deactivate Dual Zone.
To change the Dual Zone mode between “On” and “On-Surround”, select the Dual Zone mode you want on step 2 on the left column.
About sounds reproduced through the rear terminals
Through the 2nd AUDIO OUT, 2 channel signal is emitted. When playing a multichannel encoded disc, multi-channel signals are downmixed.
30
 Loading...