


 Loading...
hp LaserJet 8150
getting started guide
opsætningsvejledning
installasjonsveiledning
aloitusopas
grundläggande anvisningar

HP LaserJet 8150, 8150 N,
8150 DN, 8150 HN, and
8150 MFP Printers
English
Getting Started Guide ________
© Copyright Hewlett-Packard
Company 2000
All Rights Reserved. Reproduction, adaptation, or translation without prior written permission is prohibited, except as allowed under the copyright laws.
Publication number
C4265-90904
First Edition, October 2000
Warranty
The information contained in this document is subject to change without notice.
Hewlett-Packard makes no warranty of any kind with respect to this information. HEWLETT-PACKARD SPECIFICALLY DISCLAIMS THE IMPLIED WARRANTY OF MERCHANTABILITY AND FITNESS FOR A PARTICULAR PURPOSE.
Hewlett-Packard shall not be liable for any direct, indirect, incidental, consequential, or other damage alleged in connection with the furnishing or use of this information.
Trademark Credits
Acrobat is a trademark of Adobe Systems Incorporated.
PostScript is a trademark of Adobe Systems Incorporated which may be registered in certain jurisdictions.
Arial, Monotype, and Times New Roman, are U.S. registered trademarks of the Monotype Corporation.
CompuServe is a U.S. trademark of CompuServe, Inc.
Helvetica, Palatino, Times, and Times Roman are trademarks of Linotype AG and/or its subsidiaries in the U.S. and other countries.
Microsoft, MS Windows, Windows and Windows NT are U.S. registered trademarks of Microsoft Corporation.
TrueType is a U.S. trademark of Apple Computer, Inc.
ENERGY STAR is a U.S. registered service mark of the U.S. EPA.
Hewlett-Packard Company
11311 Chinden Boulevard
Boise, Idaho 83714 U.S.A.

Contents
Installation Checklist . . . . . . . . . . . . . . . . . . . . . . . . . . . . . . . . . . . .7 Step 1 Prepare Printer Location . . . . . . . . . . . . . . . . . . . . . . . .8 Step 2 Check Package Contents . . . . . . . . . . . . . . . . . . . . . .10 Step 3 Remove Internal Packaging . . . . . . . . . . . . . . . . . . . .11 Step 4 Locate Printer Parts . . . . . . . . . . . . . . . . . . . . . . . . . .12 Step 5 Install Accessories . . . . . . . . . . . . . . . . . . . . . . . . . . .13 Step 6 Install Toner Cartridge. . . . . . . . . . . . . . . . . . . . . . . . .14 Step 7 Load Trays 2 and 3 . . . . . . . . . . . . . . . . . . . . . . . . . . .16 Step 8 Load Tray 1 (Optional) . . . . . . . . . . . . . . . . . . . . . . . .18 Step 9 Attach Power Cord . . . . . . . . . . . . . . . . . . . . . . . . . . .20 Step 10 Install or Change the Control Panel
Overlay (Optional) . . . . . . . . . . . . . . . . . . . . . . . . . . . . . .21 Step 11 Configure the Control Panel Display Language
(Optional) . . . . . . . . . . . . . . . . . . . . . . . . . . . . . . . . . . . . .22 Step 12 Test the Printer . . . . . . . . . . . . . . . . . . . . . . . . . . . . .24 Step 13 Connect Printer Cables . . . . . . . . . . . . . . . . . . . . . . .25 Step 14 Install Printing Software . . . . . . . . . . . . . . . . . . . . . .28 Step 15 Verify Printer Setup . . . . . . . . . . . . . . . . . . . . . . . . . .31
FCC Regulations . . . . . . . . . . . . . . . . . . . . . . . . . . . . . . . . . . . . . .32
English
EN |
Contents iii |
iv Contents |
EN |

Printer Setup
English
Congratulations on your purchase of the HP LaserJet 8150 series printer! This printer is available in five configurations:
HP LaserJet 8150 printer
The HP LaserJet 8150 printer (product number C4265A) comes standard with 32 MB RAM, wide format printing, two 500-sheet trays, and a 100-sheet multipurpose tray.
Note |
The HP LaserJet 8150 requires an optional EIO card to |
|
connect to a Macintosh. |
|
|
HP LaserJet 8150 N printer
The HP LaserJet 8150 N printer (product number C4266A) comes standard with 32 MB RAM, wide format printing, two 500-sheet trays, a 100-sheet multipurpose tray, and an HP JetDirect EIO print server.
HP LaserJet 8150 DN printer
The HP LaserJet 8150 DN printer (product number C4267A) comes standard with 32 MB RAM, wide format printing, two 500-sheet trays, a 100-sheet multipurpose tray, an HP JetDirect EIO print server, and a duplexer (for printing on both sides of paper).
HP LaserJet 8150 HN printer
The HP LaserJet 8150 HN printer (product number C4269A) comes standard with 32 MB RAM, wide format printing, two 500-sheet trays, a 100-sheet multipurpose tray, a 2000-sheet input tray (tray 4), a 3000-sheet stacker, an HP JetDirect EIO print server, and a duplexer (for printing on both sides of paper).
EN |
5 |

HP LaserJet 8150 MFP printer
The HP LaserJet 8150 MFP printer (product number C4268A) comes standard with 64 MB RAM, wide format printing, hard disk, two 500-sheet trays, a 100-sheet multipurpose tray, a 2000-sheet input tray (tray 4), a 3000-sheet Stapler/Stacker, an HP JetDirect EIO print server, a duplexer (for printing on both sides of paper), a copy connect EIO board, and an HP Digital Copy.
6 Printer Setup |
EN |

Installation Checklist
WARNING!
Note
This guide will help you set up and install the new printer. For proper installation, please complete each section in order:
● |
Unpack the printer |
steps 1-4 |
● |
Install the printer |
steps 5-12 |
● Connect the printer cables |
step 13 |
|
● |
Install printing software |
step 14 |
● |
Verify printer setup |
step 15 |
The printer is heavy. HP recommends that four people move it.
To learn about all the features and capabilities of the printer, see the printer user guide and the help menus in the printer drivers (available after you install the printing software and online user guide).
English
EN |
Installation Checklist 7 |
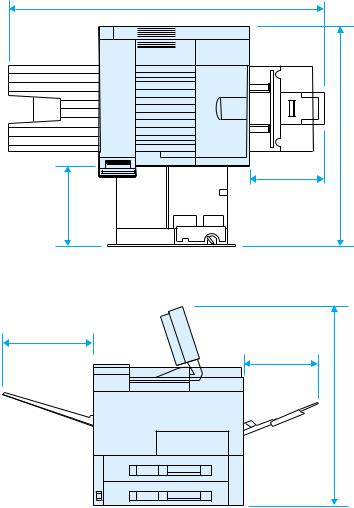
Step 1 Prepare Printer Location
Printer Size
46.75 in (1187 mm)
mm) (889 in 35
14.5 in |
11.5 in |
(368 mm) |
(292 mm) |
13.75 in
(350 mm) 11.5 in
(292 mm)
mm) (749 in 5.29
HP LaserJet 8150 Printer Dimensions (Top and Side Views)
8 Printer Setup |
EN |
Location requirements for the printer
● A sturdy, level surface for |
● |
Adequate power supply |
placement |
|
|
|
● |
A stable environment—no |
● Space allowance around the |
|
abrupt temperature or humidity |
printer |
|
changes |
● A well ventilated room |
● |
Relative humidity 20% to 80% |
● No exposure to direct sunlight |
● |
Room temperature 50° to 91° F |
or chemicals, including |
|
(10° to 32.5° C) |
ammonia-based cleaning |
|
|
solutions |
|
|
Printer Weight (without toner cartridge)
●HP LaserJet 8150 and 8150 N printers: 51 kg (112 lbs)
●HP LaserJet 8150 DN printer: 54 kg (120 lbs)
●HP LaserJet 8150 HN printer: 113 kg (249 lbs)
●HP LaserJet 8150 MFP printer: 136 kg (300 lbs)
English
EN |
Prepare Printer Location 9 |

Step 2 Check Package Contents
Power Cord
|
Control |
|
Printer |
Panel |
|
Overlay |
||
|
Printer
Documentation
|
Toner |
Printer Software |
|
CD-ROM |
|
|
Cartridge |
|
|
|
|
|
Package Contents |
|
|
|
|
Note |
A printer parallel interface cable is only included with the |
|
|
HP LaserJet 8150 base printer. See the printer user guide for |
|
|
ordering information. |
|
|
|
|
10 Printer Setup |
EN |

Step 3 Remove Internal Packaging
1 |
Note |
|
|
|
Save all packing material. You may need |
|
to repack the printer at a later date. |
|
WARNING! |
|
This printer weighs approximately 51 kg |
|
(112 lbs). HP recommends that four |
2 |
people move it. |
1 Remove all external packing tape from the printer.
2 Remove packing material from standard output bin and protective film from display.
3 Open the top cover.
3
4 Remove packing material and tape and close top cover.
5 Open the left-side door and remove the two packing spacers. Close the door.
4
5
English
EN |
Remove Internal Packaging 11 |

Step 4 Locate Printer Parts
The following illustrations give the location and names of the important printer parts.
Printer Parts (front and rear views)
1 |
Face-up Bin |
6 |
Tray 1 (multipurpose) |
12 |
Front Door |
2 |
Control Panel |
7 |
Tray 1 extensions |
13 |
Parallel Cable Connector |
3 |
Standard Output Bin |
8 |
Tray 1 paper width guides |
14 |
Foreign Interface Harness |
|
(Face-down) |
9 |
Tray 2 |
|
(AUX) |
4 |
Adjustable Paper Stop |
10 |
Tray 3 |
15 |
HP Fast InfraRed |
5 |
Top Cover |
11 |
Power Switch |
|
Connect (FIR) |
|
|
|
|
16 |
C-Link Connector |
|
|
|
|
17 |
Power Cord Connector |
|
|
|
|
|
|
12 Printer Setup |
EN |

Step 5 Install Accessories
Install any accessories that you have purchased with the printer. Use the installation instructions that are packaged with the accessories.
Multibin Mailbox |
3000-sheet Stapler/Stacker |
Multibin Mailbox |
(5-Bin with Stapler) |
or 3000-sheet Stacker |
(8-Bin) |
English
7-bin Tabletop |
Duplexer |
|
|
Mailbox |
Envelope |
||
|
|||
|
|
Feeder |
|
|
|
HP Fast InfraRed |
|
|
|
Connect |
|
2000-sheet |
|
|
|
Input Tray |
|
Printer Stand |
2 x 500-sheet Input Tray
HP Digital Copy Stand |
|
Custom Paper |
|
|
|
|
HP LaserJet MFP Upgrade Kit |
Tray |
|
|
Optional Accessories
EN |
Install Accessories 13 |

Step 6 Install Toner Cartridge
1 |
1 Open the printer’s top cover. |
2 Remove the toner cartridge from its packaging. (Save packaging for possible cartridge storage.)
Note
To prevent damage to the toner cartridge, do not expose it to light for more than a few minutes.
3 Rotate the cartridge and gently shake it from side to side to distribute the toner evenly inside the cartridge.
4 Locate the sealing tape tab on the end of the cartridge. Carefully bend the tab back and forth until it separates from the cartridge.
Continued on the next page.
14 Printer Setup |
EN |

6
7
8
5Firmly pull the tab straight out from the cartridge to remove the entire length of tape. Avoid touching any black toner on the tape.
Note
If the tab separates from the tape, grasp the tape and pull it out of the cartridge.
Note
If toner gets on your clothing, wipe it off with a dry cloth and wash clothing in cold water. (Hot water sets toner into fabric.)
6Position the cartridge as shown with the arrow pointing into the printer.
7Slide the cartridge into the printer as far as it will go.
8Close the top cover.
English
EN |
Install Toner Cartridge 15 |

Step 7 Load Trays 2 and 3
1
2
3
4
5
Note
To avoid a paper jam, never open the tray while it is in use.
The paper size setting is set to a default size at the factory. For example, the default for the United States is lettersize, while in Europe it is A4. If you would like to use a different default paper size, reconfigure the paper tray setting.
1Open Tray 2 until it stops.
2Remove the packing spacer and tape.
3If you wish to load paper that is different than the default size, turn the paper guide to the mark that indicates the size of paper you are loading.
4Turn the paper guide to the locked position.
5Adjust the left paper guide by pushing in, then lifting up and out.
Continued on the next page.
16 Printer Setup |
EN |

6
7
8
9
6Position the guide over the appropriate lines marked in the tray. Press the guide into the rear slot and then lower down into the front slot. Be sure the guide is not skewed.
7Insert up to 500 sheets of paper into the tray. Do not fill the input tray above the paper fill marks on the guide.
a Load Letter or A4 paper with the top of the page toward the rear of the tray and with the side-to-be- printed down for single-sided printing.
For two-sided printing, load the top of the page toward the rear of the tray and with the first side-to- be-printed up.
b Load short-edge fed media with the top of the page toward the right side of the tray and with the side-to-be-printed down for singlesided printing.
For two-sided printing, load media with the top of the page toward the left side of the tray and with the first side-to-be-printed up.
8Make sure the paper size tab is set correctly.
9Slide the tray back into the printer.
If you wish to select your paper by type rather than tray (source), see your online user guide.
If you wish to print on paper sizes larger than letter or A4, adjust the paper stop guide on the Standard Output Bin (Facedown). (See your online user guide for instructions.)
English
EN |
Load Trays 2 and 3 17 |

Step 8 Load Tray 1 (Optional)
Tray 1 is a multi-purpose tray and holds up to 100 sheets of paper or 10 envelopes.
Tray 1 provides a convenient way to print envelopes, transparencies, custom-size paper, labels, or other types of media without having to unload the other trays.
CAUTION
To avoid a paper jam, never add or remove paper from Tray 1 while the printer is printing.
To avoid damaging the printer, print labels, envelopes, and transparencies from Tray 1 only. Send them to the Faceup Bin, do not print them on both sides, and remove them promptly.
Note
Paper loaded in Tray 1 will be printed first unless the Tray 1 setting is changed from the printer control panel. To change the order in which trays will be printed from, see your online user guide.
1 Open Tray 1.
2 Pull out the tray extension, if needed for the paper size you are printing.
3 Slide the paper width guides to the appropriate size marked on the tray.
4 Place paper into the tray without stacking it above the paperfill mark.
Continued on next page.
18 Printer Setup |
EN |
5Paper loading differs by size:
a Load Letter or A4 paper with the top of the page toward the rear of the printer and with the side-to-be- printed up for single-sided printing.
For two-sided printing, load paper with the top of the page toward the rear of the printer and with the first side-to-be-printed down.
b Load short-edge fed media with the top of the page toward the printer and with the side-to-be- printed up for single-sided printing.
For two-sided printing, load media with the top of the page away from the printer and with the first side- to-be-printed down.
Note
Paper heavier than 28 lb (105 g/m2) should be printed from Tray 1 to the Face-up Bin to avoid curl.
English
EN |
Load Tray 1 (Optional) 19 |

Step 9 Attach Power Cord
1 |
1 |
Locate the power switch on the front |
|
|
of the printer. Make sure the printer |
|
|
is turned off. |
|
2 |
Connect the power cord to the |
|
|
printer and a grounded power strip |
|
|
or an AC outlet. |
|
3 |
Turn the printer on. After the printer |
2 |
|
warms up, the READY message |
|
should appear on the control panel |
|
|
|
display and the Ready light should |
|
|
remain on. If the READY message |
|
|
does not appear, see the problem |
|
|
solving chapter in the online user |
|
|
guide. |
3
READY
20 Printer Setup |
EN |

Step 10 Install or Change the Control Panel Overlay (Optional)
1 |
To change the overlay to a language |
|
other than English: |
1 Locate the overlay you wish to install and remove it from its bag.
Note
Make certain the power switch is off.
2 |
2 Gently lift up on each side of the |
|
installed overlay. |
3 Insert your thumbnail or a thin, rigid object in front of the overlay and press toward the back of the printer. Lift to remove.
|
4 To install the new overlay, position it |
3 |
over the control panel, rear-side first. |
5 Snap the overlay firmly onto the control panel. Ensure that the overlay is flat.
4
5
English
EN |
Install or Change the Control Panel Overlay (Optional) 21 |

Step 11 Configure the Control Panel Display
Language (Optional)
1 |
ENTER LANGUAGE |
|
=ENGLISH |
2
3
ENTER LANGUAGE |
=ENGLISH |
Use the printer control panel to set the printer to display printer messages and print configuration pages in the language of your choice.
1When you turn the printer on for the first time, wait until ENTER LANGUAGE = ENGLISH appears. To change the display language go to step 2, or to choose English go to step 4.
2If ENTER LANGUAGE = ENGLISH did not appear, press and hold SELECT while simultaneously pushing the power switch ON. Hold SELECT until
SELECT LANGUAGE appears, then release SELECT. Go to step 3.
Note
Only -VALUE +, SELECT, and GO are active while the display language is being configured. All other keys are ignored.
If you press Go without selecting a language, the printer will bring itself online and all subsequent messages will be displayed in English. However, since no display language was selected, the
ENTER LANGUAGE = ENGLISH message will reappear (after the power-on self test) every time the printer is turned on until you select a language.
3When ENTER LANGUAGE=ENGLISH displays, press - VALUE + repeatedly until the desired setting appears.
Continued on next page.
22 Printer Setup |
EN |

4
5
ENTER LANGUAGE |
=ENGLISH |
ENTER LANGUAGE |
=ENGLISH |
Note
For Japanese, Turkish, Czech, Hungarian, and Polish, language selection will change the default symbol set for the specific language. For all other languages, the default symbol set is set to PC-8.
4Press SELECT to save the selection. An asterisk (*) appears next to the selection in the display, indicating that it is now the default.
5Press GO. The control panel display will indicate the printer is ready to use.
Note
If the new language does not appear in the display, you may not have pressed SELECT to save your new selection.
English
EN |
Configure the Control Panel Display Language (Optional) 23 |

Step 12 Test the Printer
1 |
READY |
2
INFORMATION MENU |
3
CONFIGURATION
4
CONFIGURATION
5
Print a configuration page to make sure the printer is operating correctly.
1Make sure the printer is on and the READY message is displayed.
2Press MENU until the display reads
INFORMATION MENU.
3Press ITEM until the display reads
PRINT CONFIGURATION.
4Press SELECT to print the configuration page.
5The configuration page shows the printer’s current configuration.
Note
An HP JetDirect network configuration page will also print for printers with network cards installed.
|
|
|
|
|
24 Printer Setup |
EN |
|||
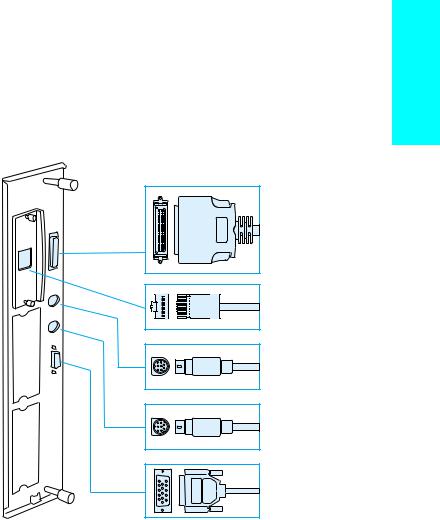
Step 13 Connect Printer Cables
For printers equipped with an optional HP JetDirect EIO Print Server, a twisted-pair network cable connection is provided through a 10/ 100Base-TX (RJ-45) connector. Connection to an Apple LocalTalk network is available through an optional LocalTalk card. The printer also has a port for HP Fast InfraRed Connect.
Parallel
Connector
RJ-45
Connector
Foreign Interface Harness (AUX) (Optional)
HP Fast InfraRed Connect (FIR) (Optional)
C-Link
Connector
English
Location of Interface Ports
EN |
Connect Printer Cables 25 |

1
2
3
Connecting Parallel Cable
To ensure reliability, use an IEEE-1284 bi-directional C-type parallel cable. (These cables are clearly marked with “IEEE-1284.”) Only IEEE-1284 cables support all of the printer’s advanced features.
1 Make sure the printer and your computer are turned off.
Note
The cable should install easily. If installation is difficult, check the cable orientation.
2 Connect the parallel cable to the printer parallel port. Press the locking release levers in while connecting the cable.
3 Connect the other end of the cable to the proper connector on the computer.
Note
See your online user guide for information on ordering IEEE-1284 parallel cables.
26 Printer Setup |
EN |

Connecting to Ethernet 10/100Base-TX
Network
Use the RJ-45 port to connect the printer to an Ethernet 10/100BaseTX network.
CAUTION Make sure the printer power is turned off before connecting to the RJ-45 port.
Ethernet 10/100Base-TX Network Interface Cable Connection
●Connect a twisted-pair network cable to the RJ-45 port on the HP JetDirect EIO Print Server.
●Connect the other end of the cable to the network.
English
EN |
Connect Printer Cables 27 |
Step 14 Install Printing Software
|
The printer comes with printing software on a CD-ROM. The printer |
|
drivers on this CD-ROM must be installed to take full advantage of the |
|
printer features. If your computer does not have a CD-ROM drive, but |
|
you have access to one, you can copy the printing software from the |
|
CD-ROM onto diskettes for installation on your computer. |
|
If you do not have access to a CD-ROM drive, go to www.hp.com and |
|
download the drivers, or call HP to order diskettes. The most recent |
|
drivers are available on the Internet. Depending on the configuration |
|
of Windows-driven computers, the installation program for the printer |
|
software automatically checks the computer for Internet access to |
|
obtain the latest software. |
|
|
Note |
Printer installation software for UNIX (HP-UX, Sun Solaris) networks is |
|
available for download at http://www.hp.com/support/net_printing. |
|
For configuration and management using your web browser, use |
|
HP Web JetAdmin. For information on HP Web JetAdmin, go to |
|
http://www.hp.com/go/webjetadmin. |
|
See the HP Customer Care pages at the front of the printer user |
|
|
|
guide for more information. |
28 Printer Setup |
EN |
Loading...