


LaserJet CP3525x
Table of contents
 Loading...
Product maintenance
Problem solving
Product use
Product management
HP Color LaserJet CP3525 Series Printer
User Guide
www.hp.com/support/cljcp3525


HP Color LaserJet CP3525 Series Printer
User Guide

Copyright and License
© 2008 Copyright Hewlett-Packard
Development Company, L.P.
Reproduction, adaptation, or translation
without prior written permission is prohibited,
except as allowed under the copyright laws.
The information contained herein is subject
to change without notice.
The only warranties for HP products and
services are set forth in the express warranty
statements accompanying such products
and services. Nothing herein should be
construed as constituting an additional
warranty. HP shall not be liable for technical
or editorial errors or omissions contained
herein.
Part number: CC468-90906
Edition 1, 09/2008
Trademark Credits
Adobe
®
, Acrobat
®
, and PostScript
®
are
trademarks of Adobe Systems Incorporated.
Corel® is a trademark or registered
trademark of Corel Corporation or Corel
Corporation Limited.
Intel® Core™ is a trademark of Intel
Corporation in the U.S. and other countries.
Java™ is a US trademark of Sun
Microsystems, Inc.
Microsoft®, Windows®, and Windows®XP
are U.S. registered trademarks of Microsoft
Corporation.
Win
dows Vista® is either a registered
trad
emark or trademark of Microsoft
Corporation in the United States and/or other
countries.
PANTONE® is Pantone, Inc's check-
standard trademark for color.
UNIX
®
is a registered trademark of The Open
Group.
ENERGY STAR and the ENERGY STAR
mark are registered U.S. marks.

Table of contents
1 Product basics
Conventions used in this guide ............................................................................................................ 2
Product comparison ............................................................................................................................. 3
Product features ................................................................................................................................... 4
Product walkaround .............................................................................................................................. 7
Front view ............................................................................................................................ 7
Back view ............................................................................................................................. 8
Interface ports ...................................................................................................................... 9
Serial number and model number location .......................................................................... 9
2 Control panel
Use the control panel ......................................................................................................................... 12
Control-panel layout ........................................................................................................... 12
Interpreting control panel indicator lights ........................................................................... 13
Control panel menus .......................................................................................................................... 14
Use the menus ................................................................................................................... 14
Menu hierarchy ................................................................................................................................... 15
Show Me How menu .......................................................................................................................... 16
Retrieve job menu .............................................................................................................................. 17
Information menu ............................................................................................................................... 19
Paper handling menu ......................................................................................................................... 20
Configure device menu ...................................................................................................................... 21
Printing menu ..................................................................................................................... 21
PCL sub-menu .................................................................................................. 22
Print Quality menu ............................................................................................................. 24
System setup menu ........................................................................................................... 27
I/O menu ............................................................................................................................ 34
Resets menu ...................................................................................................................... 41
Diagnostics menu ............................................................................................................................... 42
Service menu ..................................................................................................................................... 44
3 Software for Windows
Supported operating systems for Windows ........................................................................................ 46
Supported printer drivers for Windows ............................................................................................... 47
ENWW iii

HP Universal Print Driver (UPD) ........................................................................................................ 48
UPD installation modes ..................................................................................................... 48
Select the correct printer driver for Windows ..................................................................................... 49
Priority for print settings ...................................................................................................................... 50
Change printer-driver settings for Windows ....................................................................................... 51
Remove software for Windows ........................................................................................................... 52
Supported utilities for Windows .......................................................................................................... 53
HP Web Jetadmin .............................................................................................................. 53
Embedded Web server ...................................................................................................... 53
HP Easy Printer Care ........................................................................................................ 53
Software for other operating systems ................................................................................................. 55
4 Use the product with Macintosh
Software for Macintosh ....................................................................................................................... 58
Supported operating systems for Macintosh ..................................................................... 58
Supported printer drivers for Macintosh ............................................................................. 58
Remove software from Macintosh operating systems ....................................................... 58
Priority for print settings for Macintosh .............................................................................. 58
Change printer-driver settings for Macintosh ..................................................................... 59
Software for Macintosh computers .................................................................................... 60
HP Printer Utility ................................................................................................ 60
Open the HP Printer Utility ............................................................... 60
HP Printer Utility features ................................................................. 60
Supported utilities for Macintosh ........................................................................................ 61
Embedded Web server ..................................................................................... 61
Use features in the Macintosh printer driver ....................................................................................... 62
Print ................................................................................................................................... 62
Create and use printing presets in Macintosh ................................................... 62
Resize documents or print on a custom paper size .......................................... 62
Print a cover page ............................................................................................. 62
Use watermarks ................................................................................................ 63
Print multiple pages on one sheet of paper in Macintosh ................................. 63
Print on both sides of the page (duplex printing) ............................................... 64
Store jobs .......................................................................................................... 64
Set the color options ......................................................................................... 65
Use the Services menu ..................................................................................... 65
5 Connectivity
USB connection .................................................................................................................................. 68
Network configuration ......................................................................................................................... 68
Supported network protocols ............................................................................................. 68
Configure the network product ........................................................................................... 70
View or change network settings ...................................................................... 70
iv ENWW

Set or change the network password ................................................................ 70
Manually configure IPv4 TCP/IP parameters from the control panel ................ 71
Manually configure IPv6 TCP/IP parameters from the control panel ................ 72
Disable network protocols (optional) ................................................................. 73
Disable IPX/SPX, AppleTalk, or DLC/LLC ........................................ 73
Link speed and duplex settings ......................................................................... 74
6 Paper and print media
Understand paper and print media use .............................................................................................. 76
Supported paper and print media sizes .............................................................................................. 77
Custom paper sizes ............................................................................................................................ 79
Supported paper and print media types ............................................................................................. 80
Tray and bin capacity ......................................................................................................................... 81
Special paper or print media guidelines ............................................................................................. 82
Load trays ........................................................................................................................................... 83
Paper orientation for loading trays ..................................................................................... 83
Tray 1 ................................................................................................................ 84
Tray 2 or optional Tray 3 ................................................................................... 86
Load Tray 1 ........................................................................................................................ 88
Print envelopes ................................................................................................. 90
Load Tray 2 ........................................................................................................................ 90
Load the optional 500-sheet paper and heavy media tray (Tray 3) ................................... 92
Load standard-sized paper into Tray 3 ............................................................ 92
Load custom-size paper into Tray 3 .................................................................. 94
Load 4 x 6 inch (10 x 15 cm) size paper into Tray 3 ......................................... 96
Configure trays ................................................................................................................................. 100
Configure a tray when loading paper ............................................................................... 100
Configure a tray to match print job settings ..................................................................... 100
Configure a tray by using the Paper Handling menu ....................................................... 101
Automatic overhead transparency sensing (auto sense mode) ....................................... 101
Auto-sense settings ......................................................................................... 101
Select the media by source, type, or size ........................................................................ 102
Source ............................................................................................................. 102
Type and Size ................................................................................................. 102
7 Use product features
Economy settings ............................................................................................................................. 104
Sleep delay ...................................................................................................................... 104
Set sleep delay ................................................................................................ 104
Disable/enable sleep mode ............................................................................. 104
Wake time ........................................................................................................................ 104
Set the real-time clock ..................................................................................... 105
Set the real-time clock .................................................................... 105
ENWW v

Set the wake time ............................................................................................ 106
Set economy modes from the EWS ................................................................ 106
Use job storage features .................................................................................................................. 107
Create a stored job .......................................................................................................... 107
Print a stored job .............................................................................................................. 107
Delete a stored job ........................................................................................................... 108
Print business graphics or marketing material ................................................................................. 109
Supported glossy paper ................................................................................................... 109
Configure the paper tray .................................................................................................. 109
Configure the driver settings ............................................................................................ 110
Print weatherproof maps and outdoor signs ..................................................................................... 111
Supported tough paper .................................................................................................... 111
Set the duplex alignment .................................................................................................................. 112
8 Print tasks
Cancel a print job ............................................................................................................................. 114
Stop the current print job from the control panel .............................................................. 114
Stop the current print job from the software program ...................................................... 114
Use features in the Windows printer driver ...................................................................................... 115
Open the printer driver ..................................................................................................... 115
Use printing shortcuts ...................................................................................................... 115
Set paper and quality options .......................................................................................... 115
Set document effects ....................................................................................................... 116
Set document finishing options ........................................................................................ 116
Set job storage options .................................................................................................... 117
Set color options .............................................................................................................. 11 8
Obtain support and product-status information ................................................................ 118
Set advanced printing options ......................................................................................... 119
9 Use color
Manage color .................................................................................................................................... 122
Automatic ......................................................................................................................... 122
Print in Grayscale ............................................................................................................ 122
Restrict color use ............................................................................................................. 12 2
Restrict color printing ...................................................................................... 122
Manual color adjustment .................................................................................................. 123
Manual color options ....................................................................................... 123
Color themes ................................................................................................................... 123
Match colors ..................................................................................................................................... 125
Sample book color matching ........................................................................................... 125
Printing color samples ..................................................................................................... 125
PANTONE® color matching ............................................................................................ 126
Advanced color use .......................................................................................................................... 127
vi ENWW

HP ColorSphere toner ..................................................................................................... 127
HP ImageREt 3600 .......................................................................................................... 127
Media selection ................................................................................................................ 127
Color options .................................................................................................................... 127
Standard red-green-blue (sRGB) ..................................................................................... 127
10 Manage and maintain the product
Information pages ............................................................................................................................. 130
HP Easy Printer Care ....................................................................................................................... 131
Open the HP Easy Printer Care software ........................................................................ 131
HP Easy Printer Care software sections .......................................................................... 131
Embedded Web server ..................................................................................................................... 134
Open the embedded Web server by using a network connection ................................... 134
Embedded Web server sections ...................................................................................... 135
Use HP Web Jetadmin software ...................................................................................................... 137
Security features .............................................................................................................................. 138
Secure the embedded Web server .................................................................................. 138
Secure Disk Erase ........................................................................................................... 138
Data affected ................................................................................................... 138
Additional Information ..................................................................................... 139
Job storage ..................................................................................................... 139
HP Encrypted High Performance Hard Disks .................................................................. 139
Lock the control-panel menus .......................................................................................... 139
Lock the formatter cage ................................................................................................... 140
Manage supplies .............................................................................................................................. 141
Print-cartridge storage ..................................................................................................... 141
HP policy on non-HP print cartridges ............................................................................... 141
HP fraud hotline and Web site ......................................................................................... 141
Replace supplies .............................................................................................................................. 142
Supplies life ..................................................................................................................... 142
Locate supplies ................................................................................................................ 142
Supply replacement guidelines ........................................................................................ 142
Change print cartridges ................................................................................................... 143
Change the toner collection unit ...................................................................................... 146
Install memory ................................................................................................................. 149
Install DDR memory DIMMs ............................................................................ 149
Enable memory for Windows .......................................................................... 152
Install an HP Jetdirect or EIO print server card or EIO hard disk .................... 152
Clean the product ............................................................................................................................. 156
Clean the exterior ............................................................................................................ 156
Clean spilled toner ........................................................................................................... 156
Clean the fuser ................................................................................................................ 156
Upgrade the firmware ....................................................................................................................... 157
ENWW vii

Determine the current firmware version ........................................................................... 157
Download new firmware from the HP Web site ............................................................... 157
Transfer the new firmware to the product ........................................................................ 157
Use the flash executable file to update the firmware ...................................... 157
Use FTP to upload the firmware through a browser ....................................... 158
Use FTP to upgrade the firmware on a network connection ........................... 159
Use HP Web Jetadmin to upgrade the firmware ............................................. 159
Use Microsoft Windows commands to upgrade the firmware ......................... 160
Upgrade the HP Jetdirect firmware .................................................................................. 160
11 Solve problems
Solve general problems .................................................................................................................... 164
Troubleshooting checklist ................................................................................................ 164
Factors that affect product performance .......................................................................... 165
Restore factory settings .................................................................................................................... 166
Control-panel message types ........................................................................................................... 167
Control-panel messages .................................................................................................................. 168
Jams ................................................................................................................................................. 186
Common causes of jams ................................................................................................. 186
Jam locations ................................................................................................................... 187
Clear jams ........................................................................................................................ 187
Clear jams in the right door ............................................................................. 188
Clear jams in the output bin area .................................................................... 192
Clear jams in Tray 1 ........................................................................................ 193
Clear jams in Tray 2 ........................................................................................ 195
Clear jams in the optional 500-sheet paper and heavy media tray
(Tray 3) ............................................................................................................ 196
Clear jams in the lower right door (Tray 3) ...................................................... 196
Jam recovery ................................................................................................................... 197
Paper-handling problems ................................................................................................................. 199
Product feeds multiple sheets .......................................................................................... 199
Product feeds incorrect page size ................................................................................... 199
Product pulls from incorrect tray ...................................................................................... 200
Paper does not feed automatically .................................................................................. 200
Paper does not feed from Tray 2 or 3 .............................................................................. 201
Transparencies or glossy paper will not feed .................................................................. 201
Envelopes jam or will not feed in the product .................................................................. 202
Output is curled or wrinkled ............................................................................................. 202
Product will not duplex or duplexes incorrectly ................................................................ 203
Understand lights on the formatter ................................................................................................... 204
HP Jetdirect LEDs ........................................................................................................... 204
Heartbeat LED ................................................................................................................. 205
Solve image quality problems .......................................................................................................... 206
Example print quality problems ........................................................................................ 206
viii ENWW

Repetitive defects ruler .................................................................................................... 207
Overhead transparency defects ....................................................................................... 208
Print-quality problems associated with the environment .................................................. 208
Print quality problems associated with jams .................................................................... 208
Optimize and improve image quality ................................................................................ 208
Calibrate the product ....................................................................................... 208
Print-quality-troubleshooting pages ................................................................. 209
Set the image registration ............................................................................... 209
Correct problems with light streaks ................................................................. 209
Solve performance problems ........................................................................................................... 210
Solve connectivity problems ............................................................................................................. 211
Solve direct-connect problems ........................................................................................ 211
Solve network problems .................................................................................................. 211
Product software problems ............................................................................................................... 213
Solve common Windows problems ................................................................................................. 214
Solve common Macintosh problems ................................................................................................ 215
Appendix A Supplies and accessories
Order parts, accessories, and supplies ............................................................................................ 220
Part numbers .................................................................................................................................... 221
Accessories ..................................................................................................................... 221
Print cartridges and toner collection unit .......................................................................... 221
Memory ............................................................................................................................ 221
Cables and interfaces ...................................................................................................... 222
Maintenance kits .............................................................................................................. 222
Appendix B Service and support
Hewlett-Packard limited warranty statement .................................................................................... 224
Print cartridge limited warranty statement ........................................................................................ 225
HP Color LaserJet Fuser Kit Limited Warranty Statement ............................................................... 226
End User License Agreement .......................................................................................................... 227
Customer self-repair warranty service .............................................................................................. 229
Customer support ............................................................................................................................. 230
Appendix C Product specifications
Physical specifications ..................................................................................................................... 232
Power consumption and acoustic emissions .................................................................................... 232
Environmental specifications ............................................................................................................ 232
Appendix D Regulatory information
FCC regulations ............................................................................................................................... 234
Environmental product stewardship program ................................................................................... 235
Protecting the environment .............................................................................................. 235
ENWW ix

Ozone production ............................................................................................................ 235
Power consumption ......................................................................................................... 235
Paper use ........................................................................................................................ 235
Plastics ............................................................................................................................ 235
HP LaserJet print supplies ............................................................................................... 235
Return and recycling instructions ..................................................................................... 236
United States and Puerto Rico ........................................................................ 236
Multiple returns (more than one cartridge) ..................................... 236
Single returns ................................................................................. 236
Shipping .......................................................................................... 236
Non-U.S. returns ............................................................................................. 236
Paper ............................................................................................................................... 236
Material restrictions .......................................................................................................... 237
Disposal of waste equipment by users in private households in the European Union .... 237
Chemical substances ....................................................................................................... 237
Material Safety Data Sheet (MSDS) ................................................................................ 238
For more information ....................................................................................................... 238
Declaration of Conformity ................................................................................................................. 239
Safety statements ............................................................................................................................. 240
Laser safety ..................................................................................................................... 240
Canadian DOC regulations .............................................................................................. 240
VCCI statement (Japan) .................................................................................................. 240
Power cord statement (Japan) ......................................................................................... 240
EMI statement (Korea) ..................................................................................................... 240
Laser statement for Finland ............................................................................................. 240
Substances Table (China) ............................................................................................... 242
Index ................................................................................................................................................................. 243
x ENWW

1 Product basics
●
Conventions used in this guide
●
Product comparison
●
Product features
●
Product walkaround
ENWW 1

Conventions used in this guide
Throughout this guide, several tips, notes, cautions, and warnings alert you about important information.
TIP: Tips provide helpful hints or shortcuts.
NOTE: Notes provide important information to explain a concept or to complete a task.
CAUTION: Cautions indicate procedures that you should follow to avoid losing data or damaging the
product.
WARNING! Warnings alert you to specific procedures that you should follow to avoid personal injury,
catastrophic loss of data, or extensive damage to the product.
2 Chapter 1 Product basics ENWW
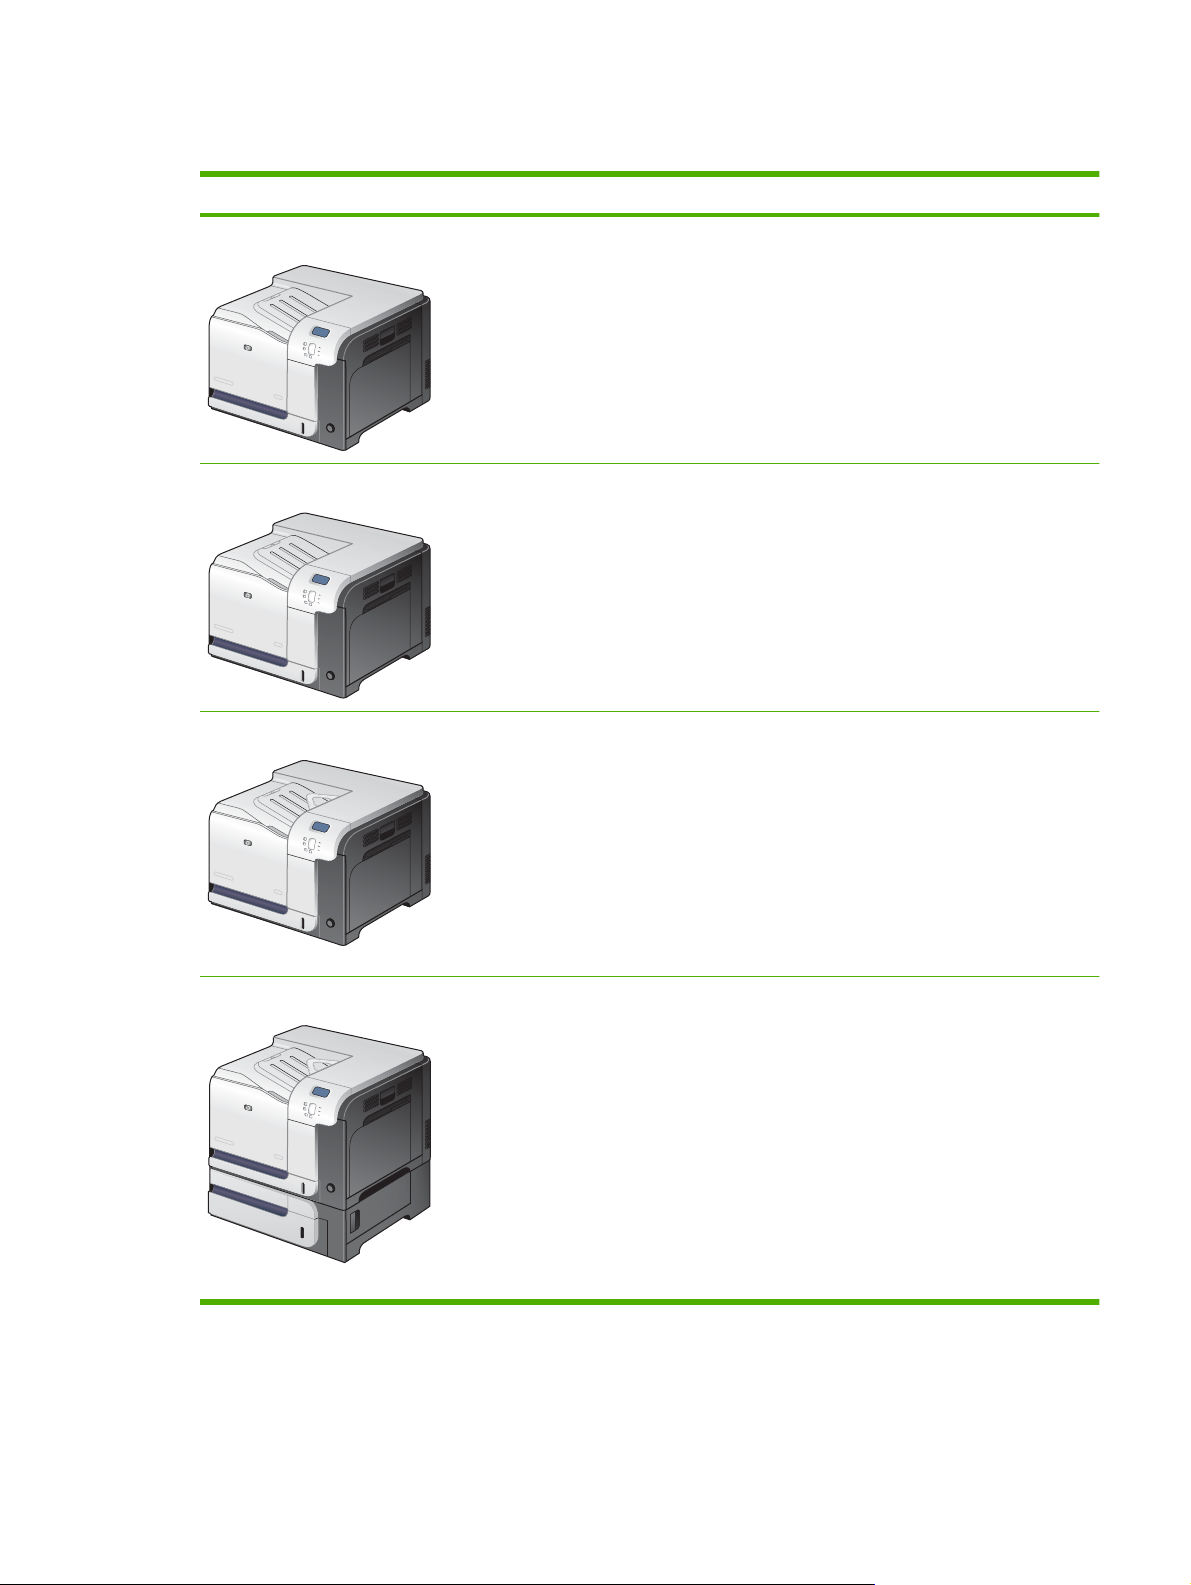
Product comparison
Model Features
HP Color LaserJet CP3525
●
100-sheet multipurpose input tray (Tray 1)
●
250-sheet input tray (Tray 2)
●
250-sheet, face-down output bin
●
Hi-speed USB 2.0 port
●
256 megabytes (MB) of random access memory (RAM)
HP Color LaserJet CP3525n
●
100-sheet multipurpose input tray (Tray 1)
●
250-sheet input tray (Tray 2)
●
250-sheet, face-down output bin
●
Hi-speed USB 2.0 port
●
HP Jetdirect embedded print server for connecting to a 10/100Base-TX network
●
256 megabytes (MB) of random access memory (RAM)
HP Color LaserJet CP3525dn
●
100-sheet multipurpose input tray (Tray 1)
●
250-sheet input tray (Tray 2)
●
250-sheet, face-down output bin
●
Hi-speed USB 2.0 port
●
HP Jetdirect embedded print server for connecting to a 10/100Base-TX network
●
384 megabytes (MB) of random access memory (RAM)
●
Automatic two-sided printing
HP Color LaserJet CP3525x
●
100-sheet multipurpose input tray (Tray 1)
●
250-sheet input tray (Tray 2)
●
250-sheet, face-down output bin
●
500-sheet paper and heavy media tray (Tray 3), including HP postcard media insert
for 101.6 x 152.4 mm (4 x 6 in) paper
●
Hi-speed USB 2.0 port
●
HP Jetdirect embedded print server for connecting to a 10/100Base-TX network
●
512 megabytes (MB) of random access memory (RAM)
●
Automatic two-sided printing
ENWW Product comparison 3

Product features
Speed and throughput
●
Print up to 30 pages per minute (ppm) on letter-size paper and 30 ppm on A4-size
paper.
●
As quick as 12 seconds to print the first page
●
Recommended maximum monthly print volume of 5,000 pages
●
A 515 megahertz (MHz) microprocessor
Resolution
●
600 dots per inch (dpi) with Image Resolution Enhancement technology 3600 for
optimum overall imaging
●
1200 x 600 dpi for detailed line work and small text
Memory
●
HP Color LaserJet CP3525: 256 MB of random-access memory (RAM), expandable
to 1 gigabyte (GB) by adding into the open DIMM slot 200-pin small outline dual
inline memory modules (DDR2 SODIMM) that support 128 MB, 256 MB, 512 MB,
or 1 GB of RAM.
NOTE: If you install a 1 GB DIMM in the open slot, the total amount of memory
available is 1 GB.
●
HP Color LaserJet CP3525n: 256 MB of random-access memory (RAM),
expandable to 1 gigabyte (GB) by adding into the open DIMM slot 200-pin small
outline dual inline memory modules (DDR2 SODIMM) that support 128 MB, 256 MB,
512 MB, or 1 GB of RAM.
NOTE: If you install a 1 GB DIMM in the open slot, the total amount of memory
available is 1 GB.
●
HP Color LaserJet CP3525dn: 384 MB of random-access memory (RAM),
expandable to 1 gigabyte (GB) by replacing the original DIMM with 200-pin small
outline dual inline memory modules (DDR2 SODIMM) that support 128 MB, 256 MB,
512 MB, or 1 GB of RAM.
NOTE: If you install a 1 GB DIMM, the total amount of memory available is 1 GB.
For the HP Color LaserJet CP3525dn model, you must replace the original 128 MB
DIMM with a 1 GB DIMM to increase memory to 1 GB.
●
HP Color LaserJet CP3525x: 512 MB of random-access memory (RAM),
expandable to 1 gigabyte (GB) by replacing the original DIMM with 200-pin small
outline dual inline memory modules (DDR2 SODIMM) that support 128 MB, 256 MB,
512 MB, or 1 GB of RAM.
NOTE: If you install a 1 GB DIMM, the total amount of memory available is 1 GB.
For the HP Color LaserJet CP3525x model, you must replace one of the original
256 MB DIMMs with a 1 GB DIMM to increase memory to 1 GB.
●
Memory Enhancement technology (MEt) automatically compresses data to use
RAM more efficiently.
User interface
●
Four-line color graphical display on the control panel
●
An embedded Web server to gain access to support and order supplies (for
network-connected products)
●
HP Easy Printer Care software (a Web-based status and troubleshooting tool)
●
Internet-enabled supply-ordering capabilities through HP Easy Printer Care
software and embedded Web server
4 Chapter 1 Product basics ENWW

Paper-handling
●
Tray 1 (multipurpose tray): A multipurpose tray for paper, transparencies, labels,
envelopes, and other paper types. The tray holds up to 100 sheets of paper, 50
transparencies, or 10 envelopes
●
Tray 2: 250-sheet tray.
●
Optional Tray 3: 500-sheet paper and heavy media tray, and an optional
HP Postcard media insert. (Both are included with the HP Color LaserJet CP3525x
printer.) Holds standard and custom-size paper. This tray automatically detects
common paper sizes.
●
Two-sided printing: The HP Color LaserJet CP3525dn printer and HP Color
LaserJet CP3525x printer support automatic two-sided printing. The other models
support manual two-sided printing.
●
Standard output bin: The standard output bin is located on the top of the product.
This bin can hold up to 250 sheets of paper. The product has a sensor that indicates
when the bin is full.
For information about supported paper sizes, see
Supported paper and print media sizes
on page 77.
For information about supported paper types, see
Supported paper and print media types
on page 80.
Languages and fonts
●
HP Printer Control Language PCL 5, PCL 6, and HP postscript level 3 emulation
●
Direct PDF
●
80 scalable TrueType PS typefaces
Print cartridges
●
For information regarding print cartridges, see
www.hp.com/go/
learnaboutsupplies.
●
Authentic HP print cartridge detection
●
Automatic toner strip remover
●
This product uses the following consumable supplies:
◦
Standard black print cartridge: CE250A
◦
High-capacity black print cartridge: CE250X
◦
Cyan print cartridge: CE251A
◦
Yellow print cartridge: CE252A
◦
Magenta print cartridge: CE253A
◦
Toner collection unit: CE254A
Supported operating systems
●
Microsoft
®
Windows
®
2000, Windows
®
XP, Windows Vista™, Windows
®
Server
2003, and Windows
®
Server 2008
●
Macintosh OS X V10.3.9, V10.4, V10.5, and later
●
Novell NetWare
●
Unix
®
●
Linux
Connectivity
●
USB 2.0 connection
●
Host USB 2.0-like port for third-party connection
ENWW Product features 5

●
Local area network (LAN) connector (RJ-45) for the embedded HP Jetdirect print
server (not included with the HP Color LaserJet CP3525 printer)
●
One enhanced input/output (EIO) slot
Environment
●
Sleep setting saves energy
●
High content of recyclable components and materials
●
Instant-on fuser saves energy
Security
●
Secure Disk Erase
●
Security lock (optional)
●
Job retention
●
User PIN authentication for stored jobs
●
IPsec security
●
HP encrypted High Performance EIO hard drive (optional)
Self-help
●
Show-me-how pages that you can print from the control panel
●
Job aids for specific tasks available from
www.hp.com/support/cljcp3525.
●
Animations and help on the control panel
●
Animations on the CD
6 Chapter 1 Product basics ENWW
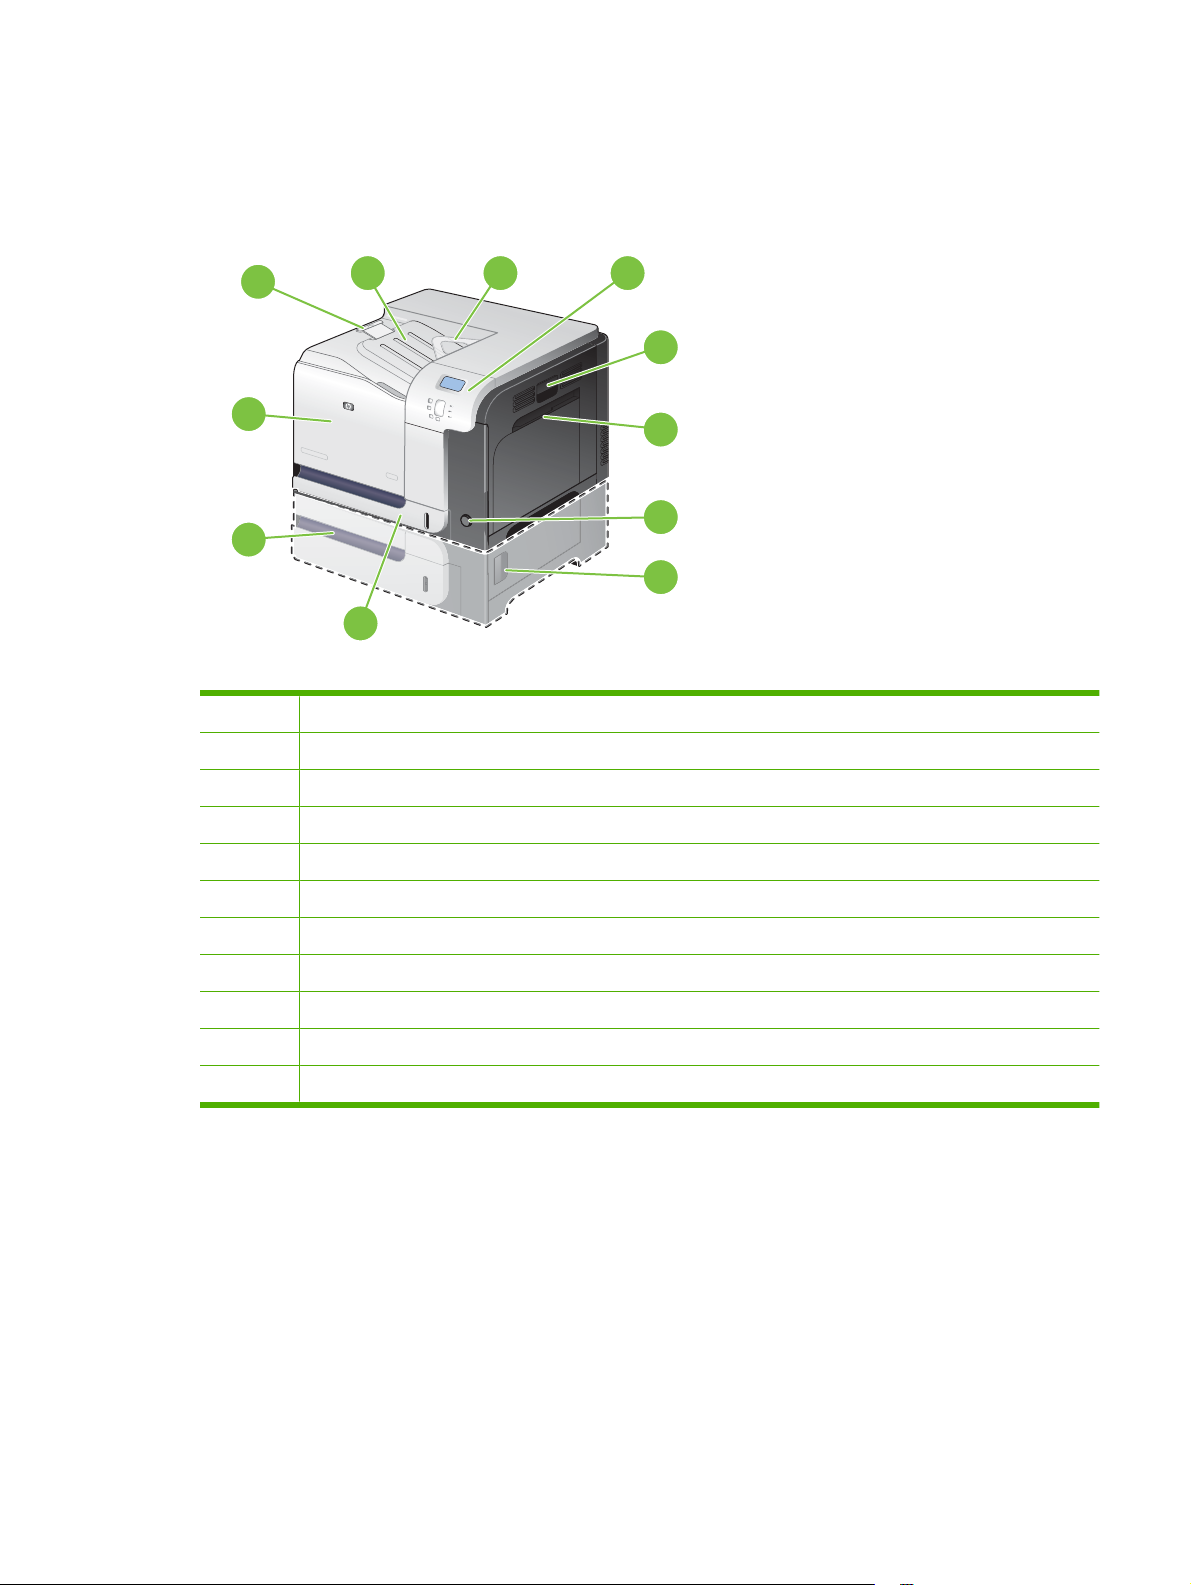
Product walkaround
Front view
1
2 3
4
5
6
7
9
11
8
10
1 Output-bin extension
2 Standard output bin
3 Duplex switchback guide (HP Color LaserJet CP3525dn printer and HP Color LaserJet CP3525x printer only)
4 Control panel
5 Right door (access for clearing jams)
6 Tray 1 (pull the handle to open the tray)
7 Power button (illuminates when turned on)
8 Lower-right door (access for clearing jams)
9 Tray 2
10 Optional Tray 3 (included with the HP Color LaserJet CP3525x printer)
11 Front door (access to print cartridges and toner collection unit)
ENWW Product walkaround 7
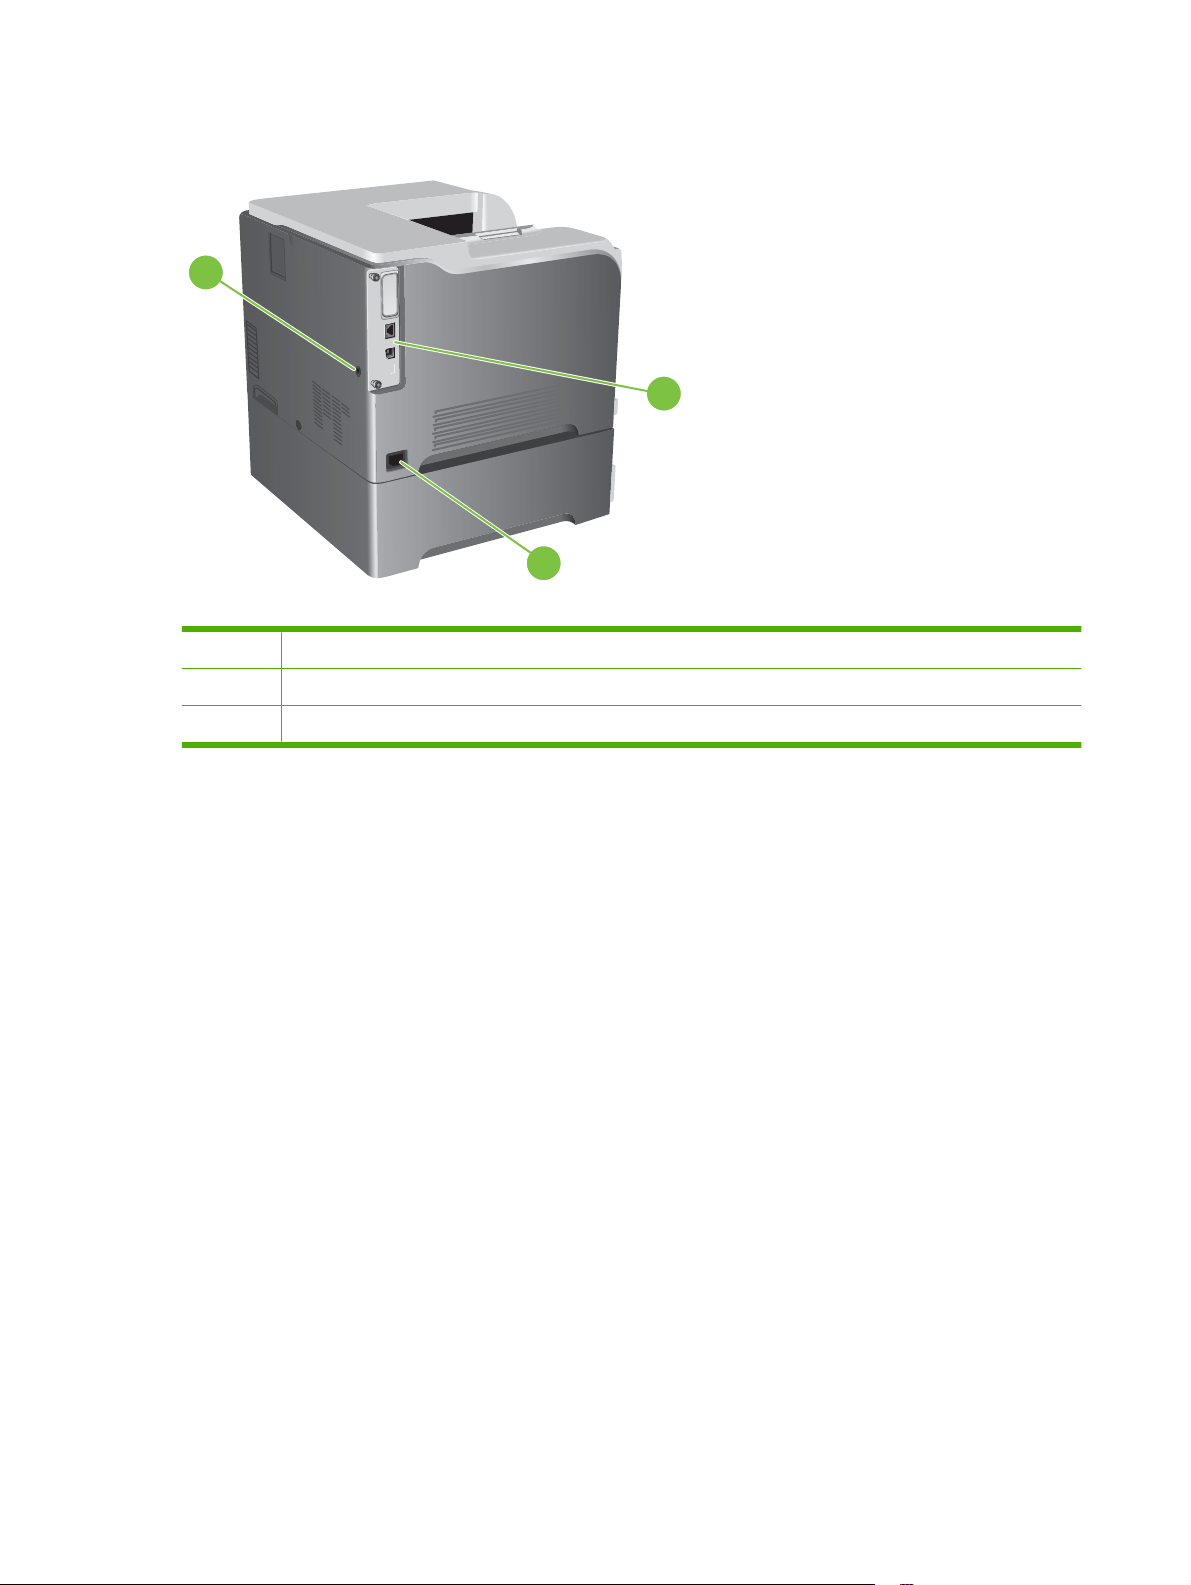
Back view
1
2
3
1 Slot for a cable-type security lock
2 Interface ports
3 Power connection
8 Chapter 1 Product basics ENWW

Interface ports
3
2
1
1 EIO interface expansion slot
2 RJ-45 network port (not activated with the HP Color LaserJet CP3525 printer)
3 Hi-speed USB 2.0 printing port
Serial number and model number location
The model number and serial number are listed on an identification label located on the back of the
product. The serial number contains information about the country/region of origin, the product version,
production code, and the production number of the product.
Model name Model number
HP Color LaserJet CP3525 CC468A
HP Color LaserJet CP3525n CC469A
HP Color LaserJet CP3525dn CC470A
HP Color LaserJet CP3525x CC471A
ENWW Product walkaround 9

10 Chapter 1 Product basics ENWW

2 Control panel
●
Use the control panel
●
Control panel menus
●
Menu hierarchy
●
Show Me How menu
●
Retrieve job menu
●
Information menu
●
Paper handling menu
●
Configure device menu
●
Diagnostics menu
●
Service menu
ENWW 11
Use the control panel
The control panel has a color, graphical and text display that provides access to all product functions.
Use the buttons to control jobs and the product status. The lights indicate overall product status.
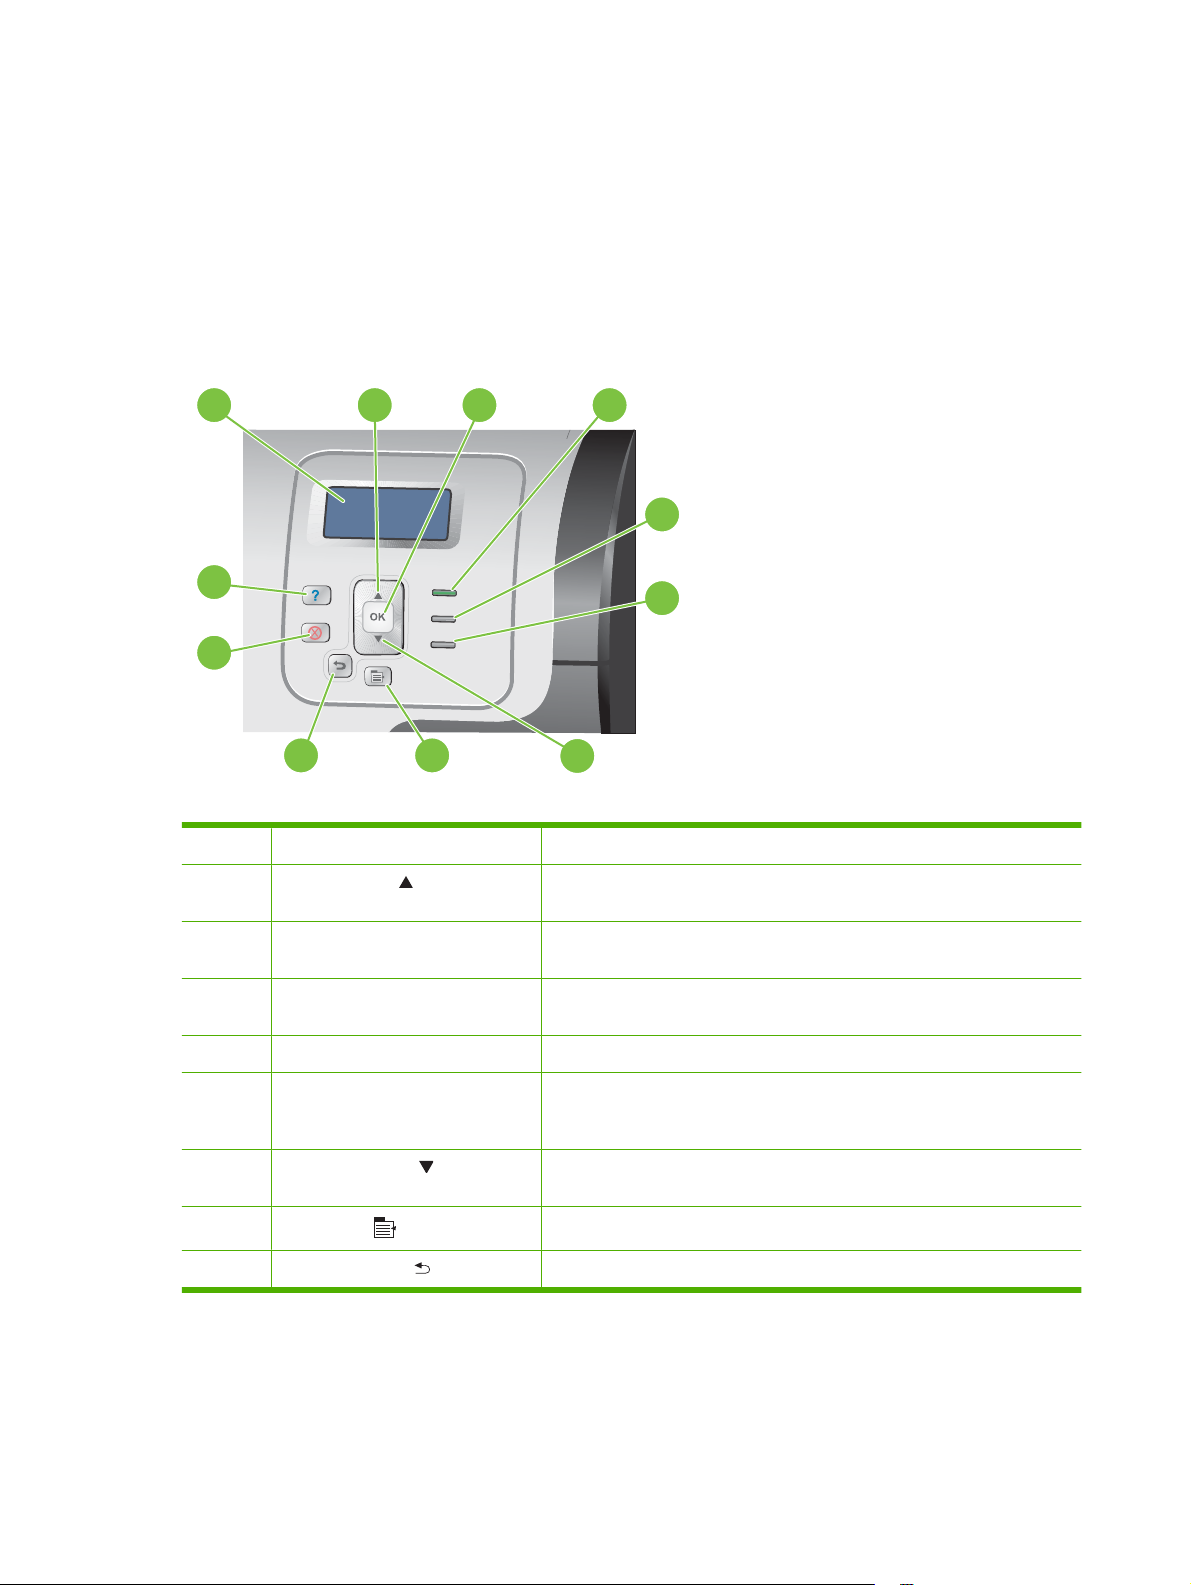
Control-panel layout
The control panel includes a color, graphical and text display, job-control buttons, and three light-emitting
diode (LED) status lights.
1
2 3
4
5
7
6
89
11
10
1 Control panel display Shows status information, menus, help information, and error messages.
2 Up arrow button Navigates menus and text, and increases the values of numerical items in
the display.
3 OK button Makes selections, resumes printing after continuable errors, and overrides
a non-HP print cartridge.
4 Ready light The Ready light indicates that the product is ready to begin processing any
job.
5 Data light The Data light indicates that the product is receiving data.
6 Attention light The Attention light indicates that the product has a condition that requires
intervention. Examples include an empty paper tray or an error message
on the display.
7 Down arrow button Navigates menus and text, and decreases the values of numerical items in
the display.
8
Menu button
Opens and closes menus.
9
Back arrow button
Navigates backward in nested menus.
12 Chapter 2 Control panel ENWW

10
Stop button
Halts the current job, presents a choice to resume or cancel the current job,
clears paper from the product, and clears any continuable errors that are
associated with the halted job. If the product is not printing a job, pressing
Stop pauses the product.
11 Help button Provides detailed information, including animations, about product
messages or menus.
Interpreting control panel indicator lights
Indicator On Off Flashing
Ready
(green)
Product is online (able to
accept and process data).
Product is offline or is turned
off.
Product is attempting to stop
printing and go offline.
Data
(green)
Processed data is present in
the product, but more data is
needed to complete the job.
Product is not processing or
receiving data.
Product is processing and
receiving data.
Attention
(amber)
A critical error has occurred.
Product requires attention.
No conditions exist that
require attention.
An error has occurred.
Product requires attention.
ENWW Use the control panel 13

Control panel menus
You can perform most routine printing tasks from the computer through the printer driver or software
application. This is the most convenient way to control the product, and will override the product control-
panel settings. See the help files associated with the software, or for more information on accessing the
printer driver, see
Software for Windows on page 45 or Use the product with Macintosh
on page 57.
You can also control the product by changing settings in the product’s control panel. Use the control
panel to access features not supported by the printer driver or software application, and to configure
trays for paper size and type.
Use the menus
●
Enter and exit the menus by pressing the Menu button
.
●
Select a menu item by using the OK button as well as select numerical values when configuring
the product.
●
Use the up or down arrows
to navigate through the menus. In addition to menu navigation, the
up and down arrows can increase and decrease numerical value selections. Hold down the up or
down arrows to scroll faster.
●
The back button
allows you to move back in menu selections.
●
If no key is pressed for 60 seconds, the product exits the menus.
14 Chapter 2 Control panel ENWW

Menu hierarchy
The following top-level menus are available:
●
SHOW ME HOW. See
Show Me How menu on page 16 for more information.
●
RETRIEVE JOB. See
Retrieve job menu on page 17 for more information.
●
INFORMATION. See
Information menu on page 19 for more information.
●
PAPER HANDLING. See
Paper handling menu on page 20 for more information.
●
CONFIGURE DEVICE. See
Configure device menu on page 21 for more information.
●
DIAGNOSTICS. See
Diagnostics menu on page 42 for more information.
●
SERVICE. See
Service menu on page 44 for more information.
ENWW Menu hierarchy 15

Show Me How menu
The SHOW ME HOW menu prints pages that provide more information about the product.
To display: Press the Menu button
, and then select the SHOW ME HOW menu.
Item Explanation
CLEAR JAMS Provides instructions for clearing jams on the product.
LOAD TRAYS Provides instructions for loading and configuring trays.
LOAD SPECIAL MEDIA Provides instructions for loading special print media such as envelopes,
transparencies, and labels.
PRINT BOTH SIDES Provides instructions for printing on both sides of the paper (duplex printing).
SUPPORTED PAPER Provides a list of the supported paper and print media.
PRINT HELP GUIDE Prints a page that shows links to additional help on the Web.
16 Chapter 2 Control panel ENWW

Retrieve job menu
The RETRIEVE JOB menu allows you to view listings of all stored jobs.
To display: Press the Menu button
, and then select the RETRIEVE JOB menu.
NOTE: Values that have an asterisk (*) are the factory-default values. Some menu items have no
default.
Item Sub-item Options Description
<USER NAME> Each user who has stored jobs is
listed by name. Select the
appropriate user name to see a list of
stored jobs.
ALL JOBS (NO PIN) PRINT
PRINT AND DELETE
DELETE
This message is displayed if a user
has two or more stored jobs that do
not require a PIN.
Either the PRINT option or the PRINT
AND DELETE option displays,
depending on the type of jobs listed.
Use the COPIES option to specify he
number of copies of the job to be
printed.
ALL JOBS (WITH
PIN)
PRINT
PRINT AND DELETE
DELETE
This message is displayed if a user
has two or more stored jobs that
require a PIN.
Either the PRINT option or the PRINT
AND DELETE option displays,
depending on the type of jobs listed.
Use the COPIES option to specify he
number of copies of the job to be
printed.
<JOB NAME X> PRINT
PRINT AND DELETE
DELETE
Each job is listed by name.
Either the PRINT option or the PRINT
AND DELETE option displays,
depending on the type of jobs listed.
Use the COPIES option to specify the
number of copies of the job to be
printed.
COPIES Specifies the number of copies of the
job to be printed. The default is 1.
If you select the JOB option, the
number of copies specified in the
driver are printed.
If you select the CUSTOM menu,
another setting displays where you
can specify the number of copies of
the job to be printed. The number of
copies that were specified in the
driver are multiplied by the number of
copies specified on the control panel.
For example, if you specified two
ENWW Retrieve job menu 17

Item Sub-item Options Description
copies in the driver and specify two
copies on the control panel, a total of
four copies of the job are printed.
18 Chapter 2 Control panel ENWW
Loading...