


Take a look at all HP Support has to offer!
Thank you for your purchase. Along with your product, you receive a variety of support services from Hewlett-Packard and our support partners designed to give you the results you need, quickly and professionally.
Online Services: for 24-hour |
World Wide Web URL—Printer drivers, updated HP printer software, and product and |
|||
access to information over your |
support information may be obtained from http://www.hp.com, or in Europe from |
|||
modem, we suggest these |
http://www2.hp.com. In Japan printer drivers may be obtained from |
|||
services. |
ftp://www.jpn.hp.com/drivers/. Korea: www.hp.co.kr. Taiwan: www.hp.com.tw, with a local |
|||
|
driver website of www.dds.com.tw. |
|
|
|
|
|
|||
|
HP Bulletin Board Service—Our electronic download service provides convenient |
|||
|
access to HP printer drivers, updated HP printer software, product information, and |
|||
|
troubleshooting hints. Dial (208) 344-1691 (U.S. and Canada) and set your |
|||
|
communication software to N,8,1. European Bulletin Board Service numbers are listed |
|||
|
at http://www2.hp.com. Taiwan: (886-2) 923-3233. Korea: HITEL or CHOLIAN (Go |
|||
|
HPK). Australia: (613) 9890 0276. New Zealand: (649) 356-3660. |
|||
|
|
|||
|
America OnLine—( America OnLine/Bertelsmann available in France, Germany, and |
|||
|
UK)—Printer drivers, updated HP printer software, and support documentation are |
|||
|
available to help you answer your HP product questions. Use Keyword HP to start your |
|||
|
tour. |
|
|
|
|
|
|||
|
CompuServe—Printer drivers, updated HP printer software, and interactive sharing of |
|||
|
technical information with other members are available on CompuServe’s HP User’s |
|||
|
forums (GO HP), or call (800) 524-3388 and ask for representative #51. (CompuServe |
|||
|
is also available in the UK, France, Belgium, Switzerland, Germany, and Austria.) |
|||
|
|
|
|
|
Obtaining Software Utilities |
Phone: |
(970) 339-7009 |
Mail: |
Hewlett-Packard |
and Electronic Information: |
Fax: |
(970) 330-7655 |
|
P.O. Box 1754 |
U.S. and Canada |
|
|
|
Greeley, CO 80632 USA |
Asia-Pacific Countries |
Fulfill Plus (65) 740-4477 (Singapore, Malaysia, Indonesia, Hong Kong). |
|||
Australia/New Zealand |
Call (612) 565-6099. |
|
|
|
|
|
|||
HP Direct Ordering for |
Call (800) 538-8787 (U.S.) or (800) 387-8164 (Canada). |
|||
Accessories and Supplies |
|
|
|
|
|
|
|||
HP Support Assistant |
This support tool offers a comprehensive online information system designed to provide |
|||
CD-ROM |
technical and product information on HP products. To subscribe to this quarterly service |
|||
|
in the U.S. or Canada, call (800) 457-1762. Fulfill Plus, (65) 740-4477 (Singapore, |
|||
|
Malaysia, Indonesia, Hong Kong). |
|
|
|
|
|
|||
HP Service Information |
To locate HP-authorized dealers, call (800) 243-9816 (U.S.); (800) 387-3867 (Canada). |
|||
|
|
|
||
HP Service Agreements |
Call (800) 446-0522 (U.S.); (800) 268-1221 (Canada). |
|
||
|
|
|
|
|
HP FIRST: HP FIRST Fax will deliver detailed troubleshooting information on common software applications and troubleshooting tips for your HP product. Call from any touch-tone phone and request up to three documents per call. These documents will be sent to the fax of your choice.
Australia |
(03) 9272-2627 |
Korea |
(02) 769-0543 |
|
Austria |
0660-8128 |
Malaysia |
(03) 298-2478 |
|
Belgium (Dutch) |
0800-1-1906 |
Netherlands |
0800-22-2420 |
|
Belgium (French) |
0800-1-7043 |
New Zealand |
(09) 356 6642 |
|
Canada |
(800) 333-1917 |
Norway |
800-11319 |
|
China |
(86 10) 6505 5280 |
Philippines |
(65) 291-7951 |
|
Denmark |
800-10453 |
Singapore |
(65) 275-7251 |
|
English outside of UK |
(31 20) 681-5792 |
Spain |
900-993123 |
|
Finland |
9800-13134 |
Sweden |
020-795743 |
|
France |
05-905900 |
Switzerland (German) |
0800 55-1527 |
|
Germany |
0130-810061 |
Switzerland (French) |
0800 55-1526 |
|
Hong Kong |
(852) 2506-2422 |
Taiwan |
02-719-5589 |
|
India |
(011) 622-6420 |
Thailand |
(02) 661-3511 |
|
Indonesia |
(21) 352-2044 |
United Kingdom |
0800-960271 |
|
Italy |
1678-59020 |
United States |
(800) 333-1917 |
|
Japan |
(81 3) 3335-8622 |
|
|
|
|
|
|
|
|

Customer Support Options Worldwide
In addition to the phone numbers listed below, appendix A, “Warranty and Support Information" contains worldwide sales and service addresses and phone numbers for countries not listed here.
U.S. and Canada: |
Call (208) 323-2551 Mon-Fri 6 am to 10 pm and Saturday 9 am to 4 pm (Mountain |
|
Customer Support & Product |
Time) free of charge during the Warranty Period; however, your standard long-distance |
|
phone charges still apply. Please have your serial number ready when calling. |
|
|
Repair Assistance |
|
|
|
|
|
(Please refer to the warranty |
Post-warranty telephone assistance is available to answer your product questions. Call |
|
chapter of this manual for |
(900) 555-1500 ($2.50* per minute, U.S. only), or call (800) 999-1148 ($25* per call, |
|
additional product repair |
Visa or MasterCard, U.S. and Canada) Mon-Fri 7 am to 6 pm and Saturday from 9 am |
|
information.) |
to 3 pm (Mountain Time). Charges begin only when you connect with a support |
|
|
technician. *Prices subject to change. |
|
|
|
|
European Customer Support Center Language and In-Country Options Available
Open Monday-Friday 8:30-18:00 CET
HP provides a free telephone support service during the warranty period. By calling a telephone number listed below, you will be connected to a responsive team waiting to help you. If you require support after your warranty has expired, you can receive support for a fee through the same telephone number. The fee is charged on a per-incident basis. When
calling HP please have the following information ready: |
|
|
|
|||
• Product name and serial number |
Date of purchase |
Description of the problem |
|
|||
|
|
|
|
|
|
|
Dutch |
Belgium: |
02 626 8806 |
Norwegian |
Norway: |
22 11 6299 |
|
|
Netherlands: |
020 606 8751 |
Danish |
Denmark: |
3929 4099 |
|
English |
Ireland: |
01 662 5525 |
Finnish |
Finland: |
0203 47288 |
|
|
UK: |
0171 512 5202 |
Swedish |
Sweden: |
08 619 2170 |
|
|
International: |
44 171 512 52 02 |
Italian |
Italy: |
02 26410350 |
|
French |
France: |
04 50 43 9853 |
Spanish |
Spain: |
902 321 123 |
|
|
Belgium: |
02 626 8807 |
Portuguese |
Portugal: |
01 441 7199 |
|
German |
Switzerland: |
084 880 1111 |
|
|
|
|
Germany: |
0180 5 25 81 43 |
|
|
|
||
|
Austria: |
0660 6386 |
|
|
|
|
In-Country Support Numbers
If you require support after your warranty has expired or additional product repair services, of if your country is not listed below, please refer to the Worldwide Sales and Service Offices in appendix A.
Africa/Middle East |
(41 22) 780-7111 |
Malaysia |
(603) 295-2566 |
|
|||
Argentina |
(54 1) |
781-4059/69 |
Mexico D.F. |
(52 5) |
326-4600 |
|
|
Australia |
(03) 9272 8000 |
Mexico Guadalajara |
(52 3) |
669 95 00 |
|
||
Brazil |
(55 11) 709-1444 |
Mexico Monterey |
(52 83) |
378 42 40 |
|
||
Canada |
(208) 323-2551 |
New Zealand |
(64 9) |
356-6640 |
|
||
China |
(8610) 6261-4174; 6261-4175; |
Philippines |
(63 2) |
894-1451 |
|
||
|
6261-4176; 6262-5666 |
Poland |
(48 22) |
37-5065 |
|
||
Czech Republic |
(42 2) |
471 7321 |
Portugal |
(351 1) |
301 7330 |
|
|
Greece |
(30 1) |
689 64 11 |
Russia |
(7 095) |
923-5001 |
|
|
Hong Kong |
800-7729 |
Singapore |
(65) 272-5300 |
|
|||
Hungary |
(36 1) |
252 4505 |
Switzerland |
(41 1) |
753 7111 |
|
|
India |
(011) 6472366 |
Taiwan |
(02) 717-9609 |
|
|||
Indonesia |
(21) 350-3408 |
Thailand |
(662) 661-4011; 661-4012 |
|
|||
Japan |
(31 20) 581-3318 |
Turkey |
(90 1) |
224-5925 |
|
||
Korea |
(82 2) |
3270-0700; outside |
|
|
|
|
|
|
Seoul, call 080-999-0700 |
|
|
|
|
|
|
|
|
|
|
|
|
|
|

HP LaserJet 6L Printer
User’s Manual
Copyright Information
© 1997 Hewlett-Packard Company
All Rights Reserved. Reproduction, adaptation, or translation without prior written permission is prohibited, except as allowed under the copyright laws.
Part number: C3990-90901 First Edition, May 1997
Documentation Warranty
Statement
The information contained in this document is subject to change without notice.
Hewlett-Packard makes no warranty of any kind with regard to this material, including, but not limited to, the implied warranties of merchantability and fitness for a particular purpose.
Hewlett-Packard shall not be liable for errors contained herein or for incidental or consequential damage in connection with the furnishing, performance, or use of this manual.
Trademark Credits
Microsoft®, Windows® and MS-DOS® are U.S. registered trademarks of Microsoft Corporation.
Material Safety Data Sheet (MSDS)
The Toner Material Safety Data Sheet (MSDS) can be obtained by calling HP First at (800)
333-1917 or (208) 344-4809. International customers should refer to “Hewlett-Packard Services Worldwide” at the front of this manual for appropriate numbers and information.
FCC Regulations
This equipment has been tested and found to comply with the limits for a Class B digital device, pursuant to Part 15 of the FCC rules. These limits are designed to provide reasonable protection against harmful interference in a residential installation. This equipment generates, uses, and can radiate radio frequency energy, and if not installed and used in accordance with the instructions, may cause harmful interference to radio communications. However, there is no guarantee that interference will not occur in a particular installation. If this equipment does cause harmful interference to radio or television reception, which can be determined by turning the equipment off and on, the user is encouraged to try to correct the interference by one or more of the following measures:
•Reorient or relocate the receiving antenna.
•Increase separation between equipment and receiver.
•Connect equipment to an outlet on a circuit different from that to which the receiver is connected.
Consult your dealer or an experienced radio/TV technician.
Note: Any changes or modifications to the printer not expressly approved by HP could void the user’s authority to operate this equipment.
Use of a shielded interface cable is required to comply with the Class B limits of Part 15 of FCC rules.
Canadian DOC Regulations
Complies with Canadian EMC Class B requirements.
<<Conforme á la classe B des normes canadiennes do
compatibilité électromagnétiques. <<CEM>>.>>

CONTENTS
1 Set Up
Introduction . . . . . . . . . . . . . . . |
. . . . . . . . . . . . . . . 1-1 |
Identifying Your Printer’s Parts . . . . . . . . . . . . . . . . . . . . . 1-1 |
|
Installing the HP LaserJet Toner Cartridge |
. . . . . . . . . . . . . . 1-2 |
Connecting Your Printer’s Cable and Cord |
. . . . . . . . . . . . . . 1-3 |
Attaching the Label to the Printer . . . . |
. . . . . . . . . . . . . . . 1-4 |
Loading Paper into the Printer . . . . . |
. . . . . . . . . . . . . . . 1-5 |
Printer Software Information . . . . . . |
. . . . . . . . . . . . . . . 1-6 |
Minimum System Requirements . . . . . . . . . . . . . . . . . . 1-6 Installation Considerations . . . . . . . . . . . . . . . . . . . . . 1-6 Installing Your Printer’s Software . . . . . . . . . . . . . . . . . . . 1-7 Standard Installation for Windows 3.1x . . . . . . . . . . . . . . . 1-7
Standard Installation for Windows 95 |
. |
. . |
. . |
. . . |
. . . . |
. . |
. 1-7 |
Custom versus Typical Installation . |
. . |
. . |
. . |
. . . |
. . . . |
. . |
. 1-8 |
Alternative Installation for Windows 3.1x . . . . . . . . . . . . . . 1-8 Alternative Installation for Windows 95 . . . . . . . . . . . . . . . 1-8 Using Online Help . . . . . . . . . . . . . . . . . . . . . . . . . . . 1-9 Installing Memory Cards (DRAM) . . . . . . . . . . . . . . . . . . 1-10
2 Printer Control Panel
Using the Front Panel . . . . . . . . . . . . . . . . . . . . . . . . . 2-1 The Front Panel . . . . . . . . . . . . . . . . . . . . . . . . . . . . 2-2
3 Printing
Selecting Print Media . . . . . |
. . . . . . . . . . . . . . . . . . . . 3-1 |
|
Selecting Media Types . . . |
. . . . . . . . . . . . . . . . . . . . 3-1 |
|
Selecting Media Sizes . . . |
. . . . . . . . . . . . . . . . . . . . 3-1 |
|
Selecting the Output Paper Path |
. . . . . . . . . . . . . . . . . . . 3-2 |
|
Using the Single-Sheet Input Slot . . . . . . . . . . . . . . . . . . . 3-3 |
||
Printing on Letterhead and Envelopes |
. . . . . . . . . . . . . . . . 3-4 |
|
Printing Tasks . . . . . . . . . |
. . . . . . . . . . . . . . . . . . . . 3-5 |
|
Printing on Both Sides (Duplexing) . . . . . . . . . . . . . . . . . 3-5 |
||
Pausing Your Printer Between Pages |
. . . . . . . . . . . . . . . 3-6 |
|
Resetting Your Printer . . . |
. . . . . . . . . . . . . . . . . . . . 3-6 |
|
Stopping a Print Job . . . . |
. . . . . . . . . . . . . . . . . . . . 3-6 |
|
Printing on Special Media . . . . . . . . . . . . . . . . . . . . . . . 3-7 Additional Tips for Custom Sizes . . . . . . . . . . . . . . . . . . 3-7
Additional Tips for Transparencies . . |
. . . . . . . . . . . . . . . 3-7 |
Additional Tips for Printing Labels . |
. . . . . . . . . . . . . . . 3-7 |
Managing HP LaserJet Toner Cartridges |
. . . . . . . . . . . . . . . 3-8 |
4 Troubleshooting
Solving Common Problems |
. . . . . . . . . . . . . . . . . . . . . . 4-1 |
Printing a Self-Test Page |
. . . . . . . . . . . . . . . . . . . . . . 4-1 |
Clearing Paper Jams . |
. . . . . . . . . . . . . . . . . . . . . . 4-2 |
Paper Will Not Feed . . |
. . . . . . . . . . . . . . . . . . . . . . 4-3 |
Cleaning Your Printer . |
. . . . . . . . . . . . . . . . . . . . . . 4-4 |
EN |
Contents-1 |

Solving Printer Problems . . . . . . . . . . . . . . . . . . . . . |
. |
4-5 |
Solving Print Quality Problems . . . . . . . . . . . . . . . . . . |
. |
4-7 |
Solving Software Problems . . . . . . . . . . . . . . . . . . . . |
4-12 |
|
Solving Hard-to-Resolve Problems . . . . . . . . . . . . . . . . . |
4-13 |
|
Networks and Switchboxes . . . . . . . . . . . . . . . . . . . . . |
4-15 |
|
Out of Memory . . . . . . . . . . . . . . . . . . . . . . . . . . . |
4-15 |
|
A Warranty and Support Information
HP Limited 1-Year Warranty Statement . . . . . . . . . . . . . . . . A-1 |
|
Hardware Service during the Warranty Period . . . . . . . . . . . A-2 |
|
Hardware Service after the Warranty Period |
. . . . . . . . . . . A-2 |
HP LaserJet Toner Cartridge Warranty . . . |
. . . . . . . . . . . A-2 |
Accessories and Supplies Information |
. . . . . . . . . . . . . . . . A-3 |
HP Software License Agreement . . |
. . . . . . . . . . . . . . . . A-4 |
Worldwide Sales and Service Offices |
. . . . . . . . . . . . . . . . A-5 |
B Printer Specifications
Printer Specifications . . . . . . . . . . . . . . . . . . . . . . . . . B-1 Regulatory Information . . . . . . . . . . . . . . . . . . . . . . . . B-2 VCCI Statement (Japan) . . . . . . . . . . . . . . . . . . . . . . B-2 Laser Statement for Finland . . . . . . . . . . . . . . . . . . . . B-2
Environmental Product Stewardship |
. . . . . . . . . . . |
. . . |
. |
. |
. |
B-4 |
Laser Safety Statement . . . . . |
. . . . . . . . . . . . |
. . . |
. |
. |
. |
B-6 |
2-Contents
EN
1
Set Up
Introduction
Congratulations on your purchase of the HP LaserJet 6L printer. The following items are required to set up your printer:
∙ HP LaserJet 6L Printer |
∙ Power Cord |
∙ HP LaserJet Toner Cartridge |
∙ Sheet of Printer Labels |
∙IEEE-1284 Compliant Parallel ∙ HP LaserJet 6L Printer Software Disks Cable (not included)
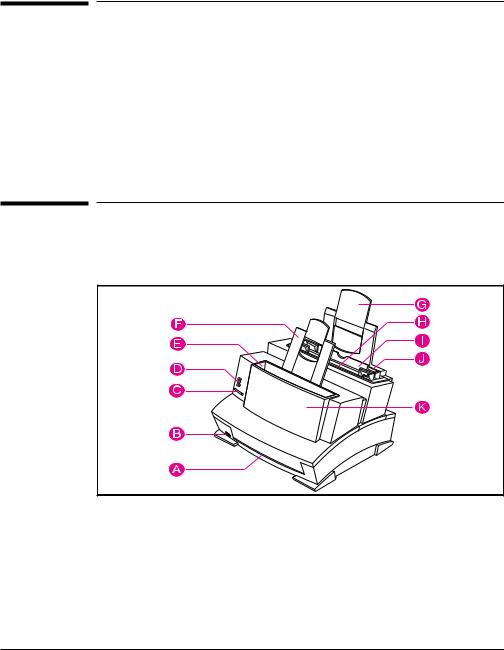
Identifying Your Printer’s Parts
Before using your printer, make sure you can identify the following parts:
Figure 1-1
A = Front Output Slot |
G = Paper Input Support |
B = Paper Path Lever |
H = Single-Sheet Input Slot |
C = Front Panel Button |
I = Paper Input Bin |
D = Indicator Lights |
J = Paper Guides |
E = Paper Output Bin |
K = Printer Door |
F = Paper Output Support |
|
EN
Set Up 1-1

Installing the HP LaserJet Toner
Cartridge
It is recommended that you use
HP LaserJet toner cartridges. HP has designed the printer, toner cartridges, and toner formula to work together to give you optimal image quality from your printer.
C a u t i o n
To prevent damage, do not expose the toner cartridge to light for more than a few minutes. For extended periods outside the printer, place the cartridge in a closed drawer, return it to the original packaging, or cover it completely with a cloth.
To install your HP LaserJet toner cartridge, you will need to first remove the toner cartridge from its packaging. (Save the packaging for possible cartridge storage and recycling.)
1 Open the Printer Door by pulling it toward you in a forward motion using both hands.
2 Roll the toner cartridge back and forth briskly to distribute the toner evenly inside the cartridge.
3 Grasp the end of the clear sealing tape on the side of the cartridge and pull firmly to remove the entire length of the tape. Once removed, the tape should measure twice the length of the toner cartridge or 490 mm
(19.3 inches).
4 Hold the cartridge by the handle (so that the arrows are facing the printer) and slide it down and back into the printer. The ends of the cartridge slide into the black plastic grooves in the printer. Push it firmly into place and close the printer door.
N o t e
If toner gets on your clothing, wipe it off with a dry cloth and wash clothing in cold water. Hot water sets toner into fabric.
1-2 Set Up
EN

Connecting Your Printer’s Cable and
Cord
N o t e
For best results, it is imperative that you use a high-quality IEEE-1284 compliant parallel cable, such as the HP LaserJet cable, between the printer and computer. This cable supports all of your printer’s advanced printing capabilities. If you experience problems with your computer not being recognized by your printer, you may have a faulty cable.
1 Connect a parallel cable to your printer. Be sure not to force the cable on upside down.
2 Secure the cable by snapping the two wire clips from the printer to the cable. A secure cable helps prevent communication problems between the computer and printer.
3 Connect the other end of the cable to a parallel port on your computer. Secure the cable by tightening the attached screws.
C a u t i o n
Be sure to connect the cable to a parallel port on your computer rather than a serial port. Connecting to the wrong port can cause damage to your printer. See your computer’s documentation for more information about the computer’s ports.
4 Connect the power cord between the printer and a grounded power strip or wall outlet.
Once the power is connected, the indicator lights on the printer’s front panel will turn on and then blink in sequence. The Error (top) light will stay on if the Paper Input Bin is empty.
You will not find an on/off switch on your printer. After 15 minutes of inactivity, the printer will automatically shift to a powered-down state called SleepMode.
Up Set 1
EN
Set Up 1-3
Attaching the Label to the Printer
A sheet of labels was shipped in the Paper Output Bin of your printer. You will need to attach the label titled “Remove Paper Before Reloading” to your printer.
1 Carefully remove the label from its backing sheet.
2 Attach the label to the printer’s Paper Input Bin.
As the label indicates, always remove and realign all paper before reloading. By doing so, you can reduce multiple paper feeds or paper jams or both.
1-4 Set Up
EN
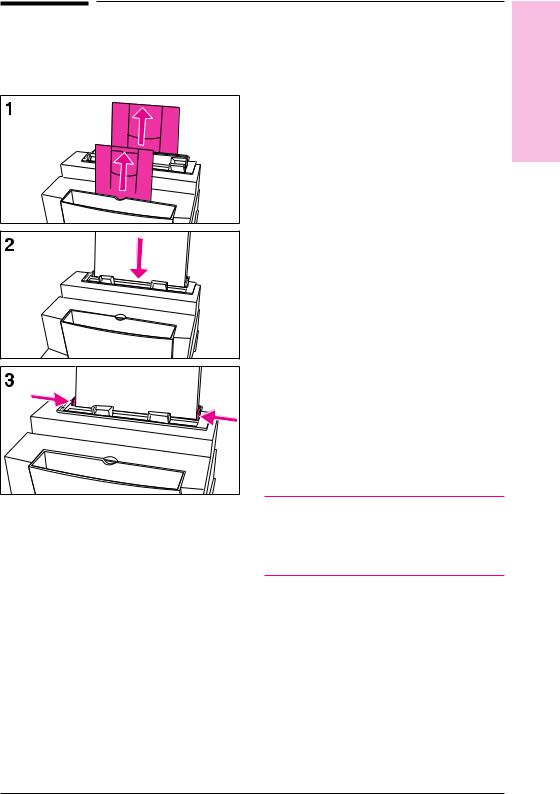
Loading Paper into the Printer
Before loading paper into the printer, you will want to raise the paper supports located behind the Paper Input Bin and the Paper Output Bin. Using paper supports can help prevent unwanted paper curl and paper jams. These supports can be extended for different lengths of paper.
1 Raise the supports on the Paper Input Bin and on the Paper Output Bin until they snap into place.
2 Insert up to 100 sheets of paper into the Paper Input Bin. Be careful not to overfill the bin. The Ready (bottom) light will come on.
3 Center the paper using the paper guides on the Paper Input Bin.
If you want to test your printer, you can print the self-test page. To do so, make sure the Ready (bottom) light is on and all other indicator lights are off. Press and release the Front Panel button. (If the printer is in SleepMode [all lights are off], you will need to press the Front Panel button twice.) The Data (middle) light will come on and the Ready (bottom) light will blink. The self-test page prints.
N o t e
When adding paper to an existing stack in the Paper Input Bin, always remove and realign all paper to avoid multiple paper feeds or paper jams or both.
Up Set 1
EN
Set Up 1-5

Printer Software Information
Before you can use your printer with any software programs, you must first install the printer’s software. Your printer’s software includes two printer drivers that support both Windows® 3.1x and Windows 95. The printer’s software will automatically select the optimal printer driver based on the requirements listed below.
Minimum System Requirements
PCL Driver
∙386 processor
∙4 MB RAM (Windows 3.1x) or
16 MB RAM (Windows 95)
∙5 MB free disk space
Host-Based Driver
∙486 processor
∙8 MB RAM (Windows 3.1x) or
16 MB RAM (Windows 95)
∙10 MB free disk space
∙DOS 5.0
∙Bidirectional communication
Installation Considerations
Some devices (such as a switchbox, zip drive, or software key) connected between the printer and the computer may prevent the printer from sending data back to the computer. If you are using one of these devices, some of your printer’s features will not be available to you, such as the status window.
During installation, if you get the message “HP LaserJet 6L printer has not been found,” check the following:
∙Check the power cord connections and power source.
∙Make sure you are using a high-quality IEEE-1284 compliant parallel cable.
∙Ensure that any devices connected between the printer and the computer (such as a switch box or zip drive) have bidirectional capabilities.
If, after checking the items listed above, you still see the
“HP LaserJet 6L printer has not been found” message, click Continue to proceed with the PCL driver installation.
If the installation could not be successfully completed, see the Alternative Installation instructions later in this chapter.
1-6 Set Up
EN

Installing Your Printer’s Software
The following section lists several different methods of installation. Use the method that is appropriate for your computer system.
Standard Installation for Windows 3.1x
This setup installs the printer software for Windows 3.1x.
1Connect your HP LaserJet 6L printer to your computer using a high-quality IEEE-1284 compliant parallel cable.
2Ensure the power cord is connected to the printer.
3Insert Disk 1 into Drive A: (or B:).
4Select File from the Program Manager and choose Run.
5Type A:SETUP (or B:SETUP) and click OK.
6Follow the instructions on your screen to complete the installation.
7Remove the disk when the installation is complete.
Standard Installation for Windows 95
This setup installs the printer software for Windows 95.
1Click Start, select Shut Down, choose Shut Down the Computer, and click Yes.
2Turn off your computer.
3Connect your HP LaserJet 6L printer to your computer using a high-quality IEEE-1284 compliant parallel cable.
4Ensure the power cord is connected to the printer.
5Turn on your computer and restart Windows 95. The “New Hardware Found” screen appears.
N o t e |
If your computer does not display the “New Hardware Found” screen, |
|
you will need to follow these instructions: 1) Insert disk 1 into Drive A: |
|
(or B:), 2) Select Start, then select Run, 3) Type A:SETUP |
|
(or B:SETUP) and click OK, then 4) Follow the instructions on your |
|
screen. |
6Select “Driver from Disk Provided by Hardware Manufacturer.”
7Click OK. The “Install From Disk” screen appears.
8Insert Disk 1 into Drive A: (or B:) and click OK.
9Follow the instructions on your screen to complete the installation.
10Remove the disk when the installation is complete.
N o t e |
If after installing the software and restarting Windows 95 your computer |
|
displays the screen “New Hardware Detected” and lists the HP LaserJet |
|
6L printer, you will want to select “Do not install a driver (Windows will |
|
not prompt you again)” and click OK. |
|
|
Up Set 1
EN
Set Up 1-7

N o t e
C a u t i o n
Custom versus Typical Installation
During installation, you may see a dialog box asking if you prefer a Typical or a Custom installation. The Typical installation installs all of the HP recommended software.
If you choose to do a Custom installation, you will be asked whether you want to install the host-based driver or the PCL driver. (See the system requirements for the PCL driver and the host-based driver.) If you meet the system requirements and your printer is connected directly to your computer, select the host-based driver. If you meet the system requirements and you are going to access the printer across a network, select the PCL driver.
You will also need to select or clear the HP LaserJet 6L Help files. Select this option if you want to include online help files for your printing software. Finally, you will be asked to select or clear TrueType Fonts. Select this option if you want to install TrueType fonts.
By following the Alternative Installation instructions below, the PCL driver files and some help files will be installed. This setup will not install the status window.
Make sure that you quit all software that is currently running, such as Microsoft® Office Manager, virus checkers, and fax utilities.
Alternative Installation for Windows 3.1x
1Quit all software that is currently running.
2From the Program Manager, open the Main group.
3Open the Control Panel and Printers.
4Click Add. A list of printers will appear on your screen with Install Unlisted or Updated Printer highlighted.
5Click Install.
6Insert Disk 2 and click OK.
7Follow the instructions on your screen to complete the installation.
8Remove the disk when the installation is complete.
Alternative Installation for Windows 95
1Quit all software that is currently running.
2Click Start, then select Settings/Printers.
3Double-click on Add Printer.
4Click Next until you come to the List of Printer Manufacturers.
5Click Have Disk.
6Insert Disk 2 and click OK. The name of the printer driver will appear.
7Click Next. Then click Next again.
8Remove the disk when the installation is complete.
1-8 Set Up
EN

Using Online Help
When you installed your printer software, you also installed online help. Online help contains detailed procedures that guide you through any task you want to perform with your printer. It provides information that is specific to the current printing task. You can access online help by selecting Help in your HP LaserJet 6L program group.
Online help is also a troubleshooting tool. When problems occur, the quickest way to find a solution is to access your online help.
Online help supports the following software topics:
∙Installation—provides installation information.
∙Overview—summarizes information about the printer driver, the status window, and accessing online help.
∙Driver Software—describes options available for your printer, such as number of copies and paper size.
∙Status Window—describes options and features of your printer and gives detailed descriptions of status window messages.
∙Troubleshooting—leads you through a question and answer troubleshooting scenario to determine and resolve problems.
∙How Do I—provides information on printing tasks.
N o t e |
Online help will not be available if you followed the Alternative |
|
Installation instructions. |
|
|
Up Set 1
EN
Set Up 1-9

Installing Memory Cards (DRAM)
Your HP LaserJet 6L printer is capable of accepting any 70ns or faster (such as a 50ns), 5V, DRAM memory card meeting JEIDA specifications.
Hewlett-Packard offers 1-, 2-, and 4-MB
DRAM memory cards.
N o t e
Some printer drivers have an adjustable memory setting. After installing or removing a memory card, this setting may require an adjustment to reflect the new memory total.
1 Unplug the power cord from the printer.
2 Open the Printer Door, remove the toner cartridge, and close the Printer Door. Protect the toner cartridge from light while working on the printer.
3 Gently tip the printer onto its side so that the memory cover is on top.
4 Remove the Memory Expansion Cover by placing a finger through the hole and pulling away from the printer.
5 Align the memory card with the corner notch so it is positioned as shown. Push it firmly into the printer.
Replace the Memory Expansion Cover, set the printer upright, reinstall the toner cartridge, load the paper, and plug the power cord back into the printer.
Print a self-test page to ensure that the printer recognizes the additional memory you have added. Your Total Memory in the “Printer Configuration” section will show the new memory total.
1-10 Set Up
EN

2
Printer Control Panel
Using the Front Panel
The Front Panel consists of one button and three indicator lights.
∙ Error (Amber)
∙ Data (Green)
∙ Ready (Green)
The lights will be in one of the following states:
On
Off
Blinking
EN
Printer Control Panel 2-1

The Front Panel
Use the Front Panel to determine the status of your printer and to accomplish the following tasks:
Status |
Condition |
Cause |
Action |
|
|
|
|
|
|
|
|
No lights are on or blinking. |
Printer is in SleepMode or |
If you wish to print, press |
|
|
|||
|
|
|
power has been |
and release the Front |
|
|
|
||
|
|
|
disconnected. |
Panel button or send the |
|
|
|
||
|
|
|
|
job to print. If no response, |
|
|
|
|
check the power cord. |
|
|
|
|
|
|
|
|
|
|
|
|
Ready light is on steadily. |
Printer is ready to print. |
No action is necessary. |
|
|
|
|
However, if you press and |
|
|
|
|
release the Front Panel |
|
|
|
|
|
|
|
|
|
button, a self-test page will |
|
|
|
|
print. |
|
|
|
|
|
|
|
Data light is on steadily |
Printer is receiving or |
No action is necessary. |
|
|
|||
|
|
and the Ready light is |
processing data. |
|
|
|
|
||
|
|
blinking. |
|
|
|
|
|
|
|
|
|
|
|
|
|
|
|
|
|
|
|
|
|
|
|
|
Data light and Ready light |
Unprinted data is in the |
Press and release the |
|
|
both remain on. |
printer. |
Front Panel button to print |
|
|
|
|
the remaining data. |
|
|
|
|
|
|
|
|
|
|
|
|
|
|
|
|
|
|
|
|
|
|
Data light is blinking. |
Printer is in Manual Feed |
Check that you have |
|
|
|
mode. |
loaded the correct paper. |
|
|
|
|
Then, press and release |
|
|
|
|
|
|
|
|
|
the Front Panel button to |
|
|
|
|
print. |
|
|
|
|
|
|
|
|
|
|
|
|
Error light remains on. |
Printer is out of paper. |
Load paper. |
|
|
|
Printer has a paper jam. |
Clear the paper path. |
|
|
|
||
|
|
|
No toner cartridge. |
Install the toner cartridge. |
|
|
|
||
|
|
|
Printer door is open. |
Close the printer door. |
|
|
|
|
|
|
|
Error light is blinking. |
Page may be too complex |
See Chapter 4, |
|
|
|||
|
|
|
for the printer’s memory |
“Troubleshooting.” |
|
|
|
||
|
|
|
capacity. |
|
|
|
|
|
|
|
|
|
|
|
|
|
|
|
|
|
|
|
|
|
|
|
All lights are on. |
Printer is indicating an |
See Chapter 4, |
|
|
|
internal problem. |
“Troubleshooting.” |
|
|
|
|
|
|
|
|
|
|
|
|
|
|
|
|
|
|
|
|
All three lights are flashing simultaneously.
The memory card may be |
See Chapter 4, |
slower than 70 ns. |
“Troubleshooting.” |
2-2 Printer Control Panel
EN

3
Printing
N o t e
Selecting Print Media
The type of media you select will affect printer performance and print quality.
Selecting Media Types
If available in your area, it is recommended that you use HP LaserJet or HP Multipurpose paper (since it has been designed specifically for use with your printer) or paper meeting HP’s specifications. You can also use recycled paper when the paper meets HP’s requirements. To order HP paper or the HP LaserJet Printer Family Paper Specification Guide, see “Accessories and Supplies Information” in appendix A.
Selecting Media Sizes
The Paper Input Bin can hold up to 100 sheets of 75 g/m2 (20 pound) print media. The Single-Sheet Input Slot is designed to hold one sheet. Both can be adjusted to hold media measuring from 76.2 x 127 mm
(3 x 5 inches) to 215.9 x 355.6 mm (8.5 x 14 inches). This includes, but is not limited to, the following paper and envelope sizes:
∙ Letter (8.5 x 11 in) |
∙ Legal (8.5 x 14 in) |
∙ Executive (7.25 x 10.5 in) |
∙ A4 (210 x 297 mm) |
∙ COM10 Envelopes |
∙ DL Envelopes |
|
(4.125 x 9.5 in) |
(110 x 220 mm) |
∙ C5 Envelopes |
∙ B5 Envelopes |
∙ Monarch Envelopes |
(162 x 229 mm) |
(176 x 250 mm) |
(3.875 x 7.5 in) |
∙Other Custom-Sized Media
Insert all media lengthwise (vertically) into the printer. If you want to print horizontally (landscape), make this selection through your software. Do not print on paper smaller than 76.2 x 127 mm (3 x 5 inches).
EN
Printing 3-1
 Loading...