


 Loading...
HP Color LaserJet Managed E55040dn
User Guide
www.hp.com/videos/LaserJet
www.hp.com/support/colorljE55040

HP Color LaserJet Managed E55040dn
User Guide
Copyright and License
© Copyright 2019 HP Development Company,
L.P.
Reproduction, adaptation, or translation without prior written permission is prohibited, except as allowed under the copyright laws.
The information contained herein is subject to change without notice.
The only warranties for HP products and services are set forth in the express warranty statements accompanying such products and services. Nothing herein should be construed as constituting an additional warranty. HP shall not be liable for technical or editorial errors or omissions contained herein.
Edition 1, 10/2019
Trademark Credits
Adobe®, Adobe Photoshop®, Acrobat®, and PostScript® are trademarks of Adobe Systems Incorporated.
Apple and the Apple logo are trademarks of Apple Inc., registered in the U.S. and other countries.
macOS is a trademark of Apple Inc., registered in the U.S. and other countries.
AirPrint is a trademark of Apple Inc., registered in the U.S. and other countries.
Google™ is a trademark of Google Inc.
Microsoft®, Windows®, Windows® XP, and Windows Vista® are U.S. registered trademarks of Microsoft Corporation.
UNIX® is a registered trademark of The Open Group.

Table of contents
1 Printer overview ........................................................................................................................................................................................ |
1 |
Warning icons ............................................................................................................................................................................ |
1 |
Potential shock hazard ............................................................................................................................................................ |
2 |
Printer views .............................................................................................................................................................................. |
4 |
Printer front view ................................................................................................................................................. |
4 |
Printer back view .................................................................................................................................................. |
5 |
Interface ports ...................................................................................................................................................... |
5 |
Control-panel view ............................................................................................................................................... |
7 |
How to use the touchscreen control panel ................................................................................. |
8 |
Printer specifications ............................................................................................................................................................. |
10 |
Technical specifications .................................................................................................................................... |
10 |
Supported operating systems ......................................................................................................................... |
11 |
Mobile printing solutions .................................................................................................................................. |
13 |
Printer dimensions ............................................................................................................................................ |
13 |
Power consumption, electrical specifications, and acoustic emissions .................................................... |
16 |
Operating-environment range ........................................................................................................................ |
16 |
Printer hardware setup and software installation ............................................................................................................ |
16 |
2 Paper trays .............................................................................................................................................................................................. |
17 |
Introduction ............................................................................................................................................................................. |
17 |
Load paper to Tray 1 (multipurpose tray) .......................................................................................................................... |
18 |
Load Tray 1 (multipurpose tray) ..................................................................................................................... |
18 |
Tray 1 paper orientation ................................................................................................................................... |
19 |
Use alternative letterhead mode .................................................................................................................... |
21 |
Enable Alternative Letterhead Mode by using the printer control-panel menus ............... |
21 |
Load paper to Trays 2, 3, 4, and 5 ....................................................................................................................................... |
22 |
Load Trays 2, 3, 4, and 5 .................................................................................................................................. |
22 |
Trays 2, 3, 4, and 5 paper orientation ............................................................................................................ |
24 |
Use alternative letterhead mode .................................................................................................................... |
25 |
Enable Alternative Letterhead Mode by using the printer control-panel menus ............... |
25 |
Load and print envelopes ..................................................................................................................................................... |
26 |
Introduction ........................................................................................................................................................ |
26 |
ENWW |
iii |
Envelope orientation ......................................................................................................................................... |
26 |
Load and print labels ............................................................................................................................................................. |
27 |
Introduction ........................................................................................................................................................ |
27 |
Manually feed labels ......................................................................................................................................... |
27 |
3 Supplies, accessories, and parts .......................................................................................................................................................... |
29 |
Order supplies, accessories, and parts ............................................................................................................................... |
30 |
Ordering .............................................................................................................................................................. |
30 |
Replace the toner cartridges ................................................................................................................................................ |
31 |
Toner-cartridge information ............................................................................................................................ |
31 |
Remove and replace the cartridges ................................................................................................................ |
32 |
Replace the toner-collection unit ........................................................................................................................................ |
35 |
Toner-collection unit information ................................................................................................................... |
35 |
Remove and replace the toner-collection unit .............................................................................................. |
35 |
4 Print .......................................................................................................................................................................................................... |
39 |
Print tasks (Windows) ............................................................................................................................................................ |
40 |
How to print (Windows) .................................................................................................................................... |
40 |
Automatically print on both sides (Windows) ............................................................................................... |
40 |
Manually print on both sides (Windows) ........................................................................................................ |
41 |
Print multiple pages per sheet (Windows) .................................................................................................... |
41 |
Select the paper type (Windows) .................................................................................................................... |
42 |
Additional print tasks ........................................................................................................................................ |
43 |
Print tasks (macOS) ............................................................................................................................................................... |
44 |
How to print (macOS) ........................................................................................................................................ |
44 |
Automatically print on both sides (macOS) ................................................................................................... |
44 |
Manually print on both sides (macOS) ........................................................................................................... |
45 |
Print multiple pages per sheet (macOS) ........................................................................................................ |
45 |
Select the paper type (macOS) ........................................................................................................................ |
45 |
Additional print tasks ........................................................................................................................................ |
46 |
Store print jobs on the printer to print later or print privately ........................................................................................ |
47 |
Introduction ........................................................................................................................................................ |
47 |
Create a stored job (Windows) ......................................................................................................................... |
47 |
Create a stored job (macOS) ............................................................................................................................ |
48 |
Print a stored job ............................................................................................................................................... |
49 |
Delete a stored job ............................................................................................................................................ |
50 |
Delete a job that is stored on the printer .................................................................................. |
50 |
Change the job storage limit ....................................................................................................... |
50 |
Information sent to printer for Job Accounting purposes ........................................................................... |
50 |
Print from a USB ash drive ................................................................................................................................................. |
51 |
Enable the USB port for printing ..................................................................................................................... |
52 |
iv |
ENWW |
Method one: Enable the USB port from the printer control panel ........................................ |
52 |
Method two: Enable the USB port from the HP Embedded Web Server (network- |
|
connected printers only) .............................................................................................................. |
52 |
Print USB documents ........................................................................................................................................ |
52 |
Print using high-speed USB 2.0 port (wired) ..................................................................................................................... |
54 |
Method one: Enable the high-speed USB 2.0 port from the printer control panel menus ................... |
54 |
Method two: Enable the high-speed USB 2.0 port from the HP Embedded Web Server |
|
(network-connected printers only) ................................................................................................................. |
54 |
5 Manage the printer ................................................................................................................................................................................. |
55 |
Advanced configuration with the HP Embedded Web Server (EWS) .............................................................................. |
56 |
Introduction ........................................................................................................................................................ |
56 |
How to access the HP Embedded Web Server (EWS) .................................................................................. |
56 |
HP Embedded Web Server features ............................................................................................................... |
58 |
Information tab ............................................................................................................................. |
58 |
General tab .................................................................................................................................... |
58 |
Print tab .......................................................................................................................................... |
59 |
Supplies tab ................................................................................................................................... |
60 |
Troubleshooting tab ..................................................................................................................... |
60 |
Security tab .................................................................................................................................... |
60 |
HP Web Services tab ..................................................................................................................... |
61 |
Networking tab .............................................................................................................................. |
61 |
Other Links list ............................................................................................................................... |
63 |
onfigure IP network settings .............................................................................................................................................. |
64 |
Printer sharing disclaimer ................................................................................................................................ |
64 |
View or change network settings ................................................................................................................... |
64 |
Rename the printer on a network ................................................................................................................... |
64 |
Manually configure IPv4 TCP/IP parameters from the control panel ........................................................ |
65 |
Manually configure IPv6 TCP/IP parameters from the control panel ........................................................ |
65 |
Link speed and duplex settings ....................................................................................................................... |
66 |
Printer security features ....................................................................................................................................................... |
68 |
Introduction ........................................................................................................................................................ |
68 |
Security statements .......................................................................................................................................... |
68 |
Assign an administrator password ................................................................................................................. |
69 |
Use the HP Embedded Web Server (EWS) to set the password ............................................ |
69 |
Provide user access credentials at the printer control panel ................................................. |
69 |
IP Security ........................................................................................................................................................... |
70 |
Encryption support: HP High Performance Secure Hard Disks .................................................................. |
70 |
Lock the formatter ............................................................................................................................................ |
70 |
Energy-conservation settings .............................................................................................................................................. |
71 |
Set the sleep timer and configure the printer to use 1 watt or less of power ......................................... |
71 |
ENWW |
v |
Set the sleep schedule ...................................................................................................................................... |
71 |
Set the idle settings .......................................................................................................................................... |
72 |
HP Web Jetadmin ................................................................................................................................................................... |
72 |
Software and firmware updates .......................................................................................................................................... |
72 |
6 Solve problems ....................................................................................................................................................................................... |
73 |
Customer support .................................................................................................................................................................. |
73 |
Control panel help system .................................................................................................................................................... |
74 |
Reset factory settings ........................................................................................................................................................... |
75 |
Introduction ........................................................................................................................................................ |
75 |
Method one: Reset factory settings from the printer control panel ......................................................... |
75 |
Method two: Reset factory settings from the HP Embedded Web Server (network-connected |
|
printers only) ...................................................................................................................................................... |
75 |
A “Cartridge is low” or “Cartridge is very low” message displays on the printer control panel ................................. |
75 |
Printer does not pick up paper or misfeeds ....................................................................................................................... |
77 |
Introduction ........................................................................................................................................................ |
77 |
The printer does not pick up paper ................................................................................................................. |
77 |
The printer picks up multiple sheets of paper .............................................................................................. |
80 |
Clear paper jams ..................................................................................................................................................................... |
84 |
Introduction ........................................................................................................................................................ |
84 |
Jam locations ..................................................................................................................................................... |
84 |
Auto-navigation for clearing paper jams ....................................................................................................... |
85 |
Experiencing frequent or recurring paper jams? .......................................................................................... |
85 |
Clear paper jams in Tray 1 (13.A1) .................................................................................................................. |
85 |
Clear paper jams in Tray 2 (13.A2) .................................................................................................................. |
87 |
Clear paper jams in Tray 3, Tray 4, or Tray 5 (13.A3, 13.A4, 13.A5) ......................................................... |
90 |
Clear paper jams in the right door and fuser area (13.B) ............................................................................ |
93 |
Clear paper jams in the output bin (13.E1) .................................................................................................... |
98 |
Resolving color print quality problems ............................................................................................................................ |
100 |
Introduction ...................................................................................................................................................... |
100 |
Troubleshoot print quality ............................................................................................................................. |
101 |
Update the printer firmware ..................................................................................................... |
101 |
Print from a different software program ................................................................................ |
101 |
Check the paper-type setting for the print job ...................................................................... |
102 |
Check the paper type setting on the printer ..................................................... |
102 |
Check the paper type setting (Windows) ........................................................... |
102 |
Check the paper type setting (macOS) ............................................................... |
102 |
Check toner-cartridge status .................................................................................................... |
103 |
Step one: Print the Supplies Status Page .......................................................... |
103 |
Step two: Check supplies status .......................................................................... |
103 |
Print a cleaning page .................................................................................................................. |
103 |
vi |
ENWW |
Visually inspect the toner cartridge or cartridges ................................................................. |
104 |
Check paper and the printing environment ............................................................................ |
105 |
Step one: Use paper that meets HP specifications .......................................... |
105 |
Step two: Check the environment ....................................................................... |
105 |
Step three: Set the individual tray alignment .................................................... |
105 |
Try a different print driver ......................................................................................................... |
106 |
Troubleshoot color quality ............................................................................................................................. |
107 |
Calibrate the printer to align the colors .................................................................................. |
107 |
Troubleshoot image defects ......................................................................................................................... |
107 |
Solve wired network problems .......................................................................................................................................... |
116 |
Introduction ...................................................................................................................................................... |
116 |
Poor physical connection ............................................................................................................................... |
116 |
The computer is unable to communicate with the printer ....................................................................... |
116 |
The printer is using incorrect link and duplex settings for the network ................................................. |
117 |
New software programs might be causing compatibility problems ....................................................... |
117 |
The computer or workstation might be set up incorrectly ....................................................................... |
117 |
The printer is disabled, or other network settings are incorrect ............................................................. |
117 |
Index ........................................................................................................................................................................................................... |
119 |
ENWW |
vii |
viii |
ENWW |
1Printer overview
Review the location of features on the printer, the physical and technical specifications of the printer, and where to locate setup information.
●Warning icons
●Potential shock hazard
●Printer views
●Printer specifications
●Printer hardware setup and software installation For video assistance, see www.hp.com/videos/LaserJet.
The following information is correct at the time of publication. For current information, see www.hp.com/ support/colorljE55040.
For more information:
HP's all-inclusive help for the printer includes the following information:
●Install and configure
●Learn and use
●Solve problems
●Download software and firmware updates
●Join support forums
●Find warranty and regulatory information
Warning icons
Use caution if you see a warning icon on your HP printer, as indicated in the icon definitions.
●Caution: Electric shock
ENWW |
1 |

●Caution: Hot surface
●Caution: Keep body parts away from moving parts
●Caution: Sharp edge in close proximity
●Warning
Potential shock hazard
Review this important safety information.
2 Chapter 1 Printer overview |
ENWW |
●Read and understand these safety statements to avoid an electrical shock hazard.
●Always follow basic safety precautions when using this product to reduce risk of injury from fire or electric shock.
●Read and understand all instructions in the user guide.
●Observe all warnings and instructions marked on the product.
●Use only a grounded electrical outlet when connecting the product to a power source. If you do not know whether the outlet is grounded, check with a qualified electrician.
●Do not touch the contacts on any of the sockets on the product. Replace damaged cords immediately.
●Unplug this product from wall outlets before cleaning.
●Do not install or use this product near water or when you are wet.
●Install the product securely on a stable surface.
●Install the product in a protected location where no one can step on or trip over the power cord.
ENWW |
Potential shock hazard 3 |

Printer views
Identify certain parts of the printer and the control panel.
●Printer front view
●Printer back view
●Interface ports
●Control-panel view
Printer front view
Locate features on the front of the printer.
1 |
2 |
3 |
|
|
4 |
10 |
5 |
|
|
9 |
6 |
|
|
8 |
|
|
7 |
Number Item
1Standard output bin
2Control panel with color touchscreen display
3Hardware integration pocket for connecting accessory and third-party devices
4Easy-access USB port
Insert a USB ash drive for printing without a computer or to update the printer firmware.
NOTE: An administrator must enable this port before use.
5Right door (access to the fuser and for clearing jams)
6Tray 1
7Model name
8Tray 2
9Front door (access to the toner cartridges)
10 |
n/off button |
|
|
4 Chapter 1 Printer overview |
ENWW |

Printer back view
Locate features on the back of the printer.
 1 5
1 5 


 2
2
4 


 3
3
Number Item
1Toner-collection-unit door
2Formatter (contains the interface ports)
3Power connection
4Serial number and product number label
5Formatter cover
Interface ports
Locate the interface ports on the printer formatter.
1 2
3
Number Item
1Local area network (LAN) Ethernet (RJ-45) network port
ENWW |
Printer views 5 |

Number Item
2Hi-Speed USB 2.0 printing port
3USB port for connecting external USB devices (this port might be covered) NOTE: For easy-access USB printing, use the USB port near the control panel.
6 Chapter 1 Printer overview |
ENWW |
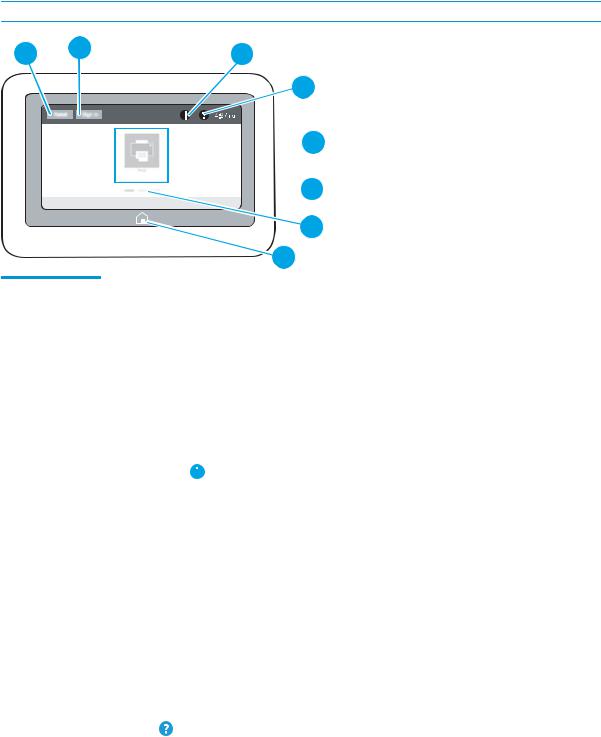
Control-panel view
The Home screen provides access to the printer features and indicates the current status of the printer.
●How to use the touchscreen control panel
Return to the Home screen at any time by selecting the Home button.
 NOTE: The features that appear on the Home screen can vary, depending on the printer configuration.
1
2 |
3 |
4
 5
5
 6
6
7
8
Number |
Item |
Description |
|||
|
|
|
|||
1 |
Reset button |
Select the Reset button to clear changes, release the printer from a |
|||
|
|
|
|
paused state, display the Message Center if there are errors, and |
|
|
|
|
|
restore the default settings. |
|
|
|
|
|||
2 |
Sign In or Sign Out button |
Select the Sign In button to access secured features. |
|||
|
|
|
|
Select the Sign Out button to sign out of the printer. The printer |
|
|
|
|
|
restores all options to the default settings. |
|
|
|
|
|
NOTE: This button displays only if the administrator has |
|
|
|
|
|
configured the printer to require permission for access to features. |
|
|
|
|
|
|
|
3 |
Information button |
|
|
Select the Information button to access a screen that provides |
|
|
|||||
|
|
|
|
access to several types of printer information. Select the following |
|
|
|
|
|
buttons on the Information screen for printer information: |
|
|
|
|
|
● |
Display Language: Change the language setting for the |
|
|
|
|
|
current user session. |
|
|
|
|
● |
Sleep Mode: Place the printer into sleep mode. |
|
|
|
|
● |
Wi-Fi Direct: View information for how to connect directly to |
|
|
|
|
|
the printer using a phone, tablet, or other device with Wi-Fi. |
|
|
|
|
● |
Wireless: View or change wireless connection settings |
|
|
|
|
|
(wireless accessory equipped models only). |
|
|
|
|
● |
Ethernet: View or change Ethernet connection settings. |
|
|
|
|
● |
HP Web Services: View information to connect and print to the |
|
|
|
|
|
printer using HP Web Services (ePrint). |
|
|
|
|||
4 |
Help button |
Select the Help button to open the embedded help system. |
|||
|
|
|
|
|
|
ENWW |
Printer views 7 |

Number |
Item |
Description |
|
|
|
5 |
Current time |
Displays the current time. |
|
|
|
6 |
Applications area |
Select any of the icons to open the application. Swipe the screen |
|
|
sideways to access more applications. |
|
|
NOTE: The available applications vary by printer. The |
|
|
administrator can configure which applications appear and the |
|
|
order in which they appear. |
|
|
|
7 |
Home-screen page indicator |
Indicates the number of pages on the Home screen or in an |
|
|
application. The current page is highlighted. Swipe the screen |
|
|
sideways to scroll between pages. |
|
|
|
8 |
Home button |
Select the Home button to return to the Home screen. |
|
|
|
How to use the touchscreen control panel
Perform the following actions to use the printer touchscreen control panel.
Table 1-1 Touchscreen control panel actions
Action |
Description |
Example |
|
|
|
|
|
Touch |
Touch an item on the screen to select that item |
Touch the Settings icon to open the Settings app. |
|
|
|
or open that menu. Also, when scrolling through |
|
|
|
menus, brie y touch the screen to stop the |
|
|
|
scrolling. |
|
|
|
|
|
|
|
|
|
8 Chapter 1 Printer overview |
ENWW |
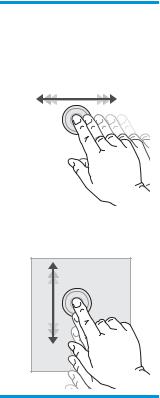
Table 1-1 Touchscreen control panel actions (continued)
Action |
Description |
Example |
|
|
|
|
|
Swipe |
Touch the screen and then move your finger |
Swipe until the Settings app displays. |
|
|
|
horizontally to scroll the screen sideways. |
|
|
|
|
|
|
|
|
|
|
|
|
|
Scroll Touch the screen and then move your finger Scroll through the Settings app. vertically to scroll the screen up and down. When
scrolling through menus, brie y touch the screen to stop the scrolling.
ENWW |
Printer views 9 |

Printer specifications
Determine the specifications for your printer model.
●Technical specifications
●Supported operating systems
●Mobile printing solutions
●Printer dimensions
●Power consumption, electrical specifications, and acoustic emissions
●Operating-environment range
 IMPORTANT: The following specifications are correct at the time of publication, but they are subject to change. For current information, see www.hp.com/support/colorljE55040.
Technical specifications
Review the printer technical specifications.
Product numbers for each model
● |
E55040dn - #3GX99A |
|
Table 1-2 Paper handling specifications |
|
|
|
|
|
Paper handling features |
E55040dn |
|
|
|
|
Tray 1 (100-sheet capacity) |
Included |
|
|
|
|
Tray 2 (550-sheet capacity) |
Included |
|
|
|
|
Tray 3 (1 x 550-sheet paper feeder) |
Optional |
|
NOTE: Can accept up to three 1 x 550-sheet paper feeders. |
|
|
|
|
|
Printer stand |
Optional |
|
|
|
|
Automatic duplex printing |
Included |
|
|
|
|
Table 1-3 Connectivity specifications |
|
|
|
|
|
Connectivity features |
E55040dn |
|
|
|
|
10/100/1000 Ethernet LAN connection with IPv4 and IPv6 |
Included |
|
|
|
|
Hi-Speed USB 2.0 |
Included |
|
|
|
|
Easy-access USB port for printing from a USB Flash/thumb drive |
Included |
|
|
|
|
Hardware Integration Pocket for connecting accessory and third-party devices |
Included |
|
|
|
|
HP Internal USB Ports |
Optional |
|
|
|
|
HP Jetdirect 3000w Accessory for Wi-Fi, NFC, and proximity card reader |
Optional |
|
|
|
|
10 Chapter 1 Printer overview |
ENWW |
Table 1-3 Connectivity specifications (continued)
Connectivity features |
E55040dn |
|
|
HP Jetdirect 3100w Accessory for Wi-Fi, NFC, BLE, and proximity card reader |
Optional |
NOTE: The HP Jetdirect 3000w NFC/ and the 3100w BLE/NFC Wireless Accessories require |
|
the HP Internal USB ports accessory (B5L28A) or must be connected via the rear host USB |
|
port. |
|
|
|
Integrated HP and Wi-Fi Direct functionality for printing from mobile devices |
Not included |
|
|
HP Jetdirect 2900nw Print Server accessory for Wi-Fi and second Ethernet port |
Optional |
|
|
Table 1-4 Print specifications
Print features |
E55040dn |
|
|
Prints 38 pages per minute (ppm) on A4 and 40 ppm on letter-size paper |
Included |
|
|
Easy-access USB port for printing from a USB Flash/thumb drive |
Included |
|
|
Store jobs in the printer memory to print later or print privately |
Optional |
|
|
Table 1-5 Other specifications
Other features |
E55040dn |
|
|
Memory: 1 GB base memory |
Included |
NOTE: Memory reported on configuration page will change from 1 GB to 2 GB with |
|
optional 1 GB Slim DIMM installed (G6W84A) |
|
|
|
Storage: 8GB eMMC |
Included |
|
|
Security: HP Trusted Platform Module (TPM) |
Optional |
|
|
Control-panel display: 4.3 in color touchscreen |
Included |
|
|
Supported operating systems
Use the following information to ensure printer compatibility with your computer operating system.
Linux: For information and print drivers for Linux, go to www.hp.com/go/linuxprinting.
UNIX: For information and print drivers for UNIX®, go to www.hp.com/go/unixmodelscripts.
The following information applies to the printer-specific Windows HP PCL 6 print drivers, HP print drivers for macOS, and to the software installer.
Windows: Download HP Easy Start from 123.hp.com/LaserJet to install the HP print driver. Or, go to the printersupport website for this printer: www.hp.com/support/colorljE55040 to download the print driver or the software installer to install the HP print driver.
macOS: Mac computers are supported with this printer. Download HP Easy Start either from 123.hp.com/ LaserJet or from the printer support page, and then use HP Easy Start to install the HP print driver.
ENWW |
Printer specifications 11 |

1.Go to 123.hp.com/LaserJet.
2.Follow the steps provided to download the printer software.
Table 1-6 Supported operating systems and print drivers
Operating system |
Print driver (for Windows, or the installer on the web for macOS) |
|
|
Windows 7, 32-bit and 64-bit |
The “HP PCL 6” printer-specific print driver is installed for this operating system as part of |
|
the software installation. |
|
|
Windows 8.1, 32-bit and 64-bit |
The “HP PCL-6” V4 printer-specific print driver is installed for this operating system as part |
|
of the software installation. |
|
|
Windows 10, 32-bit and 64-bit |
The “HP PCL-6” V4 printer-specific print driver is installed for this operating system as part |
|
of the software installation. |
|
|
Windows Server 2008 R2, SP 1, 64-bit |
The PCL 6 printer-specific print driver is available for download from the printer-support |
|
website. Download the driver, and then use the Microsoft Add Printer tool to install it. |
|
|
Windows Server 2012, 64-bit |
The PCL 6 printer-specific print driver is available for download from the printer-support |
|
website. Download the driver, and then use the Microsoft Add Printer tool to install it. |
|
|
Windows Server 2012 R2, 64-bit |
The PCL 6 printer-specific print driver is available for download from the printer-support |
|
website. Download the driver, and then use the Microsoft Add Printer tool to install it. |
|
|
Windows Server 2016, 64-bit |
The PCL 6 printer-specific print driver is available for download from the printer-support |
|
website. Download the driver, and then use the Microsoft Add Printer tool to install it. |
|
|
Windows Server 2019, 64-bit |
The PCL 6 printer-specific print driver is available for download from the printer-support |
|
website. Download the driver, and then use the Microsoft Add Printer tool to install it. |
|
|
macOS 10.13 High Sierra, macOS 10.14 |
Download HP Easy Start from 123.hp.com/LaserJet, and then use it to install the print |
Mojave |
driver. |
|
|
 NOTE: Supported operating systems can change.


 NOTE: For a current list of supported operating systems and HP’s all-inclusive help for the printer, go to www.hp.com/support/colorljE55040.


 NOTE: For details on client and server operating systems and for HP UPD driver support for this printer, go to www.hp.com/go/upd. Under Additional information, click Specifications.
Table 1-7 Minimum system requirements
Windows |
macOS |
||
|
|
|
|
● |
Internet connection |
● |
Internet connection |
● |
Dedicated USB 1.1 or 2.0 connection or a network connection |
● |
Dedicated USB 1.1 or 2.0 connection or a network connection |
● |
2 GB of available hard-disk space |
● |
1.5 GB of available hard-disk space |
●1 GB RAM (32-bit) or 2 GB RAM (64-bit)
12 Chapter 1 Printer overview |
ENWW |

 NOTE: The Windows software installer installs the HP Smart Device Agent Base service. The file size is less than 100 kb. Its only function is to check for printers connected via USB hourly. No data is collected. If a USB printer is found, it then tries to locate a JetAdvantage Management Connector (JAMc) instance on the network. If a JAMc is found, the HP Smart Device Agent Base is securely upgraded to a full Smart Device Agent from JAMc, which will then allow printed pages to be accounted for in a Managed Print Services (MPS) account. The driver-only web packs downloaded from www.hp.com for the printer and installed through the Add Printer wizard do not install this service.
To uninstall the service, open the Control Panel, select Programs or Programs and Features, and then select Add/ Remove Programs or Uninstall a Program to remove the service. The file name is HPSmartDeviceAgentBase.
Mobile printing solutions
HP offers multiple mobile printing solutions to enable easy printing to an HP printer from a laptop, tablet, smartphone, or other mobile device.
To see the full list and to determine the best choice, go to www.hp.com/go/MobilePrinting.
 NOTE: Update the printer firmware to ensure all mobile printing capabilities are supported.
●Wi-Fi Direct (wireless models only, with HP Jetdirect 3100w BLE/NFC/Wireless accessory installed)
●HP ePrint via email (Requires HP Web Services to be enabled and the printer to be registered with HP Connected)
●HP Smart app
●Google Cloud Print
●AirPrint
●Android Printing
●HP Roam
Printer dimensions
Make sure your printer environment is large enough to accommodate the printer.
ENWW |
Printer specifications 13 |

Figure 1-1 Printer dimensions
|
|
1 |
|
1 |
|
|
|
|
|
3 |
2 |
|
|
|
|
|
|
3 |
2 |
|
|
|
|
|
Dimension |
Printer fully closed |
|
|
Printer fully opened |
1. Height |
399 mm (15.7 in) |
|
|
399 mm (15.7 in) |
2. Depth |
479 mm (18.9 in) |
|
|
771 mm (30.4 in) |
3. Width |
458 mm (18.0 in) |
|
|
826 mm (32.5 in) |
Weight |
27.5 kg (60.6 lb) |
|
|
27.5 kg (60.6 lb) |
Figure 1-2 Dimensions for the 1 x 550-sheet paper feeder
1
3 |
2 |
3 |
2 |
Dimension |
Accessory fully closed |
Accessory fully open |
|
|
|
1. Height |
130 mm (5.1 in) |
130 mm (5.1 in) |
|
|
|
2. Depth |
458 mm (18.0 in) |
771 mm (30.4 in) |
|
|
|
3. Width |
458 mm (18.0 in) |
853 mm (33.6 in) |
|
|
|
Weight |
5.8 kg (12.8 lb) |
5.8 kg (12.8 lb) |
|
|
|
14 Chapter 1 Printer overview |
ENWW |

Figure 1-3 Dimensions for the printer cabinet and stand
|
|
1 |
3 |
2 |
|
2 |
|
|
Dimension |
Accessory fully closed |
Accessory fully open |
1. Height |
295 mm (11.6 in) |
295 mm (11.6 in) |
2. Depth |
465 mm (18.3 in) |
900 mm (35.4 in) |
3. Width |
460 mm (18.1 in) |
460 mm (18.1 in) |
|
This value is subject to change. For current |
|
|
information, go to www.hp.com/support/ |
|
|
colorljE55040. |
|
Weight |
17.7 kg (39 lb) |
17.7 kg (39 lb) |
This value is subject to change. For current information, go to www.hp.com/support/ colorljE55040.
This value is subject to change. For current information, go to www.hp.com/support/ colorljE55040.
Figure 1-4 Dimensions for the printer with one 1 x 550-sheet tray and the cabinet/stand
1 |
1 |
|
3 |
2 |
|
|
3 |
2 |
Dimension |
Printer and accessories fully closed |
Printer and accessories fully opened |
1. Height |
876 mm (34.5 in) |
876 mm (34.5 in) |
2. Depth |
479 mm (18.9 in) |
900 mm (35.4 in) |
ENWW |
Printer specifications 15 |

Dimension |
Printer and accessories fully closed |
Printer and accessories fully opened |
|
|
|
3. Width |
458 mm (18.0 in) |
853 mm (33.6 in) |
|
|
|
Weight |
51.1 kg (112.7 lb) |
51.1 kg (112.7 lb) |
|
|
|
Power consumption, electrical specifications, and acoustic emissions
In order to operate properly, the printer must be in an environment that meets certain power specifications.
See www.hp.com/support/colorljE55040 for current information.
 CAUTION: Power requirements are based on the country/region where the printer is sold. Do not convert operating voltages. This will damage the printer and void the printer warranty.
Operating-environment range
In order to operate properly, the printer must be in an environment that meets certain specifications.
Table 1-8 Operating-environment specifications
Environment |
Recommended |
Allowed |
|
|
|
Temperature |
17° to 25°C (62.6° to 77°F) |
10° to 32.5°C (50° to 91°F) |
|
|
|
Relative humidity |
30% to 70% relative humidity (RH) |
10% to 80% RH |
|
|
|
Printer hardware setup and software installation
For basic setup instructions, see the Hardware Installation Guide that came with the printer. For additional instructions, go to HP support on the web.
Go to www.hp.com/support/colorljE55040 for HP's all-inclusive help for the printer, which includes the following information:
●Install and configure
●Learn and use
●Solve problems
●Download software and firmware updates
●Join support forums
●Find warranty and regulatory information
●Find instructions about how to use the Microsoft Add Printer tool
16 Chapter 1 Printer overview |
ENWW |

2Paper trays
Discover how to load and use the paper trays, including how to load special items such as envelopes and labels.
●Introduction
●Load paper to Tray 1 (multipurpose tray)
●Load paper to Trays 2, 3, 4, and 5
●Load and print envelopes
●Load and print labels
For video assistance, see www.hp.com/videos/LaserJet.
The following information is correct at the time of publication. For current information, see www.hp.com/ support/colorljE55040.
For more information:
HP's all-inclusive help for the printer includes the following information:
●Install and configure
●Learn and use
●Solve problems
●Download software and firmware updates
●Join support forums
●Find warranty and regulatory information
Introduction
Use caution when loading the paper trays.
 CAUTION: Do not extend more than one paper tray at a time.
Do not use paper tray as a step.
All trays must be closed while moving the printer.
Keep hands out of paper trays or drawers when closing.
ENWW |
17 |

Load paper to Tray 1 (multipurpose tray)
The following information describes how to load paper into Tray 1.
●Load Tray 1 (multipurpose tray)
●Tray 1 paper orientation
●Use alternative letterhead mode
 CAUTION: To avoid jams, never add or remove paper from Tray 1 during printing.
Load Tray 1 (multipurpose tray)
Tray 1 holds up to 100 sheets of 75 g/m2 (20 lb) paper or 10 envelopes.
1.Open Tray 1.
2. Pull out the tray extension to support the paper.
18 Chapter 2 Paper trays |
ENWW |
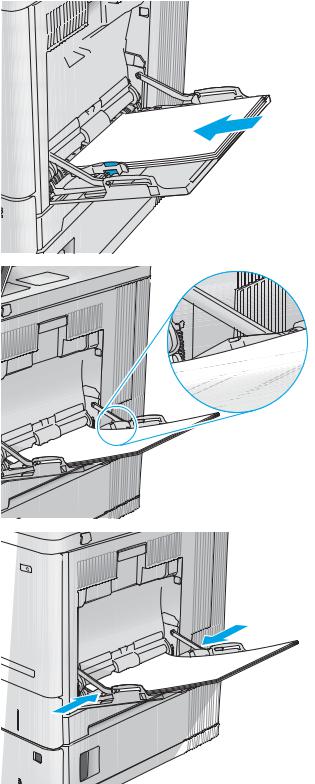
3.Spread the paper guides to the correct size, and then load paper in the tray. For information about how to orient the paper, see Tray 1 paper orientation on page 19.
4.Make sure that the paper fits under the fill line on the paper guides.
5.Adjust the side guides so that they lightly touch the paper stack, but do not bend it.
Tray 1 paper orientation
|
When using paper that requires a specific orientation, load it according to the information in the following table. |
ENWW |
Load paper to Tray 1 (multipurpose tray) 19 |

 NOTE: The Alternative Letterhead Mode settings affects the way to load letterhead or preprinted paper. This setting is disabled by default. When using this mode, load paper as for automatic duplex printing. For more information, see Use alternative letterhead mode on page 21.
Table 2-1 Tray 1 paper orientation
Paper type |
Image Orientation |
Single-sided printing |
Duplex printing or with Alternative Letterhead |
|
|
|
Mode enabled |
Letterhead or |
Portrait |
Face-down |
Face-up |
preprinted |
|
Top edge leading into the product |
Bottom edge leading into the product |
|
|
|
|
123 |
Letterhead or |
Landscape |
Face-down |
preprinted |
|
Top edge toward the back of the product |
|
|


 123
123
Face-up
Top edge toward the back of the product
 123
123


 123
123
Prepunched |
Portrait or landscape |
Holes toward the back of the product |
Holes toward the back of the product |
20 Chapter 2 Paper trays |
ENWW |
Loading...