


 Loading...
hp LaserJet 9000
9000n•9000dn•9000hns
start start aloitus innføring inledning

HP LaserJet 9000, 9000n, 9000dn, and 9000hns printers
Start
Copyright © Hewlett-Packard
Company 2001
All Rights Reserved. Reproduction, adaptation, or translation without prior written permission is prohibited, except as allowed under the copyright laws.
Publication number
C8519-90904
First Edition, May 2001
Warranty
The information contained in this document is subject to change without notice.
Hewlett-Packard makes no warranty of any kind with respect to this information. HEWLETT-PACKARD SPECIFICALLY DISCLAIMS THE IMPLIED WARRANTY OF MERCHANTABILITY AND FITNESS FOR A PARTICULAR PURPOSE.
Hewlett-Packard shall not be liable for any direct, indirect, incidental, consequential, or other damage alleged in connection with the furnishing or use of this information.
Trademark Credits
Microsoft, MS Windows, Windows and Windows NT are U.S. registered trademarks of Microsoft Corporation.
All other products mentioned herein may be trademarks of their respective companies.
Hewlett-Packard Company
11311 Chinden Boulevard
Boise, Idaho 83714 U.S.A.

Printer setup
English
Contents
Introduction . . . . . . . . . . . . . . . . . . . . . . . . . . . . . . . . . . . . . . . 4 Installation checklist . . . . . . . . . . . . . . . . . . . . . . . . . . . . . . . . 5 Prepare printer location . . . . . . . . . . . . . . . . . . . . . . . . . . . . . . 6 Check package contents . . . . . . . . . . . . . . . . . . . . . . . . . . . . . 8 Locate printer parts . . . . . . . . . . . . . . . . . . . . . . . . . . . . . . . . . 9 Remove internal packaging . . . . . . . . . . . . . . . . . . . . . . . . . . 10 Install accessories . . . . . . . . . . . . . . . . . . . . . . . . . . . . . . . . . 11 Install print cartridge . . . . . . . . . . . . . . . . . . . . . . . . . . . . . . . 12 Load Trays 2 and 3 . . . . . . . . . . . . . . . . . . . . . . . . . . . . . . . . 14 Connect printer cables . . . . . . . . . . . . . . . . . . . . . . . . . . . . . 16
Connecting a parallel cable . . . . . . . . . . . . . . . . . . . . . 17 Connecting to Ethernet 10/100Base-TX network . . . . 18 Connect power cord . . . . . . . . . . . . . . . . . . . . . . . . . . . . . . . 19 Change the control panel overlay . . . . . . . . . . . . . . . . . . . . . 20 Configure the control panel display language . . . . . . . . . . . . 22 Print a configuration page . . . . . . . . . . . . . . . . . . . . . . . . . . . 23 Install printing software . . . . . . . . . . . . . . . . . . . . . . . . . . . . . 24 Installing Windows printing software . . . . . . . . . . . . . . 25 Installing Macintosh printing software . . . . . . . . . . . . . 26 Verify printer setup . . . . . . . . . . . . . . . . . . . . . . . . . . . . . . . . 27 Customer support options worldwide . . . . . . . . . . . . . . . . . . 28 Warranty and regulatory information . . . . . . . . . . . . . . . . . . . 31 Hewlett-Packard limited warranty statement . . . . . . . . 31 Limited warranty for print cartridge life. . . . . . . . . . . . . 33 HP software license terms. . . . . . . . . . . . . . . . . . . . . . 34 FCC regulations. . . . . . . . . . . . . . . . . . . . . . . . . . . . . . 36 Safety information . . . . . . . . . . . . . . . . . . . . . . . . . . . . 38
Declaration of Conformity . . . . . . . . . . . . . . . . . . . . . . . . . . . 40
ENWW |
Contents 3 |

Introduction
Congratulations on your purchase of the HP LaserJet 9000 Series printer. This series of printers is available in four configurations.
HP LaserJet 9000 printer
The HP LaserJet 9000 printer (product number C8519A) comes standard with 64 Megabyte (MB) RAM, wide-format printing, and two 500-sheet trays.
Note |
The HP LaserJet 9000 requires an optional enhanced input/ |
|
output (EIO) card to connect to a network. |
|
|
HP LaserJet 9000n printer
The HP LaserJet 9000n printer (product number C8520A) comes standard with 64 MB RAM, wide-format printing, two 500-sheet trays, a 100-sheet multipurpose tray (optional Tray 1), and an optional
HP Jetdirect print server.
HP LaserJet 9000dn printer
 The HP LaserJet 9000dn printer (product number C8521A) comes standard with 64 MB RAM, wide-format printing, two 500-sheet trays, a 100-sheet multipurpose tray (optional Tray 1), an optional
HP Jetdirect print server, and an optional duplex printing accessory (for printing on both sides of paper).
HP LaserJet 9000hns printer
The HP LaserJet 9000hns printer (product number C8522A) contains the HP LaserJet 9000dn, a 2,000-sheet input tray (optional Tray 4), and an optional 3,000-sheet stapler/stacker or an optional 3,000sheet stacker.
4 Printer setup |
ENWW |

Installation checklist
This guide will help you set up and install your new printer. For proper installation, please complete each section in order:
● |
Unpack the printer |
steps 1-4 |
● |
Install the printer |
steps 5-12 |
● |
Install printing software |
step 13 |
● |
Verify printer setup |
step 14 |
WARNING! The printer is heavy. HP recommends that four people move it to avoid injury to you and damage to the printer.
English
ENWW |
Installation checklist 5 |
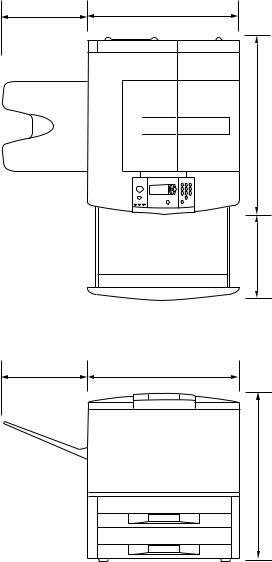
Step 1 Prepare printer location
Printer size
Prepare a location for the printer that allows for these physical and environmental requirements:
352.8 mm |
|
(13.9 in) |
638 mm (25.1 in) |
in) 9.(24 mm 633
mm 368 in) 8.(17
352.8 mm |
|
(13.9 in) |
638 mm (25.1 in) |
in) 6.(23 mm 600
HP LaserJet 9000 Printer Dimensions (top and side views)
6 Printer setup |
ENWW |

Location requirements for the printer
●A level area on the floor
●Space allowance around the printer
●A well-ventilated room
●No exposure to direct sunlight or chemicals, including ammonia-based cleaning solutions
●Adequate power supply (15A, 110V or 220V circuit located near the printer)
●A stable environment—no abrupt temperature or humidity changes
●Relative humidity 20 percent to 80 percent
●Room temperature 50 °F to 91 °F (10 °C to 32.5 °C)
Printer weight (without print cartridge)
●HP LaserJet 9000 printer: 63.5 kg (140 lb)
●HP LaserJet 9000n printer: 69.4 kg (153 lb)
●HP LaserJet 9000dn printer: 76.2 kg (168 lb)
●HP LaserJet 9000hns printer: 76.2 kg (168 lb)
English
ENWW |
Prepare printer location 7 |

Step 2 Check package contents
power cord
face-up output bin
printer
control panel
overlay
printer documentation (this manual)
print cartridge
printer software CD-ROM (including user manual)
Package Contents
8 Printer setup |
ENWW |
Step 3 Locate printer parts
The following illustrations give the location and names of the important printer parts.
E
A |
|
B |
|
C |
F |
|
|
D |
G |
|
I

 J
J
H 

K
L
 M
M
Printer Parts (front and rear views)
A |
Face-up bin |
F |
Front door |
J |
Foreign interface |
|
B |
Control panel |
G |
Tray 3 |
|
harness (AUX) |
|
|
|
|||||
C |
Tray 2 |
H |
EIO slots (3) |
K |
HP Fast InfraRed (FIR) |
|
|
Connect |
|||||
D |
Power switch |
I |
Parallel cable |
|
||
L |
HP JetLink connector |
|||||
E |
Standard output bin |
|
connector |
|||
|
|
|
||||
|
|
M |
Power cord connector |
|||
|
(Face-down bin) |
|
|
|||
|
|
|
|
|
English
ENWW |
Locate printer parts 9 |

Step 4 Remove internal packaging
Remove all packaging from the printer.
WARNING! This printer weighs approximately 63.5 kg (140 lb). HP recommends that four people move it to avoid injury to you and damage to the printer.
To remove internal packaging
1Remove all orange packing material from the exterior of the printer and remove any cardboard or styrofoam material that is not orange.
2Remove all orange packing material from the standard output bin and the protective film from the display.
3Open the left-side door and remove the two packing fuser spacers. Orange tape connects fuser spacers to the outside of left door. Remove the orange tape from the fuser shipping locks to the outside of the door. Close the door after removing the fuser spacers and the tape.
4Open the trays, remove any orange packing material, and close the trays.
5Open the front door and remove the orange packing tape at the front transfer roller area and on the lock lever for the print cartridge. Close the door.
Note |
Save all packing material. You may need it to repack the printer at a |
|
later date. |
|
|
10 Printer setup |
ENWW |
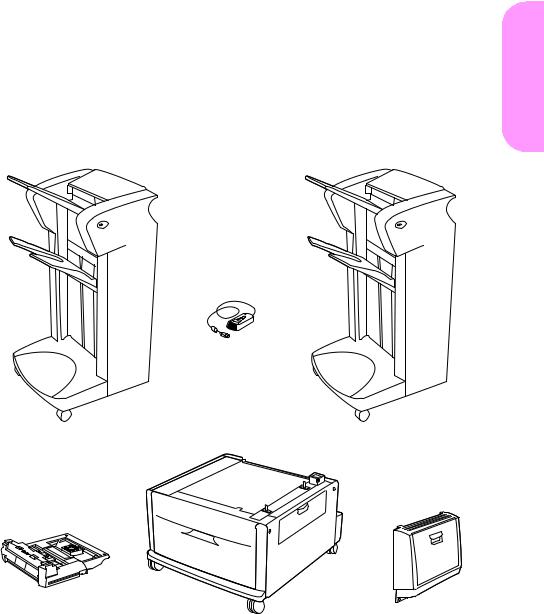
Step 5 Install accessories
Install any paper-handling accessories that you purchased with the printer or separately. Use the installation instructions that are packaged with the accessories.
If you have a 3,000-sheet stapler/stacker (or stacker) and a duplexer, Tray 4, or both, install the duplexer and Tray 4 before trying to install the 3,000 sheet stapler/stacker (or stacker).
English
HP Fast InfraRed
Connect
3,000-sheet stapler/stacker |
3,000-sheet stacker |
Duplex printing |
Tray 4 (2,000- |
|
|
sheet input |
Tray 1 (multipurpose |
||
accessory |
|||
(duplexer) |
tray) |
tray) |
Optional Accessories
ENWW |
Install accessories 11 |
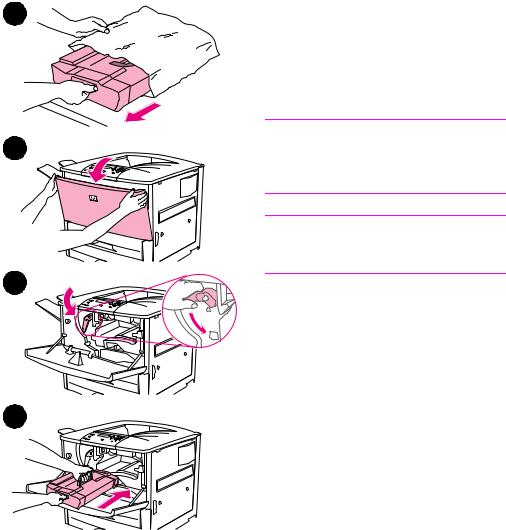
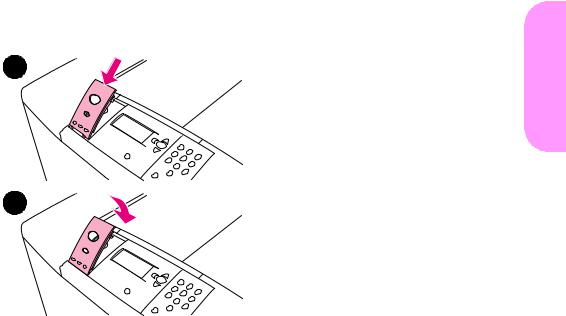
Step 6 Install print cartridge
1
2
3
4
Use this procedure to install the print cartridge. If toner gets on your clothing, wipe it off with a dry cloth and wash the clothing in cold water. Hot water sets toner into fabric.
To install the print cartridge
1 Before removing the print cartridge from its packaging, set the print cartridge on a sturdy surface. Gently slide the print cartridge out of the packaging.
CAUTION
To prevent damage to the print cartridge, use two hands when removing it from its packaging.
Note
The print cartridge does not have a pull tab.
2 Open the front door on the printer.
3 Rotate the lever downward to the unlock position.
4 Position the cartridge as shown with the arrow on the left side pointing into the printer and align it with the printer guides. Slide the cartridge into the printer as far as it will go.
12 Printer setup |
ENWW |
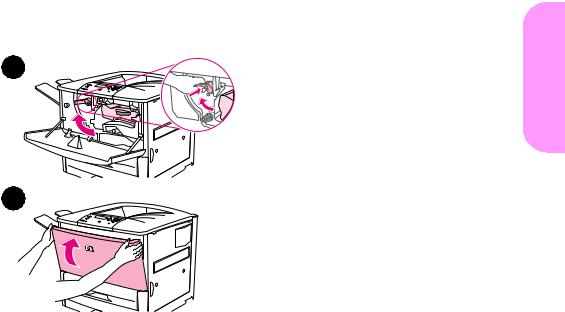
5
6
5Press the button on the green lever, and turn the lever clockwise to the locked position.
6Close the front door.
English
ENWW |
Install print cartridge 13 |
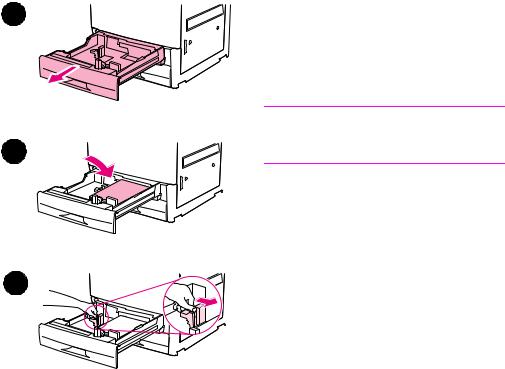
Step 7 Load Trays 2 and 3
1
2
3
This section describes how to load A4or letter-size paper. For instructions on loading and configuring other sizes and types of media, see the HP LaserJet 9000 Introduce manual (user guide) that came on the CD-ROM.
CAUTION
To avoid a paper jam, never open a tray while the printer is printing from that tray.
To load Tray 2 and Tray 3
1Pull the tray open until it stops.
2Load a stack of Letteror A4-size paper with the top of the stack toward the rear of the tray. For single-sided printing, the side to be printed should be down. For doublesided printing, the first side to be printed should be up.
3Adjust the left (Y) paper guide by pressing the tab on the guide and sliding it to the mark for A4or lettersize paper.
14 Printer setup |
ENWW |
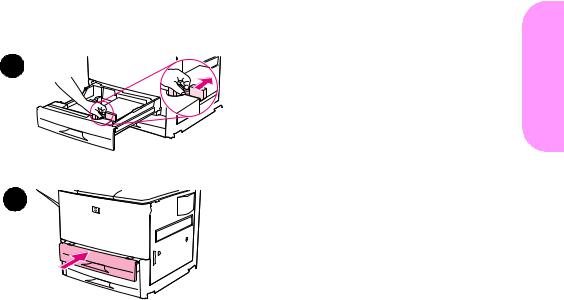
4
5
4Adjust the front (X) paper guide by pressing the tab on the guide and sliding it to the mark for A4or lettersize paper.
5Close the tray until it stops.
6Repeat steps 1 through 5 to load the other tray.
English
ENWW |
Load Trays 2 and 3 15 |

Step 8 Connect printer cables
The printer can connect to a computer using a parallel cable, or to the network using an optional HP Jetdirect print server. Connection to a Token Ring network is available through an optional Token Ring card.
For printers equipped with an optional HP Jetdirect print server, a twisted-pair network cable connection is provided through a 10/100Base-TX (RJ-45) connector. The printer also has a connector for HP Fast InfraRed Connect, a Foreign Interface Harness, and an HP JetLink Connector.
Parallel Connector (Parallel)
HP Jetdirect print server
RJ-45 connector
Foreign Interface Harness (AUX) (optional)
HP FIR (FIR) (optional)
HP JetLink connector (Accessory) (for optional accessories)
Location of Interface Ports
16 Printer setup |
ENWW |
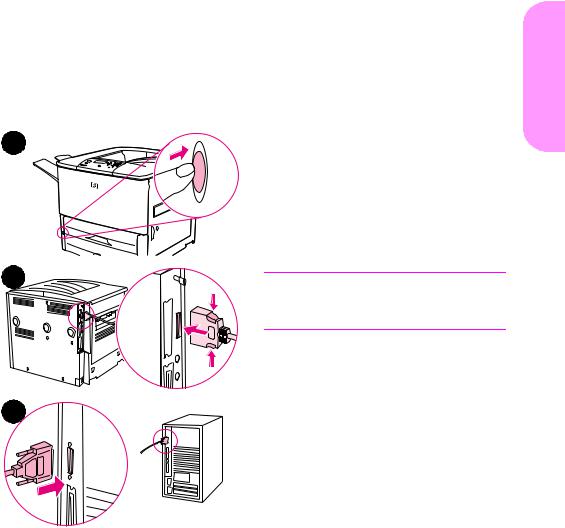
1
2
3
Connecting a parallel cable
Use a parallel cable if you want to connect the printer directly to a computer.
To ensure reliability, use an IEEE-1284 bidirectional C-type parallel cable. These cables are clearly marked with “IEEE-1284.” Only IEEE-1284 cables support all of the advanced printer features.
To connect a parallel cable
1 Make sure the printer and the computer power are turned off.
2Connect the parallel cable to the printer parallel port. Press the
locking release levers while connecting the cable.
Note
If installing the cable is difficult, make sure you have the correct cable.
3Connect the other end of the cable to the proper connector on the computer.
English
ENWW |
Connect printer cables 17 |
1
2
3
Connecting to Ethernet 10/100Base-TX network
Use the RJ-45 connector if you want to connect the printer to an Ethernet 10/100Base-TX network. The HP Jetdirect print server is an optional accessory for the base model and standard on the n, dn, and hns models. HP Jetdirect print servers are available for many different network connections.
To connect to Ethernet 10/100Base-TX network
1 Locate the power switch on the front of the printer. Press the power switch to turn the printer off (out position).
2 Connect a twisted-pair network cable to the RJ-45 connector on the HP Jetdirect print server installed in the printer.
3 Connect the other end of the cable to the network.
18 Printer setup |
ENWW |

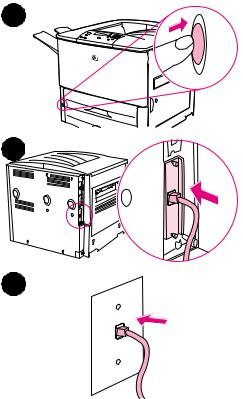
Step 9 |
Connect power cord |
|
This section describes how to connect the power cord. HP |
|
recommends connecting the power cord to a surge protector. |
1 |
To connect the power cord |
|
|
|
1 Locate the power switch on the front |
|
of the printer. Make sure the printer |
|
is turned off (out position). |
|
Note |
|
If the printer is located on top of the |
2 |
2,000-sheet feeder, do not connect the |
printer power cord to the convenience |
|
|
receptacle on this device. This connector |
|
is designed to connect to the paper |
|
output devices with the HP LaserJet |
|
9000 series. |
|
2 Connect the power cord to the |
3 |
printer, a grounded power strip, or an |
AC outlet. |
|
|
3 Press the power switch to turn the |
|
printer on (in position). After the |
|
printer warms up, the READY |
|
message should appear on the |
|
control panel display. |
|
4 If you have the optional 3,000-sheet |
4 |
stapler/stacker (or stacker), optional |
|
Tray 4, or both installed, check that |
|
the light on them is solid green. If the |
|
light is amber, flashing, or off, see |
|
the HP LaserJet 9000 Use manual |
|
(supplemental user guide) that can |
|
be downloaded from |
|
www.hp.com/support/lj9000. |
English
ENWW |
Connect power cord 19 |

Step 10 Change the control panel overlay
The control panel comes with an English 1 overlay installed. If necessary, use the
procedure below to change the control panel overlay to one included in the box.
To change the overlay
1 Locate the power switch on the front of the printer. Press the power switch to turn the printer off (button out).
2
2 Insert your fingernail or a thin, rigid object in back of the overlay and lift up.
3 Gently lift the overlay up and backward to move it away from the printer.
3
20 Printer setup |
ENWW |
4
5
4Position the new overlay over the control panel. Align the ends of the overlay with the holes on the control panel and slide the overlay in.
5Snap the overlay firmly onto the control panel. Ensure that the overlay is flat against the control panel.
6If you have an optional 3,000-sheet stapler/stacker (or stacker), optional Tray 4, or both, connect their power cords to a surge protector or AC outlet as well.
English
ENWW |
Change the control panel overlay 21 |

Step 11 Configure the control panel display
|
language |
|
By default, the control panel on the printer displays messages in |
|
English. If necessary, set the printer to display messages and print |
|
configuration pages in another supported language. |
|
|
Note |
When the power to the printer is turned on for the first time, you have |
|
the option to set the language to display messages in 17 different |
|
languages. |
|
|
Note
To configure the control panel language
1Press  .
.
2Use  or
or  to scroll to CONFIGURE DEVICE and press
  .
.
3Use  or
or  to scroll to SYSTEM SETUP and press
  .
.
4Use  or
or  to scroll to LANGUAGE and press
  .
.
5Use  or
or  to scroll to your language and press
  .
.
For Japanese, Turkish, Czech, Russian, Hungarian, and Polish, language selection will change the default symbol set for the specific language. For all other languages, the default symbol set is PC-8.
22 Printer setup |
ENWW |

Step 12 Print a configuration page
Print a configuration page to make sure the printer is operating correctly.
To print a configuration page
1Press 22 on the numeric keypad. The configuration page prints. If you have an HP Jetdirect printer server installed in the printer, an HP Jetdirect network configuration page also prints.
2If you have optional accessories such as a duplex printing accessory or Tray 4 installed, check the configuration page to ensure that it lists them as installed.
English
ENWW |
Print a configuration page 23 |
Step 13 Install printing software
|
The printer comes with printing software on a CD-ROM. The printer |
|
drivers on this CD-ROM must be installed to take full advantage of the |
|
printer features. |
|
If you do not have access to a CD-ROM drive, you can download the |
|
printing software from the Internet at www.hp.com/support/lj9000. |
|
Depending on the configuration of Windows-driven computers, the |
|
installation program for the printer software automatically checks the |
|
computer for Internet access and provides an option to obtain the |
|
latest software from the Internet. |
|
|
Note |
Printer installation software for UNIX (HP-UX, Sun Solaris) networks is |
|
available for download at www.hp.com/support/net_printing. |
|
See the HP Customer Care pages at the front of the HP LaserJet |
|
|
|
9000 Introduce manual (user guide) that came on the CD-ROM for |
|
more information. |
24 Printer setup |
ENWW |

Installing Windows printing software
This section describes how to install Windows printing software. The software is supported on Windows 95, Windows 98, Windows NT 4.0, Windows 2000, and Windows Millennium (ME).
To install the software
1Close all running programs.
2Insert the CD-ROM into the CD-ROM drive. Depending on the computer configuration, the installation program may automatically run. If the program does not run automatically: On the Start menu, click Run. Type x:setup (where X is the letter of the CD-Rom drive), and click OK.
3Follow the instructions on the computer screen.
English
ENWW |
Install printing software 25 |
Installing Macintosh printing software
This section describes how to install Macintosh printing software.
To install Macintosh printing software
1Quit all running applications.
2Insert the CD-ROM into the CD-ROM drive.
3Double-click the HP LaserJet Installers folder.
4Double-click the Installer icon for the desired language and follow the instructions on the screen.
5Open the Chooser from the Apple menu.
6Click the LaserWriter 8 icon. If the icon is not there, consult your Mac OS Help for troubleshooting information or contact
HP Customer Care (see the front pages of the HP LaserJet 9000 Introduce manual (user guide) that came on the CD-ROM).
7If you are on a network with multiple zones, select the zone in the AppleTalk Zones box where the printer is located. If this is unknown, ask your network administrator.
8Double-click the desired printer. An icon should appear.
9Close the Chooser by clicking the Go-Away (Close) box in the upper-left corner.
26 Printer setup |
ENWW |

Step 14 Verify printer setup
The easiest way to verify that the installation has been completed successfully is to print a document from a program.
To verify printer setup
1Open a program of your choice. Open or create a simple document.
2Make sure the correct printer name appears.
3Print the document.
If the document prints, your printer setup is complete!
If the document does not print correctly, check your setup and configuration. For additional assistance, see “Customer support options worldwide” on page 28.
English
ENWW |
Verify printer setup 27 |
Customer support options worldwide
Customer support and product repair assistance for the U.S. and Canada
●In the U.S., call (1) (208) 323-2551 Monday through Friday from 6 A.M. to 10 P.M. and Saturday 9 A.M. to 4 P.M., Mountain time.
●In Canada, call (1) (905) 206-4663 or (1) (800) 387-3867 Monday through Friday from 8 A.M. to 8 P.M., Mountain time.
Support is free of charge during the warranty period. However, your standard long-distance phone charges still apply. Have your system nearby and your serial number ready when calling.
If you know your printer needs repair, call (1) (800) 243-9816 to locate your nearest HP-Authorized service provider.
28 Printer setup |
ENWW |
Loading...