


Ready
Reference
Guide
English
HP LaserJet 8100, 8100 N,
and 8100 DN Printers

Ready
Reference
Guide
HP LaserJet 8100, 8100 N, and
8100 DN Printers
© Copyright Hewlett-Packard
Company 1998
All Rights Reserved. Reproduction, adaptation, or translation without prior written permission is prohibited, except as allowed under the copyright laws.
Publication number
C4214-90921
Reorder number
C4214-99001
First Edition, October 1998
Warranty
The information contained in this document is subject to change without notice.
Hewlett-Packard makes no warranty of any kind with respect to this information. HEWLETT-PACKARD SPECIFICALLY DISCLAIMS THE IMPLIED WARRANTY OF MERCHANTABILITY AND FITNESS FOR A PARTICULAR PURPOSE.
Hewlett-Packard shall not be liable for any direct, indirect, incidental, consequential, or other damage alleged in connection with the furnishing or use of this information.
Trademark Credits
PostScript is a trademark of
Adobe Systems Incorporated
which may be registered in certain jurisdictions.
Arial, Monotype, and Times New Roman are U.S. registered trademarks of the Monotype Corporation.
CompuServe is a U.S. trademark of CompuServe, Inc.
Helvetica, Palatino, Times, and Times Roman are trademarks of Linotype AG and/or its subsidiaries in the U.S. and other countries.
Microsoft, MS Windows, Windows, and Windows NT are U.S. registered trademarks of Microsoft Corporation.
TrueType is a U.S. trademark of Apple Computer, Inc.
ENERGY STAR is a U.S. registered service mark of the U.S. EPA.
Contents |
|
Control Panel .................................................. |
1 |
To Change a Control Panel Setting: ................ |
1 |
Checking the Printer’s Configuration................ |
2 |
To Print a Menu Map: ............................... |
2 |
To Print a Configuration Page: ................. |
2 |
To Print a PCL or PS Font List: ................ |
2 |
Common Printer Messages.............................. |
3 |
Printing Tasks ................................................ |
7 |
Manually Feeding Paper from Tray 1 ............... |
7 |
Selecting the Output Bin .................................. |
8 |
Loading Tray 1 ................................................. |
9 |
Loading Trays 2, 3, and the Optional |
|
2 x 500-sheet Input Tray (Trays 4 and 5) ....... |
10 |
Loading Optional 2000-sheet |
|
Input Tray (Tray 4) ......................................... |
12 |
Loading Envelopes in the Envelope Feeder .. |
14 |
Printing Special Paper.................................... |
15 |
Printing Envelopes.................................. |
15 |
Printing Transparencies.......................... |
15 |
Printing Labels ........................................ |
15 |
Printing Cards, Custom-size and |
|
Heavy Paper ........................................... |
15 |
EN |
Contents |
Contents (continued) |
|
Clearing Paper Jams.................................... |
16 |
Clearing Jams from the Input Tray Areas....... |
17 |
Clearing Jams from the Top Cover Area........ |
18 |
Clearing Jams from the Output Areas ............ |
18 |
Clearing Jams from the Optional Duplex |
|
Printing Accessory ......................................... |
19 |
Clearing the Optional Envelope Feeder ......... |
19 |
Clearing Jams from the Stapler...................... |
20 |
Solving Repeated Paper Jams....................... |
22 |
Correcting Output Quality Problems.......... |
23 |
Troubleshooting Steps ................................... |
24 |
Continue Printing When Toner Is Low............ |
26 |
Resets Menu ................................................. |
27 |
Supported Types of Paper........................... |
28 |
For More Information ................................... |
32 |
EN |
Contents |
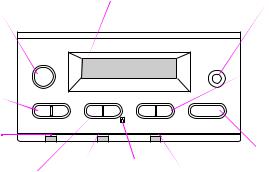
Control Panel
Places printer |
|
Cancels |
online or offline, |
|
|
resumes printing, |
2-line display |
current print job |
and exits menus |
|
|
|
|
|
|
|
|
Cancel |
Cycles |
|
|
Go |
|
|
|
|
through |
||
|
|
READY |
|
Job |
||||
|
|
|
selected |
|||||
|
|
|
|
|
|
|||
Cycles |
|
|
|
|
|
|
||
|
|
|
|
|
|
menu |
||
through |
Menu |
Item |
|
- Value + |
Select |
item’s |
||
menus |
|
|||||||
|
|
|
|
|
|
values |
||
Printer |
Ready |
Data |
Attention |
|
|
|||
|
|
|
|
|
|
|
||
is ready |
|
|
|
|
|
|
Saves |
|
|
|
Processing |
Use the item |
|
||||
Cycles through |
Action is |
selected |
||||||
information |
key to |
control |
||||||
required- |
||||||||
selected |
|
|
|
navigate |
panel |
|||
|
|
|
see display |
|||||
menu’s items |
|
|
|
the printer’s |
setting |
|||
|
|
|
|
|||||
|
|
|
|
online help |
|
|
||
To Change a Control Panel Setting:
1Press Menu until the desired menu appears.
2Press Item until the desired item appears.
3Press – Value + until the desired setting appears.
4Press Select to save the selection.
5Press Go to exit the menu.
EN |
Control Panel - 1 |
Checking the Printer's
Configuration:
From the printer’s control panel, you can print pages that give details about the printer and its current configuration. The following information pages are described here:
•Menu Map
•Configuration Page
•PCL or PS Font List
To Print a Menu Map:
1 Press Menu until INFORMATION MENU appears.
2 Press Item until PRINT MENU MAP appears.
3 Press Select to print the menu map.
To Print a Configuration Page:
1Press Menu until INFORMATION MENU appears.
2Press Item until PRINT CONFIGURATION appears.
3Press Select to print the configuration page.
To Print a PCL or PS Font List:
1Press Menu until INFORMATION MENU appears.
2Press Item until PRINT PCL FONT LIST or PRINT PS FONT
LIST appears.
3Press Select to print the font list.
EN |
Control Panel - 2 |
Common Printer Messages
Message |
Explanation |
|
|
ACCESS DENIED |
The printer control panel function you are trying |
MENUS LOCKED |
to access has been locked to prevent |
|
|
|
unauthorized access. |
|
See your network administrator. |
|
|
CHECK INPUT |
The optional input tray cannot feed paper to the |
DEVICE |
printer because a door or paper guide is open. |
alternates with |
Check the doors and paper guides. |
PAPER PATH OPEN |
|
PLEASE CLOSE IT |
|
|
|
ENV FEEDER LOAD |
Load the requested envelope type and size into |
[TYPE] [SIZE] |
the envelope feeder. Make sure the envelope |
|
|
|
size and type are set correctly from the Paper |
|
Handling Menu in the control panel. |
|
Press Go if the desired envelope is already |
|
loaded in the feeder. |
|
Press - Value + to scroll through the available |
|
types and sizes. Press Select to accept the |
|
alternate type or size. |
|
|
INPUT DEVICE |
An input paper handling device has a condition |
CONDITION xx.yy |
that needs attention before printing can resume. |
|
|
|
See the documentation that came with the paper |
|
handling device for assistance. |
EN |
Control Panel - 3 |
Message |
Explanation |
|
|
MANUALLY FEED |
Load the requested paper into Tray 1. |
[TYPE] [SIZE] |
Press Go if the desired paper is already loaded |
|
|
|
in Tray 1. |
|
Press - Value + to scroll through the available |
|
types and sizes. Press Select to accept the |
|
alternate type or size. |
|
|
OFFLINE |
Press Go to place the printer online. |
|
|
PERFORM PRINTER |
To ensure optimum print quality, the printer |
MAINTENANCE |
prompts you to perform routine maintenance |
|
|
|
every 350,000 pages. |
|
|
TRAY x EMPTY |
Load the empty tray (x) to clear the message. |
|
If you do not load the specified tray, the printer |
|
will continue printing from the next available tray, |
|
and the message will continue to display. |
|
|
TRAY x LOAD |
Load the requested paper into the specified |
[TYPE] [SIZE] |
tray (X). |
|
|
|
Ensure that the trays are correctly adjusted for |
|
size. The tray type settings (and size for Tray 1) |
|
must be set from the printer’s control panel. |
|
If you are trying to print A4 or letter size paper, |
|
and this message appears, make sure the |
|
default paper size is set correctly from the |
|
Printing Menu in the printer’s control panel. |
|
Press Go to print from the next available tray. |
|
Press - Value + to scroll through the available |
|
types and sizes. Press Select to accept the |
|
alternate type or size. |
EN |
Control Panel - 4 |
Message |
Explanation |
|
|
13.x PAPER JAM |
Remove jammed paper from the specified |
[LOCATION] |
location. Open and close the top cover to clear |
|
|
|
the message. |
|
If the message persists after all jams have been |
|
cleared, a sensor may be stuck or broken. |
|
Contact an HP-authorized service or support |
|
provider. (See the HP Support pages in the |
|
online user guide for the printer.) |
|
|
41.3 UNEXPECTED |
The paper size you are trying to print is not the |
PAPER SIZE |
same as the control panel setting for Tray 1. |
|
|
|
Reload the tray with the correct paper size. |
|
Make sure that the control panel setting for Tray |
|
1 or the Envelope Feeder is correctly adjusted |
|
for size. (The printer will continue trying to print |
|
the job until size settings are correct.) |
|
After performing the actions above, press Go |
|
twice. The page containing the error will |
|
automatically be reprinted. (Or, you might want |
|
to press Cancel Job to clear the job from the |
|
printer’s memory.) |
|
|
50.x FUSER ERROR |
An internal error has occurred. Turn the printer |
|
off, and then turn the printer on. |
|
The message might clear, and then reappear |
|
when the next print job is sent. If this message |
|
persists, contact an HP-authorized service or |
|
support provider. |
|
|
51.x or 52.x |
A temporary printing error occurred. |
PRINTER ERROR |
Turn the printer off, and then turn the printer on. |
|
|
|
If this message persists, contact an HP- |
|
authorized service or support provider. |
EN |
Control Panel - 5 |
Message |
Explanation |
|
|
69.x |
A temporary printing error occurred. |
PRINTER ERROR |
Turn the printer off, and then turn the printer on. |
|
|
|
If this message persists, contact an HP- |
|
authorized service or support provider. |
|
|
79.xxxx |
The printer detected an error. The numbers |
PRINTER ERROR |
(xxxx) indicate the specific type of error. |
|
|
|
Turn the printer off, and then turn the printer on. |
|
Try printing a job from a different software |
|
application. If the job prints, go back to the first |
|
application and try printing a different file. (If the |
|
message only appears with a certain software |
|
application or print job, contact the software |
|
vendor for assistance.) |
|
If the message persists with different software |
|
applications and print jobs, record the numbers |
|
that appear (xxxx) and contact an HP-authorized |
|
service or support provider. |
|
|
|
|
EN |
Control Panel - 6 |
 Loading...