


ADEMCO VISTA-12A
ADEMCO VISTA-12E
Security Systems
User Guide
K10021-1 9/04 Rev. A

SYSTEM COMPATIBILITY NOTICE
Your Honeywell security system is designed for use with devices manufactured or approved by Honeywell for use with your security system. Your Honeywell security system is not designed for use with any device that may be attached to your security system's keypad or other communicating bus if Honeywell has not approved such device for use with your security system. Use of any such unauthorized device may cause damage or compromise the performance of your security system and affect the validity of your Honeywell limited warranty. When you purchase devices that have been manufactured or approved by Honeywell, you acquire the assurance that these devices have been thoroughly tested to ensure optimum performance when used with your Honeywell security system.
IMPORTANT: If the keypad beeps rapidly upon entering the premises, it indicates that an alarm has occurred during your absence and an intruder may still be on the premises. LEAVE IMMEDIATELY and CONTACT THE POLICE from a nearby safe location.
– 2 –

|
Table of Contents |
Burglary System Features ........................................................................................................ |
4 |
Basic Features ........................................................................................................................... |
4 |
Exit/Entry Delays ...................................................................................................................... |
5 |
Before Arming (Ready [ ] Key) ................................................................................................. |
6 |
Bypassing Zones ........................................................................................................................ |
6 |
Basic Arming Modes.................................................................................................................. |
7 |
Disarming and Silencing Alarms.............................................................................................. |
8 |
Using the Keyswitch.................................................................................................................. |
9 |
Emergency Alarms (Panic Keys) .............................................................................................. |
9 |
Non-Alarm Functions ............................................................................................................... |
10 |
Chime Mode ............................................................................................................................. |
10 |
Using the Voice Message Center ............................................................................................ |
10 |
Using Macro Keys.................................................................................................................... |
11 |
System Devices ........................................................................................................................ |
11 |
Follow-Me Feature (audio beeps) ........................................................................................... |
11 |
Advanced System Functions .................................................................................................. |
13 |
Accessing Other Partitions ..................................................................................................... |
13 |
Defining Macro Keys ............................................................................................................... |
14 |
Schedules.................................................................................................................................. |
14 |
Time and Date Functions........................................................................................................ |
16 |
Event Log ................................................................................................................................. |
17 |
Security Codes and Authority Levels..................................................................................... |
18 |
How to Assign User Codes and Attributes............................................................................. |
19 |
Testing and Maintaining the System ................................................................................... |
20 |
Testing the System (to be conducted weekly)........................................................................ |
20 |
Maintaining the System.......................................................................................................... |
20 |
Trouble Conditions ................................................................................................................... |
22 |
Fire Alarm System (If Installed)............................................................................................ |
24 |
Quick Guide to Basic System Functions ............................................................................. |
26 |
Charts of Your System’s Features......................................................................................... |
27 |
– 3 –

Burglary System Features
Basic Features
Partitions • Partitions provide two independent areas of protection, with each partition containing a group of zones that can be armed and disarmed without affecting other zones or users.
•Partitioned systems can include a common area, which is an area shared by users of two other partitions (such as a lobby in a building).
•Some users may be given the authority to view status and arm/disarm other partitions.
•See Accessing Other Partitions section for details.
Zones |
• |
Each partition consists of specific protection points known as zones. |
|
• When a zone is faulted, its zone number is displayed on the keypad for easy identification. |
|
Keypads |
• |
The system is controlled from the keypad, and the keypad displays system status. |
|
• |
Each keypad is assigned a default partition for display purposes, and will show only that |
|
• |
partition's information. |
|
When entering codes and commands, sequential key depressions must be made within 4-5 |
|
|
|
seconds of one another. If 4-5 seconds elapse without a key depression, the entry will be |
aborted and must be repeated from its beginning.
• If you make a mistake while entering a security code, stop, press the [ ] key, and then start over. If you stop in the middle while entering a code, and then immediately start the entry over, an erroneous code might be entered.
Keypad Lockout: The system may have been programmed to lockout the keypads for 15 minutes if more than 30 keystrokes (within a 15 minute period) are made without a valid user code plus command being entered. The message “Code Sabotage” is displayed during the lockout period.
Voice Keypads • Voice Keypads (if installed), are functionally the same as other keypads.
•Voice announcements of system status (see Before Arming section)
•Voice chime, which can alert you to the opening of doors and windows while the system is disarmed (see Voice Chime in Chime mode section)
•Message center, which lets you record and playback messages (see Using the Voice Message Center in the System Overview section).
Security Codes • Your installer assigned you a security code at the time of installation. This code is required to perform most system functions.
•Each security code can have a different authority level, which defines the functions each user can perform. Refer to the Security Code section for details on adding and changing security codes.
Arm/Disarm • You can arm your system in several different modes, depending on whether you are staying in or leaving the premises.
•To arm the system, simply enter your security code followed by the desired arming mode key.
•To disarm the system, enter your security code followed by [1] OFF.
•Refer to the Arming/Disarming sections for specific arming commands.
– 4 –

Exit/Entry Delays
|
Exit Delay |
• |
When you arm the system, the system gives you a programmed amount of time to leave |
|
|
|
through the designated exit door and/or certain other zones (if programmed) without |
|
Part. 1: _____ sec |
|
|
|
• |
setting off an alarm. |
|
|
Part. 2: _____ sec |
A slow beeping, if programmed, will sound during the exit delay period until the last 10 |
|
|
|
seconds, which then changes to fast beeping. |
|
|
|
• |
|
|
Common: Same as |
If programmed, the keypad displays a countdown of the number of seconds of exit delay |
|
|
Part. 1 |
|
remaining. |
|
|
• When exit delay expires, all zones become protected and cause an alarm if opened. |
|
|
|
• Your system may have been programmed such that exit delay remains in effect until a final |
|
|
|
|
zone (e.g.,, exit door) has been closed for five seconds. Ask your installer. |
|
|
|
|
|
Exit Delay |
• |
Press the [ ] key if armed in STAY mode to restart the exit delay timer. |
|
Restart |
• |
This gives you time to open the entry/exit door to let someone in after arming STAY. The |
|
|
|
system (If programmed), automatically rearms when exit delay expires, which avoids |
|
|
• |
having to disarm the system and then rearm it again. |
|
|
When the system is armed AWAY, reopening and closing the entry/exit door before exit |
|
|
|
|
delay time expires (e.g., reentering to get a forgotten item) will restart the exit delay time. |
|
|
|
|
|
Entry Delay |
• |
Gives you time to disarm the system when you re-enter through the designated entrance |
|
|
|
door. You must disarm the system before the entry delay period ends, or an alarm will |
|
|
|
occur. |
• See your installer for your delay times.
Partition 1 |
Partition 2 |
Common Partition |
|
Delay 1: _______ seconds |
Delay 1: _______ seconds |
Delay 1: Same as Partition 1 |
|
Delay 2: _______ seconds |
Delay 2: _______ seconds |
Delay 2: Same as Partition 1 |
|
|
|
|
|
Exit Alarms • If an entry/exit door or interior zone is faulted when the exit delay ends (e.g., exit door left open), the system sounds an alarm and starts the entry delay timer.
•Disarming the system before entry delay ends stops the alarm sound.
•The message "CANCELED ALARM" or "CA" is displayed on the keypad, along with a zone number indicating the faulted zone.
•No message is sent to the Central Monitoring Station.
•If you do not disarm the system before the entry delay ends, and an entry/exit door or interior zone is still open, the alarm sound continues and an "exit alarm" message is sent to the Central Monitoring Station. The message ""EXIT ALARM" or "EA" and the faulted zone number is displayed on the keypad.
•To stop the alarm, the system must be disarmed (your code plus OFF), to clear the display, enter your code plus OFF a second time.
•An “exit alarm” also results if an entry/exit door or interior zone is faulted within two minutes after the end of the exit delay.
To clear an exit alarm:
•Make the open zone intact, then
•Enter your code plus [1] OFF to clear the display.
Your system may have been programmed for this feature to minimize false alarms sent to the
Central Monitoring Station. Ask your installer if "Exit Alarm" is active in your system. If so, check this box: [ ]
– 5 –

Before Arming (Ready [ ] Key)
Not Ready • Before arming the system, you should close or bypass all protected doors, windows and (using [ ] key), other protection zones.
•Press [ ] to display open zones (do not enter code first).
•To bypass zones, see the Bypassing Zones section below.
•Some systems, if programmed, may allow arming even if selected zones in the exit route are faulted. Depending on the programming, these zones, if left faulted when exit delay expires, will either be automatically bypassed or cause an alarm. See your installer.
Voice Status: |
• |
Voice Keypads (if installed), can announce system status and faulted zones (up to 3 zone |
|
• |
descriptors) if Voice Status is on. |
|
To turn Voice Status on/off: [#] + [0] [2] [4] |
|
|
|
(Also turns on Voice Chime mode; see Chime mode section) |
|
• |
To announce System Status: Press [ ] STATUS key once. |
|
• To announce faulted zones: Press the [ ] STATUS key a second time within 5 |
|
|
|
seconds of the first press |
Ready |
• |
All zones are closed or bypassed and you can now arm the system. |
• Some systems, if programmed, may allow arming even if selected zones in the exit route are faulted. Depending on the programming, these zones, if left faulted when exit delay expires, will either be automatically bypassed or will cause an alarm. See your installer for your system’s programming.
Bypassing Zones
Bypass Notes • You can bypass zones before arming the system or while the system is already armed.
•Your system may have a limit on the total number (1-7) of zones you may bypass (check with your installer).
•Bypassed zones are unprotected and will not cause an alarm if violated.
•The system will not allow fire zones to be bypassed.
•Zones are automatically unbypassed when the system is disarmed.
•Vent Zones: Your system may have certain windows set as “vent” zones, which are automatically bypassed if left open when arming the system (you do not need to manually bypass them). However, if a vent zone window is closed after arming, it becomes protected and will cause an alarm if opened again while the system is armed.
To Bypass |
• |
Security code + [6] BYPASS + zone numbers |
Zones |
• |
Use 2-digit zone number(s) for the zone(s) to be bypassed. |
|
• Single digit zone numbers must be preceded by a zero (e.g., 05, 06). |
|
|
• |
When finished, the keypad will momentarily display a "Bypass" message for each bypassed |
|
|
zone number. |
|
• Wait for all bypassed zones to be displayed, then arm the system as usual. |
|
|
• |
When armed, “ZONE BYPASSED” is displayed with the arm message. |
|
• To display bypassed zones prior to arming, enter your security code and press the [6] |
|
|
|
BYPASS key. |
Quick Bypass |
•Security Code+ [6] BYPASS + [#] |
|
|
• Wait for all bypassed zones to be displayed, then arm the system. |
|
Active? ____ |
• |
In a few moments, all open zones will be displayed and automatically bypassed. Make sure |
|
|
that only those zones that you wish to leave unprotected are bypassed, and that there are |
|
• |
no other zones unintentionally left open. |
|
Allows you to easily bypass all open (faulted) zones without having to enter zone numbers |
|
individually. This feature is useful if, for example, you routinely leave certain windows open when arming at night.
– 6 –

Basic Arming Modes
Stay |
• |
Security code + [3] (STAY) |
|
• |
Causes: three beeps, armed STAY displayed, ARMED indicator lights |
|
• Arms perimeter sensors, but interior sensors are left disarmed. |
|
|
• |
Use when you want to arm the system with persons staying inside (or if you have pets that |
|
|
are moving throughout the premises). |
|
• Alarm sounds if any protected window or non-entry/exit door is opened. |
|
|
• |
Persons entering later can enter through an entry/exit door, but they must disarm the |
|
|
system within the entry delay period to avoid sounding an alarm. |
Night-Stay |
• |
Security code + [3] + [3] |
(Internal) |
• |
Causes: three beeps, NIGHT-STAY displayed, ARMED indicator lights |
|
• |
Same as Stay mode, plus pre-selected interior sensors, while other interior sensors are left |
|
|
disarmed. |
|
• Use Night-Stay (internal) mode to provide increased security while staying inside. |
|
|
• |
Persons entering later can use an entry/exit door but they must disarm the system and |
|
• |
must not violate any of the programmed interior zones to avoid sounding an alarm. |
|
IMPORTANT: When Night-Stay mode is on, the selected interior zones are armed and |
|
|
|
cause an alarm if anyone enters those areas (e.g., waking in the middle of the night). To |
|
|
avoid sounding an alarm, you must disarm the system before any activity takes place in |
|
|
those zones. |
Instant |
• |
Security code + [7] (INSTANT) |
|
• |
Causes: three beeps, armed INSTANT displayed, ARMED indicator lights |
|
• |
Arms same as Stay mode but with entry delay off. |
|
• Use when staying inside and do not expect anyone to use an entry/exit door. |
|
|
• |
An alarm sounds immediately if any protected perimeter window or any door is opened, |
|
• |
including entry/exit doors. |
|
IMPORTANT: Arming in this mode greatly increases the chance of false alarms. Use |
|
|
|
extreme care in selecting this mode of arming. |
Away |
• |
Security code + [2] (AWAY) |
|
• |
Causes: beeping during exit delay, armed AWAY displayed, ARMED indicator lights |
|
• |
Arms entire system (interior and perimeter). |
|
• Use when nobody will be staying inside (including pets). |
|
|
• |
An alarm sounds if a protected window or any door is opened, or if any movement is |
|
• |
detected inside your premises. |
|
When reentering through an entry/exit door, you must disarm the system within the entry |
|
|
|
delay period to avoid sounding an alarm. |
Maximum |
• |
Security code + [4] (MAXIMUM) |
|
• Causes: same as Away mode; arms same as Away mode, but entry delay is off. |
|
|
• Use when arming/disarming is being done from the outside (e.g.,, RF keyfob) |
|
Step Arming |
• |
Press designated key A, B, C, or D, if programmed, once, twice or three times depending |
|
• |
on the arming mode desired. Each key press increases the level of security. |
|
First press: arm STAY; second press: arm Night-STAY; third press: arm AWAY |
|
Quick Arm |
• |
Press [#] + arming command key, if programmed. |
|
• This feature lets you press [#] in place of the security code when arming the system. |
|
|
• |
The security code must always be used to disarm the system. |
Function Key |
• |
Press and hold the assigned function key for 2 seconds, if programmed. |
Arming |
• |
You do not need to enter your security code before pressing the arming key. |
|
• Arms in designated arming mode. See your installer for the designated functions. |
|
– 7 –

Disarming and Silencing Alarms
Disarming |
• |
Security code + [1] OFF |
|
• The “READY” indicator lights if all zones are secure |
|
|
• The keypad emits a single tone to confirm that the system is disarmed. |
|
To Silence a |
• |
Security code + [1] OFF |
Burglary Alarm |
• |
The “READY” indicator lights if all zones are secure |
|
• The keypad emits a single tone to confirm that the system is disarmed. |
|
To Silence a |
• |
Simply press the OFF key |
Fire Alarm |
• |
The “READY” indicator lights if all zones are secure |
|
• The keypad emits a single tone to confirm that the system is disarmed. |
|
Memory of |
• |
When an alarm condition occurs, the keypad displays the number(s) of the zone(s) |
Alarm |
• |
that caused the problem, and displays the type of alarm. |
|
To Clear Alarm Display and/or “Alarm Canceled” display: Security code + [1] OFF |
|
|
|
again |
|
• Note the zone in alarm on the keypad display, and make that zone intact (close door, |
|
window, etc.).
• The message remains displayed even after disarming the system, but can be cleared with another “disarm” sequence.
IMPORTANT: If you return and the main burglary sounder is on, DO NOT ENTER, but CONTACT THE POLICE from a nearby safe location.
If you return after an alarm has occurred and the main sounder has shut itself off, the keypad will beep rapidly upon your entering, indicating that an alarm has occurred during your absence.
LEAVE AT ONCE, and CONTACT THE POLICE from a nearby safe location
– 8 –

Using the Keyswitch |
|
|
||
|
|
• Your system may be equipped with a keyswitch for arming and disarming. |
||
|
|
• To arm in AWAY mode: Turn the key to the right for 1/2 second and release. |
||
GREEN |
RED |
• |
Keypads beep twice and the red indicator lights or flashes. |
|
To arm in STAY mode: Turn the key to the right and hold for more than 1 |
||||
|
|
|||
|
|
|
second, then release. Keypads beep three times and the red indicator lights or |
|
|
|
|
flashes. |
|
|
|
• To disarm the system: Turn the key to the right and release. The red light turns |
||
|
|
|
off. |
|
Green Light: |
|
• Lights when the system is disarmed and ready to be armed (no open zones). |
||
|
|
• If the green light is off, the system is not ready (one or more zones are open). |
||
Red Light: |
|
• |
Lights or flashes when system is armed in AWAY or STAY mode. See your |
|
|
|
|
installer for the meanings of the lit red light: |
|
•Lit Steady = system armed AWAY or STAY and exit delay has expired
•Flashing = system armed STAY and exit delay timer active
•Rapid Flashing = an alarm has occurred (memory of alarm)
Emergency Alarms (Panic Keys)
Your system maybe programmed to use special keys to manually activate emergency (panic) functions.
• Sends silent alarm signal to monitoring station.
•Causes no audible alarm or change in display indicating that a silent alarm has been initiated.
• Sends audible alarm signal to monitoring station.
•Causes a loud, steady alarm at keypad(s) and at any external sounders that may be connected.
• Sends emergency alarm signal to monitoring station.
• Causes steady alarm sound at keypad(s), but not at external bells or sirens.
• Sends fire alarm signal to monitoring station.
• Causes temporal (pulsing) sound at external bells and sirens.
• Press and hold down for at least 2 seconds whichever lettered key on the keypad has been programmed for the desired emergency function.
OR
Briefly press both keys of the assigned key pair at the same time
• See your installer for the functions that have been programmed for your system.
ZONE 95 |
|
|
|
|
|
|
|
|
PRESS BOTH KEYS |
|
|
|
|
|
|
|
|
OF DESIRED PAIR |
|
|
|
|
|
|
|
|
|
|
|
B |
|
|
|
|
|
|
|
|
AT THE SAME TIME |
|
1 |
|
|
ARMED |
1 |
2 |
3 |
|
|
ZONE 99 |
ARMED |
2 |
3 |
|
OFF |
AWAY |
STAY |
|
|
|
OFF |
AWAY |
STAY |
READY |
4 |
5 |
6 |
|
|
|
READY |
4 |
5 |
6 |
ZONE 95 |
MAXIMUM TEST |
BYPASS |
ZONE 96 |
|
|
7 |
8 |
9 |
||||||
|
|
MAXIMUM |
TEST |
BYPASS |
CPU |
|
|||
C |
|
7 |
8 |
9 |
|
INSTANT |
CODE |
CHIME |
|
CPU |
|
|
0 |
# |
|
||||
|
INSTANT |
CODE |
CHIME |
|
|
|
|||
ZONE 96 |
|
|
0 |
# |
|
READY |
|
|
|
|
|
|
|
|
|
|
|||
|
|
READY |
|
|
|
|
|
|
|
D |
|
|
|
|
6164-010-V0 |
|
ZONE 99 |
|
6164-011-V0 |
|
Lettered Panic Keys |
|
|
Panic Key Pairs |
|
||||
– 9 –
Non-Alarm Functions
Chime Mode
Chime mode alerts you to movement within the premises while the system is disarmed.
Chime Mode on |
• |
Security code + [9] (Chime message appears) |
|
• |
Keypads sound three beeps whenever a protected door, window or other specified zone is |
|
|
opened. |
|
• Pressing the [ ] READY key will display the open protection points. |
|
Chime Mode off |
• |
Security code + [9] again (Chime message disappears) |
Voice Chime: |
• |
You can set the Voice Keypad(s) (if installed) to announce faulted (opened) entry/exit or |
|
• |
perimeter zones whenever normal Chime mode is on. |
Voice Chime |
[#] + [0] [2] [4] (normal Chime mode must be on first) |
|
on/off |
• |
When Voice Chime is on, faulted zones cause a voice status announcement, chime and |
|
|
display. |
• When off, the sounder still provides chime if normal Chime mode is on.
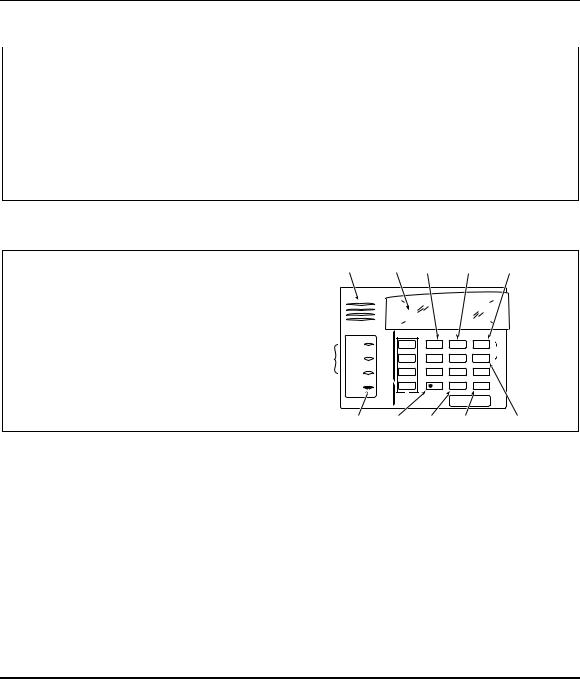
Using the Voice Message Center
The Voice Keypads feature a voice message center that lets you record and playback one message.
Basic Information
•The message can be up to 2.5-minutes long
•The message remains in the keypad’s memory until a new message is recorded.
•The volume control of the message is adjustable.
•Refer to the procedures below when using the Message Center functions.
|
|
|
|
|
|
|
|
PLAY KEY |
|
LCD |
RECORD |
VOLUME |
|
AND |
|||
SPEAKER |
DISPLAY |
KEY |
KEY |
UP VOLUME |
||||
|
|
|
|
|
|
|
|
|
|
|
|
|
|
|
|
|
|
|
|
|
|
|
|
|
|
|
|
|
|
|
|
|
|
|
|
|
|
|
|
|
|
|
|
|
|
ARMED |
1 OFF |
2 AWAY |
3 STAY |
|
|
|
RECORD |
VOLUME |
PLAY |
|
LEDs |
READY |
4 MAX |
5 TEST |
6 BYPASS |
|
|
MESSAGE |
7 INSTANT |
8 CODE |
9 CHIME |
|
|
MIC |
READY |
0 |
# |
|
|
|
STATUS |
VOICE |
FUNCTION |
|
|
MICROPHONE STATUS |
VOICE |
FUNCTION |
DOWN |
|
|
KEY |
KEY |
KEY |
|
VOLUME |
6160V-00-005-V0
Message Center Functions
Record a |
• |
[#] FUNCTION + [0] VOICE + [1] RECORD (red MESSAGE LED lights) |
Message |
• |
Message remains in memory until a new message is recorded. |
End Recording |
• |
[1] RECORD (red MESSAGE LED flashes, indicating message waiting) |
Play a Message |
• |
[#] FUNCTION + [0] VOICE + [3] PLAY |
|
• |
The recorded message plays and the red MESSAGE LED turns off. |
Adjust the |
• |
[#] FUNCTION + [0] VOICE + [2] VOLUME keys, |
Volume |
• |
then press volume key [3] ↑ (up) or [6] ↓ (down) |
|
• |
Adjusting message volume also adjusts status volume. |
|
• |
Volume cannot be adjusted while playing. |
– 10 –
 Loading...