


 Loading...
CK65 Series
Mobile Computer
powered by Android™
User Guide
Disclaimer
Honeywell International Inc. (“HII”) reserves the right to make changes in specifications and other information contained in this document without prior notice, and the reader should in all cases consult HII to determine whether any such changes have been made. The information in this publication does not represent a commitment on the part of HII.
HII shall not be liable for technical or editorial errors or omissions contained herein; nor for incidental or consequential damages resulting from the furnishing, performance, or use of this material. HII disclaims all responsibility for the selection and use of software and/or hardware to achieve intended results.
This document contains proprietary information that is protected by copyright. All rights are reserved. No part of this document may be photocopied, reproduced, or translated into another language without the prior written consent of HII.
Copyright 2019 Honeywell International Inc. All rights reserved.
Web Address: www.honeywellaidc.com
Trademarks
Google and Android are trademarks of Google LLC.
Bluetooth trademarks are owned by Bluetooth SIG, Inc., U.S.A. and licensed to Honeywell.
microSD is a registered trademark of SD-3C, LLC.
Qualcomm and Snapdragon are registered trademarks or trademarks of Qualcomm Incorporated in the United States and/or other countries.
Other product names or marks mentioned in this document may be trademarks or registered trademarks of other companies and are the property of their respective owners.
Patents
For patent information, refer to www.hsmpats.com.

TABLE OF CONTENTS
Customer Support ....................................................................................................................... |
vii |
Technical Assistance............................................................................................................ |
vii |
Product Service and Repair ............................................................................................... |
vii |
Limited Warranty................................................................................................................... |
vii |
Chapter 1 - About the Computer Features................................................... |
1 |
About the CK65 Mobile Computer .......................................................................................... |
1 |
Model Overview........................................................................................................................ |
1 |
Features of the CK65.............................................................................................................. |
3 |
About the Battery ........................................................................................................................... |
6 |
Charge the Battery Before Use........................................................................................... |
6 |
Replace the Battery................................................................................................................. |
7 |
About the Battery Status....................................................................................................... |
7 |
About the Battery Status LED Setting............................................................................. |
8 |
Check the Battery Level and Usage ................................................................................. |
9 |
About Battery Life and Conservation ........................................................................... |
10 |
Battery Recommendations and Safety Precautions .............................................. |
10 |
Enable Airplane Mode ........................................................................................................ |
11 |
Power On the Computer ........................................................................................................... |
11 |
Welcome Screen.................................................................................................................... |
11 |
Unlock the Screen....................................................................................................................... |
12 |
Change the Screen Lock to Protect the Computer........................................................ |
12 |
Configure the Screen Backlight ............................................................................................ |
13 |
About the Scan Status LED..................................................................................................... |
13 |
About the Keypad ........................................................................................................................ |
14 |
CK65 Mobile Computer |
iii |
Keypad LEDs........................................................................................................................... |
14 |
About the Color-Coded Keys............................................................................................. |
15 |
About the Audio Features......................................................................................................... |
17 |
Audio Settings ........................................................................................................................ |
18 |
Insert a microSD Card................................................................................................................ |
18 |
How to Transfer Files.................................................................................................................. |
20 |
Configure USB Connection and Transfer Files ......................................................... |
21 |
Accessories for the Computer................................................................................................. |
21 |
Chapter 2 - About the User Interface and Applications......................... |
23 |
About the User Interface........................................................................................................... |
23 |
Navigation and Function Buttons.................................................................................. |
24 |
About Status Bar Icons ....................................................................................................... |
24 |
Remap a Button or Key........................................................................................................ |
25 |
Restore Default Button Action......................................................................................... |
25 |
View and Manage Notifications ...................................................................................... |
26 |
Open Quick Settings............................................................................................................ |
26 |
Customize the Home Screen............................................................................................ |
27 |
Customize the Favorites Tray ........................................................................................... |
27 |
Use Google™ Search............................................................................................................. |
27 |
About Screen Gestures ....................................................................................................... |
28 |
Set the Time Zone.................................................................................................................. |
28 |
About Honeywell Applications................................................................................................ |
29 |
Applications You Can Download to the Mobile Computer.......................................... |
30 |
Unlock Developer Options ....................................................................................................... |
31 |
Chapter 3 - Use the Image Engine .............................................................. |
33 |
About the Image Engine ........................................................................................................... |
33 |
About the Scan Wedge Feature ....................................................................................... |
33 |
Change the Scanner Settings................................................................................................. |
34 |
Restore Default Scan Settings......................................................................................... |
34 |
Default Scan Settings.......................................................................................................... |
35 |
Add a Scan Setting Profile................................................................................................. |
39 |
iv |
CK65 Mobile Computer |
Delete a Scan Setting Profile ............................................................................................ |
39 |
About the Optional Digital Scan Button ............................................................................. |
40 |
Enable and Configure the Digital Scan Button......................................................... |
40 |
Scan Bar Codes............................................................................................................................. |
41 |
About Scanning Configuration Bar Codes.................................................................. |
41 |
Use the Scan Demo App............................................................................................................ |
42 |
Change the Scan Demo Symbology Settings ............................................................ |
42 |
Chapter 4 - Use the Camera .......................................................................... |
43 |
About the Color Camera............................................................................................................ |
43 |
How to Zoom............................................................................................................................ |
43 |
Take a Photo................................................................................................................................... |
43 |
Change Camera Settings.......................................................................................................... |
44 |
Record a Video............................................................................................................................... |
45 |
Change Video Settings............................................................................................................... |
45 |
Use the Camera as a Flashlight ............................................................................................. |
46 |
Chapter 5 - Configure the Computer .......................................................... |
47 |
How to Configure the Computer............................................................................................ |
47 |
Start the Settings App.......................................................................................................... |
47 |
About the Structure of the Settings App ...................................................................... |
47 |
About Network Communications .......................................................................................... |
55 |
Connect to a Wi-Fi Network............................................................................................... |
55 |
Connect to an Ethernet Network..................................................................................... |
56 |
How to Connect to Virtual Private Networks............................................................... |
57 |
About Wireless Security............................................................................................................. |
58 |
About Certificates.................................................................................................................. |
58 |
About Bluetooth Communications ....................................................................................... |
60 |
Connect a Bluetooth Device.............................................................................................. |
60 |
Rename the Computer and View File History ............................................................ |
61 |
Rename, Share or Unpair a Paired Device................................................................... |
61 |
About Serial and USB Communications............................................................................. |
61 |
USB Troubleshooting........................................................................................................... |
61 |
CK65 Mobile Computer |
v |
About Near Field Communication (NFC)........................................................................... |
62 |
Developer Information............................................................................................................... |
62 |
About Provisioning Mode......................................................................................................... |
63 |
Enable or Disable Provisioning Mode........................................................................... |
63 |
Chapter 6 - Manage and Maintain the Computer.................................... |
65 |
About Software Updates........................................................................................................... |
65 |
About Transferring Files via USB Connection ........................................................... |
65 |
Install Software with AutoInstall............................................................................................ |
66 |
Optional microSD Card Method...................................................................................... |
66 |
About the Honeywell Upgrader.............................................................................................. |
67 |
View the Installed OTA Version ........................................................................................ |
67 |
Install OTA Updates.............................................................................................................. |
68 |
Reboot (Restart) the Computer.............................................................................................. |
69 |
About Enterprise Data Reset................................................................................................... |
69 |
Before You Begin................................................................................................................... |
69 |
Enterprise Data Reset the Computer ............................................................................ |
70 |
About Erase All Data (Factory Reset)................................................................................... |
70 |
Before You Begin................................................................................................................... |
70 |
Erase All Data (Factory Reset).......................................................................................... |
71 |
Clean the Computer.................................................................................................................... |
71 |
Appendix A - Specifications.......................................................................... |
73 |
Computer Agency Information............................................................................................... |
73 |
Label Locations ..................................................................................................................... |
73 |
Physical and Environmental Specifications..................................................................... |
74 |
Bar Code Symbologies Supported........................................................................................ |
74 |
N6703SR Imager Engine Reading Distances.................................................................. |
75 |
N6703SR Imager Engine Field of View/Resolution................................................ |
76 |
EX20 Imager Engine Reading Distances........................................................................... |
76 |
EX20 Imager Engine Field of View/Resolution......................................................... |
77 |
vi |
CK65 Mobile Computer |
Customer Support
Technical Assistance
To search our knowledge base for a solution or to log in to the Technical Support portal and report a problem, go to www.hsmcontactsupport.com.
For our latest contact information, see www.honeywellaidc.com/locations.
Product Service and Repair
Honeywell International Inc. provides service for all of its products through service centers throughout the world. To find your service center, go to www.honeywellaidc.com and select Support. Contact your service center to obtain a Return Material Authorization number (RMA #) before you return the product.
To obtain warranty or non-warranty service, return your product to Honeywell (postage paid) with a copy of the dated purchase record. To learn more, go to www.honeywellaidc.com and select Service & Repair at the bottom of the page.
For ongoing and future product quality improvement initiatives, the mobile computer comes equipped with an embedded device lifetime counter function. Honeywell may use the lifetime counter data for future statistical reliability analysis as well as ongoing quality, repair and service purposes.
Limited Warranty
For warranty information, go to www.honeywellaidc.com and click Get Resources >
Product Warranty.
CK65 Mobile Computer |
vii |
viii |
CK65 Mobile Computer |

CHAPTER
1 ABOUT THE COMPUTER FEATURES
This chapter introduces the CK65 Mobile Computer. Use this chapter to learn about the basic computer features, functions, and accessories.
About the CK65 Mobile Computer
CK65 mobile computers, built on the Mobility Edge™ platform, deliver real-time connectivity, advanced data capture, and future-proof investment protection. A 4-inch touchscreen with the option to choose between an alphanumeric or
numeric keypad with function keys provides the flexibility to fit current and future application environments. CK65 models are equipped for fast Wi-Fi connectivity with a WLAN 802.11a/b/g/n dual-band radio and Bluetooth (v5.0) technology that includes Bluetooth Low Energy (BLE) support.
All models are available with either a N6703SR (1D/2D) high performance imager or an EX20 Near/Far (1D/2D), high performance 2D imager for long range scanning applications up to 15.2 m (50 ft).
Note: Throughout this manual, all versions of the mobile computer are referred to as the CK65 unless information is specific to a particular model type.
Model Overview
Available Features |
Model |
|
CK65L0N |
||
|
||
|
|
|
Android 8 operating system, upgradeable through Android R |
x |
|
|
|
|
2.2 GHz Qualcomm Snapdragon™ 660 octacore processor |
x |
|
|
|
|
2 GB/4 GB LPDDR4 RAM, 32 GB flash memory |
x |
|
|
|
|
High definition, bright color, outdoor-readable display with |
x |
|
responsive multi-touch capacitive touch panel |
|
|
|
|
|
Integrated ambient light sensor, accelerometer, gyroscope, and |
x |
|
magnetometer |
|
|
|
|
CK65 Mobile Computer |
1 |
Available Features |
Model |
|
CK65L0N |
||
|
||
|
|
|
Choice of physical keypad: |
x |
|
• Alphanumeric and function keypad |
|
|
• Numeric and function keypad |
|
|
|
|
|
Choice of Honeywell imager: |
x |
|
• N6703SR (1D/2D), high performance imager |
|
|
• EX20 Near/Far (1D/2D), high performance, long range imager |
|
|
|
|
|
WLAN IEEE 802.11 a/b/g/n/ac radio; Wi-Fi certified |
x |
|
|
|
|
Bluetooth™ V5.0 and Bluetooth Low Energy (BLE) technology support |
x |
|
|
|
|
NFC technology for short-range wireless data exchange |
x |
|
|
|
|
Mid-tier rugged specifications with IP64 sealing |
x |
|
|
|
|
Customer-accessible microSD™ slot for removable memory cards up |
x |
|
to 512 GB (SDXC/SDHC/SDIO-compliant) |
|
|
|
|
|
Value-added software components supporting specialized imaging |
x |
|
and OCR functions |
|
|
|
|
|
13-megapixel color camera, 4K video with image stabilization and |
x |
|
advanced software features for enhanced exposure control |
|
|
|
|
2 |
CK65 Mobile Computer |
Features of the CK65
Imager Window (LED/Laser Aperture)
Touch Panel
Notification/Scan/
Battery Status LEDs
Ambient Light
Sensor
Scan Buttons
Power Button 


Keyboard 

 (model dependent)


 Microphone
Keypad Status LEDs
CK65 Mobile Computer |
3 |
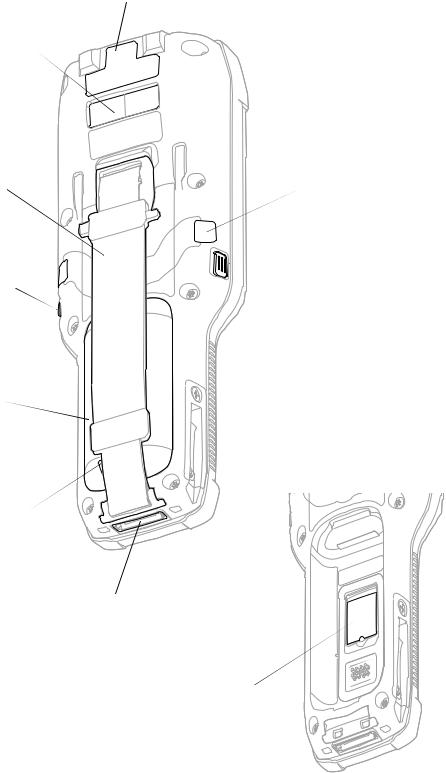
CK65 Model with N6703 Imager
Laser Safety Label Location
Camera Lens
and Flash
(optional) 
Hand Strap |
Speaker Port |
Speaker Port
 Scan/Aux Button
Scan/Aux Button
Battery
Battery Latch (under hand strap)
I/O Connector
MicroSD Card Door (battery and hand strap removed)
4 |
CK65 Mobile Computer |
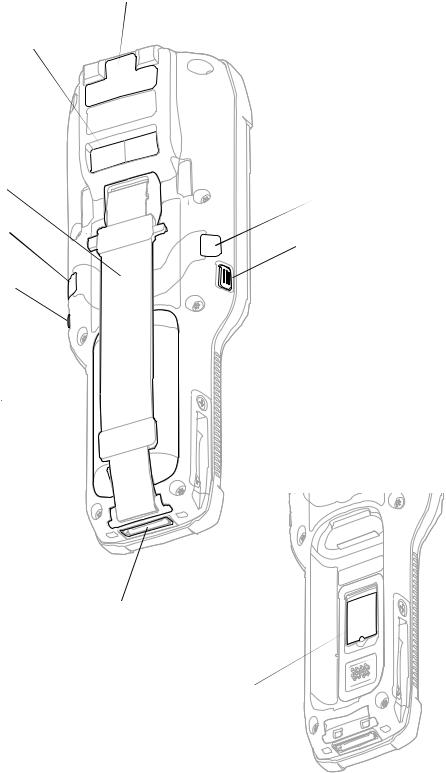
CK65 Model with EX20 Imager
Laser Safety Label Location
Camera Lens
and Flash
(optional) 
Hand Strap
Speaker Port
Speaker Port 
 Scan/Aux Button
Scan/Aux Button
Battery
Battery Latch (under hand strap)
I/O Connector
MicroSD Card Door (battery and hand strap removed)
CK65 Mobile Computer |
5 |

About the Battery
The computer uses a rechargeable Li-ion battery as its main power source. Several factors determine the life of your battery, such as display brightness, display timeout, input device, extreme temperature, and usage. Honeywell recommends that you keep the battery charged at all times to prevent data loss.
CK65 computers are designed for use with battery model AB18 manufactured for Honeywell International Inc. CK3 battery models AB17 and 1001AB01 may be used with the CK65.
Note: To view specifications specific to your battery model, see the battery insert supplied with the battery.
For a list of compatible accessories for the CK65 mobile computer series and their part numbers, see the CK65 Accessory Guide, available for download from the CK65 product page at www.honeywellaidc.com. Contact your local sales representative for replacement battery ordering information.
Caution: Read Battery Recommendations and Safety Precautions on page 10 and all cautionary markings on the battery, charging peripheral, and device using the battery before attempting to install, use, or charge the battery.
Charge the Battery Before Use
CK65 computers ship with the battery significantly discharged of power. Fully charge the battery before using your computer for the first time. You can charge the battery with a CK3 series charging accessory before or after you install the battery in the computer.
CK65 Charging Accessory |
AB18 Charge Times |
|
|
AC20 quad charger |
up to 6 hours |
|
|
AD20 single dock |
up to 6 or 7 hours |
|
|
AD21 Ethernet multidock |
up to 7 hours |
|
|
AD22 charge-only multidock |
up to 7 hours |
|
|
AV10 vehicle dock |
up to 7 hours |
|
|
DX2 or DX4 with FlexDock cup 1002UC02 |
up to 7 hours |
|
|
Universal wall mount charger |
up to 6 hours |
|
|
Note: Using the computer while charging the battery increases the time required to reach a full charge.
6 |
CK65 Mobile Computer |

Replace the Battery
When battery power is low, you have the choice to either charge the battery in the computer, or replace it with another fully charged battery. Spare batteries can be purchased separately.
Caution: Ensure all components are dry prior to placing the battery in the computer terminal. Mating wet components may cause damage not covered by the warranty.
To replace the battery:
1.Save your files and close any open applications.
2.Press and hold the Power button until the options menu appears.
3.Tap Swap Battery. Follow the on-screen instructions to place the unit in battery swap mode.
4.Release the end of the hand strap at the bottom of the computer.
5.Push the battery latch toward the battery to release the lock.
6.Lift up the edge of the battery and remove it from the computer.
7.Insert the charged battery into the computer.
8.Press down on the bottom edge of the battery to engage the lock.
9.Attach the hand strap.
About the Battery Status
To view detailed information on your battery, such as use statistics, amount of charge remaining, and battery health information:
1.Open the Settings app  .
.
2.Select either Battery or Honeywell Settings > Battery Optimizer.
You can also use the battery icon at the top of the screen in the Status bar to see battery charge information. The icon changes depending on the charge level.
Battery Status Icons
Icon Status
The battery charge is at 100%.
The battery charge is at 50%.
The battery charge is low. You need to charge or replace the battery soon.
CK65 Mobile Computer |
7 |

Icon Status
The battery is critically low. You need to replace the battery now or connect the computer to a charging accessory.
The computer is connected to external power and the battery is charging.
There is a battery error. Install another battery. If the problem persists, contact Honeywell
Technical Support.
Along with the battery icon, there is a battery status LED below the touch screen. The LED color and behavior (e.g., steady on, blinking, or off) indicates the charging status of the battery. To view status descriptions and to learn how to modify the Battery LED behavior, see About the Battery Status LED Setting on page 8.
Battery Status LED
About the Battery Status LED Setting
You can change the behavior of the Battery status LED if the out-of-box behavior for a charging battery (blinking green) is not acceptable to your environment.
You can choose one of three options:
•Honeywell Battery LED (factory default, out-of-box configuration)
•Default Battery LED (optional Android OS configuration)
•No Battery LED
Honeywell Battery LED Behavior (Factory Default/Out-of-Box Configuration)
Connected to Power |
LED State |
Description |
No |
Blinking amber |
Battery level is below 15% |
No |
Off |
Battery level is more than 15% |
Yes |
Steady amber |
Battery level is between 0% and 60% |
Yes |
Blinking green |
Battery level is between 60% and 95% |
Yes |
Steady green |
Battery level is above 95% |
Either |
Blinking red |
Battery error |
8 |
CK65 Mobile Computer |
Default Battery LED Behavior (Optional Android OS Configuration)
Connected to Power |
LED State |
Description |
|
|
|
No |
Blinking red |
Battery level is below 15% |
|
|
|
No |
Off |
Battery level is 15% or more |
|
|
|
Yes |
Steady red |
Battery level is below 15% |
|
|
|
Yes |
Steady amber |
Battery level is between 15% and 90% |
|
|
|
Yes |
Steady green |
Battery level is 90% or more |
|
|
|
Select the No battery LED setting if you want to use the LED as a notification LED for applications or device management solutions. For more information on how to use the LED as a notification LED, see http://developer.android.com/guide/ topics/ui/notifiers/notifications.html.
Change the Battery Status LED Behavior
To change the battery status LED behavior:
1.Swipe up from the bottom of the Home screen to access all apps.
2.Tap Settings  > Honeywell Settings > Battery LED.
3.Choose one of the options:
•Default Battery LED (optional Android OS configuration)
•Honeywell Battery LED (factory default/out-of-box configuration)
•No Battery LED (disable battery LED)
Check the Battery Level and Usage
In addition to the Battery status icon and LED, you can monitor the battery status from the Settings app.
1.Swipe up from the bottom of the Home screen to access all apps.
2.Tap Settings  > Battery.
The current percentage of battery power remaining and the amount of usage time left on the battery appear on the screen. A list shows the battery usage for individual apps and services. For usage details, select one of the apps or services in the list. You can also access the Battery saver feature from the battery screen.
CK65 Mobile Computer |
9 |

About Battery Life and Conservation
If you store the battery outside of the computer for long periods of time, the battery slowly discharges. To maintain battery performance, storing the battery in a charger is recommended. Use the reference table below to learn about how to conserve battery power.
When You Want to: |
Do this to Save Battery Power: |
|
|
|
|
Use the computer and the low |
Do one of the following: |
|
battery status icon appears or |
• Connect the computer to a charging accessory. |
|
the battery light turns on. |
||
• Replace the Battery (see page 7). |
||
|
||
|
|
|
Stop using the computer for |
Make sure that the low battery status icon is not on the screen |
|
5 minutes or more. |
and that the battery status LED is not on. Press and release the |
|
|
Power button to put the computer to sleep. |
|
|
|
|
Store the computer for more |
• If you are storing the computer for a few days (e.g., over the |
|
than a day. |
weekend), install a fully charged battery or connect the |
|
|
computer to a power source. |
|
|
• If you are storing the computer for a longer period of time, |
|
|
remove and charge the battery. When the battery is done |
|
|
charging, store both the battery and the computer in a cool |
|
|
location. |
|
|
• If you store the battery for several months, recharge the |
|
|
battery periodically to keep it at peak performance. |
|
|
|
|
Store the battery outside of the |
Store the batteries in a charger. |
|
computer. |
|
|
|
|
Battery Recommendations and Safety Precautions
Caution: Improper battery replacement or incompatible device usage may result in risk of burns, fire, explosion, or other hazard. Dispose of lithium-ion batteries according to local regulations. Risk of fire and burns if improperly handled. Do not open, crush, heat above 50°C (122°F) or incinerate.
•For maximum battery life, charge the battery at 20 °C (68 °F) to 25 °C (77 °F) and store at 23 °C (73 °F).
•Do not store the battery at temperatures above 60 °C (140°F). Storage above 60 °C (140°F) may damage the battery.
•Charge the battery before use. Battery ships with only a partial charge.
•See Charge the Battery Before Use on page 6 for approved charging methods. Use of this battery in other devices could result in damage to the device or battery.
•Avoid dropping the battery or computer. If you suspect that the battery or computer is damaged, send it to a Honeywell service center for inspection.
•Discarded batteries may create a safety hazard. Before disposal, cover the battery contacts with electrical insulating tape.
10 |
CK65 Mobile Computer |
•Do not modify the battery or attempt to insert foreign objects into it.
•Do not solder directly to the battery contacts.
•Do not drop the battery or apply mechanical shocks or pressure to it.
•Do not disassemble or open, crush, bend or deform, puncture, shred or burn the battery.
•Do not immerse the battery pack in water or get the battery pack wet before proper installation in the computer.
Enable Airplane Mode
If you do not need to connect to any wireless networks, you can enable Airplane mode to turn Off the radios and save battery power.
1.Swipe up from the bottom of the Home screen to access all apps.
2.Tap Settings  > Network & Internet.
3.Tap the toggle button next to Airplane mode. An airplane icon appears in the status bar to indicate Airplane mode is turned On.
Power On the Computer
After you have fully charged and installed a battery, power on the computer for the first time:
•Press and hold the Power button for approximately 3 seconds, and then release the button.
Welcome Screen
The first time you power on the computer, a Welcome screen appears. Select a language and then tap Start. You can either scan a configuration bar code or select manual to set up the computer. To learn more about how to Scan Bar Codes, see page 41.
During the manual setup process, follow the prompts on the screen to:
•Set up the Wi-Fi network connections.
•Set the time, date, and time zone, if no Wi-Fi connection is available.
•Personalize (name) the computer.
•Set up security and privacy options.
CK65 Mobile Computer |
11 |
Once you complete the initial setup, the Welcome screen no longer appears when you power on the computer and Provisioning mode is automatically turned Off (disabled). Scanning a bar code to install applications, certificates, configuration files, and licenses on the computer is restricted when Provisioning mode is turned Off. To learn more About Provisioning Mode see page 63.
Unlock the Screen
The screen lock automatically activates every time the computer is turned On or when the computer wakes from sleep mode.
•Swipe up from the lock icon at the bottom of the screen.
The level of security provided depends on the type of lock set (e.g., Swipe, Pattern, PIN, or Password). The default setting, Swipe, provides no protection against unauthorized access to your computer.
Change the Screen Lock to Protect the Computer
After you start using the computer, you should change the screen lock to prevent unauthorized persons from accessing the computer after the screen lock activates, unless they input the correct password, pin, or pattern.
The recommended setting for the Screen lock is to enable a Password lock. Use a strong password value (e.g., include numbers, characters, special characters, and mix character case).
1.Swipe up from the bottom of the Home screen to access all apps.
2.Tap Settings  > Security & location > Screen lock.
3.Choose one of the following options:
•None
•Swipe
•Pattern
•PIN
•Password
4.Follow the on-screen prompts to complete the setup.
5.Exit the Settings app.
12 |
CK65 Mobile Computer |
Configure the Screen Backlight
The display has an ambient light sensor that automatically adjusts the backlight intensity to conserve power and ensure the display is readable. You can also manually set the backlight intensity if you do not want to use the automated adaptive brightness feature.
1.Swipe up from the bottom of the Home screen to access all apps.
2.Tap Settings  > Display.
3.Choose one of the following options:
•To have the computer automatically adjust the brightness for your work environment, turn On the Adaptive brightness setting. You can tap Adaptive brightness to toggle the feature On or Off.
•To set the brightness level manually, verify the Adaptive brightness feature is turned Off, and then select Brightness level. Adjust the slider to set the brightness level.
About the Scan Status LED
The Scan Status LED indicates the read status of the imager when scanning a bar code. The Scan Status LED is located below the touch screen.
Scan Status LED
Scan Status LED Descriptions
LED Color |
Description |
Green |
Good read of a bar code. |
Red |
Failure to scan bar code. |
|
Check to make sure you have the correct symbology enabled. |
Note: The behavior of the Scan Status LEDs is determined by the scanning notification settings (see page 39).
To learn more about how to use and configure the imager engine for scanning, see Use the Image Engine beginning on page 33.
CK65 Mobile Computer |
13 |

About the Keypad
The CK65 is available in two keypad configurations.
Alphanumeric Keypad |
Numeric Keypad |
Keypad LEDs
Special characters and alternate functions are entered by pressing color-coded key sequences. Keypad LEDs located at the bottom of the keypad, indicate when a color-coded modifier key is active. All models include both orange and green modifier keys for typing alternate characters, symbols, and functions.
Orange Key Status LED
Green Key Status LED
14 |
CK65 Mobile Computer |

Keypad LED Descriptions
Status LED |
Color |
Description |
|
|
|
Orange Modifier Key Status |
Orange |
Illuminated when the orange modifier key is enabled. |
|
|
|
Green Modifier Key Status |
Green |
Illuminated when the green modifier key is enabled. |
|
|
|
About the Color-Coded Keys
Use the keypad color-coded modifier key(s) to access all the characters, numbers, symbols and functions marked on the computer keys and keypad overlay.
Note: On either keypad, you can lock the modifier key On and type only symbols or special characters by pressing the orange or green modifier key twice in rapid succession. Press the modifier key again to unlock the modifier.
Enter Characters on the Alphanumeric Keypad
Computer models with a Alphanumeric keypad include orange and green modifier keys for typing symbols and special characters. The keypad also has customizable auxiliary keys (F1 to F5) that can provide up to five additional key functions.
To learn more about customizing the key functions, see Remap a Button or Key on page 25.
To type an alphabetic character or a number:
•Press the relevant character or number key.
To type a symbol or special character:
1.Press the orange or green modifier key.
2.Press the key for the symbol or special character.
Example: Press |
and then T to type a question mark. |
To type a single uppercase alphabetic character:
1.Press the orange modifier key then A .
A will display in the status bar to indicate that shift is On.
2.Press the character. The shift notifier in the status bar will turn Off. Example: Press  , A then Y to type the capital letter Y.
CK65 Mobile Computer |
15 |
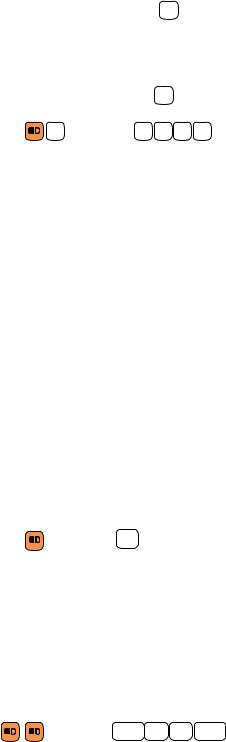
To type all uppercase alphabetic characters:
1. Press the orange modifier key then B .
A will display in the status bar while caps lock is on.
2. |
Press the character keys. |
|
|
|
3. |
Press the orange modifier key and |
B |
again to turn caps lock Off. |
|
|
Example: Press |
B and then C |
O |
L D to type the word COLD in all caps. |
Enter Characters on the Numeric Keypad
Computer models with a numeric keypad include orange and green modifier keys for typing alphabetic characters and special characters as well as accessing functions. The keypad also has customizable auxiliary keys (F1 to F12) that when used in conjunction with the green modifier key can provide up to 24 additional key functions.
To learn more about customizing the key functions, see Remap a Button or Key on page 25.
To type a number:
•Press the relevant number key.
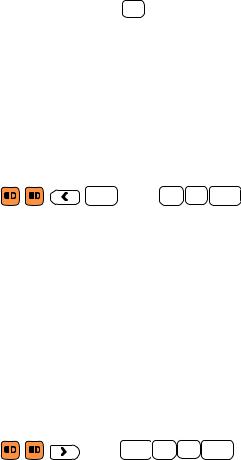
To type a single alphabetic character or symbol:
1.Press the orange or green modifier key.
(If you press the orange key, a will display in the status bar to indicate that the keypad is in alphabetic mode.)
2.Press the key for the letter or special character.
Example: Press |
and then Esc to type a lower case a. |
To type multiple alphabetic characters:
1.Press the orange modifier key twice to lock it On. a will display in the status bar.
2.Press the keys for the letters you want to input.
3.Press the orange modifier key once to return to typing numbers.
Example: Press |
and then 8 F1 . 9 to type the word “cold” in lower |
case letters. |
|
16 |
CK65 Mobile Computer |
To type a single uppercase alphabetic character:
1.Press the orange modifier key once. a will display in the status bar.
2.Press  .
.
a will change to A in the status bar to let you know shift is On.
3.Press the orange modifier key again.
4.Press the character key.
Example: Press 

 then F11 to type the capital letter Y by itself.
Alternately, to type a single uppercase alphabetic character with the modifier key locked on:
1.Press the orange modifier key twice to lock it on.
2.Press  .
.
3.Press the character key.
Example: Press |
8 then F1 . 9 to type the word “Cold”. |
To type all uppercase characters:
1.Press the orange modifier key twice. a will display in the status bar.
2.Press  .
.
a will change to A in the status bar when caps lock is turned on.
3.Press the character keys.
4.Press  again to turn caps lock Off.
Example: Press |
then 8 F1 . 9 to type the word “COLD” in |
all caps. |
|
About the Audio Features
The CK65 has multiple speakers, a microphone, and several software tools to configure sound volume or enable vibration feedback.
CK65 Mobile Computer |
17 |
Audio Settings
This section describes the audio and sound settings you can configure in the Settings app.
•To change audio settings, select the Settings app  and then tap Sound.
Note: Sound settings are model dependent. Some settings may not be available for your model type.
Sound Settings
Setting |
Description |
||
|
|
||
Media volume |
Use the sliders to set the volume for media (e.g., music, videos, |
||
|
and games), alarms and rings (notifications and ringtones). |
||
Alarm volume |
|||
|
|
||
|
|
|
|
Ring volume |
|
|
|
|
|
||
Also Vibrate for calls |
Set the phone to vibrate for incoming calls. |
||
|
|
||
Do Not Disturb preferences |
Configure the Do not disturb feature. |
||
|
|
||
Phone ringtone |
Set the phone ringtone. |
||
|
|
||
Advanced |
Select to expand the settings menu. |
||
|
|
||
Default notification sound |
Set the default sound used for notifications. |
||
|
|
||
Default alarm sound |
Set the default sound used for alarms. |
||
|
|
||
Other sounds and vibrations |
Turn sounds On or Off for: |
||
|
• |
Dial pad tones |
|
|
• |
Screen locking sounds |
|
|
• |
Charging sounds |
|
|
• |
Touch sounds |
|
|
• |
Vibrate on tap |
|
|
|
||
Emergency alerts |
Set what emergency information you want to receive and how |
||
|
you want to receive the alerts. |
||
|
|
|
|
Insert a microSD Card
You can use a microSD card to increase file storage capacity or to install software. Honeywell recommends the use of Single Level Cell (SLC) industrial grade microSD or microSDHC memory cards with the computer for maximum performance and durability.
Note: Format the memory card before initial use.
1.Save your files and close any open applications.
2.Press and hold the Power button until the options menu appears.
3.Tap Power Off.
18 |
CK65 Mobile Computer |
4.Release one end of the hand strap. Slide the end of the strap toward the bottom of the unit, and then lift out the strap.
5.Press the battery latch towards the battery.
6.Lift up on the edge of the battery and remove it from the computer
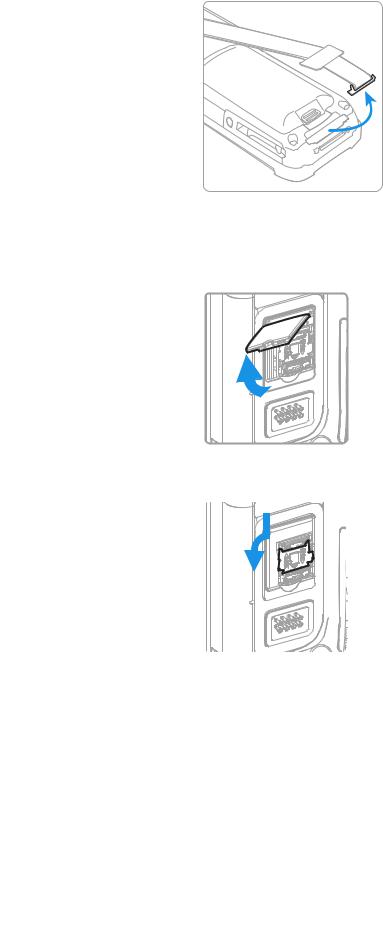
7.Press down on the card access door hinge and lift the opposite end to open it.
8.Press down gently and slide the card holder away from the open access door. Lift the edge of the holder up.
|
|
|
CK65 Mobile Computer |
19 |
|
Loading...