


 Loading...
Quick Start Guide
Gateway NV52L/NV56R
TABLE OF CONTENTS
Starting your computer |
3 |
Wireless connection........................................... |
3 |
Registration........................................................ |
3 |
Software installation........................................... |
4 |
Recovery............................................................ |
4 |
Having trouble?.................................................. |
4 |
Getting to know your computer |
5 |
Top view - display .............................................. |
5 |
Top view - keyboard .......................................... |
6 |
Special keys ............................................... |
7 |
Touchpad.................................................... |
8 |
Front view .......................................................... |
9 |
Left view............................................................. |
9 |
Right view........................................................ |
10 |
Base view........................................................ |
11 |
Recovery |
12 |
Gateway Recovery Management.................... |
12 |
Creating recovery discs ........................... |
12 |
Recovering your system.................................. |
13 |
Types of recovery .................................... |
14 |
Regulatory information |
18 |
Environment |
28 |
Software license |
30 |
Table of Contents - 1

Copyright © 01/2012.
All Rights Reserved.
Gateway NV52L/NV56R Quick Guide
Original Issue: 13 January 2012
Work Great with Microsoft® Office 2010 - Express your ideas, solve problems and simplify everyday projects with Office 2010.
Photo editing - Easily edit and print your photos with Windows Live Photo Gallery. Then share them on Facebook, YouTube™ or Windows Live.
Search & Decide with Bing™ - Find and organize the answers you need using Bing™, so you can make faster, more informed decisions.
Please use this space to write down important information about your computer.
Product name: . . . . . . . . . . . . . . . . . . . . . . . . . . . . . .
Serial Number: . . . . . . . . . . . . . . . . . . . . . . . . . . . . . . .
Date of purchase: . . . . . . . . . . . . . . . . . . . . . . . . . . . .
Place of purchase: . . . . . . . . . . . . . . . . . . . . . . . . . . . .
Visit registration.gateway.com and discover the benefits of being a customer of
Gateway.
Remark: All images are for reference purposes only. Actual configuration may vary.
2 - Quick start guide

STARTING YOUR COMPUTER
Thank you for purchasing this Gateway computer!
This guide has been designed to introduce you to the features of your computer and assist in your computing experience.
After setting up and starting your computer, as shown in the setup instructions, it will ask you questions that will help you connect to the Internet. Your computer will then configure installed software.
WIRELESS CONNECTION
To connect to a wireless network, first check the wireless features of your computer are on, and that the router or modem you want to connect to is also correctly configured.
•If wireless is not on, press the communication key (
 ) to open the Launch Manager and make sure Wi-Fi is On.
•Your computer will detect and display any available networks, select your network and enter the password, if required.
•After a short delay, your computer should connect to the Internet.
If your network is not detected, or your computer does not connect to the Internet, please refer to your ISP or router’s documentation. After your computer starts and you can use it, open Internet Explorer and follow the instructions.
Alternatively, use a network cable to connect directly to a network port on your router. Please refer to your ISP or router’s guide.
REGISTRATION
When using your computer for the first time, it is recommended that you register it. This gives you access to some useful benefits, such as:
•Faster service from our trained representatives.
•Membership in the Gateway community: receive promotions and participate in customer surveys.
•The latest news from Gateway.
How to register
During the initial startup of your computer, a window will invite you to register. Please fill in the information and click Next. The second window you'll see contains optional fields that will help us to provide you with a more personable customer service experience.
Another option
Another way to register your Gateway product is to visit our website at registration.gateway.com. Choose your country and follow the simple instructions.
Starting your computer - 3
After registering, you will be sent a confirmation email with important information that you should keep in a safe place.
SOFTWARE INSTALLATION
Your computer will automatically install software and prepare your computer for use. This may take some time, please do not turn off your computer; wait until the installation has finished.
RECOVERY
You should create recovery discs as soon as you are able. The Gateway Recovery Management program allow you to create recovery discs and then to restore or reinstall applications and drivers provided by Gateway.
HAVING TROUBLE?
Gateway provides several options to support your purchase.
Gateway support
Make sure you write down your computer serial number, date and place of purchase and model name on the area provided in this guide; save your proof of purchase. Before you call us, please write down any error message that accompanies the problem, and have the computer in front of you and switched on if possible. Having these items to hand when contacting us will ensure better and quicker service.
Gateway website
Remember to visit www.gateway.com - Check out the support section for up-to-date information, help, drivers and downloads.
Warranty and contact information
You can find information about the warranty for your computer and how to contact technical support in your computer’s Warranty.
4 - Quick start guide

GETTING TO KNOW YOUR
COMPUTER
After setting up your computer, as illustrated in the setup instructions, let us show you around your new Packard Bell computer.
Gateway NV52L/NV56R
TOP VIEW - DISPLAY
# |
Icon Item |
Description |
|
|
|
Web camera for video communication. |
|
1 |
Webcam |
A light next to the Webcam indicates that the |
|
|
|
webcam is active. |
|
|
|
|
|
2 |
Display screen |
Also called Liquid-Crystal Display (LCD), |
|
displays computer output. |
|||
|
|
||
|
|
|
|
3 |
Microphone |
Internal microphone for sound recording. |
Getting to know your computer - 5
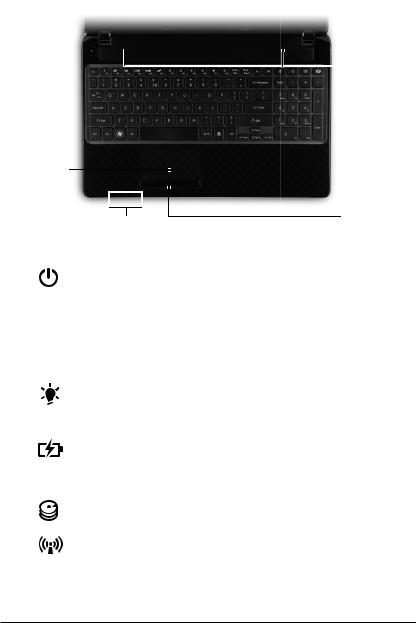
TOP VIEW - KEYBOARD
1
6
2
|
3 |
|
|
|
4 |
5 |
|
|
|
|
|
# |
Icon Item |
Description |
|
1 |
Power button / |
Turns the computer on and off. Indicates the |
|
indicator |
computer's power status. |
||
|
|||
|
|
|
|
2 |
Keyboard |
For entering data into your computer. |
|
- Special keys are described on page 7. |
|||
|
|
||
|
|
|
|
3 |
Touchpad |
Touch-sensitive pointing device which |
|
functions like a computer mouse. |
|||
|
|
||
|
|
|
|
|
Power indicator |
Indicates the computer's power status. |
|
|
|
|
|
|
|
Indicates the computer's battery status. |
|
|
Battery indicator |
- Charging: The light shows amber when the |
|
|
battery is charging. |
||
4 |
|
||
|
- Fully charged: The light shows blue when in |
||
|
|
AC mode. |
|
|
|
|
|
|
HDD indicator |
Indicates when the hard disk drive is active. |
|
|
|
|
|
|
Communication |
Indicates the computer’s wireless connectivity |
|
|
indicator |
device status. |
|
|
|
|
|
5 |
Click buttons (left |
The left and right side of the button function as |
|
and right) |
left and right selection buttons. |
||
|
|||
|
|
|
|
6 |
Speakers |
Deliver stereo audio output. |
- Note: The front panel indicators are visible even when the computer cover is closed.
6 - Quick start guide

Special keys
Your computer’s keyboard includes keys that activate special functions. The function of each key is clearly marked with an icon.
Icon |
Function |
Description |
|
Fn |
Hotkey for second |
Activates a second function on certain keys. |
|
function |
E.g. press the Fn key to activate the F1 to F12 keys. |
||
|
|||
|
|
|
|
|
Help |
Opens the help menu. |
|
|
|
|
|
|
|
Allows you to create backup copies of your computer; |
|
|
Backup |
either the entire system or only selected files and |
|
|
folders. Create a regular schedule or make copies |
||
|
|
||
|
|
whenever you want. |
|
|
|
|
|
|
Communication |
Enables/disables the computer’s communication |
|
|
devices. |
||
|
|
||
|
|
|
|
|
Display toggle |
Switches display output between the display screen, |
|
|
external monitor (if connected) and both. |
||
|
|
||
|
|
|
|
|
Screen blank |
Turns the display screen backlight off to save power. |
|
|
Press any key to return. |
||
|
|
||
|
|
|
|
|
Touchpad toggle |
Turns the internal touchpad on and off. |
|
|
|
|
|
|
Play/Pause |
Play or pause a selected media file. |
|
|
|
|
|
|
Stop |
Stop playing the selected media file. |
|
|
|
|
|
|
Previous |
Return to the previous media file. |
|
|
|
|
|
|
Next |
Jump to the next media file. |
|
|
|
|
|
|
Brightness down |
Decreases the screen brightness. |
|
|
|
|
|
|
Brightness up |
Increases the screen brightness. |
|
|
|
|
|
|
|
Opens the Social Networks application. |
|
|
Social Networking |
- If this application is not installed, the key will start |
|
|
|
||
|
|
your instant messenging application. |
|
|
|
|
|
|
Volume up |
Increases the sound volume. |
|
|
|
|
|
|
Volume down |
Decreases the sound volume. |
|
|
|
|
|
|
Speaker toggle |
Turns the speakers on and off. |
|
|
|
|
Getting to know your computer - 7
Hotkeys
The computer uses hotkeys (key combinations) to access function keys and navigation commands.
To activate hotkeys, press and hold the Fn key (bottom left) before pressing the other key in the hotkey combination.
Hotkey |
Function |
Description |
|
Fn + Special keys |
Function keys |
Activates the F1 to F12 keys. |
|
(see page 7) |
|||
|
|
||
|
|
|
|
Fn + |
Home |
Scrolls to the beginning of a document. |
|
|
|
|
|
Fn + |
End |
Scrolls to the end of a document. |
|
|
|
|
|
Fn + |
Page up |
Scrolls up a page in a document. |
|
|
|
|
|
Fn + |
Page Down |
Scrolls down a page in a document. |
-Note: It is not necessary to press the Fn key to use the F1 to F12 function keys when starting your computer or when using the BIOS.
To swap the hotkey and special function of the F1 to F12 keys, change the function key setting in the BIOS (to open the BIOS press F2 when starting your computer, then select the Main menu and change Function key behavior to Function keys).
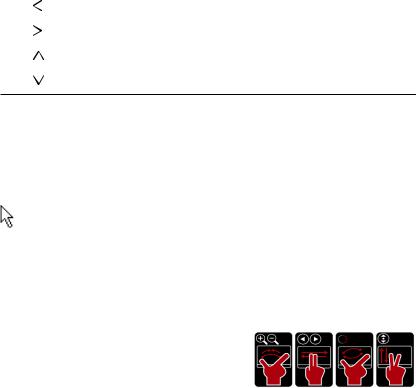
Touchpad
The touchpad controls the arrow on the screen; called the pointer or the cursor. When you slide your finger across the touch-sensitive pad,
the pointer will follow this movement.
Multi-gesture
The touchpad supports Multi-gesture commands; it can recognise patterns that use more than one finger. This allows you to control applications with a few simple gestures, such as:
•Pinch: Quickly zoom in and out of photos, maps and documents with a simple finger-thumb gesture.
•Flip: Browse photos, websites or documents by sliding two fingers horizontally.
•Rotate: Rotate photos or PDF files in 90° steps with a two-finger pivot motion.
•Scroll: Swiftly navigate web pages, documents and music playlists up or down by moving two fingers vertically.
8 - Quick start guide
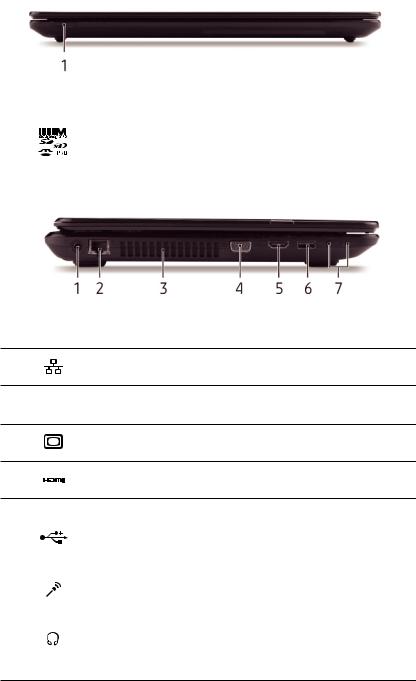
FRONT VIEW
# |
Icon Item |
Description |
|
|
Accepts Secure Digital (SD), MultiMediaCard |
|
|
(MMC), Memory Stick PRO (MS PRO), xD- |
1 |
Multi-in-1 card reader |
Picture Card (xD). |
|
|
- Push to remove/install the card. Only one |
|
|
card can operate at any given time. |
|
|
|
LEFT VIEW
# |
Icon Item |
Description |
1
2
3
4
5
|
|
|
|
|
DC-in jack |
Connects to your computer’s AC adapter. |
|
|
|
|
|
||
|
|
|
|
|
Ethernet (RJ-45) port |
Connects to an Ethernet 10/100/1000-based |
|
|
|
|
|
network. |
|
|
|
|
|
|
|
|
|
|
|
|
|
Ventilation and |
Allows the computer to stay cool. |
|
|
|
|
|
cooling fan |
- Do not cover or obstruct the openings. |
|
|
|
|
|
|
|
|
|
|
|
|
External display |
Connects to a display device (e.g., external |
|
|
|
|
|
(VGA) port |
monitor, LCD projector). |
|
|
|
|
|
HDMI port |
Supports high-definition digital video |
|
|
|
|
|
connections. |
|
|
|
|
|
|
|
|
|
Connect to USB devices (e.g., USB mouse, |
|
|
USB camera). |
6 |
USB port |
- If a port is black, it is USB 2.0 compatible, if |
|
|
|
|
|
a port is blue (optional) it is also USB 3.0 |
|
|
compatible. |
|
|
|
|
Microphone jack |
Accepts inputs from external microphones. |
|
|
|
|
|
Connects to audio line-out devices (e.g., |
7 |
Headphones / |
speakers, headphones). |
|
- Supports compatible 3.5 mm headsets with |
|
|
speaker jack |
|
|
|
built-in microphone (e.g. Acer smart |
handheld headsets).
Getting to know your computer - 9
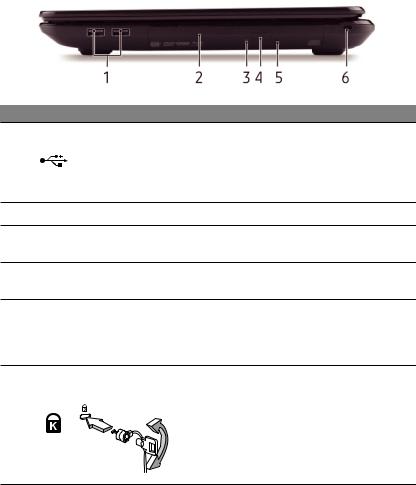
RIGHT VIEW
# |
Icon Item |
Description |
|
|
|
Connect to USB devices (e.g., USB mouse, |
|
|
|
USB camera). |
|
1 |
USB port |
- If a port is black, it is USB 2.0 compatible, if |
|
|
|
||
|
|
a port is blue (optional) it is also USB 3.0 |
|
|
|
compatible. |
|
2 |
Optical drive |
Internal optical drive; accepts CDs or DVDs. |
|
3 |
Optical disk access |
Lights up when the optical drive is active. |
|
indicator |
|||
|
|
||
4 |
Optical drive eject |
Ejects the optical disk from the drive. |
|
button |
|||
|
|
||
|
|
Ejects the optical drive tray when the computer |
|
5 |
Emergency eject |
is turned off. |
|
hole |
- Carefully insert a straightened paper clip to |
||
|
|||
|
|
||
|
|
eject the optical drive tray. |
|
|
Kensington lock slot |
Connects to a Kensington-compatible |
|
|
computer security lock. |
||
|
|
||
|
|
- Wrap the computer security lock cable |
|
6 |
|
around an immovable object such as a table |
|
|
|
or handle of a locked drawer. |
|
|
|
Insert the lock into the notch and turn the key |
|
|
|
to secure the lock. |
|
|
|
Some keyless models are also available. |
10 - Quick start guide
Loading...