


Gateway SOLO 9550, SOLO 9500 User Manual
Contents
1 Checking Out Your Gateway Solo 9500 . . . . . . . . . . . . . . . . . . . . . . . . . . 1
Front . . . . . . . . . . . . . . . . . . . . . . . . . . . . . . . . . . . . . . . . . . . . . . . . . . . . . . . . . . . . . 2 Left side . . . . . . . . . . . . . . . . . . . . . . . . . . . . . . . . . . . . . . . . . . . . . . . . . . . . . . . . . . . 3 Right side . . . . . . . . . . . . . . . . . . . . . . . . . . . . . . . . . . . . . . . . . . . . . . . . . . . . . . . . . . 4 Back . . . . . . . . . . . . . . . . . . . . . . . . . . . . . . . . . . . . . . . . . . . . . . . . . . . . . . . . . . . . . . 5 Bottom . . . . . . . . . . . . . . . . . . . . . . . . . . . . . . . . . . . . . . . . . . . . . . . . . . . . . . . . . . . . 7 Identifying your model . . . . . . . . . . . . . . . . . . . . . . . . . . . . . . . . . . . . . . . . . . . . . . . . 8 Accessories . . . . . . . . . . . . . . . . . . . . . . . . . . . . . . . . . . . . . . . . . . . . . . . . . . . . . . . . 9
2 Checking Out Your Gateway Solo 9550 . . . . . . . . . . . . . . . . . . . . . . . . . 11
Top . . . . . . . . . . . . . . . . . . . . . . . . . . . . . . . . . . . . . . . . . . . . . . . . . . . . . . . . . . . . . . 12 Front . . . . . . . . . . . . . . . . . . . . . . . . . . . . . . . . . . . . . . . . . . . . . . . . . . . . . . . . . . . . 14 Left side . . . . . . . . . . . . . . . . . . . . . . . . . . . . . . . . . . . . . . . . . . . . . . . . . . . . . . . . . . 16 Right side . . . . . . . . . . . . . . . . . . . . . . . . . . . . . . . . . . . . . . . . . . . . . . . . . . . . . . . . . 17 Back . . . . . . . . . . . . . . . . . . . . . . . . . . . . . . . . . . . . . . . . . . . . . . . . . . . . . . . . . . . . . 19 Bottom . . . . . . . . . . . . . . . . . . . . . . . . . . . . . . . . . . . . . . . . . . . . . . . . . . . . . . . . . . . 21 Identifying your model . . . . . . . . . . . . . . . . . . . . . . . . . . . . . . . . . . . . . . . . . . . . . . . 22 Accessories . . . . . . . . . . . . . . . . . . . . . . . . . . . . . . . . . . . . . . . . . . . . . . . . . . . . . . . 23
3 Getting Started. . . . . . . . . . . . . . . . . . . . . . . . . . . . . . . . . . . . . . . . . . . . . . . . . . |
25 |
Connecting the AC adapter . . . . . . . . . . . . . . . . . . . . . . . . . . . . . . . . . . . . . . . . . . . |
26 |
Protecting from power source problems . . . . . . . . . . . . . . . . . . . . . . . . . . . . . . |
28 |
Starting your notebook . . . . . . . . . . . . . . . . . . . . . . . . . . . . . . . . . . . . . . . . . . . . . . |
29 |
Waking up your notebook . . . . . . . . . . . . . . . . . . . . . . . . . . . . . . . . . . . . . . . . . |
30 |
Turning off your notebook . . . . . . . . . . . . . . . . . . . . . . . . . . . . . . . . . . . . . . . . . |
30 |
Switching user accounts in Windows XP . . . . . . . . . . . . . . . . . . . . . . . . . . . . . . . . |
31 |
Status indicators . . . . . . . . . . . . . . . . . . . . . . . . . . . . . . . . . . . . . . . . . . . . . . . . . . . |
33 |
Using the keyboard . . . . . . . . . . . . . . . . . . . . . . . . . . . . . . . . . . . . . . . . . . . . . . . . . |
35 |
Keys . . . . . . . . . . . . . . . . . . . . . . . . . . . . . . . . . . . . . . . . . . . . . . . . . . . . . . . . . |
36 |
System key combinations . . . . . . . . . . . . . . . . . . . . . . . . . . . . . . . . . . . . . . . . . |
37 |
Multi-function buttons . . . . . . . . . . . . . . . . . . . . . . . . . . . . . . . . . . . . . . . . . . . . |
39 |
Using the EZ Pad touchpad . . . . . . . . . . . . . . . . . . . . . . . . . . . . . . . . . . . . . . . . . . |
41 |
Using the touchpad . . . . . . . . . . . . . . . . . . . . . . . . . . . . . . . . . . . . . . . . . . . . . . |
42 |
Connecting the modem . . . . . . . . . . . . . . . . . . . . . . . . . . . . . . . . . . . . . . . . . . . . . . |
44 |
Connecting to an Ethernet network . . . . . . . . . . . . . . . . . . . . . . . . . . . . . . . . . . . . |
45 |
Broadband Internet connections . . . . . . . . . . . . . . . . . . . . . . . . . . . . . . . . . . . . |
45 |
Installing a printer, scanner, or other peripheral device . . . . . . . . . . . . . . . . . . . . . |
46 |
i
4 Getting Help . . . . . . . . . . . . . . . . . . . . . . . . . . . . . . . . . . . . . . . . . . . . . . . . . . . . .47
HelpSpot . . . . . . . . . . . . . . . . . . . . . . . . . . . . . . . . . . . . . . . . . . . . . . . . . . . . . . . . . .48 HelpSpot Videos . . . . . . . . . . . . . . . . . . . . . . . . . . . . . . . . . . . . . . . . . . . . . . . . .50 Online help . . . . . . . . . . . . . . . . . . . . . . . . . . . . . . . . . . . . . . . . . . . . . . . . . . . . . . . .51 Gateway Web site . . . . . . . . . . . . . . . . . . . . . . . . . . . . . . . . . . . . . . . . . . . . . . . . . .52
5 Windows Basics . . . . . . . . . . . . . . . . . . . . . . . . . . . . . . . . . . . . . . . . . . . . . . . . .53
About the Windows environment . . . . . . . . . . . . . . . . . . . . . . . . . . . . . . . . . . . . . . .54 Using the desktop . . . . . . . . . . . . . . . . . . . . . . . . . . . . . . . . . . . . . . . . . . . . . . . . . . .55 Using the Start menu . . . . . . . . . . . . . . . . . . . . . . . . . . . . . . . . . . . . . . . . . . . . .56 Identifying Window items . . . . . . . . . . . . . . . . . . . . . . . . . . . . . . . . . . . . . . . . . . . . .57 Working with files and folders . . . . . . . . . . . . . . . . . . . . . . . . . . . . . . . . . . . . . . . . .59 Viewing drives . . . . . . . . . . . . . . . . . . . . . . . . . . . . . . . . . . . . . . . . . . . . . . . . . .59 Creating folders . . . . . . . . . . . . . . . . . . . . . . . . . . . . . . . . . . . . . . . . . . . . . . . . .60 Copying and moving files and folders . . . . . . . . . . . . . . . . . . . . . . . . . . . . . . . .61 Deleting files and folders . . . . . . . . . . . . . . . . . . . . . . . . . . . . . . . . . . . . . . . . . .62 Browsing for files and folders . . . . . . . . . . . . . . . . . . . . . . . . . . . . . . . . . . . . . .64 Searching for files . . . . . . . . . . . . . . . . . . . . . . . . . . . . . . . . . . . . . . . . . . . . . . . . . . .65 Using the Windows XP, Windows Me, or Windows 2000 Search utility . . . . . .66 Using the Windows 98 Find utility . . . . . . . . . . . . . . . . . . . . . . . . . . . . . . . . . . .68 Working with documents . . . . . . . . . . . . . . . . . . . . . . . . . . . . . . . . . . . . . . . . . . . . .70 Creating a new document . . . . . . . . . . . . . . . . . . . . . . . . . . . . . . . . . . . . . . . . .70 Saving a document . . . . . . . . . . . . . . . . . . . . . . . . . . . . . . . . . . . . . . . . . . . . . .71 Opening a document . . . . . . . . . . . . . . . . . . . . . . . . . . . . . . . . . . . . . . . . . . . . .72 Printing a document . . . . . . . . . . . . . . . . . . . . . . . . . . . . . . . . . . . . . . . . . . . . . .73 Shortcuts . . . . . . . . . . . . . . . . . . . . . . . . . . . . . . . . . . . . . . . . . . . . . . . . . . . . . . . . . .74
6 Using the Internet . . . . . . . . . . . . . . . . . . . . . . . . . . . . . . . . . . . . . . . . . . . . . . .75
Learning about the Internet . . . . . . . . . . . . . . . . . . . . . . . . . . . . . . . . . . . . . . . . . . .76 Setting up an Internet account . . . . . . . . . . . . . . . . . . . . . . . . . . . . . . . . . . . . . . . . .77 Accessing your Internet account . . . . . . . . . . . . . . . . . . . . . . . . . . . . . . . . . . . .78 Using the World Wide Web . . . . . . . . . . . . . . . . . . . . . . . . . . . . . . . . . . . . . . . . . . .79 Connecting to a Web site . . . . . . . . . . . . . . . . . . . . . . . . . . . . . . . . . . . . . . . . . .80 Downloading files . . . . . . . . . . . . . . . . . . . . . . . . . . . . . . . . . . . . . . . . . . . . . . . .81 Using e-mail . . . . . . . . . . . . . . . . . . . . . . . . . . . . . . . . . . . . . . . . . . . . . . . . . . . . . . .82 Sending e-mail . . . . . . . . . . . . . . . . . . . . . . . . . . . . . . . . . . . . . . . . . . . . . . . . . .82 Checking your e-mail . . . . . . . . . . . . . . . . . . . . . . . . . . . . . . . . . . . . . . . . . . . . .83
7 Using Multimedia . . . . . . . . . . . . . . . . . . . . . . . . . . . . . . . . . . . . . . . . . . . . . . . .85
Using diskettes . . . . . . . . . . . . . . . . . . . . . . . . . . . . . . . . . . . . . . . . . . . . . . . . . . . . .86 Using the CD/DVD drive . . . . . . . . . . . . . . . . . . . . . . . . . . . . . . . . . . . . . . . . . . . . . .87 Inserting a CD or DVD . . . . . . . . . . . . . . . . . . . . . . . . . . . . . . . . . . . . . . . . . . . .87
ii
Using Audio DJ on the Solo 9550 . . . . . . . . . . . . . . . . . . . . . . . . . . . . . . . . . . . . |
. 88 |
Adjusting the volume in Windows XP . . . . . . . . . . . . . . . . . . . . . . . . . . . . . . . . . . |
. 90 |
Adjusting the volume in Windows Me, Windows 2000, and Windows 98 . . . . . . . |
94 |
Listening to CDs in Windows XP, Windows 2000, and Windows Me . . . . . . . . . . |
96 |
Listening to CDs in Windows 98 . . . . . . . . . . . . . . . . . . . . . . . . . . . . . . . . . . . . . . . |
97 |
Recording and playing audio . . . . . . . . . . . . . . . . . . . . . . . . . . . . . . . . . . . . . . . . . . |
98 |
Playing audio and video files with the Windows Media Player . . . . . . . . . . . |
100 |
Playing a DVD . . . . . . . . . . . . . . . . . . . . . . . . . . . . . . . . . . . . . . . . . . . . . . . . |
101 |
Using MusicMatch . . . . . . . . . . . . . . . . . . . . . . . . . . . . . . . . . . . . . . . . . . . . . . . . . |
102 |
Playing CDs . . . . . . . . . . . . . . . . . . . . . . . . . . . . . . . . . . . . . . . . . . . . . . . . . . |
102 |
Creating music files . . . . . . . . . . . . . . . . . . . . . . . . . . . . . . . . . . . . . . . . . . . . |
104 |
Editing track information . . . . . . . . . . . . . . . . . . . . . . . . . . . . . . . . . . . . . . . . . |
105 |
Building a music library . . . . . . . . . . . . . . . . . . . . . . . . . . . . . . . . . . . . . . . . . . |
106 |
Listening to Internet radio . . . . . . . . . . . . . . . . . . . . . . . . . . . . . . . . . . . . . . . . |
108 |
Using advanced features . . . . . . . . . . . . . . . . . . . . . . . . . . . . . . . . . . . . . . . . |
109 |
Viewing the display on a television . . . . . . . . . . . . . . . . . . . . . . . . . . . . . . . . . . . . |
110 |
Capturing video . . . . . . . . . . . . . . . . . . . . . . . . . . . . . . . . . . . . . . . . . . . . . . . . . . . |
112 |
8 Sending and Receiving Faxes . . . . . . . . . . . . . . . . . . . . . . . . . . . . . . . . . |
113 |
Setting up your cover page . . . . . . . . . . . . . . . . . . . . . . . . . . . . . . . . . . . . . . . . . . 114 Sending a fax . . . . . . . . . . . . . . . . . . . . . . . . . . . . . . . . . . . . . . . . . . . . . . . . . . . . 116 Faxing from programs . . . . . . . . . . . . . . . . . . . . . . . . . . . . . . . . . . . . . . . . . . . . . . 118 Receiving and viewing a fax . . . . . . . . . . . . . . . . . . . . . . . . . . . . . . . . . . . . . . . . . 118
9 Managing Power . . . . . . . . . . . . . . . . . . . . . . . . . . . . . . . . . . . . . . . . . . . . . . . 119
Monitoring the battery charge . . . . . . . . . . . . . . . . . . . . . . . . . . . . . . . . . . . . . . . . 120 Recharging the battery . . . . . . . . . . . . . . . . . . . . . . . . . . . . . . . . . . . . . . . . . . . . . 120 Changing batteries . . . . . . . . . . . . . . . . . . . . . . . . . . . . . . . . . . . . . . . . . . . . . . . . 121 Installing a second battery . . . . . . . . . . . . . . . . . . . . . . . . . . . . . . . . . . . . . . . 123 Extending battery life . . . . . . . . . . . . . . . . . . . . . . . . . . . . . . . . . . . . . . . . . . . . . . . 125 Conserving battery power . . . . . . . . . . . . . . . . . . . . . . . . . . . . . . . . . . . . . . . . 125 Using alternate power sources . . . . . . . . . . . . . . . . . . . . . . . . . . . . . . . . . . . . 125 Changing power modes . . . . . . . . . . . . . . . . . . . . . . . . . . . . . . . . . . . . . . . . . 126 Changing power settings . . . . . . . . . . . . . . . . . . . . . . . . . . . . . . . . . . . . . . . . . . . . 127 Changing SpeedStep settings . . . . . . . . . . . . . . . . . . . . . . . . . . . . . . . . . . . . 132 Changing power settings in Windows NT . . . . . . . . . . . . . . . . . . . . . . . . . . . . 134
10 Travel Tips . . . . . . . . . . . . . . . . . . . . . . . . . . . . . . . . . . . . . . . . . . . . . . . . . . . . . 135
Modem . . . . . . . . . . . . . . . . . . . . . . . . . . . . . . . . . . . . . . . . . . . . . . . . . . . . . . . . . . 136 Radio frequency wireless connections . . . . . . . . . . . . . . . . . . . . . . . . . . . . . . . . . 136 Files . . . . . . . . . . . . . . . . . . . . . . . . . . . . . . . . . . . . . . . . . . . . . . . . . . . . . . . . . . . . 137 Security . . . . . . . . . . . . . . . . . . . . . . . . . . . . . . . . . . . . . . . . . . . . . . . . . . . . . . . . . 137
iii
Power . . . . . . . . . . . . . . . . . . . . . . . . . . . . . . . . . . . . . . . . . . . . . . . . . . . . . . . . . . .138
11 Customizing Your Notebook. . . . . . . . . . . . . . . . . . . . . . . . . . . . . . . . . . . .139
Adjusting the screen and desktop settings . . . . . . . . . . . . . . . . . . . . . . . . . . . . . .140 Adjusting the color depth . . . . . . . . . . . . . . . . . . . . . . . . . . . . . . . . . . . . . . . . .140 Adjusting the screen resolution . . . . . . . . . . . . . . . . . . . . . . . . . . . . . . . . . . . .142 Applying a color scheme . . . . . . . . . . . . . . . . . . . . . . . . . . . . . . . . . . . . . . . . .144 Changing the desktop background . . . . . . . . . . . . . . . . . . . . . . . . . . . . . . . . .146 Selecting a screen saver . . . . . . . . . . . . . . . . . . . . . . . . . . . . . . . . . . . . . . . . .149
Changing the touchpad settings . . . . . . . . . . . . . . . . . . . . . . . . . . . . . . . . . . . . . . .151 Programming the multi-function buttons . . . . . . . . . . . . . . . . . . . . . . . . . . . . . . . . .153
12 Upgrading Your Notebook . . . . . . . . . . . . . . . . . . . . . . . . . . . . . . . . . . . . . .155
Adding PC Cards . . . . . . . . . . . . . . . . . . . . . . . . . . . . . . . . . . . . . . . . . . . . . . . . . .156 Changing bay modules . . . . . . . . . . . . . . . . . . . . . . . . . . . . . . . . . . . . . . . . . . . . . .158 Changing 5.25-inch bay modules . . . . . . . . . . . . . . . . . . . . . . . . . . . . . . . . . .158 Changing 3.5-inch bay modules . . . . . . . . . . . . . . . . . . . . . . . . . . . . . . . . . . .160 Preventing static electricity discharge . . . . . . . . . . . . . . . . . . . . . . . . . . . . . . . . . .161 Installing memory . . . . . . . . . . . . . . . . . . . . . . . . . . . . . . . . . . . . . . . . . . . . . . . . . .162 Replacing the main hard drive . . . . . . . . . . . . . . . . . . . . . . . . . . . . . . . . . . . . . . . .165
13 Using the Port Replicator and Docking Station. . . . . . . . . . . . . . . . .169
Checking out the port replicator . . . . . . . . . . . . . . . . . . . . . . . . . . . . . . . . . . . . . . .169 Front . . . . . . . . . . . . . . . . . . . . . . . . . . . . . . . . . . . . . . . . . . . . . . . . . . . . . . . . .170 Left side . . . . . . . . . . . . . . . . . . . . . . . . . . . . . . . . . . . . . . . . . . . . . . . . . . . . . .171 Back . . . . . . . . . . . . . . . . . . . . . . . . . . . . . . . . . . . . . . . . . . . . . . . . . . . . . . . . .172 Right side . . . . . . . . . . . . . . . . . . . . . . . . . . . . . . . . . . . . . . . . . . . . . . . . . . . . .174
Connecting to the port replicator . . . . . . . . . . . . . . . . . . . . . . . . . . . . . . . . . . . . . .175 Checking out the docking station . . . . . . . . . . . . . . . . . . . . . . . . . . . . . . . . . . . . . .177 Front . . . . . . . . . . . . . . . . . . . . . . . . . . . . . . . . . . . . . . . . . . . . . . . . . . . . . . . . .177 Left side . . . . . . . . . . . . . . . . . . . . . . . . . . . . . . . . . . . . . . . . . . . . . . . . . . . . . .178 Back . . . . . . . . . . . . . . . . . . . . . . . . . . . . . . . . . . . . . . . . . . . . . . . . . . . . . . . . .179 Right side . . . . . . . . . . . . . . . . . . . . . . . . . . . . . . . . . . . . . . . . . . . . . . . . . . . . .181 Connecting to the docking station . . . . . . . . . . . . . . . . . . . . . . . . . . . . . . . . . . . . .183 Adjusting audio settings . . . . . . . . . . . . . . . . . . . . . . . . . . . . . . . . . . . . . . . . . .184 Installing a PCI card in the docking station . . . . . . . . . . . . . . . . . . . . . . . . . . . . . .185
14 Networking Your Notebook . . . . . . . . . . . . . . . . . . . . . . . . . . . . . . . . . . . . .189
Using a network . . . . . . . . . . . . . . . . . . . . . . . . . . . . . . . . . . . . . . . . . . . . . . . . . . .190 Sharing a single Internet connection . . . . . . . . . . . . . . . . . . . . . . . . . . . . . . . .190 Sharing drives . . . . . . . . . . . . . . . . . . . . . . . . . . . . . . . . . . . . . . . . . . . . . . . . .190 Sharing peripheral devices . . . . . . . . . . . . . . . . . . . . . . . . . . . . . . . . . . . . . . . .191
iv
Streaming audio and video files . . . . . . . . . . . . . . . . . . . . . . . . . . . . . . . . . . . 191 Playing multi-player games . . . . . . . . . . . . . . . . . . . . . . . . . . . . . . . . . . . . . . . 191 Introducing the Gateway Connected Home . . . . . . . . . . . . . . . . . . . . . . . . . . . . . 192 Components of a Gateway Connected Home . . . . . . . . . . . . . . . . . . . . . . . . 193 Selecting a network connection . . . . . . . . . . . . . . . . . . . . . . . . . . . . . . . . . . . . . . 194 Wired connections . . . . . . . . . . . . . . . . . . . . . . . . . . . . . . . . . . . . . . . . . . . . . . 194 Wireless Connections . . . . . . . . . . . . . . . . . . . . . . . . . . . . . . . . . . . . . . . . . . . 195 Assessing your connection needs . . . . . . . . . . . . . . . . . . . . . . . . . . . . . . . . . 196 Comparing data transfer speed . . . . . . . . . . . . . . . . . . . . . . . . . . . . . . . . . . . 198 Network shopping list . . . . . . . . . . . . . . . . . . . . . . . . . . . . . . . . . . . . . . . . . . . . . . 200 HPNA . . . . . . . . . . . . . . . . . . . . . . . . . . . . . . . . . . . . . . . . . . . . . . . . . . . . . . . 200 Ethernet . . . . . . . . . . . . . . . . . . . . . . . . . . . . . . . . . . . . . . . . . . . . . . . . . . . . . . 201 Wireless Ethernet . . . . . . . . . . . . . . . . . . . . . . . . . . . . . . . . . . . . . . . . . . . . . . 202 Bluetooth . . . . . . . . . . . . . . . . . . . . . . . . . . . . . . . . . . . . . . . . . . . . . . . . . . . . . 202 For more information . . . . . . . . . . . . . . . . . . . . . . . . . . . . . . . . . . . . . . . . . . . . . . . 203
15 Moving from Your Old Computer . . . . . . . . . . . . . . . . . . . . . . . . . . . . . . 205
Transferring software and hardware from your old computer . . . . . . . . . . . . . . . 205 Using the Windows XP Files and Settings Transfer Wizard . . . . . . . . . . . . . 205 Transferring files . . . . . . . . . . . . . . . . . . . . . . . . . . . . . . . . . . . . . . . . . . . . . . . 206 Transferring Internet settings . . . . . . . . . . . . . . . . . . . . . . . . . . . . . . . . . . . . . 207 Reinstalling your old printer or scanner . . . . . . . . . . . . . . . . . . . . . . . . . . . . . 208 Reinstalling your old programs . . . . . . . . . . . . . . . . . . . . . . . . . . . . . . . . . . . . 209
16 Maintaining Your Notebook . . . . . . . . . . . . . . . . . . . . . . . . . . . . . . . . . . . . 211
Caring for your computer . . . . . . . . . . . . . . . . . . . . . . . . . . . . . . . . . . . . . . . . . . . 211 Creating an emergency startup diskette . . . . . . . . . . . . . . . . . . . . . . . . . . . . . . . . 213 Protecting your computer from viruses . . . . . . . . . . . . . . . . . . . . . . . . . . . . . . . . . 217 Managing hard drive space . . . . . . . . . . . . . . . . . . . . . . . . . . . . . . . . . . . . . . . . . . 219 Checking hard drive space . . . . . . . . . . . . . . . . . . . . . . . . . . . . . . . . . . . . . . . 219 Using Disk Cleanup . . . . . . . . . . . . . . . . . . . . . . . . . . . . . . . . . . . . . . . . . . . . 220 Checking the hard drive for errors . . . . . . . . . . . . . . . . . . . . . . . . . . . . . . . . . 221 Defragmenting the hard drive . . . . . . . . . . . . . . . . . . . . . . . . . . . . . . . . . . . . . 223 Backing up files . . . . . . . . . . . . . . . . . . . . . . . . . . . . . . . . . . . . . . . . . . . . . . . . 225 Using the Scheduled Task Wizard . . . . . . . . . . . . . . . . . . . . . . . . . . . . . . . . . 226 Recalibrating the battery . . . . . . . . . . . . . . . . . . . . . . . . . . . . . . . . . . . . . . . . . . . . 227 Cleaning your computer . . . . . . . . . . . . . . . . . . . . . . . . . . . . . . . . . . . . . . . . . . . . 228 Cleaning the exterior . . . . . . . . . . . . . . . . . . . . . . . . . . . . . . . . . . . . . . . . . . . . 228 Cleaning the keyboard . . . . . . . . . . . . . . . . . . . . . . . . . . . . . . . . . . . . . . . . . . 229 Cleaning the screen . . . . . . . . . . . . . . . . . . . . . . . . . . . . . . . . . . . . . . . . . . . . 229 Cleaning the mouse . . . . . . . . . . . . . . . . . . . . . . . . . . . . . . . . . . . . . . . . . . . . 229
v
17 Restoring Software . . . . . . . . . . . . . . . . . . . . . . . . . . . . . . . . . . . . . . . . . . . . .231
Reinstalling device drivers . . . . . . . . . . . . . . . . . . . . . . . . . . . . . . . . . . . . . . . . |
. . .231 |
Reinstalling device drivers in Windows 98, Windows Me, Windows 2000, or |
|
Windows XP . . . . . . . . . . . . . . . . . . . . . . . . . . . . . . . . . . . . . . . . . . . . . . . . |
. . .232 |
Reinstalling device drivers in Windows NT 4.0 . . . . . . . . . . . . . . . . . . . . . |
. . .233 |
Reinstalling the Windows NT 4.0 Service Pack . . . . . . . . . . . . . . . . . . . . . . |
. .244 |
Updating device drivers in Windows 98, Windows Me, Windows 2000, or |
|
Windows XP . . . . . . . . . . . . . . . . . . . . . . . . . . . . . . . . . . . . . . . . . . . . . . . . . . . . |
. .245 |
Reinstalling Windows . . . . . . . . . . . . . . . . . . . . . . . . . . . . . . . . . . . . . . . . . . . . . |
. .247 |
Reinstalling Windows 98, Windows Me, Windows 2000, or Windows XP |
. . .247 |
Reinstalling Windows NT 4.0 . . . . . . . . . . . . . . . . . . . . . . . . . . . . . . . . . . . . |
. .248 |
Reinstalling programs . . . . . . . . . . . . . . . . . . . . . . . . . . . . . . . . . . . . . . . . . . . . . |
. .249 |
18 Troubleshooting . . . . . . . . . . . . . . . . . . . . . . . . . . . . . . . . . . . . . . . . . . . . . . . .251
Safety guidelines . . . . . . . . . . . . . . . . . . . . . . . . . . . . . . . . . . . . . . . . . . . . . . . . . .252 Troubleshooting . . . . . . . . . . . . . . . . . . . . . . . . . . . . . . . . . . . . . . . . . . . . . . . . . . .253 First steps . . . . . . . . . . . . . . . . . . . . . . . . . . . . . . . . . . . . . . . . . . . . . . . . . . . . .253 Software support tools . . . . . . . . . . . . . . . . . . . . . . . . . . . . . . . . . . . . . . . . . . . . . .254 CD/DVD drive . . . . . . . . . . . . . . . . . . . . . . . . . . . . . . . . . . . . . . . . . . . . . . . . . .255 Device installation . . . . . . . . . . . . . . . . . . . . . . . . . . . . . . . . . . . . . . . . . . . . . .257 Diskette drive . . . . . . . . . . . . . . . . . . . . . . . . . . . . . . . . . . . . . . . . . . . . . . . . . .258 File management . . . . . . . . . . . . . . . . . . . . . . . . . . . . . . . . . . . . . . . . . . . . . . .259 Hard drive . . . . . . . . . . . . . . . . . . . . . . . . . . . . . . . . . . . . . . . . . . . . . . . . . . . . .260 Internet . . . . . . . . . . . . . . . . . . . . . . . . . . . . . . . . . . . . . . . . . . . . . . . . . . . . . . .261 Keyboard . . . . . . . . . . . . . . . . . . . . . . . . . . . . . . . . . . . . . . . . . . . . . . . . . . . . .262 LCD panel . . . . . . . . . . . . . . . . . . . . . . . . . . . . . . . . . . . . . . . . . . . . . . . . . . . .262 Memory . . . . . . . . . . . . . . . . . . . . . . . . . . . . . . . . . . . . . . . . . . . . . . . . . . . . . . .263 Modem . . . . . . . . . . . . . . . . . . . . . . . . . . . . . . . . . . . . . . . . . . . . . . . . . . . . . . .263 Mouse . . . . . . . . . . . . . . . . . . . . . . . . . . . . . . . . . . . . . . . . . . . . . . . . . . . . . . . .268 Networks . . . . . . . . . . . . . . . . . . . . . . . . . . . . . . . . . . . . . . . . . . . . . . . . . . . . . .268 Passwords . . . . . . . . . . . . . . . . . . . . . . . . . . . . . . . . . . . . . . . . . . . . . . . . . . . .268 PC Cards . . . . . . . . . . . . . . . . . . . . . . . . . . . . . . . . . . . . . . . . . . . . . . . . . . . . .269 Power . . . . . . . . . . . . . . . . . . . . . . . . . . . . . . . . . . . . . . . . . . . . . . . . . . . . . . . .269 Printer . . . . . . . . . . . . . . . . . . . . . . . . . . . . . . . . . . . . . . . . . . . . . . . . . . . . . . . .270 ScanDisk . . . . . . . . . . . . . . . . . . . . . . . . . . . . . . . . . . . . . . . . . . . . . . . . . . . . .272 Sound . . . . . . . . . . . . . . . . . . . . . . . . . . . . . . . . . . . . . . . . . . . . . . . . . . . . . . . .272 Video . . . . . . . . . . . . . . . . . . . . . . . . . . . . . . . . . . . . . . . . . . . . . . . . . . . . . . . .272 Telephone support . . . . . . . . . . . . . . . . . . . . . . . . . . . . . . . . . . . . . . . . . . . . . . . . .273 Before calling Gateway Technical Support . . . . . . . . . . . . . . . . . . . . . . . . . . .273 Telephone numbers . . . . . . . . . . . . . . . . . . . . . . . . . . . . . . . . . . . . . . . . . . . . .274 Tutoring and training . . . . . . . . . . . . . . . . . . . . . . . . . . . . . . . . . . . . . . . . . . . . . . . .275 Self-help . . . . . . . . . . . . . . . . . . . . . . . . . . . . . . . . . . . . . . . . . . . . . . . . . . . . . .275
vi
Tutoring . . . . . . . . . . . . . . . . . . . . . . . . . . . . . . . . . . . . . . . . . . . . . . . . . . . . . . 275
Training . . . . . . . . . . . . . . . . . . . . . . . . . . . . . . . . . . . . . . . . . . . . . . . . . . . . . . 276
A Safety, Regulatory, and Legal Information . . . . . . . . . . . . . . . . . . . . . 277
Index . . . . . . . . . . . . . . . . . . . . . . . . . . . . . . . . . . . . . . . . . . . . . . . . . . . . . . . . . . . . . . 295
vii
viii

Checking Out
Your Gateway 1
Solo 9500
If you purchased the Gateway Solo 9550, go to “Checking Out Your Gateway Solo 9550” on page 11.
Tips & Tricks To access the contents of this guide while you are traveling, download an electronic copy from 

 www.gateway.com/support/manlib/.
www.gateway.com |
1 |

Chapter 1: Checking Out Your Gateway Solo 9500
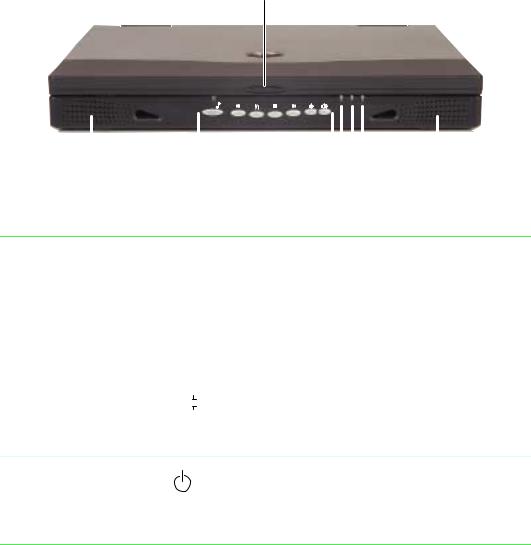
Front
|
|
|
|
|
|
|
|
|
|
|
|
|
|
|
|
|
|
|
|
|
|
|
|
|
|
|
Speaker |
Cover release latch |
Battery |
|
Speaker |
||||
|
|
|
charge |
|
|
|
||
|
|
|
|
|
|
|||
|
|
|
indicator |
Power |
||||
|
|
|
|
|
|
indicator |
||
Component |
Icon |
|
Description |
||||||||
|
|
|
|
|
|
|
|
|
|
|
|
Speakers |
|
|
|
|
|
|
|
|
|
Provide audio output when headphones or speakers are |
|
|
|
|
|
|
|
|
|
|
|
not plugged in. |
|
|
|
|
|
|
|
|
|
|
|
|
|
Cover release latch |
|
|
|
|
|
|
|
|
|
Open the notebook cover by sliding the release latch to |
|
|
|
|
|
|
|
|
|
|
|
the right. |
|
|
|
|
|
|
|
|
|
|
|
|
|
Battery charge indicator |
|
|
|
|
|
|
|
|
|
Lights up when the computer is plugged in. |
|
|
|
|
|
|
|
|
|
|
|
■ |
LED green – battery is fully charged. |
|
|
|
|
|
|
|
|
|
|
■ |
LED orange – battery is charging. |
|
|
|
|
|
|
|
|
|
|
■ |
LED off – notebook is running on battery power. |
Power indicator |
Lights up when the notebook is turned on and shows |
|
notebook power status: |
■LED on – power is ON.
■LED blinking – power is in Standby or Suspend mode.
■LED off – power is off.
2 |
www.gateway.com |
Left side
Left side
Port |
Ventilation fan |
PC Card |
3.5-inch |
options |
(do not block) |
slots |
modular bay |
Component |
Icon |
|
|
|
Description |
|||||
|
|
|
|
|
|
|
|
|
|
|
Port options |
|
|
|
|
|
|
|
|
Depending on the options you ordered with your |
|
|
|
|
|
|
|
|
|
|
notebook, this area can contain: |
|
|
|
|
|
|
|
|
|
|
■ |
A modem jack |
|
|
|
|
|
|
|
|
|
|
|
|
|
|
|
|
|
|
|
|
■ |
An Ethernet jack |
|
|
|
|
|
|
|
|
|
||
|
|
|
|
|
|
|
|
|
■ |
An IEEE 1394 (also known as Firewire or i.Link) port |
|
|
|
|
|
|
|
|
|
||
|
|
|
|
|
|
|
|
|
||
|
|
|
|
|
|
|
|
|
|
|
Ventilation fan |
|
|
|
|
|
|
|
|
Helps cool internal components. Do not block. |
|
|
|
|
|
|
|
|
|
|
|
|
PC Card slots |
|
|
|
|
|
|
|
|
Insert one Type I, II, III, or Zoom Video PC Card into this |
|
|
|
|
|
|
|
|
|
|
slot. For more information, see “Adding PC Cards” on |
|
|
|
|
|
|
|
|
|
|
page 156. |
|
|
|
|
|
|
|
|
|
|
|
|
3.5-inch modular bay |
|
|
|
|
|
|
|
|
Install a standard 3.5-inch diskette drive or an LS-120 |
|
|
|
|
|
|
|
|
|
|
drive. For more information, see “Using diskettes” on |
|
page 86 and “Changing 3.5-inch bay modules” on page 160.
www.gateway.com |
3 |
Chapter 1: Checking Out Your Gateway Solo 9500
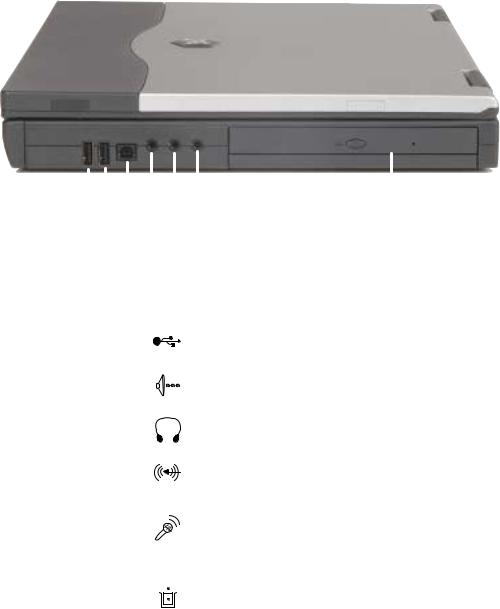
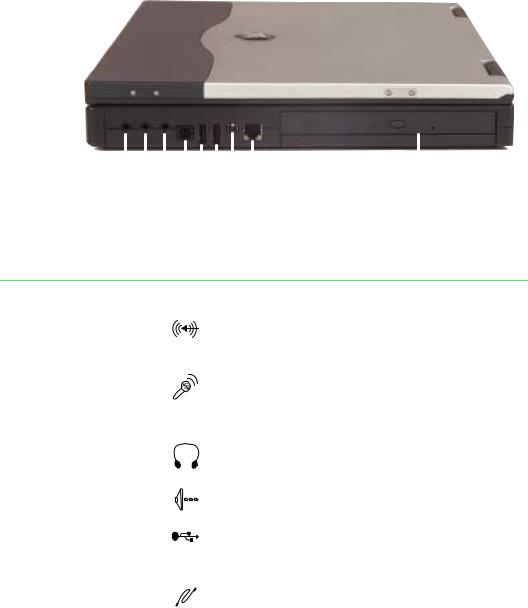
Right side
|
|
|
|
|
|
|
|
|
Microphone jack |
|
|
|
|
|
|
|
|
|
|
|
|
|
|
|
|
|
|
|
|
|
|
|
|
|
|
|
|
|
|
|
|
|
|
|
|
|
|
USB |
|
|
|
|
Line In jack |
5.25-inch |
|||||
|
|
|
|||||||||
ports |
|
|
|
|
modular bay |
||||||
|
Headphone jack |
||||||||||
|
|
|
|
|
|
|
|||||
|
|
|
|
|
|
|
|||||
|
|
|
|
S/PDIF digital audio jack |
|
|
|||||
|
|
|
|
|
|
||||||
|
|
|
|
|
|
|
|
|
|
|
|
Component |
Icon |
|
Description |
|
|
||||||
|
|
|
|
|
|
|
|
|
|
|
|
USB ports |
|
|
|
|
Plug USB (Universal Serial Bus) devices (such as a USB |
||||||
|
|
|
|
|
|
|
|
|
printer, scanner, or camera) into these ports. |
||
|
|
|
|
|
|
|
|
|
|
|
|
S/PDIF digital audio jack |
|
|
|
|
Plug an optical Toslink digital audio cable into this jack. |
||||||
|
|
|
|
|
|
|
|
|
|
|
|
Headphone jack |
|
|
|
|
Plug amplified speakers or headphones into this jack. |
||||||
|
|
|
|
|
|
|
|
|
|
|
|
Line In jack |
|
|
|
|
Connect an external audio input source (such as a |
||||||
|
|
|
|
|
|
|
|
|
stereo) to this jack so that you can record sound on your |
||
|
|
|
|
|
|
|
|
|
computer or play sound through the notebook speakers. |
||
|
|
|
|
|
|
|
|
|
|
|
|
Microphone jack |
|
|
|
|
Plug a microphone into this jack. The built-in microphone |
||||||
|
|
|
|
|
|
|
|
|
is turned off when a microphone is plugged into this jack. |
||
|
|
|
|
|
|
|
|
|
For the location of your built-in microphone, see “Using |
||
|
|
|
|
|
|
|
|
|
the keyboard” on page 35. |
|
|
|
|
|
|
|
|
|
|
|
|
|
|
5.25-inch modular bay |
|
|
|
|
Install a CD or DVD drive, a second hard drive, or a |
||||||
|
|
|
|
|
|
|
|
|
second battery into this bay. For more information, see |
||
|
|
|
|
|
|
|
|
|
|||
|
|
|
|
|
|
|
|
|
“Installing a second battery” on page 123 or “Changing |
||
|
|
|
|
|
|
|
|
|
5.25-inch bay modules” on page 158. |
||
|
|
|
|
|
|
|
|
|
|
|
|
4 |
www.gateway.com |

Back
Back
|
|
|
|
|
|
|
|
|
|
|
|
|
|
|
|
|
|
|
|
|
|
|
|
|
|
|
|
|
|
PS/2 port |
Parallel |
Monitor |
Docking |
Ventilation fan |
Serial port |
|
|
|
||||||
|
|
port |
port |
port |
(do not block) |
|
|
|
|
|
||||
|
|
|
TV out jack |
|
|
|||||||||
|
|
|
|
|
|
|
|
|
|
|
|
|
||
|
|
|
|
|
|
|
|
|
|
|
|
|
|
|
|
|
|
|
|
|
|
|
|
|
Power connector |
|
|||
|
|
|
|
|
|
|
|
|
|
|
|
|
|
|
|
|
|
|
|
|
|
|
|
|
Kensington lock slot |
||||
Component |
Icon |
Description |
|||||
|
|
|
|
|
|
|
|
PS/2 port |
|
|
|
|
|
|
Plug a PS/2® (Personal System/2) device (such as a keyboard |
|
|
|
|
|
|
|
or mouse) into this port. |
|
|
|
|
|
|
|
|
|
|
|
|
|
|
|
|
Parallel port |
|
|
|
|
|
|
Plug a parallel device (such as a printer) into this port. |
|
|
|
|
|
|
|
|
|
|
|
|
|
|
|
|
|
|
|
|
|
|
|
|
|
|
|
|
|
|
|
|
Monitor port |
|
|
|
|
|
|
Plug an analog VGA monitor into this port. |
|
|
|
|
|
|
|
|
Docking port |
|
|
|
|
|
|
Connect the optional docking station or port replicator to this |
|
|
|
|
|
|
|
port. |
|
|
|
|
|
|
|
Warning! Power is passed through this port. This docking |
|
|
|
|
|
|
|
connection is UL certified for use only with Solo 9500 docking |
|
|
|
|
|
|
|
stations or port replicators. |
|
|
|
|
|
|
|
|
Ventilation fan |
|
|
|
|
|
|
Helps cool internal components. Do not block. |
|
|
|
|
|
|
|
|
Serial port |
|
|
|
|
|
|
Plug a serial device (such as a digital camera) into this port. |
|
|
|
|
|
|
|
|
TV out jack |
|
|
|
|
|
|
Plug a TV into this jack so that you can view your notebook |
|
|
|
|
|
|
|
display on a TV using NTSC/PAL composite video. For more |
|
|
|
|
|
|
|
information, see “Viewing the display on a television” on |
|
|
|
|
|
|
|
page 110. |
|
|
|
|
|
|
|
|
www.gateway.com |
5 |

Chapter 1: Checking Out Your Gateway Solo 9500
Component |
Icon |
Description |
|||||
|
|
|
|
|
|
|
|
Power connector |
|
|
|
|
|
|
Plug the AC adapter cable into this connector. |
|
|
|
|
|
|
||
|
|
|
|
|
|
|
|
Kensington |
|
|
|
|
|
|
Secure your computer to an object by connecting a Kensington |
lock slot |
|
|
|
|
|
|
cable lock to this slot. |
|
|
|
|
|
|
|
|
6 |
www.gateway.com |
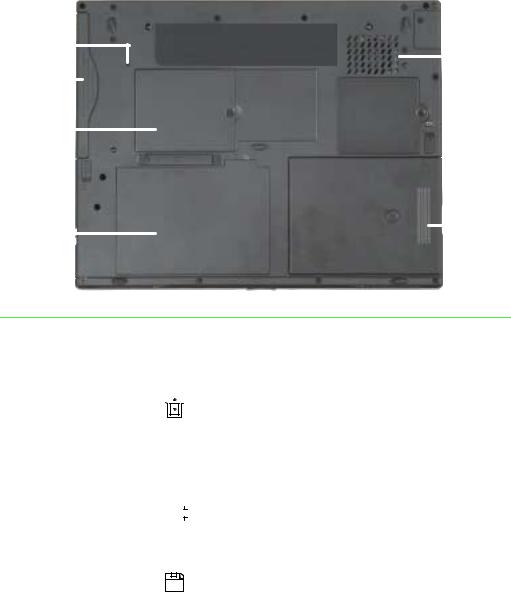
Bottom
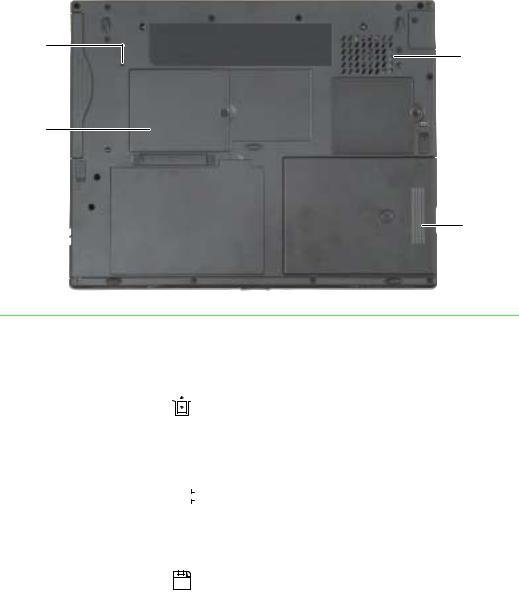
Bottom
Reset hole |
|
|
|
|
|
Ventilation |
|
|
|
|
|
||
5.25-inch |
|
|
|
|
|
fan |
|
|
|
|
|
||
|
|
|
|
|
|
|
|
|
|
|
|
|
|
modular bay |
|
|
|
|
|
|
Memory bay |
|
|
|
|
|
|
|
|
|
|
|
|
|
|
|
|
3.5-inch |
Battery bay |
|
|
|
modular bay |
|
Component |
Icon |
|
Description |
||||||||
|
|
|
|
|
|
|
|
|
|
|
|
Reset hole |
|
|
|
|
|
|
|
|
|
|
Insert a straightened paper clip into this hole to manually |
|
|
|
|
|
|
|
|
|
|
|
restart the system. |
|
|
|
|
|
|
|
|
|
|
|
|
5.25-inch modular bay |
|
|
|
|
|
|
|
|
|
|
Install a CD/DVD drive, a second hard drive, or a second |
|
|
|
|
|
|
|
|
|
|
|
battery into this bay. For more information, see “Installing |
|
|
|
|
|
|
|
|
|
|
||
|
|
|
|
|
|
|
|
|
|
|
a second battery” on page 123 or “Changing 5.25-inch |
|
|
|
|
|
|
|
|
|
|
|
bay modules” on page 158. |
|
|
|
|
|
|
|
|
|
|
|
|
Memory bay |
|
|
|
|
|
|
|
|
|
|
Install memory modules into this bay. For more |
|
|
|
|
|
|
|
|
|
|
|
information, see “Installing memory” on page 162. |
|
|
|
|
|
|
|
|
|
|
|
|
Battery bay |
|
|
|
|
|
|
|
|
|
|
Insert the battery into this bay. For more information, see |
|
|
|
|
|
|
|
|
|
|
|
“Changing batteries” on page 121. |
|
|
|
|
|
|
|
|
|
|
|
|
Ventilation fan |
|
|
|
|
|
|
|
|
|
|
Helps cool internal components. Do not block. |
|
|
|
|
|
|
|
|
|
|
|
|
3.5-inch modular bay |
|
|
|
|
|
|
|
|
|
|
Install a standard 3.5-inch diskette drive or an LS-120 |
|
|
|
|
|
|
|
|
|
|
|
drive. For more information, see “Using diskettes” on |
|
|
|
|
|
|
|
|
|
|
|
page 86 and “Changing 3.5-inch bay modules” on |
|
|
|
|
|
|
|
|
|
|
|
page 160. |
|
|
|
|
|
|
|
|
|
|
|
|
www.gateway.com |
7 |
Chapter 1: Checking Out Your Gateway Solo 9500
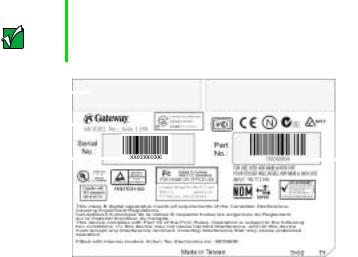
Identifying your model
The label on the bottom of your computer contains information that identifies your notebook model. Gateway Technical Support will need this information if you call for assistance.
Important The label shown below is for informational purposes only.
Label information varies by model.
Revision code and display
type/ processor size |
|
|
00.0X/000XXX |
X 0.0/XX |
|||||
|
|
||||||||
Gateway model |
|
|
|
|
|
|
|
||
number |
|
|
|
|
|
|
|
Gateway part |
|
Gateway serial |
|
|
|
|
|
|
|
|
|
number |
|
|
|
|
|
|
number |
||
8 |
www.gateway.com |
Accessories
Accessories
Gateway offers accessories that can help you make the most of using your notebook.
Batteries and automobile/airplane power adapters
If you run your notebook on battery power for extended periods, you may want to buy an additional battery so that you can swap batteries when necessary.
With an automobile/airplane power adapter, you can save battery power by plugging your notebook into an automobile cigarette lighter or an airplane in-flight power receptacle.
Carrying cases
Gateway has large-capacity carrying cases if you need additional space for accessories or supplies.
Docking stations and port replicators
Although you can attach external devices directly to your notebook, a docking station or port replicator lets you make all of those connections at once. When you travel with your notebook, you merely disconnect from the docking station or port replicator instead of unplugging all the external devices.
A docking station or port replicator also provides additional ports and other expansion features not included with your notebook.
External devices
You can attach external devices such as a keyboard, mouse, printer, or monitor to your notebook, docking station, or port replicator.
Memory
Large programs, such as multimedia games or graphics programs, use a lot of memory. If your programs are running more slowly than you think they should, try adding more memory.
www.gateway.com |
9 |
Chapter 1: Checking Out Your Gateway Solo 9500
Printers
You can attach many types of printers to your computer. The most common types are inkjet and laser printers, which print in color or black and white.
Inkjet printers and cartridges are relatively inexpensive, but usually they are slower than laser printers. Using an inkjet color printer, you can print pictures, banners, and greeting cards, as well as documents.
Laser printers and cartridges are more expensive, but usually they print much faster than inkjet printers. Laser printers are better than inkjet printers when you are printing large documents.
10 |
www.gateway.com |
Checking Out
Your Gateway 2
Solo 9550
If you purchased the Gateway Solo 9500, go to “Checking Out Your Gateway Solo 9500” on page 1.
Tips & Tricks To access the contents of this guide while you are traveling, download an electronic copy from 

 www.gateway.com/support/manlib/.
www.gateway.com |
11 |

Chapter 2: Checking Out Your Gateway Solo 9550
Top
Bluetooth Indicator
Component |
Icon |
Description |
|
|
|
Bluetooth indicator |
|
Lights up when Bluetooth is turned on. |
(optional) |
|
|
Warning Radio frequency wireless communication can interfere with equipment on commercial aircraft. Current aviation regulations require wireless devices to be turned off while traveling in an airplane. Bluetooth and IEEE 802.11b (also known as wireless Ethernet or WiFi) communication devices are examples of devices that provide wireless communication. For instructions to turn Bluetooth on and off, see “Multi-function buttons” on page 39.
12 |
www.gateway.com |
Top
Important If your system came equipped with an internal radio frequency wireless device, see “Safety, Regulatory, and Legal Information” on page 277 for general wireless regulatory and safety guidelines. To find out if your system has an internal wireless device, check the label (see “Identifying your model” on page 22).
www.gateway.com |
13 |
Chapter 2: Checking Out Your Gateway Solo 9550
Front
Cover release latch
|
|
|
|
|
|
|
|
|
|
|
|
|
|
|
|
|
|
|
|
|
|
|
|
|
|
|
|
|
Battery charge |
|
|
|
|
|
|
Speaker |
Audio DJ |
|
Speaker |
||||||||
indicator |
|
||||||||||
controls |
|
||||||||||
|
|
|
|||||||||
|
|
Power indicator |
|
|
|||||||
|
|
|
|
|
|
|
|||||
|
|
|
|
|
Hot-swap indicator |
|
|
||||
|
|
|
|
|
|
|
|||||
Component |
Icon |
|
Description |
||||||||
|
|
|
|
|
|
|
|
|
|
|
|
Cover release latch |
|
|
|
|
|
|
|
|
|
|
Open the notebook cover by sliding the release latch to |
|
|
|
|
|
|
|
|
|
|
|
the right. |
|
|
|
|
|
|
|
|
|
|
|
|
Speakers |
|
|
|
|
|
|
|
|
|
|
Provide audio output when headphones or speakers are |
|
|
|
|
|
|
|
|
|
|
|
not plugged in. |
|
|
|
|
|
|
|
|
|
|
|
|
Audio DJ controls |
|
|
|
|
|
|
|
|
|
|
Control the built-in CD player. For more information, see |
|
|
|
|
|
|
|
|
|
|
|
“Using Audio DJ on the Solo 9550” on page 88. |
|
|
|
|
|
|
|
|
|
|
|
|
Battery charge indicator |
|
|
|
|
|
|
|
|
|
|
Lights up when the computer is plugged in. |
|
|
|
|
|
|
|
|
|
|
|
■ LED green - battery is fully charged. |
|
|
|
|
|
|
|
|
|
|
|
■ LED orange - battery is charging. |
|
|
|
|
|
|
|
|
|
|
|
■ LED off - notebook is running on battery power. |
Power indicator |
Lights up when the notebook is turned on and shows |
|
notebook power status: |
■LED on - power is ON.
■LED blinking - power is in Standby or Suspend mode.
■LED off - power is off.
14 |
www.gateway.com |

Front
Component |
Icon |
Description |
|
|
|
Hot-swap indicator |
|
Indicates when it is safe to remove the 5.25-inch bay |
|
|
module. |
|
|
■LED green - it is safe to remove the 5.25-inch bay module.
■LED orange - it is not safe to remove the 5.25-inch bay
module.
For more information, see “Changing 5.25-inch bay modules” on page 158.
www.gateway.com |
15 |

Chapter 2: Checking Out Your Gateway Solo 9550
Left side
|
|
|
|
|
|
|
|
|
|
|
|
|
|
Ethernet |
Ventilation PC Card slot |
3.5-inch modular bay |
||||
jack |
Fan |
|
|
|||
Component |
Icon |
Description |
|||||
|
|
|
|
|
|
|
|
Ethernet jack |
|
|
|
|
|
|
Plug a 10/100 Ethernet network cable into this jack. For more |
|
|
|
|
|
|
|
information, see “Connecting to an Ethernet network” on page 45 and |
|
|
|
|
|
|
|
|
|
|
|
|
|
|
|
|
|
|
|
|
|
|
|
|
|
|
|
|
|
|
|
“Networking Your Notebook” on page 189. |
|
|
|
|
|
|
|
|
Ventilation Fan |
|
|
|
|
|
|
Helps cool internal components. Do not block or insert objects into |
|
|
|
|
|
|
|
these slots. |
|
|
|
|
|
|
|
|
PC Card slot |
|
|
|
|
|
|
Insert one Type I, II, or III PC Card into this slot. For more information, |
|
|
|
|
|
|
|
see “Adding PC Cards” on page 156. |
|
|
|
|
|
|
|
|
3.5-inch |
|
|
|
|
|
|
Install a standard 3.5-inch diskette drive, an additional hard drive, or |
modular bay |
|
|
|
|
|
|
a second battery into this bay. For more information, see “Installing |
|
|
|
|
|
|
|
a second battery” on page 123 and “Changing 3.5-inch bay modules” |
|
|
|
|
|
|
|
on page 160. |
|
|
|
|
|
|
|
|
16 |
www.gateway.com |
Right side
Right side
Line in jack |
|
|
|
|
|
|
|
|
|
|
|
|
|
|
|
|
|
|
|
|
|
|
|
|
|
|
|
|
|
|
|
|
|
|
|
|
|
|
|
|
|
|
|
|
|
USB |
|
|
5.25-inch modular bay |
||||||||||
|
|
|
|
|
|
|
|
|
||||||
Microphone jack |
|
|
|
|
ports |
|
|
Modem jack |
||||||
|
|
|||||||||||||
Headphone jack |
|
|
|
|
|
|
|
|
|
|
||||
|
|
|
|
|
IEEE 1394 port |
|||||||||
S/PDIF digital audio jack |
|
|
|
|
||||||||||
|
|
|
|
|
|
|
|
|||||||
|
|
|
|
|
|
|
|
|||||||
Component |
Icon |
Description |
|
|
|
Line in jack |
|
Connect an external audio input source (such as a |
|
|
stereo) to this jack so that you can record sound on your |
|
|
computer or play sound through the notebook speakers. |
|
|
|
Microphone jack |
|
Plug a microphone into this jack. The built-in |
|
|
microphone is turned off when a microphone is plugged |
|
|
into this jack. For the location of your built-in |
|
|
microphone, see “Using the keyboard” on page 35. |
|
|
|
Headphone jack |
|
Plug amplified speakers or headphones into this jack. |
|
|
|
S/PDIF digital audio jack |
|
Plug an optical Toslink digital audio cable into this jack. |
|
|
|
USB ports |
|
Plug USB (Universal Serial Bus) devices (such as a |
|
|
USB Iomega™ Zip™ drive, printer, scanner, or camera) |
|
|
into these ports. |
|
|
|
IEEE 1394 port |
|
Plug an IEEE 1394 (also known as Firewire or i.Link) |
|
|
cable into this jack. |
|
|
|
www.gateway.com |
17 |

Chapter 2: Checking Out Your Gateway Solo 9550
Component |
Icon |
|
|
Description |
||||||
|
|
|
|
|
|
|
|
|
|
|
Modem jack |
|
|
|
|
|
|
|
|
|
Plug a modem cable into this jack. |
|
|
|
|
|
|
|
|
|
||
|
|
|
|
|
|
|
|
|
|
|
|
|
|
|
|
|
|
|
|
|
|
5.25-inch modular bay |
|
|
|
|
|
|
|
|
|
Install a CD/DVD or an additional hard drive into this bay. |
|
|
|
|
|
|
|
|
|
|
For more information, see “Changing 5.25-inch bay |
|
|
|
|
|
|
|
|
|
|
|
|
|
|
|
|
|
|
|
|
|
modules” on page 158. |
|
|
|
|
|
|
|
|
|
|
|
18 |
www.gateway.com |
Back
Back
PS/2 |
Parallel |
Ventilation |
Docking |
Monitor |
Serial |
TV out |
port |
port |
Fan |
port |
port |
port |
jack |
Power connector
Kensington lock slot
Component |
Icon |
|
|
Description |
|||
|
|
|
|
|
|
|
|
PS/2 port |
|
|
|
|
|
|
Plug a PS/2 device (such as a keyboard or mouse) into |
|
|
|
|
|
|
|
this port. |
|
|
|
|
|
|
|
|
|
|
|
|
|
|
|
|
Parallel port |
|
|
|
|
|
|
Plug a parallel device (such as a printer) into this port. |
|
|
|
|
|
|
|
|
|
|
|
|
|
|
|
|
|
|
|
|
|
|
|
|
|
|
|
|
|
|
|
|
Ventilation Fan |
|
|
|
|
|
|
Helps cool internal components. Do not block or insert |
|
|
|
|
|
|
|
objects into these slots. |
|
|
|
|
|
|
|
|
Docking port |
|
|
|
|
|
|
Connect the docking station or port replicator to this |
|
|
|
|
|
|
|
port. |
|
|
|
|
|
|
|
Warning! Power is passed through this port. This |
|
|
|
|
|
|
|
docking connection is UL certified for use only with Solo |
|
|
|
|
|
|
|
9550 docking stations or port replicators. |
|
|
|
|
|
|
|
|
Monitor port |
|
|
|
|
|
|
Plug an analog VGA monitor into this port. |
|
|
|
|
|
|
|
|
Serial port |
|
|
|
|
|
|
Plug a serial device (such as a digital camera) into this |
|
|
|
|
|
|
|
port. |
|
|
|
|
|
|
|
|
TV out jack |
|
|
|
|
|
|
Plug a TV into this jack so that you can view your |
|
|
|
|
|
|
|
computer screen on a TV using NTSC/PAL composite |
|
|
|
|
|
|
|
video. For more information, see “Viewing the display on |
|
|
|
|
|
|
|
a television” on page 110. |
|
|
|
|
|
|
|
|
www.gateway.com |
19 |

Chapter 2: Checking Out Your Gateway Solo 9550
Component |
Icon |
|
Description |
||||
|
|
|
|
|
|
|
|
Power connector |
|
|
|
|
|
|
Plug the AC adapter cable into this connector. |
|
|
|
|
|
|
||
|
|
|
|
|
|
|
|
Kensington™ lock slot |
|
|
|
|
|
|
Secure your computer to an object by connecting a |
|
|
|
|
|
|
|
Kensington cable lock to this slot. |
|
|
|
|
|
|
|
|
20 |
www.gateway.com |
Bottom
Bottom
Reset
hole
Ventilation 5.25-inch Fan modular 
bay
Memory bay
3.5-inch
modular Battery  bay
bay
bay
Component |
Icon |
|
Description |
|||||||||
|
|
|
|
|
|
|
|
|
|
|
|
|
Reset hole |
|
|
|
|
|
|
|
|
|
|
|
Insert a straightened paper clip into this hole to manually |
|
|
|
|
|
|
|
|
|
|
|
|
restart the system. |
|
|
|
|
|
|
|
|
|
|
|
|
|
5.25-inch modular bay |
|
|
|
|
|
|
|
|
|
|
|
Install a CD, DVD, or an additional hard drive into this |
|
|
|
|
|
|
|
|
|
|
|
|
bay. For more information, see “Changing 5.25-inch bay |
|
|
|
|
|
|
|
|
|
|
|
||
|
|
|
|
|
|
|
|
|
|
|
|
modules” on page 158. |
|
|
|
|
|
|
|
|
|
|
|
|
|
Memory bay |
|
|
|
|
|
|
|
|
|
|
|
Install a memory module in this bay. For more |
|
|
|
|
|
|
|
|
|
|
|
|
information, see “Installing memory” on page 162. |
|
|
|
|
|
|
|
|
|
|
|
|
|
Battery bay |
|
|
|
|
|
|
|
|
|
|
|
Insert the main battery into this bay. For more |
|
|
|
|
|
|
|
|
|
|
|
|
information, see “Changing batteries” on page 121. |
|
|
|
|
|
|
|
|
|
|
|
|
|
Ventilation Fan |
|
|
|
|
|
|
|
|
|
|
|
Helps cool internal components. Do not block or insert |
|
|
|
|
|
|
|
|
|
|
|
|
objects into these slots. |
|
|
|
|
|
|
|
|
|
|
|
|
|
3.5-inch modular bay |
|
|
|
|
|
|
|
|
|
|
|
Install a standard 3.5-inch diskette drive, an additional |
|
|
|
|
|
|
|
|
|
|
|
|
hard drive, or a second battery into this bay. For more |
|
|
|
|
|
|
|
|
|
|
|
|
information, see “Installing a second battery” on |
|
|
|
|
|
|
|
|
|
|
|
|
page 123 and “Changing 3.5-inch bay modules” on |
|
|
|
|
|
|
|
|
|
|
|
|
page 160. |
|
|
|
|
|
|
|
|
|
|
|
|
|
www.gateway.com |
21 |

Chapter 2: Checking Out Your Gateway Solo 9550
Identifying your model
The label on the bottom of your computer contains information that identifies your notebook model. Gateway Technical Support will need this information if you call for assistance.
Important The label shown below is for informational purposes only.
Label information varies by model.
Gateway |
|
|
model |
Internal |
|
number |
wireless |
|
|
devices |
|
Gateway |
|
|
serial |
Gateway part |
|
number |
||
number |
||
|
||
Revision |
|
|
code and |
|
|
display |
|
|
type/ |
|
|
processor |
|
|
size |
|
22 |
www.gateway.com |
 Loading...