


Gateway LT28 Owner's Manual

User’s guide
Gateway LT Series
-
1

TABLE OF CONTENTS
Starting your computer 4
Wireless connection .......................................... 4
Registration....................................................... 5
Software installation ........................................ 6
Recovery ............................................................ 6
Having trouble? ................................................ 6
Computer Basics 8
Safety and comfort ........................................... 8
Safety precautions ..................................... 8
Health precautions .................................. 11
Getting to know your computer 14
Top view - display ........................................... 15
Top view - keyboard ....................................... 16
Special keys .............................................. 17
Rear view......................................................... 20
Left view.......................................................... 20
Right view ....................................................... 21
Base view......................................................... 23
Upgrading your computer 25
Expanding through options ........................... 25
Connectivity options................................ 25
Power supply 30
AC power adapter .......................................... 30
Battery pack .................................................... 31
Battery pack characteristics..................... 31
Installing or removing the battery
pack .......................................................... 33
Charging the battery............................... 34
Checking the battery level ...................... 34
2
Optimizing battery life ........................... 34
Battery-low warning............................... 35
Software 37
Using Windows and your software ............... 37
Welcome Center ..................................... 37
Internet security offer ............................ 37
Productivity software ............................. 38
Gateway Recovery Management........... 38
Playing multimedia files ......................... 38
Playing DVD movies................................ 42
Social networks (optional) ..................... 44
Internet 49
Social Networks (optional) ..................... 49
First steps on the net...................................... 50
Protecting your computer ...................... 50
Choose an Internet Service Provider...... 50
Network connections.............................. 52
Surf the Net! ........................................... 55
Security .................................................... 58
Helpdesk 72
Safe computing .............................................. 72
Maintenance ........................................... 72
Updates ................................................... 79
Windows Remote Assistance.................. 81
Recovery 82
Gateway Recovery Management .................. 82
Creating recovery discs ........................... 82
Recovering your system ................................. 86
Types of recovery .................................... 87

Regulatory information 94
V
G
Environment 105
Software license 107
Index 110
Copyright © 2011.
All Rights Reserved.
isit registration.gateway.com and discover the benefits of being a customer of
ateway.
Remark: All images are for reference purposes only. Actual configuration may vary.
Gateway LT Series User Guide
Original Issue: 23 February 2011
Table of contents -
3

STARTING YOUR COMPUTER
Thank you for purchasing this Gateway computer!
This guide has been designed to introduce you to the features of your
computer and assist in your computing experience.
After setting up and starting your computer, as shown in the setup
instructions, it will ask you questions that will help you connect to the
Internet. Your computer will then configure installed software.
WIRELESS CONNECTION
To connect to a wireless network, first check the wireless features of
your computer are on, and that the router or modem you want to
connect to is also correctly configured.
• If wireless is not on, press the communication key ( ) to open the
Launch Manager
• Your computer will detect and display any available networks, select
your network and enter the password, if required.
• After a short delay, your computer should connect to the Internet.
If your network is not detected, or your computer does not connect to
the Internet, please refer to your ISP or router’s documentation. After
your computer starts and you can use it, open Internet Explorer and
follow the instructions.
and make sure Wi-Fi is On.
4

Alternatively, use a network cable to connect directly to a network
port on your router. Please refer to your ISP or router’s guide.
REGISTRATION
When using your computer for the first time, it is recommended that
you register it. This gives you access to some useful benefits, such as:
• Faster service from our trained representatives.
• Membership in the Gateway community: receive promotions and
participate in customer surveys.
• The latest news from Gateway.
How to register
During the initial startup of your computer, a window will invite you
to register. Please fill in the information and click Next. The second
window you'll see contains optional fields that will help us to provide
you with a more personable customer service experience.
Another option
Another way to register your Gateway product is to visit our website
at registration.gateway.com. Choose your country and follow the
simple instructions.
After registering, you will be sent a confirmation email with
important information that you should keep in a safe place.
Starting your computer -
5

SOFTWARE INSTALLATION
Your computer will automatically install software and prepare your
computer for use. This may take some time, please do not turn off
your computer; wait until the installation has finished.
RECOVERY
You should create recovery discs as soon as you are able. The Gateway
Recovery Management program allow you to create recovery discs
and then to restore or reinstall applications and drivers provided by
Gateway. You will need a pack of writable DVDs.
See page 82 for more information about recovery.
HAVING TROUBLE?
Gateway provides several options to support your purchase.
Gateway support
Make sure you write down your computer serial number, date and
place of purchase and model name on the area provided in this guide;
save your proof of purchase. Before you call us, please write down any
error message that accompanies the problem, and have the computer
in front of you and switched on if possible. Having these items to
hand when contacting us will ensure better and quicker service.
6

Gateway website
Remember to visit www.gateway.com - Check out the support section
for up-to-date information, help, drivers and downloads.
Warranty and contact information
You can find information about the warranty for your computer and
how to contact technical support in your computer’s Warranty.
Starting your computer -
7

COMPUTER BASICS
SAFETY AND COMFORT
Safety precautions
Please follow the guidelines below to use your computer comfortably
and to avoid health problems.
Computer environment
Make sure that the computer:
• Is used on a stable surface, stand or table. A fall can seriously
damage the computer.
• Is not used on a surface that vibrates, or used when taking part in
sport, exercise or other activities in a dynamic environment.
Vibration or movement can loosen fastenings, damage internal
components and even cause battery leakage.
• Is away from direct sunlight and sources of heat.
• Is away from magnetic fields or any device generating static
electricity.
• Is kept at least 30 centimetres (one foot) away from a mobile phone.
• Is not in a dusty or damp environment.
• Is not used near water. Never spill liquids of any kind on or into your
computer.
8

• Is not placed on a carpet or any other surface that may have an
electrical charge.
Cables
Make sure that:
• Cables are not strained and that there is no risk of people walking
or tripping over them.
• Other devices do not crush the cables.
• The power cable is connected to the computer before connecting
the power cable to the AC power outlet.
• The power cable is unplugged from the power outlet before
disconnecting the power cable from the computer.
• Three-pin power cords are connected to a grounded power outlet.
• The power outlet is easily accessible and as close to the computer as
possible (do not overload it with too many adapters).
If your computer uses an external AC adapter:
• Do not cover or place objects on the AC adapter. Allow the adapter
to cool properly during use by keeping it clear of objects.
• Only use the AC adapter that is supplied with your computer.
Although other adapters may look similar, using them can damage
your computer. If a replacement is required, use only parts certified
for use with your computer.
Computer Basics -
9

Cleaning your computer
• Always unplug your computer from the power outlet before
cleaning it.
• Do not use liquid or aerosol cleaners, use a damp cloth instead.
• Never spray cleaning product directly on the screen.
• If you spill liquid on your computer, switch it off immediately,
unplug the AC adapter, remove the battery and make sure it is
completely dry before switching it on again. Wait overnight if
necessary.
Note: If your computer includes slots for memory cards or
expansion devices, plastic ’dummies’ may be installed in the card
slots. Dummies protect unused slots from dust, metal objects or
other particles. Save the dummies for use when no cards are in the
slots.
Servicing your computer
Do not attempt to service your computer yourself, as opening or
removing covers may expose you to dangerous voltage or other risks.
Refer all servicing to qualified service personnel.
Unplug your computer from the wall outlet and refer servicing to
qualified service personnel when:
• the power cord or plug is damaged, cut or frayed,
• liquid was spilled into the product,
• the product was exposed to rain or water,
10

• the product has been dropped or the case has been damaged
• the product exhibits a distinct change in performance, indicating a
need for service
• the product does not operate normally after following the
operating instructions
Note: Adjust only those controls that are covered by the operating
instructions, since improper adjustment of other controls may
result in damage and will often require extensive work by a
qualified technician to restore the product to normal condition.
Health precautions
• The computer and accessories may contain small parts. Keep them
out of the reach of small children.
• If you work or play for hours at a time, then make sure you take
regular breaks. Look away from the computer's screen once in a
while. Do not use your computer if you are tired.
• Arrange your computer so that you can work in a natural and
relaxed position. Place items that you use frequently within easy
reach.
• Position your computer directly in front of you for increased safety
and comfort. Ensure that your keyboard and touchpad are at a
comfortable height. The screen should be about 45-70 cm (18-30
inches) from your eyes.
If you use your computer for long periods while sitting at a desk,
invest in an external keyboard for improved comfort.
Computer Basics -
11

• To protect your hearing, when using speakers or headphones,
increase volume gradually until you can hear clearly and
comfortably; do not increase the volume level after your ears have
adjusted. Do not listen to high volumes for extended periods. Do
not increase the volume to block out noisy surroundings; decrease
the volume if you cannot hear people speaking near you.
• The computer’s underside, power adapter and the air from
ventilation slots may become hot during use. Avoid
continuous body contact and do not place the computer on
your lap while it is operating.
• Ensure that the computer’s ventilation slots and openings are never
obstructed or covered. Do not place the computer on a soft surface
(such as a carpet, chair or bed) that may block ventilation slots.
• Do not push objects of any kind into ventilation or case slots as they
may touch dangerous voltage points or short-out parts that may
result in a fire or electric shock.
• Some disorders of the hands, wrists, arms, neck, shoulders, legs and
back may be associated with, or aggravated by certain repetitive
actions. To reduce your risk of developing these disorders, type with
your wrists straight and your hands and wrists floating above the
keyboard. If you experience periods of pain, tingling, numbness or
other discomfort, please contact your doctor.
• We advise that parents monitor the use of games by their children.
If you or your child experience any of the following symptoms:
dizziness, blurred vision, eye or muscle twitches, loss of
12

consciousness, disorientation, any involuntary movement or
convulsion, IMMEDIATELY discontinue use and consult your doctor.
This may happen even if the person has no medical history of
epilepsy.
Computer Basics -
13

GETTING TO KNOW YOUR COMPUTER
After setting up your computer as illustrated in the setup instructions,
let us show you around your new Gateway computer.
14

TOP VIEW - DISPLAY
1
2
# Icon Item Description
1 Webcam Web camera for video communication.
3
2 Display screen
3 Microphone Internal microphone for sound recording.
Also called Liquid-Crystal Display (LCD),
displays computer output.
Getting to know your computer -
15
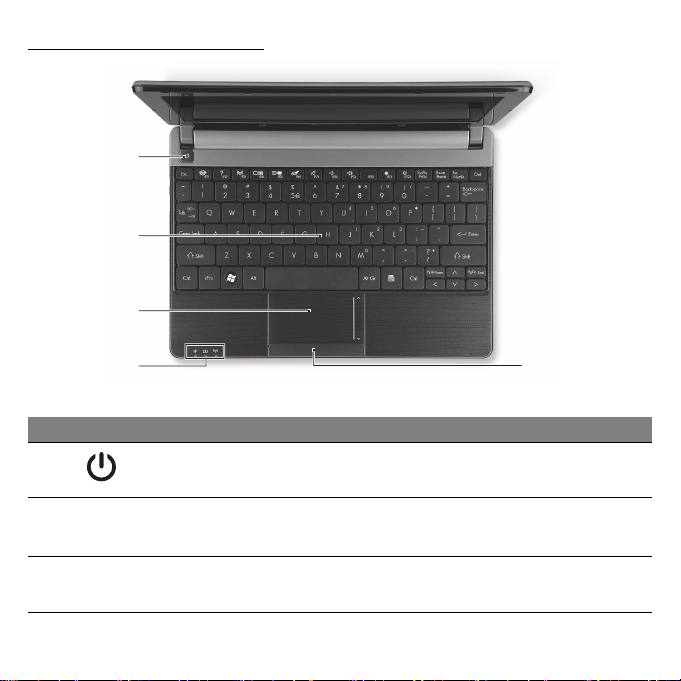
TOP VIEW - KEYBOARD
1
2
3
4
# Icon Item Description
1
2 Keyboard
3Touchpad
Power button /
indicator
Turns the computer on and off. Indicates the
computer's power status.
For entering data into your computer.
− Special keys are described on page 17.
Touch-sensitive pointing device which
functions like a computer mouse.
16
5
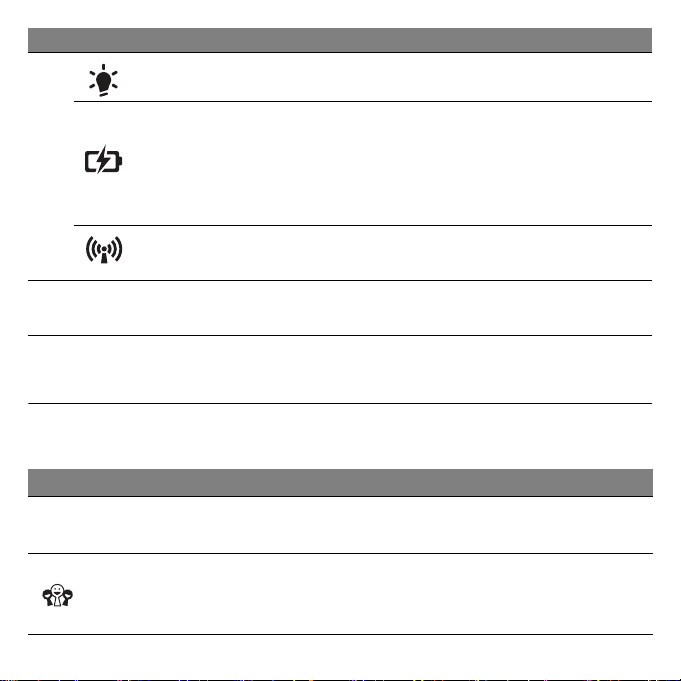
# Icon Item Description
Power indicator Indicates the computer's power status.
Indicates the computer's battery status.
4
Battery indicator
− Charging: The light shows amber when
the battery is charging.
− Fully charged: The light shows blue when
in AC mode.
Communication
indicator
Indicates the computer’s wireless
connectivity device status.
5
Click buttons (left
and right)
−
Note:
The front panel indicators are visible even when the computer cover is closed.
The left and right side of the button function
as left and right selection buttons.
Special keys
Your computer’s keyboard includes keys that activate special
functions. The function of each key is clearly marked with an icon.
Icon Function Description
Hotkey for second
Fn
function
Social Networking
Activates a second function on certain keys.
E.g. press the Fn key to activate the F1 to F12 keys.
Opens the Social Networks application.
− If this application is not installed, the key will start
your instant messenging application.
Getting to know your computer -
17
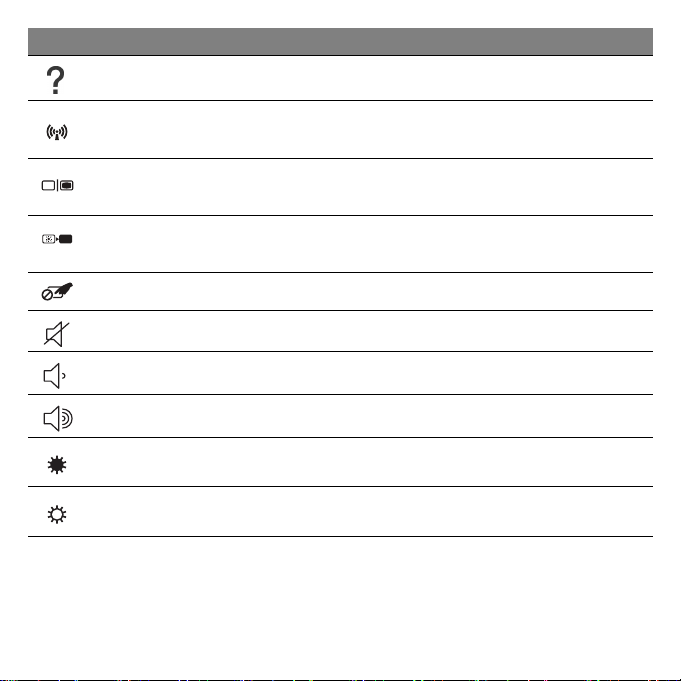
Icon Function Description
Help Opens the User's Guide for your computer.
18
Communication
Display toggle
Screen blank
Touchpad toggle Turns the internal touchpad on and off.
Speaker toggle Turns the speakers on and off.
Volume down Decreases the sound volume.
Volume up Increases the sound volume.
Brightness down Decreases the screen brightness.
Brightness up Increases the screen brightness.
Enables/disables the computer’s communication
devices.
Switches display output between the display screen,
external monitor (if connected) and both.
Turns the display screen backlight off to save power.
Press any key to return.

Hotkeys
The computer uses hotkeys (key combinations) to access Num Lock,
function keys and navigation commands.
To activate hotkeys, press and hold the Fn key (bottom left) before
pressing the other key in the hotkey combination.
Hotkey Function Description
Fn + Special keys
(see page 17)
Fn + Page Up Home Scrolls to the beginning of a document.
Fn + Page Down End Scrolls to the end of a document.
− Note: It is not necessary to press the Fn key to use the F1 to F12 function keys
when starting your computer or when using the BIOS.
To swap the hotkey and special function of the F1 to F12 keys, change the
function key setting in the BIOS (to open the BIOS press F2 when starting your
computer, then select the Main menu and change Function key behavior to
Function keys).
Function keys Activates the F1 to F12 keys.
Getting to know your computer -
19

REAR VIEW
1
# Icon Item Description
1 Battery bay Houses the computer's battery pack.
LEFT VIEW
21345
# Icon Item Description
1 DC-in jack Connects to your computer’s AC adapter.
20
2
3
Ethernet (RJ-45)
port
External display
(VGA) port
Connects to an Ethernet 10/100/1000-based
network.
Connects to a display device (e.g., external
monitor, LCD projector).

# Icon Item Description
4
5 USB 2.0 port
Ventilation and
cooling fan
Allows the computer to stay cool.
− Do not cover or obstruct the openings.
Connect to USB devices (e.g., USB mouse,
USB camera).
RIGHT VIEW
213 4
# Icon Item Description
Accepts Secure Digital (SD), MultiMediaCard
1
Multi-in-1 card
reader
(MMC), Memory Stick PRO (MS PRO), xDPicture Card (xD).
− Push to remove/install the card. Only one
card can operate at any given time.
Getting to know your computer -
21

# Icon Item Description
Microphone jack Accepts inputs from external microphones.
Connects to audio line-out devices (e.g.,
2
Headphones /
speaker jack
speakers, headphones).
− Supports compatible 3.5 mm headsets
with built-in microphone (e.g. Acer smart
handheld headsets).
3 USB 2.0 port
Connect to USB devices (e.g., USB mouse,
USB camera).
22
Kensington lock slot
Connects to a Kensington-compatible
computer security lock.
− Wrap the computer security lock cable
4
around an immovable object such as a
table or handle of a locked drawer.
Insert the lock into the notch and turn the
key to secure the lock.
Some keyless models are also available.

BASE VIEW
1
2
6
3
# Icon Item Description
1
2
Ventilation and
cooling fan
Memory
compartment
Hard disk bay
Allows the computer to stay cool.
− Do not cover or obstruct the openings.
Houses the computer's main memory.
Houses the computer's hard disk (secured
with screws).
Getting to know your computer -
5
4
23

# Icon Item Description
3 Battery release latch
4 Battery bay Houses the computer's battery pack.
5 Battery lock Locks the battery in position.
6 Speakers Deliver stereo audio output.
Releases the battery for removal. Insert a
suitable tool and slide to release.
24

UPGRADING YOUR COMPUTER
EXPANDING THROUGH OPTIONS
Your computer offers you many options for a complete computing
experience.
Connectivity options
Ports allow you to connect peripheral devices to your computer. For
instructions on how to connect different external devices to the
computer, read the following section.
Memory card reader
Memory cards are used in a wide selection of
digital cameras, PDAs, MP3 players and mobile
phones.
Inserting a memory card
1. Align the card so that the connector points towards the port, with
the connectors facing down.
2. Carefully slide the card into the port. If you find you need to use any
force to insert the card, try reorientating the card slightly.
3. Push the card until it clicks into place. A few millimetres of the card
will extend from beyond the slot.
Upgrading your computer -
25

If the card contains some files, the
appear (this depends on the contents of the card) and ask you if you
wish to use a program to access the contents of the card. Select an
option here if it is appropriate, otherwise select Cancel. If the card
contains no files, or unknown files, a window will open showing the
contents of the card.
Windows Auto Play
window may
Removing a card from an memory card reader
1. Click on the Safely Remove
Hardware icon in the
Notification Area
clock).
2. Click on Eject SD Card (or the
name of the
3. Wait until a
Hardware
4. Remove the card.
message is displayed.
(next to the
device).
Safe to Remove
1
2
Built-in networking
The built-in networking allows you to connect your computer to
an Ethernet-based network.
Connect an Ethernet cable from the Ethernet (RJ-45) port on the
chassis of the computer to a network jack or hub on your
network.
26
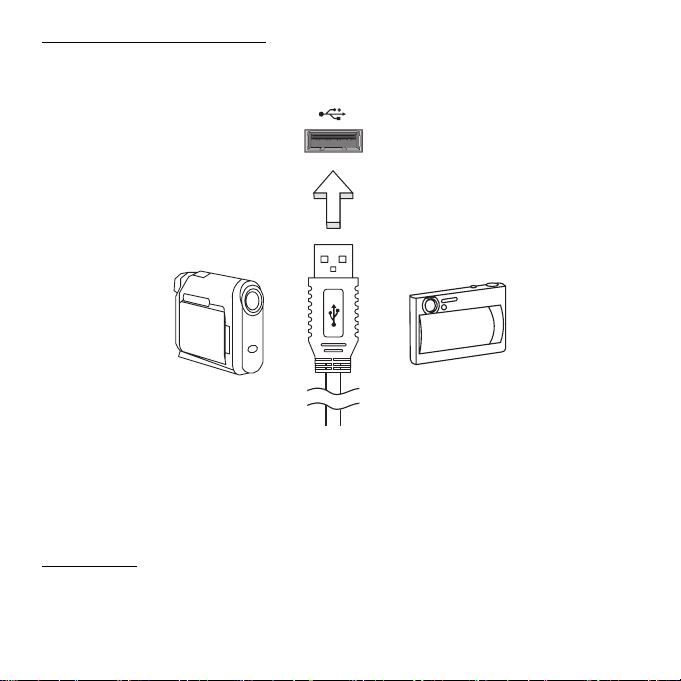
Universal Serial Bus (USB)
The USB port is a high-speed serial bus which allows you to connect
USB peripherals without taking up system resources.
Certain computers may include one or more USB 3.0 ports. These
resemble standard USB ports, except they include additional internal
connections and are blue. You may use USB 3.0 compatible devices
with these ports to benefit from faster transfer speeds.
Video port
Connect to a monitor with a VGA or DVI port (the type of connection
supported depends on your computer’s configuration). The
appropriate cable is usually included with the monitor.
Upgrading your computer -
27

Follow these steps to connect an monitor to your computer:
1. Check that the computer is powered off and the monitor power
switch is turned off.
2. Attach the video cable to the monitor port on the computer. Secure
the cable connection with the screws provided.
3. Connect the monitor power cable and plug it into a properly
grounded wall outlet.
4. Follow any setup instructions in the monitor's user's guide.
5. Turn on power to the monitor, then the computer.
6. Make sure that the current resolution and refresh rate do not
exceed the specifications of the monitor. If necessary change the
display settings used by the computer.
Note: To access the display controls: Click on Start, Control Panel,
Appearance and Personalization. Click on the Display category,
then select Change Display Settings.
28

High-Definition Multimedia Interface (only for certain models)
HDMI (High-Definition Multimedia Interface) is an
industry-supported, uncompressed, all-digital audio/
video interface. HDMI provides an interface between any
compatible digital audio/video source, such as a set-top
box, DVD player, and A/V receiver and a compatible
digital audio and/or video monitor, such as a digital
television (DTV), over a single cable.
Use the HDMI port on your computer to connect with
high-end audio and video equipment. Single cable
implementation allows tidy setup and fast connection.
Headphones and microphone
These two ports allow you to connect audio devices. Use the
headphone port to plug in stereo headphones or powered speakers.
Plugging an audio device to the headphone port disables the built-in
speakers. Use the microphone port to connect an external microphone
for mono recording; plugging in an external microphone disables the
built-in microphone.
Upgrading your computer -
29

POWER SUPPLY
AC POWER ADAPTER
Your computer can use the supplied external power adapter (a power
'brick') to run on AC power. A power cable is provided that is
appropriate for the country where the computer was purchased.
The power adapter provides adequate power to run your computer
and recharge the battery pack at the same time.
Caution: Do not cover or place objects on the AC adapter. Keeping
the adapter clear of objects allows the adapter to cool properly
during use.
Only use the AC adapter that is supplied with your computer.
Although other adapters may look similar, using them can damage
your computer.
30
 Loading...