


Gateway FHX2303L, HX2003L, KX1853, KX1903, KX1953 Owner's Manual
...
User’s Manual
Gateway NE572/NV572
- 1

TABLE OF CONTENTS
Starting your computer 4
Wireless connection ........................................... 4
Registration ........................................................ 5
Software installation ........................................... 6
Recovery ............................................................ 6
Having trouble? .................................................. 6
Computer Basics 8
Safety and comfort ............................................. 8
Safety precautions ...................................... 8
Health precautions .................................... 11
Getting to know your computer 14
Top view - display ............................................ 15
Top view - keyboard ......................................... 16
Front view......................................................... 17
Left view ........................................................... 18
Right view......................................................... 20
Base view......................................................... 22
Using the keyboard 24
Lock keys and numeric keypad........................ 24
Special keys.............................................. 25
Windows keys .................................................. 28
Touchpad 29
Touchpad basics .............................................. 29
Touchpad gestures .......................................... 30
Upgrading your computer 31
Expanding through options .............................. 31
Connectivity options.................................. 31
Power supply 36
AC power adapter ............................................ 36
2 - Table of Contents
Battery pack..................................................... 37
Battery pack characteristics ..................... 37
Replacing the battery pack....................... 39
Installing or removing the battery pack .... 39
Charging the battery................................. 40
Checking the battery level ........................ 40
Optimizing battery life............................... 41
Battery-low warning.................................. 41
Power management 43
Saving power................................................... 43
Software 46
Using Windows and your software .................. 46
Internet security offer ............................... 46
Gateway Recovery Management............. 46
Internet 47
First steps on the net ....................................... 47
Protecting your computer ......................... 47
Choose an Internet Service Provider ....... 47
Network connections................................ 49
Surf the Net! ............................................. 53
Security .................................................... 53
Recovery 62
Creating a recovery backup............................. 62
Creating a drivers and applications backup..... 66
Recovering your system .................................. 69
Reinstalling drivers and applications........ 70
Returning to an earlier system
snapshot................................................... 73
Returning your system to its factory
condition................................................... 74
Recovering from Windows ....................... 75

Recovering from a recovery backup ......... 79
Copyright © 04/2013. All Rights Reserved.
Gateway NE572/NV572 User’s Manual
Original Issue: 19 April 2013
Visit registration.gateway.com and discover the benefits of being a customer of
Gateway.
Remark: All images are for reference purposes only. Actual configuration may vary.
Frequently asked questions 83
Tips and hints for using Windows 8 ................. 86
Three concepts you might want to
keep in mind.............................................. 86
How do I access the charms? ................... 86
How do I get to Start? ............................... 86
How do I jump between apps?.................. 87
How do I turn off my computer?................ 87
Why is there a new interface?................... 87
How do I unlock my computer?................. 88
How do I personalize my computer?......... 88
I want to use Windows in the way
that I'm used to - give me my
desktop back! ........................................... 89
Where are my apps? ................................ 89
What is a Microsoft ID (account)? ............ 91
How do I add a favorite to Internet
Explorer?.................................................. 91
How do I check for Windows
updates? .................................................. 92
Where can I get more information?.......... 92
Regulatory information 93
Environment 111
Software license 114
Index 117
Table of Contents - 3

STARTING YOUR COMPUTER
Thank you for purchasing this Gateway computer!
This guide has been designed to introduce you to the features of your
computer and assist in your computing experience.
After setting up and starting your computer, as shown in the setup
instructions, it will ask you questions that will help you connect to the
Internet. Your computer will then configure installed software.
WIRELESS CONNECTION
To connect to a wireless network, first check the wireless features of your
computer are on, and that the router or modem you want to connect to is
also correctly configured.
• If wireless is not on, press the Windows key ( ) + W, type "Wireless"
and then click on Wireless. Click the toggle switch under Wi-Fi to
enable the wireless connection. Click again to disable.
• To connect to a network, press the Windows key ( ) + W, type
"Wireless" and then click on Connect to a network. Select your
network and enter the password if required.
• After a short delay, your computer should connect to the Internet.
If your network is not detected, or your computer does not connect to the
Internet, please refer to your ISP or router’s documentation. After your
computer starts and you can use it, open Internet Explorer and follow the
instructions.
4 - Starting your computer

Alternatively, use a network cable to connect directly to a network port
on your router. Please refer to your ISP or router’s guide.
REGISTRATION
When using your computer for the first time, it is recommended that you
register it. This gives you access to some useful benefits, such as:
• Faster service from our trained representatives.
• Membership in the Gateway community: receive promotions and
participate in customer surveys.
• The latest news from Gateway.
How to register
During the initial startup of your computer, a window will invite you to
register. Please fill in the information and click Next. The second window
you'll see contains optional fields that will help us to provide you with a
more personable customer service experience.
Another option
Another way to register your Gateway product is to visit our website at
registration.gateway.com. Choose your country and follow the simple
instructions.
After registering, you will be sent a confirmation email with important
information that you should keep in a safe place.
Starting your computer - 5

SOFTWARE INSTALLATION
Your computer will automatically install software and prepare your
computer for use. This may take some time, please do not turn off your
computer; wait until the installation has finished.
RECOVERY
You should create recovery discs as soon as you are able. The Gateway
Recovery Management program allow you to create recovery discs and
then to restore or reinstall applications and drivers provided by Gateway.
HAVING TROUBLE?
Gateway provides several options to support your purchase.
Gateway support
Make sure you write down your computer serial number, date and place of
purchase and model name on the area provided in this guide; save your
proof of purchase. Before you call us, please write down any error
message that accompanies the problem, and have the computer in front of
you and switched on if possible. Having these items to hand when
contacting us will ensure better and quicker service.
Gateway website
Remember to visit www.gateway.com - Check out the support section for
up-to-date information, help, drivers and downloads.
6 - Starting your computer

Warranty and contact information
You can find information about the warranty for your computer and how to
contact technical support in your computer’s Warranty.
Starting your computer - 7

COMPUTER BASICS
SAFETY AND COMFORT
Safety precautions
Please follow the guidelines below to use your computer comfortably and
to avoid health problems.
Computer environment
Make sure that the computer:
• Is used on a stable surface, stand or table. A fall can seriously damage
the computer.
• Is not used on a surface that vibrates, or used when taking part in sport,
exercise or other activities in a dynamic environment. Vibration or
movement can loosen fastenings, damage internal components and
even cause battery leakage.
• Is away from direct sunlight and sources of heat.
• Is away from magnetic fields or any device generating static electricity.
• Is kept at least 30 centimetres (one foot) away from a mobile phone.
• Is not in a dusty or damp environment.
• Is not used near water. Never spill liquids of any kind on or into your
computer.
• Is not placed on a carpet or any other surface that may have an
electrical charge.
8 - Computer Basics

Please note
• Slots and openings are provided for ventilation to ensure reliable
operation of the product and to protect it from overheating. These
openings must not be blocked or covered. The openings should never
be blocked by placing the product on a bed, sofa, rug or other similar
surface. This product should never be placed near or over a radiator or
heat register, or in a built-in installation unless proper ventilation is
provided.
• Never push objects of any kind into this product through cabinet slots as
they may touch dangerous voltage points or short-out parts that could
result in a fire or electric shock. Never spill liquid of any kind onto or into
the product.
• To avoid damage of internal components and to prevent battery
leakage, do not place the product on a vibrating surface.
• Never use it under sporting, exercising, or any vibrating environment
which will probably cause unexpected short current or damage rotor
devices, HDD, optical drive, and even exposure risk from lithium battery
pack.
Cables
Make sure that:
• Cables are not strained and that there is no risk of people walking or
tripping over them.
• Other devices do not crush the cables.
Computer Basics - 9

• The power cable is connected to the computer before connecting the
power cable to the AC power outlet.
• The power cable is unplugged from the power outlet before
disconnecting the power cable from the computer.
• Three-pin power cords are connected to a grounded power outlet.
• The power outlet is easily accessible and as close to the computer as
possible (do not overload it with too many adapters).
If your computer uses an external AC adapter:
• Do not cover or place objects on the AC adapter. Allow the adapter to
cool properly during use by keeping it clear of objects.
• Only use the AC adapter that is supplied with your computer. Although
other adapters may look similar, using them can damage your computer.
If a replacement is required, use only parts certified for use with your
computer.
Cleaning your computer
• Always unplug your computer from the power outlet before cleaning it.
• Do not use liquid or aerosol cleaners, use a damp cloth instead.
• Never spray cleaning product directly on the screen.
• If you spill liquid on your computer, switch it off immediately, unplug the
AC adapter, remove the battery and make sure it is completely dry
before switching it on again. Wait overnight if necessary.
Note: If your computer includes slots for memory cards or expansion
devices, plastic ’dummies’ may be installed in the card slots. Dummies
10 - Computer Basics

protect unused slots from dust, metal objects or other particles. Save
the dummies for use when no cards are in the slots.
Servicing your computer
Do not attempt to service your computer yourself, as opening or removing
covers may expose you to dangerous voltage or other risks. Refer all
servicing to qualified service personnel.
Unplug your computer from the wall outlet and refer servicing to qualified
service personnel when:
• the power cord or plug is damaged, cut or frayed,
• liquid was spilled into the product,
• the product was exposed to rain or water,
• the product has been dropped or the case has been damaged,
• the product exhibits a distinct change in performance,
• the product does not operate normally after following the operating
instructions
Note: Adjust only those controls that are covered by the operating
instructions, since improper adjustment of other controls may result in
damage and will often require extensive work by a qualified technician
to restore the product to normal condition.
Health precautions
• The bottom surface, areas around ventilation openings and AC adapter
may get hot. To avoid injury, ensure they do not come in contact with
your skin or body.
Computer Basics - 11

• Your device and its enhancements may contain small parts. Keep them
out of the reach of small children.
• The computer and accessories may contain small parts. Keep them out
of the reach of small children.
• If you work or play for hours at a time, then make sure you take regular
breaks. Look away from the computer's screen once in a while. Do not
use your computer if you are tired.
• Arrange your computer so that you can work in a natural and relaxed
position. Place items that you use frequently within easy reach.
• Position your computer directly in front of you for increased safety and
comfort. Ensure that your keyboard and touchpad are at a comfortable
height. The screen should be about 45-70 cm (18-30 inches) from your
eyes.
If you use your computer for long periods while sitting at a desk, invest
in an external keyboard for improved comfort.
• To protect your hearing, when using speakers or headphones, increase
volume gradually until you can hear clearly and comfortably; do not
increase the volume level after your ears have adjusted. Do not listen to
high volumes for extended periods. Do not increase the volume to block
out noisy surroundings; decrease the volume if you cannot hear people
speaking near you.
• The computer’s underside, power adapter and the air from
ventilation slots may become hot during use. Avoid
continuous body contact and do not place the computer on
your lap while it is operating.
12 - Computer Basics

• Ensure that the computer’s ventilation slots and openings are never
obstructed or covered. Do not place the computer on a soft surface
(such as a carpet, chair or bed) that may block ventilation slots.
• Do not push objects of any kind into ventilation or case slots as they
may touch dangerous voltage points or short-out parts that may result in
a fire or electric shock.
• Some disorders of the hands, wrists, arms, neck, shoulders, legs and
back may be associated with, or aggravated by certain repetitive
actions. To reduce your risk of developing these disorders, type with
your wrists straight and your hands and wrists floating above the
keyboard. If you experience periods of pain, tingling, numbness or other
discomfort, please contact your doctor.
• We advise that parents monitor the use of games by their children. If you
or your child experience any of the following symptoms: dizziness,
blurred vision, eye or muscle twitches, loss of consciousness,
disorientation, any involuntary movement or convulsion, IMMEDIATELY
discontinue use and consult your doctor. This may happen even if the
person has no medical history of epilepsy.
Computer Basics - 13

GETTING TO KNOW YOUR
COMPUTER
After setting up your computer, as illustrated in the setup instructions, let
us show you around your new Gateway computer.
Gateway NE572/NV572
14 - Getting to know your computer

TOP VIEW - DISPLAY
1
2
3
# Icon Item Description
Web camera for video communication.
1 Webcam
A light next to the Webcam indicates that the
webcam is active.
2 Display screen
3 Microphone Internal microphone for sound recording.
Also called Liquid-Crystal Display (LCD),
displays computer output.
Getting to know your computer - 15

TOP VIEW - KEYBOARD
1
2
3
4
# Icon Item Description
1
Power button /
indicator
2 Keyboard
3 Touchpad
4
16 - Getting to know your computer
Click buttons (left
and right)
Turns the computer on and off. Indicates the
computer's power status.
For entering data into your computer.
- See "Using the keyboard" on page 24.
Touch-sensitive pointing device which
functions like a computer mouse.
- .See "Touchpad" on page 29.
The left and right side of the button function as
left and right selection buttons.
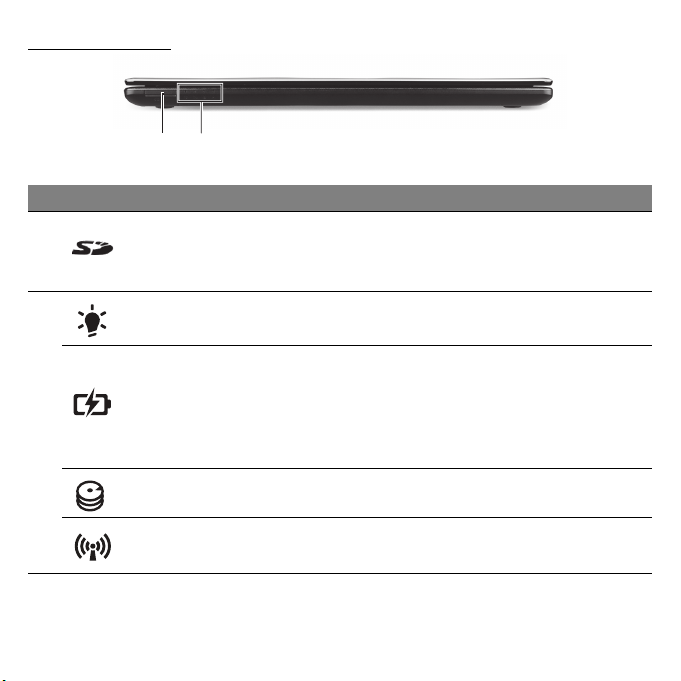
FRONT VIEW
1 2
# Icon Item Description
Accepts Secure Digital (SD) cards.
1 Card reader
Power indicator Indicates the computer's power status.
Battery indicator
2
HDD indicator Indicates when the hard disk drive is active.
- Push to remove/install the card. Only one
card can operate at any given time.
Indicates the computer's battery status.
- Charging: The light shows amber when the
battery is charging.
- Fully charged: The light shows blue when in
AC mode.
Communication
indicator
- Note: The front panel indicators are visible even when the computer cover is closed.
Indicates the computer’s wireless connectivity
device status.
Getting to know your computer - 17

LEFT VIEW
21 3 754 6
# Icon Item Description
Kensington lock slot
1
2
3
Ventilation and
cooling fan
External display
(VGA) port
Connects to a Kensington-compatible
computer security lock.
- Wrap the computer security lock cable
around an immovable object such as a table
or handle of a locked drawer.
Insert the lock into the notch and turn the key
to secure the lock.
Some keyless models are also available.
Allows the computer to stay cool.
- Do not cover or obstruct the openings.
Connects to a display device (e.g., external
monitor, LCD projector).
4 Ethernet (RJ-45) port
5 HDMI port
18 - Getting to know your computer
Connects to an Ethernet 10/100/1000-based
network.
Supports high-definition digital video
connections.

# Icon Item Description
Connects to USB devices.
6 USB port
7
Headphones /
speaker jack
- If a port is black, it is USB 2.0 compatible, if
it is blue it is also USB 3.0 compatible (see
below).
Connects to audio line-out devices (e.g.,
speakers, headphones).
- Supports compatible 3.5 mm headsets with
built-in microphone (e.g. Acer smart
handheld headsets).
Information on USB 3.0
• Compatible with USB 3.0 and earlier devices.
• For optimal performance, use USB 3.0-certified devices.
• Defined by the USB 3.0 specification (SuperSpeed USB).
Getting to know your computer - 19

RIGHT VIEW
Note: Depending on configuration, your system may not be equipped
with an optical (CD/DVD) drive.
1 65432
# Icon Item Description
Connects to USB devices.
1 USB ports
2 Optical drive Internal optical drive; accepts CDs or DVDs.
- If a port is black, it is USB 2.0 compatible, if
it is blue it is also USB 3.0 compatible (see
below).
3
4
5
20 - Getting to know your computer
Optical disk access
indicator
Optical drive eject
button
Emergency eject
hole
Lights up when the optical drive is active.
Ejects the optical disk from the drive.
Ejects the optical drive tray when the computer
is turned off.
- Carefully insert a straightened paper clip to
eject the optical drive tray.

# Icon Item Description
6 DC-in jack Connects to your computer’s AC adapter.
Information on USB 3.0
• Compatible with USB 3.0 and earlier devices.
• For optimal performance, use USB 3.0-certified devices.
• Defined by the USB 3.0 specification (SuperSpeed USB).
Getting to know your computer - 21

BASE VIEW
1
2
3
# Icon Item Description
1 Battery release latch
Releases the battery for removal. Insert a
suitable tool and slide to release.
5
4
Memory
compartment
2
Hard disk bay
3 Speakers Deliver stereo audio output.
22 - Getting to know your computer
Houses the computer's main memory.
Houses the computer's hard disk (secured with
screws).

# Icon Item Description
4
Ventilation and
cooling fan
5 Battery bay Houses the computer's battery pack.
Allows the computer to stay cool.
- Do not cover or obstruct the openings.
Getting to know your computer - 23

USING THE KEYBOARD
The keyboard has full-sized keys and a numeric keypad, separate cursor,
Windows, function and special keys.
Lock keys and numeric keypad
Note: Information in this section may not apply to your computer.
The keyboard has three lock keys which you can toggle on and off.
Lock key Description
Caps Lock
Num Lock
The numeric keypad functions like a desktop numeric keypad.
Desired access Num Lock on Num Lock off
Number keys on
embedded keypad
When Caps Lock is on, all alphabetic characters typed
are in uppercase.
When Num Lock is on, the keypad is in numeric mode.
The keys function as a calculator (complete with the
arithmetic operators +, -, *, and /). Use this mode when
you need to do a lot of numeric data entry.
Type numbers in a normal
manner.
Control the cursor and
page view.
24 - Using the keyboard

Special keys
Your computer’s keyboard includes keys that activate special functions.
The function of each key is clearly marked with an icon.
Icon Function Description
Fn Hotkey for
second function
Activates a second function on certain keys.
E.g. press the Fn key to activate the F1 to F12
keys.
Help Opens the help menu.
Backup Allows you to create backup copies of your
computer; either the entire system or only
selected files and folders. Create a regular
schedule or make copies whenever you want.
Communication Enables/disables the computer’s
communication devices.
Display toggle Switches display output between the display
screen, external monitor (if connected) and
both.
Screen blank Turns the display screen backlight off to save
power. Press any key to return.
Touchpad toggle Turns the internal touchpad on and off.
Play/Pause Play or pause a selected media file.
Using the keyboard - 25
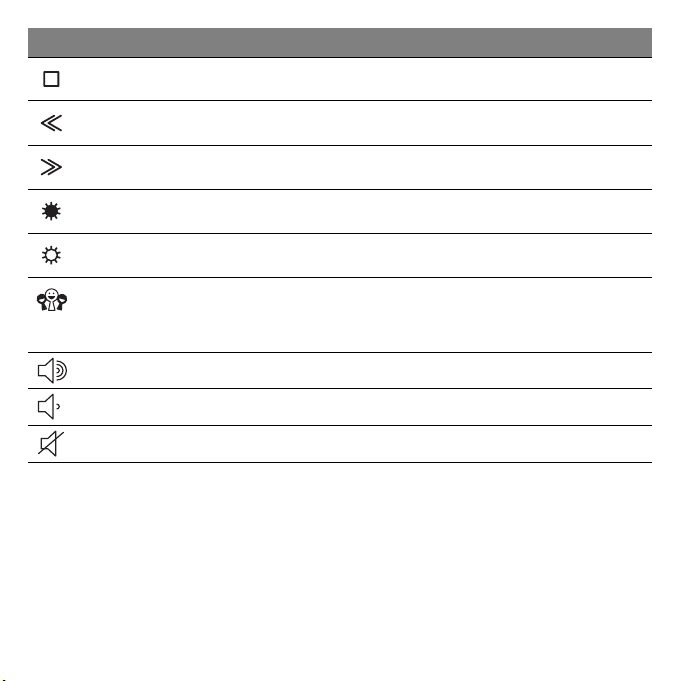
Icon Function Description
Stop Stop playing the selected media file.
Previous Return to the previous media file.
Next Jump to the next media file.
Brightness down Decreases the screen brightness.
Brightness up Increases the screen brightness.
Social
Networking
Volume up Increases the sound volume.
Volume down Decreases the sound volume.
Speaker toggle Turns the speakers on and off.
26 - Using the keyboard
Opens the Social Networks application.
If this application is not installed, the key will
start your instant messenging application.

Hotkeys
The computer uses hotkeys (key combinations) to access function keys
and navigation commands.
To activate hotkeys, press and hold the Fn key (bottom left) before
pressing the other key in the hotkey combination.
Hotkey Function Description
Fn + Special keys
(see page 25)
Fn +
Function
Activates the F1 to F12 keys.
keys
Home Scrolls to the beginning of a document.
Fn + End Scrolls to the end of a document.
Fn + Page up Scrolls up a page in a document.
Fn + Page Down Scrolls down a page in a document.
Note: It is not necessary to press the Fn key to use the F1 to F12
function keys when starting your computer or when using the BIOS.
To swap the hotkey and special function of the F1 to F12 keys, change
the function key setting in the BIOS (to open the BIOS press F2 when
starting your computer, then select the Main menu and change
Function key behavior to Function keys).
Using the keyboard - 27

Windows keys
The keyboard has two keys that perform Windows-specific functions.
Key Description
Windows key
Application
key
Pressed alone it returns to the Start screen.
It can also be used with other keys for special
functions, please check Windows Help.
This key has the same effect as clicking the right
mouse button; it opens the application's context
menu.
28 - Using the keyboard

TOUCHPAD
TOUCHPAD BASICS
The touchpad controls the arrow (or 'cursor') on the screen. As you
slide your finger across the touchpad, the cursor will follow this
movement.
Press the left or right side of the button located beneath the touchpad to
perform selection and execution functions. These two areas are similar to
the left and right buttons on a mouse. Tapping on the touchpad is the
same as clicking the left side of the button.
Note: The touchpad is sensitive to finger movement; the lighter the
touch, the better the response.
Please keep the touchpad and your fingers dry and clean.
The cursor is controlled by some basic gestures:
• Single-finger slide: Slide a finger across the touchpad to
move the cursor.
• Single-finger tap: Lightly tap the touchpad with your finger, to
perform a 'click', which will select or start an item. Quickly
repeat the tap to perform a double tap or 'double click'.
• Drag: Press and hold the left side of the selection button, or tap twice
anywhere on the touchtap, then slide a second finger across the
touchpad to select all items in an area.
Touchpad - 29

TOUCHPAD GESTURES
Windows 8 and many applications support touchpad gestures that use
one or more fingers.
Note: Support for touchpad gestures depends on the active
application.
These allow you to control applications with a few simple gestures, such
as:
• Swipe in from edge: Access Windows tools
by swiping into the center of the touchpad
from the right, top or left.
• Swipe in from right edge: Toggle the charms.
• Swipe in from top edge: Toggle the app commands.
• Swipe in from left edge: Switch to the previous app.
• Two-finger slide: Swiftly scroll through web pages,
documents and playlists by placing two fingers on the
touchpad and moving both in any direction.
• Two-finger pinch: Zoom in and out of photos, maps and
documents with a simple finger-and-thumb gesture.
30 - Touchpad
 Loading...