


Gateway SOLO 2500 User Manual
Contents |
|
About This Guide .................................................................................. |
iii |
Checking Out Your Documentation..................................................... |
iii |
Conventions Used in This Guide........................................................... |
iv |
Chapter 1: Checking Out Your Notebook Computer .............. |
5 |
Checking Out Your Solo 2500................................................................ |
6 |
Keyboard and LCD panel ................................................................ |
6 |
System Status Indicators (LCDs) .................................................... |
8 |
Back ports panel ............................................................................. |
10 |
Right side ports and bays ............................................................... |
11 |
Left side ports and battery bay....................................................... |
12 |
Bottom release latches and memory bay....................................... |
13 |
Chapter 2: Getting Started .................................................... |
15 |
Getting Your System Running.............................................................. |
16 |
Installing the battery pack .............................................................. |
16 |
Connecting the AC power.............................................................. |
18 |
Starting up your notebook.............................................................. |
19 |
Chapter 3: Using Your Notebook .......................................... |
23 |
Using Your Solo 2500........................................................................... |
24 |
Using the keyboard......................................................................... |
24 |
Using key combinations................................................................. |
25 |
Using the LCD................................................................................ |
29 |
Using the pointing device............................................................... |
31 |
Using the audio............................................................................... |
39 |
Using diskette media (3.5" or LS120 diskettes)............................ |
41 |
Using disc media (CD-ROM)........................................................ |
42 |
Removing and replacing the hard disk drive ................................ |
44 |
Using PC Cards .............................................................................. |
46 |
Using the IR port ............................................................................ |
48 |
Using the USB ports....................................................................... |
51 |
Using McAfee VirusScan.............................................................. |
52 |
i

Chapter 4: Managing Power Usage ...................................... |
55 |
Maximizing Power Management......................................................... |
56 |
Charging the battery pack.............................................................. |
56 |
Using the battery............................................................................ |
58 |
Monitoring the battery status......................................................... |
59 |
Setting the power button................................................................ |
60 |
Using the suspend and standby modes.......................................... |
61 |
Maximizing the battery life ........................................................... |
63 |
Appendix A: Accessories ....................................................... |
65 |
Solo Notebook Accessories ................................................................. |
66 |
Appendix B: Using the BIOS Setup Program ....................... |
69 |
About the BIOS Setup Utility............................................................... |
70 |
Using the BIOS Setup Utility........................................................ |
70 |
Appendix C: Contacting Gateway ......................................... |
73 |
Contacting Gateway.............................................................................. |
74 |
Calling Gateway ............................................................................ |
74 |
Calling Gateway when outside the |
|
U.S. and Canada............................................................................. |
75 |
Index ....................................................................................... |
77 |
ii Using Your Gateway Solo 2500 Multimedia Notebook

About This Guide
This document provides an overview of your Solo 2500 and information about using it.
Chapter 1: “Checking Out Your Notebook Computer” helps you get familiar with the ports and components on your notebook.
Chapter 2: “Getting Started” provides information about setting up your notebook.
Chapter 3: “Using Your Notebook” covers using the system ports and connecting peripherals to your computer. It also discusses some common uses for your computer.
Chapter 4: “Managing Power Usage” provides information about maximizing battery power and using Standby, Suspend, and other system modes.
Checking Out Your
Documentation
In addition to this User Guide, we’ve also provided other documentation to help you maximize using your system. Please refer to the following printed and online documentation for additional resources:
♦Printed manuals
•The “Maintaining and Troubleshooting Your Solo 2500 Notebook” contains information about managing system resources, preserving your system performance, reinstalling your operating system and drivers, and general troubleshooting tips.
•Windows 95, 98, or NT manual (dependent upon the operating system you ordered) provides information about using the operating system, learning about advanced features, networking, getting help, and more.
♦Online documentation - Lets you access the electronic manuals from your hard drive when you are traveling or when the manuals are not accessible. To access the online documentation click Start, Online Documentation and select the manual you want to review.
iii

♦Gateway Website (http://www.gateway.com) - If you have a modem, an analog phone line, and a subscription to an Internet service provider you can tap into some of the latest help and other information on our website. We provide tech support help, technical documents, tech tips, FAQs (Frequently Asked Questions), glossary, software library with BIOS updates, and other resources that can help you make the most of using your notebook.
Conventions Used in This Guide
This book uses the following conventions to help identify information:
Convention example |
Description |
|
|
ENTER |
Key names, which correspond to |
|
keys on the keyboard, are printed in |
|
small capitals. |
|
|
CTRL+ALT+DEL |
Letters in small caps. A plus sign |
|
between keys indicates that the keys |
|
must be pressed simultaneously. |
|
|
c:\setup |
Commands to be typed are repre- |
|
sented in all lower case characters |
|
on an individual line. |
|
|
Click OK |
Options to click or select are printed |
|
in bold (actions to be taken by user). |
|
|
“User’s Guide” |
Names of publications and cross-ref- |
|
erenced headings are printed in quo- |
|
tations. |
 Note:
Note:
This is an example of an important note that may appear in the manual.
Sidebars give critical information such as warnings and important notes.
iv Using Your Gateway Solo 2500 Multimedia Notebook
Checking Out
Your Notebook
Computer
Checking Out Your Solo 2500................................ |
6 |

Checking Out Your Solo 2500
Take a tour of your notebook to familiarize yourself with its options.
Keyboard and LCD panel
A
B
C
K
H
J I H G F E D
G
6 Using Your Gateway Solo 2500 Multimedia Notebook
Component |
Icon |
Description |
|
|
|
A. Color Liquid Crys- |
|
Provides sharp, crisp resolution with backlit |
tal Display (LCD) |
|
anti-glare screen. |
shown w/ 13.3” LCD |
|
|
|
|
|
B. System status |
|
Indicates the system status modes. |
indicators |
|
|
(LCM - Liquid |
|
|
Crystal Module) |
|
|
|
|
|
C. Keyboard |
|
Provides full functionality of a desktop com- |
|
|
puter keyboard. Many of these keys have |
|
|
been assigned alternate functions, including |
|
|
shortcut keys for Windows 95, Status Display |
|
|
menus, and numeric keypad. |
|
|
|
D. CD-ROM drive |
|
The CD-ROM reads data CDs or audio CDs. |
|
|
|
E. CD-ROM |
|
Provides manual eject capability to remove a |
emergency eject |
|
CD if power is unavailable. Insert a straight- |
hole |
|
ened paper clip to eject the CD tray. |
|
|
|
F. CD-ROM |
|
Ejects the CD-ROM tray from the drive. This |
eject button |
|
button is functional only when power is on. |
|
|
|
G. Enhanced EZ |
|
Controls the cursor movement on the screen. |
Pad™ TouchPad |
|
|
or EZ Point™ |
|
|
|
|
|
H. Speakers |
|
Provides high quality sound reproduction for |
|
|
software and audio CDs. |
|
|
|
I. Power LED |
|
Indicates system power status: |
|
|
• Steady green = power is On |
|
|
• Blinking green = system is in suspend mode |
|
|
or standby mode. The LED will flash every |
|
|
four seconds. |
|
|
• LED off = power is Off |
|
|
|
J. Microphone |
|
Provides built-in omni-directional audio |
|
|
recording capability. |
|
|
|
K. Power button |
|
Press to turn power ON or OFF. Can also be |
|
|
configured to Suspend/Resume mode. |
|
|
|
Chapter 1: Checking Out Your Notebook Computer 7
System Status Indicators (LCDs)
Indicator |
Icon Description |
||
|
|
|
|
A. Battery gauge |
|
|
Appears when a battery is installed. Shows |
|
|
|
battery activity and status. |
|
|
|
• Battery contains 5 ticks (marks) to indicate |
|
|
|
charge level where 1 tick = lowest charge |
|
|
|
and 5 ticks = highest charge. |
|
|
|
• Battery low - Icon appears with no ticks and |
|
|
|
blinks. |
|
|
|
• Battery malfunction - Icon appears with all |
|
|
|
ticks blinking. |
|
|
|
|
B. Charge |
|
|
Displays when battery is charging on AC |
|
|
|
power. Turns off when battery is fully |
|
|
|
charged. |
|
|
|
|
C. AC adapter |
|
|
Displays when system is powered by the AC |
(power) |
|
|
adapter. |
|
|
|
|
D. Hard drive |
|
|
Displays when the computer accesses the |
|
|
|
hard drive. |
|
|
|
|
E. Floppy disk drive |
|
|
Displays when the computer accesses the |
|
|
||
|
|
|
floppy disk drive or LS120 drive. |
|
|
|
|
F. CD-ROM |
|
|
Displays when the computer accesses the |
|
|
|
CD-ROM drive. |
|
|
|
|
8 Using Your Gateway Solo 2500 Multimedia Notebook
Indicator |
Icon Description |
G. Scroll lock |
Visible when Scroll Lock is enabled. |
H. Pad lock |
Visible when Pad Lock is enabled. |
I. Caps lock |
Visible when Caps Lock is enabled. |
J. System docked |
Visible when the system is docked. |
Chapter 1: Checking Out Your Notebook Computer 9
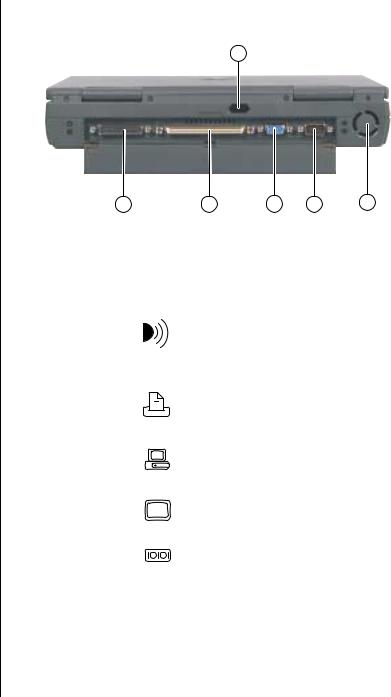
Back ports panel
A
B C D E F
Port |
Icon Description |
||
|
|
|
|
A. Fast IR (Infra- |
|
|
Sends infrared signals between the notebook |
red) port |
|
|
and a remote device that uses infrared (for |
|
|
|
example, another computer, printer, or other |
|
|
|
peripheral). Place infrared devices up to 3 |
|
|
|
feet (1 meter) apart. |
|
|
|
|
B. Parallel port |
|
|
Connect parallel device such as a printer to |
(LPT1) |
|
|
this port. |
|
|
||
|
|
||
|
|
||
|
|
|
|
C. Docking port |
|
|
Connect an optional docking station to this |
|
|
|
port. |
|
|
|
|
D. VGA port |
|
|
Connect the VGA monitor cable to this port. |
|
|
|
|
E. Serial port |
|
|
Connect an optional serial device to this port. |
|
|
|
|
F. Fan intake |
|
|
Pulls air into chassis to keep system compo- |
|
|
|
nents cool. |
|
|
|
|
10 Using Your Gateway Solo 2500 Multimedia Notebook
Right side ports and bays
A B C D E F
Component |
Icon Description |
|||||||
|
|
|
|
|
|
|
|
|
A. FDD (Floppy |
|
|
|
|
|
|
|
Either a FDD or an LS120 drive is installed |
Diskette Drive)/ |
|
|
|
|
|
|
|
here. (FDD shown) |
LS120 drive |
|
|
|
|
|
|
|
|
|
|
|
|
|
|
|
|
|
B. FDD/LS120 |
|
|
|
|
|
|
|
Ejects the FDD or LS120 diskette from the |
eject button |
|
|
|
|
|
|
|
drive. The LS120 button is functional only |
|
|
|
|
|
|
|
|
when power is on. |
|
|
|
|
|
|
|
|
|
(Not shown) |
|
|
|
|
|
|
|
Provides manual eject capability to remove a |
LS120 emergency |
|
|
|
|
|
|
|
diskette if power is unavailable. See “Using |
eject hole |
|
|
|
|
|
|
|
emergency eject for diskette and disc media” |
|
|
|
|
|
|
|
|
on Page 43. |
|
|
|
|
|
|
|
|
|
C. PC Card eject |
|
|
|
|
|
|
|
Push once to release the eject button and |
|
|
|
|
|
|
|||
buttons |
|
|
|
|
|
|
|
push a second time to eject the PC Card. |
|
|
|
|
|
|
|||
|
|
|
|
|
|
|
|
|
D. PC Card slots |
|
|
|
|
|
|
|
Accepts two Type I or Type II PC Cards or |
|
|
|
|
|
|
|
|
one Type III PC Card. (Install Type III PC |
|
|
|
|
|
|
|
|
Card in the bottom slot.) |
|
|
|
|
|
|
|
|
|
E. PS/2 port |
|
|
|
|
|
|
|
Connect the keyboard, mouse, numeric key- |
|
|
|
|
|
|
|
|
pad, or other external device to this port. |
|
|
|
|
|
|
|
|
|
F. Power connector |
|
|
|
|
|
|
|
Connect the AC power adapter to this port. |
|
|
|
|
|
|
|
||
|
|
|
|
|
|
|
|
|
Chapter 1: Checking Out Your Notebook Computer 11
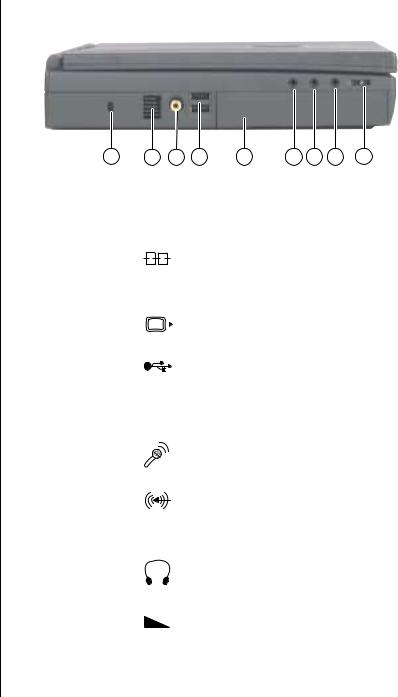
Left side ports and battery bay
A B C D E F G H I
Component |
Icon |
Description |
|
|
|
|
|
A. Kensington lock |
|
|
Attach Kensington lock into this slot. |
slot |
|
|
|
|
|
|
|
B. Air outlet port |
|
|
Outlet for air intake to cool components. |
|
|
|
|
C. Composite video |
|
|
Connect a TV, VCR, or video camera to this |
out (TV out) |
|
|
port. |
|
|
|
|
D. USB (Universal |
|
|
Plug optional USB serial devices into these |
Serial Bus) ports |
|
|
ports. |
|
|
|
|
E. Battery bay |
|
|
Insert battery into the battery bay to power |
|
|
|
your system with a battery. |
|
|
|
|
F. Mic in |
|
|
Connect an external microphone to this port |
|
|
|
to record audio. (1/8-inch/3.5-mm jack.) |
|
|
|
|
G. Audio Line In |
|
|
Connect an external audio input source |
|
|
|
(computer, stereo, VCR, etc.) to this port to |
|
|
|
record or play audio through the notebook |
|
|
|
speakers. (1/8-inch/3.5-mm jack.) |
|
|
|
|
H. Speaker out/ |
|
|
Connect external speakers or headphones to |
Headphone jack |
|
|
this port. Supports small unamplified speak- |
|
|
|
ers. (1/8-inch/3.5-mm jack.) |
|
|
|
|
I. Volume wheel |
|
|
Adjust built-in speaker volume, external speaker, |
|
|
|
and headphone volume. Other port volume lev- |
|
|
|
els are controlled by multimedia software. |
|
|
|
|
12 Using Your Gateway Solo 2500 Multimedia Notebook
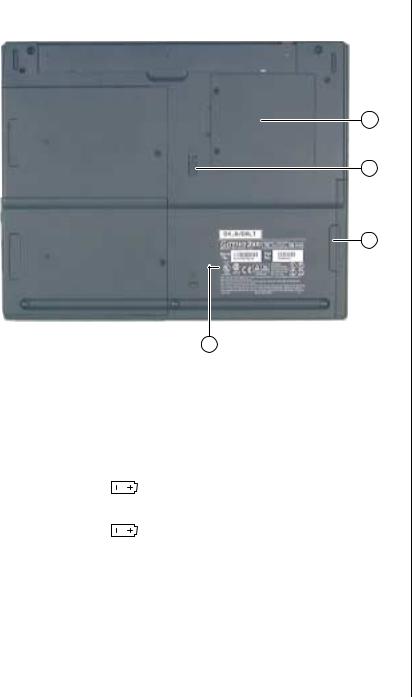
Bottom release latches and memory bay
A
B
C
D
Component |
Icon Description |
|
|
A. Memory bay |
Open the memory bay cover to install/ |
|
remove SO-DIMM memory modules. |
|
|
B. Battery release |
Slide the latch to release the battery pack |
latch |
from the battery pack bay. |
|
|
C. Battery pack bay |
Slide battery pack into bay for battery power |
|
and battery charging. |
|
|
D. System identifi- |
Provides product model number, serial num- |
cation label |
ber, display type, and processor speed. |
|
|
Chapter 1: Checking Out Your Notebook Computer 13

14 Using Your Gateway Solo 2500 Multimedia Notebook

Getting |
|
Started |
|
Getting Your System Running.............................. |
16 |
Installing the battery pack .............................. |
16 |
Connecting the AC power.............................. |
18 |
Starting up your notebook.............................. |
19 |

 Note:
Note:
Battery life varies depending on configuration, power management settings, and features used.
Getting Your System Running
To get the computer started you’ll need to install the battery pack, connect to AC power, open the LCD panel, and start up the system.
Installing the battery pack
Your notebook is powered by one of the longest-lasting batteries available, shipped to you partially charged. When you first get started, you may want to use the AC adapter to fully charge the battery and provide a constant supply of power while you are checking out some of the notebook features.
If your battery is not installed, you need to install the battery pack and charge it. You can charge the battery:
♦When you are using your notebook with the AC adapter
♦When the system is attached to AC power and in standby or suspend mode
♦When the system is attached to AC power and the system is turned off The notebook can run on a fully charged battery for about 3 to 4 hours. Use
the battery gauge icon  in the taskbar or battery gauge
  in the system status indicator to track the available battery power. See “Monitoring the battery status” on Page 59 to learn more about tracking battery status.
Battery life is affected by how much you use the system components such as the hard drive, CD-ROM drive, LCD display, and other components. Other factors such as the power management settings affect battery life. See Chapter 4, “Managing Power Usage” for more information about power management and monitoring the battery status.
16 Using Your Gateway Solo 2500 Multimedia Notebook
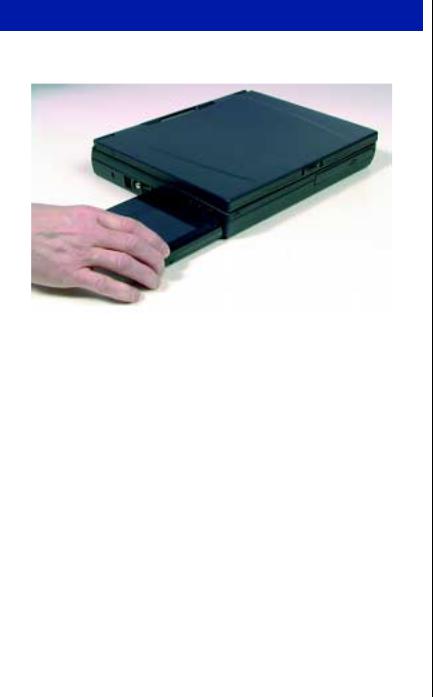
To install the battery pack
1. Slide the battery pack into the battery pack bay.
2. Push the battery until it snaps into place.
Chapter 2: Getting Started 17
 Caution!
Replace the power cord if it becomes damaged. The replacement cord must be of the same type and voltage rating as the original cord.
 Warning!
Do not attempt to disassemble the AC adapter. The AC adapter has no user-replaceable or user-serviceable parts inside. The AC adapter has dangerous voltages that can cause serious personal injury or death. Contact Gateway about returning defective AC adapters.
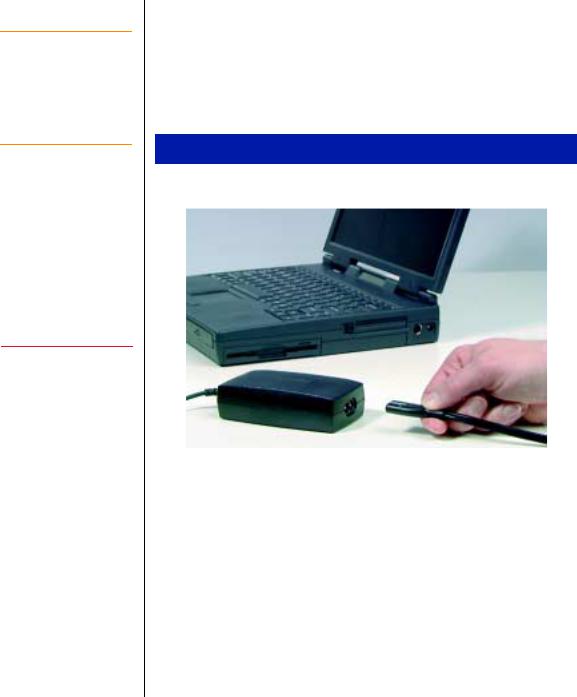
Connecting the AC power
Your AC adapter comes in two parts:
♦Power cord
♦AC power adapter
To connect the AC adapter
1. Connect the power cord to the AC power adapter.
18 Using Your Gateway Solo 2500 Multimedia Notebook
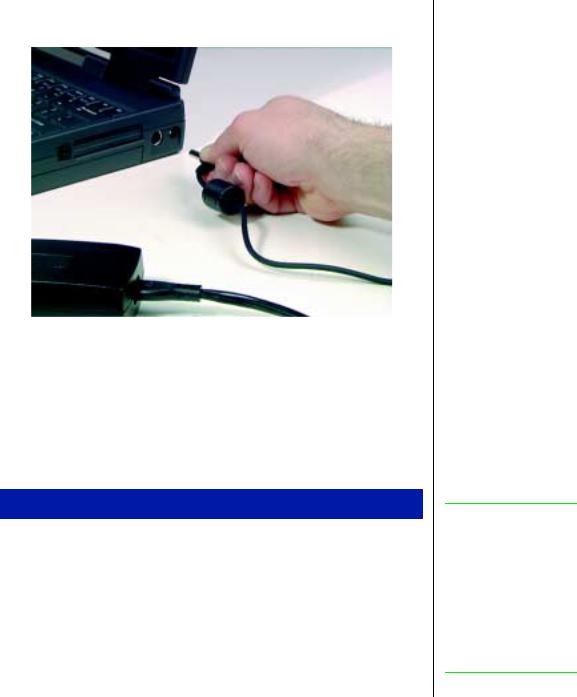
2.Plug the AC power adapter into the notebook power connector on the right side of the notebook near the back.
3. Plug the power cord into an electrical outlet.
Starting up your notebook
Once the battery is installed and the AC power adapter is plugged in you will see the battery icon  , the AC power icon
  , and the charge icon
  .
.
To startup the computer
1.Slide the LCD panel latch to the right to release and open the LCD panel.
2.Tilt the LCD panel to adjust for the proper viewing angle.
3.Press the power button to turn your computer on.
 Note:
Note:
The power button is preset to On/Off mode. You can set it to function either in On/Off or Standby/Resume mode using the BIOS setup program. See “Setting the power button” on Page 60 for more information about changing power button modes.
Chapter 2: Getting Started 19
 Note:
Note:
This system ships with the “Auto dim with battery” feature enabled. Auto dim cuts LCD power 50% when your notebook is operating on battery power. See “Using the BIOS Setup Utility” on Page 70 for more information about changing the Power menu options.
4.Press FN+− or FN+↓ to change display brightness for suitable viewing. Notebooks with a HPA screen, press FN+ → or FN+ ← to control
display contrast.
To complete the first-time operating system setup
1.Windows starts and the Regional Settings dialog box opens.
2.Scroll down the list and select the regional setting.
3.Click Next. The Keyboard Layout dialog box opens.
4.Scroll down the list and select the keyboard layout.
5.Click Next. The User Information dialog box opens.
6.Enter your Name and Company (optional) in the User Information dialog box.
7.Click Next. The License Agreement opens.
8.Scroll through the License Agreement to read it.
9.Click I accept the agreement, then click Next. The Certificate of Authenticity dialog box opens.
10.Enter the Product ID number. This number is located on the Certificate of Authenticity on the cover of the Windows manual.
11.Click Next. The Start Wizard window opens.
12.Click Finish. The Time Properties dialog box opens.
13.Set the Time Zone and Time.
14.Click OK. The Add Printer Wizard dialog box opens.
15.Click Next.
16.Select a printer from the list and click Next.
- OR -
click Cancel to skip the printer setup.
20 Using Your Gateway Solo 2500 Multimedia Notebook
17.Select the printer port (usually LPT1).
18.Click Next. The Printer Name dialog box opens.
19.Name the printer leaving the default name or rename the printer.
20.Click Next.
21.Click Yes or No to print a test page.
22.Click Finish. The Welcome dialog box opens.
Chapter 2: Getting Started 21

22 Using Your Gateway Solo 2500 Multimedia Notebook
Using Your |
|
Notebook |
|
Using Your Solo 2500................................................ |
24 |
Using the keyboard.............................................. |
24 |
Using key combinations...................................... |
25 |
Using the LCD..................................................... |
29 |
Using the pointing device.................................... |
31 |
Using the audio.................................................... |
39 |
Using diskette media (3.5" or LS120 diskettes).41 |
|
Using disc media (CD-ROM)............................. |
42 |
Removing and replacing the hard disk drive...... |
44 |
Using PC Cards ................................................... |
46 |
Using the IR port ................................................. |
48 |
Using the USB ports............................................ |
51 |
Using McAfee VirusScan ................................... |
52 |
Using Your Solo 2500
This chapter covers using the components on your computer. Spend some time getting familiar with the versatility built into your Solo notebook.
Using the keyboard
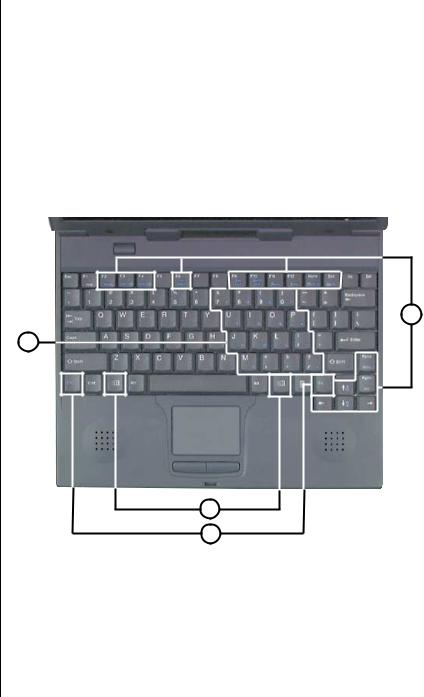
Your notebook features a full-size keyboard that has the full functionality of a desktop computer keyboard. Many of the keys have been assigned alternate functions, including shortcut keys for Windows 95, function keys for specific system operations, and pad lock keys for the numeric keypad.
A
D
C
B
24 Using Your Gateway Solo 2500 Multimedia Notebook
Key |
Action |
|
|
A. Fn (function) |
Press FN key plus one of the Fn Combination keys |
Combination |
(blue) to perform a specific function. For example, |
keys |
FN+F2 shows the Pop-up status display. |
|
|
B. Fn (function) |
Press FN key plus another Fn Combination key (such |
keys |
as F2, F3, F4, etc.) to perform a specific function. |
|
|
C. Windows logo |
Press to activate the Windows Start button menu. |
key |
|
|
|
D. Numeric keypad |
Press FN+F9 to activate the numeric keypad. |
|
|
Using key combinations
For normal key functions:
♦Press the key to get numerals, punctuation marks, and lower case letters.
♦Press the key together with the SHIFT key to get symbols and standard upper case letters.
Special keys
The following keys help you use shortcuts when working with some software:
Key |
Description |
|
|
|
Use this key to display the Windows Start menu. |
Use this key to provide quick access to shortcut menus and help assistants in Windows.
Chapter 3: Using Your Notebook 25
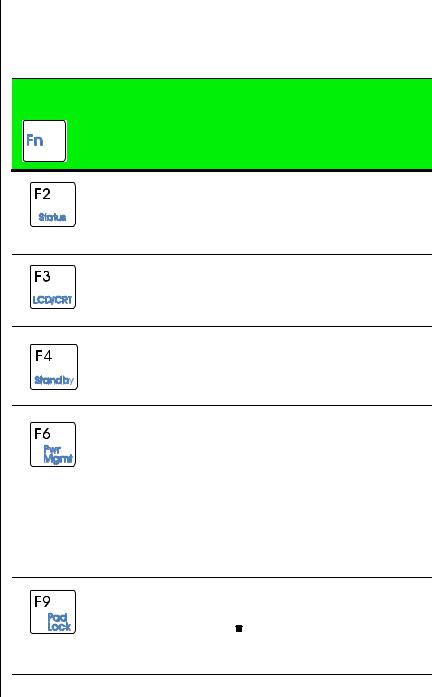
Function keys
Press the FN key together with one of the following keys (with blue letters) to get these “on-the-fly” functions:
Key Description
Combination
+
Displays the power status display for the Pop-up Status Display program in the upper left corner of the Windows 95 desktop. Press the key combination again to make the display disappear. See “Pop-up status display” on Page 60.
Toggles between the LCD display, external monitor, both displays at the same time, or TV display (NTSC or PAL format) as the active display. See “Using the LCD” on Page 29.
Places the system in Standby mode. See “Using the suspend and standby modes” on Page 61 for more information about the Standby mode.
Makes temporary changes to the power management (PM) mode settings by toggling the setting options:
• PM ON - enables power management with AC or battery power
•PM DC - enables power management when the notebook is using battery power only.
•PM OFF - disables power management.
The selected option is not saved when the system is turned off. The power management settings selected in the BIOS setup program are effective when the system is restarted.
Enables the Pad Lock function so you can use the numeric keypad.
The Pad Lock icon  stays lit while this function is enabled. Press the key combination again to make the display disappear.
26 Using Your Gateway Solo 2500 Multimedia Notebook
 Loading...