


6030
Doro 6030
Quick Start Guide
English
1
2
3
4
5
6
7
8
www.doro.com
14
13
12
11
10
9
15
16
17
18
19
20
21
22
Charge the phone
CAUTION
Only use batteries, charger and accessories
that have been approved for use with
this particular model. Connecting other
accessories may be dangerous and may
invalidate the phone’s type approval and
guarantee.
When the battery is running low, is
displayed and a warning signal is heard.
• Connect the mains adapter to the wall
socket and to the charging socket
Tip: It is recommended to remove the
protective plastic lm from the display to
enhance the visibility.
y
.
2. GET TO KNOW YOUR PHONE
Turn the phone on and off
1. Press and hold the red button on
the phone to turn it on/off. Conrm with
Yes
to power off.
2. If the SIM card is valid but protected with a
PIN code (Personal Identication Number),
PIN
is displayed. Enter the PIN code and
press OK. Delete with
Clear
.
Receive a call
1. Open the ip and press to answer,
or press
and then
call (busy signal).
Alternately, press to reject the call
directly.
2. Press /close the ip to end the call.
Silent
to switch off the ring signal
Reject/
close the ip to reject the
Volume control
Use
+/-
or / to adjust the sound
volume during a call. The volume level is
indicated on the display.
Silent
Silent is a xed prole with keypad tone,
message tone and ring tone disabled, while
vibration, tasks and alarm are unchanged.
• Press and hold # to activate and to
deactivate silent.
Call options
During a call the soft keys ( ) give access
to additional functions.
ICE (In Case of Emergency)
In the event of a trauma, it is critical to
have this information as early as possible
to increase the chances of survival. Add ICE
contact to improve your own safety. First
responders can access additional information
such as medication and next of kin from your
phone in case of an emergency. All elds are
optional, but the more information provided
the better.
Press
Menu â Phonebook â ICE
5. Use / to scroll the list of entries.
6. Press
7. Press
Edit
to add or edit information in
each entry. Delete with
Save
when done.
Clear
.
.
Settings
• Press
Menu â ICE
.
5. ASSISTANCE BUTTON
The assistance button allows easy access to
contact your predened help numbers should
you need help. Make sure that the assistance
function is activated before use. See the
full manual on how to activate, how to enter
recipients in the numbers list, and how to edit
the text message.
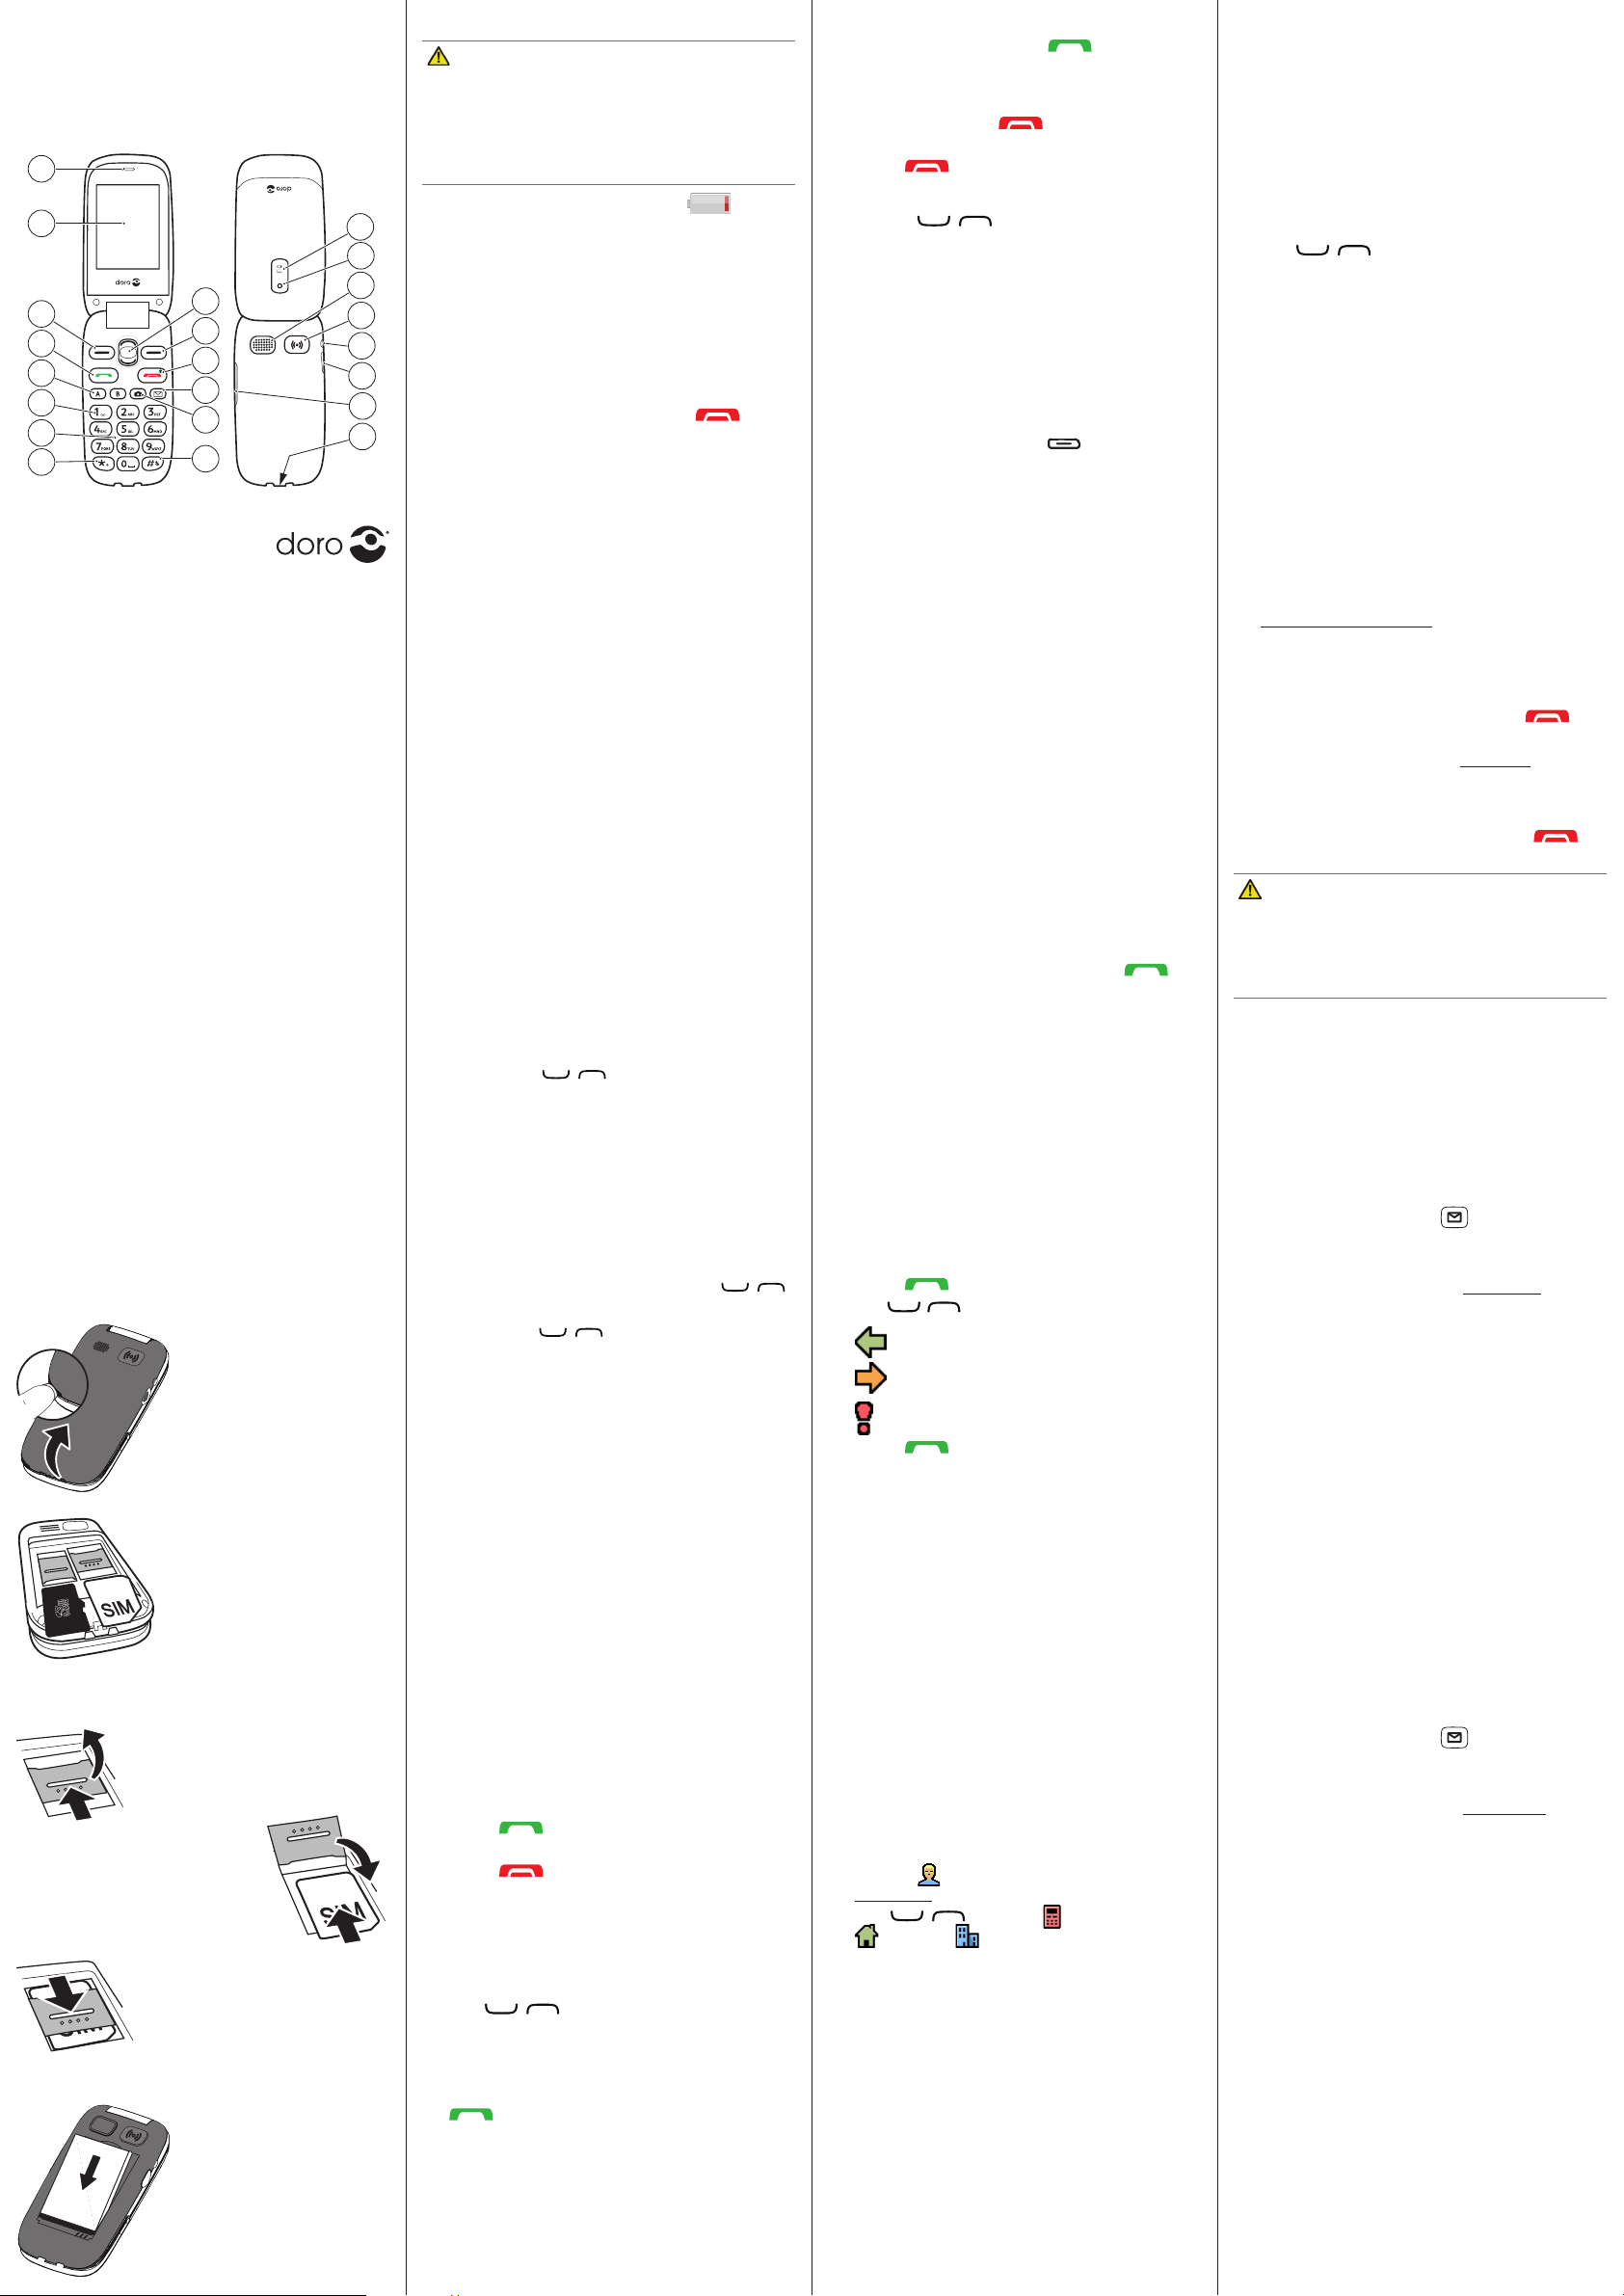
1. Earpiece
2. Display
3. Left selection
button
4. Call button
5. Speed dials
6. Voicemail
7. Microphone
8. International prex/
symbols
9. Silent /
Input method
10. Camera shortcut/
Take a picture
11. Message shortcut
Note!
All illustrations are for illustrative
purposes only and may not accurately depict
the actual device. The items supplied with
your phone might vary depending on the
software and accessories available in your
region or offered by your service provider.
You can obtain additional accessories
from your local Doro dealer. The supplied
accessories provide the best performance
with your phone.
12. End call /
Power on/off
13. Right selection
button
14. Scroll buttons
15. Phone indicators
16. Camera
17. Loudspeaker
18. Assistance button
19. Headset socket
20. Charging socket
21. Volume control
22. Lanyard hold
(not included)
Note! If PIN and PUK codes were not
provided with your SIM card, please contact
your service provider.
Attempts: #
attempts left. When no more attempts
remain,
card must now be unlocked with the PUK
code (Personal Unblocking Key).
1. Enter the PUK code and conrm with OK.
2. Enter a new PIN code and conrm with OK.
3. Re-enter the new PIN code and conrm
with OK.
shows the number of PIN
PIN blocked
is displayed. The SIM
Start-up wizard
When starting the telephone for the rst time,
you can use the start-up wizard to set some
basic settings.
Tip: You can run the start-up wizard later if
you want.
Step-by-step instructions
The arrow (â) indicates next action in step-
by-step instructions. To conrm an action,
press OK. To select an item, scroll or highlight
the item using / and then press OK.
Speed dial
Use A–B, 0 and 2–9 to speed dial an
entry from standby.
• Press and hold the corresponding button
to dial.
Add speed dial numbers
1. Press
2. Select A â Add
3. Press OK to conrm.
4. Repeat to add speed dial entries for
Menu
â
Settings
Speed dial
the phonebook.
buttons B, 0, 2–9.
.
and select an entry from
â
Phonebook
â
SOS calls
As long as the phone is switched on, it is
always possible to place an SOS call by
entering the main local emergency number
for your present location followed by .
Make an assistance call
1. When help is needed, press and hold the
assistance button for 3 seconds, or press
it twice within 1 second.
The assistance call begins after a delay of
5 seconds. In this time you can prevent a
possible false alarm by pressing .
2. An assistance text message (SMS) is sent
to all recipients.The rst recipient in the
list is dialled. If the call is not answered
within 25 seconds, the next number is
dialled. Dialling is repeated 3 times or
until the call is answered, or until is
pressed.
CAUTION
When an assistance call is activated the
phone is pre-set to handsfree mode. Do
not hold the device near your ear when
the handsfree mode is in use, because the
volume may be extremely loud.
Settings
• Press
Menu â Settings â Assistance
.
Full user manual
For the full user manual, useful links and
more information please visit www.doro.
co.uk/support/ or contact our Helpline.
1. GET STARTED
SIM card, memory card and battery
Remove the battery cover.
Be careful not to damage
your ngernails when you
remove the battery cover.
Do not bend or twist the
battery cover excessively
as it may be damaged.
Insert the SIM card and the SD card.
Remove the battery if it is
already installed. Locate the
SIM card holder.
This device accepts micro
GB
Compatible card type: microSD, microSDHC.
SIM or 3FF SIM card.
Optional:
holder. The device works
with or without a SD card
Locate the SD card
Enter text
• Press a numerical key repeatedly until
the desired character is shown. Wait a
few seconds before entering the next
character.
• Press * for a list of special characters.
Select the desired character with /
and press OK to enter it.
• Use
• Press # to cycle upper case, lower case
• Press and hold # to change writing
+/- or
within the text.
and numerals.
language.
/ to move the cursor
Predictive text
In some languages you can use the input
method which uses a dictionary to suggest
words.
1. Press
2. Select On to enable, or
3. Press OK to conrm.
Menu â Settings â Messages
Predictive text
.
Off
â
to disable.
Change language, time and date
The default language is determined by the
SIM card.
Call log
Received, missed, and dialled calls are saved
in a combined call log. 20 calls of each type
can be stored in the log. For multiple calls
related to the same number, only the most
recent call is saved.
1. Press .
2. Use / to scroll through the call log.
=
Received call
=
Dialled call
=
Missed call
3. Press to dial, or
Options
.
6. MESSAGES
Create and send text messages
1. Press shortcut button ,
or press
â
2. Write your message, see Enter text, then
press To.
3. Select a recipient from
Alternatively, select
recipient manually and press
4. Select
You can modify the recipients by selecting
one and press
Delete all
5. When done, press
Menu â Messages â Create new
SMS.
Phonebook
Enter number
Done
Add
to add more recipients.
Options â Edit/Delete
.
Send
.
.
to add
.
/
Create and send picture messages
Both you and the recipient must have subscriptions that support picture message. The
settings for picture message are supplied by
your service provider and can be sent to you
automatically via text message.
Press the card’s lid carefully
towards the assistance button
until it “clicks”.
Lift the lid to an upright
position. Place the card in the
compartment as shown on the
drawing. Make sure the card’s
contacts are facing downwards.
Close the lid.
Carefully press down
and slide the lid away from
the assistance button until it
“clicks” into place.
To insert the SD card (optional), follow the
instructions for the SIM card.
Insert the battery.
Insert the battery by
sliding it into the battery
compartment with the
contacts facing downwards
to the right. Replace the
battery cover.
3. CALLS
Make a call
1. Enter the phone number including the
area code. Delete with
2. Press to dial. Press
the call.
3. Press to end the call.
Note! For international calls, always use +
before the country code for best operation.
Press * twice for the international prex +.
Clear
Abort
.
to cancel
Call from the phonebook
1. Press
2. Use / to scroll through the
3. Press
Name
to open the phonebook.
phonebook, or quick search by pressing
the key corresponding to the rst letter of
the name.
Options â Call,
to dial the selected entry, or press
Back
to return to standby.
alternatively, press
4. PHONEBOOK
The Phonebook can store 100 entries with 3
phone numbers in each entry.
Add contact
1. Press
2. Enter a
3. Use / to select
4. When done, press
Menu â Phonebook
-New contact- â Add
Name
for the contact, see
Enter text. Delete with
Home
or
Ofce
phone number(s) including the area code.
Save
â
.
Clear
.
Mobile
,
, and enter the
.
1. Press shortcut button ,
or press
â
2. Write your message, see Enter text.
3. Press
•
My pictures
•
Take picture
picture.
Note! To keep best picture quality, send only
one picture per message.
You can also
Preview MMS
4. Press
your subject, then press
5. Press
from
Alternatively, select
recipient manually and press
6. Press
7. Press
Menu â Messages â Create new
MMS
.
Options â Add picture:
to select a le.
to use the camera to take a
Add sound, Add video,
using the
Options â Add subject
Options â To
Phonebook
Add
to add more recipients.
Send
to send.
Options
and select recipient
.
Enter number
menu.
and enter
Done
.
Done
and
to add
.
Settings
• Press
Menu â Settings â Messages
.
 Loading...